Philips 3100 EP3360 Manuel utilisateur
- Catégorie
- Cafetières
- Taper
- Manuel utilisateur
Ce manuel convient également à

3100 series
Super automatic
espresso machine
EN USER MANUAL
DA BRUGERVEJLEDNING
DE BENUTZERHANDBUCH
ES MANUAL DEL USUARIO
FR MODE D’EMPLOI
IT MANUALE UTENTE
NL GEBRUIKSAANWIJZING
NO BRUKERHÅNDBOK
PT MANUAL DO UTILIZADOR
FI KÄYTTÖOPAS
SV ANVÄNDARHANDBOK
EL ΕΓΧΕΙΡΙΔΙΟ ΧΡΉΣΉΣ
EP3363, EP3362, EP3360
EP3559, EP3558, EP3551
EP3550
4219.460.4098.1 PHILIPS3100 OTC GLOSSY_FRONT-BACK_A5_WE.indd 1 04-07-17 14:07

Boekje_2xlinks_ICOON_A5pag.indd 1 04-04-17 15:00

27
2
19
17
15
32
30
33
22
23
24
25
20
4
5
3
11 12
18
29
7 6
26
16
14
13
28
10
8
9
31
21
1
1

5 sec.
2
3
4
FILTER
0%
NEW?
AQUA CLEAN
5
FILTER
1 / 8
AQUA CLEAN
6
0 / 8
ON
OFF
7
FILTER
2 / 8
AQUA CLEAN
8
9
MEMO
2x
10
11
2
1
1
12
13
14
15
16
17
1
2
3
4
5
18
1
2
19
20
21
22
23
24
25

26
27
28
29
30
1
2
1
31
32
2
1
33
34
35
36
START
CALC
CLEAN
37
38
39
REMOVE
FILTER
40
M
AX
CALC
CLEAN
CALC
CLEAN
1
2
41


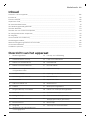
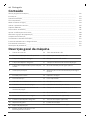
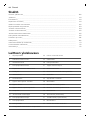
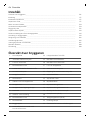
Contents
Machine overview________________________________________________________________ 6
Introduction ____________________________________________________________________ 7
First installation__________________________________________________________________ 7
AquaClean filter__________________________________________________________________ 7
Measuring water hardness_________________________________________________________ 8
Using the control panel ___________________________________________________________ 8
Brewing drinks___________________________________________________________________ 9
Personalizing drinks______________________________________________________________ 10
Adjusting grinder settings__________________________________________________________ 11
Handling the brew group__________________________________________________________ 11
Cleaning and maintenance_________________________________________________________ 12
Descaling procedure______________________________________________________________ 15
Warning icons and error codes______________________________________________________ 16
Ordering accessories______________________________________________________________ 18
Troubleshooting_________________________________________________________________ 18
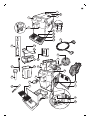
Machine overview
1 Control panel
2 Adjustable coffee dispensing spout
3 Lid of water tank
4 Lid of bean hopper
5 Lid of pre-ground coffee compartment
6 Main switch
7 Socket for cord
8 Service door
9 'Drip tray full' indicator
10 Drip tray
11 Drip tray release button
12 Cord
13 Grind setting knob
14 Cover of bean hopper
15 Bean hopper
16 Brew group
18 Coffee exit duct
19 Coffee residues drawer
20 Coffee grounds container
21 Drip tray cover
22 Hot water dispensing spout
23 Opening for hot water dispensing spout
24 Water tank
25 AquaClean filter
26 Milk container
27 Milk dispensing unit
28 Lid of milk dispensing unit
29 Milk dispensing spout
30
31
32 Measuring scoop
33 Water hardness test strip
17 Inside of service door with contact
information
6
English
Grease tube (optional)
Cleaning brush (optional)

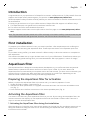
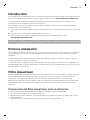
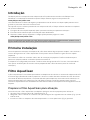
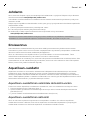
Introduction
Congratulations on your purchase of a Philips full-automatic coffee machine! To fully benefit from the
support that Philips offers, please register your product at www.philips.com/coffee-care.
Read the separate safety booklet carefully before you use the machine for the first time and save it for
future reference.
To help you get the best out of your coffee machine, Philips offers full support in 3 different ways:
1 The separate quick start guide for first installation and first use.
2 This user manual for more detailed information.
3 Online support and movies: scan the QR code on the front page or visit www.philips.com/coffee-
care
Note: This machine has been tested with coffee. Although it has been carefully cleaned, there may be
some coffee residues left. We guarantee, however, that the machine is absolutely new.
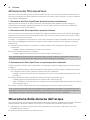
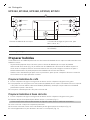
First installation
To prepare your coffee machine for use, you need to perform a few simple steps such as filling the
water circuit and activating the AquaClean filter. These steps are shown in the separate quick start
guide.
For the best-tasting coffee, you need to brew 5 coffees initially to allow the machine to complete its
self-adjustment.
The machine has been set up to get the best taste out of your coffee beans. Therefore we advise you
not to adjust the grinder settings until you have brewed 100-150 cups (approx. 1 month of usage).
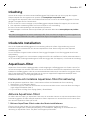
AquaClean filter
The AquaClean filter is designed to reduce limescale deposits in your coffee machine and provide
filtered water to preserve the aroma and flavor of each cup of coffee. If you use a series of 8
AquaClean filters as indicated by the machine and in this user manual, you don't have to descale your
machine for up to 5000 cups. With each filter you can enjoy up to 625 cups, depending on the
selected coffee varieties and the rinsing and cleaning frequencies.
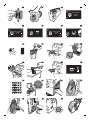
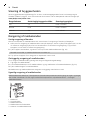
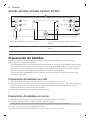
Preparing the AquaClean filter for activation
Before you place the AquaClean filter in the water tank, you need to prepare it for use:
1 Shake the filter for about 5 seconds (Fig. 2).
2 Immerse the filter upside down in a jug with cold water and wait until no more air bubbles come
out (Fig. 3).
3 Push the filter onto the filter connection to the lowest possible point (Fig. 4).
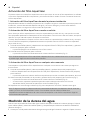
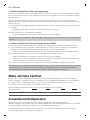
Activating the AquaClean filter
You need to activate every new AquaClean filter that you use. By activating the AquaClean filter, the
machine monitors the capacity of the AquaClean filter and the number of filters used. There are 3
ways to activate the AquaClean filter.
1. Activating the AquaClean filter during first installation
After switching on for the first time, the machine guides you through the first installation steps such as
filling the water tank, filling the water circuit and activating the AquaClean filter. Simply follow the
instructions on the screen.
7
English

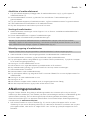
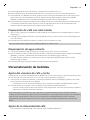
2. Activating the AquaClean filter when prompted
Note: Replace the AquaClean filter as soon as the capacity has dropped to 0% and the filter icon
flashes quickly. Replace the AquaClean filter at least every 3 months, even if the machine has not yet
indicated that replacement is required.
Tip: We advise you to buy a new filter when the capacity has dropped to 10% and the filter icon starts
flashing slowly. This ensures that you can replace the filter when the capacity has dropped to 0%.
1 Press the MENU button, scroll to AQUACLEAN FILTER and press the OK button to confirm.
-
The display asks if you want to activate a new filter (Fig. 5).
2 Press the OK button to confirm.
-
The display automatically updates the number of filters used (Fig. 6).
Note: If you want to replace the AquaClean filter after 8 filters have been used, you first need to
descale the machine. Follow the instructions on the display.
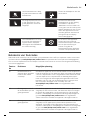
3. Activating the AquaClean filter at any other time
You can start (re)using the AquaClean filter at any time by following the instructions below.
1 Press the MENU button, select MENU and press the OK button to confirm. Scroll to AQUACLEAN
FILTER. Press the OK button to confirm.
-
The display shows the numbers of AquaClean filters that have been installed previously from 0
to 8 filters (Fig. 6).
2 Select ON on the display and press the OK button to confirm (Fig. 7).
-
The display automatically updates the number of filters used (Fig. 8).
-
Then the 'machine ready' screen appears with the AquaClean 100% icon to indicate that the
filter has been installed (Fig. 9).
3 Dispense 2 cups of hot water (0.5 l) to complete the activation. Discard this water.
Note: In some situations the machine will tell you that you need to descale the machine before you
can install and activate a new AquaClean filter. This is because your machine has to be completely
limescale-free before you start to use the AquaClean filter. Follow the instructions on the screen.
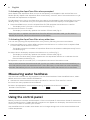
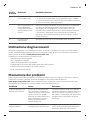
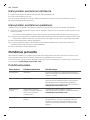
Measuring water hardness
Use the water hardness test strip supplied to set the water hardness. Press the MENU button, select
MENU and scroll to select WATER HARDNESS.
1 Immerse the water hardness test strip in tap water for 1 second. Then wait for 1 minute.
2 Check how many squares have turned red.
3 Select the appropriate water hardness setting and press the OK button to confirm.
Number of red squares:
Value to be set 1 2 3 4
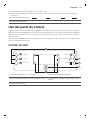
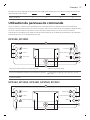
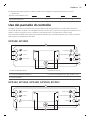
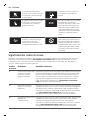
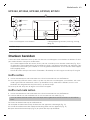
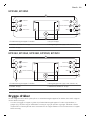
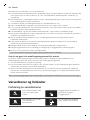
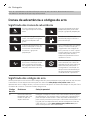
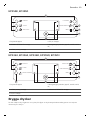
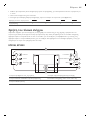
Using the control panel
Below you find an overview and description of the control panel of the machine. Some of the buttons
have a double function; if applicable the navigation icons appear on the display. Use the buttons next
to this icon to select or confirm your choices.
Use the MENU button to select other drinks and to change settings such as the water hardness and
coffee temperature.
8
English

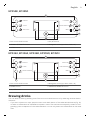
EP3558, EP3550
MEMO
ESPRESSO
AROMA STRENGTH
MENU
MEMO
COFFEE
MEMO
CAPPUCCINO
HOT WATER
1
2
3
5
4
1. One-touch drink buttons 4. On/off button
2. AROMA STRENGTH button 5. Navigation icons (up, down, back, ok)
3. MENU button
EP3363, EP3362, EP3360, EP3559, EP3551
MEMO
ESPRESSO
MENU
MEMO
COFFEE
AROMA STRENGTH
CAPPUCCINO
LATTE MACCHIATO
MEMO
MEMO
2
45
1
3
1. One-touch drink buttons 4. Navigation icons (up, down, back, ok)
2. MENU button 5. AROMA STRENGTH button
3. On/off button
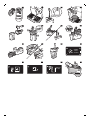
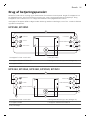
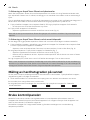
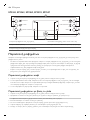
Brewing drinks
You can select a drink by pressing one of the one-touch drink buttons or by selecting another drink in
the menu.
-
If you want to brew two cups, press the one-touch drink button of the selected drink twice (Fig. 10)
or select a coffee drink via the MENU and press it twice. The machine automatically carries out two
grinding cycles in sequence for the selected drink. You can only brew two coffee drinks at the same
time.
9
English

-
Slide the dispensing spout up or down to adjust its height to the size of the cup or glass you are
using.
Brewing coffee drinks
1 Fill the water tank with tap water and fill the bean hopper with beans.
2 To brew a coffee, press one of the one-touch drink buttons. To select another type of coffee, press
the MENU button, select DRINKS, scroll down to the desired drink and press the OK button.
3 To stop dispensing coffee, press the OK button.
Brewing milk-based drinks
1 Fill the water tank with tap water and fill the bean hopper with beans.
2 Remove the lid of the milk container and fill the milk container with milk (Fig. 11).
Aways use milk coming directly from the fridge for optimal results.
3 Place the lid back onto the milk container.
4 If attached, remove the hot water spout from the machine (Fig. 12).
5 Slightly tilt the milk carafe and attach it to the machine (Fig. 13).
6 Open the milk dispensing spout (Fig. 14) and place a cup on the drip tray.
7 To brew a milk-based drink, press one of the one-touch drink buttons. To select another type of
milk-based drink, press the MENU button, select DRINKS, scroll down to the desired drink and
press the OK button.
8 Directly after dispensing the milk-based drink, the display asks you if you want to perform the
quick clean procedure for the milk carafe. You have 10 seconds to activate the quick clean
procedure. Press the OK button to confirm.
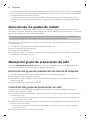
Brewing coffee with pre-ground coffee
1 Open the lid and pour one measuring scoop of pre-ground coffee into the pre-ground coffee
compartment. Then close the lid (Fig. 15).
2 Press the AROMA STRENGTH button and select the pre-ground coffee brewing function.
3 Press the ESPRESSO button or select another coffee drink.
Note: With pre-ground coffee you can only brew one coffee at a time.
Dispensing hot water
1 If it is not attached, attach the hot water spout to the machine (Fig. 16).
2 EP3363, EP3362, EP3360, EP3559, EP3551 only: Press the MENU button. Select DRINKS, confirm
and scroll to select HOT WATER.
-
EP3558, EP3550 only: Press the one-touch HOT WATER button to dispense hot water.
3 To stop dispensing hot water, press the OK button.
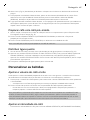
Personalizing drinks
Adjusting coffee and milk volume
You can adjust the volume of the drink brewed according to your taste and to the size of the cups. We
advise you to use glass cups or cups with a ceramic-coated rim.
10
English

1 To adjust the espresso volume, press and hold the ESPRESSO button until the display shows the
MEMO icon (Fig. 17).
-
The machine enters the programming phase and starts to brew the selected drink.
2 Press the OK button when the cup contains the desired amount of espresso.
-
The tick on the display shows that the button is programmed: every time it is pressed, the
machine brews the set espresso volume.
Note: To set the volume of coffee, cappuccino, latte macchiato (EP3363, EP3362, EP3360, EP3559,
EP3551 only), follow the same procedure: press and hold the button of the drink and press the OK
button when the cup contains the desired amount of coffee or milk. Make sure that the milk carafe is
in place and that the milk spout is open.
Adjusting coffee strength
-
To change the coffee strength, press the AROMA STRENGTH button.
-
Each time you press the AROMA STRENGTH button, the machine selects a higher aroma strength
setting. There are 5 strengths, 1 is very mild and 5 is very strong. After setting 5, setting 1 is selected
again (Fig. 18).
-
The display shows the chosen strength. After adjusting the coffee strength, the display shows the
main menu again and saves the chosen aroma strength when you brew a coffee.
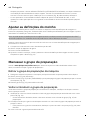
Adjusting grinder settings
You can adjust the grinder settings by using the grind setting knob inside the bean container. There
are 5 different grind settings you can choose from. The lower the setting, the stronger the coffee.
Note: You can only adjust the grind settings when the machine is grinding coffee beans. You need to
brew 2 to 3 drinks before you can taste the full difference.
Caution: Do not turn the grind setting knob more than one notch at a time to prevent damage to the
grinder.
1 Place a cup under the coffee dispensing spout.
2 Open the lid of the bean hopper.
3 Press the ESPRESSO button.
4 When the grinder starts grinding, press down the grind setting knob and turn it to the left or right
(Fig. 19).
Handling the brew group
Go to www.philips.com/coffee-care for detailed video instructions on how to remove, insert and
clean the brew group.
Removing the brew group from the machine
1 Switch off the machine by pressing the main switch on the back of the machine.
2 Open the service door (Fig. 20).
3 Press the PUSH button (Fig. 21) and pull at the grip of the brew group to remove it from the
machine (Fig. 22).
4 Remove the coffee residues drawer (Fig. 23).
11
English

Reinserting the brew group
Before you slide the brew group back into the machine, make sure it is in the correct position.
1 Check if the arrow on the yellow cylinder on the side of the brew group is aligned with the black
arrow and N (Fig. 24).
-
If they are not aligned, push down the lever until it is in contact with the base of the brew group
(Fig. 25).
2 Make sure that the yellow locking hook on the other side of the brew group is in the correct
position.
-
To position the hook correctly, push it upwards until it is in uppermost position (Fig. 26).
3 Place back the coffee residues drawer.
4 Slide the brew group back into the machine along the guiding rails on the sides until it locks into
position with a click. Do not press the PUSH button.
5 Place back the coffee grounds container.
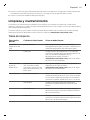
Cleaning and maintenance
Regular cleaning and maintenance keeps your machine in top condition and ensures good-tasting
coffee for a long time, a steady coffee flow and a perfect milk froth.
Consult the table on when and how to clean all detachable parts of the machine. You can find more
detailed information and video instructions on www.philips.com/coffee-care.
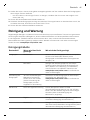
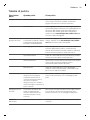
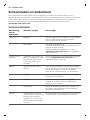
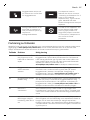
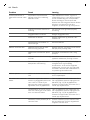
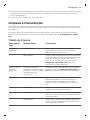
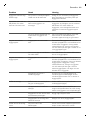
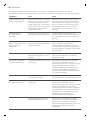
Cleaning table
Part description
When to clean How to clean
Brew group Weekly Remove the brew group and rinse it under the
tap (see 'Cleaning the brew group under the
tap').
Monthly Clean the brew group with the Philips coffee oil
remover tablet (see 'Cleaning the brew group
with the coffee oil remover tablets'). Go to
www.philips.com/coffee-care for detailed video
instructions.
Lubrication of the
brew group
Depending on the type of
usage. Consult the
lubrication table (see
'Lubricating the brew group').
Lubricate the brew group with the Philips grease.
Go to www.philips.com/coffee-care for detailed
video instructions.
Milk carafe After every day of use Perform the QUICK CARAFE CLEAN as indicated
on the machine after preparing a milk-based
drink (see 'Carafe quick clean').
Daily Clean the milk carafe thoroughly (see 'Thorough
cleaning of the milk carafe').
Weekly Disassemble the milk carafe and clean all parts
under the tap (see 'Weekly cleaning of the milk
carafe').
12
English

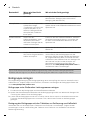
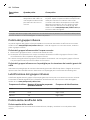
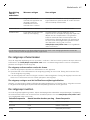
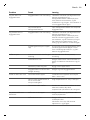
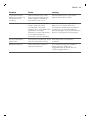
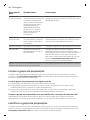
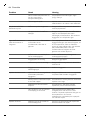
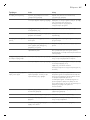
Part description When to clean How to clean
Monthly Clean the milk carafe with the Philips milk circuit
cleaner (see 'Monthly cleaning of the milk
carafe').
Drip tray Empty the drip tray as soon
as the red 'drip tray full'
indicator pops up through
the drip tray (Fig. 27). Clean
the drip tray when it suits
you.
Remove the drip tray and rinse it under the tap
with some washing-up liquid.
Coffee grounds
container
Empty the coffee grounds
container when prompted by
the machine. Clean it when it
suits you.
Remove the coffee grounds container while the
machine is switched on and rinse it under the tap
with some washing-up liquid.
Water tank When it suits you. Rinse the water tank under the tap
Coffee funnel Check the coffee funnel
weekly to see if it is clogged.
Unplug the machine and remove the brew group.
Open the lid of the pre-ground coffee
compartment and insert the spoon handle into
the coffee funnel. Move the handle up and down
until the clogged ground coffee falls down (Fig.
28). Go to www.philips.com/coffee-care for
detailed video instructions.
Tip: There is a cleaning calender on the last page of this user manual. Write down the dates on which
you have performed a cleaning action.
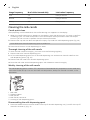
Cleaning the brew group
Regular cleaning of the brew group prevents coffee residues from clogging up the internal circuits.
Visit www.philips.com/coffee-care for support videos on how to remove, insert and clean the brew
group.
Cleaning the brew group under the tap
1 Remove the brew group and the coffee residues drawer.
2 Rinse the coffee residues drawer and the brew group thoroughly with water. Carefully clean the
upper filter of the brew group.
3 Let the brew group air-dry before you place it back. Do not dry the brew group with a cloth to
prevent fibers from collecting inside the brew group.
Cleaning the brew group with the coffee oil remover tablets
Only use Phillips Saeco coffee oil remover tablets. Follow the instructions given in the user manual
that comes with the coffee oil remover tablets.
Lubricating the brew group
Lubricate the brew group regularly to ensure that the moving parts continue to move smoothly. See
the table below for the lubrication frequency. Visit www.philips.com/coffee-care for detailed video
instructions.
13
English

Usage frequency Nr of drinks brewed daily Lubrication frequency
Low 1-5 Every 4 months
Normal 6-10 Every 2 months
Heavy >10 Every month
Cleaning the milk carafe
Carafe quick clean
After preparing a milk-based drink, the carafe cleaning icon appears on the display.
1 When the carafe cleaning icon appears on the display, press the OK button if you want to perform
a cleaning cycle. You have 10 seconds to activate the quick clean procedure. Press the escape
button if you do not want to perform the quick clean procedure.
2 Remove the cup with the drink and place an empty cup under the milk dispensing spout (Fig. 29).
Note: Make sure the milk dispensing spout is pulled out.
3 Press the OK button to start dispensing hot water.
Thorough cleaning of the milk carafe
To clean the milk carafe thoroughly, you have to do the following regularly:
1 Remove the lid of the milk dispensing unit.
2 Lift the milk dispensing spout out of the milk dispensing unit and remove the milk tube from the
milk dispensing spout (Fig. 30).
3 Remove the milk tube from the milk dispensing spout.
4 Rinse the milk tube and milk dispensing spout with lukewarm water thoroughly.
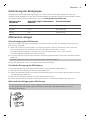
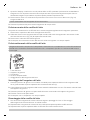
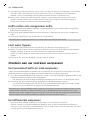
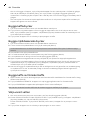
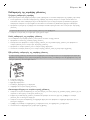
Weekly cleaning of the milk carafe
The milk dispensing spout consists of 5 components. Disassemble all components once a week and
clean them under the tap. You can also clean all components, except for the milk container, in the
dishwasher.
1 2
5
3
4
1 Milk tube
2 Rubber support
3 Milk frother
4 Milk frother connector
5 Housing of milk dispensing spout
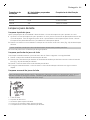
Disassembling the milk dispensing spout
1 Press the release buttons on both sides of the top of the milk dispensing unit (1) and lift the top off
the milk container (2) (Fig. 31).
14
English

2 Turn the milk dispensing unit upside down and hold it firmly in your hand. Pull the milk tube off the
rubber support (Fig. 32).
3 Press the release buttons on the milk frother and remove the milk frother from the the rubber
support (Fig. 33).
4 Pull the milk frother connector out of the milk frother (Fig. 34).
5 Rinse all components under a lukewarm tap.
Reassembling the milk carafe
1 To reassemble the milk dispensing spout, follow steps 2 to 4 of 'Disassembling the milk dispensing
spout' in reverse order.
2 Place the milk dispensing spout back into the top of the milk carafe.
3 Place the top of the milk carafe back onto the milk carafe.
Note: Before you place the milk froth dispensing spout back into the top of the milk carafe, move the
pin inside the top to the correct position. If this pin is not in the correct position, you cannot place the
milk froth dispensing spout back into the top of the milk carafe (Fig. 35).
Monthly cleaning of the milk carafe
Only use Philips/Saeco milk circuit cleaner for this cleaning cycle.
1 Pour the contents of the milk circuit cleaner sachet in the milk carafe. Then fill the milk carafe with
water up to the MAX indication (Fig. 36).
2 Insert the milk carafe into the machine and place a container under the milk dispensing spout.
3 Press the MENU button, select DRINKS and scroll to MILK FROTH. Press the OK button to start
dispensing the cleaning solution.
4 Repeat step 3 until the milk carafe is empty.
5 When the carafe is empty, remove the container and the milk carafe from the machine.
6 Rinse the milk carafe thoroughly and fill it with fresh water up to the MAX level indication.
7 Insert the milk carafe into the machine.
8 Place the container under the milk dispensing spout.
9 Press the MENU button and select MILK FROTH in the DRINKS menu to start the carafe rinsing
cycle.
10 Repeat step 9 until the milk carafe is empty.
11 Repeat steps 6-10.
12 When the machine stops dispensing water, the cleaning cycle is finished.
13 Disassemble all the components and rinse them under a lukewarm tap.
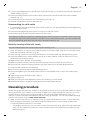
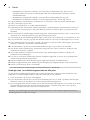
Descaling procedure
Please use Philips descaler only. Under no circumstances should you use a descaler based on sulfuric
acid, hydrochloric acid, sulfamic or acetic acid (vinegar) as this may damage the water circuit in your
machine and not dissolve the limescale properly. Not using the Philips descaler will void your
warranty. Failure to descale the appliance will also void your warranty. You can buy Philips descaling
solution in the online shop at www.saeco.com/care.
1 When the machine asks you to descale it (Fig. 37), press the OK button to start. To start descaling
without being prompted by the machine, press the MENU button, scroll to select START CALC
CLEAN and press the OK button to confirm.
-
The display reminds you that you have to insert the milk carafe. (Fig. 38) Fill the milk carafe with
water up to the MIN level indication. Insert the milk carafe into the machine and open the milk
dispensing spout.
15
English

-
The display reminds you that you have to open the milk dispensing spout (Fig. 39).
-
The display reminds you that you have to remove the AquaClean filter (Fig. 40).
2 Remove the drip tray and the coffee grounds container, empty them and put them back into place.
3 Remove the water tank and empty it.
4 Place a large container (1.5 l) under the coffee dispensing spout.
5 Pour the whole bottle of Philips descaler in the water tank and then fill it with water up to the CALC
CLEAN level (Fig. 41). Then place it back into the machine and press the OK button to confirm.
6 The first phase of the descaling procedure starts. The descaling procedure lasts approx. 30 minutes
and consists of a descaling cycle and a rinsing cycle.
7 Let the machine dispense the descaling solution until the display reminds you that the water tank
is empty.
8 Empty the water tank, rinse it and then refill it with fresh water up to the CALC CLEAN level
indication.
9 Remove and rinse the milk carafe. Fill it with fresh water up to the MIN level indication and reinsert
it into the machine. Then open the milk froth dispensing spout.
10 Empty the container and place it back under the coffee dispensing spout. Press OK to confirm.
11 The second phase of the descaling cycle, the rinsing phase, starts and lasts 3 minutes. The display
shows the rinsing icon and the duration of the phase.
12 Wait until the machine stops dispensing water. The descaling procedure is finished when the tick
appears on the display.
13 Press the OK button to exit the descaling cycle. The machine starts heating up and performs the
automatic rinsing cycle.
14 Clean the milk carafe after descaling (see 'Weekly cleaning of the milk carafe').
15 Clean the brew group after descaling (see 'Cleaning the brew group under the tap').
16 Place a new AquaClean filter in the water tank.
Tip: Using the AquaClean filter reduces the need for descaling!
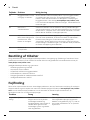
What to do if the descaling procedure is interrupted
You can exit the descaling procedure by pressing the on/off button on the control panel. If the
descaling procedure is interrupted before it is completely finished, do the following:
1 Empty and rinse the water tank thoroughly.
2 Fill the water tank with fresh water up to the CALC CLEAN level indication and switch the machine
back on. The machine will heat up and perform an automatic rinsing cycle.
3 Before brewing any drinks, perform a manual rinsing cycle. To perform a manual rinsing cycle, first
dispense half a water tank of hot water and then brew 2 cups of pre-ground coffee without adding
ground coffee.
Note: If the descaling procedure was not completed, the machine will require another descaling
procedure as soon as possible.
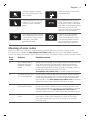
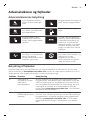
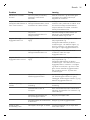
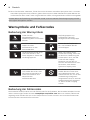
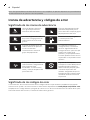
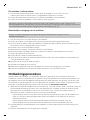
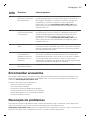
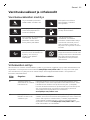
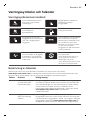
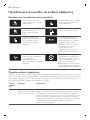
Warning icons and error codes
Meaning of the warning icons
ADD WATER
Fill the water tank with fresh
water to the MAX level
indication.
The brew group is blocked by
coffee powder. Clean the brew
group.
16
English

ADD COFFEE
The bean hopper is empty.
Put new coffee beans in the
bean hopper.
Insert the drip tray and close
the service door.
The brew group is not in the
machine or it is not inserted
correctly. Insert the brew
group.
10
xx
If the display shows an error
code, check section 'Meaning
of the error codes' to see what
the code on the display means
and what you can do. The
machine cannot be used when
this icon is on the display.
The coffee grounds container
is full. Make sure the machine
is switched on. Then remove
and empty the coffee
grounds container.
There is air is the machine,
place a cup under the hot
water spout and select Ok to
start priming. Make sure the
hot water spout is inserted
before starting the process.
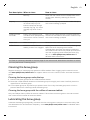
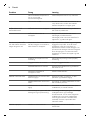
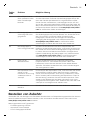
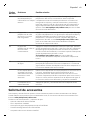
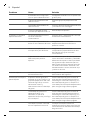
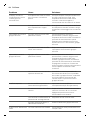
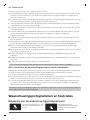
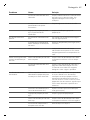
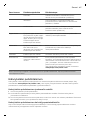
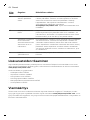
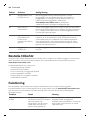
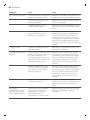
Meaning of error codes
Below you find a list of the error codes showing problems that you can solve yourself. Video
instructions are available on www.philips.com/coffee-care. If another error code appears, please
contact the Philips Consumer Care Center in your country. For contact details, see the warranty leaflet.
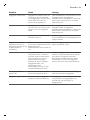
Error
code
Problem Possible solution
01 The coffee funnel is
blocked by ground
coffee or a foreign
object.
Switch off the machine and unplug it. Remove the brew group.
Then open the lid of the pre-ground coffee compartment.
Insert the spoon handle and move it up and down to make
clogged ground coffee fal down (Fig. 28). If a foreign object is
blocking the coffee funnel, remove it. Visit
www.philips.com/coffee-care for detailed video instructions
03 The brew group is dirty
or not well-greased.
Switch off the machine with the main switch. Rinse the brew
group with fresh water, let it air-dry and then lubricate it (see
'Lubricating the brew group'). Consult chapter 'Cleaning the
brew group' or visit www.philips.com/coffee-care for detailed
video instructions. Then switch the machine on again.
04 The brew group is not
positioned correctly.
Switch off the machine with the main switch. Remove the brew
group and reinsert it. Make sure that the brew group is in the
correct position before you insert it. Consult chapter 'Handling
the brew group' or visit www.philips.com/coffee-care for
detailed video instructions. Then switch the machine on again.
05 There is air in the water
circuit.
Restart the machine by switching it off and on again with the
main switch. If this works, dispense 2-3 cups of hot water.
Descale the machine if you have not done so for a longer
period of time.
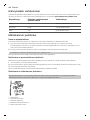
17
English

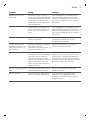
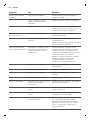
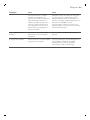
Error
code
Problem Possible solution
The AquaClean filter
was not prepared
properly before
installation or it is
clogged.
Remove the AquaClean filter and try again to brew a coffee. If
this works, make sure that the AquaClean filter is prepared
properly before you place it back (see 'Preparing the
AquaClean filter for activation'). Put the AquaClean filter back
into the water tank. If this still does not work, the filter is
clogged and needs to be replaced.
14 The machine is
overheated.
Switch the machine off and switch it back on again after 30
minutes.
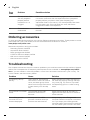
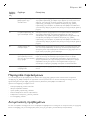
Ordering accessories
To clean and descale the machine, only use the Philips maintenance products. These products can be
purchased from your local retailer, from the authorized service centers or online at
www.philips.com/coffee-care.
Maintenance products and type numbers:
-
Descaling solution CA6700
-
AquaClean filter CA6903
-
Brew group grease HD5061
-
Coffee oil remover tablets CA6704
-
Milk circuit cleaner CA6705
-
Maintenance kit CA6707
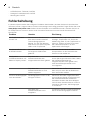
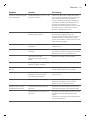
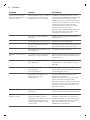
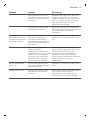
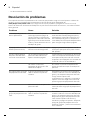
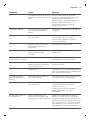
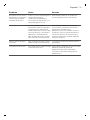
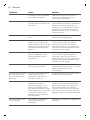
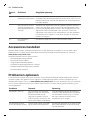
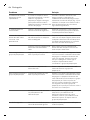
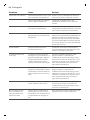
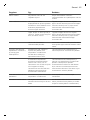
Troubleshooting
This chapter summarizes the most common problems you could encounter with the machine. Support
videos and a complete list of frequently asked questions are available on www.philips.com/coffee-
care. If you are unable to solve the problem, contact the Consumer Care Center in your country. For
contact details, see the warranty leaflet.
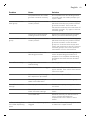
Problem
Cause Solution
The drip tray fills up
quickly.
This is normal. The machine
uses water to rinse the internal
circuit and brew group. Some
water flows through the internal
system directly into the drip
tray.
Empty the drip tray when the 'drip tray
full' indicator pops up through the drip
tray cover (Fig. 27). Place a cup under
the dispensing spout to collect rinsing
water.
The machine is in DEMO
mode.
You pressed the standby
button for more than 8
seconds.
Switch the machine off and then on
again with the main switch on the back
of the machine.
The 'coffee grounds
container full' icon
remains displayed.
You emptied the coffee
grounds container while the
machine was switched off.
Always empty the coffee grounds
container while the machine is switched
on. If you empty the coffee grounds
container when the machine is switched
off, the coffee cycle counter is not reset.
18
English
La page est en cours de chargement...
La page est en cours de chargement...
La page est en cours de chargement...
La page est en cours de chargement...
La page est en cours de chargement...
La page est en cours de chargement...
La page est en cours de chargement...
La page est en cours de chargement...
La page est en cours de chargement...
La page est en cours de chargement...
La page est en cours de chargement...
La page est en cours de chargement...
La page est en cours de chargement...
La page est en cours de chargement...
La page est en cours de chargement...
La page est en cours de chargement...
La page est en cours de chargement...
La page est en cours de chargement...
La page est en cours de chargement...
La page est en cours de chargement...
La page est en cours de chargement...
La page est en cours de chargement...
La page est en cours de chargement...
La page est en cours de chargement...
La page est en cours de chargement...
La page est en cours de chargement...
La page est en cours de chargement...
La page est en cours de chargement...
La page est en cours de chargement...
La page est en cours de chargement...
La page est en cours de chargement...
La page est en cours de chargement...
La page est en cours de chargement...
La page est en cours de chargement...
La page est en cours de chargement...
La page est en cours de chargement...
La page est en cours de chargement...
La page est en cours de chargement...
La page est en cours de chargement...
La page est en cours de chargement...
La page est en cours de chargement...
La page est en cours de chargement...
La page est en cours de chargement...
La page est en cours de chargement...
La page est en cours de chargement...
La page est en cours de chargement...
La page est en cours de chargement...
La page est en cours de chargement...
La page est en cours de chargement...
La page est en cours de chargement...
La page est en cours de chargement...
La page est en cours de chargement...
La page est en cours de chargement...
La page est en cours de chargement...
La page est en cours de chargement...
La page est en cours de chargement...
La page est en cours de chargement...
La page est en cours de chargement...
La page est en cours de chargement...
La page est en cours de chargement...
La page est en cours de chargement...
La page est en cours de chargement...
La page est en cours de chargement...
La page est en cours de chargement...
La page est en cours de chargement...
La page est en cours de chargement...
La page est en cours de chargement...
La page est en cours de chargement...
La page est en cours de chargement...
La page est en cours de chargement...
La page est en cours de chargement...
La page est en cours de chargement...
La page est en cours de chargement...
La page est en cours de chargement...
La page est en cours de chargement...
La page est en cours de chargement...
La page est en cours de chargement...
La page est en cours de chargement...
La page est en cours de chargement...
La page est en cours de chargement...
La page est en cours de chargement...
La page est en cours de chargement...
La page est en cours de chargement...
La page est en cours de chargement...
La page est en cours de chargement...
La page est en cours de chargement...
La page est en cours de chargement...
La page est en cours de chargement...
La page est en cours de chargement...
La page est en cours de chargement...
La page est en cours de chargement...
La page est en cours de chargement...
La page est en cours de chargement...
La page est en cours de chargement...
La page est en cours de chargement...
La page est en cours de chargement...
La page est en cours de chargement...
La page est en cours de chargement...
La page est en cours de chargement...
La page est en cours de chargement...
La page est en cours de chargement...
La page est en cours de chargement...
La page est en cours de chargement...
La page est en cours de chargement...
La page est en cours de chargement...
La page est en cours de chargement...
La page est en cours de chargement...
La page est en cours de chargement...
La page est en cours de chargement...
La page est en cours de chargement...
La page est en cours de chargement...
La page est en cours de chargement...
La page est en cours de chargement...
La page est en cours de chargement...
La page est en cours de chargement...
La page est en cours de chargement...
La page est en cours de chargement...
La page est en cours de chargement...
La page est en cours de chargement...
La page est en cours de chargement...
La page est en cours de chargement...
La page est en cours de chargement...
La page est en cours de chargement...
La page est en cours de chargement...
La page est en cours de chargement...
La page est en cours de chargement...
La page est en cours de chargement...
La page est en cours de chargement...
La page est en cours de chargement...
La page est en cours de chargement...
La page est en cours de chargement...
La page est en cours de chargement...
La page est en cours de chargement...
La page est en cours de chargement...
La page est en cours de chargement...
La page est en cours de chargement...
La page est en cours de chargement...
La page est en cours de chargement...
La page est en cours de chargement...
La page est en cours de chargement...
La page est en cours de chargement...
La page est en cours de chargement...
La page est en cours de chargement...
La page est en cours de chargement...
La page est en cours de chargement...
La page est en cours de chargement...
La page est en cours de chargement...
La page est en cours de chargement...
La page est en cours de chargement...
La page est en cours de chargement...
La page est en cours de chargement...
La page est en cours de chargement...
La page est en cours de chargement...
La page est en cours de chargement...
La page est en cours de chargement...
La page est en cours de chargement...
La page est en cours de chargement...
La page est en cours de chargement...
La page est en cours de chargement...
La page est en cours de chargement...
La page est en cours de chargement...
La page est en cours de chargement...
La page est en cours de chargement...
La page est en cours de chargement...
La page est en cours de chargement...
La page est en cours de chargement...
La page est en cours de chargement...
La page est en cours de chargement...
La page est en cours de chargement...
La page est en cours de chargement...
La page est en cours de chargement...
La page est en cours de chargement...
La page est en cours de chargement...
La page est en cours de chargement...
La page est en cours de chargement...
La page est en cours de chargement...
La page est en cours de chargement...
La page est en cours de chargement...
La page est en cours de chargement...
La page est en cours de chargement...
La page est en cours de chargement...
La page est en cours de chargement...
La page est en cours de chargement...
La page est en cours de chargement...
La page est en cours de chargement...
La page est en cours de chargement...
La page est en cours de chargement...
La page est en cours de chargement...
La page est en cours de chargement...
La page est en cours de chargement...
La page est en cours de chargement...
La page est en cours de chargement...
La page est en cours de chargement...
La page est en cours de chargement...
La page est en cours de chargement...
La page est en cours de chargement...
-
 1
1
-
 2
2
-
 3
3
-
 4
4
-
 5
5
-
 6
6
-
 7
7
-
 8
8
-
 9
9
-
 10
10
-
 11
11
-
 12
12
-
 13
13
-
 14
14
-
 15
15
-
 16
16
-
 17
17
-
 18
18
-
 19
19
-
 20
20
-
 21
21
-
 22
22
-
 23
23
-
 24
24
-
 25
25
-
 26
26
-
 27
27
-
 28
28
-
 29
29
-
 30
30
-
 31
31
-
 32
32
-
 33
33
-
 34
34
-
 35
35
-
 36
36
-
 37
37
-
 38
38
-
 39
39
-
 40
40
-
 41
41
-
 42
42
-
 43
43
-
 44
44
-
 45
45
-
 46
46
-
 47
47
-
 48
48
-
 49
49
-
 50
50
-
 51
51
-
 52
52
-
 53
53
-
 54
54
-
 55
55
-
 56
56
-
 57
57
-
 58
58
-
 59
59
-
 60
60
-
 61
61
-
 62
62
-
 63
63
-
 64
64
-
 65
65
-
 66
66
-
 67
67
-
 68
68
-
 69
69
-
 70
70
-
 71
71
-
 72
72
-
 73
73
-
 74
74
-
 75
75
-
 76
76
-
 77
77
-
 78
78
-
 79
79
-
 80
80
-
 81
81
-
 82
82
-
 83
83
-
 84
84
-
 85
85
-
 86
86
-
 87
87
-
 88
88
-
 89
89
-
 90
90
-
 91
91
-
 92
92
-
 93
93
-
 94
94
-
 95
95
-
 96
96
-
 97
97
-
 98
98
-
 99
99
-
 100
100
-
 101
101
-
 102
102
-
 103
103
-
 104
104
-
 105
105
-
 106
106
-
 107
107
-
 108
108
-
 109
109
-
 110
110
-
 111
111
-
 112
112
-
 113
113
-
 114
114
-
 115
115
-
 116
116
-
 117
117
-
 118
118
-
 119
119
-
 120
120
-
 121
121
-
 122
122
-
 123
123
-
 124
124
-
 125
125
-
 126
126
-
 127
127
-
 128
128
-
 129
129
-
 130
130
-
 131
131
-
 132
132
-
 133
133
-
 134
134
-
 135
135
-
 136
136
-
 137
137
-
 138
138
-
 139
139
-
 140
140
-
 141
141
-
 142
142
-
 143
143
-
 144
144
-
 145
145
-
 146
146
-
 147
147
-
 148
148
-
 149
149
-
 150
150
-
 151
151
-
 152
152
-
 153
153
-
 154
154
-
 155
155
-
 156
156
-
 157
157
-
 158
158
-
 159
159
-
 160
160
-
 161
161
-
 162
162
-
 163
163
-
 164
164
-
 165
165
-
 166
166
-
 167
167
-
 168
168
-
 169
169
-
 170
170
-
 171
171
-
 172
172
-
 173
173
-
 174
174
-
 175
175
-
 176
176
-
 177
177
-
 178
178
-
 179
179
-
 180
180
-
 181
181
-
 182
182
-
 183
183
-
 184
184
-
 185
185
-
 186
186
-
 187
187
-
 188
188
-
 189
189
-
 190
190
-
 191
191
-
 192
192
-
 193
193
-
 194
194
-
 195
195
-
 196
196
-
 197
197
-
 198
198
-
 199
199
-
 200
200
-
 201
201
-
 202
202
-
 203
203
-
 204
204
-
 205
205
-
 206
206
-
 207
207
-
 208
208
-
 209
209
-
 210
210
-
 211
211
-
 212
212
-
 213
213
-
 214
214
-
 215
215
-
 216
216


Philips 3100 EP3360 Manuel utilisateur
- Catégorie
- Cafetières
- Taper
- Manuel utilisateur
- Ce manuel convient également à
dans d''autres langues
- italiano: Philips 3100 EP3360 Manuale utente
- English: Philips 3100 EP3360 User manual
- español: Philips 3100 EP3360 Manual de usuario
- Deutsch: Philips 3100 EP3360 Benutzerhandbuch
- Nederlands: Philips 3100 EP3360 Handleiding
- português: Philips 3100 EP3360 Manual do usuário
- dansk: Philips 3100 EP3360 Brugermanual
- svenska: Philips 3100 EP3360 Användarmanual
- suomi: Philips 3100 EP3360 Ohjekirja
Documents connexes
-
Philips EP1200/09 Manuel utilisateur
-
-
Saeco HD8921/04 Manuel utilisateur
-
-
Philips-Saeco SM7786 Xelsis Manuel utilisateur
-
-
Philips HD8827/12 Manuel utilisateur
-
-
-
Philips HD5730/10 Manuel utilisateur
Autres documents
-
Saeco HD8917/09 Manuel utilisateur
-
Philips-Saeco SM5478/10 Manuel utilisateur
-
-
Saeco HD8911/01 Manuel utilisateur
-
-
-
Philips-Saeco SM7583/00R1 Manuel utilisateur
-
Waterdrop CA6903 Manuel utilisateur
-
-
Aeg-Electrolux ecs 5200 Manuel utilisateur