EcoFlow Smart Generator Manuel utilisateur
- Catégorie
- Groupes électrogènes
- Taper
- Manuel utilisateur

EcoFlow Smart Generator
Dual Fuel
User Manual


Users are expected to read this User Manual carefully and ensure they have
fully understood the content before using this product. Please keep this User
Manual for future reference. Any incorrect usage may result in severe injury
to the user or others, damage to the product or loss of property. By using
this product, the user will be deemed as having understood, recognized
and accepted all the terms and contents of the User Manual, and will be
responsible for any incorrect usage, and all the consequences arising
therefrom. EcoFlow hereby disclaims any liability for any losses due to the
user's failure to use the product according to the User Manual.
Subject to compliance with laws and regulations, our company has the
final right to interpret this document and all documents of and related to
this product. Any update, revision or termination of the content thereof, if
necessary, will be made without prior notice, and users must visit the official
website of EcoFlow for the latest information regarding the product.
Disclaimer
EcoFlow Smart Generator Dual Fuel (hereinafter the “generator “)

1
18
19
19
20
21
16
1
1
2
3
1. Safety Guidelines
2. Getting Started
3. Maintenance and Servicing
Contents
3.1 Checking the Spark Plug
3.2 Adjusting the Carburetor
3.3 Replacing the Engine Oil
3.4 Air Filter
3.5 Fuel Filter Strainer
3.6 Muffler
1.1 Safety Warning
1.2 Safety Instructions
1.3 Important Labels
1.4 FCC Class A Warnings
24
25
26
27
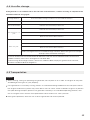
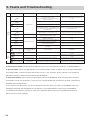
5. Faults and Troubleshooting
6. Parameters and Specifications
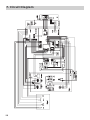
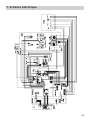
7. Circuit Diagram
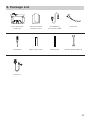
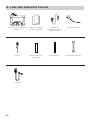
8. Package List
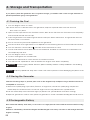
4. Storage and Transportation
4.1 Draining the Fuel
4.2 Storing the Generator
4.3 Rechargeable Battery
4.4 Use after storage
4.5 Transportation
21
22
22
22
23
23
4
6
7
10
11
12
13
14
14
2.1 Appearance Description
2.2 Introduction to the Icons on the Display Screen
2.3 Before You Use the Product
2.4 Using the Product
--2.4.1 Startup
--2.4.2 Turning Off
--2.4.3 AC Connections
--2.4.4 DC Charging
2.4.4.1 Charging the DELTA Max, the DELTA Pro,
or the Power Kits
2.4.4.2 Charging the DELTA Max Extra Battery Pack
or the DELTA Pro Extra Battery Pack
--2.4.5 EcoFlow App
--2.4.6 Application Range
--2.4.7 Special Requirements
15
15
16
4
22
17

1
1. Safety Guidelines
1.1 Safety Warning
1.2 Safety Instructions
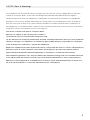
The safety of you and others, as well as of property are of the primary importance. Please carefully read the
extremely important safety warnings we have written in the User Manual and the sticker of the generator set.
This is to remind you of the potential dangers which may harm you and others. Before each safety warning is
a symbol and one of the three following words: danger, warning or caution.
These words indicate:
If you fail to follow the instructions, your life will be at risk or you will be severely injured.
If you fail to follow the instructions, your life may be at risk or you may be seriously injured.
If you fail to follow the instructions, your generator set and other property may be damaged.
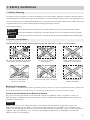
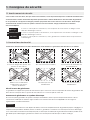
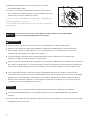
Please read the User Manual carefully before using the generator in order to avoid accidents.
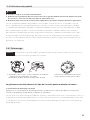
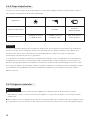
Do not use in damp
environments
Make sure that no fuel is
spilled when refueling
Do not smoke when refueling Switch off the engine
before refueling
Keep any combustibles at
least 1m / 3ft away
Do not use indoors and keep away
from doors, windows and vents
Danger
Warning
Caution
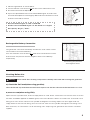
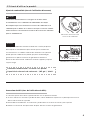
Earthing the Generator
Connect the Generator to the Electrical System
The generator is equipped with system grounding, which is used to connect the generator’s frame components
to the ground terminal in the AC outlet. The system grounding doesn’t connect to the AC neutral.
Do not connect the generator to the electrical system of a building, unless an isolation switch has
been properly installed by a licensed electrician. Please comply with all applicable laws and electrical
regulatory requirements.
Keep the air inlets in the side of front panel, the muffler and the bottom of generator clean and
unblocked and prevent any debris, mud or water from entering. The generator, the controller or the
engine may be damaged if these air inlets become blocked. Do not transport, store or use the generator
together with other products. Any oil leaks may damage the generator or endanger your personal
safety as well as your property.
Caution

2
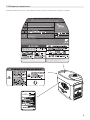
1.3 Important Labels
Please refer the following stickers carefully before starting to use the product.
Backfeed into utility system can cause property
damage and electrocution hazard.
Do not connect the generator to a building's
electrical system unless an isolation switch has
been properly installed by a licensed electrician.
Only operate in well-ventilated areas. Using a generator indoors
CAN KILL YOU IN MINUTES.
Generator exhaust contains carbon monoxide. This is a poison you cannot see or smell.
Tampering with this CO alarm system will cause Carbon Monoxide poisoning!
When operating the generator:
Never place a partition or other barrier around the generator.
Do not cover the generator with a box.
Do not place any objects on the generator.
Turn the fuel tank cap air vent knob to "OFF" after the engine has completely cooled down.
Read the owner's manual and all labels before operating.
WARNING:
Cancer and Reproductive
Harm-www.P65Warnings.ca.gov.
Check for spilled fuel or fuel leaks. Stop engine before refueling.
Electrocution can occur if generator is used in rain, snow, or near water. Keep this unit dry at all times.
Electrocution or property damage can occur. Refer to the owner's manual.
!
WARNING/AVERTISSEMENT
Lire le manuel d'utilisation et toutes les étiquettes avant d'utiliser de générateur.
Utiliser uniquement dans des zones bien aérées. L'utilisation d'un générateur à l'intérieur PEUT VOUS TUER EN QUELQUES
MINUTES. Les gaz d'échappement d'un générateur contiennent du monoxyde de carbone. Il s'agit d'un poison invisible et
inodore.
Il existe un risque d'électrocution si le générateur est utilisé sous la pluie, dans la neige ou à proximité d'eau. Garder cet
appareil au sec en permanence.
Il existe un risque d'électrocution ou de dommages matériels. Se reporter au manuel d'utilisation.
Arrêter le moteur avant de faire le plein.
Ne jamais entourer le générateur d'une cloison ou d'une autre barrière.
Ne pas recouvrir le générateur d'une enceinte.
Ne placer aucun objet sur le générateur.
L'alimentation directe du générateur via le réseau peut
entraîner des dommages matériels et des risques
d'électrocution.
Ne pas connecter le générateur au système électrique d'un
bâtiment à moins qu'un interrupteur-sectionneur n'ait été
reproduction-www.P65Warnings.ca.gov.
AVERTISSEMENT:
MADE IN CHINAEcoFlow Inc.
COUPURE AUTOMATIQUE D'ALIMENTATION -VOUS DEVEZ
DÉPLACER LE GÉNÉRATEUR À L'EXTÉRIEUR, À L'AIR LIBRE. DIRIGER
L'ÉCHAPPEMENT VERS L'EXTÉRIEUR. NE PAS UTILISER LE GÉNÉRATEUR
DANS DES ZONES FERMÉES (PAR EXEMPLE, PAS DANS LA MAISON OU LE GARAGE)
SORTIR À L'AIR LIBRE ET DEMANDER UNE AIDE MÉDICALE EN CAS DE NAUSÉE,
VERTIGES OU DE SENSATION DE FAIBLAIBLESSE.
L'utilisation d'un générateur à l'intérieur PEUT VOUS TUER EN QUELQUES MINUTES. Les gaz d'échappement
d'un générateur contiennent du monoxyde de carbone. Il s'agit d'un poison invisible et inodore.
NE JAMAIS utiliser le générateur à l'intérieur d'une maison ou d'un garage, MÊME SI les portes et les
fenêtres sont ouvertes.
Utiliser le générateur uniquement À L'EXTÉRIEUR et loin des fenêtres, des portes et des aération.
MODEL/MODÈLE :
EFG200
RATED POWER/PUISSANCE NOMINALE :
1.8kW Gasoline/1.6kW LPG
RATED AC OUTPUT VOLTAGE/NIMELLINEN AC-LÄHTÖJÄNNITE :
120 V~ 60 Hz
RATED AC OUTPUT CURRENT/NIMELLINEN AC-LÄHTÖVIRTA :
15A GASoline/13.3A LPG
POWER FACTOR/FACTEUR DE PUISSANCE :
1
INSULATION CLASS/CLASSE D'ISOLATION :
F
IC ID :
21098-ESPC3MINI1
RATED SPEED/RÉGIME NOMINAL :
5000rpm
PHASE/PHASE :
Single/monophasé
RATED AMBIENT TEMP/TEMPÉRATURE AMBIANTE NOMINALE :
25 ˚C
DC OUTPUT/SORTIE CC :
42V~58.8 V, 32 A
FCC ID :
2AC7Z-ESPC3MINI1
EcoFlow Smart Generator Dual Fuel
CAN ICES-002(A) / NMB-002(A)
CAN ICES-003(A) / NMB-003(A)
www.eco ow.com
Low Power Generating Sets

3
1.4 FCC Class A Warnings
This equipment has tested and found to comply with the limits for a Class A digital device, pursuant
to Part 15 of the FCC Rules. These limits are designed to provide reasonable protection against
harmful interference when the equipment is operated in a commercial environment. This equipment
generates, uses, and can radiate radio frequency energy and, if not installed and used in accordance
with the instruction manual, may cause harmful interference to radio communications. Operation of
this equipment in a residential area is likely to cause harmful interference in which case the user will be
required to correct the interference at his own expense.
This device complies with part 15 of the FCC Rules.
Operation is subject to the following two conditions:
(1) the device may not cause harmful interference, and
(2) this device must accept any interference received, including interference that may cause undesired
operation. Changes or modifications not expressly approved by the party responsible for compliance
could viod the user’s authority to operate the equipment.
NOTE: This equipment has been tested and found to comply with the limits for a Class A digital device,
pursuant to part 15 of the FCC Rules. These limits are designed to provide reasonable protection
against harmful interference when the equipment is operated in a commercial environment.
This equipment generates, uses, and can radiate radio frequency energy and, if not installed and used
in accordance with the instrction manual, may cause harmful interference to radio communications.
Operation of this equipment in a residential area is likely to cause harmful interference in which case
the user will be required to correct the interference at his own expense.

4
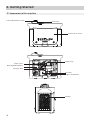
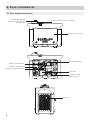
Maintenance Cover
2.1 Appearance Description
2. Getting Started
Fuel Cap
Fuel Cap Breather Valve
Muffler
Air Filter
Rechargeable Battery
Choke Lever
Oil Drain Bolt
Spark Plug
Engine Oil Dipstick

5
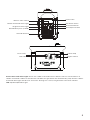
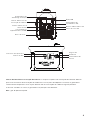
Engine Switch
Starter Grip
LCD Screen
IOT Reset Switch
AC Power Button
AC Output Sockets
Dust Cover
LPG Inlet
Carbon Monoxide Alert Light
Engine Oil Alert Light
Electric Start Switch
Extra Battery Port (XT150)
Ground Terminal
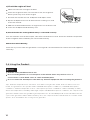
Carbon Monoxide Alert Light: When the carbon monoxide sensor detects that the concentration of
carbon monoxide is about to exceed the standard, the generator will automatically stop and the carbon
monoxide alert light will flash for 5 minutes. During this course, the generator cannot be started.
LPG: liquefied petroleum gas.

6
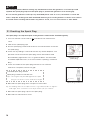
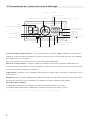
2.2 Introduction to the Icons on the Display Screen
Remaining Oil Percentage: If the amount of oil falls below 600 ml while the gasoline is in use, the
remaining oil percentage will show as 0%. During this time, the icon will flicker to remind you to add
more fuel immediately. The display will show 99% when the LPG is in use.
Wi-Fi Status: The devices that support Bluetooth connection will be connected to the App directly or to
the Internet after the the network connection process is completed.If it is successfully connected to the
Internet, the icon will stay on.
* See Section 5 for more troubleshooting steps.
Error Code: Please refer to the EcoFlow app for specific information on error codes.
ECO Mode: In this mode, the generator will automatically match the rpm according to power output
level in order to reduce fuel consumption and noise. Default ECO Mode.
ECO Mode Settings:
1. Hold the AC power switch for two seconds;
2. This can be done in the app. For details, please refer to 2.4.5.
ECO
Wi-Fi Status
Total Run TimeRemaining Power Percentage
Eco Mode
AC Output DC Output
Output Overload Alert
Communication Connection
Output Power
Rechargeable
Battery Fault Alert
Error Code
Carbon Monoxide
Alert
Low Temperature Alert
High-Temperature Alert
Remaining Running Time
Pairing Indicator

7
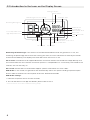
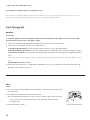
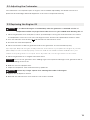
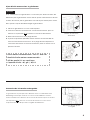
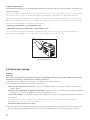
2.3 Before You Use the Product
Please read the Safety Guidelines carefully before refueling as
fuel is inflammable and toxic. Do not overfill the fuel tank, as
fuel may expand and spill out when the fuel tank warms up.
Be sure to tightly close the fuel cap after refueling.
Danger
Recommended fuel: unleaded gasoline
Fuel tank capacity: 1.05 gal. / 4.00 L
Clean away the residual fuel with a clean and soft cloth after
refueling to avoid damage to the rubber shell. Please use
unleaded fuel rather than leaded fuel which may severely
damage the internal parts of generator. Take off the fuel cap
and fill up until the red indicator.
Caution
Open fuel cap
Refueling
Fuel Filter
Strainer
Red Indicator
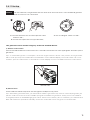
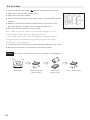
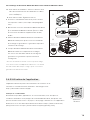
1. Make sure the LPG cylinder valve is in the closed position.
2. If you are using a new LPG cylinder, first remove the plastic
cap located on top of the cylinder valve.
3. Connect the LPG hose to the LPG cylinder valve and tighten
it by hand, without over-tightening it.
4. Remove the dust cover from the LPG access port of the
generator.
5. Remove the protective rubber plug from the female connector
of the LPG hose.
6. Insert the female connector of the LPG hose into the LPG access
port and push it until you hear a clicking noise, and move the
outer ring of the female connector forward.
Tips: 1. Immediately close the LPG cylinder valve when the generator is shut down.
2. Do not place the LPG cylinder on the side with the generator’s muffler.
Adding fuel (when using gasoline)
Connecting LPG (when using LPG)
Insert the LPG Hose

8
Danger
Warning
When the engine is running, do not place the LPG hose or the LPG cylinder in the exhaust passage of
the muffler.
Caution
If there is a strong LPG smell, immediately close the cylinder valve, and use soapy water to wet all the LPG
hose fittings to check for leak. If bubbles appear or grow, then this indicates a leak in the LPG hose. Do not
check for air leaks by using an open flame such as by lighting a cigarette. If you find a leak, contact a qualified
technician to inspect it.
Use an approved LPG cylinder that is equipped with an OPD (Overfill Prevention Device). Install the
LPG cylinder on a flat surface, with the cylinder always in a upright position and the valve resting on
top of the cylinder.
Do not allow children to tamper or play with the LPG cylinder or LPG hose.
The gas cylinder should not be installed near any sources of ignition, and should not be exposed to
sunlight, rain, or dust.
Close the cylinder valve during transportation and storage by disconnecting the cylinder and covering it with
a protective cap. If possible, a plastic protective cap is typically used. Keep the cylinder far away from sources
of ignition, Keep ventilation inside the vehicle.
The LPG hose and standard LPG cylinder need to be used together in this device.
Make sure that the inspection date on the LPG cylinder is within the scope of specified usage.
The position of the cylinder must be firmly set to avoid excessive bending or twisting when
the LPG hose is connected.
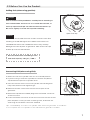
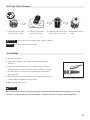
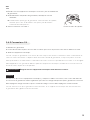
Removing the
maintenance cover
Add Generator Engine Oil
There is no engine oil in the generator when delivered from the
factory. Do not start up the generator until after adding sufficient
engine oil. Do not tilt the generator when adding engine oil, to
prevent damage to the generator due to adding excessive oil.
Caution

9
1. Place the generator on a level plane.
2.
Turn the maintain cover knob to and take off the maintenance cover.
3. Unscrew the lid and oil dipstick.
4. Inject the specified amount of recommended engine oil, and screw
the lid and oil dipstick closed tightly. Reinstall the maintenance cover
and turn the knob to Closed.
Recommended engine oil: SAE SJ 10W-40
Grade of recommended engine oil: API Grade SJ or higher
Oil capacity: 0.1 gal. / 0.38 L
Rechargeable Battery Connection
The generator cannot be started by the Electric Start switch unless
connected to the internal battery.
Turn the maintain cover knob to , take off the maintenance cover
and connect the positive and the negative wires of the battery
respectively.
Refilling the engine oil
Open the LPG cylinder valve, and use soapy water to soak all the connections on the LPG hose to check
for leaks. If bubbles appear or bubbles grow, then this indicates a leak in the LPG hose. If the leak is at a
fitting, then turn off the valve on the cylinder and tighten the fitting. Open the valve again and use
soapy water to recheck the fitting, then turn off the valve on the cylinder and tighten the fitting. If the
leak continues, or if the leak is not at the fitting, then stop using the generator and contact customer
support.
Take off the fuel cap and check the fuel level. Inject more fuel into the tank if the fuel level is too low.
Checking Before Use
Please check the following components carefully each time before using the generator.
Warning
Connecting the positive
and negative wires
b) Check the LPG(when using LPG)
a) Check the fuel level(when using gasoline)

10
Turn the maintain cover knob to Open, take off the maintenance cover and check whether the positive
and the negative wires of battery are connected correctly.
Check for any issues while the generator is running and consult EcoFlow for further technical support if
necessary.
d) Check whether the rechargeable battery is connected correctly
Malfunctions While Running
c) Check the engine oil level
Check the engine oil level. If the oil level is low, the engine oil
alarm system may shut off the engine.
1. Unscrew the lid, take out the oil dipstick and wipe it clean.
2. Dip the oil dipstick into the oil filler without screwing it in, and
check the oil level.
3. Add the recommended amount of engine oil if the oil level is low.
4. Screw the oil dipstick and lid firmly shut.
Make sure there are no engine oil leaks.
Engine oil level check
Read the Safety Guidelines before use.
Do not use the generator in a closed space as the exhaust fumes may result in a loss of
consciousness or even death. Use it in a well-ventilated place.
Do not connect the AC Output Socket with any electrical equipment before starting the generator.
Tips: Ambient Temperature for Generator -15℃-40℃ in the gasoline mode, and -5℃-40℃ in the LPG
mode. The generators can operate under standard atmospheric conditions (“standard atmospheric
conditions”- ambient temperate of 25℃ - atmospheric pressure of 100 kPa - relative humidity of 30%).
When the temperature, humidity, and height surpass standard atmospheric conditions, the output of the
generator will decrease Using under high temperature for an extended period of time will affect the life
cycle of the generator and its built-in battery. Also, the output must be lowered when it is used in small
spaces, since it will affect the cooling of the generator.
2.4 Using the Product
Danger

11
a) Electric Start Switch
Press and hold the Electric Start Switch for 2 seconds to execute the start-up program and start up the
generator.
Tips: To save battery power consumption, when the Engine Switch is at the "ON" position, if the generator
fails to start up, the power will be disconnected after 3 mins and the display screen will switch off. In this
situation, press the start button to activate the screen display to then re-enable the Electric Start Switch.
b) Manual start
Pull the Manual Starter Grip until the line tightens and push it by force.
Tips: When doing a manual start, you will need to hold the generator to prevent it from bumping while you
pull the cord. Do not let the starter handle spring back towards the generator. Gently return the handle to
its original position to avoid damaging the starter. When there is battery loss or no battery, the maintenance
door will need to be opened to manually control the choke door when using the LPG manual start.
1. a. To Use Gasoline: Turn the fuel cap vent valve
knob to ‘’ON’’;
b. To Use LPG: Open the LPG cylinder valve;
2. Turn the Engine Switch to "ON".
The generator can be started using any of the four methods below:
2.4.1 Startup
Manual start
ab
For fuel selection, the generator will use LPG when the LPG hose is connected and gasoline
when the hose is not connected.
Caution

12
To turn the engine off in an emergency, turn the engine switch to the “OFF” position. In any other
circumstances, please follow the below steps.
1. Switch off all electrical equipment and disconnect them from the generator.
2. There are four methods to turn off the generator:
a) Using the Engine Switch: Turn the Engine Switch to "OFF" to turn off the generator.
b) Using the Electric Start button: Press and hold the Electric Start button for 2 seconds to stop the engine.
c) Automatic shutdown: This generator will auomatically stop when the DC charging is completed. Refer to
2.4.4.
Tips: When the AC Power Button and DC output are turned off, it will automatically stop after 10mins to save
fuel.
d) APP shutdown, refer to 2.4.5.
3. Wait until the generator is completely cooled down, then turn the Engine Switch and the fuel cap
breather valve knob to "OFF".
1. Turn off all the connected electrical equipment, and then disconnect from
the generator;
2. a. Temporary Generator Disuse, Same as fuel;
b. Prolonged Generator Disuse, Turn off the cylinder valve, wait until LPG
in the machine is exhausted, and then the machine will shut down
automatically;
3. Turn the knob to ‘’OFF’’.
2.4.2 Turning off
gasoline
LPG
Insert the LPG Hose
c) Self-start, see paragraph 2.4.4
d) Starting through the app, see paragraph 2.4.5
Tips: When the ambient temperature is below 32 ℉(0 °C), the engine will need to warm up for three
minutes after being started, during which time no load should be loaded.

13
Caution
Warning
Make sure that all electrical equipment including wires and plugs are in good condition before being
connected to the generator, and confirm that all loads carried by the generator are within the rated load
range and that the load current is within the rated current range.
Tips: Make sure that the generator is grounded. If any electrical equipment needs to be grounded, the
generator must also be grounded.
2.4.3 AC Connections
Switch off all electrical equipment before inserting plugs.
1. Start the generator.
2. Insert the plug into the AC Output Socket and check that the on-screen AC output port icon is illuminated.
3. Switch on the electrical equipment.
Tips: When the generator is in operation, the AC output can be turned on and off through the AC output
switch. If the output reaches or exceeds 50% of the rated level of the generator, you can switch to high
performance mode by holding the AC output switch for two seconds or setting it in the app. If the
generator is powering multiple electrical equipments, then power the electrical equipment according to
their output level, from highest to lowest.

14
1. a. To use Fuel: Turn the fuel cap vent valve knob
to ‘’ON’’ (See 2.4.1 Step 1);
b. To use LPG: Connect the LPG cylinder to the
entire machine, and open the valve
(See 2.4.1 Step 1);
2. Turn the Engine Switch to "ON" (see Step 2 in
paragraph 2.4.1).
3. Connect with DELTA Max ①,DELTA Pro ②,or
Power Kits ③ through the 5m/ 16.4ft Extra Bat
tery Connection Cable*.
4. If the remaining power of DELTA Max,
DELTA Pro or Power Kits falls to the lower limit,
it will send a request to the generator to re
charge. The generator will respond and start
recharging.
Tips: If the remaining power of DELTA Max,
DELTA Pro or Power Kits does not fall to the lower
limit, the generator can be started by hand to start
recharging.
5. When the remaining power of DELTA Max,
DELTA Pro or Power Kits reaches the upper limit,
a request will be sent to the generator set to
stop charging, and the generator set will
respond and automatically stop.
Tips: When it is automatically started, the generator
AC output switch is off by default. When the AC is
on, the generator will not be available once the DC is
finished. The upper and lower power limits can be set in
the app of the portable power station being connected.
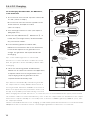
2.4.4 DC Charging
2.4.4.1 Charging the DELTA Max, the DELTA Pro,
or the Power Kits
Extra Battery
Connection Cable
DELTA Pro to
Smart Generator
Adapter
①
②
③
When charging DELTA Max, DELTA Pro, or Power Kits, it is recommended that the upper power limit be
set to 80% in order to increase fuel efficiency. Turn on the AC output switch for simultaneous AC output
when the DC output is already on. The total power of AC+DC is 1,800W (gasoline)/1,600 W (LPG), with
AC output prioritized.
*When connected the DELTA Pro for charging, you will need to purchase the DELTA Pro to Smart Generator
Adapter from the e-commerce store for connecting the generator to DELTA Pro or Power Kits.

15
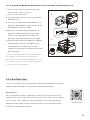
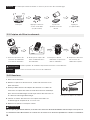
2.4.5 EcoFlow App
1. a. To use Fuel: Turn the fuel cap vent valve
knob to ‘’ON’’ (See 2.4.1 Step 1);
b. To Use LPG: Also 2.4.4.1;
2. Turn the Engine Switch to "ON" (see Step 2 in
paragraph 2.4.1).
3. Connect to the DELTA Max Extra Battery ④ or
DELTA Pro Extra Battery ⑤ with the 5m/ 16.4ft
Extra Battery Connection Cable*.
4. Switch on the DELTA Max Extra Battery or
DELTA Pro Extra Battery and it will send a
request to the generator to recharge. The
generator will respond and start recharging.
5. When the DELTA Max Extra Battery or DELTA
Pro Extra Battery is fully recharged, it will
send a request to the generator to stop
charging. The generator will respond and stop
DC recharging.
* When connected the DELTA Pro Extra Battery
for charging, you will need to purchase the
DELTA Pro to Smart Generator Adapter from the
e-commerce store for connecting the generator
to the DELTA Pro Extra Battery.
2.4.4.2 Charging the DELTA Max Extra Battery Pack or the DELTA Pro Extra Battery Pack
Extra Battery
Connection Cable
DELTA Pro to Smart
Generator Adapter
You can control and view the information and data of the product through the
EcoFlow app. Download at: https://download.ecoflow.com/app
Privacy Policy
By using EcoFlow Products, Applications and Services, you consent to the
EcoFlow Term of Use and Privacy Policy, which you can access via the “About”
section of the “User” page on the EcoFlow App or on the official EcoFlow
website at https://www.ecoflow.com/policy/terms-of-use and https://www.
ecoflow.com/policy/privacy-policy
EcoFlow app
④
⑤

16
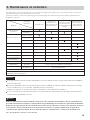
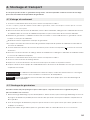
Application
Power Factor 1 0.8–0.95 0.4–0.75
(Efficiency 0.85)
Output ≤1,800 W (Gasoline)
≤1,600 W (LPG)
≤1,440 W (Gasoline)
≤1,280 W (LPG)
≤612 W (Gasoline)
≤544 W (LPG)
Please make sure that the total load of the generator is within the rated range before using the
generator, or otherwise the generator may be damaged.
When this generator is supplying power to precision instruments, electronic controllers, personal
computers and microcomputers, please keep the generator a sufficient distance away from any of the
foregoing equipment to avoid electromagnetic interference, and at the same time, to ensure that the
generator will not be interfered with by these electronic devices.
If this generator is used to supply power to medical devices, it is recommended to consult with
the corresponding equipment manufacturers and technicians first. This is because some electronic
equipment or general purpose machines in hospitals require a strong current upon startup and may not
be able to use the generator. Please contact the equipment manufacturer for confirmation even if the
respective start parameters of the equipment satisfy the conditions listed in the table above.
There may be local laws or regulations applicable to the intended use of the generator set. Please
consult with qualified electricians, electrical inspectors or the local authorities with jurisdiction for
further information.
In some areas, generator sets must be registered with local utility companies.
Generator sets, if used on construction sites, may be subject to regulations.
2.4.6 Application Range
2.4.7 Special Requirements
Warning
Caution
La page est en cours de chargement...
La page est en cours de chargement...
La page est en cours de chargement...
La page est en cours de chargement...
La page est en cours de chargement...
La page est en cours de chargement...
La page est en cours de chargement...
La page est en cours de chargement...
La page est en cours de chargement...
La page est en cours de chargement...
La page est en cours de chargement...
La page est en cours de chargement...
La page est en cours de chargement...
La page est en cours de chargement...
La page est en cours de chargement...
La page est en cours de chargement...
La page est en cours de chargement...
La page est en cours de chargement...
La page est en cours de chargement...
La page est en cours de chargement...
La page est en cours de chargement...
La page est en cours de chargement...
La page est en cours de chargement...
La page est en cours de chargement...
La page est en cours de chargement...
La page est en cours de chargement...
La page est en cours de chargement...
La page est en cours de chargement...
La page est en cours de chargement...
La page est en cours de chargement...
La page est en cours de chargement...
La page est en cours de chargement...
La page est en cours de chargement...
La page est en cours de chargement...
La page est en cours de chargement...
La page est en cours de chargement...
La page est en cours de chargement...
La page est en cours de chargement...
La page est en cours de chargement...
La page est en cours de chargement...
La page est en cours de chargement...
La page est en cours de chargement...
La page est en cours de chargement...
La page est en cours de chargement...
La page est en cours de chargement...
La page est en cours de chargement...
-
 1
1
-
 2
2
-
 3
3
-
 4
4
-
 5
5
-
 6
6
-
 7
7
-
 8
8
-
 9
9
-
 10
10
-
 11
11
-
 12
12
-
 13
13
-
 14
14
-
 15
15
-
 16
16
-
 17
17
-
 18
18
-
 19
19
-
 20
20
-
 21
21
-
 22
22
-
 23
23
-
 24
24
-
 25
25
-
 26
26
-
 27
27
-
 28
28
-
 29
29
-
 30
30
-
 31
31
-
 32
32
-
 33
33
-
 34
34
-
 35
35
-
 36
36
-
 37
37
-
 38
38
-
 39
39
-
 40
40
-
 41
41
-
 42
42
-
 43
43
-
 44
44
-
 45
45
-
 46
46
-
 47
47
-
 48
48
-
 49
49
-
 50
50
-
 51
51
-
 52
52
-
 53
53
-
 54
54
-
 55
55
-
 56
56
-
 57
57
-
 58
58
-
 59
59
-
 60
60
-
 61
61
-
 62
62
-
 63
63
-
 64
64
-
 65
65
-
 66
66


EcoFlow Smart Generator Manuel utilisateur
- Catégorie
- Groupes électrogènes
- Taper
- Manuel utilisateur
dans d''autres langues
- English: EcoFlow Smart Generator User manual
Documents connexes
-
EcoFlow 50 Amp Hub Guide de démarrage rapide
-
-
EcoFlow RIVER 2 Mode d'emploi
-
-
EcoFlow EFR610 RIVER 2 Max Fast Charging Portable Power Station Manuel utilisateur
-
EcoFlow EFWN511 Manuel utilisateur
-
-
EcoFlow 100 W Flexible Solar Panel Manuel utilisateur
-
