Balboa Mach 2.1 EL Series Installation And Configuration Manual
- Taper
- Installation And Configuration Manual

Doc P/N 40232 Rev. B
Basic Installation and Configuration Guidelines for
Mach 2.1 EL-Series Spa Controllers.
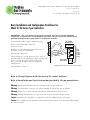
IMPORTANT: The System must be properly mounted. Do not rely on the plumbing
connection to support the system. Regular operation will cause excessive vibration and
potential damage to the system unless it is mounted securely.
Use minimum 6AWG copper conductors only.
Torque field connections between
21 and 23 in lbs.
Readily accessible disconnecting means to be
provided at time of installation
Permanently connected
Connect only to a circuit protected by a Class A
Ground Fault Circuit Interrupter (GFCI) mounted at
least 5’ (1.52M) from the inside walls of the
tub and in line of sight from the equipment
compartment.
CSA enclosure: Type 2
Refer to Wiring Diagram inside the cover of the control enclosure.
Refer to Installation and Safety Instructions provided by the spa manufacturer.
Warning: People with infectious diseases should not use a spa or hot tub.
Warning: To avoid injury, exercise care when entering or exiting the spa or hot tub.
Warning: Do not use a spa or hot tub immediately following strenuous exercise
Warning: Prolonged immersion in a spa or hot tub may be injurious to your health
Caution: Maintain water chemistry in accordance with the Manufacturers instructions.
Caution: The equipment and controls shall be located not less than 1.5 meters horizontally from
the spa or hot tub.
Typical field connections for main power.
Compatible with system software rev 100-1xx-10 or higher
Doc P/N 40232 Rev. B
04-05-2006
© Copyright 2006 Balboa Instruments, Inc.
GREEN
WHITE
WHITE AC (120 V)
FOR W-WIRES
120V
Heater
Jumper
(remove
for 240V
Heater)
RED AC (240 V)
FOR W-WIRES
BLACK
RED
FROM GFCI
J23 J19 J28
J43 J42 J48
J53 J54
J55 J25
J26

Doc P/N 40232 Rev. B
CSA Compliance/Conformité
Caution:
• Test the ground fault circuit interrupter before each use of the spa.
• Read the instruction manual.
• Adequate drainage must be provided if the equipment is to be installed in a pit.
• For use only within an enclosure rated CSA Enclosure 3.
• Connect only to a circuit protected by a Class A ground fault circuit interrupter.
• To ensure continued protection against shock hazard, use only identical replacement parts
when servicing.
• Install a suitably rated suction guard to match the maximum flow rate marked.
Warning:
• Water temperature in excess of 38°C may be injurious to your health.
• Disconnect the electrical power before servicing.
Attention:
• Toujours verifier l’efficacite du disjoncteur differentiel avant d’utiliser differentiel avant
d’utiliser le bain.
• Lire la notice technique.
• Lorsque l’appareillage est installe dans une fosse, on doit assurer un drainage adequat.
• Employer uniquement a l’interieur d’une cloture CSA Enclosure 3.
• Connecter uniquement a un circuit protege par un disjoncteur differentiel de Class A.
• Afin d’assurer une protection permanente contre le danger de shock electrique, lors de
l’entretien employer seulement des pieces de rechange identiques.
• Les prises d’aspiration doivent etre equipees de grilles convenant au debit maximal
indique.
Avertissement:
• Des temperatures de l’eau superieures a 38°C peuvent presenter un danger pour la sante.
• Deconnecter du circuit d’alimentation electrique avante l’entretien.
Warning/Advertissement:
• Disconnect the electric power before servicing. Keep access door closed.
• Deconnecter du circuit d’alimentation electrique avant l’entretien. Garder la porte fermer.

Doc P/N 40232 Rev. B
EL Series Mach 2.1 Edit Menu
The Mach 2 EL systems (2.1 and higher) have a new user interface called the Edit Menu. This
menu contains several submenus to allow changing various settings from a panel.
Note: in the following discussion, the ‘Temp’ button can be Warm, Cool, or Temp, depending
on the type of panel used. Likewise, the ‘Light’ button can be any Spa-Light or Fiber-Optic
Light button.
Accessing the Edit Menu
The Edit Menu is accessed using button sequence Temp, Jets1, Light.
After pressing Jets 1, the panel will display ‘Edt’, or “F‘x’” on the display (‘x’ represents filter
duration in hours and will show as 1, 2, 3, etc.). After pressing “Light,” you will see a display of
the the first submenu in the list.
Submenus
Depending on the system configuration, the following submenus are available on the Edit Menu:
USr – User preference settings
SId – Displays system SSID and firmware version number
Navigating the Menus
The following panel buttons are used to navigate through the various submenus and settings:
Temp – cycles through submenus and settings
Jets1 – performs select and enter functions
Light – exits to next higher menu level
For example, once the Edit Menu is entered, pressing the temp button cycles through the
submenus, pressing the Jets1 button enters the selected submenu, and the Light button exits the
Edit Menu.
The SId submenu, and certain settings under the other submenus, behave differently when Jets1
is pressed. This differences will be noted in the appropriate submenu’s description later in this
document.
The main Edit Menu has a five second timeout – if no panel button is pressed within five
seconds the menu will be exited. The submenus have a 30-second timeout.

Doc P/N 40232 Rev. B
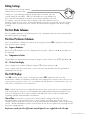
Editing Settings
Each submenu has a list of settings
shown with its current value.
Settings are cycled through using the Temp button, and Jets1 puts the
current setting in edit mode. While in edit mode the value portion will
flash, and the Temp button is used to cycle between possible values for
the setting. Once the desired value is displayed the Jets1 button is pressed
again to accept the new value. If the Light button is pressed, or the menu times out, before
the Jets1 button is pressed the new value is discarded and the original value of the setting
restored.
The Test Mode Submenu
The Test Mode Submenu is used during service by a qualified technician and is not intended
for normal spa use or settings.
The User Preference Submenu
The User Preference submenu is entered by pressing Jets1 when USr is displayed on the panel.
This menu has three settings:
Sr - Suppress Reminders
When set to Y, reminders are never displayed on the panel. When set to n, all reminders to
be displayed.
tc - Temperature in Celsius
Temperatures are displayed on the panel in degrees Celsius if this is set to Y, Fahrenheit if n.
24 - 24-hour Time Display
Time is displayed in 24-hour (military) format if Y, 12-hour (am/pm) if n.
These settings need to be reset after a service call, they do not affect the safe operation or
performance of the spa.
The SSID Display
The SId selection is not a menu. Pressing Jets1 while SId is displayed will cause the
manufacturer, model, and software version IDs to be displayed in sequence just as they are at
system power-up (such as 100 - 133 - 10) followed by the firmware version number (e.g. 2.1).
This menu is useful for service technicians.
Note: System firmware may be updated from time to time. If your spa is ever reprogrammed
with new firmware, request a new Installation and Configuration Guide to determine if any
new user settings have been made available. Call Balboa at 800-645-3201 for information
regarding updated documentation and software.
Time of Day: Time of day is preserved in 30-day battery backup on EL 5000 and
EL 8000 Systems. Only panels that have a “Time” button can display time-of-day. All spa
settings except time of day are preserved in persistent memory indefinitely, unless reset during
service. EL1000 and EL2000 systems reset the time of day on each power-up, requiring time of
day to be reprogrammed.
Reference cards for the different control panels are supplied with the spa.
-
 1
1
-
 2
2
-
 3
3
-
 4
4


Balboa Mach 2.1 EL Series Installation And Configuration Manual
- Taper
- Installation And Configuration Manual
dans d''autres langues
- English: Balboa Mach 2.1 EL Series
Autres documents
-
Jacuzzi (2014) J-400™ Le manuel du propriétaire
-
 Cal Spas Spas Portables Le manuel du propriétaire
-
 Calspas Portable Spas Le manuel du propriétaire
-
 Cal Spas Portable Spa Le manuel du propriétaire
-
 Cal Spas Spas Portables Le manuel du propriétaire
-
 Cal Spas Spas Portables Le manuel du propriétaire
-
 Cal Spas Spas Portables Le manuel du propriétaire
-
 Cal Spas Spas Portables Le manuel du propriétaire
-
 Cal Spas Spas Portables Le manuel du propriétaire


