Yamaha CD S2000 - SACD Player Le manuel du propriétaire
- Catégorie
- Lecteur CD
- Taper
- Le manuel du propriétaire
Ce manuel convient également à

BLACK
DIC 2181s*
UCAB
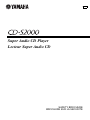
OWNER’S MANUAL
MODE D’EMPLOI

HiFi Began with Yamaha
Yamaha’s involvement with and passion for music goes back
more than a century, to when we built our first reed organ in
1887. Now we are the world’s leading producer of pianos and
other musical instruments, and are involved with music in many
other ways as well. We manufacture professional recording
equipment, we design concert halls and we assist artists at
concerts with set up and sound tuning.
This knowledge and experience benefits our production of
audio components in many ways. We introduced our first HiFi
(High Fidelity) turntable in 1954. Thereafter we were one of the first
to offer mass-produced, high quality audio equipment,
and introduced many legendary stereo components.
We hope you enjoy the genuine HiFi experience of
Yamaha Natural Sound.

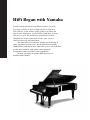
Excellence in Audio Achievement
First HiFi System introduced in 1920
We introduced numerous HiFi components
(turntables, FM/AM tuners, integrated
amplifiers, preamplifiers, power amplifiers
and speakers) in 1955 - 1965.
Natural Sound Speaker Series introduced
in 1967
NS-20 Monitor Speaker
CA-1000 Integrated Amplifier
Featuring A-Class operation, the CA-1000 set
the standard for integrated amplifiers.
NS-690 Monitor Speaker
NS-1000M Monitor Speaker
A truly legendary speaker still revered by HiFi
enthusiasts.
B-1 Power Amplifier
An innovative power amp that used FETs in all
stages.
C-2 Control Amplifier
Received top prize at the Milan International Music
and HiFi Show
NS-10M Studio Monitor Speaker
Became of the most popular studio monitors
in the world.
A-1 Integrated Amplifier
PX-2 Turntable
Yamaha’s first straight arm turntable.
B-6 Power Amplifier
Pyramid-shaped power amplifier.
GT-2000/L Turntable
First CD Player (CD-1) introduced in 1983
B-2x Power Amplifier
MX-10000 Power Amplifier and
CX-10000 Control Amplifier
Redefined the capabilities of separate components.
AX-1 Integrated Amplifier
GT-CD1 CD Player
MX-1 Power Amplifier and
CX-1 Preamplifier
Soavo-1 and Soavo-2 Natural Sound
Speaker Systems
A-S2000 Stereo Amplifier and
CD-S2000 Super Audio CD Player

4 En
◆ Full-stage balanced signal transmission achieves the ultimate in CD
reproduction
◆ Full-stage balanced signal transmission beginning with the DAC
◆ Exclusive Yamaha loading mechanism with superior quietness
◆ Independent power supplies with digital and analog completely
separated
◆ Pure Direct
◆ Left-right symmetrical design with rigid, stable construction
◆ Super sound from Super Audio CDs
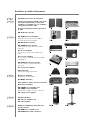
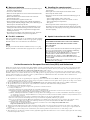
■ Supplied accessories
Please check that you have received all of the following parts.
• AC power cable
• Remote control
• Batteries (AA, R6, UM-3) (×2)
• Audio pin cable
• Safety brochure
■ About this manual
• y indicates a tip for your operation.
• This manual is printed prior to production. Design and specifications are subject to change in part as a result of improvements, etc. In
case of differences between the manual and the product, the product has priority.
• The color of images in this manual may vary from the original.
• Read the safety brochure before using this unit.
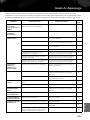
Contents
Controls and functions.......................................................................................................................................... 6
Connections.......................................................................................................................................................... 14
Specifications ....................................................................................................................................................... 18
Playable disc format............................................................................................................................................ 19
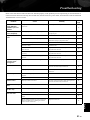
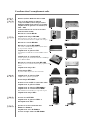
Troubleshooting................................................................................................................................................... 21
01EN_CD-S2000_UCAB.book Page 4 Wednesday, February 4, 2009 4:17 PM
Black process 45.0° 240.0 LPI

CONTROLS AND FUNCTIONS
5 En
Controls and functions
In this chapter, you will learn the controls and functions of CD-S2000.

6 En
Controls and functions
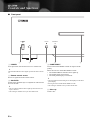
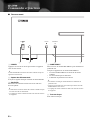
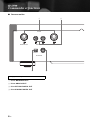
■ Front panel
1 POWER
Press upward or downward to turn on or off this unit.
y
The POWER indicator above lights up when this unit is turned
on.
2 Remote control sensor
Receives signals from the remote control.
3 SA-CD/CD
Switches the playback layer of a hybrid SA-CD between
SA-CD and CD.
y
• The SA-CD/CD indicator above lights up when the SA-CD
layer is selected.
• This setting is retained even if you turn off this unit.
4 PURE DIRECT
Turns on the PURE DIRECT mode to improve audio
quality.
When this unit is in the PURE DIRECT mode:
• The PURE DIRECT indicator above lights up.
• The digital output is turned off.
• The front panel display is turned off.
y
• The least indicators and messages are still displayed in the front
panel display.
• Press again to turn off the PURE DIRECT mode.
• This setting is retained even if you turn off this unit.
5 Disc tray
Loads a disc.
POWER
OFF
ON
SA-CD/CD
PURE DIRECT
312 4 5

7 En
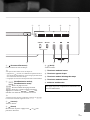
6 (Open/Close)
Opens or closes the disc tray.
y
You can also close the disc tray by:
• pressing (Play) on the front panel or on the remote control
or by pressing the front edge of the disc tray gently.
• pressing a numeric button on the remote control.
7 (Skip/Search backward),
(Skip/Search forward)
: Skips to the next track.
: Skips back to the beginning of the current track.
(twice): Skips to the previous track.
Press and hold or to search backward/
forward.
y
Each time you press and hold or , the search
speed increases by 4 levels.
8 (Play)
Starts playback.
9 (Pause)
Pauses playback. Press or to resume playback.
0 (Stop)
Stops playback.
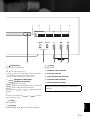
A Playback status indicator
B Disc type indicator
C Time display mode indicator
D Playback mode indicator
E Multi-information display
ALLOFFRANDOM
REMAINTOTALTRACK
SREPPROGWMAMP3SA-CD
09876
AB C D E
See pages 20 for more information on MP3/WMA
playback.
English


9 En
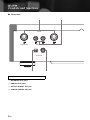
5 VOLTAGE SELECTOR
(Asia and General models only)
The VOLTAGE SELECTOR on the rear panel of this unit
must be set for your local main voltage BEFORE plugging
the AC power cable into the AC wall outlet.
See page 16 for further information.
6 AC IN
Use this inlet to plug in the supplied power cable.
See page 16 for connection information.
7 Foot
The feet of this unit include built-in spikes. Using the
spikes can reduce the effect of vibrations on the set. When
using the spikes, remove the magnet foot by pulling it.
When using the feet’s built-in spikes, the spikes may scratch the
shelf or floor on which this unit is installed. Use the supports
when placing this unit on expensive furniture, etc.
y
If this unit is unstable, you can adjust the foot height by rotating
it.
AC IN
VOLTAGE
SELECTOR
5 6 7
(Asia and General models)
Caution
Spike
English

10 En
Controls and functions
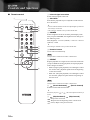
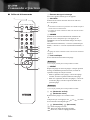
■ Remote control
1 Infrared signal transmitter
Sends infrared signals to this unit.
2 SA-CD/CD
Switches the playback layer of a hybrid SA-CD between
SA-CD and CD.
y
• The SA-CD/CD indicator on the front panel lights up when the
SA-CD layer is selected.
• This setting is retained even if you turn off this unit.
3 DIMMER
Selects brightness level for the front panel display. Each
time you press DIMMER, the brightness level changes in
the following order:
Max (brightest) → Level 1 (default) → Level 2 → Level 3
(darkest) → Max
y
This setting is retained even if you turn off this unit.
4 Numeric buttons
Use to select a track directly.
This operation is ineffective for MP3 or WMA discs.
5 REPEAT
Repeats playback of a single track or all tracks. Each time
you press REPEAT during playback, the repeat playback
mode changes as follows:
• REP S (single repeat playback): On reaching the end of
the current track, playback repeats from the beginning
of the current track.
• REP ALL (all repeat playback): On reaching the end of
the last track, playback repeats from the beginning of
the first track.
This operation is ineffective for MP3 or WMA discs.
6 (Search backward), (Search forward)
Searches tracks backward/forward.
y
Each time you press or , the search speed increases by 4
levels.
7 (Skip backward), (Skip forward)
: Skips to the next track.
: Skips back to the beginning of the current track.
(twice): Skips to the previous track.
98
0
7
654
321
RANDOMREPEAT PROGRAM
CLEARENTER
DISPLAYDIMMER
CD
OPEN/CLOSEPURE DIRECTSA-CD/CD
E
3
2
1
G
F
D
C
B
A
0
9
8
6
5
4
7
Note
Note

11 En
8 OPEN/CLOSE
Opens or closes the disc tray.
9 PURE DIRECT
Turns on the PURE DIRECT mode to improve audio
quality.
When this unit is in the PURE DIRECT mode:
• The PURE DIRECT indicator above lights up.
• The digital output is turned off.
• The front panel display is turned off.
y
• The least indicators and messages are still displayed in the front
panel display.
• This setting is retained even if you turn off this unit.
0 DISPLAY
Switches the time display. Each time you press DISPLAY
during playback, the time display changes as follows:
• Elapsed time of the current track (default setting). The
TRACK indicator lights up in the front panel display.
• Remaining time of the current track. The TRACK and
REMAIN indicators light up in the front panel display.
• Total remaining time of the disc. The TOTAL and
REMAIN indicators light up in the front panel display.
A CLEAR
Erases the last programmed track when this unit is in the
program editing mode. See “Program playback” on this
page.
y
You can erase all programmed tracks when the playback is
stopped.
B ENTER
Confirms a track number entered when you are
programming tracks.
C RANDOM
Turns on or off the random playback mode.
• This operation is ineffective for MP3 or WMA discs.
• The random playback mode is canceled when playback is
stopped or the disc is ejected.
D PROGRAM
Turns on or off the program playback mode. See “Program
playback” on this page.
E (Pause)
Pauses playback. Press or to resume playback.
F (Play)
Starts playback.
G (Stop)
Stops playback.
■ Program playback
In the program playback mode, you can play back tracks
in a programmed sequence.
• This operation is ineffective for MP3 or WMA discs.
• The programmed tracks are erased when the disc is ejected or
this unit is turned off.
1 Press PROGRAM while playback is stopped.
This unit is set to the program editing mode.
2 Select a track by using the numeric buttons
and ENTER.
3 Repeat step 2 to program the next track.
You can program up to 24 tracks.
4 Press p.
Playback starts from the beginning of the
programmed sequence.
Notes
See pages 20 for more information on MP3/WMA
playback.
Notes
English

12 En
Controls and functions
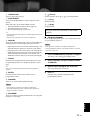
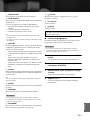
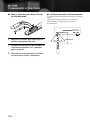
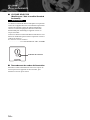
■ Installing batteries in the remote control
1 Press the part and slide the battery
compartment cover off.
2 Insert the two supplied batteries
(AA, R6, UM-3) according to the polarity
markings (+ and –) on the inside of the
battery compartment.
3 Slide the cover back until it snaps into place.
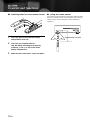
■ Using the remote control
The remote control transmits a directional infrared beam.
Be sure to aim the remote control directly at the remote
control sensor on the front panel of this unit during
operation.
2
1
3
30 30
Approximately 6 m (20 ft)

CONNECTIONS
13 En
Connections
In this section, you will make connections between CD-S2000 and your
amplifier.

14 En
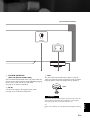
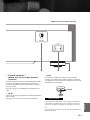
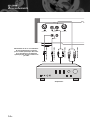
Connections
COAXIALOPTICAL
BALANCED OUT
OUTPUT
ANALOG OUT
R
LL
R
BALANCED OUT
DIGITAL OUT
Amplifier
Select one of these connections.
If your amplifier is equipped with XLR
balanced input jacks, we recommend
balanced connection for optimum
audio performance.
XLR balanced cable
Audio cable (supplied)
Coaxial digital cable
Optical digital cable

15 En
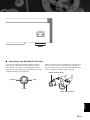
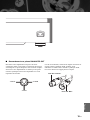
■ Connecting to the BALANCED OUT jacks
Connect your amplifier with the XLR balanced output
jacks. The pin assignments for these jacks are shown
below. Refer to the owner’s manual supplied with your
amplifier and verify that its XLR balanced input jacks are
compatible with the pin assignments.
When connecting, be sure to match the pins and insert the
connector of the “female” XLR balanced cable. When
disconnecting, pull out the “female” XLR balanced cable
while pressing down the latch lock on the plug.
AC IN
1: ground 2: hot
3: cold
“Female” XLR connector
“Male” XLR connector
English

16 En
Connections
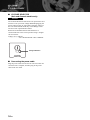
■ VOLTAGE SELECTOR
(Asia and General models only)
The VOLTAGE SELECTOR on the rear panel of this unit
must be set for your local voltage BEFORE plugging the
power cable into the AC wall outlet. Improper setting of
the VOLTAGE SELECTOR may cause damage to this
unit and create a potential fire hazard.
Rotate the VOLTAGE SELECTOR clockwise or
counterclockwise to the correct position using a straight
slot screwdriver.
Voltages are as follows:
........................AC 110/120/220/230–240 V, 50/60 Hz
■ Connecting the power cable
Plug the power cable into the AC IN connector when all
connections are complete, and then plug in the power
cable to the AC outlet.
Caution
230-
240V
VOLTAGE
SELECTOR
Voltage indication

Specifications
In this section, you will find technical specifications for CD-S2000.

18 En
Specifications
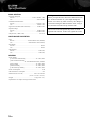
AUDIO SECTION
• Frequency Response
SA-CD ..................................................... 2 Hz to 50 kHz (–3 dB)
CD ......................................................................... 2 Hz to 20 kHz
• Total Harmonic Distortion
SA-CD .................................................................. 0.0017% or less
CD .......................................................................... 0.002% or less
• Signal to Noise Ratio (IHF-A Network) ................. 116 dB or more
• Dynamic Range
SA-CD .................................................................. 110 dB or more
CD ........................................................................ 100 dB or more
• Output Level (1 kHz, 0 dB) ............................................ 2.0 ± 0.3 V
LASER DIODE PROPERTIES
•Type
SA-CD ......................................... Semiconductor laser (AlGaInP)
CD ................................................ Semiconductor laser (AlGaAs)
• Wavelength
SA-CD ............................................................................... 650 nm
CD ..................................................................................... 780 nm
• Output Power
SA-CD ....................................................................... 5 mW (max)
CD ............................................................................. 7 mW (max)
GENERAL
• Power Supply
[U.S.A. and Canada models] .............................. AC 120 V, 60 Hz
[Asia and General models]
AC 110/120/220/230–240 V, 50/60 Hz
[China model] .................................................... AC 220 V, 50 Hz
[Korea model] .................................................... AC 220 V, 60 Hz
[Australia model] ............................................... AC 240 V, 50 Hz
[U.K. and Europe models] ................................. AC 230 V, 50 Hz
• Power Consumption ................................................................ 30 W
• Off-state Power Consumption ................................................... 0 W
• Dimensions (W x H x D) ................................ 435 x 137 x 440 mm
(17-1/8” x 5-3/8” x 17-5/16”)
• Weight .............................................................. 15 kg (33 lbs. 1 oz.)
* Specifications are subject to change without notice.
Taking care of this unit
When you wipe this unit, do not use chemical solvents
(ex. alcohol or thinner etc.); this might damage the
finish. Use a clean, dry cloth. For heavy dirt, dampen a
soft cloth in detergent diluted with the water, wring it
out, and then clean this unit up with the cloth.
The screws on the side panels may loosen as wood
expands and contracts. In this case, tighten the screws.

19 En
Playable disc format
■ Supported disc types
This unit is designed to play back compact discs bearing
the marks shown below. Never attempt to load any other
types of discs into this unit. This unit can also play back 8-
cm (3-inch) compact discs.
Super Audio CD
Audio format based upon the current CD standards but
includes a greater amount of information that provides
higher quality sound. There are three types of discs: single
layer, dual layer and hybrid discs. The hybrid disc can be
played on existing CD players as well as Super Audio CD
players since it contains both standard audio CD and
Super Audio CD information.
This unit does not show text data on the front panel display.
Compact discs (digital audio)
The most popular discs for commercially available audio
CDs.
CD-R, CD-RW digital audio discs
Music CDs made by copying onto a CD-R or CD-RW
(including MP3 or WMA format files).
• Be sure to use a CD-R or CD-RW disc made by a reliable
manufacturer.
• Be sure to use a CD-R or CD-RW disc which has at least one of
the following phrases on the disc or disc case.
– FOR CONSUMER
– FOR CONSUMER USE
– FOR MUSIC USE ONLY
• Be sure to use a finalized CD-R or CD-RW disc.
CD-TEXT discs
The discs recorded with text data such as album titles,
track titles, and artist names. These discs can be played
back with ordinary CD players.
This unit does not show text data on the front panel display.
Note
1
2
3
Super Audio CD disc type
Single layer disc
HD layer
Dual layer disc
Hybrid layer disc
HD layer
CD layer
HD layer
Hybrid Super Audio CD disc
CD layer that plays on any
CD player
- High Quality DSD Stereo
- High Quality DSD Multi-channel
High Density layer containing:
Notes
Note
NOTE:
This unit may not be able to play back some CD-RW discs or
discs on which recording was not made correctly.
To prevent a malfunction of this unit:
• Do not use any nonstandard shaped
disc (heart, etc.) available in the
market as it might damage this unit.
• Do not use a disc with tape, seals, or
paste on it. Such a disc may get stuck
in this unit or cause damage to this
unit.
English

20 En
Playable disc format
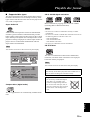
■ About MP3 and WMA discs
You can play back MP3 and WMA files recorded on a
CD-R or CD-RW with similar uses as a music CD.
MP3
MP3 (MPEG-1 Audio Layer-3) is a standard technology
and format for compressing an audio sequence into a
small-sized file. However, the original level of sound
quality is preserved during playback.
• This unit plays back MP3 files in alphanumeric order.
• Up to 648 folders and files (combined) and up to 299 folders are
recognized; however, some folders and files may not be
recognized depending on their directory structure.
• Depending on recording conditions such as recording software
settings, this unit may not be able to play back the disc or files
in the order they were recorded.
• This unit is compatible with a sampling frequency of 44.1 kHz.
• This unit is compatible with a bitrate of 32, 40, 48, 56, 64, 80,
96, 112, 128, 160, 192, 224, 256, or 320 kbps. Variable bitrate is
not supported.
• The disc must be ISO9660 compatible.
• The text data contained in the files are not displayed on this
unit.
WMA
WMA (Windows Media Audio) is a Microsoft file format
for encoding digital audio files similar to MP3 although
WMA can compress files at a higher rate than MP3.
• This unit plays back WMA files in alphanumeric order.
• Up to 648 folders and files (combined) and up to 299 folders are
recognized; however, some folders and files may not be
recognized depending on their directory structure.
• This unit is compatible with a sampling frequency of 44.1 kHz.
• This unit is compatible with a bitrate of 48, 64, 80, 96, 128, 160,
or 192 kbps. Variable bitrate is not supported.
• The disc must be ISO9660 compatible.
• Copyright-protected WMA files cannot be played back with
this unit.
• The text data contained in the files are not displayed on this
unit.
■ Handling compact discs
• Always handle a disc with care so that its surface is not
scratched.
• Compact discs are rarely worn out during playback, but
damage to the disc surface when the disc is being
handled can adversely affect the disc playback.
• Be sure to use a felt-tip pen or similar writing tool
when writing on the label side of a disc. Do not use a
ball-point pen, pencil, or other hard-tipped writing
tools as these may damage the disc and may adversely
affect the disc playback.
• Do not warp discs.
• When a disc is not currently being used, remove it from
this unit and store it in an appropriate case.
• When removing or storing a disc, be careful not to
scratch the playing surface.
• Compact discs are not affected by small particles of
dust or fingerprints on their playing surface, but even
so they must be kept clean. Wipe the disc surface with
a clean, cry cloth. Do not wipe the disc surface with a
circular motion; wipe it straight outward from the
center.
• Do not try to clean the disc surface with any type of
disc cleaner, record spray, anti-static spray or liquid, or
any other chemical-based liquid as such substances
may irreparably damage the disc surface.
• Do not expose discs to direct sunlight, high
temperature, or high humidity for a long period of time
as these conditions may warp or otherwise damage the
disc.
• To play back an 8-cm (3-inch) compact disc, place it in
the inner recessed area of the disc tray. Do not put a
normal 12-cm CD on top of an 8-cm CD.
Notes
Notes
La page est en cours de chargement...
La page est en cours de chargement...
La page est en cours de chargement...
La page est en cours de chargement...
La page est en cours de chargement...
La page est en cours de chargement...
La page est en cours de chargement...
La page est en cours de chargement...
La page est en cours de chargement...
La page est en cours de chargement...
La page est en cours de chargement...
La page est en cours de chargement...
La page est en cours de chargement...
La page est en cours de chargement...
La page est en cours de chargement...
La page est en cours de chargement...
La page est en cours de chargement...
La page est en cours de chargement...
La page est en cours de chargement...
La page est en cours de chargement...
La page est en cours de chargement...
La page est en cours de chargement...
La page est en cours de chargement...
La page est en cours de chargement...
La page est en cours de chargement...
La page est en cours de chargement...
La page est en cours de chargement...
La page est en cours de chargement...
La page est en cours de chargement...
La page est en cours de chargement...
La page est en cours de chargement...
La page est en cours de chargement...
-
 1
1
-
 2
2
-
 3
3
-
 4
4
-
 5
5
-
 6
6
-
 7
7
-
 8
8
-
 9
9
-
 10
10
-
 11
11
-
 12
12
-
 13
13
-
 14
14
-
 15
15
-
 16
16
-
 17
17
-
 18
18
-
 19
19
-
 20
20
-
 21
21
-
 22
22
-
 23
23
-
 24
24
-
 25
25
-
 26
26
-
 27
27
-
 28
28
-
 29
29
-
 30
30
-
 31
31
-
 32
32
-
 33
33
-
 34
34
-
 35
35
-
 36
36
-
 37
37
-
 38
38
-
 39
39
-
 40
40
-
 41
41
-
 42
42
-
 43
43
-
 44
44
-
 45
45
-
 46
46
-
 47
47
-
 48
48
-
 49
49
-
 50
50
-
 51
51
-
 52
52


Yamaha CD S2000 - SACD Player Le manuel du propriétaire
- Catégorie
- Lecteur CD
- Taper
- Le manuel du propriétaire
- Ce manuel convient également à
dans d''autres langues
Documents connexes
-
Yamaha CD-S3000 Le manuel du propriétaire
-
Yamaha CD-S2000 Le manuel du propriétaire
-
Yamaha CD-S2100 Le manuel du propriétaire
-
-
Yamaha CD-S1000 Le manuel du propriétaire
-
-
Yamaha BD-A1060 Le manuel du propriétaire
-
-
-
Yamaha NX-U02 Le manuel du propriétaire