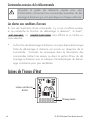
Automate 4308A Le manuel du propriétaire
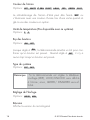
- Taper
- Le manuel du propriétaire

OWNER’S GUIDE
MODEL
4308A
Since its inception, Directed has had one
purpose, to provide consumers with the fin-
est vehicle security and accessories avail-
able. The recipient of nearly 100 patents and
Innovations Awards in the field of advanced
electronic technology. Quality Directed prod-
ucts are sold and serviced throughout North
America and around the world.
Call (800) 274-0200 for more information
about our products and ser vic es.
Vista, CA 92081
Directed is committed to delivering world-
class quality products and services that excite
and delight our customers.
Vehicle Security System
G4308AML 2012-12
©
2012 Directed. All rights reserved.
www.automatecarsecurity.com

Contents
Getting Started .................................................................................................... 2
Charging the Remote Control ................................................................ 2
2-Way Remote Control ........................................................................................ 3
Advanced Remote Control Commands ................................................... 4
Fault Condition Alerts ........................................................................... 4
Status Screen Icons .............................................................................................. 4
Basic Commands .................................................................................................6
Lock ................................................................................................... 6
Unlock ................................................................................................ 6
AUX ................................................................................................... 6
Remote Start ........................................................................................ 7
Advanced Commands .........................................................................................7
Runtime Reset ...................................................................................... 7
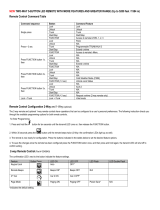
Remote Control Configuration .............................................................................. 8
Navigating Menus and Options ............................................................ 8
Access Menu Items .............................................................................. 8
Remote Features (Main Menu) ............................................................... 9
Setup Remote menu .............................................................................. 9
Demo Mode ...................................................................................... 12
Power Off ......................................................................................... 12
Exit .................................................................................................. 13
Remote Start Features ........................................................................................ 13
Disabling Remote Start ....................................................................... 13
Additional Remotes ...........................................................................................13
Remote and System Operations .......................................................................... 14
Out of Range .................................................................................... 14
No Remote Output ............................................................................. 14
1-Way Companion Remote Control .................................................................... 15
Using the 1-Way Companion Remote ................................................... 15
Battery Information (7351A) ..............................................................................16
Low Battery ....................................................................................... 16
Low Battery Alerts .............................................................................. 17
Battery Life ........................................................................................ 17
Battery Information (7143A) ............................................................... 18
Battery Disposal ................................................................................ 18
Government Regulations .................................................................................... 19
Warning! Safety First ......................................................................................... 20
Limited Lifetime Consumer Warranty ...................................................................22

2
© 2012 Directed. All rights reserved.
Getting Started
Your 7351A remote is powered by an internal rechargeable battery
that can only be serviced by an authorized Directed dealer. Due to
transit and storage time prior to your purchase, the battery charge
may have depleted. To ensure proper operation, check the battery
level and connect the battery charger if not fully charged. See Bat-
tery Information and Status Screen Icons sections for more information
about the battery.
Charging the Remote Control
1. Plug the AC adapter into a 110V AC outlet. Insert the mini-USB
connector into the mini-USB port located on the side of the re-
mote control (see diagram under 7351A 2-way). The text field
will display
CHARGE
to indicate the remote control is charging
(The remote remains operational while charging and can com-
mand the system).
2. Once fully charged the text field will display
FULL
.
3. The remote control is then ready for use. Disconnect the mini-
USB end from the remote control first and then the AC adapter
from the AC outlet.
Note
If the battery is excessively depleted when the charger is
connected, functionality may be delayed while it charges to
the minimum voltage required to operate the display, after
which normal charging resumes.

3
© 2012 Directed. All rights reserved.
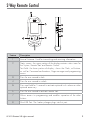
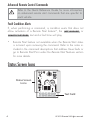
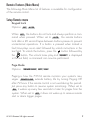
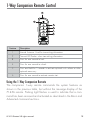
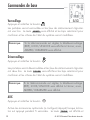
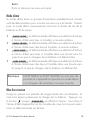
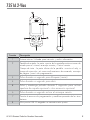
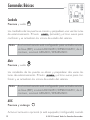
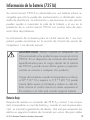
2-Way Remote Control
4
2
7
8
5
6
3
1
Feature Description
1 Internal Antenna: Used for transmitting and receiving information
2 Status screen - the upper portion of the display contains status icons for
the System, Remote Start and Remote Control.
Text field - the lower portion of display - shows the Clock, or Runtime,
as well as Command confirmations, Page messages and programming
menus
3
Press for one second to lock.
4 Press for one second to unlock.
5
Press and hold for 5 seconds to activate optional trunk release or other
optional accessory.
6 Press for one second to activate remote start.
7 Allows access to programming and modifies operation of the other
buttons.
8 Mini-USB Port: The battery charger plugs into this port.

4
© 2012 Directed. All rights reserved.
Advanced Remote Control Commands
Refer to the Quick Reference Guide for more information
on advanced remote start commands that are specific to
each vehicle.
Fault Condition Alerts
If, when performing a command, a condition exists that does not
allow activation of a Remote Start feature*, the
NOT AVAILABLE
or
REMOTE START ERROR
text and a fault tone will play.
* Remote Start feature not available when the Remote Start status
is incorrect upon receiving the command. Refer to the notes in-
cluded in the command descriptions that address these faults or
go to Remote Start Error under the Remote Start Features section
for more details.
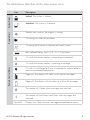
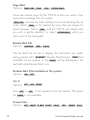
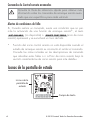
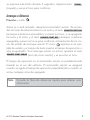
Status Screen Icons
1
ALL
Text Field
Status Screen
Icons

5
© 2012 Directed. All rights reserved.
The table below describes all the status screen icons.
Icon Description
System Status
Locked: The system is Locked.
Unlocked: The system is Unlocked.
Remote Start
Remote start is active, the engine is running.
On during Aux channel activation.
On during Fault Report to indicate the Hood is open.
Remote Control Status
Bars indicate battery level is Full, ¾,½,¼ or Empty.
On while the remote control is transmitting a command.
On while the remote control is receiving a message.
On with Out of Range fault tone to indicate the remote failed to
receive a command confirmation.
Pager on: The remote will wake up to listen for messages.
Pager off: The remote will not wake up to listen for messages.
The remote will Vibrate when messages are received.
The remote will emit Beeps and Tones when messages are
received.
Text field
Displays the Clock, Runtime, message text and feature menus.

6
© 2012 Directed. All rights reserved.
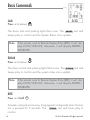
Basic Commands
Lock
Press and release
The doors lock and parking lights flash once. The
ARMED
text and
beeps play to confirm and the System Status Icons update.
Note
If the remote is set to Remote Keyless Entry (RKE), it will dis-
play LOCK/UNLOCK; otherwise, it will display ARMED/
DISARMED.
Unlock
Press and release
The doors unlock and parking lights flash twice. The
DISARM
text and
beeps play to confirm and the system status icons update.
Note
If the remote is set to Remote Keyless Entry (RKE), it will dis-
play LOCK/UNLOCK; otherwise, it will display ARMED/
DISARMED.
AUX
Press and hold
AUX
Activates optional acccessory (if equipped/configured) when this but-
ton is pressed for 5 seconds. The
TRUNK
text and tones play to
confirm.
6:30

7
© 2012 Directed. All rights reserved.
Remote Start
Press and release
Activates (or if On, deactivates) the remote starter. The engine and
parking lights turn On and the
REMOTE START ON
text and tones play,
or the engine and parking lights turn Off and the
REMOTE START OFF
text
and tones play to confirm, the Remote Start status icons update. The
icon will display in the status screen and the text field will display
the Runtime or Clock as programmed. If Remote Start fails to activate,
REMOTE START ERROR
text and a fault tone play.
The runtime on the remote starter is predetermined based on vehicle
application. The remote starter will shut down when the preset runtime
times out or when any shutdown zone becomes active.
Note
Refer to the Quick Reference Guide for more information.
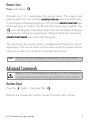
Advanced Commands
Refer to the Quick Reference Guide for more information
on advanced commands that are specific to each vehicle.
Runtime Reset
Press the button 1 time and then .
Re-starts the remote start runtime counter if remote start is active.

8
© 2012 Directed. All rights reserved.
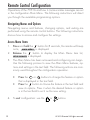
Remote Control Configuration
Operations of the 7351A and how it communicates messages are set
in the configuration Main Menu. The following instructions will direct
you through the available programming options.
Navigating Menus and Options
Navigating menus and features, changing options, and exiting are
performed using the remote control buttons. The following instructions
discuss how to access and configure the settings.
Access Menu Items
1. Press and hold the button for 8 seconds, the remote will beep
once,
MAIN MENU
is displayed.
2. Release the
button to display the Main Menu item list,
SETUP REMOTE
is displayed.
3. The Main Menu has been accessed and configuring can begin.
Use the following process to view the Main Menu features, op-
tions and settings in the text field. The following actions are com-
monly used throughout the configuration operation.
s Press the
AUX
or buttons to change the feature or option
that is displayed in the text field.
s Press the
button to choose the feature in the text field and
view its options. Press it when the desired feature or option
is in the text field to set it as the new setting.
4. To exit configuration: use the
or buttons.

9
© 2012 Directed. All rights reserved.
Remote Features (Main Menu)
The following Main Menu list of features is available for configuration
of the remote control.
Setup Remote menu
Keypad Lock
Options:
OFF
,
AUTO
When
OFF
, the buttons do not lock and always perform a com-
mand when pressed. When set to
AUTO
, the remote buttons
lock after a 20 second lapse between buttons presses to prevent
unintentional operations. If a button is pressed when locked a
fault tone plays as an alert followed by unlock instructions in the
text field. To unlock the buttons, press the
button followed by
the
button. The unlock tones play and
READY
is displayed
in the text field, a command can now be performed.
Page Mode
Options:
POWER SAVE
,
OFF
,
ON
Paging is how the 7351A remote monitors your system’s mes-
sages.
POWER SAVE
extends battery life by turning Paging Off
after 72 hours if the remote control is not used during this period.
Just press any button to resume system monitoring. When set to
ON
it wakes up every few seconds to listen for pages from the
system. When set to
OFF
it does not wake up to receive remote
start or alarm trigger pages.

10
© 2012 Directed. All rights reserved.
Page Alert
Options:
TONE VIBE
,
TONE
,
VIBE
,
SCREEN ONLY
There are several ways for the 7351A to alert you when it has
received a message from the system.
TONE VIBE
will alert by both emitting tones and vibrating the re-
mote. Select
TONE
to be alerted by tones that are unique for
each message. Select
VIBE
and the 7351A will silently alert
you with a gentle vibration, or select
SCREEN ONLY
when you
don’t want to be interrupted.
Remote Start Info
Options:
RUNTIME
,
TEMP
,
CLOCK
The text field can be set to display the information you prefer
during remote start.
RUNTIME
: Remote Start Runtime,
TEMP
(not
available on this system), or the
CLOCK
will be displayed in the
text field while Remote Start is on.
Runtime Alert (Not available on this system)
Options:
ON
,
OFF
Car 2
Options:
OFF
,
ON
,
HOME
Turns
OFF
or
ON
, 2 car operation from the remote. The option
for
HOME
is not available.
Screen Color
Options:
OFF
,
WHITE
,
LT GRN
,
VIOLET
,
AQUA
,
RED
,
GREEN
,
BLUE

11
© 2012 Directed. All rights reserved.
The status screen backlighting can be
OFF
, or will illuminate
with a selected color during output when set to one of the option
colors.
Temp Unit (Not available on this system)
Options:
F
,
C
Button Beep
Options:
ON
,
OFF
When set to
ON
, the remote will emit a beep as confirmation
of a button press. When set to
OFF
, beeps are not emitted for
button presses.
System Type
Options:
SEC
,
RKE
Note
If the remote is set to Remote Keyless Entry (RKE), it will
display LOCK/UNLOCK; otherwise, it will display
ARMED/DISARMED.
Clock Set
Options:
HOUR
,
MIN
Review
Displays firmware version
Exit
Exits and returns to the main menu

12
© 2012 Directed. All rights reserved.
Demo Mode
Demo Mode plays a pre-selected group of animations as a demon-
stration tool to show friends or family. Running Demo mode shortens
the battery life over time if used excessively
s
SINGLE SILENT
: The remote will display a selection of icons on
the status screen without beeps and tones then stop.
s
SINGLE SOUND
: The remote will display a selection of icons on
the status screen with beeps and tones then stop.
s
LOOP SILENT
: The remote will display a selection of icons on
the status screen without beeps and tones in an endless loop until
the battery charger is disconnected.
s
LOOP SOUND
: The remote will display a selection of icons on
the status screen with beeps and tones in an endless loop until the
battery charger is disconnected.
Note
Loop Silent and Loop Sound are not available and will not
appear in the Demo Mode menu unless the battery charger
is connected.
Power Off
When an extended period of non-operation is anticipated, turning the
power off will preserve the battery charge. Press the
button while
POWER OFF
is displayed. The status screen icons clear as the power
off tones play, the remote is turned off.
To turn the remote on, Press and hold the
button for 3 seconds,
the status screen icons refresh as the power on tones play. The remote
also turns itself on and begins charging when the battery charger is
connected.

13
© 2012 Directed. All rights reserved.
Exit
To return to normal operation, press the button while EXIT is dis-
played.
Remote Start Features
Refer to the Quick Reference Guide for more information on
remote start features that are specific to each vehicle.
Disabling Remote Start
Remote start can be disabled by moving the Toggle Switch to the On
position. If remote start is attempted while the toggle switch is On,
the engine will not start. Move the switch back to the Off position to
resume normal operation.
Note
Consult your local 12-volt retailer for the location of Toggle
switch.
Additional Remotes
This device does not support end user programming. To add a new
remote, please consult your local 12-volt retailer to have one pro-
grammed for you.

14
© 2012 Directed. All rights reserved.
Remote and System Operations
Out of Range
Each time a command is performed the remote will expect a com-
mand confirmation from the system. If a command confirmation is not
received the out-of-range icon (
)
and a fault tone will play as an
alert.
No Remote Output
Occasionally when a command is performed the remote may not
generate a command confirmation output or Out of Range output.
This indicates that the system received the command but it was an
incomplete command (e.g. Aux button pressed too short to activate
the trunk release) or it was an illegal message (e.g. the command
was corrupted due to local RF interference). These are temporary nor-
mal functions of the system and remote, perform the command again
within 10 seconds to return to normal operation.

15
© 2012 Directed. All rights reserved.
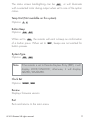
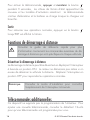
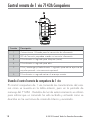
1-Way Companion Remote Control
3
1
4
2
5
6
Feature Description
1 Internal Antenna: Used for transmitting information
2 Transmit LED flashes when transmitting information.
3
Press for one second to lock.
4 Press for one second to unlock.
5 Press and hold for 5 seconds to activate optional trunk release or other
optional accessory.
6 Press for one second to activate remote start.
Using the 1-Way Companion Remote
The companion 1-way remote commands the system features as
shown in the previous table, but without the message display of the
7143A remote. Parking light flashes is used to indicate that a com-
mand has been received and activated as described in the Basic and
Advanced command sections.

16
© 2012 Directed. All rights reserved.
Battery Information (7351A)
The 7351A remote control is powered by an internal rechargeable
battery that can be serviced only through an authorized Directed Elec-
tronics dealer. The information and precautions in this section can
help maximize your battery’s life and usage in providing your 7351A
remote control with many years of trouble free operation.
The battery information for the 1-way companion remote control can
be found in the 1-way Companion Remote Control section of this
manual.
Warnings! NEVER connect the supplied AC adapter
to products other than the 7351A remote control. It is
a high current device designed specifically for rapid
charging of the 7351A battery and may cause severe
damage or explosion when connected to any other
products.
Charging the battery when the temperature is below
32°F (0°C) or above 113°F (45°C) may cause severe
battery damage and/or reduce battery life. Avoid
placing the remote control in areas exposed to ex-
treme cold or heat (direct sunlight) when charging the
battery.
Low Battery
After a command is performed the 7351A and 1-way companion
remote controls check their battery level and, when the level requires
attention, will begin generating alerts. Once the alerts begin they
will continue to command the system for several days but should be

17
© 2012 Directed. All rights reserved.
charged at the earliest opportunity or failure to control the system may
occur.
Low Battery Alerts
After performing a command,
LOWBAT
and several beeps play on
the 7351A remote to indicate the battery needs to be charged.
Important
To preserve power at critically low battery levels the
7351A turns the pager off and stops receiving mes-
sages from the system. It will continue to command the
system until the battery can be charged.
Battery Life
The 7351A remote control has many features that make it one of the
most unique remote controls on the market today, including superior
long range communication with the system. The default feature settings
provide for excellent battery charge duration. However, to maximize
this duration between charges, the following suggestions will help:
s Turn the remote Off: When not in use and/or out of range of the
vehicle the remote can be turned off in the Main menu.
s Turn Paging off: The remote will not wake up to check for mes-
sages with Paging off in the Setup Remote menu.
s Turn Beeps off: The Button beeps can be turned off in the Setup
Remote menu. The command beeps still play normally.

18
© 2012 Directed. All rights reserved.
Battery Information (7143A)
The 1-way companion remote is powered by one 3V coin cell lithium
battery (PN CR-2032) that will last approximately one year under
normal use.
Battery Replacement
1. Unscrew the hardware on unit rear and remove from housing.
2. Hold the unit base with one hand and gently twist and pull the
main housing body with the other. This releases all parts of the
housing assembly.
3. Remove battery from clip and replace with a new one while
observing the correct polarity.
4. Reassemble unit and secure with hardware.
Battery Disposal
Directed cares about the environment. If you need to dis-
pose of the battery, please do so in accordance with your
municipal requirements for battery disposal.

19
© 2012 Directed. All rights reserved.
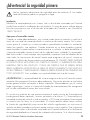
Government Regulations
This device complies with Part 15 of FCC rules. Operation is subject to the following
two conditions: (1) This device may not cause harmful interference, and (2) This device
must accept any interference received, including interference that may cause undesirable
operation.
This equipment has been tested and found to comply with the limits for a class B digital
device, pursuant to Part 15 of the FCC Rules. These limits are designed to provide
reasonable protection against harmful interference in a residential installation. This equip-
ment generates and can radiate radio frequency energy and, if not installed and used
in accordance with the instruction manual, may cause harmful interference to radio com-
munications. However, there is no guarantee that interference will not occur in a particular
installation. If this equipment does cause harmful interference to radio or television, which
can be determined by turning the equipment OFF and ON, the user is encouraged to try
to correct the interference by one or more of the following measures:
s Reorient or relocate the receiving antenna.
s Increase the separation between the equipment and receiver.
s Connect the equipment into an outlet on a circuit different from that to which the
receiver is connected.
s Consult the dealer or an experienced radio / TV technician for help.
This device complies with the Industry Canada Radio Standards Specification RSS 210.
Its use is authorized only on a no-interference, no-protection basis; in other words, this
device must not be used if it is determined that it causes harmful interference to services
authorized by IC. In addition, the user of this device must accept any radio interference
that may be received, even if this interference could affect the operation of the device.
WARNING! Changes or modifications not expressly approved by the party responsible
for compliance could void the user’s authority to operate this device.
La page est en cours de chargement...
La page est en cours de chargement...
La page est en cours de chargement...
La page est en cours de chargement...
La page est en cours de chargement...
La page est en cours de chargement...
La page est en cours de chargement...
La page est en cours de chargement...
La page est en cours de chargement...
La page est en cours de chargement...
La page est en cours de chargement...
La page est en cours de chargement...
La page est en cours de chargement...
La page est en cours de chargement...
La page est en cours de chargement...
La page est en cours de chargement...
La page est en cours de chargement...
La page est en cours de chargement...
La page est en cours de chargement...
La page est en cours de chargement...
La page est en cours de chargement...
La page est en cours de chargement...
La page est en cours de chargement...
La page est en cours de chargement...
La page est en cours de chargement...
La page est en cours de chargement...
La page est en cours de chargement...
La page est en cours de chargement...
La page est en cours de chargement...
La page est en cours de chargement...
La page est en cours de chargement...
La page est en cours de chargement...
La page est en cours de chargement...
La page est en cours de chargement...
La page est en cours de chargement...
La page est en cours de chargement...
La page est en cours de chargement...
La page est en cours de chargement...
La page est en cours de chargement...
La page est en cours de chargement...
La page est en cours de chargement...
La page est en cours de chargement...
La page est en cours de chargement...
La page est en cours de chargement...
La page est en cours de chargement...
La page est en cours de chargement...
La page est en cours de chargement...
La page est en cours de chargement...
La page est en cours de chargement...
La page est en cours de chargement...
La page est en cours de chargement...
La page est en cours de chargement...
La page est en cours de chargement...
La page est en cours de chargement...
La page est en cours de chargement...
La page est en cours de chargement...
La page est en cours de chargement...
-
 1
1
-
 2
2
-
 3
3
-
 4
4
-
 5
5
-
 6
6
-
 7
7
-
 8
8
-
 9
9
-
 10
10
-
 11
11
-
 12
12
-
 13
13
-
 14
14
-
 15
15
-
 16
16
-
 17
17
-
 18
18
-
 19
19
-
 20
20
-
 21
21
-
 22
22
-
 23
23
-
 24
24
-
 25
25
-
 26
26
-
 27
27
-
 28
28
-
 29
29
-
 30
30
-
 31
31
-
 32
32
-
 33
33
-
 34
34
-
 35
35
-
 36
36
-
 37
37
-
 38
38
-
 39
39
-
 40
40
-
 41
41
-
 42
42
-
 43
43
-
 44
44
-
 45
45
-
 46
46
-
 47
47
-
 48
48
-
 49
49
-
 50
50
-
 51
51
-
 52
52
-
 53
53
-
 54
54
-
 55
55
-
 56
56
-
 57
57
-
 58
58
-
 59
59
-
 60
60
-
 61
61
-
 62
62
-
 63
63
-
 64
64
-
 65
65
-
 66
66
-
 67
67
-
 68
68
-
 69
69
-
 70
70
-
 71
71
-
 72
72
-
 73
73
-
 74
74
-
 75
75
-
 76
76
-
 77
77


Automate 4308A Le manuel du propriétaire
- Taper
- Le manuel du propriétaire
dans d''autres langues
- English: Automate 4308A Owner's manual
- español: Automate 4308A El manual del propietario
Documents connexes
Autres documents
-
Viper 4708V Le manuel du propriétaire
-
Viper 4708P Le manuel du propriétaire
-
Python 4710P Le manuel du propriétaire
-
-
 Autostart GS-RFK2800DB Le manuel du propriétaire
-
 ProStart CT-4211TW DEC-2019 NGRF Le manuel du propriétaire
-
-
Clifford Matrix 4208X Le manuel du propriétaire
-
-
SEOYON ELECTRONICS NYOSYEC3TX1612 Manuel utilisateur

