Plasma Cool ACW600C Le manuel du propriétaire
- Catégorie
- Climatiseurs mobiles
- Taper
- Le manuel du propriétaire

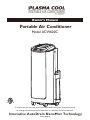
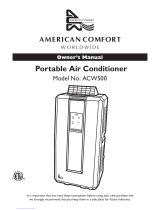
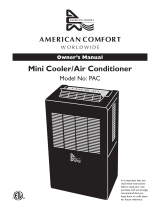
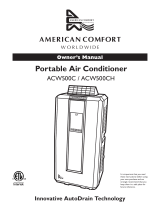
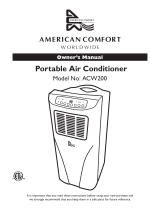
Portable Air Conditioner
Model ACW600C
Owner’s Manual
It is important that you read these instructions before using your new purchase and
we strongly recommend that you keep them in a safe place for future reference.
Innovative AutoDrain NanoMist Technology
Patent Pending

Table of Contents
Thank You! ………………………………………………………………………1
Safety Instructions …………………………………………………………… 1-2
Specifications ……………………………………………………………………3
Parts ……………………………………………………………………………4
Positioning ………………………………………………………………………5
Control Panel ……………………………………………………………………6
Remote Control …………………………………………………………………7
Multi Protective Function ………………………………………………………8
Emptying the Water Container …………………………………………………9
Cleaning ……………………………………………………………………… 10
Troubleshooting ……………………………………………………………… 11
Warranty ……………………………………………………………………… 12

1
Read this entire instruction manual before use.
Please keep your receipt and the unit’s original box for a warranty return.
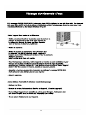
Thank You!
IMPORTANT!
• The unit is designed for indoor operation.
• The unit is not designed to cool server rooms, sun rooms, or a room generating constant high levels of heat.
• Rating: This unit must be connected to a 115V/60Hz grounded outlet.
• The installation must be in accordance with regulations of the country where the unit is used.
If you are in any doubt about the electrical installation, have it checked and if necessary modi� ed by a
quali� ed electrician.
• Never connect the unit to an electrical outlet using an extension cord.
If an outlet is not available, one should be installed by a licensed electrician.
• The air conditioner is safe. However, as with any electrical appliance, use it with care.
• Keep out of the reach of children.
• Do not clean the unit by spraying it or immersing it in water.
• Do not insert any object into the opening
s of the unit.
• Disconnect the unit from the outlet before cleaning the unit or any of its components.
WARNING!
• Never operate this appliance if it has a damaged cord or plug.
• Do not lead the cord over sharp edges.
• A damaged supply cord should be replaced by the manufacturer,
its service agent or a quali� ed person in order to avoid a hazard.
• Any service other than regular cleaning or � lter replacement should be performed by an authorized
service representative. Failure to do so could result in a loss of warranty.
• See warranty page to read about warranty requirements, procedure, and instructions.
Safety Instructions
Thank you for purchasing an Arbaco Portable Air Conditioner. Arbaco is a leading brand in indoor
air treatment. We would like you to enjoy the many bene� ts this unit offers, so please read this
manual carefully and take full advantage of the many advanced features that your Arbaco Portable Air
Conditioner offers you.
Arbaco has specialized in complete indoor environment control, manufacturing world-class air
conditioners, dehumidi� ers and air puri� ers with innovative technology.
In designing these advanced products, we have listened carefully to our customers and have passed
their views on to our research and development laboratories.
We wish you many years of enjoyable use.
After reading this manual, please keep it in a safe place for future re
ference.

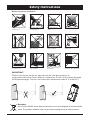
2
IMPORTANT:
The fi rst time that you use the unit, please ensure that it has been standing in an
upright position for at least 2 hours before it is switched on. The AC unit must always be stored
and transported upright. The unit is not to be used in temperatures under 41°F or over 95°F.
Safety Instructions
Reminder:
Unit Contains R410A. Waste electrical products must not be disposed of with household
waste. This product should be taken to your local recycling center for safe treatment.
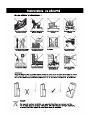
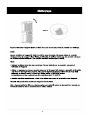
Close to a heat source
Inside unit exposed to the
weather outdoors
In a permanent very humid
environment
If the power cable wires
are frayed or cut
When small children may
be left unattended
Do Not Connect the unit
to extension cord.
Where the power cable
may be damaged
On a slope or uneven
surface
Where it may be damaged
by chemicals
Where there is a risk of
interference by foreign objects
This products is not made
for DIY repair
If there is a risk of liquid
falling on the unit
Do not use your air conditioner:

3
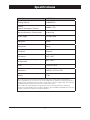
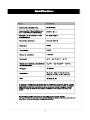
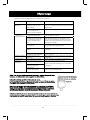
Specifi cations
Model ACW600C
Cooling Capacity 12,000 BTU/h
Cooling/Heating
Power Consumption / Current
1000W / 9.7A
Moisture Removal in Cooling mode 61 pints/day
Power Supply 110-120V/60Hz
Refrigerant R410A
Compressor Rotary
Fan Speed 3 Speeds
Thermostat 64ºF - 80ºF
Ambient Temperature Range
for Operation
60ºF - 105ºF
Timer 1-24 hour Timer
Dimensions 18.5"W x 33.1"H x 13"D
Weight 71 lbs.
The cooling capacity of the unit may be affected by the height of your ceiling, quality of your insulation, or
number of windows in your room. There is no current testing statute for portable air conditioning products in
the United States, yet we have made every effort to design engineer a superior quality portable air conditioning
unit that effectively and efficiently cools select areas of the home or office.
These portable air conditioning units are designed engineered to provide supplemental air conditioning.
To gain a better understanding of the performance capabilities of your new ACW portable AC unit, you can visit
us online at: www.americancomfort.com/portableacdisclaimer

4
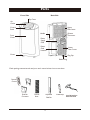
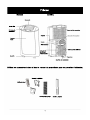
Parts
Caster
Front
Cover
Back SideFront Side
Check packing accessories and read your user’s manual to learn how to use them.
Top Cover
Handle
Upper
Filter frame
Exhaust
Connector
Power
Cord
Location
Lower
Filter Frame
Rubber Plug
Plug Cap
Power
Supply
Cord
Control
Panel
Air
Outlet
Exhaust
Hose
Slide Bar
Connector
Remote
Control
Adjustable
Slide Bar
Foam strip
Spiral Water Pipe
with Connector

5
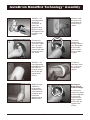
Put spiral water
pipe into hot air
� exible hose.
Connect the
female half of the
quick connector
at the end of the
spiral water pipe
to the male part
in the hot air
outlet pipe.
Turn the
connector
90 degrees
clockwise until it
is locked in place.
Assemble the
hot air hose on
the unit.
Clip on the
water atomizer
at the end of
the spiral pipe
to the holder.
Unfold � exible
hose with attached
hose adapter
connector, and
snap into
Window Slide Bar.
AutoDrain NanoMist Technology
™
Assembly
2
3
6
8
4
5
7
1
Attach Window
Slide Bar
Connector to
Exhaust Hose by
twisting as shown.
Only
Required For
Disassembly.
In order to
unlock the quick
connector, push
the tab and turn
the connector
counter-
clockwise.

6
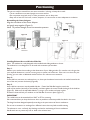
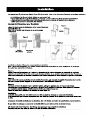
Positioning
Installing Exhaust Hose to Window Slide Bar
Note: The window kit is only designed to be installed with sliding windows or doors.
The window kit is not designed or to be used with casement style windows.
Step 1:
Measure your window kit according to the dimensions of your sliding window. If in case the unit is larger than
your required dimensions, it can be cut using a saw or power tool of the sort. If the unit is too short for your
opening, you can order an additional window kit from our online store to extend it.
Step 2:
Screw slide bar connector into exhaust hose � rst, then spin the exhaust hose into the air outle
t located at the
rear of the unit (counter-clockwise) (Figure B).
Step 3:
Insert slide bar connector into adjustable slide bar. Extend the Slide Bar length to match the
width of the window (vertically or horizontally), and then tighten the screw to hold the length of the slide bar
(Figure D). Make sure the adjustable slide bar � ts snug in your window and stays in place.
Proceed to close and lock your window on the Slide Bar to secure in place (Figure C).
IMPORTANT
The � exible hose can be extended from 10.63" to 59" for mounting
We recommend that you keep the hose as short as possible to minimize possible loss back in the room.
This length has been designed especially acco
rding to the speci� cations of the air conditioner.
Do not use an extension or exchange for a different hose as that may lead to malfunctioning.
The exhaust air must � ow freely. Any blockage can lead to overheating of the air conditioner.
Handle with care to prevent any kink or bend in the exhaust hose.
This unit can easily be moved from one room to another. In doing, so keep this in mind:
• The air conditioner must stand upright on an even surface.
• Do not position near bath, sink, or other permanent, wet or damp area.
• Keep unit at least 18" from wall, curtains, draperies, or heat sources to insure adequate air circul
ation.
Assembling the Outer Adaptor
Align the two halves of the Outer Adaptor
and gently snap together (Figure A).
Note: To prevent damage, do not use excessive pressure.
Exhaust
Hose
Slide Bar
Connector
Figure C
Figure A
Figure B

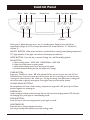
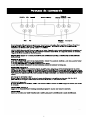
Control Panel
7
When plug in, follow the start music, unit is in standby status. Digital screen will indicate
temperature (Range: 41º-95ºF), if temperature above 95º, screen will show “H”, if below 41º,
indicate “L”.
ON/OFF BUTTON: When press this button, model will be in cooling mode (Setting temperature
75º), high speed fan. Press again, unit will shut off and play shut off music.
MODE BUTTON: Press this key to choose Cooling, Fan, and Dehumidifying Mode.
FAN BUTTON:
a. Under cooling mode: HIGH FAN - MIDDLE FAN - LOW FAN
b. Under fan model: same as cooling mode
c. Under dehumidifying mode, fan is working in low speed
d. If switch between cooling and fan, fan speed won’t change.
TIMER BUTTON:
Press once, TIMER icon � ashes, “88” area indicates 24:00; you can set y
our time with UP and
DOWN buttons. You can set auto shut off time when the unit is running, you can also set auto
running time when the unit is off. When you � nish ing the setting, icon will continue � ashing until
the current time is right the setting time. If set again, history record will be cleared.
UP AND DOWN BUTTONS:
Set temperature and timer. Under cooling , temperature range is 64º~86º, press Up and Down
buttons together can exchange to:
SLEEPING KEY:
Under cooling or heating mode, press the key can make unit into sleeping mode, LCD will show
the Sleeping Icon, press again to cancel Sleeping mode.
SWING BUTTON:
Press this key to start auto swing function, press again to cancel.
MIGHTINESS KEY:
Press this key to choose mightiness function:
You can get cooling effect quickly only under cooling mode.
Timer
langiSpU
Receptor
SwingDisplay AreaMode
ffO/nOnwoD
Fan Speed ssenithgiMgnipeelS

8
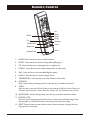
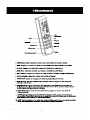
Remote Control
Power
Down
Swing
Sleeping
Timer
Reset
Mode
Up
Fan
Temperature
Mightiness
Keypad Lock
1. POWER: Press this key to turn on/off the button.
2. MODE: Press this key to choose cooling, dehumidifying, fan
3. UP: Press this key to turn up temperature or adjust time.
4. DOWN: Press this key to turn down temperature or adjust time.
5. FAN: Press this key to set low/middle/high fan speed.
6. SWING: Press this key to control swing function.
7. TEMPERATURE: Press this key to choose Celcius or Fahrenheit.
8. SLEEPING:
Only under cooling or heating function. Press this key to enable this function.
9. TIMER:
Press this key to set time. Within 5 hours, time interval is half hour; from 5 hours to
24 hours, time interval is 1 hour. Once set number will � ash 5 times as con� rmation.
10. MIGHTINESS: Under cooling mode, press this key to achieve maximum ou
tput.
11. KEYPAD LOCK:
Once set, press this key to lock all the button, as the screen will show image: Press
this key again to unlock(This function can prevent kid control the unite) .
12. RESET: Press this key to reset remote control, default setting is cooling mode and
high speed fan, auto swing.

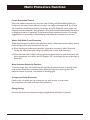
Multi Protective Function
9
Freeze Prevention Control
When the ambient temperature is very low under Cooling and Dehumidifying Mode, the
compressor and water motor will stop working if the copper coil temperature Tp <2º after
the compressor continued to work for 10 minutes, the LCD Display E4; when copper coil
temperature will increase>8º, the protection will be dis-functioned automatically, and restore
to foregoing mode for Compressor Three-minutes Delay protection function. It is strongly
suggested not to use cooling or dehumidifying mode when the temperature is too low.
Water-Full Water Level Protection
Water-level protection is done by the water-level switch. Water-level switch is always closed,
and it will open when the protection function runs.
a) When checking the water-leve
l protection, compressor must work. After 10 seconds
moving, the water-level switch will go to stability that is water-level protection.
b) When the water-level is higher than the protective water-level, the water-level switch will
move( compressor is at work), the LCD displays “P2”, pls drainage (the way of drainage as
below 5th).
Auto Overheat Protective Function
To use for longer time, this model have auto overheat protective function in heating mode,
it can protect compressor and down motor effectively (stop them working) when unit
temperature back to normal, unit will back to working again.
Compressor Delay-Protection
Except of the � rst power-on, the compressor can work at once, in other cases;
the compressor
runs under 3 minutes delay protection.
Energy Saving:
Press any key on the control panel, background light will turn off after 10 seconds.

10
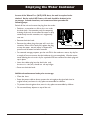
Emptying the Water Container
In case of the WATER FULL (W.F.) LED alert, the unit is required to be
drained. At the end of AC Season, this unit should be drained prior
to storage. In both situations, we recommend that you take the
following steps.
Switch off the unit and remove the plug from the outlet.
• Position a � at container or dish on the � oor under
the drain hole. Use container only for temporary
draining of the unit, do not allow the water to drip
continuously into the container, as it might easily
over� ow.
• Remove the drain knob.
• Remove the rubber plug, the water will � ow in the
container. When this is nearly full, replace the plug
to stop the water � ow and empty it. Repeat this
process until all water has been removed.
• For seasonal storage purposes, put the unit ON in fan mode on a warm, dry d
ay for
a couple of hours to ensure that the inside can dry out completely. We also recom-
mend allowing the unit to air dry for a period of 24 hours without the drain plug and
cap in place.
• Insert the rubber plug into the drain hole � rmly,
the
WATER FULL LED (W.F.) should not � ash any longer.
• Screw on the drain knob.
Additional maintenance/tasks prior to storage.
• Clean the � lters.
• Store the power cable as shown, protect the unit against dust (put back into its
original carton) and store in a dry place not accessible for children.
• To protect the unit against dust, store in a dry place not accessible by children
• Do not stock heavy objects on top of the unit
Rubber Plug Drain Knob

11
Always unplug the unit from the power supply (wall outlet) before
beginning the cleaning.
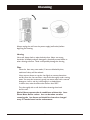
Housing
Use a soft, damp cloth to wipe the body clean. Never use strong
chemicals, oil-based products, detergents, chemically treated cloths or
other cleaning solutions. These could possibly damage the housing.
Filter
· Clean the � lters every two weeks, if � lters are blocked by dust,
machine ef� ciency will be reduced.
· Use a vacuum cleaner or tap the � lter lightly to remove loose dust
and dirt from the � lters and then rinse them thoroughly under running
water. You may also immerse it gently into warm water with a neutral
detergent, rinse it, and dry it thoroughly in a shaded place.
In either case, water should not be warmer than 104°F.
· Dry thoroughly with a soft cloth before inserting them back
into the unit.
Notice!
Never operate the air conditioner without the � lters.
Please Note: Active carbon � lter can be taken out after
removing the � lter frame and should be cleaned or changed
every 2-3 weeks based on the environment.
Cleaning

12
Troubleshooti ng
Never try to repair or dismantle the air condition yourself.
Incompetent repairs result in loss of warranty and can endanger the user and the property.
noituloSesuaCmelborP
The air
conditioner does
not function.
*
No power supply. Make sure the
green light on the plug is lit.
Connect to a functioning outlet and switch on.
See below for Plug and Reset button application.
Is the power light � ashing?
Is the water full LED lit?
Empty the water container (See pg. 9).
The air
conditioner does
not seem to
perform.
The unit is in direct sunlight. Close curtains/shades
Windows or doors open, many
people or a heat source in the room.
Close doors and windows. Unit is not made to
cool server rooms, sun rooms, or any rooms
generating a constant
The filter is dirty. Clean the � lter (See pg. 10).
Air inlet or air outlet blocked.
Power off the unit and unplug from outlet.
Remove blockage.
Room temperature lower than the
selected value.
Change temperature selection.
Set at the lowest possible setting: 60°F.
The unit is noisy. Unit stands uneven. Place on an even, solid surface (less vibrations).
The compressor
does not work.
The overheat protection may be
activated.
Wait 30 minutes until the temperature has
decreased, then turn on the unit again.
The remote
control does not
function.
Distance too great.
Make sure the remote control is correctly aimed
at the control panel.
Remote control signal not detected
by the control panel.
The batteries are drained. Check batteries on remote.
Note: When abnormal situations occur, turn off machine and pull out plug, then contact
with professional electrician for help
* LCDI Plug
If you plug in the Air Conditioner, and there is no green light on the plug,
press the reset button on the LCDI plug. The green light should be lit,
indicating that the air conditioner is getting power from the electrical outlet.
Make sure unit is plugged directly into a dedicated electrical source/outlet.
Do not use any extension cords. See electrical speci� cations listed on
page 3 and make sure the electrical source can accommodate the unit’s
energy consumption.
If the plug continues to trip (which is a USA national safety standard feature)
and the green light goes off, the cord may be damaged preventing you from
resetting the unit. For your safety, contact a licensed electrician.
TEST
RESET
Reset Button
Green Light
Test Button

One Year Limited Warranty
American Comfort Worldwide LLC (“ACW”) warrants this ACW portable air conditioner to the original retail
purchaser (“Purchaser”) purchasing only in the 48 Contiguous States, for one year from the date of purchase, against
defects in material and workmanship under normal use and service. Should your ACW Portable air conditioner prove
defective within one year from the date of purchase, please follow our return procedure to return the defective unit.
Within the � rst 30 days, ACW is responsible for the freight cost to and from our authorized service center for all units
with an ACW authorized RMA. After 30 days and up to life of warranty (12 months), customer is responsible for freight
costs to and from our authorized service center.
ACW’s sole obligation under this warranty is to replace, or at ACW’s discretion, to repair, free of charge, all defective
parts, for a period of one (1) year from date of original purchase. All replacement parts and units will be new, remanu-
factured, or refurbished. ANY IMPLIED WARRANTY OF MERCHANTABILITY IS SIMILARLY LIMITED TO ONE
(1) YEAR FROM DATE OF ORIGINAL PURCHASE AND NO ACTION BASED UPON ANY IMPLIED WARRANTY
OF MERCHANTABILITY OR OTHERWISE MAY BE COMMENCED AFTER EXPIRATION OF ONE (1) YEAR FROM
DATE OF ORIGINAL RETAIL PURCHASE. Some states do not allow limitations on how long an implied warranty lasts,
so the above limitation may not apply to you. Proof of Purchase (i.e. copy of receipt) must be sent with the unit.
The provisions of this warranty shall not apply to any product which in ACW’s judgment has been (1) subject to misuse
or neglect. (2) damaged in an accident. (3) used for a purpose for which it was not designed, or (4) repaired or altered
in any way that adversely affected its performance or reliability. Do not attempt to “open unit”, except for � lter replace-
ment. Opening unit will void manufacturer’s warranty.
THIS WARRANTY DOES NOT COVER:
• Damage, accidental or otherwise, to the unit while in the possession of the consumer not caused by a defect in
material or workmanship.
• Damage caused by consumer misuse, tampering, or failure to follow the care and special handling provisions
in the instructions.
• Damage to the � nish of the case, or other a
ppearance parts caused by the wear.
• Damage caused by repairs or alterations of the unit by anyone other than those authorized by
American Comfort Worldwide.
• Freight and Insurance cost for the warranty service beyond 30 days from date of purchase up to life of warranty
(12 months).
This warranty covers only new products purchased from our authorized dealers or retailers. It does not cover used,
salvaged, or refurbished products.
To obtain warranty service, the defective product or part must be shipped or delivered to: American Comfort World-
wide, the Manufacturer. If warranty applies under ACW’s approved terms, all Shipping charges and insurance are
covered by purchaser.
AMERICAN COMFORT WORLDWIDE NEITHER ASSUMES NOR AUTHORIZES ANY PERSON TO ASSUME
FOR IT ANY OTHER (LIABILITY IN CONNECTION WITH ITS PRODUCTS, THERE ARE NO WARRANTIES
WHICH EXTEND BEYOND THE DESCRIPTION ON THE FACE HEREOF. NO RESPONSIBILITY IS ASSUMED FOR
INCIDENTAL OR CONSEQUENTIAL DAMAGES THAT MAY RESULT FROM THE USE OF AN ACW PRODUCT,
NOR FOR THE DAMAGES DUE TO ACCIDENT, ABUSE, LACK OF RESPONSIBLE CARE, THE AFFIXING OF ANY
UNAUTHORIZED ATTACHMENT, LOSS OF PARTS, OR USE AT A VOLTAGE OTHER THAN SPECIFIED. Some
states do not allow the exclusion of limitation of incidental or consequential damages, so these limitations may not
apply to you. ACW disclaims all liabilities for defects or damages caused by use of replacement parts obtained from or
by service at any service center other than American Comfort Worldwide, the Manufacturer.
This warranty gives you speci� c legal rights, and you may also have other rights which vary from state to state.
QUESTIONS? Call 1-877-613-1800 · www.plasmacoolstorelcom
Dear Customer: Please keep this warranty for your records, along with a copy of the original receipt.
DO NOT return it.
12
7092192211A
03/10

CLimatiseur portable
Modèle ACW600C
fabriqué par

Merci ! ……………………………………………………………………………1
Instructions de sécurité…………………………………………………………1-2
Spécifications ………………………………………………………………..……3
Pièces ………………………………………………………………………….…..4
Autodrain technology assembly...............................................................................5
Installation …………………………………………………………………….….6
.
Panneau de commande ………………………………………………………..….7
Télécommande ………………………………………………………………...…8
Fonction multi protection …………………………………………………...……9
Vidange du réservoir d’eau …………………………………………….......……10
Nettoyage …………………………………………………………………...……11
Dépannage …………………………………………………………….....………12
Garantie……………………………………………………………......………… 13

Instructions de sécurité
IMPORTANT !
&HWDSSDUHLOHVWFRQoXSRXUrWUHLQVWDOOpjO¶LQWpULHXU
&HWDSSDUHLOQ¶HVWSDVFRQoXSRXUrWUHLQVWDOOpGDQVGHVFHQWUHVGHVHUYHXUVGHVVRODULXPV
QLGHVSLqFHVSURGXLVDQWGHVQLYHDX[pOHYpVGHFKDOHXUGHIDoRQFRQVWDQWH
&DUDFWpULVWLTXHVQRPLQDOHV&HWDSSDUHLOGRLWrWUHUDFFRUGpjXQHDOLPHQWDWLRQPLVHjOD
WHUUHGH9+]
/¶LQVWDOODWLRQGRLWrWUHFRQIRUPHjODUqJOHPHQWDWLRQGXSD\VGDQVOHTXHOO¶DSSDUHLOVHUD
XWLOLVp
6LYRXVDYH]GHVGRXWHVTXDQWjO¶LQVWDOODWLRQpOHFWULTXHGHPDQGH]jXQpOHFWULFLHQTXDOLILp
GHODYpULILHUHWG¶DSSRUWHUOHVPRGLILFDWLRQVQpFHVVDLUHVDXEHVRLQ
1HMDPDLVEUDQFKHUO¶DSSDUHLOGDQVXQHSULVHGHFRXUDQWjO¶DLGHG¶XQHUDOORQJH6¶LOQ¶\D
SDVGHSULVHGHFRXUDQWSURFKHYRXVGHYULH]HQIDLUHLQVWDOOHUXQHSDUXQpOHFWULFLHQDJUpp
/HFOLPDWLVHXUQHSRVHSDVGHGDQJHU7RXWHIRLVFRPPHLOV¶DJLWG¶XQDSSDUHLOpOHFWULTXH
O¶XWLOLVDWHXUGRLWIDLUHSUHXYHGHSUXGHQFH
7HQLUFHWDSSDUHLOORLQGHVHQIDQWV
1HSDVDVSHUJHUO¶DSSDUHLOG¶HDXQLOHSORQJHUGDQVO¶HDXSRXUOHQHWWR\HU
1HSDVLQWURGXLUHG¶REMHWVGDQVOHVRXYHUWXUHVGHO¶DSSDUHLO
'pEUDQFKHUO¶DSSDUHLODYDQWGHOHQHWWR\HURXG¶HQQHWWR\HUOHVFRPSRVDQWV
AVERTISSEMENT !
1HMDPDLVODLVVHUIRQFWLRQQHUO¶DSSDUHLOVLOHFRUGRQG¶DOLPHQWDWLRQRXODILFKHHVWHQGRPPDJp
1HSDVDSSX\HUOHFRUGRQVXUGHVERUGVWUDQFKDQWV
8QFRUGRQG¶DOLPHQWDWLRQHQGRPPDJpGHYUDLWrWUHUHPSODFpSDUOHIDEULFDQWVRQDJHQWRXXQHSHUVRQQH
TXDOLILpHDILQG¶pYLWHUWRXWGDQJHU
7RXWHLQWHUYHQWLRQDXWUHTX¶XQQHWWR\DJHUpJXOLHURXOHUHPSODFHPHQWGHVILOWUHVGHYUDLWrWUHHIIHFWXpHSDUXQ
WHFKQLFLHQDXWRULVp/HQRQUHVSHFWGHFHWWHFRQVLJQHSRXUUDLWDQQXOHUODJDUDQWLH
3UHQGUHOHWHPSVGHOLUHODJDUDQWLHODPDUFKHjVXLYUHHQFDVGHUpFODPDWLRQHWOHVLQVWUXFWLRQV
Merci !
9HXLOOH]OLUHODQRWLFHDXFRPSOHWDYDQWG¶XWLOLVHUO¶DSSDUHLO
$VVXUH]YRXVGHFRQVHUYHUYRWUHUHoXG¶DFKDWGHPrPHTXHO¶HPEDOODJHG¶RULJLQHHQFDVGH
UpFODPDWLRQ


La page est en cours de chargement...
La page est en cours de chargement...
La page est en cours de chargement...
La page est en cours de chargement...
La page est en cours de chargement...
La page est en cours de chargement...
La page est en cours de chargement...
La page est en cours de chargement...
La page est en cours de chargement...
La page est en cours de chargement...
-
 1
1
-
 2
2
-
 3
3
-
 4
4
-
 5
5
-
 6
6
-
 7
7
-
 8
8
-
 9
9
-
 10
10
-
 11
11
-
 12
12
-
 13
13
-
 14
14
-
 15
15
-
 16
16
-
 17
17
-
 18
18
-
 19
19
-
 20
20
-
 21
21
-
 22
22
-
 23
23
-
 24
24
-
 25
25
-
 26
26
-
 27
27
-
 28
28
-
 29
29
-
 30
30


Plasma Cool ACW600C Le manuel du propriétaire
- Catégorie
- Climatiseurs mobiles
- Taper
- Le manuel du propriétaire
dans d''autres langues
- English: Plasma Cool ACW600C Owner's manual
Autres documents
-
Beko BS 107 C Manuel utilisateur
-
 American Comfort Worldwide ACW500CH Le manuel du propriétaire
-
 American Crafts PAC Manuel utilisateur
-
Danby DDR30B2GDB Manuel utilisateur
-
-
 American Comfort Worldwide ACW500CH Le manuel du propriétaire
-
-
 American Comfort Worldwide ACW200 Le manuel du propriétaire
-
 American Comfort Worldwide ACW300 Le manuel du propriétaire
-
 American Comfort Worldwide ACW500CH Le manuel du propriétaire


