La page est en cours de chargement...

©Copyright Lotronic 2018 Manual DMX512-PRO 1
512-CHANNEL DMX CONTROLLER
COMMANDE DMX A 512 CANAUX
512-KANAL DMX CONTROLLER
CONTROLADOR DMX 512 CANALES
Ref. : DMX512-PRO (Code : 15-1845)
INSTRUCTION MANUAL
MANUEL D’UTILISATION
BEDIENUNGSANLEITUNG
MANUAL DE INSTRUCCIONES

©Copyright Lotronic 2018 Manual DMX512-PRO 2

©Copyright Lotronic 2018 Manual DMX512-PRO 3
GB – USER MANUAL
DMX512-PRO
SAFETY RECOMMENDATIONS
* Please keep this User Guide for future consultation. If you sell the unit to another
user, be sure that they also receive this instruction booklet.
* Always make sure that you are connecting to the proper voltage and that the line
voltage you are connecting to is not higher than that stated on decal or rear panel of
the fixture.
* This product is intended for indoor use only!
* To prevent risk of fire or shock, do not expose fixture to rain or moisture. Make sure
there are no flammable materials close to the unit while operating.
* The unit must be installed in a location with adequate ventilation, at least 50cm
from adjacent surfaces. Be sure that no ventilation slots are blocked.
* Always disconnect from power source before maintenance, repairs or fuse
replacement.
* In the event of serious operating problem, stop using the unit immediately. Never
try to repair the unit by yourself. Repairs carried out by unskilled people can lead to
damage or malfunction. Please contact the nearest authorized technical assistance
center. Always use the same type spare parts.
* Don’t connect the device to a dimmer pack.
* Make sure power cord is never crimped or damaged.
* Never disconnect power cord by pulling or tugging on the cord.
* Operate this device only under ambient temperature conditions of -5°C to +45°C.
* There are no serviceable parts inside the device. Maintenance and service
operations are only to be carried out by authorized dealers.
* Should you need any spare parts, please use genuine parts. Should you have further
questions, please contact your dealer.
* We recommend a frequent cleaning of the device. Please use a soft lint-free and
moistened cloth. Never use alcohol or solvents!
DESCRIPTION
The DMX controller serves for operation of DMX-controlled light effect devices such
as LED spot lights, moving heads and scanners in discotheques or on stage. The
controller provides 512 control channels which can be assigned as desired to the 32
control channels. The built-in effect generator facilitates programming significantly. 9
movement patterns designed for moving heads and scanners can be called at the
push of a button as well as 7 color effects designed for light effect devices with
RGBW LEDs in particular. 32 memory banks are available for programming
illumination scenes. 32 additional memory banks are available for programming
chases (sequences of scenes) with 100 steps each. The chases may be played

©Copyright Lotronic 2018 Manual DMX512-PRO 4
manually, sound-controlled or automatically. All settings of your light show can be
conveniently stored and archived on a USB memory device.
CONTROLS & FUNCTIONS
TOP panel:
1. Slider controls 1-16
•
For adjusting the DMX values of the connected light effect units. The current DMX
value is indicated on the display.
•
Controls 1-4 adjust the brightness ratio of the red, green, blue and white LEDs of the
light effect units and control 5 adjusts the total brightness.
2. Number buttons 1 to 16 with LEDs
These buttons control different functions depending on the selected mode and have
a dual function; the PAGE button allows switching between the two channel groups
1-16 and 17-32.
•
FIXTURE: To select and deselect devices.
•
MOVEMENT: To activate and deactivate movement patterns (button 1-9) or color
effects (button 10-16).
•
SCENE: To activate or deactivate illumination scenes.
•
CHASE: To activate or deactivate chases.
3. PAGE Button with LEDs
To switch the number buttons between the two channel groups 1-16 and 17-32.
•
LED A lights: channel group 1-16 is selected.
•
LED B lights: channel group 17-32 is selected.
4. FIXTURE Button with LED
•
With the button pressed (LED lights) the number buttons allow to select and deselect
devices.
•
Adjusts the fade in time for the RGBW color channels together with the pan wheel.
5. MOVEMENT Button with LED
With the button pressed (LED lights) the number buttons allow to activate and
deactivate movement patterns or color effects.

©Copyright Lotronic 2018 Manual DMX512-PRO 5
6. SCENE Button with LED
With the button pressed (LED lights) the number buttons allow to activate and
deactivate illumination scenes.
7. CHASE Button with LED
With the button pressed (LED lights) the number buttons allow to activate and
deactivate chases.
8. Data wheel PAN
Controls the pan movement of moving heads or scanners and programs functions.
9. Data wheel TILT
Controls the tilt movement of moving heads or scanners and programs functions.
10. USB Port
Connect a USB storage device for storing and importing data and firmware updates.
11. Button REC/ENTER with LED
• Long press: To activate or deactivate the programming mode.
• Short press: For storing individual illumination scenes or chases and for confirming
adjustments.
12. Button MENU/ESC with LED
• Long press: To call and exit the system settings.
• Short press: To abort a setting procedure and jump back to a higher menu level.
13. Button BLACK OUT/DEL with LED
• Sets all control channels to the value zero (e.g. for turning off the devices).
• For deleting illumination scenes or chases.
• For inserting a scene into a chase.
14. Button RUN MODE/SWAP with LEDs
• For setting the running mode of a chase. A short press switches between manual,
sound-controlled and automatic mode. The LEDs next to the button indicate the
current setting.
- MANUAL: The chase can be manually advanced step by step with the pan wheel.
- MUSIC: The individual steps of the chase run to the rhythm of the music picked up
via the internal microphone.
- AUTO: The individual steps of the chase run at the adjusted speed and fade time.
• For switching between the parameters when editing movement patterns.
15. Display
Rear panel:
16. DMX512 output
3-pin XLR jack for connecting the DMX input of the first light effect unit.
17. Power input

©Copyright Lotronic 2018 Manual DMX512-PRO 6
Plug in the mains cable of the supplied power unit here.
18. Power on/off
Switches the controller on and off.
Installation and Connections
Switch off the DMX controller prior to connecting any units or to changing any
existing connections.
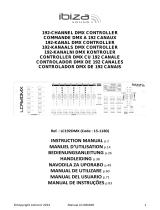
Fig. 5.1 Example for connection
Installation
Install the unit on a plane surface or in your rack. When choosing the installation spot
make sure that there is enough space around the unit for ventilation or that heated
air from the rack can be passed on to improve heat radiation. Steady overheating will
damage the unit.
CABLE CONNECTORS
Cabling must have a male XLR connector on one end and a female XLR connector on
the other end.
DMX connector configuration
Termination reduces signal errors. To avoid signal transmission problems and
interference, it is always advisable to connect a DMX signal terminator.
CAUTION
Do not allow contact between the common and the fixture’s chassis ground.
Grounding the common can cause a ground loop, and your fixture may perform
erratically. Test cables with an ohm meter to check correct polarity and to make sure
the pins are not grounded or shorted to the shield or each other.
INPUT
COMMON
DMX +
DMX-
Resistance 120 ohm
1/ 4w between pin 2
(DMX-) and pin 3 (DMX+)
of the last fixture.

©Copyright Lotronic 2018 Manual DMX512-PRO 7
Unit
Starting
address
Unit
Starting
address
1
1
17
289
2
19
18
307
3
37
19
325
4
55
20
343
5
73
21
361
6
91
22
379
7
109
23
397
8
127
24
415
9
145
25
433
10
163
26
451
11
181
27
469
12
199
18
199
13
217
29
505
14
235
30
free
15
253
31
free
16
271
32
free
Setting up a DMX Serial Data Link
1. Connect the (male) 3 pin connector side of the DMX cable to the output (female) 3
pin connector of the controller.
2. Connect the end of the cable coming from the controller which will have a
(female) 3 pin connector to the input connector of the next fixture consisting of
a (male) 3 pin connector.
3. Then, proceed to connect from the output as stated above to the input of the
following fixture and so on.
Connection to the Mains
Connect the power supply unit to the power input jack and the mains plug to a mains
outlet. Always disconnect the mains connector when you wish to change connections,
move the unit to a different place or if it is not used for a longer period.
Configuration
Adjusting the DMX Starting Addresses of the Light Effect Units
Adjust the DMX starting address of the connected light effect units according to the
following scheme. If identical units are to be controlled synchronously, they can
receive the same starting address; otherwise each unit must receive an individual
address. For further information, please refer to the unit’s documentation.
Table 6.1 Default values for the starting address of the light
effect units

©Copyright Lotronic 2018 Manual DMX512-PRO 8
Manual Assignment of DMX Starting Addresses
It is possible to individually assign the DMX starting addresses to the controller. The
assignment can be made in the system settings.
1. Switch on the controller with the rear power switch. The unit is in manual mode
and the display indicates “Manual” in the upper line.
2. Keep the button MENU pressed for 2 seconds to call the system settings.
3. The display indicates the first menu item „01.Patch fixture“(otherwise select it
with the pan wheel). Press the button ENTER to begin with the configuration. The
display indicates “PLEASE SELECT FIXTURE”.
4. Use the buttons number buttons 1-16 to select the unit of which the DMX starting
address is to be assigned (control LED lights).
5. This menu item allows adjusting further characteristics. Use the button SWAP to
switch between the options.
6. Select the option DMX START ADDR to assign the DMX starting address. The
display indicates “NO PATCH ADDRESS“ in case no assignment was made yet;
otherwise it indicates e.g. “ADR: 001“.
Fig. 6.1 Manual address assignment
7. Change the address with the pan wheel. For addresses that were already assigned,
the display inserts a “!”.
8. Press the button ENTER to memorize your setting.
• To confirm the memory procedure, all LEDs of the controller flash three times.
9. Repeat the steps 4, 7 and 8 to assign further units.
10. After your settings, exit the system settings. For this, keep the button MENU
pressed for 2 seconds.
Manual Assignment of DMX Channels
It is possible to individually assign the DMX channels of the connected light effect
units to the control elements of the controller (softpatch). However, some DMX
channels must be assigned according to a certain scheme, in order for the controller
to correctly perform the integrated movement patterns, color effects and fade
effects. For control of the pan/tilt function of moving heads or scanners, the
corresponding DMX channels must be assigned e.g. to the pan and tilt wheel; and for
control of RGBW light effect units, the DMX channels which control red, green, blue,
white and the dimmer function, must be assigned to the sliding control 1-5. The
assignment can be made in the system settings.
1. Keep the button MENU pressed for 2 seconds to call the system settings.
DMX START ADDR
FX:01 ADR:001

©Copyright Lotronic 2018 Manual DMX512-PRO 9
2. The display indicates the first menu item „01.Patch fixture“ (otherwise select it
with the pan wheel). Press the button ENTER to begin with the configuration. The
display indicates “PLEASE SELECT FIXTURE”.
3. Use the buttons number buttons 1-16 to select the unit which the DMX channels
are to be assigned (control LED lights).
4. Select the option FADER CHANL with the button SWAP to assign the DMX channels
to the control elements. The display indicates the control element in the upper line,
e.g. “Fader CHANL:1/R “ and the DMX channel in the lower line, e.g. “DMX
channel:01”
Fig. 6.2 Channel assignment
5. Adjust the first control element with the pan wheel, e.g. 1/R = sliding control 1 and
assign the DMX channel with the tilt wheel.
Control
DMX channel
Control
DMX channel
1/red
1
10
10
2/green
2
11
11
3/blue
3
12
12
4/white
4
13
13
5/dimmer
5
14
14
6
6
15
15
7
7
16
16
8
8
PAN
17
9
9
TILT
18
Tab. 6.2 Assignment of DMX channels to the control elements
6. Press the button ENTER to memorize your setting.
•
To confirm the memory procedure, all LEDs of the controller flash three times.
7. Repeat the steps 5 and 6 to assign further DMX channels.
8. Press the button DEL to delete an assignment (indication „NULL“).
•
To confirm the deleting procedure, all LEDs of the controller flash three times.
9. After your settings, exit the system settings.
For this, keep the button MENU pressed for 2 seconds.
Inverting Output Values
It is possible to individually invert the output values of the 512 control channels. The
adjustment can be made in the system settings.
Fader CHANL:1/R FX:01
DMX channel:01

©Copyright Lotronic 2018 Manual DMX512-PRO 10
1. Keep the button MENU pressed for 2 seconds to call the system settings.
2. The display indicates the first menu item „01.Patch fixture“ (otherwise select it
with the pan wheel). Press the button ENTER to begin with the configuration. The
display indicates “PLEASE SELECT FIXTURE”.
3. Use the number buttons 1-16 to select the unit of which the DMX channels are to
be inverted (control LED lights).
4. Select the option FADER REVERSE with the button SWAP. The display indicates the
control element in the upper line, e.g. “FADER:1/R “ and the current setting in the
lower line, e.g. “REVERSE:NO“.
Fig. 6.3 Inverting output values
5. Adjust the first control element with the pan wheel and use the tilt wheel to select
the setting [YES] if the output value of the control channel is to be inverted or [NO] if
not. With activated inversion, the output value is zero if the control channel has been
set to the maximum value and vice versa.
6. Press the button ENTER to memorize your setting.
• To confirm the memory procedure, all LEDs of the controller flash three times.
7. Repeat the steps 5 and 6 to invert further control channels.
8. Repeat the steps 3, 5 and 6 to adjust further units.
9. After your settings, exit the system settings.
For this, keep the button MENU pressed for 2 seconds.
Assigning the Fade In Function
The fade in function for the RGBW color channels 1-4 and the dimmer channel can be
individually assigned to each device. The adjustment can be made in the system
settings.
1. Keep the button MENU pressed for 2 seconds to call the system settings.
2. The display indicates the first menu item „01.Patch fixture“ (otherwise select it
with the pan wheel). Press the button ENTER to begin with the configuration. The
display indicates “PLEASE SELECT FIXTURE”.
3. Use the buttons number buttons 1-16 to select the unit to be configured (control
LED lights).
4. Select the option COLOR FADE with the button SWAP.
Fig. 6.4 Assigning the fade in function
5. Use the tilt wheel to select the setting [YES] if fade in of the device should be
possible or [NO] if not. With the function activated, the controller automatically
creates all necessary intermediate values for the fade in.
Fader CHANL:1/R
REVERSE:NO
COLOR FADE
FIXTURE:01 [NO]

©Copyright Lotronic 2018 Manual DMX512-PRO 11
6. Press the button ENTER to memorize your setting.
• To confirm the memory procedure, all LEDs of the controller flash three times.
7. Repeat the steps 3, 5 and 6 to configure further units.
8. After your settings, exit the system settings.
For this, keep the button MENU pressed for 2 seconds.
Copying Device Settings
All DMX values assigned to a light effect unit can be conveniently copied to another
unit. The adjustment can be made in the system settings.
1. Keep the button MENU pressed for 2 seconds to call the system settings.
2. The display indicates the first menu item „01.Patch fixture“ (otherwise select it
with the pan wheel). Press the button ENTER to begin with the configuration. The
display indicates “PLEASE SELECT FIXTURE”.
3. Keep the number button pressed of the unit to be copied.
4. In addition, press the number button you would like to copy the values to. The
display shortly indicates “COPY“.
Fig. 6.5 Copying device settings
OPERATION
Switch on the controller with the rear power switch. The unit is in manual mode and
the display indicates “Manual” in the upper line.
Manual Adjustment of an Illumination Scene
An illumination scene contains the values of all control channels including the pan
and tilt settings of the connected light effect units.
1. Press the button FIXTURE.
• The control LED lights.
2. Use the number buttons 1-16 to select the units to be controlled.
• The corresponding LEDs of the buttons light.
• If a number button is pressed once again, the corresponding device is deselected.
• Instead of selecting each device individually, devices with consecutive numbers can
be selected simultaneously. For this, press the first and last number button
simultaneously.
Example: For selecting the devices 1 to 8, press the number buttons 1 and 8
simultaneously. Thus, all 8 devices will be selected simultaneously. In the same way, it
is possible to deselect devices again.
Fig. 7.1 Adjusting DMX values
FX:01 COPY FX:02
Manual
CH:02 Val:098

©Copyright Lotronic 2018 Manual DMX512-PRO 12
3. Adjust the desired DMX values (0-255) for the DMX channels using the sliding
controls and, if necessary, the pan and tilt wheels.
• As soon as a fader is moved, the display indicates the number of the control channel
in the lower line and the current output value as a DMX value.
4. The 32 light effect units are combined in 2 groups (channel pages) of 16 channels
each. If necessary, use the button PAGE to switch between the two channel groups
1-16 (LED A lights) and 17-32 (LED B lights) and repeat steps 2 and 3, until the desired
values are assigned to all channels.
Adjusting an Illumination Scene with Movement Patterns and Color
effects
The built-in effect generator allows creating 9 different movement patterns for pan
and tilt movement of moving heads or scanners as well as 7 additional color effects
for LED light effect units. The effects can be saved together with other DMX values in
a scene.
1. Press the button FIXTURE (control LED lights) and use the number buttons 1-16 to
select the devices to be assigned to an effect.
• If necessary, used the button PAGE to switch between the two channel groups 1-6
(LED A lights) and 17-32 (LED B lights).
2. Call the effect mode with the button MOVEMENT.
• The control LED lights.
3. Select the desired movement patterns or color effect with the number buttons
1-16.
• The selected devices will begin to perform the movement pattern or color effect.
• Number buttons 1-9: Create movement patterns designed for pan and tilt
movement of moving heads or scanners.
• Number buttons 10-16: Create color effects for all kinds of LED light effect units.
• For optimum results of the color effects triggered by buttons 15 and 16, the
operation with a least 8 devices is recommended.
4. The parameters of the movement patterns and color effects can be edited and
adapted to your particular application.
Fig. 7.2 Adjusting parameters
• Movement patterns 1-9: Press the button SWAP to switch between the parameters
and adjust the values with the Pan/Tilt wheels.
- MOVEMENT RANGE: The pan/tilt movement can be adjusted between 1 and 100 %.
- MOVEMENT OFFSET: Correction values can be adjusted for fine adjustment of the
pan/tilt movement.
MOVEMENT RANGE
PAN:050%
TL:080%

©Copyright Lotronic 2018 Manual DMX512-PRO 13
- MOVEMENT SPEED: The running speed can be adjusted between 1 and 100 %.
- DELAY LEVEL: The delay time for the operation with several devices can be adjusted
between 0 and 30 seconds.
Fig. 7.3 Adjusting parameters
• Color effects 10-16: The running speed can be adjusted between 1 and 100 %
(indication “MOVEMENT SPEED“).
Memorizing Illumination Scenes
32 memory banks are available for illumination scenes. Each scene contains the
values of all control channels including the pan and tilt settings of the connected light
effect units as well as movement patterns or color effects at the time of storage.
Fig. 7.4 Programming mode
1. Call the programming mode. For this, keep the REC pressed until the LED above
the button lights.
2. Press the button FIXTURE.
• The control LED lights.
3. Use the number buttons 1-16 to select the devices to be controlled.
• The corresponding LEDs of the buttons light.
• If a number button is pressed once again, the corresponding device is deselected.
Fig. 7.5 Adjusting DMX values
4. Adjust the desired DMX values (0-255) for the DMX channels using the sliding
controls and, if necessary, the pan and tilt wheels.
• As soon as a fader is moved, the display indicates the number of the control channel
in the lower line and the current output value as a DMX value.
5. If necessary, movement patterns or color effects can be integrated in the scene.
For this, call the effect mode with the button MOVEMENTS and select the desired
effect with the number buttons 1-16. Exit the effect mode again by pressing the
button FIXTURE.
6. If necessary, use the button PAGE to switch between the two channel groups 1-16
(LED A lights) and 17-32 (LED B lights) and repeat steps 3 and 5, until the desired
values are assigned to all channels.
7. Deselect the adjusted devices with the corresponding number button 1-16.
8. Repeat the steps 3 to 5 for all further devices to be adjusted.
MOVEMENT COLOR:1
SPEED:42%
PROGRAM
PROGRAM
CH:02 Val:098

©Copyright Lotronic 2018 Manual DMX512-PRO 14
9. Press the button SCENE and then the button REC to memorize the scene.
10. Select the desired memory bank with one of the number buttons 1-16.
• If necessary, use the button PAGE to switch between the two channel groups 1-16
(LED A lights) and 17-32 (LED B lights).
• To confirm the memory procedure, all LEDs of the controller flash three times.
11. Repeat the steps 2 to 10 to memorize further scenes.
12. After all desired scenes have been memorized, switch off the programming
mode. For this, keep the button REC pressed until the LED above the button lights.
Calling Illumination Scenes
Static scenes from the memory bank can only be used in manual mode.
1. There should be no device selected. If one of the control LEDs of the number
buttons 1- 16 light, press the corresponding button for deselecting.
2. Press the button SCENE.
• The control LED lights.
3. Call the desired scene with the number buttons 1-16.
• The control LED lights.
• If the button is pressed once again, the scene is deselected (control LED
extinguishes).
• If necessary, use the button PAGE to switch between the two channel groups 1-16
(LED A lights) and 17-32 (LED B lights).
Adjusting Fade In for the Color Channels
Fig. 7.6 Adjusting a fade in time
It is possible to adjust a fade in time for illumination scenes affecting the RGBW color
channels 1-4 and the dimmer channel. When actuating a sliding control, the
corresponding channel is moved slowly and steadily to its target value. The controller
automatically creates all necessary intermediate values. Keep the button FIXTURE
pressed and simultaneously adjust the fade in time with the pan wheel between 0-30
seconds. When turning the wheel, the display indicates the selected value in the
lower line, e.g. “Fade 8.5S“ for a fade in lasting 8.5 seconds.
Deleting Illumination Scenes
Fig. 7.7 Programming mode
Manual
Fade 8.5S
Program

©Copyright Lotronic 2018 Manual DMX512-PRO 15
1. Call the programming mode. For this, keep the REC pressed until the LED above
the button lights.
2. Press the button SCENE.
• The control LED lights.
3. Keep the button DEL pressed and select the scene to be deleted with the number
buttons 1-16.
• The control LEDs of the memory banks containing data light.
• If necessary, use the button PAGE to switch between the two channel groups 1-16
(LED A lights) and 17-32 (LED B lights).
• To confirm the deleting procedure, all LEDs of the controller flash three times.
4. After the desired scene has been deleted, switch off the programming mode. For
this, keep the button REC pressed until the LED above the button lights.
Programming and Memorizing Chases
For programming chases (sequences of scenes), 32 memory banks are available. A
sequence of up to 100 steps can be programmed on each memory bank. Previously
memorized scenes may also be compiled to a chase in any desired order. Chases may
run automatically, manually, or sound-controlled.
Fig. 7.8 Programming mode
1. Call the programming mode. For this, keep the REC pressed until the LED above
the button lights.
2. Press the button CHASE.
• The control LED lights.
Fig. 7.9 Programming a chase
3. Select the desired memory bank with one of the number buttons 1-16.
• If necessary, use the button PAGE to switch between the two channel groups 1-16
(LED A lights) and 17-32 (LED B lights).
• The display indicates e.g. “Chase01 Step001“ in the lower line.
4. Press the button FIXTURE.
• The control LED lights.
5. Use the number buttons 1-16 to select the devices to be controlled.
Program
Program
Chase01 Step001

©Copyright Lotronic 2018 Manual DMX512-PRO 16
• If necessary, use the button PAGE to switch between the two channel groups 1-16
and 17-32.
Fig. 7.10 Adjusting the first scene
6. Adjust the first illumination scene with the sliding controls and, if necessary the
pan and tilt wheels.
• The display indicates the number of the control channel in the lower line and the
current output value as a DMX value.
7. It is also possible to call a scene previously memorized or a movement pattern or
color effect and to insert it into the chase. For this, call the scene or the effect with
the button SCENE or MOVEMENT and the corresponding number button.
8. Press the button REC to memorize the scene.
• To confirm the memory procedure, all LEDs of the controller flash three times.
• The indication “Step001" changes to “Step002“ and you can adjust and memorize
the next scene.
9. Repeat the steps 6 to 8 to adjust and memorize the next scene.
• Up to 100 scenes can be programmed for a chase.
10. After the desired chase has been memorized, switch off the programming mode.
For this, keep the button ENTER pressed until the display indication switches back to
“Manual“.
Inserting a Scene Into a Chase
1. Call the programming mode. For this, keep the REC pressed until the LED above
the button lights.
2. Press the button CHASE.
• The control LED lights.
3. Select the chase to be extended with one of the number buttons 1-16.
• The control LED of the number button lights and the display indicates the number
and steps of the chase.
• If necessary, use the button PAGE to switch between the two channel groups 1-16
(LED A lights) and 17-32 (LED B lights).
4. Select the step after which a new step is to be inserted with the pan wheel.
5. Press the button MENU.
• The LED INSERT above the button lights.
6. Now, a scene can be inserted. For this, call the scene with the button SCENE and
the corresponding number button.
7. Press the button REC to memorize the revised chase.
• To confirm the memory procedure, all LEDs of the controller flash three times.
8. Repeat the steps 4 to 7 to insert further scenes into this chase.
Program
CH:02 Val:098

©Copyright Lotronic 2018 Manual DMX512-PRO 17
9. After the revised chase has been memorized, switch off the programming mode.
For this, keep the button ENTER pressed until the display indication switches back to
“Manual“.
Playing a Chase
A chase must be programmed before you can call it. Chases can be played manually,
time- controlled or sound-controlled. As a basic setting, the manual mode is
activated. The LEDs MANUAL, MUSIC and AUTO indicate the current setting.
1. There should be no device or illumination scene selected. If one of the control
LEDs of the number buttons 1-16 light, press the corresponding button for
deselecting.
2. Press the button CHASE.
• The control LED lights.
Fig. 7.11 Calling a chase
3. Use the number buttons 1-16 to select the desired chase.
• The control LED flashes.
• If necessary, use the button PAGE to switch between the two channel groups 1-16
(LED A lights) and 17-32 (LED B lights).
• Up to 5 chases can be selected simultaneously. The chases are played one after the
other. The LED of the chase currently playing flashes, the others light.
• The display indicates the number of the chase (e.g. “Chase01”) in the lower line and
the current step (e.g. “Step001).
4. Select the chase running mode with the button RUN MODE. The mode is indicated
by the LEDs next to the button.
Fig. 7.12 Chase in manual mode
• MANUAL: The chase can be manually advanced step by step with the pan wheel.
Fig. 7.13 Chase in sound-controlled mode
• MUSIC: The individual steps of the chase run to the rhythm of the music picked up
via the internal microphone.
The sensitivity of the sound control is adjustable. For this, keep the button RUN
MODE pressed and turn the tilt wheel to adjust a value between 0-100 %. The higher
the value, the higher the sensitivity.
Manual
Chase01 Step001
Manual
Chase05 Step080
Music
Sensitivity 050%

©Copyright Lotronic 2018 Manual DMX512-PRO 18
Fig. 7.14 Chase in automatic mode
• AUTO: The individual steps of the chase run at the adjusted speed and fade time.
Use the pan wheel to adjust the running speed, i.e. how long a scene is shown,
between 10 minutes and 0.1 seconds (indication “Wait“).
Use the tilt wheel to adjust the fade time, i.e. the time between the steps, between 0
and 30 (indication “Fade“).
5. A flashing LED indicates which chase can be adjusted when several chases are
selected simultaneously. The chase selected last can be adjusted. To adjust a
different chase instead, keep the corresponding number button pressed until its LED
flashes.
6. To stop a chase, press the corresponding number button so that its LED
extinguishes.
Adjusting Fade In for the Color Channels
Fig. 7.15 Adjusting a fade in time
It is possible to adjust a fade in time for chases affecting the RGBW color channels
1-4 and the dimmer channel. The controller automatically creates all necessary
intermediate values. Keep the button FIXTURE pressed and simultaneously adjust the
fade in time with the pan wheel between 0-30 seconds. When turning the wheel, the
display indicates the selected value in the lower line, e.g. “Fade 8.5S“ for a fade in
lasting 8.5 seconds.
Overwriting Channels Manually
During the playback of a chase, it is possible to overwrite the programmed DMX
values with the sliding controls. This allows for minor adjustments during a live
performance without the need for reprogramming scenes.
1. Press the button FIXTURE use the number buttons 1-16 to select the units to be
controlled manually.
2. Adjust the desired DMX values for the DMX channels using the sliding controls
and, if necessary, the pan and tilt wheels.
3. If necessary, use the button PAGE to switch between the two channel groups 1-16
(LED A lights) and 17-32 (LED B lights) and repeat steps 1 and 2, until the desired
values are assigned to all channels.
Deleting a Chase
Fig. 7.16 Programming mode
Auto
Wait 1M10S
Manual
Fade 8.5S
Program

©Copyright Lotronic 2018 Manual DMX512-PRO 19
1. Call the programming mode. For this, keep the REC pressed until the LED above
the button lights.
2. Press the button CHASE.
• The control LED lights.
3. Keep the button DEL pressed and select the chase to be deleted with the number
buttons 1-16.
• The control LEDs of the memory banks containing data light.
• If necessary, use the button PAGE to switch between the two channel groups 1-16
(LED A lights) and 17-32 (LED B lights).
• To confirm the deleting procedure, all LEDs of the controller flash three time.
4. After the desired chase has been deleted, switch off the programming mode. For
this, keep the button REC pressed until the LED above the button lights.
Blackout Function
With the blackout function it is possible to blackout and illumination scene or chase
completely. Current fadings and chases are not stopped by the blackout function,
they continue “in the dark” in the meantime.
1. With the button BLACK OUT/DEL this function is switched on: The LED above the
button flashes and all control channels are set to the output value zero.
2. By pressing the button BLACK OUT/DEL again, the function stops: The LED is
extinguished and all channels return to their pervious output values.
3. In the system settings, is possible define whether all control channels react to the
button BLACK OUT/DEL or only the dimmer control channel.
After Use
After the operation, disconnect the mains plug of the power supply unit from the
socket, to prevent unnecessary power consumption.
SYSTEM SETTINGS
This mode allows you to change important system settings for the controller.
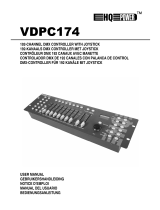
Fig. 8.1 Calling the system settings
1. Keep the button MENU for 2 seconds to call the system settings.
• The display indicates the first menu item “01.Patch fixture”.
2. Turn the pan wheel to browse the menu items.
3. Press the button ENTER to select the desired menu item.
4. Turn the pan wheel to change a setting and confirm with ENTER.
5. Shortly press the button ESC to abort the setting procedure and return to the main
menu level.
1. Patch fixture

©Copyright Lotronic 2018 Manual DMX512-PRO 20
6. To save your settings and exit the system settings, keep the button MENU pressed
for 2 seconds.
The following adjustments are possible:
Indication
Function
01. Patch fixture
DMX configuration #1
02. Reset factory
Reset to factory settings
03. Delete all Fixture patch
Delete all DMX address assignments
04. Fade mode
Fade function
05. RDM DMX Address setup
RDM DMX address assignments
06. Data backup
Data backup
07. Data load
Data import
08. Send fixture Update file
Firmware update #2
09. Black-out mode
Blackout function
#1 This menu item is covered in chapter 6
#2: This function is not available
Reset factory [Reset to factory settings]
Here you can reset the controller to factory setting.
1. Call the menu item with the pan wheel and confirm with ENTER.
2. Select the setting [YES] with the pan wheel and confirm with ENTER.
• The display shortly indicates ”Reset factory Please wait ..“ and then “OK“ as soon as
the factory settings are loaded.
Delete all Fixture patch [Delete all DMX address assignments]
All address assignments and control channel options made can be deleted and reset
to the presettings.
1. Call the menu item with the pan wheel and confirm with ENTER.
2. Select the setting [YES] with the pan wheel if a reset is to be made. Confirm with
ENTER.
• The display shortly indicates “SAVE OK“ and returns to the main menu level.
Fade mode [Fade function]
The fade function can be assigned to all control channels or only to the pan and tilt
wheels.
1. Call the menu item with the pan wheel and confirm with ENTER.
2. Use the pan wheel to select the setting [ALL CHANNELS] if the fade function is
possible for all control channels or select [ONLY PAN/TILT] if it is only possible for the
pan and tilt wheels. Confirm with ENTER.
/