
User Manual

Page 2 of 69 Obey 70 User Manual Rev. 7
Table of Contents
1. Before You Begin .................................................................................................................................... 8
What is Included ......................................................................................................................................................... 8
Claims ......................................................................................................................................................................... 8
Text Conventions ........................................................................................................................................................ 8
Symbols ...................................................................................................................................................................... 8
Disclaimer ................................................................................................................................................................... 8
Limited Warranty........................................................................................................................................................ 9
Safety Notes ............................................................................................................................................................... 9
2. Introduction ........................................................................................................................................... 10
Product Overview ..................................................................................................................................................... 10
Dimensions ............................................................................................................................................................... 10
3. Setup ...................................................................................................................................................... 11
AC Power .................................................................................................................................................................. 11
Mounting .................................................................................................................................................................. 11
Orientation ............................................................................................................................................................ 11
Rigging ................................................................................................................................................................... 11
Product Addressing .................................................................................................................................................. 11
Signal Output ......................................................................................................................................................... 12
Physical Fader Assignment .................................................................................................................................... 12
Joystick Assignment .............................................................................................................................................. 12
Copying Physical Fader Assignment ...................................................................................................................... 13
Fader Reverse (0–255/255–0) .............................................................................................................................. 13
Resetting the System ............................................................................................................................................. 13
4. Programming ......................................................................................................................................... 13
Entering Program Mode ........................................................................................................................................... 13
Exiting Program Mode .............................................................................................................................................. 13
Creating a Scene ....................................................................................................................................................... 13
Create a Chase .......................................................................................................................................................... 14
Chase Modifications .............................................................................................................................................. 14
Adding a Step to a Chase ...................................................................................................................................................... 14
Delete a Scene/Step in a Chase ............................................................................................................................................ 14
Copy a Bank into a Chase ..................................................................................................................................................... 14
5. Programming Modifications ................................................................................................................ 14
Delete One Scene ..................................................................................................................................................... 14
Delete All Scenes ...................................................................................................................................................... 14
Delete a Chase .......................................................................................................................................................... 14
Delete All Chases ...................................................................................................................................................... 14
Delete a Bank of Scenes ........................................................................................................................................... 14
6. Playback ................................................................................................................................................. 15
Scene Playback ......................................................................................................................................................... 15
Manual Scene Playback (Single) ............................................................................................................................ 15
Auto Bank Playback ............................................................................................................................................... 15
Music Bank Playback ............................................................................................................................................. 15
Chase Playback ...................................................................................................................................................... 15
Manual Chase Playback ......................................................................................................................................... 15
Auto Chase Playback ............................................................................................................................................. 15

Obey 70 User Manual Rev. 7 Page 3 of 69
Music Chase Playback ........................................................................................................................................... 15
Playback Modifications ............................................................................................................................................. 16
MIDI Operation ..................................................................................................................................................... 16
Setting the MIDI Channel ...................................................................................................................................... 16
MIDI Configuration (Response) ................................................................................................................................ 16
Tap Sync .................................................................................................................................................................... 16
Fog Control ............................................................................................................................................................... 16
Strobe Control .......................................................................................................................................................... 16
7. Technical Information ........................................................................................................................... 17
Maintenance ............................................................................................................................................................ 17
Technical Specifications ............................................................................................................................................ 17
Returns ..................................................................................................................................................................... 18
1. Antes De Empezar ................................................................................................................................. 19
Qué va Incluido ......................................................................................................................................................... 19
Reclamaciones .......................................................................................................................................................... 19
Convenciones de Texto ............................................................................................................................................ 19
Símbolos ................................................................................................................................................................... 19
Exención de Responsabilidad ................................................................................................................................... 19
Garantía Limitada ..................................................................................................................................................... 20
Notas de Seguridad .................................................................................................................................................. 20
2. Introducción .......................................................................................................................................... 21
Visión General del Producto ..................................................................................................................................... 21
Dimensiones ............................................................................................................................................................. 21
3. Instalación ............................................................................................................................................. 22
Corriente Alterna ...................................................................................................................................................... 22
Montaje .................................................................................................................................................................... 22
Orientación ............................................................................................................................................................ 22
Colocación ............................................................................................................................................................. 22
Asignación de Direcciones del Producto .................................................................................................................. 22
Salida de Señal....................................................................................................................................................... 23
Asignación del Fader Físico ................................................................................................................................... 23
Asignación del Joystick .......................................................................................................................................... 24
Copiar la Asignación del Fader Físico .................................................................................................................... 24
Fader Inverso (0–255/255–0) ............................................................................................................................... 24
Reiniciar el Sistema ............................................................................................................................................... 24
4. Programación ........................................................................................................................................ 25
Entrar en el Modo de Programa. .............................................................................................................................. 25
Salir del Modo de Programa. .................................................................................................................................... 25
Crear una Escena ...................................................................................................................................................... 25
Crear una Secuencia ................................................................................................................................................. 25
Modificaciones de Secuencia ................................................................................................................................ 25
Añadir un Paso a una Secuencia ........................................................................................................................................... 25
Borrar una Escena/Paso en una Secuencia .......................................................................................................................... 26
Copiar un Banco en una Secuencia ...................................................................................................................................... 26
5. Modificaciones De Programación ....................................................................................................... 26
Borrar una Escena .................................................................................................................................................... 26
Borrar Todas las Escenas .......................................................................................................................................... 26
Borrar una Secuenciae.............................................................................................................................................. 26
Borrar Todas las Secuencias ..................................................................................................................................... 26

Page 4 of 69 Obey 70 User Manual Rev. 7
Borrar un Banco de Escenas ..................................................................................................................................... 26
6. Reproducción ........................................................................................................................................ 26
Reproducción de Escena .......................................................................................................................................... 26
Reproducción Manual de Escena (única) .............................................................................................................. 26
Reproducción Automática de Banco ..................................................................................................................... 27
Reproducción de Banco de Música ....................................................................................................................... 27
Reproducción de Secuencia .................................................................................................................................. 27
Reproducción de Secuencia Manual ..................................................................................................................... 27
Reproducción de Secuencia Automática ............................................................................................................... 27
Reproducción de Secuencia Musical ..................................................................................................................... 27
Modificaciones de la Reproduccións ........................................................................................................................ 27
Funcionamiento MIDI ............................................................................................................................................ 27
Configurar el Canal MIDI ....................................................................................................................................... 27
Configuración MIDI ................................................................................................................................................... 28
(Respuesta) ............................................................................................................................................................... 28
Sincronización al Toque ............................................................................................................................................ 28
Control de Niebla ...................................................................................................................................................... 28
Control de Estroboscopio ......................................................................................................................................... 28
7. Información Técnica ............................................................................................................................. 29
Mantenimiento ......................................................................................................................................................... 29
Especificaciones Técnicas ......................................................................................................................................... 29
1. Avant De Commencer ........................................................................................................................... 31
Ce qui est Compris .................................................................................................................................................... 31
Réclamations ............................................................................................................................................................ 31
Conventions de Texte ............................................................................................................................................... 31
Symboles .................................................................................................................................................................. 31
Clause de non Responsabilité ................................................................................................................................... 31
Garantie Limitée ....................................................................................................................................................... 32
Consignes de Sécurité ............................................................................................................................................... 32
2. Introduction ........................................................................................................................................... 33
Aperçu du Produit .................................................................................................................................................... 33
Dimensions ............................................................................................................................................................... 33
3. Configuration ......................................................................................................................................... 34
Alimentation CA ....................................................................................................................................................... 34
Installation ................................................................................................................................................................ 34
Orientation ............................................................................................................................................................ 34
Suspension ............................................................................................................................................................ 34
Adressage de l'appareil ............................................................................................................................................ 34
Sortie de Signal ...................................................................................................................................................... 34
Attribution du Potentiomètre Physique ................................................................................................................ 34
Attribution de la Manette ..................................................................................................................................... 35
Attribution du Potentiomètre Physique ................................................................................................................ 35
Potentiomètre Inversé (0–255/255–0) ................................................................................................................ 35
Réinitialisation du Système ................................................................................................................................... 36
4. Programmation ...................................................................................................................................... 36
Entrer dans le Mode Programmation ....................................................................................................................... 36
Sortir du Mode Programmation ............................................................................................................................... 36
Créer une Scène ....................................................................................................................................................... 36

Obey 70 User Manual Rev. 7 Page 5 of 69
Créer un Chenillard ................................................................................................................................................... 36
Modifications Apportées au Chenillard ................................................................................................................. 37
Ajouter un pas à un Chenillard ............................................................................................................................................. 37
Supprimer une Scène/un pas d'un Chenillard ...................................................................................................................... 37
Copier une Banque dans un Chenillard ................................................................................................................................ 37
5. Modifications Apportees Aux Programmes ....................................................................................... 37
Supprimer une Scène ............................................................................................................................................... 37
Supprimer Toutes les Scènes .................................................................................................................................... 37
Supprimer un Chenillard ........................................................................................................................................... 37
Supprimer Tous les Chenillards ................................................................................................................................ 37
Supprimer une Banque de Scènes ............................................................................................................................ 37
6. Lecture ................................................................................................................................................... 38
Lecture de Scène ...................................................................................................................................................... 38
Lecture Manuelle de Scène (simple) ..................................................................................................................... 38
Lecture Automatique de Banque .......................................................................................................................... 38
Lecture d'une Banque de Musique ....................................................................................................................... 38
Lecture de Chenillards ........................................................................................................................................... 38
Lecture Manuelle de Chenillards ........................................................................................................................... 38
Lecture Automatique de Chenillard ...................................................................................................................... 38
Lecture de Chenillards de Musique ....................................................................................................................... 38
Modifications Apportées à la Lecture ...................................................................................................................... 39
Fonctionnement MIDI ........................................................................................................................................... 39
Configurer le Canal MIDI ....................................................................................................................................... 39
Configuration MIDI (réponse)................................................................................................................................... 39
Tap Sync .................................................................................................................................................................... 40
Commande du Brouillard ......................................................................................................................................... 40
Commande du Stroboscope ..................................................................................................................................... 40
7. Informations Techniques ..................................................................................................................... 41
Entretien ................................................................................................................................................................... 41
Spécificités Techniques ............................................................................................................................................ 41
Renvois ..................................................................................................................................................................... 42
1. Erste Schritte ......................................................................................................................................... 43
Packungsinhalt .......................................................................................................................................................... 43
Schadens-meldung ................................................................................................................................................... 43
Text-konventionen ................................................................................................................................................... 43
Symbole .................................................................................................................................................................... 43
Haftungs-ausschluss ................................................................................................................................................. 43
Eingeschrän-kte Garantie ......................................................................................................................................... 44
Sicherheitshinweise .................................................................................................................................................. 44
2. Einleitung ............................................................................................................................................... 45
Produktübersicht ...................................................................................................................................................... 45
Abmessungen ........................................................................................................................................................... 45
3. Einrichten des Geräts ........................................................................................................................... 46
Wechselstrom ........................................................................................................................................................... 46
Montage ................................................................................................................................................................... 46
Montagerichtung................................................................................................................................................... 46
Hängende Montage ............................................................................................................................................... 46
Adressierung des Geräts ........................................................................................................................................... 47
Signalausgang ........................................................................................................................................................ 47

Page 6 of 69 Obey 70 User Manual Rev. 7
Physische Fader-Zuweisung .................................................................................................................................. 47
Joystick-Zuweisung ................................................................................................................................................ 47
Kopieren einer physischen Fader-Zuweisung ........................................................................................................ 48
Fader-Umkehr (0–255/255–0) ............................................................................................................................. 48
Zurücksetzen des Systems ..................................................................................................................................... 48
4. Programmierung ................................................................................................................................... 49
Aufrufen des Programm-Modus ............................................................................................................................... 49
Beenden des Programm-Modus ............................................................................................................................... 49
Erstellen einer Szene ................................................................................................................................................ 49
Auswählen eines Chase ............................................................................................................................................ 49
Chase-Änderungen ................................................................................................................................................ 50
Hinzufügen eines Schritts zu einem Chase ........................................................................................................................... 50
Löschen einer Szene/eines Schritts in einem Chase ............................................................................................................. 50
Kopieren eines Multiplexers in ein Chase ............................................................................................................................ 50
5. Programmierung von Änderungen ..................................................................................................... 50
Löschen einer Szene ................................................................................................................................................. 50
Löschen aller Szenen ................................................................................................................................................ 50
Löschen eines Chase ................................................................................................................................................. 50
Löschen aller Chases ................................................................................................................................................. 50
Löschen eines Multiplexers von Szenen ................................................................................................................... 50
6. Wiedergabe ............................................................................................................................................ 51
Szenen-Wiedergabe ................................................................................................................................................. 51
Manuelle Szenen-Wiedergabe (Einzeln) ............................................................................................................... 51
Automatische Multiplexer-Wiedergabe ................................................................................................................ 51
Musikgesteuerte Multiplexer-Wiedergabe ........................................................................................................... 51
Wiedergabe von Chases ........................................................................................................................................ 52
Manuelle Chase-Wiedergabe ................................................................................................................................ 52
Automatische Chase-Wiedergabe ......................................................................................................................... 52
Musikgesteuerte Chase-Wiedergabe .................................................................................................................... 52
Wiedergabe-Änderungen ......................................................................................................................................... 53
MIDI-Betrieb .......................................................................................................................................................... 53
Einstellen des MIDI-Kanals .................................................................................................................................... 53
MIDI-Konfiguration (Reaktion) ................................................................................................................................. 53
Tap Sync .................................................................................................................................................................... 54
Nebelsteuerung ........................................................................................................................................................ 54
Stroboskop-Steuerung .............................................................................................................................................. 54
7. Technische Informationen ................................................................................................................... 55
Wartung .................................................................................................................................................................... 55
Technische Daten ..................................................................................................................................................... 55
1. Voordat u begint .................................................................................................................................... 56
Wat is er inbegrepen ................................................................................................................................................ 56
Claims ....................................................................................................................................................................... 56
Tekstconventies ........................................................................................................................................................ 56
Symbolen .................................................................................................................................................................. 56
Disclaimer ................................................................................................................................................................. 56
Beperkte Garantie .................................................................................................................................................... 57
Veiligheidsvoorschriften ........................................................................................................................................... 57
2. Inleiding.................................................................................................................................................. 58
Product Overzicht ..................................................................................................................................................... 58

Obey 70 User Manual Rev. 7 Page 7 of 69
Afmetingen ............................................................................................................................................................... 58
3. Instelling ................................................................................................................................................ 59
AC-stroom ................................................................................................................................................................. 59
Montage ................................................................................................................................................................... 59
Oriëntatie .............................................................................................................................................................. 59
Opbouw ................................................................................................................................................................. 59
Adressering van het product .................................................................................................................................... 60
Signaaluitvoer ........................................................................................................................................................ 60
Fysieke fadertoewijzing ......................................................................................................................................... 60
Toewijzing van de joystick ..................................................................................................................................... 60
Kopiëren van de fysieke fadertoewijzing .............................................................................................................. 61
Omgekeerde fader (0–255/255–0) ....................................................................................................................... 61
Resetten van het systeem ..................................................................................................................................... 61
4. Programmeren ....................................................................................................................................... 62
Naar de programmeringsmodus gaan ...................................................................................................................... 62
De programmeringsmodus verlaten ........................................................................................................................ 62
Creëren van een scène ............................................................................................................................................. 62
Creëren van een achtervolging................................................................................................................................. 63
Achtervolgingswijzigingen ..................................................................................................................................... 63
Een stap toevoegen aan een achtervolging ......................................................................................................................... 63
Een scène/stap in een achtervolging verwijderen ............................................................................................................... 63
Een geheugenbank in een achtervolging kopiëren .............................................................................................................. 63
5. Programmeringswijzigingen ................................................................................................................ 64
Een scène wissen ...................................................................................................................................................... 64
Alle scènes wissen .................................................................................................................................................... 64
Een achtervolging wissen ......................................................................................................................................... 64
Alle achtervolgingen wissen ..................................................................................................................................... 64
Een geheugenbank met scènes wissen .................................................................................................................... 64
6. Afspelen ................................................................................................................................................. 65
Scène afspelen .......................................................................................................................................................... 65
Handmatig afspelen van de scène (één) ............................................................................................................... 65
Automatisch afspelen van de geheugenbank ....................................................................................................... 65
Afspelen van de muziekbank ................................................................................................................................. 65
Afspelen van de achtervolging .............................................................................................................................. 65
Handmatig afspelen van de achtervolging ............................................................................................................ 65
Automatisch afspelen van de achtervolging ......................................................................................................... 65
Afspelen van de muziekachtervolging ................................................................................................................... 65
Afspeelwijzigingen .................................................................................................................................................... 66
MIDI-bediening ...................................................................................................................................................... 66
Instellen van het MIDI-kanaal ............................................................................................................................... 66
MIDI-configuratie (Antwoord) .................................................................................................................................. 66
Tiksynchronisatie ...................................................................................................................................................... 66
Nevelregeling ............................................................................................................................................................ 66
Stroboscoop-bediening ............................................................................................................................................ 66
7. Technische informatie .......................................................................................................................... 67
Onderhoud ............................................................................................................................................................... 67
Technische Specificaties ........................................................................................................................................... 67
Retouren ................................................................................................................................................................... 68

Page 8 of 69 Obey 70 User Manual Rev. 7
1. Before You Begin
What is Included
•
Obey 70
• 12 VDC, 500 mA External Power Supply
•
User Manual
Claims
If the box or the contents appear damaged from shipping, or show signs of
mishandling, notify the carrier immediately, not Chauvet
. Failure to do so in a timely
manner may invalidate your claim with the carrier. In addition, keep the container and
all the packing material for inspe
ction. For other issues, such as missing components
or parts, damage not related to shipping, or concealed damage, file a claim with
Chauvet within 7 days of delivery.
Text Conventions
Chauvet manuals use the following conventions to differentiate certain types of
information from the regular text.
Convention
Meaning
[10]
A DIP switch to be configured
<Menu>
A key to be pressed on the fixture’s control panel
1–512
A range of values
50/60
A set of values of which only one can be chosen
Settings
A menu option not to be modified (for example, showing the operating
mode/current status)
MENU > Settings
A sequence of menu options to be followed
<ENTER>
A key to be pressed on the product’s control panel
ON
A value to be entered or selected
Symbols
This manual uses the following symbols for information that requires special
attention.
Symbol
Meaning
Critical installation, configuration, or operation information. Failure to
comply may make the product not work, damage it, or cause harm to the
user.
Important installation or configuration information. The product may not
function correctly if this information is not used.
Useful information.
Disclaimer
Chauvet believes that the information contained in this manual is accurate in all
respects. However, Chauvet assumes no responsibility and specifically disclaims any
and all liability to any party for any loss, damage or disruption caused by any errors
or
omissions in this document, whether such errors or omissions result from
negligence, accident or any other cause. Chauvet reserves the right to revise the
content of this document without any obligation to notify any person or company of
such revision, how
ever, Chauvet has no obligation to make, and does not commit to
make, any such revisions. Download the latest version from
www.chauvetlighting.com.
The works of authorship contained in this manual,
including, but not limited to, all
design, text and images are owned by Chauvet.
© Copyright 2019 Chauvet & Sons, Inc. All rights reserved.
Electronically published by Chauvet in the United States of America.
CHAUVET, the Chauvet logo, D-Fi, and D-Fi USB a
re registered trademarks or
trademarks of Chauvet & Sons Inc. (d/b/a Chauvet and Chauvet Lighting) in the
United States and other countries. Other company and product names and logos
referred to herein may be trademarks of their respective companies.

Obey 70 User Manual Rev. 7 Page 9 of 69
Limited Warranty
FOR WARRANTY REGISTRATION AND COMPLETE TERMS AND CONDITIONS
PLEASE VISIT OUR WEBSITE.
For Customers in the United States and Mexico:
www.chauvetlighting.com/warranty-registration
For Customers in the United Kingdom, Republic of Ireland, Belgium, the
Netherlands, Luxembourg, France, and Germany:
www.chauvetlighting.eu/warranty-registration/
Chauvet warrants that this product shall be free from defects in material and
workmanship under normal use, for the period specified in and subject to the
exclusions
and limitations set forth in, the full limited warranty on our website. This
warranty extends only to the original purchaser of the product and is not transferable.
To exercise rights under this warranty, you must provide proof of purchase in the
form of
an original sales receipt from an authorized dealer that shows the product
name and date of purchase. THERE ARE NO OTHER EXPRESS OR IMPLIED
WARRANTIES. This warranty gives you specific legal rights. You may also have
other rights that vary from state to st
ate and country to country. This warranty is valid
only in the United States, United Kingdom, Republic of Ireland, Belgium, the
Netherlands, Luxembourg, France, Germany and Mexico. For warranty terms in
other countries, please consult your local distributor.
Safety Notes
• Please keep this User Manual for future consultation. If you sell the unit to
another user, be sure that they also receive this manual.
• Always make sure that you are connecting the product to the proper voltage,
and that the line voltage you are connecting to is not higher than that stated on
the sticker or rear panel of the fixture.
• This product is intended for indoor use only! To prevent risk of fire or shock, do
not expose fixture to rain or moisture.
• Make sure there are no flammable materials close to the unit while operating.
• The unit must be installed in a location with adequate ventilation, at least 20″
(50 cm) from adjacent surfaces. Be sure that no ventilation slots are blocked.
• Always disconnect from power source before servicing or replacing fuse and be
sure to replace with same fuse source.
• Maximum ambient temperature (Ta) is 104 °F (40 °C). Do not operate fixture at
temperatures higher than this.
• In the event of a serious operating problem, stop using the unit immediately.
Never try to repair the unit by yourself. Repairs carried out by unskilled people
can lead to damage or malfunction. Please contact the nearest authorized
technical assistance center.
• Never connect the device to a dimmer pack.
• Make sure the power cord is never crimped or damaged.
• Never disconnect the power cord by pulling on the cord.
• Avoid direct eye exposure to the light source while it is on.
• To eliminate wear and improve its lifespan, during periods of non-
use completely
disconnect from power via breaker or by unplugging it.
Please read these instructions carefully. It includes important
information about the installation, usage, and maintenance
of this product.

Page 10 of 69 Obey 70 User Manual Rev. 7
2. Introduction
Product Overview
Dimensions
Scene Selection Buttons
Chase Selection Buttons
LCD Display
Mode Modification Area
Speed Time Fader
Fade Time Fader
Fixture Selection Buttons
Page Selection Button
Strobe Button
Fog Button
X/Y Joystick
MIDI In
DMX Polarity
Switch
DMX Out
Connections
Description
Sticker
Power On/Off
Fog Out
Strobe Out
DC Power In

Obey 70 User Manual Rev. 7 Page 11 of 69
3. Setup
AC Power
This product requires an external power supply, which is included. The included
power supply is rated for 100–
240 VAC, 50/60 Hz, 500 mA max. Before powering on
the unit, make sure the line voltage to which you are
connecting it is within the range
of accepted voltages listed on the label affixed to the product
or refer to the
Technical Specifications. The
listed current rating indicates average current draw
under normal conditions.
• Always connect the fixture to a grounded circuit. Never connect the fixture
to a rheostat (variable resistor) or dimmer circuit, even if the rheostat or
dimmer channel is used only as a 0 to 100% switch.
• To eliminate wear and improve its lifespan, during periods of non-
use
completely disconnect from power via breaker or by unplugging it.
Mounting
Before mounting the product, read and follow the safety recommendations indicated
in the Safety Notes.
Orientation
The Obey 70 may be mounted in any position; make sure adequate ventilation is
provided around the product.
Rigging
•
Choose a location for the product that gives easy access for maintenance and
programming.
•
Make sure that the structure or surface onto which you are mounting the product
can support the product’s weight (see Technical Information).
• When rigging the product onto a truss, you should use a mounting clamp of
appropriate weight capacity and a safety cable.
Product
Addressing
The Obey 70 can control up to 12 separate fixtures. Each fixture must be set to
predetermined DMX addresses. Please see the chart below for the DMX starting
addresses of each of the 12 fixtures.
Product
Address
DIP
switch
Product
Address
DIP
switch
Product
Address
DIP
switch
1
1
1
5
129
1,8
9
257
1,9
2
33
1,6
6
161
1,6,8
10
289
1,6,9
3
65
1,7
7
193
1,7,8
11
321
1,7,9
4
97
1,6,7
8
225
1,6,7,8
12
353
1,6,7,9

Page 12 of 69 Obey 70 User Manual Rev. 7
Signal Output
In order to use this controller with multiple fixtures, you must daisy chain from the
output of the Obey 70, using DMX cables to link from one fixture to another.
Physical Fader
Assignment
Use this feature to combine or unify fixture control attributes for different fixtures. For
example; if you are controlling 4 moving mirrors and 4 moving yokes, the color, gobo,
and dimmer channels may not line up ideally on the physical
faders. Use this
function to reassign these channels to faders 1, 2, and 3:
1. Press <PROGRAM> and <TAP SYNC/DISPLAY>. This will enter the physical fader
assignment mode.
2. Select one of the fixtures: <FIXTURE 1–12>
3. Move the <SPEED> fader to select the physical slider (control channel).
4. Move the <FADE TIME> fader to select the DMX channel.
5. Press <MIDI/ADD> to save the setting.
6. Repeat steps 3–5 until all of the faders have been assigned for the fixture.
7. Press <PROGRAM> and <TAP SYNC/DISPLAY> two times to exit physical fader
assignment mode.
Reset the fader assignment back to the original, factory settings by performing
a soft reset. Please see the section “Resetting the System”
for detailed
instructions on this procedure.
The joystick will be displayed as [SLIDERT1/SLIDERP1] for Page A, and
[SLIDERT2/SLIDERP2] for Page B.
The joystick is pre assigned to channels 15/16 (Page A) and 31/32 (Page B).
When moving channels, you must relocate the previously addressed channel
to a new location. For example: w
hen moving channel 12 to channel 1, channel
1 must be relocated to a new channel.
Joystick
Assignment
The joystick is designed for moving head & scanning mirror products.
1. Press <PROGRAM> and <TAP SYNC/DISPLAY>. This will enter the physical fader
assignment mode.
2. Select one of the products: <FIXTURE 1–12> (this will be the fixture that you want to
modify the channels for).
3. Move the <SPEED> fader to select the pan control [SLIDERP1/1].
4. Move the <FADE TIME> fader to select the DMX channel to assign it to.
5. Press <MIDI/ADD> to save the setting.
6. Repeat steps 3-5 for the tilt [SLIDERT1/2].
7. Press <PROGRAM> and <TAP SYNC/DISPLAY> two times to exit physical fader
assignment mode.
When assigning the joystick to a channel (for example, channel two), you must
also relocate channel two to a new location.

Obey 70 User Manual Rev. 7 Page 13 of 69
Copying Physical
Fader Assignment
This process will copy the physical fader assignment from one fixture into another.
1. Press <PROGRAM> and <TAP SYNC/DISPLAY>. This will enter the physical fader
assignment mode.
2. Press & hold the fixture button that contains the desired physical fader assignment.
3.
While still holding the previous fixture button, press & hold the fixture that you want to copy
into.
4. While still holding the two fixture buttons above, press & hold <MIDI/ADD>.
5. While still holding all three buttons down, release the fixture selected in step # 2 above.
6. While still holding down <MIDI/ADD>, release the fixture selected in step # 3 above.
7. Release <MIDI/ADD>.
8. All fixture LEDs will flash.
9. Press <PROGRAM> and <TAP SYNC/DISPLAY> two times to exit physical fader
assignment mode.
This will not copy the fader-reverse setting(s).
Fader Reverse
(0–255/255–0)
This function will allow you to reverse the DMX output of the physical fader(s).
1. Press <PROGRAM> and <TAP SYNC/DISPLAY> two times. This will enter the fader
reverse assignment mode.
2. Select one of the fixtures: <FIXTURE 1–12> (this will be the fixture that you want to modify
the channels for).
3. Move the <SPEED> fader to select the physical slider (control channel).
4. Move the <FADE TIME> fader to activate/deactivate this function.
5. Press <MIDI/ADD> to save the setting.
6. Repeat steps 3–5 until all of the faders have been assigned for the fixture.
7. Press <PROGRAM> and <TAP SYNC/DISPLAY> one time to exit fader reverse
assignment mode.
Resetting the
System
Use this function to revert all settings and scenes back to the state they were in
when the product left the factory.
1. Turn off the unit.
2. Press and hold <BANK UP> and <AUTO/DEL>.
3. Turn on power to the unit (while still holding <BANK UP> and <AUTO/DEL>).
4. All LEDs will blink to indicate a successful reset.
This will erase all scenes, chases, and other settings!
This process may take
up to 30 seconds to complete.
4. Programming
Entering Program
Mode
No programming may be done on the Obey 70 without first entering program mode.
You will find references to this process in many other sections of this user
manual.
Press and hold <PROGRAM> for three seconds to exit program mode.
1. Turn on the controller.
2. Press and hold <PROGRAM> for three seconds.
3. When the LED displays Program LED lights, you have entered program mode.
Exiting Program
Mode
You will find references to this process in many other sections of this user manual.
1. While currently in program mode, press and hold <PROGRAM> for three seconds.
2. When the LED display Program LED turns off, you have exited program mode.
Creating a Scene
Use this function to create a static look on stage.
1. Turn on the controller.
2. Enter program mode.
3. Select one or more fixtures.
4. Using the 8 sliders, modify the value of the desired channel(s).
5. When the desired look has been achieved, press <MIDI/ADD>.
6. Use <BANK UP/DOWN> to select a desired bank (30 possible) to save the scene to.
7. Once you have navigated to the desired bank, press the <SCENE> (1–8) to save the
scene directly to.
8. All LEDs will flash to indicate that the scene has been saved.
9. Repeat steps 3–8 until you are finished programming all scenes.
10. Exit program mode.
You may select more than one fixture at a time. If you do so, you will not have
separate control over each of them.
You may program multiple fixtures into the
same scene.
Use PAGE A/B to switch between the 2 pages for the selected fixture.

Page 14 of 69 Obey 70 User Manual Rev. 7
Create a Chase
A chase is a series of scenes. Program the scenes before programming the chases.
1. Enter program mode.
2. Select the chase that will be programmed (1–6).
3. Call up the first scene for the chase by pressing the appropriate <SCENE> button. You
may use <BANK UP/DOWN> to navigate through the different pages of the scenes.
4. Once the controller is outputting the correct scene to the lights, press <MIDI/ADD>.
5. All LEDs will flash when the scene is added to the chase.
6. Call up the second scene for the chase by pressing the appropriate <SCENE> button.
7. Once the controller is outputting the correct scene to the lights, press <MIDI/ADD>.
8. All LEDs will flash when the scene is added to the chase.
9. Continue through steps 6–8 until all of the scenes have been added to the chase.
10. Exit program mode.
Chase Modifications
Adding a Step to a
Chase
This function will add a step after any step within a chase.
1. Enter program mode.
2. Activate the chase.
3. Using <BANK UP/DOWN>, scroll through the banks until you arrive at the bank that
contains the new scene.
4. Press <TAPSYNC/DISPLAY>. The display will change to step display mode.
5. Using <BANK UP/DOWN>, scroll to the step that will appear before the new step.
6. Press <MIDI/ADD>. The current step on the display will increase by one.
7. Press the new scene: <SCENE 1–8>.
8. Press <MIDI/ADD>. All LEDs on the controller will flash.
Delete a Scene/Step in a
Chase
1. Enter program mode.
2. Activate the chase.
3. Press <TAPSYNC/DISPLAY>. The display will change to step display mode.
4. Using <BANK UP/DOWN>, scroll to the step that you want to delete.
5. Press <AUTO/DEL>.
6. All LEDs on the controller will flash.
Copy a Bank into a
Chase
This function copies an entire bank after any existing steps in a chase.
1. Enter program mode.
2. Activate the desired chase.
3. Using <BANK UP/DOWN>, scroll through the banks until you arrive at the bank that you
want to copy into the chase.
4. Press <MUSIC/BANK COPY> and <MIDI/ADD> simultaneously.
5. All LEDs on the controller will flash.
5. Programming Modifications
Delete One Scene
Use this function to delete one of the scenes in the controller. Repeat this process for
each scene that you need to delete.
1. Enter program mode.
2. Use <BANK UP/DOWN> to navigate program banks.
3. Press and hold the <AUTO/DEL> button while pressing the SCENE you want to delete.
Delete All Scenes
Use this function to delete all of the scenes in the controller.
1. Turn off the unit.
2. Press and hold <BANK DOWN> and <PROGRAM>.
3. Turn on power to the unit (while still holding <BANK DOWN> and <PROGRAM>).
4. When all LEDs blink, the function is successfully completed.
Delete a Chase
1. Enter program mode.
2. Activate the chase to be deleted: <CHASE 1–6>.
3. Press <AUTO/DEL> and <CHASE 1–6> simultaneously.
4. When all LEDs blink, the function is successfully completed.
Delete All Chases
1. Enter program mode.
2. Press <AUTO/DEL> and <BANK DOWN> simultaneously.
3. While still holding the buttons down, turn the controller OFF.
Delete a Bank of
Scenes
1. Enter program mode.
2. Activate the BANK that you want to delete.
3. Press <AUTO/DEL> and the <MUSIC/BANK COPY> simultaneously.
4. When all LEDs blink, the function is successfully completed.

Obey 70 User Manual Rev. 7 Page 15 of 69
6. Playback
Scene Playback
Manual Scene
Playback (Single)
This controller is capable of playing back a single scene at a time. The <SPEED>
and <FADE TIME> faders will not function in this mode.
Please see the instructions
below for further explanation.
1. Set the controller in [MANUAL] playback mode. If [AUTO] or [MUSIC] is visible on the
display, press the appropriate button(s) to disable the mode(s). When these modes are
disabled, the controller will be in manual scene playback mode.
2. Using <BANK UP/DOWN>, navigate to the appropriate bank of the desired scene.
3. Activate the appropriate scene by pressing <SCENE 1–8>.
4. Activate another scene, if desired. This will disable any previously selected scene.
Auto Bank Playback
This controller is capable of playing back all 8 scenes on one of the 30 banks. These
scenes will play back in sequential order. The <SPEED> and <FADE TIME>
faders
are used to control the transition between the individual scenes.
Please see the
instructions below for further explanation.
1. Press <AUTO/DEL> to set the controller in [AUTO] playback mode.
2. Using <BANK UP/DOWN>, navigate to the appropriate bank of scenes.
3. Use the <SPEED> and <FADE TIME> faders to adjust the scene transition.
The scenes will play in sequential order within the bank.
Only programmed
scenes will play back. Empty scenes will be skipped during playback.
Music Bank
Playback
This controller is capable of playing back all 8 scenes on one of the 30 banks. These
scenes will play back in sequential order. The triggering from
one scene to another
will be
synchronized to the beat of the music. Please see the instructions below for
further explanation.
1. Press <MUSIC/BANK COPY> to set the controller in [MUSIC] playback mode.
2. Using <BANK UP/DOWN>, navigate to the appropriate bank of scenes.
The scenes will play in sequential order within the bank.
Only programmed scenes will play back.
Empty scenes will be skipped during
playback.
Chase Playback
There are three different modes of playback for the chases in the Obey 70. Please
see the sections below for detailed instructions on these modes.
You may activate multiple chases in this controller.
They will play back in
sequential order.
Manual Chase
Playback
You may play back the individual scenes within a chase manually.
1. Enter program mode.
2. Activate the desired chase.
3. Press <TAP SYNC/DISPLAY>.
4. Use <BANK UP/DOWN> to scroll through the scenes within the chase. The current scene
will be shown on the display as [STEP ***].
Auto Chase
Playback
You may control the playback of the chases in this controller by using the <SPEED>
and <FADE TIME> faders. Please see the instructions below for further explanation.
1. Activate the desired chase by pressing <CHASE 1–6>.
2. Press <AUTO/DEL>.
3. Using the <SPEED> and <FADE TIME> faders, adjust the playback speed and transition
between the individual scenes (steps).
Music Chase
Playback
You may synchronize the playback of the chases in this controller to the beat of the
music. Please see the instructions below for further explanation.
1. Activate the desired chase by pressing <CHASE 1–6>.
2. Press <MUSIC/BANK COPY>.

Page 16 of 69 Obey 70 User Manual Rev. 7
Playback Modifications
MIDI Operation
The controller will only respond to MIDI commands on the MIDI channel when it is
set to
full stop. Perform all MIDI control using Note on commands. All other MIDI
instructions are ignored. To stop a chase, send the blackout on note.
The controller is always in MIDI receive mode. It is not necessary for the
display to read [MIDI] for the controller to respond to MIDI commands.
Setting the MIDI
Channel
1. Press <MIDI/ADD>. The display should read [MIDI] and the current channel assignment.
2. Using <BANK UP/DOWN>, select the MIDI channel (1–16).
3. Press <MIDI/ADD> to save the setting.
MIDI
Configuration
(Response)
MIDI Note
Function (Turns On/Off)
00–07
Scenes 1–8, Bank 1
08–15
Scenes 1–8, Bank 2
16–23
Scenes 1–8, Bank 3
24–31
Scenes 1–8, Bank 4
21–39
Scenes 1–8, Bank 5
40–47
Scenes 1–8, Bank 6
48–55
Scenes 1–8, Bank 7
56–63
Scenes 1–8, Bank 8
64–71
Scenes 1–8, Bank 9
72–79
Scenes 1–8, Bank 10
80–87
Scenes 1–8, Bank 11
88–95
Scenes 1–8, Bank 12
96–103
Scenes 1–8, Bank 13
104–111
Scenes 1–8, Bank 14
112–119
Scenes 1–8, Bank 15
120
Chase 1
121
Chase 2
122
Chase 3
123
Chase 4
124
Chase 5
125
Chase 6
126
Blackout
Tap Sync
This feature is another method of adjusting the playback speed. It functions in the
same modes in which the <SPEED>
fader is active. Please see the steps below for
the operation.
1. Press <TAP SYNC/DISPLAY> three (3) times. The timing between pressing this button
determines the speed.
2. Repeat, as necessary, until the time has been set to the desired speed.
It may be a good idea to synchronize pressing this button three times along
with the beat of the musi
c (bpm). This will allow the lights to synchronize with
the music.
Fog Control
The Obey 70 has a dedicated fog button that will work with compatible Chauvet fog
machines. This button works with the dedicated 5-
pin connector that is located on
the back panel of the controller.
When the fog LED is on, it indicates that the fog machine has reached the
maximum temperature. When the LED is not on
, the fog machine may still
function, but it will not operate for maximum rated time, as it will begin below
the maximum temperature.
Strobe Control
The Obey 70 has a dedicated strobe button that will work with compatible Chauvet
products. This button works with the dedicated ¼”
connector that is located on the
back panel of the controller.
The LED indicator for the strobe button will flash at the same rate as the strobe
light(s).

Obey 70 User Manual Rev. 7 Page 17 of 69
7. Technical Information
Maintenance
To maintain optimum performance and minimize wear, fixtures should be cleaned
frequently. Usage and environment are contributing factors in determining frequency.
As a general rule, fixtures should be cleaned at least twice a month. Dust build-
up
reduces light output performance and can cause overheating. This can lead to
reduced lamp life and increased mechanical wear. Be sure to power off fixture before
conducting maintenance.
1. Unplug fixture from power.
2. Use a vacuum or air compressor and a soft brush to remove dust collected on
external vents.
3. After the fixture is at room temperature, clean all lenses with a mild solution of
glass cleaner or Isopropyl Alcohol and a soft lint free cotton cloth or lens tissue.
4. Apply solution to the cloth or tissue and drag dirt and grime to the outside of the
lens.
5. Gently polish optical surfaces until they are free of haze and lint.
Always dry the parts carefully after cleaning them.
Never spin a fan using compressed air.
Technical
Specifications
Dimensions and
Weight
Length
Width
Height
Weight
19 in (483 mm)
7 in (178 mm)
2.8 in (71 mm)
7.3 lb (3.3 kg)
Note: Dimensions in inches rounded to the nearest decimal digit.
Power
Power Supply Type
Range
Voltage Selection
External power supply
100–240 V, 50/60 Hz
Auto-ranging
Parameter
120 V, 60 Hz
230 V, 50 Hz
Consumption
<1 W
<1 W
Operating/Inrush
current
0.2 A 0.2 A
DMX Refresh Rate
25 Hz
Thermal
Maximum External Temp.
104 °F (40 °C)
DMX
I/O Connectors
Connector Type
Channel Range
3-pin XLR
Sockets
384
Ordering
Product Name
Item Code
Item Number
Obey 70
09080234
OBEY70

Page 18 of 69 Obey 70 User Manual Rev. 7
To get support or return a product:
• If you are located in the US, contact Chauvet World Headquarters.
• If you are located in the UK or Ireland, contact Chauvet Europe Ltd.
• If you are located in France, contact Chauvet France.
• If you are located in Germany, contact Chauvet Germany.
• If you are located in Mexico, contact Chauvet Mexico.
• If you are located in Benelux, contact Chauvet Europe BVBA.
• If you are located in any other country, DO NOT contact Chauvet. Instead,
contact your local distributor. See www.chauvetlighting.com for distributors
outside the US, UK, Ireland, Mexico, or Benelux.
If you are located outside the US, UK, Ireland, Mexico, or Benelux, contact your
distributor of record and follow their instructions on how to
return Chauvet
products to them. Visit our website www.chauvetlighting.com for contact details.
Returns
Call the corresponding Chauvet Tech Support office and request a Return
Merchandise Authorization (RMA) number before shipping the product. Be prepared
to provide the model number, serial number, and a brief description of the cause for
the return.
You must send the merchandise prepaid
, in its original box, and with its original
packing and accessories. Chauvet will not issue call tags.
Clearly label the package with the RMA number. Chauvet
will refuse any product
returned without an RMA number.
Write the RMA number on a properly affixed label. DO NOT write the RMA number
directly on the box.
Before sending the product, clearly write the following information on a piece of
paper and place it inside the box:
• Your name
• Your address
• Your phone number
• The RMA number
• A brief description of the problem
Be sure to pack the product properly. Any shipping damage resulting from
inadequate packaging will be your responsibility. FedEx packing or double-
boxing
are recommended.
Chauvet reserves the right to use its own discretion to repair or replace
returned product(s).

Obey 70 Manual de Usuario Rev. 7 Página 19 de 69
1. Antes De Empezar
Qué va Incluido
•
Obey 70
• Fuente de Alimentación Externa de12 VDC, 500 mA
•
Manual de Usuario
Reclamaciones
Si la caja o los contenidos parecen dañados por el transporte, o muestran signos de
manejo incorrecto, notifíqueselo al transportista inmediatamente, no a Chauvet
. Si
no lo hace oportunamente, puede quedar invalidada su reclamación al transportista.
Además, guarde la caja y todo el material de embalaje para su inspección. Para
otras incidencias, como componentes o piezas que falten, daños no relacionados
con el transporte o daños no evidentes, presente una reclamación a Chauvet
en el
plazo de 7 días de la entrega.
Convenciones de
Texto
Los manuales de Chauvet usan las siguientes convenciones para diferenciar ciertos
tipos de información del texto normal.
Convention
Meaning
[10]
Un conmutador DIP para configurar
<Menu>
Una tecla que se tiene que pulsar en el panel de control del aparato
1–512
Un rango de valores
50/60
Un conjunto de valores de los cuales solo se pude escoger uno
Configuración
Una opción de menú que no se modifica (por ejemplo, mostrar el modo
de funcionamiento/estado actual)
MENÚ >
Configuración
Una secuencia de opciones de menú que ha de seguirse
<ENTER>
Una tecla que se tiene que pulsar en el panel de control del producto
ON
Un valor que se tiene que introducir o seleccionar
Símbolos
Este manual usa los siguientes símbolos para información que requiere atención
especial.
Symbol
Meaning
Instalación, configuración o información sobre funcionamiento crítica. Su
incumplimiento podría hacer que el producto no funcione, que se averíe, o
causar daños al usuario.
Instalación o información de configuración importante. El producto puede
no funcionar correctamente si esta información no se usa.
Información útil.
Exención de
Responsabilidad
La información y especificaciones contenidas en este Manual de Usuario están
sujetas a cambio sin previo aviso. Chauvet no asume responsabilidad de ningún tipo
por cualquier error u omisión, y se reserva el derecho a revisar o rehacer este
manual en cualqu
ier momento. La versión más reciente de este manual se puede
descargar de http://www.chauvetlighting.com.
© Copyright 2019 Chauvet. Todos los derechos reservados.
Publicado electrónicamente por Chauvet en los Estados Unidos de América.
CHAUVET, el logotipo de Chauvet, D-Fi y D-
Fi USB son marcas comerciales
registradas o marcas comerciales de Chauvet & Sons Inc. (d / b / a Chauvet and
Chauvet Lighting) en los Estados Unidos y otros países. Otros nombres y logot
ipos
de compañías y productos a los que se hace referencia en este documento pueden
ser marcas comerciales de sus respectivas compañías.

Página 20 de 69 Obey 70 Manual de Usuario Rev. 7
Garantía Limitada
PARA VER EL REGISTRO DE GARANTÍA Y LOS TÉRMINOS Y CONDICIONES
COMPLETOS, VISITE NUESTRO SITIO WEB.
Para clientes en los Estados Unidos y México:
www.chauvetlighting.com/warranty-registration
Para clientes en Reino Unido, República de Irlanda, Bélgica, Países Bajos,
Luxemburgo, Francia y Alemania: www.chauvetlighting.eu/warranty-registration/
Chauvet garantiza que este producto estará libre de defectos de material y mano de
obra en condiciones de us
o normales, durante el periodo especificado, sujeto
siempre a las exclusiones y limitaciones establecidas en la garantía limitada
completa de nuestro sitio web. Esta garantía se concede únicamente al comprador
original del producto y no es transferible. Pa
ra ejercer los derechos que otorga esta
garantía, usted debe proporcionar una prueba de compra en forma de un recibo de
compra original, expedido por un distribuidor autorizado, donde figure el nombre del
producto y la fecha de compra. NO EXISTEN OTRAS GAR
ANTÍAS EXPRESAS NI
IMPLÍCITAS. Esta garantía le otorga derechos legales específicos. Es posible que a
usted le asistan otros derechos, que variarán dependiendo del estado o del país.
Esta garantía solamente es válida en los Estados Unidos, Reino Unido, Rep
ública
de Irlanda, Bélgica, Países Bajos, Luxemburgo, Francia, Alemania y México. Para
conocer los términos de garantía en otros países, consulte a su distribuidor local.
Notas de
Seguridad
• Guarde este Manual de Usuario para futuras consultas. Si vende este producto
a otro usuario, asegúrese de que este recibe también este manual.
• As
egúrese siempre de que conecta el producto a la tensión adecuada, y de que
la tensión de la línea a la que está conectándolo no es superior a la establecida
en la pegatina o en el panel posterior del aparato.
• ¡Este producto está destinado al uso en interiores solamente! Para evitar
riesgos de incendio o descarga, no exponga el aparato a la lluvia o la humedad.
• Asegúrese de que no hay materiales inflamables cerca de la unidad cuando
esté en funcionamiento.
• La unidad debe instalarse en una ubicación con venti
lación adecuada, al menos
a 20'' (50cm) de superficies adyacentes. Asegúrese de que no se han
bloqueado las ranuras de ventilación.
• Desconecte siempre de la fuente de alimentación antes de repararlo o sustituir
el fusible, y asegúrese de sustituir el fusible con uno de la misma clase.
• La máxima temperatura ambiente (Ta) es de 104 °F (40 °C). No haga funcionar
el aparato a temperaturas más altas que esta.
• En caso de un problema grave de funcionamiento, deje de usar la unidad
inmediatamente. Nunca intente reparar el producto por usted mismo. Las
reparaciones llevadas a cabo por personal no cualificado pueden provocar
averías o funcionamiento defectuoso. Póngase en contacto con el centro de
asistencia técnica autorizado más cercano.
• Nunca conecte el dispositivo a un regulador de intensidad.
• Asegúrese de que el cable de alimentación no está retorcido ni estropeado.
• Nunca desconecte de la alimentación tirando del cable.
• Evite la exposición directa de los ojos a la fuente de luz mientras esté
encendido.
• Para evitar un desgaste innecesario y alargar su vida útil, desconecte
complemente el producto de la alimentación, mediante el interruptor o
desenchufándolo, durante los periodos en los que no se use.
Por favor, lea estas instrucciones detenidamente. Incluyen
información importante sobre la instalación, uso y
mantenimiento de este producto.
La page est en cours de chargement...
La page est en cours de chargement...
La page est en cours de chargement...
La page est en cours de chargement...
La page est en cours de chargement...
La page est en cours de chargement...
La page est en cours de chargement...
La page est en cours de chargement...
La page est en cours de chargement...
La page est en cours de chargement...
La page est en cours de chargement...
La page est en cours de chargement...
La page est en cours de chargement...
La page est en cours de chargement...
La page est en cours de chargement...
La page est en cours de chargement...
La page est en cours de chargement...
La page est en cours de chargement...
La page est en cours de chargement...
La page est en cours de chargement...
La page est en cours de chargement...
La page est en cours de chargement...
La page est en cours de chargement...
La page est en cours de chargement...
La page est en cours de chargement...
La page est en cours de chargement...
La page est en cours de chargement...
La page est en cours de chargement...
La page est en cours de chargement...
La page est en cours de chargement...
La page est en cours de chargement...
La page est en cours de chargement...
La page est en cours de chargement...
La page est en cours de chargement...
La page est en cours de chargement...
La page est en cours de chargement...
La page est en cours de chargement...
La page est en cours de chargement...
La page est en cours de chargement...
La page est en cours de chargement...
La page est en cours de chargement...
La page est en cours de chargement...
La page est en cours de chargement...
La page est en cours de chargement...
La page est en cours de chargement...
La page est en cours de chargement...
La page est en cours de chargement...
La page est en cours de chargement...
La page est en cours de chargement...
-
 1
1
-
 2
2
-
 3
3
-
 4
4
-
 5
5
-
 6
6
-
 7
7
-
 8
8
-
 9
9
-
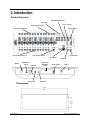 10
10
-
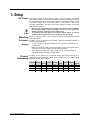 11
11
-
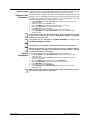 12
12
-
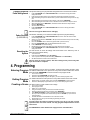 13
13
-
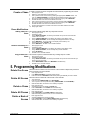 14
14
-
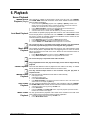 15
15
-
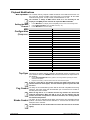 16
16
-
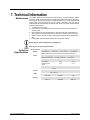 17
17
-
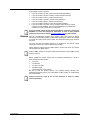 18
18
-
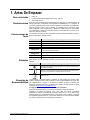 19
19
-
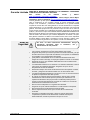 20
20
-
 21
21
-
 22
22
-
 23
23
-
 24
24
-
 25
25
-
 26
26
-
 27
27
-
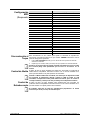 28
28
-
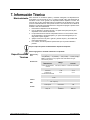 29
29
-
 30
30
-
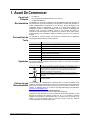 31
31
-
 32
32
-
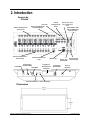 33
33
-
 34
34
-
 35
35
-
 36
36
-
 37
37
-
 38
38
-
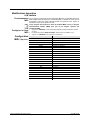 39
39
-
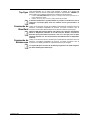 40
40
-
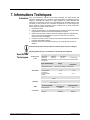 41
41
-
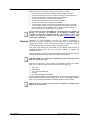 42
42
-
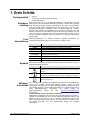 43
43
-
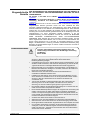 44
44
-
 45
45
-
 46
46
-
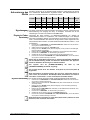 47
47
-
 48
48
-
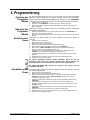 49
49
-
 50
50
-
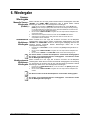 51
51
-
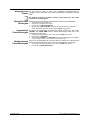 52
52
-
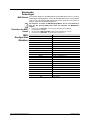 53
53
-
 54
54
-
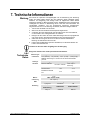 55
55
-
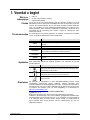 56
56
-
 57
57
-
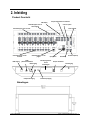 58
58
-
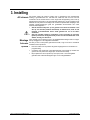 59
59
-
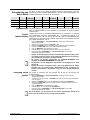 60
60
-
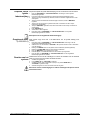 61
61
-
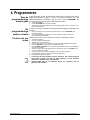 62
62
-
 63
63
-
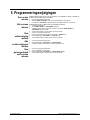 64
64
-
 65
65
-
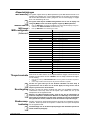 66
66
-
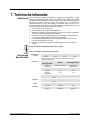 67
67
-
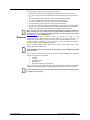 68
68
-
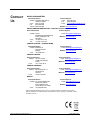 69
69


CHAUVET DJ Obey 70 DMX Controller Manuel utilisateur
- Taper
- Manuel utilisateur
- Ce manuel convient également à
dans d''autres langues
Documents connexes
-
Chauvet Obey 40 DMX Controller Manuel utilisateur
-
CHAUVET DJ Obey 40 D-Fi 2.4 Manuel utilisateur
-
-
-
-
-
-
-
Autres documents
-
Beamz DMX384 Le manuel du propriétaire
-
Chauvet Obey 10 Manuel utilisateur
-
-
 Ibiza Light LC192DMX Le manuel du propriétaire
-
 HQ Power vdpc174 Manuel utilisateur
-
 HQ Power 192-channel DMX controller with joystick spécification
-
Nicols C 2416 Manuel utilisateur
-
HQ Power VDPC145 Manuel utilisateur
-
 HQ Power VDPDMXC145 Manuel utilisateur
-
 afx light DMX512-PRO Le manuel du propriétaire


