
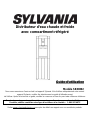
Hot & Cold Water Dispenser
with Refrigrated Storage Compartment
Instruction Manual
Model # SE80092
Thank you for purchasing this Sylvania product.
Please read this Instruction Manual carefully before using this Sylvania product to ensure proper use.
After reading this manual, please keep it in a safe place and refer to it when necessary.
For additional information on this product or for help with set-up please call the Customer
Help Line at 1-800-287-4871
Visit www.sylvaniaelectronics.ca for more information about our great products

2
TABLE OF CONTENTS
Safety Instructions……………………………...3
Safety Precautions………………………….3
Grounding Instructions……………………..3
Proper Disposal of the Dispenser…………4
Parts Overview……………………………..........4
Proper Installation and Location…………......5
Prior to First Time Use………………………....5
Electronic Controls & Display Overview.......5
Setting Up the Water Dispenser……...……....6
Using the Water Dispenser……...……............7
Using the Refrigerated Compartment.……....7
Specifications…………………………………....7
Cleaning and Caring for the Dispenser ….....8
Cleaning the Dispenser Cabinet…………..8
Cleaning the Condenser…………………...8
Cleaning the Drip Tray and Grille…………8
Cleaning the Water Tanks…………………8
Draining the Dispenser…………………….8
Circuit Diagram……………………………..9
Troubleshooting Tips……………………….... 9
Warranty Statement………………………...... 10

3
SAFETY INSTRUCTION
WARNING!
Use this appliance only for its intended purpose as described in this Owner’s Manual.
SAFETY PRECAUTIONS
When using electrical appliances, basic safety precautions should be followed, including the following:
• This water dispenser must be properly installed and
located in accordance with these instructions before
it is used.
• Do not allow children to climb, stand or hang on the
outside of the dispenser. The dispenser could tip
over and get damaged and seriously injure
somebody.
• Do not store or use gasoline or other flammable
vapors and liquids in the vicinity of this or any other
appliance.
• Unplug the water dispenser before cleaning and
making repairs.
Note: We strongly recommend that any servicing
be performed by a qualified individual. If your
Sylvania water dispenser requires servicing or
you have technical questions, please call
toll free 1-800-287- 4871.
• Do not use this dispenser to dispense anything other
than water.
• Do not plug in the power cord or turn on the power
when the water dispenser is empty.
• Never turn the water dispenser upside-down or tilt it
more than 45º.
• Wipe up any water spills immediately after loading
or unloading water bottles.
WARNING: Do not use with water that is
microbiologically unsafe or of unknown quality
without adequate disinfection.
• The dispenser heats water to a temperature of
approximately 90ºC. Water temperatures above
52ºC can cause severe burns. Please operate the
dispenser carefully
GROUNDING INSTRUCTIONS
WARNING- improper use of the grounding
plug can result in a risk of electric shock.
This appliance must be grounded. In the event
of an electrical short circuit, grounding
reduces the risk of electric shock by providing
an escape wire for the electric current.
This appliance is equipped with a power cord
which contains a grounding wire with a
grounding plug. The plug must be plugged into
an outlet that is properly installed and
grounded.
Consult a qualified electrician or service
technician if the grounding instructions are
not completely understood, or if doubt
exists as to whether the appliance is
properly grounded.
If the outlet is a standard 2-prong wall outlet, it is your
personal responsibility and obligation to have it
replaced with a properly grounded 3-prong wall outlet.
Do not under any circumstances cut or remove the
third (ground) prong from the power cord.
Do not use an adapter plug with this appliance.
Do not use an extension cord with this appliance. If
the power cord is too short, have a qualified
electrician or service technician install an outlet near
the appliance.
For best operation, plug the appliance into its own
electrical outlet on a dedicated circuit to prevent
flickering of lights, blowing of fuse, or tripping of circuit
breaker.

4
PROPER DISPOSAL OF THE WATER DISPENSER
CFC DISPOSAL
Your old water dispenser may contain a cooling system that used CFC’s (chlorofluorocarbons). CFC’s are
believed to harm stratospheric ozone. If you are throwing away your old dispenser, make sure the CFC
refrigerant is removed for proper disposal by a qualified service person. If you intentionally release this CFC
refrigerant you can be subject to fines and imprisonment under provisions of environmental legislation.
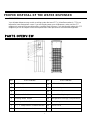
PARTS OVERVIEW
No. Part Name No. Part Name
1
bottle supporter
9
cold water dispenser button
2
power button
10
hot water tap
3
set mode button
11
cold water tap
4
silent mode button
12
removable drip tray
5
heating mode button
13
refrigerated storage compartment
6
cooling mode button
14
drain plug
7
°C / °F temperature readout button
15
power cord
8
hot water dispenser button
16
condenser

5
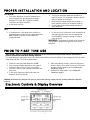
Electronic Controls & Display Overview
PROPER INSTALLATION AND LOCATION
LOCATION
• The water dispenser should be installed in an
environment where the temperature ranges
between 10ºC and 38ºC. Relative humidity
should not be higher than 90%
• Avoid direct sunshine
TIPS
• If the dispenser is not going to be used for an
extended period of time, turn the water dispenser
OFF, unplug the power cord and drain the
remaining water
• The rear of the water dispenser should be at
least 10 inches / 25 centimeters from the wall to
allow for proper air circulation
• Never place the water dispenser on paper or
foam, possibly causing an unstable condition
• Do not place anything flammable besides the
water dispenser
• In case the hot or cold water is not needed for an
extended period of time, turn the appropriate
function OFF (Cooling or heating) in order to
save electricity
WARNING: The dispenser should not be turned on
until at least 3 minutes have gone by since it was
turned off.
PRIOR TO FIRST TIME USE
IMPORTANT: Prior to using the Water Dispenser for the first time, the water tanks need to be flushed in
order to prevent the water from tasting awkward.
The water dispenser tanks also need to be cleaned periodically to prevent buildup of mineral deposits that can affect
water taste and flow. To clean the water tanks:
1. Make sure that the water dispenser is OFF
2. Mix one quart of water with either one quart of
vinegar or four ounces of citric acid crystals
3. Pour the solution in the opening at the top of the
dispenser
4. Press each dispenser button until water just
begins to flow from the tap
5. After about twenty minutes, press the dispenser
buttons until no more water comes out of the taps
and drain the hot water tank (see Draining the
Dispenser, page 7).
6. Reinstall the water bottle ( see Loading the
Dispenser, page 5)
IMPORTANT: Before use, dispense one quart of water from each tap to make sure the cleaning solution is completely
removed.

6
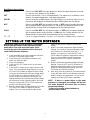
SETTING UP THE WATER DISPENSER
Brief Button Descriptions
ON/OFF -
Press to turn ON / OFF the water dispenser. When the water dispenser is turned
on, only the clock appears on the display
SET -
Press to set the time , hot or cold temperature. The sequence is as follows: hours,
minutes, hot water temperature, cold water temperature
SILENT -
Press to mute the audible signals, the ‘Alert Display’ icon in the top right corner of
the screen will disappear to indicate that the audible signals are now muted
HOT -
Press to turn ON / OFF the hot water function. In OFF mode, the water dispenser
will not perform water heating function. In ON mode, the Heating indicator on the
display will turn on and show set temperature for the heating function
COLD -
Press to turn ON / OFF the cold water function. In OFF mode, the water dispenser
will not perform water cooling function. In ON mode, the Cooling indicator on the
display will turn on and show set temperature for the cooling function
°C / °F -
Press to toggle between Celsius or Fahrenheit temperature readout
IMPORTANT: Make sure the dispenser is unplugged.
Before loading the water bottle, wipe the top of the
bottle with a clean cloth and wash hands. Avoid
touching the part of the bottle that will be directly in
contact with the water dispenser.
1. Invert the bottle on top of the dispenser and place
securely on the bottle support collar
2. Press the hot and cold dispenser buttons until
water runs from both taps
3. Plug in the dispenser
4. Press the ON / OFF button to turn on the water
dispenser
5. Press the SET button once to set the hours of the
clock. The hour digits will begin flashing. Press the
HOT and COLD buttons to adjust the hour setting.
Once you have picked the right hour setting, press
the SET button to confirm this setting. NOTE – if
you do not press any button for 8 seconds, the
settings mode will be cancelled and all the settings
will revert back to their original position. Also note
that you can keep the HOT or COLD pressed to
quickly scroll through the digits.
6. Now the minute digits will begin flashing. Press the
HOT and COLD buttons to adjust the minute
setting. Once you have picked the right minute
setting, press the SET button to confirm this
setting.
7. Now the hot water temperature digits will begin
flashing. If you want to change temperature read-
out to Celsius or Fahrenheit, press the
°C / °F
button as required.
Press the HOT and
COLD buttons to adjust the temperature setting.
Once you have picked the right temperature
setting, press the SET button to confirm this
setting.
8. Now the cold water temperature digits will begin
flashing. Press the HOT and COLD buttons to
adjust the temperature setting. Once you have
picked the right temperature setting, press the
SET button to confirm this setting.
9. Next, don’t press any button for 8 seconds and the
screen will return back to only displaying the time.
Now the settings are memorized. You can check
settings by pressing SET button repeatedly.
NOTE – if there is a power failure, or the water
dispenser is unplugged, the settings will be lost.
The water dispenser will revert back to factory
programmed settings.
Contact a local water bottle distributor to
purchase water bottles.

7
USING THE WATER DISPENSER
If you can see the clock showing on the display, the water dispenser is on. If the Clock is not showing, press the
ON / OFF button once to turn the water dispenser on.
• Press the HOT button to turn the heating function on. The current temperature will be displayed and the water
dispenser will start to heat up the water to the set temperature. Once the set temperature is reached, three
things happen. One, the heating icon to the left of the hot water temperature display will become solid. Two, the
water dispenser will go into warm keeping mode in order to conserve electricity. Three, the dispenser will beep
3 times (if SILENT mode is off) to let you know that the set temperature has been reached. If the temperature
reaches 5°C below the set temperature, the water dispenser will start the heating process again until the set
temperature is reached. Press the HOT button again to turn of the heating function. The amber temperature
display will disappear from the display.
• Press the COLD button to turn the cooling function on. The current temperature will be displayed and the water
dispenser will start to cool the water to the set temperature. Once the set temperature is reached, three things
happen. One, the cooling icon to the right of the cold water temperature display will become solid. Two, the
water dispenser will go into temperature maintenance mode in order to conserve electricity. Three, the
dispenser will beep 3 times (if SILENT mode is off) to let you know that the set temperature has been reached.
If the temperature reaches 5°C above the set temperature, the water dispenser will start the cooling process
again until the set temperature is reached. Press the COLD button again to turn of the cooling function. The
blue temperature display will disappear from the display.
• If you want to change temperature read-out to Celsius or Fahrenheit, press the
°C / °F button as required.
Allow 40 minutes for water to reach hot and cold temperatures
USING THE REFRIGERATED COMPARTMENT
IMPORTANT: Prior to using the refrigerated
compartment for the first time, clean the compartment with a wet cloth and dry thoroughly.
Place a sponge at the bottom of the compartment and close the door tight.
• After turning the cooling function on, wait 2 hours before placing any food or drinks in the refrigerated
compartment.
• Always leave some space in between the items in the refrigerated compartment in order for the air to circulate
properly
• Periodically, remove the sponge from the compartment and squeeze it to remove excess moisture. Put it back
into the compartment after removing the excess moisture.
Note that the default temperature inside the refrigerated compartment is 4°C.
SPECIFICATIONS
Capacity: 3 or 5 Gallon Water Bottle
Chilling Rate: Approx. 2 liters per hour
Heating Rate: Approx. 5 liters per hour
Power Consumption:
Cooling - 100W
Heating - 500W

8
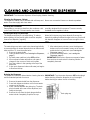
CLEANING AND CARING FOR THE DISPENSER
IMPORTANT: Turn the water dispenser off and unplug it before cleaning
Cleaning the Dispenser Cabinet
The dispenser cabinet can be washed with mild soap and
water. Rinse thoroughly with clear water.
Cleaning the Condenser
Sweep away or vacuum up dust from the condenser coils
on the back of the unit. For best results, use a brush
.
Cleaning the Drip Tray and Grille
The dispenser drip tray is not self-draining. To reduce
water spotting, the tray and its grille should be emptied,
cleaned and wiped dry regularly.
Cleaning the Water Tanks
The water dispenser tanks need to be cleaned periodically
to prevent buildup of mineral deposits that can affect water
taste and flow. To clean the water tanks:
1 Remove the water bottle
2 Drain the water tanks ( see Draining the Dispenser,
page 7)
3 Set both power switches to the OFF position
4 Mix one quart of water with either one quart of
vinegar or four ounces of citric acid crystals
5 Pour the solution in the opening at the top of the
dispenser
6 Press each dispenser button until water just begins
to flow from the tap
Draining the Dispenser
The dispenser should be drained before cleaning the tanks
and for extended periods of non-use.
1. Remove the water bottle from the dispenser.
2. Press both dispenser buttons until no more water
comes out of the taps.
3. Place a bucket beneath the drain plug. The drain
plug is located at the rear of the dispenser (see
image to the right).
4. Remove the cap from the drain plug and allow
water to drain completely. Replace the cap.
Never use commercial cleaners or abrasive powders.
specially designed for this purpose. These are usually
available at most appliance stores.
Water left in the tray may leave deposits. Remove the
deposits by adding undiluted vinegar to the tray. Soak until
the deposits disappear or become loose enough to rinse
away.
7 After about twenty minutes, press the dispenser
buttons until no more water comes out of the taps
and drain the hot water tank (see Draining the
Dispenser, page 7).
8 Reinstall the water bottle ( see Loading the
Dispenser, page 5)
IMPORTANT: Before use, dispense one quart of water
from each tap to make sure the cleaning solution is
completely removed.
IMPORTANT: Turn the water dispenser OFF and unplug it
before draining. Allow the dispenser to cool overnight
before draining to reduce the risk of scalding
Drain plug cap

9
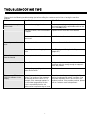
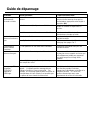
TROUBLESHOOTING TIPS
Please check the following troubleshooting tips before calling the customer service line or having the machine
repaired.
Problem Possible Causes What To Do
Water not hot enough or
cold enough
Dispenser is unplugged and Push the power plug completely into the outlet
and make sure that the applicable switches are
set to the ON position
The fuse is blown / the circuit breaker
is tripped
Replace fuse or reset the circuit breaker
All the water in the water tank has
been used
Wait 40 minutes for water to heat or cool
Water dispenser does not
work
Empty water bottle Replace with new bottle of water
Mineral deposits are clogging the
tanks
See Cleaning and Caring for the Dispenser
(pages 6-7)
Water dispenser leaks
from the outside
Crack or pin hole in bottle Replace with a new bottle of water
Water dispenser is noisy Water Dispenser is uneven Make sure the water dispenser is installed on a
level floor which is strong enough to support it
when fully loaded
Bottle making a gurgling noise as
water fills the tanks
This is normal
The message ‘ER’ (as in
ERROR) appears on the
display
Possible short circuit or sensor
failure. The location of the message
will indicate where the error is. For
example, if the message appears in
the hot water temperature section,
there is a possibility that the hot
water sensor is experiencing an issue
Reset the water dispenser by turning it off and
leaving it unplugged for about 3 minutes. Plug
the water dispenser back in and check if the
problem persists. If the problem persists, please
call our customer service department

10
SYLVANIA APPLIANCE WARRANTY
We appreciate your purchase of a SYLVANIA APPLIANCE. We take pride in the quality of our products and have manufactured your new
APPLIANCE unit to exacting quality standards. We feel confident that in normal use, it will provide you with satisfactory performance.
However, should you experience difficulty, you are protected under the provisions of this warranty.
SYLVANIA APPLIANCES are warranted against manufacturing defects in materials and workmanship in normal use for the following
periods from the date of purchase by the original user, and is conditional upon the unit being installed and used as directed in the instruction
manual.
WARRANTY PERIOD
Domestic WATER DISPENSER – Carry-in Service : One (1) year Parts and Labour
SYLVANIA's obligation under this warranty should be limited to the repair, including all necessary parts and the labour connected
therewith, or at our option the exchange of any APPLIANCE which shows evidence of a manufacturing defect within the warranty period.
Replacement parts, furnished in connection with this warranty shall be warranted for a period equal to the unexpired portion of the original
equipment warranty.
CUSTOMER OBLIGATIONS
This warranty applies to the product from the original date of purchase at retail. Therefore, the owner must provide a copy of the original,
dated bill of sale. No warranty service will be performed without a bill of sale. Transportation to and from the service depot is the
responsibility of the owner.
WARRANTY EXCLUSIONS
This warranty is extended to SYLVANIA APPLIANCES purchased and used in Canada. This warranty shall not apply to appearance or
accessory items including but not limited to: cabinet, cabinet parts, knobs. This warranty shall, in addition, not apply to damages due to
handling, transportation, unpacking, set-up, installation, customer adjustments that are covered in the instruction book, repair or
replacement of parts supplied by other than the SYLVANIA authorized service depot, any malfunction or failure caused by or resulting
from abnormal environmental conditions, improper unauthorized service, improper maintenance, modifications or repair by the consumer,
abuse, misuse, neglect, accident, fire, flood, or other Acts of God, and incorrect line voltage.
This Appliance product is only warranted to the original retail purchaser. This warranty becomes void in the event of commercial or rental
use. This warranty becomes void in the event serial numbers are altered, defaced or removed.
SYLVANIA reserves the right to make changes in design or to make additions to or improvements upon this product without incurring any
obligation to install the same on products previously manufactured. The foregoing is in lieu of all other warranties expressed or implied
and SYLVANIA neither assumes nor authorizes any person to assume for it any other obligation or liability in connection with the sale or
service of this product. In no event shall SYLVANIA or its SYLVANIA dealers be liable for special or consequential damage arising
from the use of this product, or for any delay in the performance of this warranty due to cause beyond our control.
The purchaser may have other rights under existing provincial or federal laws, and where any terms of this warranty are prohibited by such
laws, they are deemed null and void, but the remainder of the warranty shall remain in effect.
HOW TO OBTAIN SERVICE
Should this product require service, you may obtain specific information on how to obtain service by contacting the SYLVANIA Dealer
from whom this product was purchased, or by contacting us directly:
SONIGEM SERVICE
300 Alden Road
Markham, Ontario
L3R 4C1
PHONE: (905) 940-5089 FAX: (905) 940-2303
TOLL FREE: 1-800-287-4871

Distributeur d’eau chaude et froide
avec compartiment réfrigéré
Guide d’utilisation
Modèle SE80092
Nous vous remercions d’avoir acheté cet appareil Sylvania. Afin d’utiliser adéquatement votre nouvel
appareil Sylvania, veuillez lire attentivement ce guide d’utilisation avant
de l’utiliser. Après la lecture de ce guide, veuillez le conserver en lieu sûr pour toute référence ultérieure.
Pour tout renseignement supplémentaire sur cet appareil ou si vous avez besoin d’aide pour
l’installer, veuillez contacter notre ligne d’assistance à la clientèle : 1-800-287-4871.
Visitez www.sylvaniaelectronics.ca
pour plus de détails en rapport avec nos excellents produits.

2
TABLE DES MATIÈRES
Renseignements importants relatifs à la sécurité 3
Mesures de sécurité 3
Instructions de mise à la masse
3
Élimination adéquate du distributeur
4
Nomenclature des pièces
4
Installation dans un endroit adéquat
5
Avant l’utilisation initiale
5
Commandes électroniques et survol de l’affichage
6
Réglage du distributeur……………………………………..7
Utilisation du distributeur d’eau
8
Utilisation du compartiment réfrigéré
8
Spécifications
9
Entretien et nettoyage
9
Nettoyer le compartiment de rangement et l’extérieur
9
Nettoyer le condensateur
9
Nettoyer le plateau d’égouttement et le grillage
9
Nettoyer les bacs d’eau
9
Vider le distributeur.............................................................10
Guide de dépannage 11
Énoncé de la garantie………………………………………12

3
RENSEIGNEMENTS IMPORTANTS RELATIFS À LA SÉCURITÉ
AVERTISSEMENT!
N’utilisez cet appareil que pour son usage prescrit, tel que décrit dans ce guide d’utilisation.
MESURES DE SÉCURITÉ
Lorsque vous utilisez des appareils électriques, vous devez suivre des mesures préventives de base, dont celles qui suivent :
• Avant d’utiliser ce distributeur d’eau, celui-ci doit être
installé adéquatement et positionné selon les
instructions ci-incluses.
• Ne laissez pas les enfants monter, se tenir debout ni
se suspendre sur la partie extérieure du distributeur
d’eau, ni sur les tablettes se trouvant à l’intérieur du
boîtier de rangement (sur certains modèles).
Ils pourraient tomber ou faire tomber l’appareil sur
eux-mêmes, ce qui leur causerait de sérieuses
blessures, en plus d’endommager le distributeur.
• N’entreposez pas ou n’utilisez pas d’essence ou tout
autre produit inflammable près de cet appareil ou tout
autre appareil électrique.
• Débranchez le distributeur d’eau avant de le nettoyer
et de le réparer, si tel est le cas.
REMARQUE : Nous vous recommandons de ne
pas tenter de réparer l’appareil; confiez tout appel
de service à un technicien Sylvania autorisé. Si
votre distributeur Sylvania nécessite une
réparation ou si vous avez des questions
techniques, veuillez communiquer avec nous au
numéro sans frais suivant : 1-800-287-4871.
• Ne branchez pas le cordon d’alimentation ou ne
mettez pas le distributeur d’eau en marche lorsqu’il
est vide.
• Ne mettez jamais le distributeur d’eau à l’envers ou
ne le penchez pas de plus de 45˚.
• Essuyez toute éclaboussure d’eau qui survient après
avoir installé ou retiré les bouteilles d’eau.
• AVERTISSEMENT : N’utilisez pas d’eau non potable
ou comportant des microbes dangereux à moins
d’avoir préalablement désinfecté le système .
Le distributeur chauffe l’eau à une température
d’environ 90˚C. Les températures supérieures à 52˚C
peuvent causer de sérieuses blessures ou même la
mort en conséquence de l’échaudage. Les enfants,
les handicapés et les gens âgés sont les plus
susceptibles d’être ébouillantés.
.
INSTRUCTIONS DE MISE À LA MASSE
AVERTISSEMENT – Toute utilisation
inadéquate de la fiche de mise à la masse
peut constituer un risque d’électrocution.
Cet appareil doit être mis à la masse.
S’il survient un court-circuit électrique, la
mise à la masse réduit les risques
d’électrocution en procurant au courant
électrique une voie d’échappement.
Cet appareil est doté d’un cordon
d’alimentation doté d’un fil et d’une fiche
de mise à la masse. Cette fiche doit être
insérée dans une prise possédant une
mise à la masse adéquate.
Consultez un électricien ou un technicien
qualifié si vous ne comprenez pas bien les
instructions de mise à la masse ou si vous
croyez que l’appareil ne possède pas de
mise à la masse.
Si la prise de courant est une prise murale standard
à deux broches, vous avez la responsabilité de la
remplacer par une prise de courant à 3 broches dont
la mise à la masse est adéquate.
Vous ne devez jamais couper ni arracher la broche
de la mise à la masse du cordon d’alimentation.
N’utilisez pas d’adaptateur avec cet appareil.
N’utilisez pas de rallonge avec cet appareil. Si le
cordon d’alimentation est trop court, demandez à un
électricien d’installer une prise de courant près de
l’appareil.
Pour optimiser le fonctionnement de l’appareil,
branchez l’appareil dans sa propre prise de courant,
installée sur un circuit indépendant afin d’empêcher
les lumières de vaciller, les fusibles de sauter et les
disjoncteurs, d’être déclenchés.

4
Élimination adéquate du distributeur
Votre vieux distributeur d’eau possède peut-être un système de refroidissement qui utilisait des CFC
(chlorofluorocarbones). De nombreuses associations et agences affirment que les CFC nuisent à la couche d’ozone.
Si vous jetez votre vieux distributeur d’eau, assurez-vous de faire retirer le fluide de refroidissement au CFC par un
technicien qualifié. Si par votre négligence du liquide réfrigérant au CFC devait s’échapper, vous pourriez être passible
de fortes amendes, voire même d’emprisonnement selon les lois environnementales de certaines municipalités.
NOMENCLATURE DES PIÈCES
AVANT ARRIÈRE
No. Nom de la pièce
1 Support de bouteille
2 Touche d’alimentation
3 Touche de réglage des modes
4 Touche du mode silencieux
5 Touche du mode de chauffage
6 Touche du mode de refroidissement
7 Touche de lecture de la température ˚C/˚F
8 Touche de distribution d’eau chaude
9 Touche de distribution d’eau froide
10 Robinet d’eau chaude
11 Robinet d’eau froide
12 Plateau ramasse-goutte amovible
13 Compartiment réfrigéré
14 Bouchon de vidange
15 Cordon d’alimentation
16 Condensateur

5
INSTALLATION DANS UN ENDROIT ADÉQUAT
EMPLACEMENT
• N’installez pas le distributeur d’eau là où la
température est inférieure à 10˚C ou supérieure à
38˚C. L’humidité relative ne doit pas excéder
90%.
• Évitez la lumière directe du soleil.
CONSEILS
• Si le distributeur ne doit pas être utilisé pour une
période prolongée, réglez-le à la position OFF,
débranchez le cordon d’alimentation et videz
l’eau résiduelle.
• Afin de procurer une bonne circulation d’air,
allouez un espace d’au moins 10 po. (25 cm)
entre la partie arrière du distributeur d’eau et le
mur.
• N’installez jamais le distributeur sur une surface
de papier ou de mousse car ceci risquerait d’être
instable.
• Ne placez rien d’inflammable près du distributeur.
AVERTISSEMENT : Ne remettez jamais en marche
le refroidisseur sans que trois minutes se soient
écoulées depuis que vous l’avez mis hors fonction.
· Si l’eau chaude ou froide n’est pas utilisée
pendant une période prolongée, mettez le
commutateur approprié, situé à l’arrière du
distributeur, à la position OFF afin d’économiser
l’énergie.
AVANT L’UTILISATION INITIALE
IMPORTANT : avant d’utiliser le distributeur
d’eau pour la première fois, les réservoirs d’eau
doivent être vidés afin d’éviter que l’eau ait un
goût désagréable. Les réservoirs d’eau doivent
également être nettoyés périodiquement afin de
prévenir l’accumulation de minéraux qui affectent le
goût de l’eau ainsi que l’écoulement de l’eau.
Procédez tel que décrit ci-dessous pour nettoyer les
réservoirs.
1. Assurez-vous que les commutateurs d’alimentation
soient réglés à la position OFF.
2. Mélangez un litre d’eau avec un litre de vinaigre ou
quatre onces de cristaux d’acide citrique.
3. Versez la solution dans l’ouverture située sur le
dessus du distributeur.
4. Appuyez sur chaque robinet jusqu’à ce que l’eau
commence à s’en échapper.
5. Après environ vingt minutes, appuyez sur les
robinets jusqu’à ce qu’il n’y ait plus d’eau qui s’en
échappe et videz le réservoir d’eau chaude (voir la
section ‘Vider le distributeur’ de la page 7).
6. Réinstallez la bouteille d’eau (voir ‘Charger le
distributeur’ de la page 5).
IMPORTANT : Avant l’utilisation, laissez couler environ un
litre d’eau de chaque robinet afin d’enlever toute trace de
solution de nettoyage.

6
CONTRÔLES ÉLECTRONIQUES ET AFFICHAGE
Brève description des
touches
ON/OFF -
Appuyez sur la touche ON / OFF pour mettre le distributeur en ou hors fonction.
Lorsque le distributeur est en fonction, l’heure est affichée à l’écran.
SET -
Appuyez sur cette touche pour régler l’heure, la température de l’eau chaude ou de
l’eau froide. La séquence est la suivante : heures, minutes, température de l’eau
chaude et de l’eau froide.
SILENT -
Appuyez sur cette touche pour faire taire les signaux audibles. L’affichage de
l’icône ‘d'alerte’ située dans le coin supérieur droit de l’écran disparaîtra pour vous
indiquer que les signaux audibles sont maintenant silencieux.
HOT -
Appuyez sur la touche ON / OFF pour pour activer la fonction de l’eau chaude.
En mode hors fonction OFF, le distributeur de chauffera pas l’eau. En mode en
fonction ON, le voyant de chauffage s’allumera à l’affichage et affichera la
température.
COLD -
Appuyez sur la touche ON / OFF pour pour activer la fonction de l’eau froide. En
mode hors fonction OFF, le distributeur de refroidira pas l’eau. En mode en
fonction ON, le voyant de refroidissement s’allumera à l’affichage et affichera la
température.
°C / °F -
Appuyez sur cette touche pour permuter entre le réglage de la
température Celsius ou Fahrenheit.

7
RÉGLAGE DU DISTRIBUTEUR
IMPORTANT : Assurez-vous que le distributeur soit
débranché et que les deux commutateurs d’eau
chaude et froide soient réglés à la position OFF.
Avant de charger le distributeur, essuyez le dessus de
la bouteille avec un chiffon propre et lavez-vous les
mains. Évitez de toucher à la partie de la bouteille qui
entre directement en contact avec le distributeur
d’eau.
1. Inversez la bouteille sur la partie supérieure du
distributeur et déposez-la solidement sur le collet de
support.
2. Appuyez sur les touches de distribution d’eau
chaude et froide jusqu’à ce que l’eau coule des
deux robinets.
3. Branchez le distributeur.
4. Appuyez sur la touche ON/OFF pour mettre le
distributeur en marche.
5. Appuyez une fois sur la touche SET pour régler
l’heure de l’horloge. Les heures clignoteront.
Appuyez sur les touches HOT et COLD pour régler
l’heure. Lorsque l’heure est réglée, appuyez sur la
touche SET pour confirmer le réglage.
REMARQUE : Si vous n’appuyez pas sur une
touche à l’intérieur d’un délai de 8 secondes, le
réglage sera annulé. Veuillez noter que vous
pouvez également maintenir les touches HOT ou
COLD enfoncée pour défiler plus rapidement.
6. Les minutes clignoteront. Appuyez sur la touche
HOT et COLD pour régler les minutes. Lorsque les
minutes seront réglées, appuyez sur la touche SET
pour confirmer.
7. Les chiffres de la température de l’eau chaude
clignoteront. Si vous désirez changer la lecture de
la température en Celcius ou en Fahrenheit,
appuyez sur la touche ˚C/˚F, selon vos préférences.
Appuyez sur la touche HOT ou COLD pour régler la
température. Lorsque la température désirée est
atteinte, appuyez sur la touche SET pour confirmer
le réglage.
8. Les chiffres de la température de l’eau froide
clignoteront. Si vous désirez changer la lecture de
la température en Celcius ou en Fahrenheit,
appuyez sur la touche ˚C/˚F, selon vos préférences.
Appuyez sur la touche HOT ou COLD pour régler la
température. Lorsque la température désirée est
atteinte, appuyez sur la touche SET pour confirmer
le réglage.
9. Ensuite, si vous n’appuyez pas sur une touche à
l’intérieur d’un délai de 8 secondes, l’heure sera
affichée à l’écran. Lorsque les réglages sont
entrés en mémoire, vous pouvez les réviser en
appuyant successivement sur la touche SET.
REMARQUE : S’il y a panne de courant ou si le
distributeur est débranché, les réglages seront
perdus. Le distributeur retournera aux réglages par
défaut. Contactez votre distributeur d’eau
embouteillée pour acheter des bouteilles d’eau.

8
UTILISATION DU
DISTRIBUTEUR D’EAU
Si vous voyez l’affichage de l’heure, le distributeur est en
fonction. Si l’heure n’est pas affichée, appuyez une fois
sur la touche ON/OFF pour l’activer.
• Appuyez sur la touche HOT pour activer la fonction
de chauffage. La température de l’eau sera
affichée et le distributeur commencera à chauffer
l’eau à la température réglée. Lorsque la
température réglée est atteinte, trois choses se
produiront. La première, l’icône de chauffage
située à gauche de l’affichage de la température de
l’eau chaude sera allumée en feu fixe. La
deuxième, le distributeur accédera au mode de
conservation de la chaleur afin d’économiser sa
consommation électrique. La troisième, le
distributeur émettra trois bips (si le mode
SLIENCIEUX est désactivé) pour vous avertir que la
température est atteinte. Si la température atteint
5˚C sous la température réglée, le distributeur
commencera le processus de chauffage jusqu’à ce
que la température réglée soit atteinte. Appuyez
de nouveau sur la touche HOT pour désactiver la
fonction de chauffage. L’affichage de la
température de couleur ambre disparaîtra de
l’affichage.
• Appuyez sur la touche COLD pour activer la fonction
de refroidissement. La température réglée sera
affichée et le distributeur refroidira l’eau à la
température réglée. Lorsque la température réglée
est atteinte, trois choses se produiront. La
première, l’icône de refroidissement située à droite
de l’affichage de la température de l’eau froide sera
allumée en feu fixe. La deuxième, le distributeur
accédera au mode de conservation afin
d’économiser sa consommation électrique. La
troisième, le distributeur émettra trois bips (si le
mode SLIENCIEUX est désactivé) pour vous avertir
que la température est atteinte. Si la température
atteint 5˚C de plus que la température réglée, le
distributeur commencera le processus de
refroidissement jusqu’à ce que la température réglée
soit atteinte. Appuyez de nouveau sur la touche
COLD pour désactiver la fonction de
refroidissement. L’affichage de la température de
couleur ambre disparaîtra de l’affichage.
• Si vous désirez changer l’affichage de la
température de Celcius à Farenheit, appuyez sur la
touche ˚C/˚F selon le cas.
Veuillez allouer un délai de 40 minutes pour que
l’eau atteigne les températures réglées pour
l’eau froide ou l’eau chaude.
UTILISATION DU COMPARTIMENT RÉFRIGÉRÉ
IMPORTANT : Assurez-vous de nettoyer le compartiment réfrigéré avec un chiffon humide avant de
l’utilisation initiale. Placez une éponge dans de dessous du compartiment et fermez complètement la porte.
• Après avoir activé la fonction de refroidissement, attendez 2 heures avant de mettre des aliments ou des
breuvages dans le compartiment
• Laissez toujours un espace entre les aliments afin de permettre à l’air de circuler dans le compartiment réfrigéré.
• Périodiquement, retirez l’éponge du compartiment et essorez-la pour en retirer l’excès d’humidité. Replacez-la
dans le compartiment après en avoir retiré l’humidité.
Veuillez noter que la température intérieure par défaut du compartiment réfrigéré est de 4˚C.

9
SPÉCIFICATIONS
Capacité : 3 ou 5 gallons d’eau par bouteille
Vitesse de refroidissement : environ 2 litres à l’heure
Vitesse de chauffage : environ 5 litres à l’eau
Consommation d’alimentation :
Refroidissement – 100 watts
Chauffage – 500 watts
ENTRETIEN ET NETTOYAGE
IMPORTANT : Réglez les deux interrupteurs de mise en marche-arrêt à la position OFF et débranchez le distributeur
avant de procéder au nettoyage.
Nettoyer le compartiment de rangement et l’extérieur
Vous pouvez nettoyer les parties internes et externes du boîtier à l’aide d’un savon doux et d’eau. Rincez à fond
Nettoyer le condensateur
À l’aide d’un aspirateur, nettoyez la poussière se trouvant sur les bobines du condensateur. Pour de meilleurs résultats,
utilisez une brosse conçue spécialement à cet usage. Vous la trouverez dans la plupart des magasins d’appareils
ménagers.
L’eau peut causer des dépôts. Retirez les dépôts en ajoutant du vinaigre dilué dans l’eau. Laissez tremper jusqu’à
ce que les dépôts disparaissent ou soient suffisamment dégagés pour que vous puissiez les rinceravec de l’eau claire.
N’utilisez jamais de nettoyeurs commerciaux ni de poudres de récurage abrasives.
Nettoyer le plateau d’égouttement et le grillage
Le plateau d’égouttement du distributeur ne se vide pas seul. Pour réduire les taches causées par l’eau, vous devez
vider, nettoyer et essuyer régulièrement le plateau et son grillage.
L’eau qu’on laisse sécher dans le plateau peut faire des dépôts. Nettoyez les dépôts en versant du vinaigre non
Nettoyer les bacs d’eau
Les bacs du distributeur d’eau doivent être nettoyés périodiquement afin de prévenir l’accumulation de minéraux
pouvant affecter le goût de l’eau et son débit.
Faites ceci pour nettoyer les cuves d’eau :
1. Retirez la bouteille d’eau.
2. Videz les bacs d’eau (consultez la section ‘Vider le distributeur’ à la page 7).
3. Réglez les deux interrupteurs de mise en marche-arrêt à la position OFF.
4. Mélangez un litre d’eau avec un litre de vinaigre ou quatre onces de cristaux d’acide citrique.
5. Versez la solution dans l’ouverture située au-dessus du distributeur.
6. Appuyez sur chaque robinet d’eau jusqu’à ce que l’eau commence à couler des robinets.
7. Après environ vingt minutes, appuyez sur les touches de distribution d’eau jusqu’à ce qu’il ne sorte plus d’eau
des robinets, puis videz la cuve d’eau chaude ( consultez la section ‘Vider le distributeur’).
8. Réinstallez la bouteille d’eau ( consultez la section ‘Charger le distributeur’).
IMPORTANT : Avant l’utilisation, laissez couler environ un litre d’eau de chaque robinet afin d’enlever toute trace de
solution de nettoyage.

10
VIDER LE DISTRIBUTEUR
Le distributeur devrait être vidé avant de nettoyer les cuves ou si vous allez en vacances ou quittez la maison pendant
une longue période.
1. Retirez la bouteille d’eau du distributeur d’eau.
2. Appuyez sur les touches de distribution d’eau jusqu’à ce qu’il ne sorte plus d’eau des robinets.
3. Placez un seau sous la sortie d’eau. Sur les modèles de plancher, la sortie est située à l’arrière du distributeur.
Sur les modèles de comptoir, la sortie se trouve sous le distributeur.
4. Retirez le capuchon de la sortie d’eau et laissez l’eau se vider. Replacez le capuchon.
IMPORTANT : Réglez les deux interrupteurs de mise en marche-arrêt à la position OFF et débranchez le distributeur
d’eau avant de procéder au drainage. Afin de réduire les risques d’échaudage, laissez le distributeur se refroidir
pendant une nuit entière avant de vider les cuves.
La page charge ...
La page charge ...
-
 1
1
-
 2
2
-
 3
3
-
 4
4
-
 5
5
-
 6
6
-
 7
7
-
 8
8
-
 9
9
-
 10
10
-
 11
11
-
 12
12
-
 13
13
-
 14
14
-
 15
15
-
 16
16
-
 17
17
-
 18
18
-
 19
19
-
 20
20
-
 21
21
-
 22
22


Sylvania SE80092 Manuel utilisateur
- Taper
- Manuel utilisateur
- Ce manuel convient également à
dans d''autres langues
- English: Sylvania SE80092 User manual
Autres documents
-
GE PXCR33KSS Manuel utilisateur
-
GE GXCF05D Manuel utilisateur
-
GE GNCF04H/GXCF05D Manuel utilisateur
-
Haier WDNS201SS Manuel utilisateur
-
Sunbeam 168 Manuel utilisateur
-
Glacier Bay VWD1066BLS-1-HDU Mode d'emploi
-
vitapur VWD1066BLS Manuel utilisateur
-
-
vitapur Water Dispenser Mode d'emploi
-
GE GXCF20FBB Manuel utilisateur