
ge, com
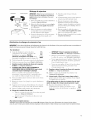
GEProf!ld Tri-Temperamre Water
@ ® ®
Dispenser with Refreshment Chiller
Safety Instruaions .................. 2, 3
Using the Water Dispenser
Child Safeguard ..................... 4
Cold _'_ater and Coml)artn/ent
Features and Parts List ................ 4
Loading the Dispenser . ............... 4
Specifications ....................... 8
Care and Cleaning ................. 5-8
_l}'oubleshooting Tips ............... 8, 9
Consumer Support
Ctmsumer Support ........... Back Cover
X'_hrranty ................... Back Cover
Franqais
In_brmations en matibre
de s&_tHt_ ..................... l O, l l
Utilisation du dislributeur d'eau
Caract&'istiques et liste de pi&es ...... 12
Carm t&'istiques techniques ........... l 6
Chargement du distributem" . ......... 12
Sauvegarde pour la protection
des enfimts ........................ 12
Entretien et nettoyage . ............ 13-16
Conseils de d_pannage . ........... 16, 17
Soutien au eonsommateur
(;armatie .......................... 18
Soutien au consommateur . ........... 18
GX(I;2 5FBS
Distributeur d'eau de GE Profilg M
it trois tempdratures avec
rdffigdrant de rafraichissements
La section francaise commence h la page 10
Dispensador de agua de
GEProfilgMde tres temperaturas
con enfriador de refrescos
La seeeion en espa#ol empieza en la pagina 19
Espa_ol
In_brmaci6n de segmqdad .......... 19, 20
C6mo utilizar el dispensador de a_ta
Cdmo cargar el dispensador , .......... 21
Especificaciones .................... 25
Lista de l)artes y caracterfsticas ......... 21
Seguro contra nifios ................. 22
Cuidado y [impieza ................ 29-25
Solucionar problemas ............... 25, 26
Apoyo al consumidor
Garantfa .......................... 27
Apoyo al consmnidor , ............... 27
215C1002P035 49-50173 1705 Jfl

iMPORTANTSAFETYiNFORMATiON.
READALLiNSTRUCtiONSBEFOREUSING.
WARNING!
Usethis appliance onlyfor its intendedpurposeas describedinthisOwner'sManual
SAFETYPRECAUTIONS
Whenusingelectrical appliances,basic safetyprecautions shouldbefollowed,includingthe following."
_:This "wa|er dispenser must be t)roperly inslalled
and lo(aled in a((ordan(e wiih Ihese insu'u( lions
tlcti)l'(_ i! is us(_d.
::_'_[)o not allow children to climt/, stand or hang
on the outside of the dist)ensel; or on the shelves
inside the storage c_binet (on some models).
I'h() could tip the dispenser over and damage
it and seriously iI!iure then/selves.
i):?Do not store or use gasoline or other tlamnlat/le
vapors _md liquids ill the vi(init) of this or ally
other appliance.
::NUnplug the water dispenser beli)re cleaning or
making ret)airs.
NOTE: GEdoes not support any servicing of the
dispense_ We strongly recommend that you do not
attempt to service the dispenser yourself.
::U_Do not rise this dispenser to dispense _mything
other than water.
i_:Wipe up any water spills immediatel} after loading
or tmloading water boules.
i):?Children should be supervised by a parent when
using this product.
WARNING:Do uot use with water that is
microbinlogically unsafe or of unknown quality.
;:CAUtiON:The dispenser beats water
to a temperature of approxhnately 194°F (90°C).
Water temperatures above 125°F (52°C) era1 cause
severe bunls or death from scalding. Clfildren,
the disabled mad the elderly are at highest risk
of beh_ scalded.
NOTICE:'_+,s product is intended solely for
use hi cllillit_g cmmed mid boxed beverages, mid
packaged nouperishables.
}_+l)o not t)lug ill the power (ord (n" turn on die
t)(>wel" S'Wi|( hes when lhe _va|er dispenser is en/t)l }
PROPERINSTALLATIONANDLOCATION
::_:i_\llo\\ r at least 1" (2.5 cm) of space between tile
back of ttle water dispenser and the wall to allow
lbr t)roper air circulation.
!+;:Do not install tile water dispenser where the
temperature will go bel(+w 50°F (10°C) or
above 100'F (38°(;).
!+;:Install the water dispenser on a level floor strong
enl)ugh to support it when fidly loaded. Do not
install where it will be subject to direct sunlight,
heat or moisture.
2

6ROUNDINGINSTRUCTIONS
WARNING:Improper use of the grounding plug can result in a risk of electric shock.
Tlfis apl)liall(e lllUSl be grounded. Ill die evelll ot an
ele(tl](al short (ircuil, grounding reduces the risk of
ele( I:_( sho(k.
This appliance is equipped with a power cord having
a gmmlding wire with a grounding phlg. The phlg
must be plugged into all outlet that is properl?
installed and grounded.
Consuh a qualified electrician if the grounding
ins:rim:ions are not completely understood, or if
doubt exists as to whether the appliance is properly
grounded.
If the outlet is a standard 2-prong wall outlet, it is
your personal responsibility and obligation to have
it replaced with a t)roperl} grounded 3-prong
wall outlet.
Do not tinder ai/y circllll:Stalices gilt or relllO\_' tile
third (ground) prong fi'om tile t)ower cord.
Do :lOt use all adapter plug with this appliance.
Do :lOt use all extension cord Mth this appliance,
If the power cord is u)o short, have a qualified
electrician install all outlet near the appliance.
For best operation, plug the appliance into its own
electrical outlet on a dedicated circuit to pre_Vllt
flickering of lights, blowing of fl:se or tripping of
circuit breake::
PROPERDISPOSALOFTHEWATERDISPENSER
Refrigerant Disposal
reti'igerant ill its (()()ling s) stem. These reti'igerants
are t)elie_vd to harm stratospheric ozone, If you are
throwing ;{_r_{}your old dispenseJ, make sure the
reli'igerant is removed and recovered lot proper
disposal by all El{\-certiJied technician. If you
intentionally release this reli'igerant, y_u Call be
sul_iect to thles and imprisom:lent raider provisions
of environmental legislation.
READANDFOLLOWTHISSAFETYINFORMATIONCAREFULLY.
SAVETHESEINSTRUCTIONS

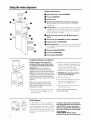
Using the water dispenser.
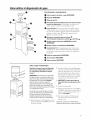
Features and Parts List
0 Bottle Support Collar--Black (WS28X10048)
Separator (WS28X10013)
Cold Water Tank
Hot (Red) and Cold (Blue) Power Switch (back of dispenser).
The CoM (Blue) t)oxver sxvi|ch also ItlrllS Ol/Ihe dliller
(omparHnenu
Indicator Lights. 'Ille green liglu will be li! x_r}_:l__1_(:dispenser
is t)lugged in. The red and l)lue lighls will (}cle on and off
while lilt? (tisl)ens( r heals alld cools lhe waler. Comt)ressor
slarl is delayed u t) lo 3 mimnes,
Hot _ , Romn Temperature B, Cold I_ Water Dispenser
Buttons
Dispenser Drip Tray(WS28X10031) and Grille (WS28X10032)
O Cmnpartment Drip Tray (WS29X10029)
_Chiller Compartment. The (omt)arlmenl is imended solel) for
use ill (hilling tanned and boxed l)exerages and packaged
nont)erishables.
Cmnpartment Shelf (WS28X10028)
Drainage Cap (WSOIXIO008)
Silicon Stopper (WSOIXIO007)
-----iiiiii\ _ _......
\' (\[,i
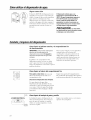
Loading the Dispenser and Start Up
Sanitize the dispenser water tanks prior to
installing a full bottle ofwater for the first time
(see "Cleaning and Sanitizing the Water Tanks").
IMPORTANT"Make sure the dispenser is
unplugged with both the hot and cold power
switches (on the back of the dispenser) set to the
0 (off) position. Before placing the water bottle on
the dispenser, wash hands and wipe the top of the
bottle with a clean cloth. Avoid touching the part
of the bottle that will be in contact with the water
dispenser.
Make sure the water /evel in the top of the
dispenser is low enough to allow for proper
bottle installation. Failure to do so may cause
the dispenser to overflow
1. Peel the label lh)m the top cover of the
bottle (i[prusent). Do notremove the
entire 1)otth, cap.
2. Place the bottle on top of tile dist)enser
as shown, aligning the dispensing valve
t)robe to tile center of tile water bottle
cap. Press down umil the probe
t)enetrates the bottle cap, allowing the
bottle to rust on the sut)port collar:
3. IMPORTANT:Press both dispense buttm)s
m#il water runsfrom both taps.
4. Plug ill the dispense):
5. Set the COI,D and t lOT t)ower s_itches
(located on the top le/i rein" of the
dispenser) to the I(ml) position.
6. _llow 30 minutes fbr water to reach hot
and coM mmperatures.
Contact a local water bottle distributor to
purchase water bottles,
4
Child Safeguard
"Ihe tt()T disl)ens('r btlttOI/is equipped _dth
a chiM satbguard tl_at reduces die risk of hot
_;_mr being dispensed accidentally or t)} small
children. 'Ib dispense ware1; rotate the knob
com/terclockwise and push tl/e button ill. The
knoll will reset amomadcallx when the button
is released.
The dispenserheats water to a temperature of
approximately 190°F(88°C). Water temperatures
above 125°F(52°C) can cause severe bures or
death from scalding. Children, the disabled and
the elderly are at highest risk of being scalded.
CAUTION:Cbildre,lsbouldbe
supervised bya parent when using this product.

Camandcleaningofthedispenser.
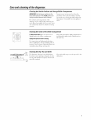
Cleaning the Outside Cabinet and Storage/Chiller Compartment
IMPORTANT: Set both power switches (on the
back of the dispenser) in the 0 (off) position and
unplug the water dispenser before cleaning,
"File cabin(t _lnd compartm(nt ot th(
disp(nser can b( washed wit]l mild soap and
wat_ r. Rinse thorot/gh]_ _Jth ;lear wat_ 1: Nex_r
use com//l(rcial cl(aners or abrasi e scouring
])owders.
Sweep ;IW;l_or _at:tuu/l ;ut_ dI/st ]}'ore the
conde*/s(r coils on the back of II*(/mit. Fo_
best resi/lts, use a brilsh sp( cially desigl/(d l_)r
this imrpos(. It is available at most applial_c(
s[<)l'eS.
Cleaning the Inside of the Chiller Compartment
To help prevent odors,]ea',,ea_l open box of
baki_g soda in 1he (hillel (omt)artment.
Unplug the dispenser before cleanhlg.
Clean olher parts of"the clliller compaltmenl--
ill(ludit_g door gaskets al*d all l)lasli( parts--
1he Sall/e _,_1}
Use _;irm _;iter m_(1 baki_lg soda solntion--
all()ut a t_,blespooH (1:, ml) of l)_ki_g so(t_ to
a quart (1 liter) of _v_ter. This both (learns _md
neHtralizes odors. Rinse a_(] wipe (]ry.
Drip
traygrille
Drip
tray
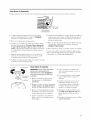
Cleaning the Drip Tray and Grille
The disp(_s(r drip tra} is not selJ:-(lr_dni*lg.
To re(luc( water spotting or deposits, tl_( tr;_
and its grille should l)( emplied, (:lean(d ai/d
wil)((1 (lr} r(gularl}.
(:1(a_ _i111mild so_l) or OHlh(1<)1)rack iH the
dis]lwas]ler.

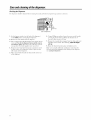
Careandcleaningofthedispenser.
Draining the Dispenser
"ll/c dispens,.+rshouM bt+dr;6ued btdbr,.+*lem/iug the tanks and betbre lea i_:,gtbr long v;uations or abst'_:,*,.'s.
(rear of dispenser)
Drain
outlet cap
1. Set both pox_er switches (on tile back of the dispenser)
in tilt: 0(off)position and unplug tilt: dispenser.
2. Remoxe tile water bottle t>om the dispensel:
3. Ptlt a container that will withstand hot water under the hot
_ater rap. Press the hot disperser button mltil the water is
cool (about 1quart). Add water to tile _old water reservoir
(on top Mlere tilt: bottle supplies _ater) as needed.
4. Dispense _ater ti'om both buttons into container(s) until
no more water (Tailbe disllensed (about I quart of _ttet"
still remains in the dispenser).
5. Place a large bucket b,.:rl,.:athtile drain outlet on the rear
of the dispenser.
6. Using a Phillips scre_driwr, loosen tile screws on tile bracket
covering tile drain outlet cap. Rotate tile bracket out of
tile _a) to allow access to tilt: cap.
7. Remo_e tilt: cap and silicon stopper f?romtile drain outlet and
and allow _ater to drain. :\[_er draining, replacethestopper
andcap.
8. Rotate the lmu ket l/a_k into pla_e and tighwn s_re_s.
Make sure to install a tull bottle and dispense water Ji'om tile
hot _ater tap befbre plugging in and turning on tile dispenser
(see I_oadingtho Disponsor).
6

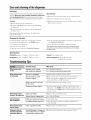
Toremove Toreplace
1°
(_ Supportcollar
Separator 2.
3.
Cleaning the Separator
IMPORTANT: Set both power switches 5.
(on the back of the dispenser) in the 0 (off)
position and unplug the water dispenser 6.
before cleaning,
I_eIllOV(' the water t/ottle 21rid drain [lie
dispenser (see Draining the Dispenser). 7.
Remove the Stlllt/ort (ollar by tllrI/illg
counterclockwise and trolling straig-]lt olt_
Remove tile plastic separator t)y
pulling straight out (you may need
t() twist slightly to loosen), 8.
4. Clean the separator with dish soap
and water or ill the top rack of 9.
the dishwasher.
D] T the separator thoroughly on
both sides.
Using a clean cloth or paper towel,
thoroughly dr} tile cold water
r(,servoir,
Place the separator back ill the
dispenser. Make sure tlle long, tapered
end of the separator is positioned
tirnfly on tile metal tllug on the
bottom of tile reservoil:
Replace the supt)ort collar and turn
clockwise mltil it is firmly ill place.
Install a flfll water bottle on the
dispenser see Loading the Dispenser).
Sanitizing and Cleaning the Water Tanks
IMPORTANT." Periodically the water dispenser tanks must be sanitized to prevent unpleasant tastes m the water and cleaned to
remove mineral de )osits that can hnpair flow
ToSanitize:
gelore cleaning, set both power switches
(on the back of the dispenser) ill tile 0 (off)
position and unplug the water dispenser.
NOTE: For lirst time instal]_tion, skip
steps 2-4.
OFF
position
2o Emply the water bottle, then remov( it l}'om tile
dispenser.
3. Drain the water tanks (see Draining the Dispenser).
4. Reinstall the silicon stopper and drain cap (see Draining
the Dispenser).
5. DO NOT ADO BLEACH FIRST OR DIRECTLY TO THE
DISPENSER. Concentrated bleach may damage plastic.
Add 1/2 teasp()()I/ (2.5 ml) elordinary' 6.0%
maximlml h/)_lsehold blea( h to a 2/]lmrt (2 liter)
I/it( her/illed with tap waIer.
6. I)our tile si)lution ii/ the oi)ening at th( top of
the dispenser.
7, Reileat steps 5 and 6 mltil the disilenser is filll.
8, ])ross the hot and cold dispenser butIons imtil
th( water just llegins to flow l]'oln tile taps.
9. Allow to sit/br 15-20 nlinutes.
10. Rinse out the bleach solution:
-- Drain the Wat(T tanks into a larg{' lm(ket
(see Draining the Dispenser).
-- Make sm'e that tile silicon stoI)p('r is NOT
installed.
-- IMPORTANT: Remove the separator and wipe out the
cold water reserve# (see Cleaning the Separator).
-- Clean, then reinstall the separator and (ollar
(s(w Cleaning the Separator).
-- Pore" aill)rilximat{'ly' 1 gallon (4 qllarts or 4 lit{'rs)
of fi'esh tail water into th_ top and allow to drain
inlo tile lmcket.
-- Fh/sh with all additional 1 gallon (4 qmu'ts or
4 lilers) ofli'esh tap water and allow to drain
into th( l/uck_ t.
11. Reinstall No silicon stopper and drain cap (see Draining
the Dispenser).
12, Install a ti'esh wa[er botth' (see Loading the Dispenser).
13. Dispense 1 quart (1 fiter) of water ffmn each tap and
tast( to mak{' sur{' the bh'a( h solmion is (om/)h'tely'
r{'lllOV{'(1,
If you continue to taste the chlorine from the bleach solution,
repeat steps 10-13 until the taste is gone.
14. Plug ill lhe dispens(r. Then Illrn oil |he ha| [_
and told I)(}_A'(r swiIches (on |he lla(k of Ill(
disI}enser)" ON
position
To Remove Mineral Deposits:
Mix 2 quarts (2 liters) of water with two quarts of vinegar OR mix I gallon of water (4 liters) with 16ounces (454 g) of citric acid
crystals, Bleach does not remove mineral deposits, Do this in place of step 5 when removing mineral deposits,

Careand cleaningof thedispenser.
Defrosting
Defrost whenever frost on the waft of thechiller uompartrneetbecomes
excessive.Never use a sharp or metallic instrument to remove frost
as it may damage the liner. We reuornroendusiega plastic"scraper
Donot use any ekctrical device ie defroskTg yourchiller compartroent
To defrost:
iJi:P,i,movc iwms ti'om the (omparmIent.
>: Turn till' CoM (Bhu') Power swiwh tit oil and uIIplug
the (lJspenser.
ij):Put several towels iII the 1)ottom of the compartnIem
to collect waWr.
Deti'osfiIIg usually takes a tow hours, To defl'ost li_ster
keep the door open,
After defrosting:
Yi::RelII(We the wet towels and wipe tip any reniaiiiing water.
_i::Wit)e the compartnIent with a dl) cloth.
Yi::PhIg hi the unit and turn on the Cold (Blue) power switch.
Return items to the unit.
Preparing for Vacation
For long va(atioiis or abs('iI( ('s, s('[ b//th p/)w('r s_i_ch(s
(on the balk of the dispenser) to the O (off) position.
1. Unplug the water dispens(r.
2. R1mo_(' the *a;iter bottle.
3. [)rain the water tanks (so( Braining the Dispenser).
4. DU the separator th//roughly on both the top and t)//tt//m
(se_ Cleaningthe Separator).
5. I,eaxv the door of th( chiller coniparmiei_t open.
After returning from vacatio< makesure tosanitize the water
tanks before usingthe dispenser(seeCleaningand Sanitizing
the Water Tank).
Specifications
Chilling Rate: approx. 0.5 gallons (2 hwr:) l)er hol u"
Heating Rate: aItItrox. 0.8 gallons (3 lile*_) per holtr
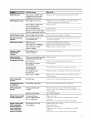
Troubleshootingtips.
Capacity: 3 or 5 gallon boule
Power Consumption:}leaIiI/g: _0 "_'r_l_llS IllaX,
Cooling: 125 %}1|1S III}IX.
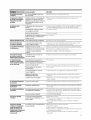
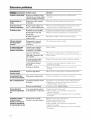
PossibleCauses What ToDo
Water has poor taste Separator needs clemfing. • See Cleaning the Separator:
or odor
Uoit needs to be smfilized. "St,(, Cleaning and Sanitizing the Water Tanks.
Water not hot enough Dispenser is tmplugged. "Ptlsh |lie ])ltlg (-Oll/t)hqel } lille 1lie otlllel.
or cold eoough The fuse is blmm/dreuit * P.eplace house ti_se or resel lit(" hi)use cJrcuil breaker:
breaker is tripped. • It 1oo man) iwms ;it'(- plugged bile a single circuil,
I/love ,q()tl/e ileitis lo a difl('I'enl circuh.
All the water in the water tank "_ai! _40 rain tiles R)r wawr lo heal or cool,
has been used.
Temperature limiter tripped. "Sol lhe hol and toM power swilches (on lhe back of lhe
dispenser) lo the 0 (off)position. Wail lix(' minuws; lhcn set
lhe switches lo lhe I (on) posJtio/l, _'aJl 240///J/ltlleS /ill" walcr
lo heal or cool,
Water dispenser does Empty water bottle. "P, eplace _dl]t a I/('_'_rbollle (/I_Ara|('r.
not work--No water flow
Mineral deposits dogging tanks. • See Care and Cleaning.
Cold water button C_liller door has been left open. "(:lose chiller do/)r.
does ootdispense Ice buildup blocking water flow. • Turn off toM NOW(q"swilch overllJgh| alt0 flip 1)a(-k Oil
in lhe morning,
Waterdispenserleaks (_ack or phi hole ha bottle. "Replace wilh a l/CW botlle of water.
from the outside
Compressor does not Normal Operation---Compressor "Wail tor tip l/) 3 minules lor lit(" conq)ressor l/) slarl.
start when coldpower start is delayed by up to 3 minute.s
switch/blue light is on to prolong die compressor life.
8

Possible Causes What ToDo
Bottle feels warm Water system overf'flled. Water • I)ist)ellse (old x,'¢_||e]("mllil air is released iallo the 1)oltlc,
is boiling in the hot tmlk and
bubbling up hlto the bottle.
Water dispenser is noisy Water dispex_ser is tmeven. • Make sm'c tlae x_r_l_l_is h_slallcd on a kvel tloor strong
cnotlgh to siq)porl il _vhell ttflly loaded.
Botde makhlg a gurgling noise •This is normal.
as water fills the tatfl(s.
Hot water boiling sound. • T}fis is normal.
Dispeuser or water bottle shakes •This is normal,
when die cooling system cycles off.
Particles floating in water Water has high mineral content. • Fiald a vca|el _SO[]F(C_vJ|h ]ov_rCFhardness,
Foul odorin airaroued Hot water tmlk is empty or • Press the hol dispenser btmon tmfil wa|cl" t]()_rs t() ['_]_()V_
dispenser not completely full. air flora the hol Iaalk.
Chiller does not operate CaViller is not on. • _I![]]'l) |he (',old (t_hle) po_rel" swil(h o11.
Water dispenser is unplugged. • Push lhe plug complclely iron lhe outlet.
The fuse is blown/circuit • Ret)la(c hlsc or reset the lweakc_:
breaker is o*ipped.
Vibration or rattling Water dispenser is on • List shims 1(_,love] lhc tlnil.
(slight vibration an nneven surface.
is normal)
Compressor/motor Often occurs when large amounts •This is normal.
operates (blue light on) of food are placed hi cooler.
forlongperiods orcycles Door left open. • (_he(:k to scc i["package is hol(lJI_g door ot)eJL
Hot weather or frequent • _I'hJs iS nol'lnal,
door openhlgs.
is first plugged hi.
Not enough clearance • Make sure lherc is ellotlgh air circtflafi(m arotm(l the tUlJl.
from die wall.
Water system overf'flled. • I)ist)cllse _r_" _i'()_l 1]_ ( ()1(t t_t]( _t tmfil air is released
into lhc l)olflc.
Chillercompartment Door left open. • Check to scc i[ package is holdh_g door ot)elL
tOO warm
Compartment/cold water Low ambient temperature. • Place IlllJls ill l'OOlll lelnpcl'alul'e cnvil'onl//cnl.
too cold/frozen
Chiller compartment Foods lrmasmitdng odor • Foods _vi|h S|FOng o(loFs sho k be Jgh 13_%rl"_t t _(
basodor to chiller. • Keep zm ot)eal box ofl)akialg soda in lhe IlllJl; replace cvery
lhree monlhs.
Interior needs clemlhlg. • See Care and cleaning.
Moisture forms on outside Not unusual durh_g •l_Jpc surthce dry.
of chiller compartmen t periods of lfigh hmnidity • ()t)eralc tnlil ill Ieml)crature-mid htmfidib'_ (mlrollcd
mid/or temperature. ]o(afiolL
• Place mill in tr_9 lo (:(ml_fin Inoisltu'c _lc(:tu//tflatJon.
Moisture collects inside
chiller compartment
(in humid weather, air
carries moisture into
chiller compartment
when door is opened)
Too frequent or too long,
door openhl_.
• Minimize time door is open.
• Wipe surlhce dry,
• Empl? internal drip truly,
• Operate tmfi ill tempcramru-and Immidil}-(ontrollcd
location.
• Pla(e unit in tr_} to (ontaJn moisture a(( umuladon.

INFORMAT/ONSIMPORTANTESENMATIEREBES£-CURIT£-.
L/SEZTOUTESLES/NSTRIICT/ONSAVANTB'IIT/L/SERCETAPPARE/L
AVERTISSEMENT!
N'utilisezcot appareil qu'auxfins pr#vuesdansle Manuel du propribtaire.
PflECAUflONSDESdLCUfllTE
Ouand vous utilisez un appareil #lectrombnager, vous devez suivre des precautions en matibre de sbcurit#,
en particulier los suivantes :
i:_\'ous devuz bJen installer et placer ce dislrJlmteur ::_'q£ssu}t'ztome c_claboussure d'eau imm('diatemem
d'eau, (onlbrm_ment fi ces instructions, avant de apr6s _\'oir (harg(' ou d_charg( •les bouteilles
l'udlise_: d'eau.
i:i_)Ne permeuezjamaJs 5 des entimts de grimpel;
de se tenJr ou de se pendre _'ll'cxt(,rieur du
distributeur ou sur les ('tagi'res qui se trouvent _
l'intc_riem" de l'armoJre de rangement (sin" terrains
modbles). Ils peuvem renverser le distributeur et
l'endolil[//ager Oil se blesser SC_l'Jetlse[//en[.
:!:;Ne rangezjamais ou n'utilJsezjamaJs d'essence ou
d'autre liquide oft '4q_eur inflammable _'lproximit6
de ce dJstributeur oil de tout autre appareJl
dleetrom('nage_:
:!:;D('bran(hez Vo[Fe dJstrJbuteur d'eau avili/[ de le
nemver ou de le rdparer.
NOTE: GEn'est on favour d'aucune r@aration ou
entretien pour le distributeur, Nous vous
recommandons fortement de ne pas essayer d'assurer
vous-meme los r#parations ou I'entretien de votre
distributeur,
!_;:Les enfants doivent _tre surveill6s par tm parent
quand ils udlisent ce produit.
AVERTISSEMENT:N'u_sezja_a_s
d'eau qui ne soit pas microbiologJquement sable
ou qui soit de qualit_ h_comme.
_;ATTENTION:,_distributeurr6chauffe
l'eau it tree temp6rature d'environ 90 °C (194 °F).
L'eau iI tree temp6rature sup6rieure &52 °C
(125 °F) peut occasionner des brfilures s6vbres
ou la mort par 6bouiUantage. Les enfants, les
persomles handicap6es et les personnes 5g6es
courent le plus grand risque d'etre 6bouiUmlt6s.
Ce produit ne doit &tre udlis6 que
pour reffoidir des boissoos en boite ou en paquet
et des aliments non-p6_rissables emball6s.
_:i_N'udlisezjamais ee dislribmeur pour dislribuer
_t_[l|Fe ([hose (tile de l'eau.
_:i_iNe IIle||ez t)_ts 1( (OlIll[/tl|a|e[iF de In_tl°Clle ell
t)osilJon de inardle otl lie |)ranc_/ez t)as le cordoll
d'alJmenlalion quand le dJslribuleur est vide.
BONNEINSTALLATIONETBONENTflET./EN
ii,!I ,aissez an moJns 2,5 em (1 po) d'espaee lJbre
enu'e l'arribre du distribmeur d'eau et le minx
pour permettre une b(mne cir( ulation d'ah:
i:}_N'installezjamais le distributeur d'eau darts tm
emplacement oi_ la tempc:rature peut deseendre
au-dessous de 10 '(; (50 'F) oft monter au-dessus
de 38 °C (100 °F).
k_;]nstallez le dJstributetw d'eau sur m:, plancher
stfftisamment lbrt pour le porter quand Jl est
complbtemem plein, Ne l'installezjamaJs darts m_
emplacement ou Jl pent ?'tre expos(' dJrectement
an soleil, fi la chaleur ou _'_l'humidJt6,
10

INSTRUCTIONSDEMISEALA TERRE
AVERTISSEMENT: Une ma.voise utifisation de/a fiche triphas#e peut occasionner
une secousse #lectrique.
Cel appareil ('leclrom('nager doil _'qre mis fi la terr(.
En (as de (:ourl (ir(:uil dle(lrique, la raise _'_la lerre
r('duil le risque de se(ousse (,le(:lrique.
Cet appareil dlectromdnager est mmfi dhm cordon
d'alhnentation mmfi d'un til de raise fi la terre _v(,c
une fiche triphas('e. I _a liche doit ("tre branchde
darts role prise murale qui est bien installde et
raise _'_la terre.
Consuhez un ('lectricien qualifid si vous ne
comprenez pas bien les instru(tions de raise _'lla
terre ou si vous ne s_vez pas si votre appareil est
bien mis _'_la terre.
Si la prise murale est une prise normale biphas(:e,
vous (`qes responsable et vous ("tes obligd de la
remplacer par une prise triphas('e 1)ien raise
_'_la terre.
N( (oupez ou 11'( lllevezjanlais la lroisibme bro(he
(nfise _'_la lerre) du (or(hm d'alimenlali(m.
N'milisez pas une fiche d'a(laplali(m a\rec ce|
appareil.
N'utilisez pas de rallonge dlectrique _c,'ec cet
appareil. Si le cordon d'alimemadon est trop court,
demandez _'_un ('lectricien qualili(' d'installer une
prise murale prg's de votre appareil.
Pour Ull meilleur ffmctiom_ement, branchez cet
appareil ('lectr()m('nager fi sa propre prise 61ectrique
pour ('viter tome hmii_'re qui clignote, fllsible qui
saute ou disjondeur qui bascule.
BONNEMISEAU REBUTDUDISTRIBUTEURD'EAU
Disposition du refrigerant
Votre ancien distril)uteur d'eau pent comenir
tm r(,li'ig('rant r('glememaire darts son s}st6me de
reli'oidissemem. Ces r('trig('rants sont jug('s nocils
pour l'ozone stratosph('riqtle. Si vous d('barrassez
de votre ancien distribmem', assurez-_ous que
le r('li'ig(:ram soit enlevd el r(:cup('r(' par tLi_
technicien certifi(' par I'EE\. Si vous lib('rez
intentiomlellemeiH ce r('li'ig(:rant, vous pouvez
('Ire sotmfis attx coi_traventions el fi
l'empris(mnement sous provisions
des lois sin" l'environnement.
LISEZETSUIVEZSOIGNEUSEMENTCESMESURESDESECURITE.
CONSERVEZCESINSTRUCTIONS
77

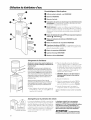
Utilisationdudistributeurd'eau.
Caract#fistiques et /iste depieces
0 Collierde soutiende boeteil/e--eoir (WS28X100M)
S#parateur (WS28X10013)
R#servoir d'eaufroide
Commutateursde marche eau chaude(rouge)et eau froide (bleu)(arri&e
dudistributeur).Lc connnutalc/n de mmcl_e Cold (blcu) reel mlssi
ell nl_tr( h(_ ]e (Olllp_trlim( 111relll)idi_,s(_/]r.
_Voyants lumineaux.Le voyant verl s allum_ quand ]e distril)ulcnr cst
])l'_ll([l_, L(f VOy_Hl[ I'Ot[_(! (!1 ]If VOV_/IH bllf/] s_tll[Inl(f[l[ ([ S'_[(fi_[l_![l[
quand le (/islribulexlr rd( haufik_ ou refioil/it l'cau. Lc (/dnl m_ge (lu
(Olll])l'( SS(!I[I" (SI l'(O/l_,_tlll all(r jtlS/lll'_
3 nlinules.
Boutonsde distrihudoeNot(ehaude) _s
_ ,Roomtemperature(temperature
ambiaete) j, Cold (froide)
Plateaude condensationdudietributeer(WS28XfO031)etgrille
(WS28X10032)
Plateau de condensation de eompar;imeet(WS29XfO029)
_Compartiment refroidisseur (GXCF2OE).Ce (Oll_l)a rri_nefit _1e 11__itQ re
/llilis(" (IUe l)Otlr ielllti(lir lifts blIisso11s Oil |)alto Oil ell ])_l/]tlel it( des
aliments non-pdrissabl_ s oral)all&.
EtagOredu eompar;imeat (WS2BXIOO2B)
Capuohon de drahmge(WSOfX10008)
Bouohonensificone (WSOIXIO007)
Chargement du distributeur
Oes&fectezle reservoird'eaeavaotde/'emp!# pour/a
premierefois(oooseltez"Ne#oyageetdeshffection des
reservoirsd'eae').
IMPORTANT:Assurez-vousquele flistributeursoit
d#branch#et quelos deuxcommutateurs demarche
(eauchaufleet eaufroide)(_farribre flu flistributeur)
soientenposition0 (art#t)avantdele charger Avant
de/e charger,essuyezlehaut dela bouteilleavec un
tingepropre etlavez-vouslosmains,E-vitezdetoucher
/apattie fie laboutei//equisera encontact avec/e
flistributeur fl'eau,
Assurez-vous que& niveau de/'eau onboutflu
distributeursoitsuffisammenthas pourpermettre u/?e
bonneinstallation dela boutei//e,Si vousnele faites
pas,vousrisquezdeprovoquer und#borflementflu
flistributeu_
l, Pelcz l'dlill/K!tle (Ill CO/l_,(_lC](t silud (fll h}tll[ (l(f
1t bouwille(s'il y a lieu). N( l-( fir( z pie toni lc
(al)U( hoe lie 1t 1)ouwill(.
2,
3,
Pl tcez la 1)outeille en lmut du (listril)uteul-
(olnme l'indillue la figure, en Mignant la sonde
all1 ro|)illtff (]istl_|)tll('/ll ;1/I (('lltlc all1 bl)ll(holl
de 1t boureille d'eau. Pressez vers le basjusqu'_
ce que la sonde pdn?'trc dins le beechen de la
1)outcille, en perlnettam _ 1t bouteille lie
reposer Slll le (ol (hi so/Itiell.
IMPORTANT:Appuyez ear los deuxhoutoasdu
distributeurjusqu_ co quede Yea, come des
deux robinets.
4. Branchezle (lisuil)u_elm
5. Mell(z l(s conlnllll}Ut:lll'S (]£ lll;/l'Cll(_ FROII) (1
C]tA1 I) (simds _'1l'al'l'i('q'tf, (Ill (O/t Slll)(_l'i(/Ir
gauche lie (lislril)ul(ur) (m position I (maroho).
6. All,._nd(z }0 lninules llUt_ l'(au atl(ign( la
I(nllK_raltlf( (h_/tl(](! (1 la I(_lll})(}l_/llll( [loi(]( ,
Appelezun distributeurlocalpour acheter yesbouteilles
d'eau,
12
Commutateurde
sauvegardepourla
protectiondesenfants
Sauvegarde pour la protection des enfants
Ix' bouton du (listlJ/)uteur CIL\UI) est muni qu'une
sauvegurde pO/ll-la sd(:uritd des ( i11_111{£qui ld(]llil le
li_.!lUelie i/istlJ/)udon accidentelle iI'eau chaude par
lie j(un(s (ill,lille. PO/ll-fSil-(couler l'(au, tourn(z le
Ct)lllIllUlalC/ll" Ilans le S(IIS illl_ l'S¢ _ des aiguilles (/'un(
inOllll-U et appu}ez SUI" le bOlltOll. Lt coinllllltat(lll
St" lelllet alllOlllaliq/lelnellt ell l:)lac<qtlaIl(] VOUS
l('lficllez le bo/l[Oil.
Ledistrihuteurrechaaffereaeh one temperature
d'ooviroe88°C (190°F).t'eae honetemperature
seperieere h52°C(125°F)poutoceasioeoor des&Meres
oe desb/esseresseriousospareboeillaotage. Lee
oofaots,!ospersooneshaodicapeeset lospetsooees
#geescoereot Io plusIorisqued_tro eboeillaetes.
ATTENTION: doi o,,t#tro
surveill#sparnoparentqeaodils etiliseot co prodeit.

Entmtienet nettoyagedudistributeur.
Nettoyage de I'ext#rieur de/'armoire et de rangement
du compartiment refroidisseur
IMPORTANT:Mettezlee deuxcommutateursde
marche (4I'arribre dedistributeur)enposition0 (arr_t)
st d#branehez/edistributeurd'eauavantde/e/Tettoyer
Vous pouvez n( tto)'er l'_lrlnl)il-_ (t le COIllp_ll'lilll( Ill
dtl distllblltellr avec (le ]'earl sa_llne/ise. RiilceZ
bien avec de lkau ptn_. N'ufilisezjamais d(
ll('ttO_A£1t COIIHn( l'(i_tl Oil (1(_ poll(ll"U fl l'(_(ll l'(q"
_O)l'dSi_ e.
Enlev( z la })oussi(q-(' du _,el-p( lllill (hi (oild( ilgatelll-
5 l'arlJ£'l-{ de l'apl)areil 5 l'akle d'une blosse ou
d'un aspi_-ateui: Dm r obtenir les ldsuh_tts les
111( illetll-S, tllili_,ez tlne bl-oss( spt_cialeiIl( ilt COll¢lle
5 cette fin. Vous la trouvel-_ z dans la phlpart d(s
lnagasins d'appal-dls dlectromdnagel-s.
Nettoyage de 17nterieur du compartiment refroidisseur
Pouraider# emp#cher/esodems,laissez tme
bOlle (/( l)i(al'l)Oll_'d( d( SOil(l( OtlV(_l-le dans l(!
( Olll})a l-lilllenl le[ loi(]iss(_l i 1.
Nellov(z (k la 111(:111{ lll{llli{!l'{ I(!S gt/lll'(!S palti( s Oil
COllll)allilnenl l-efl_)idiss(_/ll-, y (X)llll)lJS l(_s joinls (!1
ks pibc(s en lnali(_r( plasfiqu(.
B#braoehez/e distributeuravaotdeoettoyer.
L lilisez un( solution d'eau fi&k <t de bical-bonale
(/( SOtl(l(---<'llxilo[l till( cllill( l-fi ';oupe (15 rnl) (le
bicarbonate de soude par litl-{ d'eau. Cette sohllion
nettoie foul (i1 lle/lll'alisallt les ode/ll-S. RillCeZ et
eSStly( z ( olllpl_'telllellt.
Grille
Tire# de condensation et grille
Le lin)il- (/e condensation du (/istlJ/)umur ne ';e vide
paS alltOlllatiquelllellt. POUr l-(Idllil-( _ les laches dues
filkau ou fides ddp6ts, wlus dt_sz vide*, nettl)w r
et sdcher l-dgtlli_'r(illellt le tiri)ir <t la grilk.
_(!IlOY( Z _'t ]'(atl ](}g{!l'( 111()111 S{/VOIIlI{)IlS( Oil (/;/ns
la c]ayelle Slll)eri(_llle de volle lnac]line a ]aver la
vaisselk.
Tiroirde
condensation
13

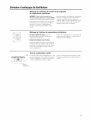
Entretienetnettoyagedudistributeur.
Vidange du distributeur
_t)/ls de_ez vider ]e distr/btltetlr n_allt de l_e[_o\el" les l'esey\ oil's e[ n_allt de _o/]s a|)sel)tel" poLlr" de l()l)_tles \at nl/(es oLl/]Ile ]()l)_He (]/ll'ee,
(arri6re du distributeur)
[Capuchon
desortie
l. Mt tt(z les intt rrupteurs de mard_e (_'ll'arri_*w du distributeur)
_n position 0 (arr#t) _t dt%rnnchez le distributeur d'_au.
2. Enlevez In l×mteilk d'eau du distributeul:
_* ._[_[[t Z le COtltetlnll[ qui t't ce_t_l l'(au ( hatl(]a soils 1_ tol)hlt [
d'enu chnudt. Appuyez sur le bou/on du distributeur d'eau
chaudejusqu'a ce que l'eau soit fralche (environ 1 litre). Ajoutez
dt l'enu nu rdscr_xtir d'enu fl'oide (en haut de l_'lofl In boutt ill_
Ibm'nit l'enu) si mq.essairu.
4. Appuycz sur les deux boutons du (listribtm ur et laissez (ouler
l'enu jusqu'_', <e qu'il n'y nit plus d'tau qui coult (environ l litr(
d'enu (lemeure (!nns le distributeur).
5. Plnct z un gTnnd seau sims la sortie dt _idnngt situ_t _'ll'arri;*r<
du distributeur.
6. _kl'nide d'un Iotn-nevis Phillips, desst rrez los vis du supporl qui
couvre le capuchon de sortie de vidnnge. Fahes tourner le supporl_
conlp16tetnt nt pour nvoir n(c_'satl capri( Non.
7. Enkvez le capud_on et k l×md_on de silk one de la sortie dt
xidnngc et pennettez _'1l'eau de s'e( oulet: AptSs la vklangt,
reme#ezenplacele bauchanet lecapuchan.
8, ]:_drestourner lc',upport _fin (k k remt ttre en pl_(e et lesst rrez
los xis.
X'_surez-vous d'instalk runt boutdlle pleine cr dt thiru <oukr l'eau
du rol)inet d'eau _.}latl(1.t_o,'nntde bFntl( hel- et de remettFe ell
mnrch_ It distributt ur (voir Chargementdu distributeur).
14

Enl_vement Remiseenplace
soutien
debouteille
_ S@aratour
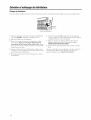
Nettoyage du separateur
IMPORTANT: Mettez les deux commutateurs de
marche (_ farribre du distributeur) enposition 0
(arrOt) et d_branchez le distributeur d'eau avant
tout nettovage.
I. Enluvcz la lxmt(qlh, d'eau ut _k[uz h, distribut_ ur
(con_uhez Vidageflu distributeur).
2, Enh'vez h' collier &' soHtit n en tournant dans le
sens oppose a celul des alguilles d'une montre
_t _n tivant droit.
3. Enlevez le st_pal_ltClll _11 matibr_ plastklU_
<n tirant droit (vous axxz peulZ'tre Ix soin
de totdre l(:g&* ment pour ddgagcr).
4. Nettoyez le s6pamtcur mcc de l'eau sa_smneuw
sa_mn_ u',c ou dans le lave-vai',',_lle, sur le
panier sup6rieu_:
5. Faitesbien sbcherle haul el le })asdu
s6paratem:
6. ,kl'aide d'un lingc propre ou d'un ( ssuie-t,.)ut,
s&:hezle r(:,,el,afird'eau fixfide_'lfond.
7. P,emettez le s6pa_wt_ur en place dans le
disu'ibut_m:Assurcz-vousque l'exu6mit_
allong(:e et amincie du sdparateur wit ins&'_e
[i:rnlenlent ()aidsla priw m6tallklue sitllee ell
hasdu l(:selv fi_:
8. Remettez en [)lac_le collkr d< soutien et
Iournez davisle sens des aiguillesd'une montre
.jusqu'fic_ qu'il ',oilbien fix6 en plac_.
9. P,emett_z en [)lacela bouteille d'eau (consuhez
Chargementfludistributeur).
Oesinfoction et nettoyage des reservoirs d'eau
IMPORTANT: Vousdevez d#sinfecter p#riodiquement les r#servoirs du distributeur d'eau pour emp#cher route accumulation de
d#p6ts min#raux qui peuvent changer le go5t et le d#bit de I'eau,
Pour deshffecter :
l. ,\rant d( d_:sinf((t(r, tn(tt(z l_s d(ux
(Olll[lltlt::ltellls (l( mar(he (_'1l'arri&r_ du
distributem) en position 0 (arrOt)_t
)
d#branchez le distributeur d'eau. NOTE: t our Position
la premiX're installation, saut<z les ('tat)_ s 2-4. ARR[:T
2. Vidcz la born<lilt d'_au, puis rcfir<z-la du distribut_ ur.
3. Videz les r(:ser',oirs d'<au (w)ir Vidaoecludistributeur).
4. Remettez en place le bouchon de silicone et le capuchon
de drain (voir Vidage du distributeur).
5. N'AJOUTEZ PAS L'EAUDE JAVEL EN PREMIER OU
DIRECTEMENT DANS LEDISTRIBUTEUR. L'eau de Javel
concentree risque d'endommager le plastique.
_2rs<z 1/2 _uilh r _'tth(" (2,5 ml) d'<au deJav<l
domestiqtu ((on(_ntration 6,0 5/_maxinmm) darts
une cruche (le 2 liu'< s r<mplie d'_au du robin< t.
6. X'('rsez la solution dans l'ouv( rture sim('e sur l( dessus
du distributeur.
7. R('p6tez les (:tapes 3 et 6,jtlsqtl'_'l c( que le distribut(ur
soit plein.
8. Appuyez sin les boutons d_ distribution d'eau chaude
(t floid_ jusqu'_'t ce <lU_ l'<au coul( des d(ux lobitv, ts.
9. Laissez la solution agir p<ndant 15 _'120 tnim]t<s.
10. Ringage de la solution d'eau de aavel :
-- Vi&z k _ont_nu &s r&< tvoits d'cau darts un grand
s_au (volt Vidage du distributeur).
-- ,\SSIII'(Z-VOtlS ()jill2 1( bOll(hell 1'11 sili(on( n( sole
PAS en place.
-- IMPORTANT: Enlevez le s#parateur et nettoyez le
r#servoir d'eau froide (volt Nettoyage du s#parateur).
-- NcttoT,.cz, puis rcmcttcz tn pla{c ]( s('paratcur ct
1< _olli< r de souticn (_oir Nettoyage du s#parateur).
-- Vt)-s(z approximativcm(t'_t ] gallon (4 liu-(s) d'cau
du robin( t darts l'ouve_mr( du dcssus, puis laisscr
]'(an s'('coulcl- (tails le St atl.
-- V_rs<z tm autre gallon (4 litres) d'eau du robinet
darts l'ouvermr< dn dessus, puis laiss<r l'eau
s'(:couler darts k s<au.
11. Remettez en place le bouchon de silicone et le capuchon
de drain (volt Vidage du distributeur).
12. M('EI(z (n pla(c llIIC bout(ill( d'catt hal(h( (_,oh-
Chargement du distributeur).
13. Laissez #couler 1litre d'eau a travers chaque robinet _t
gofit_ z-y afin de x&'ificr qu< la solutiot_ d'cau d( ,]ax<l
a compl_'t_ ment ('t(" (wacu('_.
Si I'eau TaSte toujours le chlore de In solution d'eau de davel,
repetez les etapes 10a 13jusqu'a ne plus percevoir ce goSt.
14. Bran(hezh distribut(u_.Mett(zles I_
(oIllllltltal(tl£s (le ])l;-]Fche earl (]lau(le (t (!all
fi-oid< (A l'arri{'re du disu-ibut<m) <n position Position
I (marche). MARCHE
Pour enlever les depSts m&eraux :
M#langez 2 litres d'eau avec deux fitres de vinaigre; OU m#langez 4/itres d'eau avec 454 grammes de cristaux d'acide citrique.
L'eau de Javel n'enlbve pas les d#pSts min#raux. Appliquez cette proc#dure _ I'#tape 51orsque vous voulez enlever les d#pSts min#raux.
15

Entretienetnettoyagedudistributeur.
Degivrage
D@ivrezchaque fois que le givre sur la paroi du cempartiroent
refreictisseurctevient excessive.N_tilisez jamais d'instrmnent
aiguis_ ou meta]lique pour enlever ]e givre, car vous risquez
d'endommager les conduites. Nous veuerecommandoned'uti/iser un
gratteir el7matibre plastique. N'utilisez jamaL_un appareil bbctrique pour
d@ivrer le cempartiment refreidi_seur
Pourdegivrer:
iJi:l{nHev('z Hes aHiments du compartiment.
iJ)_Mettez He commutateur de marche CoHd (bHeu) en position
OF[: (arrg_t) et d('branchez Hedistribmeur.
Yi::Meuez pHusieurs serviettes en bas du compartiment, pour
recueiHHir H'eau.
I _e ddgiwage prend g('ndraHement quelques heures. Pour
d('giw('r pHus rapidement, Haissez Haporte ouverte.
Apresavoirdegivre:
i__]_lllex,rez Hes servi( lles mouiHHdes el esslt? ez ( on/H)H_'lemenl
|Oll|e (?all reslanle,
_i::Essu} ez Hecompardment a\'ec tm Hinge sec,
_i::Branchez H'appareiH et meUez Hecommutateur de marche
CoHd (bleu) en posidon ON (marche), RemeUez Hes
aHiments dans H'appareiH,
Preparation au depart en vacances
(_)ll_I/(] VOI1S H)_iI't('z ('11 \r_t(_tll((S Oil V()tlS _d)S('llI_'Z I)elld_tllI
Hongtemps, m('tt('z h's (H('ux (ommlltat('urs de tam'oh('
(5 H'arribr_ du dist_ibuteur) en position O (arr_O.
1. [)(_H)l'ai/(Th(?z He disllJHmlellr d'_all,
2. EnHe\'_z Habou_dHHed'eau.
3. _,idez Hesrdserxoirs d'_ a_l (xoir Vidagedu distributeur).
4. Faites bien sdcher He haul et H_ has du sdi)arateur (v()iI"
Nettoyage du s@arateur).
5. I,aissc'z HaporU' dl_ compartimc'nt r_'Hi'oidisscm" olw_ rte.
De retour de vaeanees, assurez-vous de d6sinfecter les r6servoirs
d'eau avant d'utiliser /e distributeur (volt Nettoyage et d#sinfection
des r6servoirs d'eau).
Caraet#ristiques techniques
Taux de refroidissement: en\iron 2 Hi_r_s (0,5 galHons) par
HI e/5I'e
raux de rechauffement: enxiron 3 Hiires (0,8 gaHHons) i)ar hellre
Conseilsde depannage.
Capac#e:bomeiHHe de H5 ou 20 Hirers (3 ou 5 g dHons)
ConsommatJon de courant: R&:haufi_'emenl : 480 _r_[S _l_X.
P.efroidissem_ n| : H25 _r_[_iS_;_X,
L'eaua unmauvaisgo#t
ou unemauvaiseodeur
Causepossible
Le s6parateur dolt ,_trenettoy6.
Le distributeltr doit 6,tre d6sinfect6.
Que fa#e
• (]onstl]l(zNettoyageNettoyagedus#parateur.
• Consuh(zNettoyageetd#sinfecfiondesr#servoirsd'eau,
L'eaun'ostpas suffisamment Le distributetlr n'est pas branch6. • Poussez t'_nlll)l_'lCllielll la licllc dallS la prise nlurulc.
chaudeoufroide
Le ft_sible a santo ou le disjoncteltr • ]_.t'llll)lat ('7 h" h_sible de l_ ill:liSOlloil r('l.Wdll('llc7 h"disjOll¢ R't/r
a bascuh}, de l_ lllUi_Oll.
• Si |1-1)l_ d'al'li(lcs sl mr bF,ulcllds _ur lc lll£_llle('ia ui|, clllex.l'z quelqucs
arfich's pour h's bc,mcher 5 till (il'_tli/dilIdrellL
Toute l'eau des r6servoirs a 6t6 ufilisOe. • .\llclldez 30 lllillll |es qlle l'eau '_eld( ll;_llfIeor/ se a.lh_idissc.
Le limiteur de tempOramre s'est • Merle7 los cOmHlUmleurs (l'eau (hau,./e et ,./'c_u lh)idc (5 l'ard_'_rc du
d6dench6. (/istributeur) en })osiliOll 0 (agret_. A|tcn!/ez 5 lnillUle% pl/is lllettez les
(Ollllllt/[atcllrS ell D()siliOllI (marche).A||cndez 30 lllilllll(_s qlle l'eau
se l-('li'_i,./iss("oil s("rdcllatlllc.
Ledistributeurd'eaune La bouteille d'eau est vide. • ]_.Cllll)laccMa par une l lOuvcllc l_)ulcillc d'call.
fonctionne pas---L'eau ne Des d6p6ts de min_ratlx bott('hellt • (Jlmsllllez Entretienetnettoyage.
coulepas
les r6servoirs.
t'oau no coulepas quand La porte du refroidis,seur d'eau • F('I'III('Zla l)Ol'l('(hi l"eh'oit/isbetll"(l'eatl.
vousappuyezsur lebouton est ouverte.
d'eaufroide
De la glace emp6che l'ean de passer. • I)dbrun(llcz lc (olnllllltaR't/r du re[h_i(/i_eur }_('lld;lll/l;_ lltli| cl
lC|H'andhez-le lc lllatill.
Labouteilleestchaude
Le sTstbme d'eau est _rop plein. L'ean
bout dans le r6servoir dean chaude et
bouillonne dm_s la bouteille.
• I)ispensez (1< l'(!au fl'l)i(l_ iusqu'5 (:(! (lU( l'air esl r(!lfichd dans
la bouteille.

Causepossible
Ledistributeurd'eaucoule Il y a ml trou d'6ph_|e ou tree fente
I'exterieur duns la bouteille.
Ouefake
• R( llll)]a(( z par tlllellolwe]]e bolll( i]]e (['eall.
Le compresseurne demarre Op6rafion normale---Le d6marrage du * Pati(nl( zjusqu'_'_ 3 ulhllll( s DOllr [/ellnettr( all COlllpr( SS(llr de
pas Iorsque le voyant bleu de compressetw est retard6 dttraJlt tree ([(_lllHl-l-el-.
Hnterrupteur d'eau froide p6riode pouvant aller jttsqu'a 3 minutes
est allume af'm de prolonger la dur6e de vie du
compresseHr.
Le distributeurd'eau Le distriboteur d'eau n'est pas bien * Assur( z-vous (lue le disuibuteul _d'eau suit bien installd sur un plancher
faitdubruit h niveau, hodzonlal suttisamm( m [brt pour le Solltellil" qllalld il est plein.
La bouteille fait Im glou-glou qttand * Ce bruit (!st llOllllal.
reau rempnt les r6servoirs.
Son d'eau chaude qlfi bout. * (_e hi'tilt (!st llOHllal.
lorsque le systbme de refroidissement
termine son cycle.
Particulesquiflottentdansreau L'eao confient beaocoup de min6raux. * Trollvez llll( SolllX ( d'eall illoins d tire.
Une mauvaise odeurdans Le r6servoir d'eau chaude est vide * Appuy(z sur le boulon de distribution d'eau (haude iusqu'fi ce qu(
I'akautourdudistributeur oupas complbtement plein, l'eau (old( polw (SI( l" l'ail" (hi rds( l'VOil"(['eall (hall([e.
Le compartiment refroidisseur L'appareil n'est pus en marche. * Melt_z le ( ()Illlllll[_i(lll" de in/r(he Cold (bleu) (ll posifiOll ON (lll/l'(he).
ne fonctionnepas Le distributeltr d'eau n'est p_s branch6. * Pouss( z la fi(he (:oinpl{'l( mezll ([HllS la pl'ise.
Le fiLsible a saot6/le disjonctetw * R( inplac(z k tilsible ou rebl'allch( z le ([i@)llctetll:
a basclfl&
II se pruduit des vibrations Le distriboteur d'eau se trouve sur • _ filisez d(s (ales pour bien ill( Ill'( l'appar( il _ l'hol-izonlale.
Ou uu bruit de creculle (des line surface in6gale.
vibrationslegeres sent normales)
Le compresseur/moteur Cela se prodlfit souvent quand de • Cesl normaL
fonctionne (la lumiere bleue grandes quantit_s d'aliments sont plac6es
marche) pendant des p6riodes dans le comparfiment refroidisseur.
ou des cycles longs La porte est rest6e ouverte. • z\SSHIeZ-lOllS qH_llll paqu( 111( bloqu( pus la _( l'lll( Hlr( de la port(.
L'eau est chaude ou volts OtP,TeZ • (_'esI llOrlllal.
souvem la porte.
C'est normal quand vous venez de r(ffokii.
brancher l'appareil.
L'appareil n'est pas plac6 * Assurez-x ous qu'il y ;/it sllftiSallllllenl ([e (ir(ulafion d'air _t/ItOllF d(
suffisalmnent loin du tour. l'appareil.
Le s_csti_me d'eao est flop plein. • I)ispensez de l'eau d( rol)inel [i-oid jusqu'fi (e (Ill( l'air (!st relfi(hd
(|arts la boul( ille.
Le Coulpartimentrefroidisseur La porte est rest6e ouverte. • Assur(z-xous qu'un paqu(t n( bh)qu( pus la t( l'ill( Illl-( de la purl(.
est trop chaud
Compartjment/eaufroide Temp6raawe ambimzte basse. • Pla((z l'appareil dints un ellVil_Ollll( Ill( Ill O1_1la [( lllp(_l;/Hlre alnbiante
trop froide/gel esi llOllnale.
te compartiment refroidisseur Les aliments trartsmettent de l'odeur • Vous (l( vez bien elllpa(ltletel - les aliments qui (tnl (l(s o(1( m's tl)rtes.
a dee odeurs au compartimem refroidisseur. • (_OllS( rlez lille |)oil( ollvel_[e de bicarl_)nat( (1( sou(l( (Jails l'appareil;
1_( lllll|_t(( Z-|_/ lOllS |(S 'I'OiS lllOiS.
Vol_ devez nettoyer l'int6rieur. • ())llsllh( z SoiI?s ot i?ettoyage,
Ilseformedel'bumidit# Ce n'est pas anormal penda_nt des • Essllv( z l)ien la sllrth(:e.
I'oxterieur p6riodes de haute temp6ramre et/ou • Fail(s |illlCtiOllll(_l _l'appar(il dHlts des ( lllpl;/(( lllell[ Oil la telllpdl_tllll-e
• P|ac( z |'apl)areil (|alts lln |:)|at(all pour r(cll( i||il" |'accumulation
d'humidild.
Il se fonnedel_umiditb
I'interieur ducompartiment
refroidisseur(quandil fail
humide,rair transportede
rhumidite dansle eompartiment
refroidisseurquandvous
ouvrezlaporte)
Volts ollwez la porte trop fr6quemment
ol, trop longtemps.
• Dinlinuez le wraps (l'ouvertur( (le la porte.
• l{ssll'_l z |lien la St]I't_I( e,
• Videz le plateau (le cond( nsafion int(_l'i( in:
• Faims tilncdonner l'apparcil dans des ( lnplac( lnent off la mmlldmture
et l'hunfi(litd sont conu-61des.
• Plac(z l'appareil dans un plateau pour r(cueillir l'accunmlafion
(l'hunfiditd.
/7

Soutienau consommateur.
SiteInternetGEAppliances www,electromenaoersoe.ca
._Vt'Z \'(Ills {/Ill' question OUb( soin d'aidt' conccrnant votre ailpar/,il ('h'clronl('nagt'r? Essav/'z It sit('
in{ern(l de (;E Appliances, 24 heures parjoul; 365jonrs par an. Pour i)lus de (oi/tbrt (t de railiditd
vous pouvez inaintenan{ y extraire les manuels d'nfilisation, et in0me (oinnlander des pi&:es el des
ca{ah/gues. Vi/us i)ouv/,z dgaleinent poser _os questions a no{re den/andez _'_notre equii)e d'Exper{s7
et beall(ou I) d'au{res choses...
StudiodeDesignpourla VraieVie www,electromenaoersoe.ca
GE agi{ ac{i\cn/cnt ('n/avcur (In (on(/'I){ eh' Design Univ('rs('l--<h's produils, s(rvi('cs i't ('ll'_dl'Ollll('Illl'I/{S
(lUi peuvenl {"{l'eiltilis('s par des personnes de tout age, taille el cailaci{d. Nous reconnaissons le besoin
de con(evoir des produi{s adapt(.s a iln grand nou/bre de handicails i)hysiques el nlentaux. Pour obl(nir
des delails sill"les ailillications du Design Univ<Ts(l de GE, qtd c(mlilrcnd (Its iddes d'agencenlent de
cuisine pour des ilersonnes handicap/:es, consuhez d_'s fi pr/;sent notre sile in{ernel. Pour les personn(s
nlal-cntendantes, nlerci d'ai)peler le nmller(/: 800.T/)D.GILkC (800.833.4322).
Pi ceset accessoires
www. electromenagersge,ca
I,es ilersonnes pe/p<(ilt rec(vi)ir directenlenl _'1la illaJson des ili+"ces (les (;aries X]S'.\, MasterCard (;,u
{)iS( OV('I" SOIl{ at(('pilOt's). (',OHII)IHI/d('z(}IIlig-m' _"tOIlt IllOIll{'II{, 24 heurcs 1)arjollr oil par tdldIlhon(
all nunlero 800.626.2002, aux Emts-Unis, ilendant les horaires de bureall habitllels. An Canada,
api)elez au nunlero 800.663.6060.
Los directivesstipul_es dartsle presentmanuelcomportentdesproceduresquen'importequel utilisateur
peuteffectuer.GEn'estellfaveurd'aucunereparation ouentretienpourle distrihuteur.It!ousvous
recommandonsfortementde nepasessayerd'assurervous-m&ne losreparationsouI'entretiende votre
distributeur.
O[TKICteZ [70US www, electromenaoersoe.ca
Si xous n'&(s l)as salistsil (hi S_l"A(e Ai)res _ iI[e don[ x+(tlls_r_z bdn('fici(' de (;E, (itnm(Wz i/i)[is Sill"
nolre silc en foui'nissanl l(/IlS les details, y (oinIlris "_(/ll'eillll/l(?l'/) dr! I('l+;llll(/I/(, OUecriv( z au :
• • • 9 _
Manag(r, Cuslilmer Relad/tns, (;E Appliances, Ai@iance Park, I,oulsvllle, K'_402_ ).
GARANTIE LIMITI_E D'UNE ANNI_E
@w (vmwe kz,_'mzmt;('?
--'Ibm ddtmlt dt matdri¢l ou de nlain d'oeuvre du produit.
Q},s/.,q.i n;,_Epasww:,+,_/pa*la.ram+t;+,?
-- [x's I)oult illes d't ml.
-- Los d(=plac(:mt Ills fi votre domicilt ])o111" VOllS ellS( igrlcr ( Oll/lllgllt
utiliscr It produiI.
-- iJilt installation, it lllisc Oil ( lltl-( tit 11 illcollectc.
-- {Jilt pannt du produiI causdc pro m_ abus d'utilisation, un<
mauwfisc utilisation, toult moditication, t xploitation commt rcialc
otl title utili_ltion du p_o(luit dans ml I)ut iloil prdxll.
irl7)ut pro(hilt qui <st utilis(" cn (l( hors d'un( rdsi(l¢ ncc ou (l'un
I)/ll't'aI I.
i Ix 11 llipla( tqll( nt (Its lilsibk s ou des di@m(tcul'_ (1¢ lu l'ttsidt n(t=.
-- Utilisation tit cc produit lorsquc l'tml csI microbioh)giqucmcnt
inipurc 011dc qualitd inconnuc.
-- [)()llllnH_t {=11produit si xous l'utiliscz pOllr distribut r mmc (hose
qtlt dt l'cau.
--'Ibm donmiagt (:ausd au produit par accident, inccndic, inondation
Oil actc dt Di(/I.
i']7)ut st rvi(x all produit.
--Tout dommage fortult ou indirect catls_ par des d_fauts 6ventuels
de cet apparelL son inslallation ou les r{.paraiions effecnd'es.
• @u4D, ('st la &m;+,de la ,gznanU,. @d,s [).Dat?
i Unt anndt.
• (:<..+.e_+_uo_j+.l.;,,..,a¢<:l+..<,_io_n
i I_IIIICIIeZ It prodllit aII llla_ilsh101"1 V()/IS l'av_ z achctd a_,cc Illl(
t xcnlplairc de la "Prt uvc d'achaI'2 Unc unil6 ncuvc ou rcmisc fi ncut
scra fimrnk. ('cttt garantit cxcluI los fluis d'cxpddition dtl produiI fi
votr< dol/]icilc.
EXCLUSIONDE GARANTIES IMPLICITES--Votre seul et unique
reeoursest I_ehange du produit selon lesdispositionsde eette
Garantie limitee. Toutesles garanties implieites, ineluant les
garanties de eommercialite et d'adequation a un usage
speeifique, sent limitees a une annee ou a la periode la plus
eourte autorisee par la legislation.
CetIe garaitie comte l'acheIeur original et tout propd_'tah'e subs&luent des
produits achetOs h des fins rOsidenfielles ou de bureau h l'intbrieur des Etats-
Unis. En Alaska, ceIte gm'm_fie exchtt le coot d'expOdition ou les appels de
service h votre maison ou bnreau.
Certah_s l_tats ne permettent pas l'exclusion ou la reslriction des domtnages
accessoires ou cons6rutifs. Cetle garantie vons donne des droits juridiqttes
particuliefs, niais vons potrcez _galelllent avoir d'antres dmits qui varient
d'EtaI h Etat. Pour co,maitre vos dmits juridiques, constd)ez le bureau de
protectlon du consommateur de votre localit(', de votre Etat ou le procurem"
g&l_ral de votre Etat.
Con tttt_iez notis sitr ge.com, ou appelez le nltm_ro sans frais 800.952.5039
aux Elats-Unls. Ati Canada, conta_'iez notis stir ww_:elecrrlmaenag.'ersge.ca,
ou appelez le nima_ro sans frals 866.777.7627.
Garant : General Electric Company,Louisville,KY 40225.
18

INFORMAC/ONESBESEGURIDABIMPORTANTES.
LEATODASLASINSTRUCC/ONESANTESBEUSAR.
iADVERTENCIA!
Use esteaparatosolamentecon elprop6sito para el cual fuefabricado deacuerdo a comase describe en
este Manual del Propietario.
PRECAUCIONESDESEGURIDAD
Cuando use aparatos, usted debe tomar ciertas precauciones de seguridad, incluyendo las siguientes:
::__Es[(, dlsp(,11sador de ag,tl._l d(,b(, s(,r instalado _:!!I JlIlpi(, ctL_llqtll(,r d(,rl'aln(, d(, a_tl_l
apropiadam(,nt(, y lo( alizado de acuerdo coil inmediatament(, despu4s de hab(,r llenado
(,stas insmmcion(,s ames de s(,r usado, o x_,ciado bol(,llas de agua.
i,_!No p(,rmita que los nifi(:,s se trepen, paten o
cu(,lgu(,n de la part(` exlerna del dispensado*,
o (,n los (,slant(,s ('i1el inlel'JOr del gabin(,t(,
de ahnacenamiemo (en algunos mod(,los). Eslo
podHa hater que el dispensador se _x)ll(,ey se
dan(, o (ause lesion(,s serias a los nihos.
i?;!No almac(,ne o use gasolina ni otros vilpolK,S
o lfquidos inllamables prdxJmo a esle u otro
aparato.
::_':D(,scone(le el dispensador de agua antes de
limpiarlo o hacerle cualquier reparaci6n.
NOTA:GEnoproporciona servicio para eldispensador,
Recomendamosqueno intente proporcionar servicio
al dispensadorustedmismo,
;;_'_No use (,st(, disp(,nsador de agua para disp(,nsar
ninguna otra cosa qu(, I/o sea agua.
_No (on(`(l(` (`l (al)l(` (`l('cld(o ni at(ion( los
i111(`rrtlplor(s (`l&:n'icos (tlalldo (`] disp(`nsador
(|(` agtla (`S|_{ \r_Icfo,
:!2,Los nh_os deben ser supervisados por tmo de los
padres cumldo se disponga a tsar esm producto.
ABIIERTENClA:no. que
sea inicrobiologicamente inse_a o de calidad
desconocida.
PRECAUCION:E,dispensador
calienta agua atma temperatura de
aproxhnadamente 90 °C (194 °F). E1 agua a
temperaturas mayores de 52 °C (125 °F) puede
cattsar quemaduras severas y hasta la muerte
debido alas quemaduras. Los nh_tos, las personas
con incapaddades fisicas y los andmms lJenen tm
riesgo mayor de sufrir quemaduras.
A VISO_ tste producto fiene la hlten(,i6n
de set usado solamente en bebidas enlatadas
refrigeradas y en bebidas en cajas, ademfis de
productos sin expiration empacados.
INSTALACIONAPROPIADAYLOCALIZACION
}_:P(,nnila por lo m(,nos 2,5 cm (1 pulg.) de (,spacio
(,nm' la parl(, posle_'ior del dispensador de agua y
la pared, para permidr qu(, el aire circul(,.
::_'_No instal(" el dispensador de agua dond(, la
l(,mperalura (,sl6 pot" d(,b_!jo de 10 "C (50 "F)
o por (,ncima de 38 °C (100 "F).
ii,!]nslale el disp(,nsador de agua entm piso nivelado
lo suH(ienl(,menl(, resistent(" para resisdr su peso
cuando (,sl5 tolahn(,nl(, ll(,no. No inslale donde
esl(' s/J,ieto a la luz dilx'cta (td sol, calor o humedad.
19

INFORMACIONESDESEGURIDADIMPORTANTES.
LEATODASLASINSTRUCCIONESANTESDEUSAR.
INSTflUCCIONESPAflACONEX./ONA TIEflflA
ADVERTENCIA:El ._o inaprepiade de un enchufe que no est_ cenectade a tierra
apropiadamente podria resultar en riesgos de descargas el#ctricas.
Este aparaIo debe estar conectado a tierra. En el
caso de qtle octllq'a tin (c, rto circtfito, la t onexi6n
a tierra reduce el riesg-o de descarga eh"ctrica.
Este _q)_u'ato est_i equipado con un c_lble eldctrico
que dene m_ enchu/c que cuent_l con [m cable pardi
set conectado a derra. E1 en(hulb debe estar
conect_do atm en(hulb que est" lnstal_do
apropiadamente y que est(' conectado _ tierra.
Consulte a un electricista caliiicado si usted no
emiende las instrut(iones de com'xidn a tierra, o si
existe algmm duda de si el aparato est_i conectado
apropiadamente a tierra.
Si el enchuib es m/o est_indar de dos clm'ijas, es su
responsabilidad personal y obligaddn hater que sea
reemplazado con m_ enclmlb de 3 clm'ijas con
conexidn a tierra.
B@_ nJngmm dr_ unsmmia corle o ['__I_[_r_ la
ler<er da_iia (la de conexi6n a den'a) del (able
el&lrico.
No utilizar tm adaptador con este aparato.
No utilizar tm cable de exlensidn con este aparato.
Si el cable el('ctrico del aparato es muy corto, haga
que un ele( tridsta (alilicado instale un
Io///aCO/TJe/lle cerca del aparato.
Para obtener una m@)r operacidn, enchtdb este
aparam en su tomacorriente propio para evitar que
las luces parpadeen, que se queme un flMble o que
se dispare un interruptor de circuho.
COMOELIMINARSUDISPENSADOflDEAGUA
DEFORMAAPflOPIADA
Deshacerse de/refrigerante
Su amiguo dispensador de _*gua pro'de haber
usado tm reli'igerame regulado en su sistema
de enl?'iamiento. Estos rei_'igerames son nocivos
para el ozono estratosi_'rico. Si se deshace del
andguo dispensador asegdrese de que se
deshaga del ret_'igerante correctamente por ml
t_'cnico cerdt_cado EE\. Si se libera a propdsho
el rel?'igerante puede estar sqjeto alas muhas y
al encarcelamiemo b@) las estipulaciones de
la legislaci6n ambiemal.
LEAYSIGACUIDADOSAMENTELAINFORMACIONDESEGURIDAD.
CONSERVEESTASINSTRUCCIONES
20
La page charge ...
La page charge ...
La page charge ...
La page charge ...
La page charge ...
La page charge ...
La page charge ...
La page charge ...
-
 1
1
-
 2
2
-
 3
3
-
 4
4
-
 5
5
-
 6
6
-
 7
7
-
 8
8
-
 9
9
-
 10
10
-
 11
11
-
 12
12
-
 13
13
-
 14
14
-
 15
15
-
 16
16
-
 17
17
-
 18
18
-
 19
19
-
 20
20
-
 21
21
-
 22
22
-
 23
23
-
 24
24
-
 25
25
-
 26
26
-
 27
27
-
 28
28


GE PXCR33KSS Manuel utilisateur
- Taper
- Manuel utilisateur
- Ce manuel convient également à
dans d''autres langues
- English: GE PXCR33KSS User manual
- español: GE PXCR33KSS Manual de usuario
Documents connexes
Autres documents
-
Sylvania SE80092 Manuel utilisateur
-
Hotpoint HSM22IFTASA Le manuel du propriétaire
-
Master Chef 043-2338-4 Manuel utilisateur
-
-
-
Maytag Ice2O Series Manuel utilisateur
-
Tork Matic Manuel utilisateur
-
 NKE ELECTRONICS TopLine Le manuel du propriétaire
