Sony HVL-F45RM Manuel utilisateur
- Catégorie
- La caméra clignote
- Taper
- Manuel utilisateur

HVL-F45RM
4-694-604-11(1)
Flash
Operating Instructions
GB
Mode d’emploi
FR
http://www.sony.net/flash/f45rm/
Mettez à jour le logiciel de votre appareil photo
avant utilisation.
Pour toute information sur la compatibilité de
votre appareil, consultez le site d’assistance dédié.
Update the software of your camera to the
latest version before use.
Refer to the dedicated support site for
information on camera compatibility.

2
GB
English
Before operating the product,
please read this manual
thoroughly and retain it for
future reference.
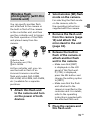
WARNING
To reduce the risk of fire or
electric shock,
1) do not expose the unit to rain
or moisture.
2) do not place objects filled with
liquids, such as vases, on the
apparatus.
Do not expose the batteries to
excessive heat such as sunshine,
fire or the like.
Do not touch the flashtube
during operation, it may become
hot when the flash fires.
CAUTION
Replace the battery with the
specified type only. Otherwise,
burst, fire or injury may result.
Dispose of used batteries
according to the instructions.
Notice
If static electricity or
electromagnetism causes data
transfer to discontinue midway
(fail), restart the application or
disconnect and connect the
communication cable (USB, etc.)
again.
This product has been tested
and found compliant with
the limits set out in the EMC
regulation for using connection
cables shorter than 3 meters (9.8
feet).
This equipment complies with
FCC/IC radiation exposure limits
set forth for an uncontrolled
environment and meets the FCC
radio frequency (RF) Exposure
Guidelines and RSS-102 of the
IC radio frequency (RF) Exposure
rules. This equipment has very
low levels of RF energy that
are deemed to comply without
testing of specific absorption
ratio (SAR).
For Customers in the
U.S.A.
If you have any questions about
this product, you may call:
Sony Customer Information
Center
1-800-222-SONY (7669).
The number below is for the FCC
related matters only.

GB
3
GB
Regulatory Information
Declaration of Conformity
Trade Name: SONY
Model No.: HVL-F45RM
Responsible Party:
Sony Electronics Inc.
Address:
16535 Via Esprillo, San Diego,
CA 92127 U.S.A.
Telephone No.:
858-942-2230
This device complies with
Part15 of the FCC Rules.
Operation is subject to the
following two conditions: (1)
This device may not cause
harmful interference, and (2)
this device must accept any
interference received, including
interference that may cause
undesired operation.
This equipment must not be
co-located or operated in
conjunction with any other
antenna or transmitter.
CAUTION
You are cautioned that any
changes or modifications not
expressly approved in this
manual could void your authority
to operate this equipment.
Note:
This equipment has been tested
and found to comply with the
limits for a Class B digital device,
pursuant to Part 15 of the FCC
Rules.
These limits are designed to
provide reasonable protection
against harmful interference in
a residential installation. This
equipment generates, uses,
and can radiate radio frequency
energy and, if not installed
and used in accordance with
the instructions, may cause
harmful interference to radio
communications. However, there
is no guarantee that interference
will not occur in a particular
installation. If this equipment
does cause harmful interference
to radio or television reception,
which can be determined by
turning the equipment off and
on, the user is encouraged to
try to correct the interference
by one or more of the following
measures:
- Reorient or relocate the
receiving antenna.
- Increase the separation
between the equipment and
receiver.

4
GB
- Connect the equipment into an
outlet on a circuit different from
that to which the receiver is
connected.
- Consult the dealer or an
experienced radio/TV
technician for help.
For Customers in
Canada
This device complies with
Industry Canada’s licence-
exempt RSSs.
Operation is subject to the
following two conditions:
() This device may not cause
interference; and
() This device must accept
any interference, including
interference that may cause
undesired operation of the
device.
For Customers in
Europe
Manufacturer: Sony Corporation,
1-7-1 Konan Minato-ku Tokyo,
108-0075 Japan
For EU product compliance: Sony
Belgium, bijkantoor van Sony
Europe Limited, Da Vincilaan
7-D1, 1935 Zaventem, Belgium
Hereby, Sony Corporation,
declares that this equipment is
in compliance with the essential
requirements and other relevant
provisions of Directive 1999/5/
EC. For details, please access the
following URL:
http://www.compliance.sony.de/
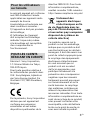
Disposal of Old
Electrical & Electronic
Equipment (Applicable
in the European Union and
other European countries
with separate collection
systems)
This symbol on the product or
on its packaging indicates that
this product shall not be treated
as household waste. Instead
it shall be handed over to the
applicable collection point
for the recycling of electrical
and electronic equipment. By
ensuring this product is disposed
of correctly, you will help prevent
potential negative consequences
for the environment and human
health, which could otherwise be
caused by inappropriate waste
handling of this product. The
recycling of materials will help to
conserve natural resources. For
more detailed information about
recycling of this product, please

GB
5
GB
contact your local Civic Office,
your household waste disposal
service or the shop where you
purchased the product.
For Customers in
Singapore
For Customers in
Malaysia

6
GB
Table of Contents
Before use ...................................................................................7
Identifying parts ........................................................................ 9
Preparations ........................................................................... 13
Inserting batteries .................................................................... 13
Attaching/removing the flash unit to/from the camera ......... 14
Turning on the power of the flash unit .................................... 15
Pairing with a radio wireless commander/receiver
(for radio wireless flash photography) ..................................... 17
Settings .................................................................................... 20
Quick Navi settings .................................................................. 20
MENU settings ..........................................................................22
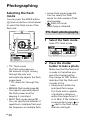
Photographing......................................................................24
Photographing ..........................................................................24
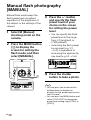
Manual flash photography (MANUAL) .....................................26
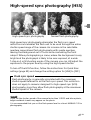
High-speed sync photography (HSS) .......................................27
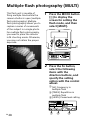
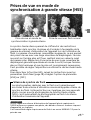
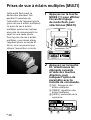
Multiple flash photography (MULTI) .........................................28
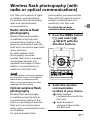
Wireless flash photography
(with radio or optical communications) ................................... 31
Wireless flash photography
(with radio wireless communications) .....................................33
Wireless flash photography
(with optical wireless communications)...................................38
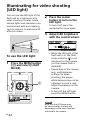
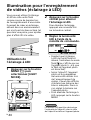
Illuminating for video shooting (LED light) ..............................42
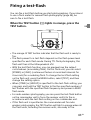
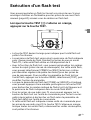
Firing a test-flash ..................................................................... 43
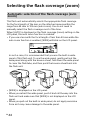
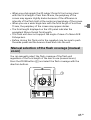
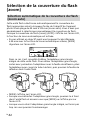
Selecting the flash coverage (zoom) ....................................... 44
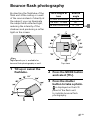
Bounce flash photography .......................................................47
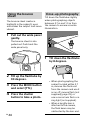
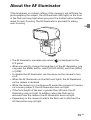
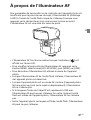
About the AF illuminator ......................................................... 49
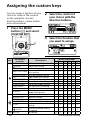
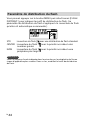
Assigning the custom keys ..................................................... 50
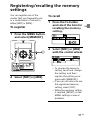
Registering/recalling the memory settings ............................. 51
Others ........................................................................................52
Notes on use .............................................................................52
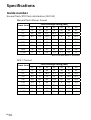
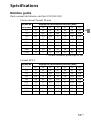
Specifications ........................................................................... 54

GB
7
GB
Before use
This flash unit can be used in combination with Sony Interchangeable
Lens Digital Cameras, Sony Interchangeable Lens Digital HD Video
Camera Recorders, and Sony Digital Still Cameras that have a
conventional Multi Interface Shoe.
Some functions may not work depending on the model of your
camera or video camera recorder.
For details on compatible camera models of this flash unit, visit
the Sony website in your area, or consult your Sony dealer or local
authorized Sony service facility.
See the operating instructions of this unit and refer to the operating
instructions of your camera.
Keep the flashtube clean. The soiled flashtube surface may
cause heat buildup, resulting in smoke or scorches. To clean the
flashtube, wipe it with a soft cloth, etc.
This flash unit is designed with ingress protection in mind, but
not tested and found waterproof. Do not use the unit in the rainy
weather.
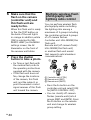
Notes on continuous flashes
The flash unit continues to fire during continuous photographing,
multi flash photography, and modeling flashing.
Continuous flashes, as well as reflections of the continuous flashes
from walls, may trigger some symptoms such as the seizures in case
a person with photosensitivity sees the flashes.
In such a case, immediately stop using the flash unit.

8
GB
Do not place this flash unit in the following
locations
Regardless of whether this flash unit is in use or in storage, do not
place it in any of the following locations. Doing so may lead to a
malfunction.
• Placing this flash unit in locations subject to direct sunlight such as on
dashboards or near a heater may cause this unit to deform or malfunction.
• Locations with excessive vibration
• Locations with strong electromagnetism
• Locations with excessive sand
In locations such as the seashore and other sandy areas or where dust clouds
occur, protect the unit from sand and dust. This may lead to a malfunction.
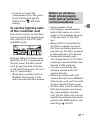
Communication distance
The radio wireless communication distance available between this
flash unit and the camera is approximately 30 m (98.4 ft.). (Acquired
under our measurement conditions.)
• The distance given above applies under conditions where there are no
obstacles, shielding, or radio wave interferences.
• The communication distance may be shorter depending on the positioning of
the products, the ambient environment, and weather conditions.
Update the software of your camera to the latest version before
use.
Refer to the dedicated support site for information on camera
compatibility.
http://www.sony.net/flash/f45rm/

GB
9
GB
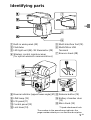
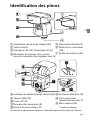
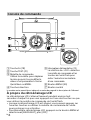
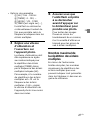
Identifying parts
The number in the parentheses indicates the
page number where you can find the description.
Built-in wide panel (44)
Flashtube
LED light unit (42) /AF illuminator (49)
Wireless control signal receiver
(for optical wireless communications)
Multi Interface foot (14)
Multi/Micro USB
Terminal
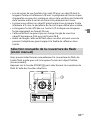
Bounce sheet (48)
Bounce indicator (upper/lower angle) (47)
LINK lamp (35)
LCD panel (11)
Control panel (10)
Lock lever (14)
Release button (14)
Battery chamber door
(13)
Mini-stand (32)
* Tripod attachment hole

10
GB
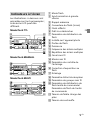
Operation console
Fn button (20)
TEST button (43)
Control wheel
Use the wheel to move the
focus or change the setting item
value on the Quick Navi screen
or the MENU settings screen.
Direction buttons
Power switch (15)
Selecting “LOCK” disables
the control wheel and the
buttons on the flash unit and
you can prevent unintentional
operations.
MENU button (22)
Center button
About the LCD backlight
The LCD backlight turns on and stays lit for about 8 seconds every time
you press one of the buttons or use the control wheel on the flash unit.
• While the LCD backlight is lit, you can press one of the buttons or
use the control wheel on the unit to keep it lit longer.
• To turn off the LCD backlight, press the MENU button and select
[BACKLIGHT], and then [OFF].
The number in the parentheses indicates the
page number where you can find the description.

GB
11
GB
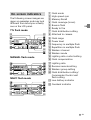
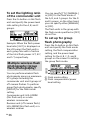
On-screen indicators
The following screen images are
given as examples and may look
different from what you actually
see on the LCD panel.
TTL flash mode
MANUAL flash mode
MULTI flash mode
Flash mode
High-speed sync
Memory Recall
Flash coverage (zoom)
Bounce flash
Ready to fire
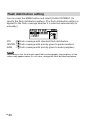
Flash distribution setting
Attached to camera
Flash range
Power level
Frequency in multiple flash
Repetition in multiple flash
Wireless channel
Wireless mode
Lighting ratio control setting
Flash compensation
Lighting ratio
Receiver remote setting
Wireless group setting
Flash distribution setting/
Commander/Control unit
flash setting
Low-battery indicator
Overheat indicator

12
GB
Wireless commander mode
(radio control)
Wireless receiver mode
(radio control)
Wireless controller mode
(optical wireless communications)
Wireless remote mode
(optical wireless communications)
Flash mode
High-speed sync
Memory Recall
Flash coverage (zoom)
Bounce flash
Ready to fire
Flash distribution setting
Attached to camera
Flash range
Power level
Frequency in multiple flash
Repetition in multiple flash
Wireless channel
Wireless mode
Lighting ratio control setting
Flash compensation
Lighting ratio
Receiver remote setting
Wireless group setting
Flash distribution setting/
Commander/Control unit
flash setting
Low-battery indicator
Overheat indicator

GB
13
GB
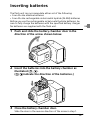
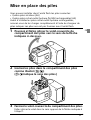
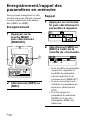
Inserting batteries
Preparations
The flash unit can accommodate either set of the following:
• Four AA-size alkaline batteries
• Four AA-size rechargeable nickel-metal hydride (Ni-MH) batteries
Before you use the rechargeable nickel-metal hydride batteries, be
sure to fully charge the batteries with the specified battery charger.
No batteries are supplied with the flash unit.
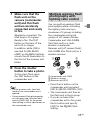
1 Push and slide the battery chamber door in the
direction of the arrow shown below.
2 Insert the batteries into the battery chamber as
illustrated (
).
(
indicate the direction of the batteries.)
3 Close the battery chamber door.
Slide the door in the reverse direction of the arrow in step 1.

14
GB
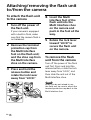
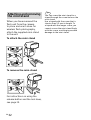
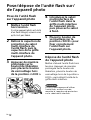
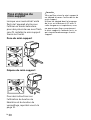
Attaching/removing the flash unit
to/from the camera
To attach the flash unit
to the camera
1 Turn off the power of
the flash unit.
If your camera is equipped
with a built-in flash, make
sure that the camera flash is
not released.
2 Remove the terminal
protection cap from
the Multi Interface
foot on the flash unit;
and the shoe cap from
the Multi Interface
shoe on the camera.
3 Press and hold the
release button and
rotate the lock lever
away from “LOCK.”
4 Insert the Multi
Interface foot of the
flash unit into the
Multi Interface shoe
on the camera and
push in the foot all the
way.
5 Rotate the lock lever
toward “LOCK” to
secure the flash unit
on the camera.
To remove the flash
unit from the camera
Turn off the power of the flash
unit first. Press and hold the
release button, rotate the lock
lever away from “LOCK,” and
then slide the unit out of the
Multi Interface shoe.
Notes
When you do not intend to use
the flash unit, be sure to attach the
terminal protection cap back to the
Multi Interface foot.

GB
15
GB
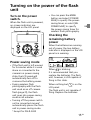
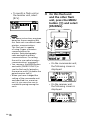
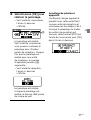
Turning on the power of the flash
unit
Turn on the power
switch.
When the flash unit is powered,
on-screen indicators are
displayed on the LCD panel.
Power-saving mode
• If the flash unit is left unused
for 3 minutes while it is used
alone or connected to the
camera in a power-saving
state, the LCD panel will
automatically turn off to
conserve the battery power.
• During wireless flash
photography with the flash
unit used as an off-camera
flash (page 31), the flash
unit goes into power-saving
mode in 60 minutes.
• Turning off the power switch
on the connected camera*
automatically places the flash
unit in power-saving mode.
* Except for DSLR-A100
• You can press the MENU
button and select [POWER
SAVE] to specify the power-
saving timer, or select [WL
POWER SAVE] to specify
the power-saving timer for
wireless flash photography.
Checking the
remaining battery
power
When the batteries are running
out of power, the low-battery
indicator is displayed on the LCD
panel as a warning.
When is blinking:
It is recommended that you
replace the batteries. The flash
unit, however, is still capable of
firing in this state.
When nothing but
is on the
LCD panel:
The flash unit is not capable of
firing. Replace the batteries.

16
GB
Notes on continuous
flashes
If you use the flash unit
continuously for a short period
of time, its built-in safety circuit
may be triggered to reduce the
flash counts by increasing the
flash frequency.
Also, if the temperature inside
the flash unit rises further,
(overheat indicator) will light
on the LCD panel to indicate
that flash firing is disabled for a
while. In such a case, turn off the
power switch on the flash unit
and leave the unit unused for
about 10 minutes to allow it to
cool down.
Continuous flashes heat up the
batteries inside the flash unit.
Take extra care if you need to
remove the batteries.

GB
17
GB
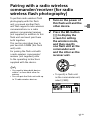
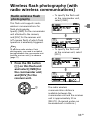
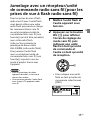
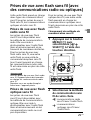
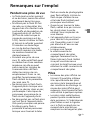
Pairing with a radio wireless
commander/receiver (for radio
wireless flash photography)
To perform radio wireless flash
photography with this flash
unit, you need another flash
unit that supports radio wireless
communications or a radio
wireless commander/receiver
(not supplied) in addition to this
flash unit and must pair them
both together.
This section describes how to
pair two HVL-F45RM (this flash
unit) units.
For pairing the flash unit with
a radio wireless commander/
receiver (not supplied), refer
to the operating instructions
supplied with the device.
Tips
• You need to bring both devices
within 1 m from each other for
pairing.
• You can pair the flash unit with up
to 15 radio wireless devices.
1 Turn on the power of
this flash unit and the
other device.
2 Press the WL button
(
) to display the
screen for setting
the wireless mode,
and then specify
one flash unit as the
commander unit
and the other as the
receiver unit.
• To specify a flash unit
as the commander unit,
select [CMD].

18
GB
• To specify a flash unit as
the receiver unit, select
[RCV].
Notes
• The above instructions are given
based on the assumption that
this flash unit uses default radio
wireless communications.
This flash unit is capable
of using 2 types of wireless
communications for
wireless flash photography:
radio and optical wireless
communications. For setting
the unit to use optical wireless
communications, see page 31.
• You can press the MENU button
and select [PAIRED DEVICE] to
see the flash unit(s) paired as
the receiver unit(s) or delete the
paired receiver unit(s).
• When you have changed the
setting of the commander unit
and specified it as a receiver
unit, or vice versa, be sure to
reestablish paring among the
units.
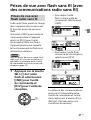
3 On this flash unit
and the other flash
unit, press the MENU
button () and select
[PAIRING].
• On the commander unit,
the following screen is
displayed.
• On the receiver unit,
the following screen is
displayed.

GB
19
GB
4 Select [OK] to
establish pairing.
• On the commander unit,
the following screen is
displayed.
Pairing is established. On
the commander unit, you
can continue pairing with
other receiver units. Every
time pairing is established
with a receiver unit, the
number of paired devices
() increases.
• On the receiver unit,
the following screen is
displayed.
Pairing is established.
When pairing is established,
the LINK lamp turns from
red to green in color.
To establish a pairing with 2
or more devices
Set each device to be paired
with this flash unit as the
receiver unit and repeat steps
3 and 4.
When you are finished with
pairing with all receiver units,
select [EXIT] on the commander
unit, and then [OK] on the
following screen.

20
GB
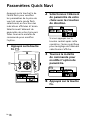
Settings
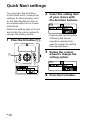
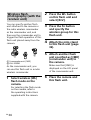
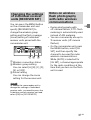
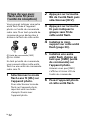
Quick Navi settings
You can press the Fn button
on the flash unit to change the
settings for photography, such
as the selected flash mode, in
accordance with the on-screen
indications.
Select the setting item of choice
and rotate the control wheel to
change the setting option.
1 Press the Fn button ().
2 Select the setting item
of your choice with
the direction buttons.
Pressing the center button
following the above
operation displays the
specific screen for setting
the selected item.
3 Rotate the control
wheel to change the
setting option.
4 Press the Fn button.
La page charge ...
La page charge ...
La page charge ...
La page charge ...
La page charge ...
La page charge ...
La page charge ...
La page charge ...
La page charge ...
La page charge ...
La page charge ...
La page charge ...
La page charge ...
La page charge ...
La page charge ...
La page charge ...
La page charge ...
La page charge ...
La page charge ...
La page charge ...
La page charge ...
La page charge ...
La page charge ...
La page charge ...
La page charge ...
La page charge ...
La page charge ...
La page charge ...
La page charge ...
La page charge ...
La page charge ...
La page charge ...
La page charge ...
La page charge ...
La page charge ...
La page charge ...
La page charge ...
La page charge ...
La page charge ...
La page charge ...
La page charge ...
La page charge ...
La page charge ...
La page charge ...
La page charge ...
La page charge ...
La page charge ...
La page charge ...
La page charge ...
La page charge ...
La page charge ...
La page charge ...
La page charge ...
La page charge ...
La page charge ...
La page charge ...
La page charge ...
La page charge ...
La page charge ...
La page charge ...
La page charge ...
La page charge ...
La page charge ...
La page charge ...
La page charge ...
La page charge ...
La page charge ...
La page charge ...
La page charge ...
La page charge ...
La page charge ...
La page charge ...
La page charge ...
La page charge ...
La page charge ...
La page charge ...
La page charge ...
La page charge ...
La page charge ...
La page charge ...
La page charge ...
La page charge ...
La page charge ...
La page charge ...
La page charge ...
La page charge ...
La page charge ...
La page charge ...
La page charge ...
La page charge ...
La page charge ...
La page charge ...
La page charge ...
La page charge ...
La page charge ...
La page charge ...
-
 1
1
-
 2
2
-
 3
3
-
 4
4
-
 5
5
-
 6
6
-
 7
7
-
 8
8
-
 9
9
-
 10
10
-
 11
11
-
 12
12
-
 13
13
-
 14
14
-
 15
15
-
 16
16
-
 17
17
-
 18
18
-
 19
19
-
 20
20
-
 21
21
-
 22
22
-
 23
23
-
 24
24
-
 25
25
-
 26
26
-
 27
27
-
 28
28
-
 29
29
-
 30
30
-
 31
31
-
 32
32
-
 33
33
-
 34
34
-
 35
35
-
 36
36
-
 37
37
-
 38
38
-
 39
39
-
 40
40
-
 41
41
-
 42
42
-
 43
43
-
 44
44
-
 45
45
-
 46
46
-
 47
47
-
 48
48
-
 49
49
-
 50
50
-
 51
51
-
 52
52
-
 53
53
-
 54
54
-
 55
55
-
 56
56
-
 57
57
-
 58
58
-
 59
59
-
 60
60
-
 61
61
-
 62
62
-
 63
63
-
 64
64
-
 65
65
-
 66
66
-
 67
67
-
 68
68
-
 69
69
-
 70
70
-
 71
71
-
 72
72
-
 73
73
-
 74
74
-
 75
75
-
 76
76
-
 77
77
-
 78
78
-
 79
79
-
 80
80
-
 81
81
-
 82
82
-
 83
83
-
 84
84
-
 85
85
-
 86
86
-
 87
87
-
 88
88
-
 89
89
-
 90
90
-
 91
91
-
 92
92
-
 93
93
-
 94
94
-
 95
95
-
 96
96
-
 97
97
-
 98
98
-
 99
99
-
 100
100
-
 101
101
-
 102
102
-
 103
103
-
 104
104
-
 105
105
-
 106
106
-
 107
107
-
 108
108
-
 109
109
-
 110
110
-
 111
111
-
 112
112
-
 113
113
-
 114
114
-
 115
115
-
 116
116


Sony HVL-F45RM Manuel utilisateur
- Catégorie
- La caméra clignote
- Taper
- Manuel utilisateur
dans d''autres langues
- English: Sony HVL-F45RM User manual
Documents connexes
-
Sony HVL-F60RM Manuel utilisateur
-
Sony HVL-F42AM Le manuel du propriétaire
-
Sony HVL-F56AM Le manuel du propriétaire
-
-
Sony HVL-F36AM Le manuel du propriétaire
-
-
-
Sony FA-WRC1M Mode d'emploi
-
Sony HVL-F60M Manuel utilisateur
-
Sony HVL-F32M Manuel utilisateur