Panasonic Drill EY7460 Manuel utilisateur
- Catégorie
- Perceuses mixtes sans fil
- Taper
- Manuel utilisateur

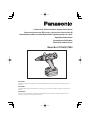
Cordless Drill & Driver/Cordless Hammer Drill & Driver
Perceuse-visseuse sans fi l/Perceuse à percussion-visseuse sans fi l
Destornillador y taladro sin cables/Destornillador y taladro percutor sin cables
Operating Instructions
Instructions d'utilisation
Manual de instrucciones
Model No: EY7460/EY7960
IMPORTANT
This manual contains safety information. Read manual completely before first using this product and save this manual for
future use.
IMPORTANT
Ce mode d’emploi contient des informations sur la sécurité. Lisez-le en entier avant d’utiliser le produit et conservez-le pour
référence.
IMPORTANTE
Este manual contiene información de seguridad. Lea completamente este manual antes de utilizar por primera vez este
producto, y guárdelo para poder consultarlo en el futuro.

-
2
-
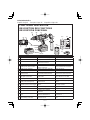
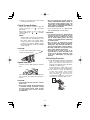
(A)
Keyless drill chuck Mandrin porte-foret sans fi l Mandril sin llave
(B)
Clutch handle Poignée de l’embrayage Mango de embrague
(C)
Speed selector switch
Interrupteur de sélection de vitesse
Interruptor selector de velocidad
(D)
Forward/Reverse lever
Levier d’inversion marche
avant-marche arrière
Palanca de avance/inversión
(E)
Alignment marks Marques d’alignement Marcas de alineación
(F)
Battery pack release button
Bouton de libération de
batterie autonome
Botón de liberación de batería
(G)
Battery pack (EY9L60) Batterie autonome (EY9L60) Batería (EY9L60)
(H)
Control panel
Panneau de commande Panel de controle
(I)
Overheat warning lamp
(battery/motor)
Témoin d’avertissement de
surchauffe (batterie/moteur)
Luz de advertencia de sobre-
calentamiento (batería/motor)
(J)
LED light on/off button
Bouton Marche/Arrêt de la
lumière DEL
Botón ON/OFF de luz LED
(K)
LED light Lumière DEL Luz indicadora
(L)
Battery low warning lamp
Témoin d’avertissement de
batterie basse
Luz de aviso de baja carga de
batería
(M)
Variable speed control trigger
Gâchette de commande de
vitesse
Disparador del control de
velocided variable
(N)
Support handle Manche de support Mango de soporte
(O)
Battery charger (EY0L80)
Chargeur de batterie (EY0L80) Cargador de batería (EY0L80)
(P)
Battery Pack cover
Couvercle de la batterie
autonome
Cubierta de batería
(Q)
Ni-MH/Ni-Cd battery pack
dock
Poste d’accueil de la batterie
autonome Ni-MH/Ni-Cd
Enchufe de carga de batería
Ni-MH/Ni-Cd
(R)
Li-ion battery pack dock
Poste d’accueil de la batterie
autonome Li-ion
Enchufe de carga de batería
Li-ión
Index/Index/Indice
English: Page 3 Français: Page 15 Español: Página 30
FUNCTIONAL DESCRIPTION
DESCRIPTION DES FONCTIONS
DESCRIPCIÓN FUNCIONAL
Ni-MH
Ni-Cd
(A) (B) (C)
(D)
(E)
(E)
(F)
(G)
(H)
(M)
(N)
(R)
(Q)
(K)
(J) (I)
(L)
(O)
(P)

-
3
-
I. INTRODUCTION
These tools can be used to tighten
screws in clutch mode and to drill
holes in wood and metal in drill mode.
Additionally, model EY7960 can be
used to drill holes in soft concrete and
similar materials in hammer mode.
II.
GENERAL SAFE-
TY RULES
WARNING! Read all instructions
Failure to follow all instructions listed below
may result in electric shock, fire and/or
serious injury. The term “power tool” in all
of the warnings listed below refers to your
main operated (corded) power tool and
battery operated (cordless) power tool.
SAVE THESE INSTRUCTIONS
Work Area Safety
1) Keep work area clean and well lit.
Cluttered or dark areas invite acci-
dents.
2) Do not operate power tools in ex-
plosive atmospheres, such as in
the presence of flammable liq-
uids, gases or dust.
Power tools create sparks which
may ignite the dust or fumes.
3)
Keep children and bystanders
away while operating a power tool.
Distractions can cause you to lose
control.
Electrical Safety
1) Power tool plugs must match the
outlet. Never modify the plug in
any way. Do not use any adapt-
er plugs with earthed (grounded)
power tools.
Unmodified plugs and matching out-
lets will reduce risk of electric shock.
2)
Avoid body contact with earthed or
grounded surfaces such as pipes,
radiators, ranges and refrigerators.
There is an increased risk of elec-
tric shock if your body is earthed or
grounded.
3) Do not expose power tools to
rain or wet conditions.
Water entering a power tool will in-
crease the risk of electric shock.
4) Do not abuse the cord. Never use
the cord for carrying, pulling or
unplugging the power tool. Keep
cord away from heat, oil, sharp
edges or moving parts.
Damaged or entangled cords in-
crease the risk of electric shock.
5)
When operating a power tool out-
doors, use an extension cord suit-
able for outdoor use.
Use of a cord suitable for outdoor use
reduces the risk of electric shock.
Personal Safety
1) Stay alert, watch what you are
doing and use common sense
when operating a power tool. Do
not use a power tool while you
are tired or under the influence
of drugs, alcohol or medication.
A moment of inattention while oper-
ating power tools may result in per-
sonal injury.
2) Use safety equipment. Always
wear eye protection.
Safety equipment such as dust
mask, non-skid safety shoes, hard
hat, or hearing protection used for
appropriate conditions will reduce
personal injuries.
3) Avoid accidental starting. Ensure
the switch is in the off position
before plugging in.
Carrying power tools with your fin-
ger on the switch or plugging in the
power tools that have the switch on
invites accidents.
4)
Remove any adjusting key or wrench
before turning the power tool on.
A wrench or a key left attached to a
rotating part of the power tool may
result in personal injury.
5) Do not overreach. Keep proper
footing and balance at all times.
This enables better control of the
power tool in unexpected situations.
6) Dress properly. Do not wear
loose clothing or jewelry. Keep
your hair, clothing and gloves
away from moving parts.
Loose clothes, jewelry or long hair
can be caught in moving parts.

-
4
-
7)
If devices are provided for the
connection of dust extraction and
collection facilities, ensure these
are connected and properly used.
Use of these devices can reduce
dust related hazards.
Power Tool Use and Care
1)
Do not force the power tool. Use
the correct power tool for your
application.
The correct power tool will do the
job better and safer at the rate for
which it was designed.
2)
Do not use the power tool if the
switch does not turn it on and off.
Any power tool that cannot be con-
trolled with the switch is dangerous
and must be repaired.
3)
Disconnect the plug from the pow-
er source and/or the battery pack
from the power tool before making
any adjustments, changing acces-
sories, or storing power tools.
Such preventive safety measures
reduce the risk of starting the pow-
er tool accidentally.
4)
Store idle power tools out of the
reach of children and do not al-
low persons unfamiliar with the
power tool or these instructions
to operate the power tool.
Power tools are dangerous in the
hands of untrained users.
5) Maintain power tools. Check for
misalignment or binding of mov-
ing parts, breakage of parts and
any other condition that may af-
fect the power tools operation. If
damaged, have the power tool re-
paired before use.
Many accidents are caused by
poorly maintained power tools.
6)
Keep cutting tools sharp and clean.
Properly maintained cutting tools with
sharp cutting edges are less likely to
bind and are easier to control.
7) Use the power tool, accessories
and tool bits etc. in accordance
with these instructions and in the
manner intended for the particu-
lar type of power tool, taking into
account the working conditions
and the work to be performed.
Use of the power tool for operations
different from those intended could
result in a hazardous situation.
Battery Tool Use and Care
1)
Ensure the switch is in the off posi-
tion before inserting battery pack.
Inserting battery pack into pow-
er tools that have the switch on in-
vites accidents.
2) Recharge only with the charger
specified by the manufacturer.
A charger that is suitable for one type
of battery pack may create a risk of fire
when used with another battery pack.
3) Use power tools only with specif-
ically designated battery packs.
Use of any other battery packs may
create a risk of injury and fire.
4)
When battery pack is not in use,
keep it away from other metal ob-
jects like paper clips, coins, keys,
nails, screws, or other small metal
objects that can make a connection
from one terminal to another.
Shorting the battery terminals to-
gether may cause burns, or a fire.
5) Under abusive conditions, liq-
uid may be ejected from battery;
avoid contact. If contact acciden-
tally occurs, flush with water. If
liquid contacts eyes, additionally
seek medical help.
Liquid ejected from the battery may
cause irritation or burns.
Service
1) Have your power tool serviced by
a qualified repair person using
only identical replacement parts.
This will ensure that the safety of
power tool is maintained.
III. SPECIFIC SAFE-
TY RULES
1) Wear ear protectors. Exposure to
noise can cause hearing loss.
2)
Use auxiliary handles supplied
with the tool. Loss of control can
cause personal injury.

-
5
-
3)
Hold power tools by insulated grip-
ping sur faces when performing an
operation where the cutting tool
may contact hid den wiring.
Contact with a “live” wire will make
ex posed metal parts of the tool
“live” and shock the operator.
4)
Be aware that this tool is always in
an operating condition, since it does
not have to be plugged into an elec-
trical outlet.
5) If the bit becomes jammed, imme-
diately turn the trigger switch off
to prevent an overload which can
damage the battery pack or mo-
tor. Use reverse motion to loosen
jammed bits.
6)
Do not operate the Forward/Reverse
lever when the trigger switch is on.
The battery will discharge rapidly
and damage to the unit may occur.
7) When storing or carrying the tool,
set the Forward/Reverse lever to
the center position (switch lock).
8) Do not strain the tool by holding
the speed control trigger halfway
(speed control mode) so that the
motor stops. The protection cir-
cuit will activate and may prevent
speed control operation. If this hap-
pens, release the speed control
trigger and squeeze again for nor-
mal operation.
9) Be careful not to get dust inside the
chuck.
10) Do not touch the rotating parts to
avoid injury.
11)
Do not use the tool continuously for a
long period of time. Stop using the tool
from time to time to avoid temperature
rise and heat overload of the motor.
12) Do not drop the tool.
13)
Wear dust mask, if the work causes
dust.
14)
During charging, the charger may be-
come slightly warm. This is normal.
Do NOT charge the battery for a long
period.
Symbol meaning
V Volts
Direct current
n
0
No load speed
… min
-1
Revolutions or
reciprocation per minutes
Ah
Electrical capacity of
battery pack
Forward rotation
Reverse rotation
Rotation with hammering
Rotation only
WARNING:
Some dust created by power sand-
ing, sawing, grinding, drilling, and
other construction activities contains
chemicals known to the State of Cal-
ifornia to cause cancer, birth defects
or other reproductive harm. Some
examples of these chemicals are:
* Lead from lead-based paints
* Crystalline silica from bricks and
cement and other masonry prod-
ucts
* Arsenic and chromium from chem-
ically-treated lumber.
To reduce your exposure to these
chemicals: work in a well ventilated
area, and work with approved safety
equipment, such as dust masks that
are specially designed to filter the
microscopic particles.

-
6
-
IV. FOR BATTERY
CHARGER &
BAT TERY PACK
Important Safety Instructions
1)
SAVE THESE IN STRUCTIONS -This
manual contains important safety
and operating instructions for bat-
tery charger EY0L80.
2) Before using battery charger, read
all instructions and cautionary mark-
ings on (1) battery charger, (2) bat-
tery pack.
3) CAUTION
- - To reduce the risk of in-
jury, charge only Panasonic Battery
Pack as shown in last page.
Other types of batteries may burst
causing personal injury and damage.
4) Do not expose charger to rain or
snow.
5) To reduce the risk of damaging the
electric plug and cord, pull by plug
rather than cord when disconnect-
ing charger.
6) Make sure cord is located so that it
will not be stepped on, tripped over,
or otherwise subjected to damage
or stress.
7) An extension cord should not be
used unless absolutely necessary.
Use of improper extension cord
could result in a risk of fire and
electric shock. If extension cord
must be used, make sure:
a. that pins on plug of extension
cord are the same number, size
and shape as those of plug on
charger.
b. that extension cord is proper-
ly wired and in good electrical
condition.
c. that wire size is large enough
for ampere rating of charger as
specified below.
RECOMMENDED MINIMUM AWG SIZE OF
EXTENSION CORDS FOR
BATTERY CHARGERS
AC Input Rating.
Amperes
AWG Size of Cord
Equal to or
greater than
But less
than
Length of Cord, Feet
25 50 100 150
0 2 18 18 18 16
8) Do not operate charger with dam-
aged cord or plug
replace them
immediately.
9) Do not operate charger if it has re-
ceived a sharp blow, been dropped,
or otherwise damaged in any way;
take it to a qualified serviceman.
10) Do not disassemble charger; take it
to a qualified serviceman when ser-
vice or repair is required. Incorrect
reassembly may result in a risk of
electric shock or fire.
11) To reduce the risk of electric shock,
unplug charger from outlet before
attempting any maintenance or
cleaning.
12) The charger and battery pack are
specifically designed to work togeth-
er. Do not attempt to charge any
other cordless tool or battery pack
with this charger.
13) Do not attempt to charge the battery
pack with any other charger.
14) Do not attempt to disassemble the
battery pack housing.
15) Do not store the tool and battery
pack in locations where the tempera-
ture may reach or exceed 50°C (122°F)
(such a metal tool shed, or a car in
the summer), which can lead to de-
terioration of the storage battery.
16) Do not charge battery pack when the
temperature is BELOW 0°C (32°F)
or ABOVE 40°C (104°F). This is very
important.
17) Do not incinerate the battery pack.
It can explode in a fire.
18) Avoid dangerous environment. Do not
use charger in damp or wet locations.
19) The charger is designed to operate
on standard household electrical
power only. Do not attempt to use it
on any other voltage!
20) Do not abuse cord. Never carry char-
ger by cord or yank it to disconnect
from outlet. Keep cord away from
heat, oil and sharp edges.
21) Charge the battery pack in a well
ventilated place, do not cover the
charger and battery pack with a
cloth, etc., while charging.
22) Use of an attachment not recom-
mended may result in a risk of fire,
electric shock, or injury to persons.

-
7
-
23) Do not short the battery pack. A bat-
tery short can cause a large current
flow, over heating and burns.
24) NOTE: If the supply cord of this appli-
ance is damaged, it must only be re-
placed by a repair shop appointed by
the manufacturer, because special
purpose tools are required.
25) TO REDUCE THE RISK OF ELEC-
TRIC SHOCK, THIS APPLIANCE
HAS A POLARIZED PLUG (ONE
BLADE IS WIDER THAN THE
OTHER).
This plug will fit in a polarized outlet
only one way. If the plug does not fit
fully in the outlet, reverse the plug. If
it still does not fit, contact a qualified
electrician to install the proper outlet.
Do not change the plug in any way.
WARNING:
• Do not use other than the Panasonic
battery packs that are designed for
use with this rechargeable tool.
• Do not dispose of the battery pack in
a fire, or expose it to excessive heat.
• Do not drive the likes of nails into the
battery pack, subject it to shocks,
dismantle it, or attempt to modify it.
• Do not allow metal objects to touch
the battery pack terminals.
• Do not carry or store the battery
pack in the same container as nails
or similar metal objects.
• Do not charge the battery pack in a
high-temperature location, such as
next to a fire or in direct sunlight.
Otherwise, the battery may over-
heat, catch fire, or explode.
• Never use other than the dedicated
charger to charge the battery pack.
Otherwise, the battery may leak,
overheat, or explode.
• After removing the battery pack from
the tool or the charger, always reat-
tach the pack cover. Otherwise, the
battery contacts could be shorted,
leading to a risk of fire.
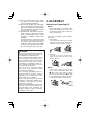
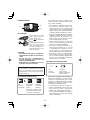
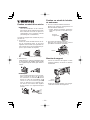
V. ASSEMBLY
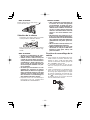
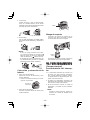
Attaching or Removing Bit
NOTE:
When attaching or removing a bit,
disconnect battery pack from tool
or place the switch in the center po-
sition (switch lock).
This tool is equipped with a keyless
drill chuck.
1. Attachment
Insert the bit and turn the lock collar
clockwise (looking from the front) to
tighten firmly until it stops clicking.
Lock collar
2. Removal
Turn the lock collar counterclock-
wise (looking from the front), then
remove the bit.
NOTE:
If excessive play occurs in the
chuck, secure the drill in place and
open the chuck jaws by turn-
ing the lock collar and
tighten
the screw (left-handed screw) with
a screwdriver by turning it counter-
clockwise (viewed from the front).

-
8
-
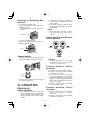
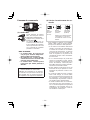
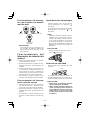
Attaching or Removing Bat-
tery Pack
1.
To connect the battery pack:
Line up the alignment marks and at-tach
the battery pack.
Slide the battery pack until it locks into
position.
Alignment marks
2.
To remove the battery pack:
Push on the button from the front to re-
lease the battery pack.
Button
Support handle
Place the support handle at your favorite
position and tighten the handle securely.
Tighten
Loosen
Remove the handle when placing the
tool in the storage case.
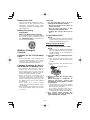
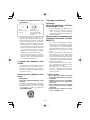
VI. OPERATION
[Main Body]
Switch Operation
1. The speed increases with the
amount of depression of the trigger.
When beginning work, depress the
trigger slightly to start the rotation
slowly.
2. A feedback electronic controller is
used to give a strong torque even
in low speed.
3. The brake operates when the trig-
ger is released and the motor stops
immediately.
NOTE:
When the brake operates, a brak-
ing sound may be heard. This is
normal.
Switch and Forward/Reverse
Lever Operation
Forward Reverse
Switch lock
CAUTION:
To prevent damage, do not operate
Forward/Reverse lever until the bit
comes to a complete stop.
Forward Rotation Switch
Operation
1. Push the lever for forward rotation.
2. Depress the trigger switch slightly
to start the tool slowly.
3. The speed increases with the
amount of depression of the trigger
for efficient tightening of screws and
drilling. The brake operates and the
chuck stops immediately when the
trigger is released.
4. After use, set the lever to its center
position (switch lock).
Reverse Rotation Switch
Operation
1. Push the lever for reverse rotation.
Check the direction of rotation
before use.
2. Depress the trigger switch slightly
to start the tool slowly.

-
9
-
3. After use, set the lever to its center
position (switch lock).
Clutch Torque Setting
Adjust the torque to one of the 18
clutch settings or " " position
(EY7460).
Adjust the torque to one of the 18
clutch settings or "
", " " position
(EY7960).
NOTE:
Always make sure to stop operation
of the tool and disengage it from
the work, when you select Ham-
mering mode from Drilling mode
or when you shift to Drilling mode
from Hammering mode by rotating
clutch handle.
CAUTION:
Set the clutch setting at this mark ( )
before actual operation.
Speed Selection
Choose a low or high speed to suit the
use.
HIGH
LOW
The more the variable speed control trig-
ger is pulled, the higher the speed be-
comes.
CAUTION:
• Check the speed selector switch
before use.
• Use at low speed when high torque
is needed during operation. (Using
at high speed when high torque
is required may cause a motor
breakdown.)
• Do not operate the speed selector
switch (LOW-HIGH) while pulling on
the speed control trigger. This can
cause the rechargeable battery to
wear quickly or damage the internal
mechanism of the motor.
* See specifications for "MAXIMUM
RECOMMENDED CAPACITIES".
CAUTION:
• To prevent excessive temperature
increase of the tool surface, do not
operate the tool continuously using
two or more battery packs. The tool
needs cool-off time before switching
to another pack.
• Do not close up vent holes on the
sides of the body during operation.
Otherwise, the machine function is
adversely affected to cause a failure.
• Do NOT strain the tool (motor). This
may cause damage to the unit.
• Use the tool in such a way as to
prevent the air from the body vent
holes from blowing directly onto
your skin. Otherwise, you may get
burned.
Bit-locking Function
1. With the trigger switch not engaged
and a screwdriver bit locked in
place, the tool can be used as a
manual screwdriver (up to 40 N•m,
408 kgf-cm, 353 in-lbs).
There will be a little play in the
chuck, but this is not a malfunction.
2.
This feature is handy for tightening
screws that require more torque
than the maximum torque of the
driver (position on the clutch), for
confirming the tightness of a screw or
to loosen an extremely tight screw.

-
10
-
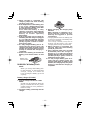
Control Panel
(1)
(2)
(3)
(1) LED light
Before the use of LED
light, always pull the
power switch once.
Press
the LED light
button.
The light illuminates with
very low current, and it
does not adversely af-
fect the performance of
the tool during use or its
battery capacity.
CAUTION:
• The built-in LED light is designed to
illuminate the small work area tempo-
rarily.
• Do not use it as a substitute for a
regular flashlight, since it does not
have enough brightness.
• LED light turns off when the tool has
not been used for 5 minutes.
Caution: DO NOT STARE INTO BEAM.
Use of controls or adjustments or perfor-
mance of procedures other than those
specifi ed herein may result in hazardous
radiation exposure.
(2) Overheat warning lamp
Off
(normal
operation)
Illuminated:
Overheat
(motor)
Flashing:
Overheat
(battery)
Indicates operation has
been halted due to motor
or battery overheating.
To protect the motor or battery, be
sure to note the following when carry-
ing out this operation.
•
If the motor or battery becomes hot,
the protection function will be acti-
vated and the motor or battery will
stop operating. The overheat warning
lamp on the control panel illuminates
or flashes when this feature is active.
• If the overheating protection feature
activates, allow the tool to cool thor-
oughly (at least 30 minutes). The
tool is ready for use when the over-
heat warning lamp goes out.
• Avoid using the tool in a way that
causes the overheating protection
feature to activate repeatedly.
•
If the tool is operated continuously un-
der high-load conditions or if it is used
in hot-temperature conditions (such as
during summer), the over-heating pro-
tection feature may activate frequently.
• If the tool is used in cold-tempera-
ture conditions (such as during win-
ter) or if it is frequently stopped dur-
ing use, the overheating protection
feature may not activate.
(3) Battery low warning lamp
Off
(normal
operation)
Flashing
(No charge)
Battery protection
feature active
Excessive (complete) discharging of
lithium ion batteries shortens their
service life dramatically. The driver
includes a battery protection feature
designed to prevent excessive dis-
charging of the battery pack.
• The battery protection feature ac-
tivates immediately before the bat-
tery loses its charge, causing the
battery low warning lamp to flash.
• If you notice the battery low warning
lamp flashing, charge the battery
pack immediately.

-
11
-
Battery Pack Life
The rechargeable batteries have a
limited life. If the operation time
becomes extremely short after
recharging, replace the battery pack
with a new one.
Battery Recycling
ATTENTION:
FOR Li-ion Battery Pack, EY9L60
A Li-ion battery that is recyclable powers
the product you have purchased. Please
call 1-800-8-BATTERY for information on
how to recycle this battery.
[Battery Charger]
Charging
Cautions for the Li-ion Battery
Pack
• If the temperature of the battery pack
falls approximately below −10°C (14°F),
charging will automatically stop to
prevent degradation of the battery.
Common Cautions for the Li-
ion/Ni-MH/Ni-Cd Battery Pack
• The ambient temperature range is
between 0°C (32°F) and 40°C (104°F).
If the battery pack is used when the
battery temperature is below 0°C (32°F),
the tool may fail to function properly.
• When charging a cool battery pack
(below 0°C (32°F)) in a warm place,
leave the battery pack at the place and
wait for more than one hour to warm up
the battery to the level of the ambient
temperature.
• Cool down the charger when
charging more than two battery packs
consecutively.
• Do not insert your fingers into contact
hole, when holding charger or any other
occasions.
CAUTION:
To prevent the risk of fire or
damage to the battery charger.
• Do not use power source from an
engine generator.
• Do not cover vent holes on the
charger and the battery pack.
• Unplug the charger when not in
use.
Li-ion Battery Pack
NOTE:
Your battery pack is not fully charged
at the time of purchase. Be sure to
charge the battery before use.
Battery charger (EY0L80)
1. Plug the charger into the AC outlet.
NOTE:
Sparks may be produced when the
plug is inserted into the AC power
supply, but this is not a problem in
terms of safety.
2. Insert the battery pack firmly into the
charger.
1. Line up the alignment marks and
place the battery onto the dock on the
charger.
2. Slide forward in the direction of the
arrow.
Alignment marks
3. During charging, the charging lamp
will be lit.
When charging is completed, an
internal electronic switch will
automatically be triggered to prevent
overcharging.
•
Charging will not start if the battery
pack is warm (for example, immediately
after heavy-duty operation).
The orange standby lamp will be
flashing until the battery cools down.
Charging will then begin automatically.
4. The charge lamp (green) will
flash slowly once the battery is
approximately 80% charged.

-
12
-
5. When charging is completed, the
charging lamp will start flashing
quickly in green color.
6. If the temperature of the battery pack
is 0°C or less, charging takes longer
to fully charge the battery pack than
the standard charging time.
Even when the battery is fully
charged, it will have approximately
50% of the power of a fully charged
battery at normal operating
temperature.
7. If the power lamp does not light im-
mediately after the charger is plugged
in, or if after the standard charging
time the charging lamp does not flash
quickly in green, consult an author-
ized service center.
8. If a fully charged battery pack is in-
serted into the charger again, the
charging lamp lights up. After several
minutes, the charging lamp may flash
quickly to indicate the charging is
completed.
9. Remove the battery pack while the
battery pack release button is held
up.
Battery pack
release button
Ni-MH/Ni-Cd Battery Pack
NOTE:
When you charge the battery pack
for the first time, or after prolonged
storage, charge it for about 24
hours to bring the battery up to full
capacity.
Battery charger (EY0L80)
1. Plug the charger into the AC outlet.
NOTE:
Sparks may be produced when the
plug is inserted into the AC power
supply, but this is not a problem in
terms of safety.
2. Insert the battery pack firmly into the
charger.
3. During charging, the charging lamp
will be lit.
When charging is completed, an in-
ternal electronic switch will auto-
matically be triggered to prevent
overcharging.
• Charging will not start if the battery pack
is warm (for example, immediately after
heavy-duty operation).
The orange standby lamp will be
flashing until the battery cools down.
Charging will then begin automatically.
4. When charging is completed, the
charging lamp will start flashing
quickly in green color.
5. If the charging lamp does not light
immediately after the charger is
plugged in, or if after the standard
charging time the charging lamp does
not flash quickly in green, consult an
authorized service center.
6. If a fully charged battery pack is in-
serted into the charger again, the
charging lamp lights up. After several
minutes, the charging lamp may flash
quickly to indicate the charging is
completed.

-
13
-
VII. MAINTENANCE
Use only a dry, soft cloth for wiping the unit. Do not use a damp cloth, thinner, benzine,
or other volatile solvents for cleaning.
VIII. ACCESSORIES
Use only bits suitable for size of drill's chuck.
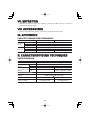
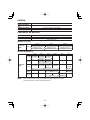
IX. APPENDIX
MAXIMUM RECOMMENDED CAPACITIESMAXIMUM RECOMMENDED CAPACITIES
Model EY7460 EY7960
Screw
driving
Machine screw M8
Wood screw ø 10 mm (3/8")
Self-drilling screw ø 6 mm (15/64")
Drilling
For Wood ø 38 mm (1-1/2")
For Metal ø 13 mm (1/2")
For Masonry --- 13 mm (1/2")
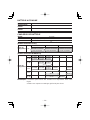
X. SPECIFICATIONS
MAIN UNIT
Model EY7460 EY7960
Motor voltage 21.6 V DC
No load speed
Low 100 - 400 min
-1
(rpm)
High 350 - 1500 min
-1
(rpm)
Blows Rate Per Minute
Low --- 1800 - 7200 min
-1
(bpm)
High --- 6300 - 27000 min
-1
(bpm)
Chuck capacity
ø 1.5 mm - ø 13 mm (1/16" - 1/2")
Clutch torque
Approx. 1.0 N•m (10 k
f-cm, 8.8 in-lbs) –
6.9 N•m (70 k f-cm, 61 in-lbs)
Overall length
232 mm (9-1/8") 245 mm (9-5/8")
Weight (with battery pack: EY9L60)
2.45 k
(5.39 lbs) 2.55 k (5.61 lbs)
BATTERY PACK
Model EY9L60
Storage battery Li-ion Battery
Battery voltage 21.6 V DC (3.6 V x 6 cells)
Capacity 3 Ah
BATTERY CHARGER
Model EY0L80
Rating See the rating plate on the bottom of the charger.
Weight 0.95 k
(2.1 lbs)

-
14
-
[Li-ion battery pack]
Charging
time
3 Ah
14.4 V 21.6 V 28.8 V
EY9L40
Usable: 35 min.
Full: 50 min.
EY9L60
Usable: 45 min.
Full: 60 min.
EY9L80
Usable: 55 min.
Full: 70 min.
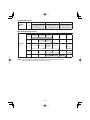
[Ni-Cd/Ni-MH battery pack]
Charging
time
7.2 V 9.6 V 12 V 15.6 V 18 V 24 V
1.2 Ah
EY9065
EY9066
EY9080
EY9086
EY9001
EY9006
20 min.
1.7 Ah
EY9180
EY9182
EY9101
EY9103
25 min.
2 Ah
EY9168 EY9188
EY9106
EY9107
EY9108
EY9136
EY9116
EY9117
30 min.
60 min.
3 Ah
EY9200 EY9230 EY9210
45 min. 90 min.
3.5 Ah
EY9201 EY9231 EY9251
55 min. 65 min.
NOTE: This chart may include models that are not available in your area.
Please refer to the latest general catalogue.

-
15
-
I. INTRODUCTIONI. INTRODUCTION
Ces outils peuvent être utilisés pour
serrer des vis en mode embrayé, et
pour percer des trous dans du bois et
du métal en mode perceuse. Le modè-
le EY7960 peut aussi être utilisé pour
percer des trous dans du béton mou et
des matériaux similaires en mode per-
cussion.
II.
CONSIGNES DE SE-
CU RITE GENERALES
AVERTISSEMENT! Veuillez lire
toutes les instructions.
Si les instructions détaillées ci-dessous
ne sont pas observées, cela peut
entraîner une électrocution, un incendie
et/ou des blessures graves. Le terme
“outil mécanique” utilisé dans tous les
avertissements ci-dessous se réfère aux
outils mécaniques opérés par cordons
d'alimentation et par batterie (sans fil).
CONSERVEZ CES INSTRUC-
TIONS
Sécurité de la zone de
travail
1) Gardez la zone de travail propre et
bien aérée.
Les endroits encombrés et sombres
invitent les accidents.
2) Ne faites pas fonctionner les outils
mécaniques dans des atmosphè-
res explosives, comme en présen-
ce de liquides inflammables, de
gaz ou de poussière.
Les outils mécaniques génèrent des
étincelles qui peuvent enflammer la
poussière ou les vapeurs.
3)
Gardez les enfants et les specta-
teurs éloignés lors du fonctionne-
ment d’un outil mécanique.
Les distractions peuvent en faire per-
dre le contrôle.
Sécurité électrique
1) La fiche des outils mécaniques
doit correspondre aux prises sec-
teur. Ne modifiez la fiche sous
aucun prétexte. N’utilisez pas de
fiche adaptatrice avec les outils
mécaniques mis à la terre.
Des fiches non modifiées et des pri-
ses secteur correspondant réduisent
les risques d’électrocution.
2)
Evitez tout contact physique avec
les surfaces mises à la terre telles
que tuyaux, radiateurs, micro-ondes
et réfrigérateurs.
Il y a un risque d’électrocution sup-
plémentaire si votre corps est mis à
la terre.
3)
N’exposez pas les outils mécaniques à
la pluie ou à des conditions humides.
De l’eau pénétrant dans un outil mé-
canique augmente le risque d’élec-
trocution.
4)
Ne malmenez pas le cordon. N’uti-
lisez jamais le cordon pour trans-
porter, pour tirer ou pour débran-
cher l’outil mécanique. Gardez le
cordon éloigné de la chaleur, de
l’huile, d’objets aux bords cou-
pants ou de pièces en mouvement.
Les cordons endommagés on emmêlés
augmentent le risque d'électrocution.
5) Lors du fonctionnement des outils
mécaniques à l’extérieur, utilisez
une rallonge adaptée à l’utilisation
à l’extérieur.
L’utilisation d’un cordon adapté à
l’utilisation à l’extérieur réduit les ris-
ques d’électrocution.
Sécurité personnelle
1) Restez alerte, regardez ce que
vous faites et faites preuve de bon
sens lorsque vous utilisez un outil
mécanique. N’utilisez pas un outil
mécanique alors que vous êtes fa-
tigué ou sous les effets de drogue,
d’alcool ou de médicaments.
Un moment d’inattention pendant
que vous faites fonctionner l’outil mé-
canique peut entraîner des blessures
graves.

-
16
-
2) Utilisez des équipements de sé-
curité. Portez toujours des protec-
tion pour vos yeux.
Des équipements de sécurité com-
me masque antipoussière, chaus-
sures de sécurité non glissantes,
casque de protection ou protections
d’oreilles, utilisés dans des condi-
tions appropriées réduisent les bles-
sures corporelles.
3) Evitez tout démarrage accidentel.
Assurez-vous que l’interrupteur
est en position d'arrêt avant de
brancher l’outil.
Le transport d’outils mécaniques
avec le doigt sur l’interrupteur ou le
branchement d’outils mécaniques
dont l’interrupteur est sur la position
de marche invite les accidents.
4) Retirez toute clé d’ajustement ou
clé de serrage avant de mettre
l’outil mécanique en marche.
Une clé de serrage ou une clé d’ajus-
tement laissée attachée à une pièce
tournante de l’outil mécanique peut
entraîner des blessures corporelles.
5) Ne vous mettez pas en déséqui-
libre. Gardez une bonne prise au
sol et votre équilibre à tout mo-
ment.
Ceci permet un meilleur contrôle de
l’outil mécanique dans des situations
inattendues.
6) Habillez-vous correctement. Ne
portez pas de vêtements lâches
ou de bijoux. Gardez vos cheveux,
vêtements et gants éloignés des
pièces en mouvement.
Des vêtements lâches, des bijoux ou
des cheveux longs peuvent se faire
prendre dans les pièces en mouve-
ment.
7) Si des dispositifs pour la
connexion d’appareils d’extraction
et de ramassage de la poussière
sont fournis, assurez-vous qu’ils
sont connectés et correctement
utilisés.
L’utilisation de ces dispositifs peut ré-
duire les risques concernés.
Utilisation et soins de
l’outil mécanique
1) Ne forcez pas l’outil mécanique.
Utilisez l’outil mécanique correct
pour votre application.
L’outil mécanique correct exécute
mieux le travail dans de meilleurs
conditions de sécurité s’il est utilisé à
l’allure pour laquelle il a été conçu.
2) N’utilisez pas l’outil mécanique
si l’interrupteur ne le met pas en
marche ou ne l’arrête pas.
Tout outil mécanique qui ne peut pas
être contrôlé par son interrupteur est
dangereux et doit être réparé.
3)
Débranchez la fiche de la sour-
ce d’alimentation et/ou du bloc de
batterie avant d’effectuer tout ajus-
tement, de changer d’accessoire
ou de ranger l’outil mécanique.
De telles mesures de sécurité pré-
ventives réduisent les risques de fai-
re démarrer l’outil mécanique acci-
dentellement.
4) Rangez les outils mécaniques inu-
tilisés hors de la portée des en-
fants et ne laissez personne qui
n’est pas familiarisé avec l’outil
mécanique ou ses instructions fai-
re fonctionner l’outil mécanique.
Les outils mécaniques sont dange-
reux dans les mains des utilisateurs
manquant d’entraînement.
5) Entretenez bien les outils méca-
niques. Vérifiez l’alignement ou
l’emboîtage des pièces en mouve-
ment, l’intégrité des pièces et tou-
te autre condition pouvant affecter
le fonctionnement de l’outil méca-
nique. S’il est endommagé, faites
réparer l’outil mécanique avant de
l’utiliser.
De nombreux accidents sont provo-
qués par des outils mécaniques mal
entretenus.
6) Maintenez les outils de coupe affû-
tés et propres.
Les outils de coupe bien entretenus
avec des lames bien affûtées ont
moins de chances de gripper et sont
plus faciles à contrôler.

-
17
-
7) Utilisez l’outil mécanique, les ac-
cessoires, les mèches, etc.,
conformément à ces instructions
et de la façon pour laquelle l’outil
particulier a été conçu en tenant
compte des conditions de travail
et de la tâche à exécuter.
L’utilisation de l’outil mécanique à des
fins autres que celles pour lesquelles
il a été conçu peut présenter une si-
tuation à risque.
Utilisation et soins de
la batterie de l’outil
1) Assurez-vous que l’interrupteur
est dans la position d’arrêt avant
d’insérer le bloc de batterie.
L’insertion du bloc de batterie dans
un outil mécanique dont l’interrupteur
est sur la position de marche peut
provoquer des accidents.
2) N’effectuez la recharge qu’avec le
chargeur spécifié par le fabricant.
Un chargeur convenant à un bloc de
batterie peut entraîner un risque d’in-
cendie lorsqu’un autre bloc de batte-
rie est utilisé.
3) N’utilisez les outils mécaniques
qu’avec les bloc de batterie spé-
cialement conçus pour eux.
L’utilisation de tout autre bloc de
batterie peut entraîner un risque de
blessure et d’incendie.
4) Lorsqu’un bloc de batterie n’est
pas utilisé, gardez-le éloigné d’ob-
jets métalliques comme agrafes,
pièces de monnaie, clés, clous, vis
ou tout autre petit objet métallique
pouvant établir une connexion en-
tre les deux bornes.
Si les bornes de la batterie sont mi-
ses en court-circuit, cela peut entraî-
ner des brûlures ou un incendie.
5) Si elle est malmenée, du liquide
peut s’échapper de la batterie. Evi-
tez tout contact. Si un contact ac-
cidentel se produit, rincez à l’eau.
Si du liquide entre en contact avec
les yeux, consultez un médecin.
Le liquide éjecté de la batterie peut
entraîner des irritations ou des brûlu-
res.
Réparation
1) Faites réparer votre outil mécani-
que par du personnel de répara-
tion qualifié en n’utilisant que des
pièces de rechange identiques.
Ceci assure le maintien de la sécuri-
té de l’outil mécanique.
III. REGLES DE SE-
CURITE PARTI-
CULIERES
1) Portez des lunettes lorsque vous
utilisez l’outil pendant de longues
périodes. L’exposition prolongée à
du bruit de haute densité peut entraî-
ner la perte de l’ouïe.
2) Utilisez la manche auxiliaire four-
nie avec l'outil. Si vous perdez le
contrôle de l'outil, vous risquez de
vous blesser.
3) Tenez l’outil par les surfaces de
prise isolées lorsque vous effec-
tuez une opération lors de laquel-
le l’outil de coupe risque d’entrer
en contact avec des câblages ca-
chés.
Le contact avec un fil sous tension
fera passer le courant dans les piè-
ces métalliques exposées et électro-
cutera l’opérateur.
4) N’oubliez pas que cet appareil est
toujours prêt à fonctionner, parce
qu’il ne doit pas être branché dans
une prise électrique.
5) Si la mèche est coincée, mettez im-
médiatement le commutateur de la
gâchette hors tension afin de préve-
nir une surcharge pouvant endom-
mager la batterie autonome ou le
moteur. Dégagez la mèche en inver-
sant le sens de rotation.
6)
Ne manœuvrez pas le levier d’inver-
sion marche avant - marche arrière
lorsque le commutateur principal est
sur la position de marche. La batterie
se déchargerait rapidement et la per-
ceuse serait endommagée.
7) Lorsque vous rangez ou transpor-
tez l’outil, mettez le levier d’inversion
marche avant - marche arrière sur
la position centrale (verrouillage du
commutateur).

-
18
-
8)
Ne forcez pas l’outil en maintenant la
gâchette de contrôle de vitesse en-
foncée à moitié (mode de contrôle
de la vitesse) de sorte que le moteur
s’arrête. Le circuit de protection s’ac-
tivera et pourra empêcher le contrôle
de la vitesse. Dans ce cas, relâchez
la gâchette de contrôle de la vites-
se, puis serrez-la à nouveau pour le
fonctionnement normal.
9) Evitez la pénétration de poussière
dans le mandrin.
10) Ne touchez pas les pièces rotatives
pour éviter toute blessure.
11)
N’utilisez pas l’outil continuellement
pendant une longue période. Arrêtez
d’utiliser l’outil de temps en temps pour
éviter une augmentation de la tempé-
rature et de surchauffer le moteur.
12) Ne laissez pas tomber l’outil.
13)
Mettez un masque antipoussière, si
les travaux produisent de la poussière.
14)
La température du chargeur peut
s’élever en cours d’utilisation. Ce n’est
pas là le signe d’une anomalie de
fonctionnement. NE chargez PAS la
batterie pendant une longue période.
Symbole Signification
V Volts
Courant continu
n
0
Vitesse sans charge
… min
-1
Révolutions ou alternan-
ces par minute
Ah
Capacité électrique de la
batterie autonome
Rotation en sens normal
Rotation en sens inverse
Rotation avec martelage
Rotation seulement
AVERTISSEMENT:
La poussière résultant de ponçage,
sciage, meulage, perçage à haute
pression et de toute autre activité de
construction, contient des produits
chimiques réputés être cause de
cancer, de malformations congéni-
tales ou autres problèmes reproduc-
tifs. Ces produits chimiques sont,
par exemple :
* Le plomb contenu dans les peintu-
res à base de plomb
* La silice cristalline, contenue dans
les briques, le ciment et autres pro-
duits de maçonnerie; et
* L’arsenic et le chrome provenant du
bois traité chimiquement.
Pour réduire l’exposition à ces pro-
duits chimiques, il faut travailler
dans un lieu bien aéré et porter un
équipement de sécurité approprié tel
que certains masques anti-poussiè-
re conçus spécialement pour filtrer
les particules microscopiques.
IV.
CHARGEUR DE
BATTERIE ET BAT-
TERIE AUTONOME
Instructions de sécurité
importantes
1)
CONSERVEZ CES INSTRUCTIONS
La présente notice contient des ins-
tructions de sécurité et d’utilisation
importantes pour le chargeur de bat-
terie EY0L80.
2) Avant d’utiliser le chargeur de batte-
rie, lisez toutes les instructions et les
marques d’avertissement figurant sur
(1) le chargeur de batterie, (2) la bat-
terie autonome.
3) MISE EN GARDE –
Pour réduire le
risque de blessures, chargez la bat-
terie autonome Panasonic seulement
comme indiqué à la dernière page.
Les autres types de batteries ris-
quent d’exploser et de causer des
blessures corporelles et des domma-
ges matériels.

-
19
-
4) N’exposez pas le chargeur à la pluie
ou à la neige.
5) Pour réduire les risques de domma-
ges à la fiche et au cordon secteur,
débranchez le chargeur en tirant la
fiche et non le cordon.
6) Veillez à acheminer le cordon de fa-
çon que personne ne risque de le
piétiner, de trébucher dessus, d’en-
dommager ou d’étirer le cordon.
7) N’utilisez une rallonge qu'en cas de
nécessité absolue.
Si vous utilisez une rallonge inadé-
quate, vous risquez de causer un in-
cendie ou une électrocution. Si vous
devez absolument utiliser une rallon-
ge, veillez à respecter les points sui-
vants:
a. Le nombre, la taille et la forme des
broches de la fiche de la rallonge
doivent être identiques à ceux de la
fiche du chargeur de batterie.
b. La rallonge doit avoir des conduc-
teurs en bon état et être elle-mê-
me en bon état d'utilisation.
c.
La taille des conducteurs doit être
suffisante pour les normes d'inten-
sité en ampères du chargeur, com-
me indiqué ci-dessous.
TAILLE AWG MINIMUM RECOMMANDÉE DES
RALLONGES POUR CHARGEURS
DE BATTERIES
Norme d’entrée
CA
Ampères Taille AWG du
cordon
Egal ou
supérieur à
Mais
inférieur à
Longueur du
cordon, pieds
25 50 100 150
0 2 18 18 18 16
8) N’utilisez pas un chargeur dont la fiche
ou le cordon est endommagé – rem-
placez-les immédiatement.
9) N’utilisez pas le chargeur s’il a reçu
un choc violent, s'il a subi une chute
ou s’il a été endommagé de quelque
manière que ce soit;
10) Ne démontez pas le chargeur; si des
travaux d’entretien ou de réparation
sont nécessaires, confiez-le à un
technicien qualifié. Si vous le remon-
tez incorrectement, vous risquez de
causer une électrocution ou un in-
cendie.
11) Pour réduire le risque d’électrocution,
débranchez le chargeur de la prise
de courant avant d’entreprendre des
travaux d’entretien ou de nettoyage.
12) Le chargeur et la batterie autonome
ont été conçus spécifiquement pour
fonctionner ensemble.
Ne tentez pas de charger un autre
outil à batterie ou une autre batterie
autonome avec ce chargeur.
13) Ne tentez pas de charger la batterie
autonome avec un autre chargeur.
14) Ne tentez pas de démonter le loge-
ment de la batterie autonome.
15) Ne rangez pas l’outil ou la batterie
autonome à des endroits où la tempé-
rature est susceptible d'atteindre ou
de dépasser 50°C (122°F) (par exem-
ple dans une remise d’outils électri-
ques, ou dans une voiture en été),
car ceci risquerait d'abîmer la batterie
stockée.
16) Ne chargez pas la batterie autono-
me lorsque la température est IN-
FÉRIEURE À 0°C (32°F) ou SUPÉ-
RIEURE à 40°C (104°F). Ceci est
très important.
17) N’incinérez pas la batterie autonome.
Elle risquerait d'exploser dans les
flammes.
18) Evitez toute utilisation dans un envi-
ronnement dangereux. N’utilisez pas
le chargeur à un endroit humide ou
mouillé.
19) Le chargeur a été conçu pour fonc-
tionner uniquement sur des prises
secteur domestiques standard. Ne
l’utilisez pas sous des tensions diffé-
rentes!
20) Ne manipulez pas brutalement le cor-
don secteur. Ne transportez jamais le
chargeur en le tenant par le cordon,
ou ne le tirez pas brutalement pour le
débrancher de la prise. Gardez le cor-
don à l’abri de la chaleur, de l’huile et
de bords coupants.
21) Chargez la batterie autonome à un
endroit bien ventilé; ne couvrez pas
le chargeur et la batterie autono-
me avec un chiffon, etc., pendant la
charge.

-
20
-
22) Si vous utilisez un accessoire non re-
commandé, un incendie, une électro-
cution, des blessures risqueraient de
s’ensuivre.
23) Ne court-circuitez pas la batterie
autonome. Un court-circuit de la bat-
terie risquerait de faire passer un
courant de forte intensité, et une sur-
chauffe, un incendie ou des blessu-
res risqueraient de s'ensuivre.
24) REMARQUE: Si le cordon secteur de
cet appareil est endommagé, il doit
être remplacé exclusivement dans un
atelier agréé par le fabricant, car ces
travaux exigent l’utilisation d’outils
spéciaux.
25) POUR RÉDUIRE LES RISQUES
D’ÉLECTROCUTION, CET APPA-
REIL EST ÉQUIPÉ D’UNE FICHE
POLARISÉE (UNE LAME EST PLUS
LARGE QUE L’AUTRE).
Cette fiche ne pourra être insérée que
d'une seule façon dans une prise po-
larisée. Si la fiche ne peut pas être in-
sérée à fond dans la prise, insérez la
fiche sens dessus dessous. Si vous
ne parvenez toujours pas à insérer la
fiche, adressez-vous à un électricien
qualifié pour installer une prise de
courant adéquate.
Ne modifiez la fiche en aucune façon.
AVERTISSEMENT:
• N'utilisez que les batteries autono-
mes de Panasonic car elles sont
conçues pour cet outil rechargeable.
• Ne mettez pas la batterie autonome
dans le feu, ne la placez pas près
d'une source de chaleur excessive.
• N'enfoncez pas de clou ou autre
dans la batterie autonome, ne la
secouez pas, ne la démontez pas,
n'essayez pas de la modifier.
• Ne mettez pas d'objets métalliques
en contact avec les bornes de la
batterie autonome.
• Ne placez pas la batterie autonome
dans le même contenant que des
clous ou des objets métalliques
semblables.
• Ne chargez pas la batterie auto-
nome dans un endroit où la tempé-
rature est élevée, comme près d'un
feu ou au contact direct des rayons
du soleil. Sinon la batterie pourrait
surchauffer, s'enflammer ou explo-
ser.
• N'utilisez jamais un autre chargeur
pour charger la batterie autonome.
Sinon la batterie pourrait fuir, sur-
chauffer ou exploser.
• Après avoir retiré la batterie auto-
nome de l’outil ou du chargeur,
remettez toujours le couverclede la
batterie autonome en place. Sinon,
les contacts de la batterie peuvent
se mettre en court-circuit, entraî-
nant le risque d’un incendie.
La page est en cours de chargement...
La page est en cours de chargement...
La page est en cours de chargement...
La page est en cours de chargement...
La page est en cours de chargement...
La page est en cours de chargement...
La page est en cours de chargement...
La page est en cours de chargement...
La page est en cours de chargement...
La page est en cours de chargement...
La page est en cours de chargement...
La page est en cours de chargement...
La page est en cours de chargement...
La page est en cours de chargement...
La page est en cours de chargement...
La page est en cours de chargement...
La page est en cours de chargement...
La page est en cours de chargement...
La page est en cours de chargement...
La page est en cours de chargement...
La page est en cours de chargement...
La page est en cours de chargement...
La page est en cours de chargement...
La page est en cours de chargement...
-
 1
1
-
 2
2
-
 3
3
-
 4
4
-
 5
5
-
 6
6
-
 7
7
-
 8
8
-
 9
9
-
 10
10
-
 11
11
-
 12
12
-
 13
13
-
 14
14
-
 15
15
-
 16
16
-
 17
17
-
 18
18
-
 19
19
-
 20
20
-
 21
21
-
 22
22
-
 23
23
-
 24
24
-
 25
25
-
 26
26
-
 27
27
-
 28
28
-
 29
29
-
 30
30
-
 31
31
-
 32
32
-
 33
33
-
 34
34
-
 35
35
-
 36
36
-
 37
37
-
 38
38
-
 39
39
-
 40
40
-
 41
41
-
 42
42
-
 43
43
-
 44
44


Panasonic Drill EY7460 Manuel utilisateur
- Catégorie
- Perceuses mixtes sans fil
- Taper
- Manuel utilisateur
dans d''autres langues
- English: Panasonic Drill EY7460 User manual
- español: Panasonic Drill EY7460 Manual de usuario
Documents connexes
-
Panasonic EY7960 Manuel utilisateur
-
Panasonic Power Hammer EY7840 Manuel utilisateur
-
-
Panasonic EY7420 Manuel utilisateur
-
-
Panasonic EY7880 Manuel utilisateur
-
-
-
-