Epson EasyMP EMP-735 Setup Manual
- Catégorie
- Projecteurs
- Taper
- Setup Manual


English
EasyMP Setup Guide
English

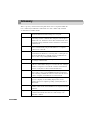
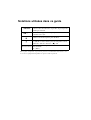
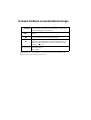
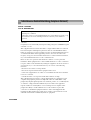
Notations Used in This Guide
When "projector" appears in the text of this guide, it may refer to items which
are accessories or optional equipment in addition to the main projector unit
itself.
Caution :
Indicates procedures which may result in damage or injury if
sufficient care is not taken.
Tip :
Indicates additional information and points which may be
useful to know regarding a topic.
Indicates pages where related information or more detailed
description is provided.
Indicates that an explanation of the underlined word or
words in front of this symbol appears in the glossary of
terms. See "Appendices: Glossary". p.62
[(Button Name)]
Shows the buttons on the control panel or on the remote
control.
Ex: [ESC]

3
English
Contents
Functions .......................................................................................... 5
Projecting Images Using a Wireless Computer Connection
(Network Screen) .................................................................................5
Monitoring Projector Errors with EMP Monitor and SNMP ................ 6
Using a Memory Card to Give a Presentation Without a Computer
(CardPlayer) ......................................................................................... 7
Software Overview............................................................................ 9
EasyMP Software Overview (Projector)................................................ 9
EasyMP Software Overview (Computer) .............................................. 9
Before Use
Operating Environment ................................................................... 12
System Requirements for EasyMP Software....................................... 12
Conditions for Connecting to CompatibleWireless LAN Cards and
Access Points ..................................................................................... 14
Precautions Regarding the Use of the IncludedWireless LAN Card...14
Inserting and Removing Cards ....................................................... 16
Installation ...........................................................................................16
Removal ............................................................................................... 17
Interpreting the Access Lamp.............................................................. 18
Installing EasyMP Software ............................................................ 19
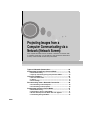
Projecting Images from a Computer Communicating
via a Network (Network Screen)
Types of Network Connections ....................................................... 22
Connecting Using Easy Connect Mode .......................................... 23
Before Connecting ............................................................................... 23
Steps for Connecting Using Easy Connect Mode................................ 24
Using the Toolbars .......................................................................... 35
Icon Use and Actions........................................................................... 35
E-Zoom................................................................................................ 37
Basic Settings.......................................................................................38
Disconnecting from a Network Connection..................................... 40
Disconnecting at the Computer............................................................40
Disconnecting at the Projector............................................................. 40

4
Contents
Connecting in Access Point Mode................................................... 41
Before Connecting............................................................................... 41
Connecting in Access Point Mode....................................................... 41
What If the Projector You Want does not Appear?.............................. 52
Transmitting Encrypted Data............................................................... 56
Appendices
Compatible Memory Cards ............................................................. 60
Uninstalling EasyMP Software ........................................................ 61
Glossary.......................................................................................... 62
About Compliance Statement ......................................................... 64
Index ............................................................................................... 66

5
English
Functions
EasyMP supplied with the projector has two main functions:
• Network Screen Function - uses a wireless connection to connect to a
network and project images from a computer
• CardPlayer Function - projects files stored on a memory card in this
projector and allows a presentation to be shown without connecting to a
computer.
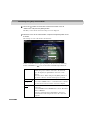
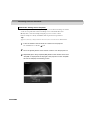
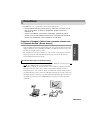
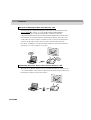
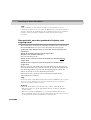
Projecting Images Using a Wireless Computer Connection
(Network Screen)
Have you ever tried to set up for a presentation where you had to fumble with cables
in the limited time between speakers or had to rearrange seating to connect a cable
that was just a little too short?
By setting up the wireless LAN card included with the projector, you can project
images from a computer that has a wireless LAN card or internal wireless LAN
functionality.
The two wireless LAN connection modes are "Easy connect mode
(ad hoc mode
)" and "Access point mode (infrastructure mode)".
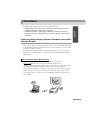
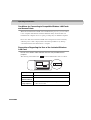
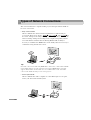
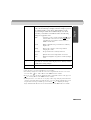
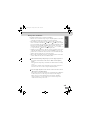
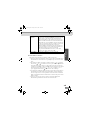
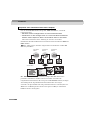
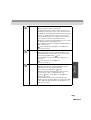
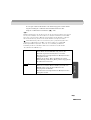
Of the two, when using "Easy connect mode", connection is as simple as setting up
corresponding passwords or numbers on both the projector and computer.
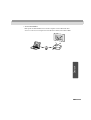
Projectors and computers can not only be connected one-to-one, but one computer
can be connected to as many as four projectors. This way, projectors placed in
several classrooms or conference rooms can simultaneously project images from
one computer.
Easy Connection with a Wireless LAN

6
Functions
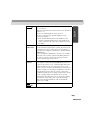
If a wireless LAN system is already installed in an office, use the "Access point
mode" to share projectors from a participating computer via the company network.
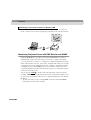
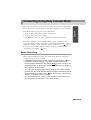
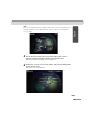
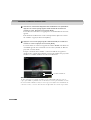
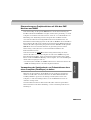
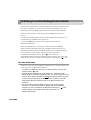
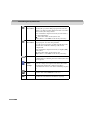
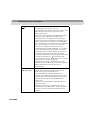
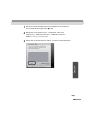
Monitoring Projector Errors with EMP Monitor and SNMP
Using the "EMP Monitor" provided on the included CD-ROM, it is possible to
simultaneously monitor and control the projector from a computer, when using
"Access point mode" to connect to a computer on a wireless LAN. The monitoring
function monitors the error state, power status, and input status of the projector. The
control function performs simultaneous start-up, and image signal input switching
of multiple projectors. Using EMP monitor, it is possible for a single operator to
control the simultaneous starting and monitoring of projectors arranged in separate
classrooms or meeting rooms.
You can also use SNMP
to monitor and control the status of projectors from a
computer. SNMP creates a notification message when an abnormal condition occurs
on a projector, and sends the notification to a computer identified by a pre-defined
IP address.
* In order to monitor a projector using SNMP, you need to first install SNMP
management software on the computer.
Connecting Via an Access Point in a Wireless LAN

7
English
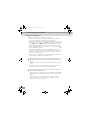
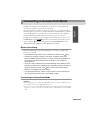
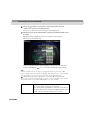
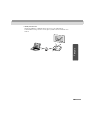
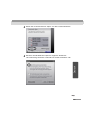
Using a Memory Card to Give a Presentation Without a
Computer (CardPlayer)
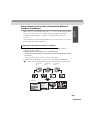
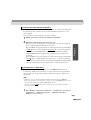
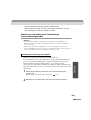
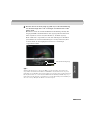
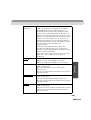
When a memory card containing image files, or a "scenario" made from PowerPoint
files, is set into the projector, its contents can be projected directly using the
CardPlayer function. Neither a computer, nor the application software are
necessary.
You can make your presentation with just this projector and a memory card, and not
be weighed down by other equipment.
Using "EMP SlideMaker2", which is provided on the CD-ROM, makes the
following operations simple.
• Extracting the selected slides from a PowerPoint file.
• Combine the selected slides from different PowerPoint files and save them
as one file.
This type of file is referred to as a "scenario" in this guide.
In addition to PowerPoint files, a scenario may contain JPEG, and BMP files.
See "Files that Can be Included in Scenarios" in the EasyMP Operation Guide.
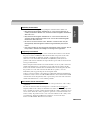
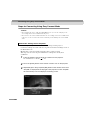
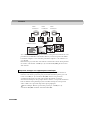
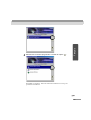
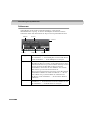
Projecting a PowerPoint file without a computer
PowerPoint
File 1
PowerPoint
File 2
PowerPoint
File 3
Scenario File

8
Functions
Using "EMP SlideMaker2", you can extract and rearrange the selected parts of your
presentation without editing the original files, and easily and efficiently create
presentation material tailored to suit your audience and needs.
Insert a memory card containing a scenario into the projector. Select the CardPlayer,
and use the scenario playing function to present the scenario.
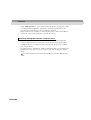
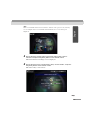
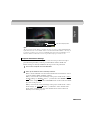
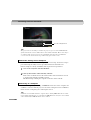
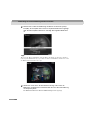
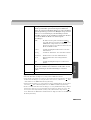
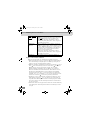
By storing pictures from a digital camera on a memory card, and inserting that
memory card into the projector, the photos can be projected directly using the
CardPlayer function. A computer is unnecessary because the projector can show
these images directly.
If graphics files are combined into folders, besides being able to view a file list, the
graphics files can be projected one-at-a-time in order as if showing photographic
slides.
See "Files that Can be Projected by the CardPlayer" in the EasyMP Operation
Guide.
Projecting Photograph Data from a Digital Camera

9
English
Software Overview
"Network Screen" and "CardPlayer" are already installed on the projector. These
applications are referred to as "EasyMP" in this manual.
Furthermore, "EMP NS Connection", "EMP SlideMaker2", and "EMP Monitor"
may be installed on a computer and are included amongst the software on the
"EasyMP Software CD-ROM".
Each of these programs is described below.
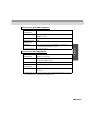
EasyMP Software Overview (Projector)
EasyMP supplied with this projector has the following functions.
EasyMP Software Overview (Computer)
The "EasyMP Software CD-ROM", which is included, contains the following three
programs to assist EasyMP. Individual program products can be selected and
installed as needed. For detailed installation information, refer to "Installing
EasyMP Software". p.19
Network Screen This function projects images from a computer
communicating via a network. Furthermore, this software
can be used to apply settings to a projector using a Web
browser, or to manage a projector using SNMP
.
CardPlayer This function is used to project scenario and graphics files
stored on a memory card inserted into a projector, and it is
used to edit scenarios.
EMP NS Connection This software is used to transmit images from computer to
a projector using a wireless LAN.
EMP SlideMaker2 This software is used to create and transmit scenarios.
EMP Monitor This software is used to simultaneously monitor and
control multiple projectors that are connected to a network.


11
11
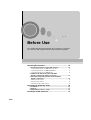
Before Use
This chapter describes the preparation for connecting to a computer
via a wireless LAN using the wireless LAN card that is provided.
Operating Environment................................................... 12
• System Requirements for EasyMP Software ........................ 12
• System Requirements for EMP NS Connection................................ 12
• System Requirements for EMP SlideMaker2.................................... 13
• System Requirements for EMP Monitor............................................ 13
• Conditions for Connecting to Compatible
Wireless LAN Cards and Access Points.............................. 14
• Precautions Regarding the Use of the Included
Wireless LAN Card................................................................. 14
• EM Safety Precautions....................................................................... 15
• Frequency Precautions....................................................................... 15
• International Travel Precautions........................................................ 15
Inserting and Removing Cards....................................... 16
• Installation................................................................................ 16
• Removal.................................................................................... 17
• Interpreting the Access Lamp ................................................ 18
Installing EasyMP Software............................................ 19

12
Operating Environment
System Requirements for EasyMP Software
The "EasyMP Software CD-ROM" provided, contains the following programs.
• EMP NS Connection
Transmit images from computer to a projector using a wireless LAN.
• EMP SlideMaker2
Create and transmit scenarios.
• EMP Monitor
Simultaneously monitor and control multiple projectors connecting on a
network.
The hardware requirement for each software program is different as follows.
* Macintosh is not supported.
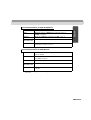
System Requirements for EMP NS Connection
OS Windows 98/Me/2000/XP
*
CPU Minimum: Pentium III 500MHz (Recommended: Pentium III
700MHz or higher)
Memory At least: 128MB (Recommended: 192MB or above)
Available hard
drive disk space
At least 20MB
Display At least VGA (640×480) resolution (Recommended: XGA
(1024×768) resolution, 16-bit colour)

13
English
* Macintosh is not supported.
* Macintosh is not supported. Internet Explorer 3 or later must be used if Windows
95 is used.
System Requirements for EMP SlideMaker2
OS Windows 98/Me/2000/XP
*
CPU Minimum: Celeron 300MHz (Recommended: Celeron
400MHz or higher)
Memory Minimum: 64MB (Recommended: 128MB or above)
Available hard
drive disk space
12MB
Display At least SVGA (800×600) resolution (Recommended: XGA
(1024×768) resolution or above)
System Requirements for EMP Monitor
OS Windows 95/98 Second Edition/Me/NT 4.0 Workstation/2000
Professional/XP
*
CPU Minimum: Pentium MMX 166MHz (Recommended: Pentium
II 233MHz or higher)
Memory 64MB or more (128MB or more recommended)
Available hard
drive disk space
At least 6MB
Display Minimum: XGA (1024×768) or higher resolution, 16-bit colour
or higher

14
Operating Environment
Conditions for Connecting to Compatible Wireless LAN Cards
and Access Points
When the included wireless LAN card is installed in the projector, you can connect
to the computers with internal wireless LAN functionality, wireless LAN card
installed in the computer and access point, providing they are all Wi-Fi compliant.
Please note: The enclosed wireless LAN card is designed to be used exclusively
with this projector. Our company will not be held responsible for any damage
caused if the LAN card is inserted into a computer.
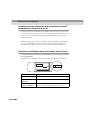
Precautions Regarding the Use of the Included Wireless
LAN Card
Do not use a wireless LAN card other than the one provided with this
projector.
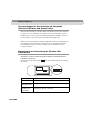
The meaning of the label below for the included LAN card is as follows.
Frequency Range 2.4GHz band
Modulation HR/DSS-SS
Potential
Interference Range
Less than 20m
Can/Can not
change frequency
Uses all bands, and is capable of avoiding "licenced" as well
as "unlicenced" bands.

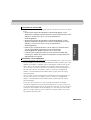
15
English
Be aware of the following points regarding the included wireless LAN card.
• May exert electromagnetic interference on, and cause malfunction of,
cardiac pacemakers. Before use, ensure that electromagnetic interference
does not occur.
• May exert electromagnetic interference on, and cause malfunction of,
sensitive medical equipment. Before use, ensure that electromagnetic
interference does not occur.
• Do not use near microwave ovens. Wireless communication may be
interrupted by electromagnetic interference generated by microwave
ovens.
• Use of this product on aircraft may be restricted in some countries. Use of
this product is based on due diligence with regard to regulations.
The frequency range which applies to the wireless LAN cards that can be used in
the projector is the 2.4GHz band. This wireless LAN card operates in the same
frequency bandwidth as industrial, scientific, and medical devices such as
microwave ovens and mobile unit identification (RF-ID) systems (licenced
premises radio stations and unlicenced specified low-power radio stations) used in
factory production lines.
Before using the wireless LAN card, check that there are not any radio stations for
mobile unit identification or specified low-power radio station premises nearby.
In the event that this wireless LAN card should interfere electromagnetically with
the premises of a radio station used for mobile unit recognition, cease use
immediately and stop generating the electromagnetic field.
Contact your nearest dealer or the address provided under "International Warranty
Conditions" in Safety Instructions/World-Wide Warranty Terms if this wireless LAN
card interferes electromagnetically with a special low-power radio station used for
mobile unit identification or causes similar problems.
The wireless LAN card configuration is based on the specifications of the country
of purchase.
Because the wireless LAN card is designed to conform to the channel
and
frequency limits of the country it is intended to be used in, it may infringe upon the
laws or regulations of other countries if used outside the country of purchase. If you
need to use it outside the country of purchase, purchase a new wireless LAN card
for that country. To purchase such a card, contact the address for the country of use,
provided in the "International Warranty Conditions" section of the Safety
Instructions/World-Wide Warranty Terms booklet.
EM Safety Precautions
Frequency Precautions
International Travel Precautions

16
Inserting and Removing Cards
Inserting and removing PC cards will be explained using the included wireless LAN
card provided as an example. When using a commercial memory card, please refer
to the documentation included with the card. If inserting or removing a card in a PC
card slot on a computer, please refer to the documentation for the computer.
Tip :
The following PC cards can be inserted in the card slot on this projector.
• Wireless LAN card (only available with the one included with this projector)
• Memory card
For detailed specifications regarding compatible cards, refer to "Compatible Memory
Cards". p.60
• Wired LAN card
For details on the available wired LAN card, please visit the Web site
http://www.epson.co.uk/.
For Network settings, refer to "Connecting in Access Point Mode". p.41
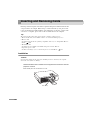
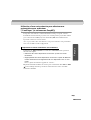
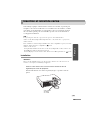
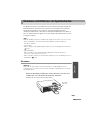
Installation
Caution :
Insert the PC card facing the right way. Installing the device back to front or upside
down may cause failure or damage.
Hold the wireless LAN card with the face uppermost and insert it into the
projector card slot.
Insert firmly into the slot until it is secure.
This side up

17
English
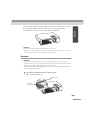
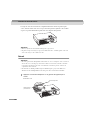
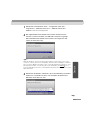
Once the wireless LAN card has been fully inserted in the card slot, the rear edge of
the card will protrude from the slot. When the card is properly seated, the
transmitter/receiver portion of the card protrudes from the slot.
Caution :
• Always remove the card before transporting the projector.
• Furthermore, when storing the projector in the included soft carrying case, be sure to
remove the card, and store the card in the carryall’s pocket.
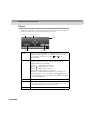
Removal
Caution :
• Do not remove a PC card when the access lamp is lit green, when connected to a
network or when projecting a scenario. Improperly removing a PC card may result in
damage to the card or data destruction on a memory card.
• The PC card gets hot during and after projector use. Please handle the card carefully to
avoid personal injury or burns.
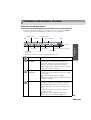
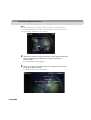
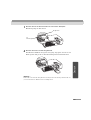
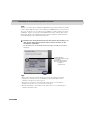
1
Press the eject button to the left of the card slot.
The eject button will pop out.
Eject button
Card slot
access lamp

18
Inserting and Removing Cards
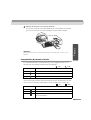
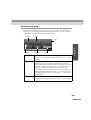
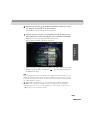
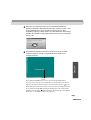
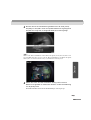
2
Press the eject button again.
Enough of the wireless LAN card will be ejected so that you can grasp the edge
of the card and pull it straight out of the slot.
Caution :
Be sure to press the eject button back in to prevent it from being broken or damaged.
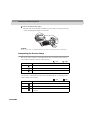
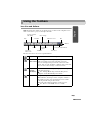
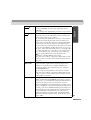
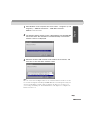
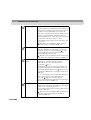
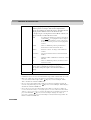
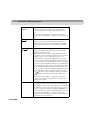
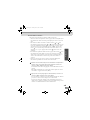
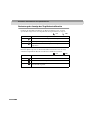
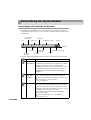
Interpreting the Access Lamp
The colour of the card slot access lamp indicates the access status of the memory
card as follows when the memory card is inserted.
: ON : OFF
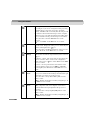
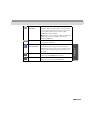
The card slot access lamp is not on when the wireless LAN card is inserted in the
card slot. The communication status can be determined by the access lamp on the
wireless LAN card as follows.
: ON : OFF
State Access status
Green Data is being read from the memory card.
OFF Not accessing the memory card.
Red An error occurred whilst reading the memory card.
State Communication status
Yellow The wireless LAN card is ready for use.
Green Data is being transmitted.
OFF The projector is off or the wireless LAN card is not inserted
correctly.

19
English
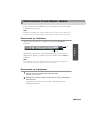
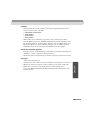
Installing EasyMP Software
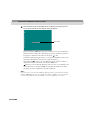
Install "EMP NS Connection", "EMP SlideMaker2", and "EMP Monitor" from the
accessory "EasyMP Software CD-ROM" individually, or as needed.
When using Windows 2000/NT4.0/XP, only a user with administrator privileges can
install the software.
Before installation, close all other programs.
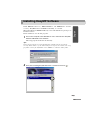
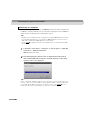
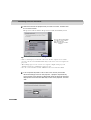
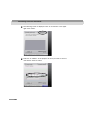
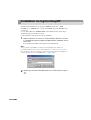
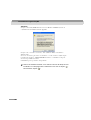
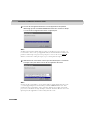
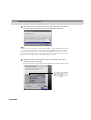
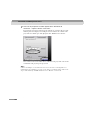
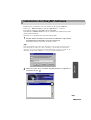
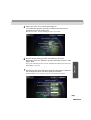
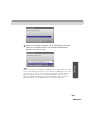
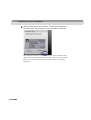
1
Turn on the computer, allow Windows to start, and insert the "EasyMP
Software CD-ROM" in the CD drive.
The Setup program should start automatically.
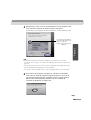
Tip :
If the Setup program does not start automatically, manually start the program by
selecting "Start"-"Run" to get the "Run" dialogue box. Specify the location of the setup
program by entering the "R(CD drive letter):\SETUP.exe" and then clicking "OK".
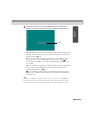
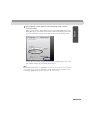
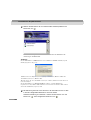
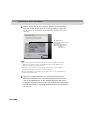
2
Verify that "Installing EasyMP Software" is selected, and click " ".
La page est en cours de chargement...
La page est en cours de chargement...
La page est en cours de chargement...
La page est en cours de chargement...
La page est en cours de chargement...
La page est en cours de chargement...
La page est en cours de chargement...
La page est en cours de chargement...
La page est en cours de chargement...
La page est en cours de chargement...
La page est en cours de chargement...
La page est en cours de chargement...
La page est en cours de chargement...
La page est en cours de chargement...
La page est en cours de chargement...
La page est en cours de chargement...
La page est en cours de chargement...
La page est en cours de chargement...
La page est en cours de chargement...
La page est en cours de chargement...
La page est en cours de chargement...
La page est en cours de chargement...
La page est en cours de chargement...
La page est en cours de chargement...
La page est en cours de chargement...
La page est en cours de chargement...
La page est en cours de chargement...
La page est en cours de chargement...
La page est en cours de chargement...
La page est en cours de chargement...
La page est en cours de chargement...
La page est en cours de chargement...
La page est en cours de chargement...
La page est en cours de chargement...
La page est en cours de chargement...
La page est en cours de chargement...
La page est en cours de chargement...
La page est en cours de chargement...
La page est en cours de chargement...
La page est en cours de chargement...
La page est en cours de chargement...
La page est en cours de chargement...
La page est en cours de chargement...
La page est en cours de chargement...
La page est en cours de chargement...
La page est en cours de chargement...
La page est en cours de chargement...
La page est en cours de chargement...
La page est en cours de chargement...
La page est en cours de chargement...
La page est en cours de chargement...
La page est en cours de chargement...
La page est en cours de chargement...
La page est en cours de chargement...
La page est en cours de chargement...
La page est en cours de chargement...
La page est en cours de chargement...
La page est en cours de chargement...
La page est en cours de chargement...
La page est en cours de chargement...
La page est en cours de chargement...
La page est en cours de chargement...
La page est en cours de chargement...
La page est en cours de chargement...
La page est en cours de chargement...
La page est en cours de chargement...
La page est en cours de chargement...
La page est en cours de chargement...
La page est en cours de chargement...
La page est en cours de chargement...
La page est en cours de chargement...
La page est en cours de chargement...
La page est en cours de chargement...
La page est en cours de chargement...
La page est en cours de chargement...
La page est en cours de chargement...
La page est en cours de chargement...
La page est en cours de chargement...
La page est en cours de chargement...
La page est en cours de chargement...
La page est en cours de chargement...
La page est en cours de chargement...
La page est en cours de chargement...
La page est en cours de chargement...
La page est en cours de chargement...
La page est en cours de chargement...
La page est en cours de chargement...
La page est en cours de chargement...
La page est en cours de chargement...
La page est en cours de chargement...
La page est en cours de chargement...
La page est en cours de chargement...
La page est en cours de chargement...
La page est en cours de chargement...
La page est en cours de chargement...
La page est en cours de chargement...
La page est en cours de chargement...
La page est en cours de chargement...
La page est en cours de chargement...
La page est en cours de chargement...
La page est en cours de chargement...
La page est en cours de chargement...
La page est en cours de chargement...
La page est en cours de chargement...
La page est en cours de chargement...
La page est en cours de chargement...
La page est en cours de chargement...
La page est en cours de chargement...
La page est en cours de chargement...
La page est en cours de chargement...
La page est en cours de chargement...
La page est en cours de chargement...
La page est en cours de chargement...
La page est en cours de chargement...
La page est en cours de chargement...
La page est en cours de chargement...
La page est en cours de chargement...
La page est en cours de chargement...
La page est en cours de chargement...
La page est en cours de chargement...
La page est en cours de chargement...
La page est en cours de chargement...
La page est en cours de chargement...
La page est en cours de chargement...
La page est en cours de chargement...
La page est en cours de chargement...
La page est en cours de chargement...
La page est en cours de chargement...
La page est en cours de chargement...
La page est en cours de chargement...
La page est en cours de chargement...
La page est en cours de chargement...
La page est en cours de chargement...
La page est en cours de chargement...
La page est en cours de chargement...
La page est en cours de chargement...
La page est en cours de chargement...
La page est en cours de chargement...
La page est en cours de chargement...
La page est en cours de chargement...
La page est en cours de chargement...
La page est en cours de chargement...
La page est en cours de chargement...
La page est en cours de chargement...
La page est en cours de chargement...
La page est en cours de chargement...
La page est en cours de chargement...
La page est en cours de chargement...
La page est en cours de chargement...
La page est en cours de chargement...
La page est en cours de chargement...
La page est en cours de chargement...
La page est en cours de chargement...
La page est en cours de chargement...
La page est en cours de chargement...
La page est en cours de chargement...
La page est en cours de chargement...
La page est en cours de chargement...
La page est en cours de chargement...
La page est en cours de chargement...
La page est en cours de chargement...
La page est en cours de chargement...
La page est en cours de chargement...
La page est en cours de chargement...
La page est en cours de chargement...
La page est en cours de chargement...
La page est en cours de chargement...
La page est en cours de chargement...
La page est en cours de chargement...
La page est en cours de chargement...
La page est en cours de chargement...
La page est en cours de chargement...
La page est en cours de chargement...
La page est en cours de chargement...
La page est en cours de chargement...
La page est en cours de chargement...
La page est en cours de chargement...
La page est en cours de chargement...
La page est en cours de chargement...
La page est en cours de chargement...
La page est en cours de chargement...
La page est en cours de chargement...
La page est en cours de chargement...
La page est en cours de chargement...
La page est en cours de chargement...
La page est en cours de chargement...
La page est en cours de chargement...
La page est en cours de chargement...
La page est en cours de chargement...
La page est en cours de chargement...
La page est en cours de chargement...
La page est en cours de chargement...
La page est en cours de chargement...
La page est en cours de chargement...
La page est en cours de chargement...
La page est en cours de chargement...
La page est en cours de chargement...
La page est en cours de chargement...
La page est en cours de chargement...
La page est en cours de chargement...
La page est en cours de chargement...
La page est en cours de chargement...
La page est en cours de chargement...
-
 1
1
-
 2
2
-
 3
3
-
 4
4
-
 5
5
-
 6
6
-
 7
7
-
 8
8
-
 9
9
-
 10
10
-
 11
11
-
 12
12
-
 13
13
-
 14
14
-
 15
15
-
 16
16
-
 17
17
-
 18
18
-
 19
19
-
 20
20
-
 21
21
-
 22
22
-
 23
23
-
 24
24
-
 25
25
-
 26
26
-
 27
27
-
 28
28
-
 29
29
-
 30
30
-
 31
31
-
 32
32
-
 33
33
-
 34
34
-
 35
35
-
 36
36
-
 37
37
-
 38
38
-
 39
39
-
 40
40
-
 41
41
-
 42
42
-
 43
43
-
 44
44
-
 45
45
-
 46
46
-
 47
47
-
 48
48
-
 49
49
-
 50
50
-
 51
51
-
 52
52
-
 53
53
-
 54
54
-
 55
55
-
 56
56
-
 57
57
-
 58
58
-
 59
59
-
 60
60
-
 61
61
-
 62
62
-
 63
63
-
 64
64
-
 65
65
-
 66
66
-
 67
67
-
 68
68
-
 69
69
-
 70
70
-
 71
71
-
 72
72
-
 73
73
-
 74
74
-
 75
75
-
 76
76
-
 77
77
-
 78
78
-
 79
79
-
 80
80
-
 81
81
-
 82
82
-
 83
83
-
 84
84
-
 85
85
-
 86
86
-
 87
87
-
 88
88
-
 89
89
-
 90
90
-
 91
91
-
 92
92
-
 93
93
-
 94
94
-
 95
95
-
 96
96
-
 97
97
-
 98
98
-
 99
99
-
 100
100
-
 101
101
-
 102
102
-
 103
103
-
 104
104
-
 105
105
-
 106
106
-
 107
107
-
 108
108
-
 109
109
-
 110
110
-
 111
111
-
 112
112
-
 113
113
-
 114
114
-
 115
115
-
 116
116
-
 117
117
-
 118
118
-
 119
119
-
 120
120
-
 121
121
-
 122
122
-
 123
123
-
 124
124
-
 125
125
-
 126
126
-
 127
127
-
 128
128
-
 129
129
-
 130
130
-
 131
131
-
 132
132
-
 133
133
-
 134
134
-
 135
135
-
 136
136
-
 137
137
-
 138
138
-
 139
139
-
 140
140
-
 141
141
-
 142
142
-
 143
143
-
 144
144
-
 145
145
-
 146
146
-
 147
147
-
 148
148
-
 149
149
-
 150
150
-
 151
151
-
 152
152
-
 153
153
-
 154
154
-
 155
155
-
 156
156
-
 157
157
-
 158
158
-
 159
159
-
 160
160
-
 161
161
-
 162
162
-
 163
163
-
 164
164
-
 165
165
-
 166
166
-
 167
167
-
 168
168
-
 169
169
-
 170
170
-
 171
171
-
 172
172
-
 173
173
-
 174
174
-
 175
175
-
 176
176
-
 177
177
-
 178
178
-
 179
179
-
 180
180
-
 181
181
-
 182
182
-
 183
183
-
 184
184
-
 185
185
-
 186
186
-
 187
187
-
 188
188
-
 189
189
-
 190
190
-
 191
191
-
 192
192
-
 193
193
-
 194
194
-
 195
195
-
 196
196
-
 197
197
-
 198
198
-
 199
199
-
 200
200
-
 201
201
-
 202
202
-
 203
203
-
 204
204
-
 205
205
-
 206
206
-
 207
207
-
 208
208
-
 209
209
-
 210
210
-
 211
211
-
 212
212
-
 213
213
-
 214
214
-
 215
215
-
 216
216
-
 217
217
-
 218
218
-
 219
219
-
 220
220
-
 221
221
-
 222
222
-
 223
223


Epson EasyMP EMP-735 Setup Manual
- Catégorie
- Projecteurs
- Taper
- Setup Manual
dans d''autres langues
- English: Epson EasyMP EMP-735
- Deutsch: Epson EasyMP EMP-735
Documents connexes
-
Epson EMP-1715 Manuel utilisateur
-
-
-
Epson 1715C Mode d'emploi
-
-
Epson EH-TW490 Le manuel du propriétaire
-
Epson ELPMB45 Short-Throw Wall Mount Guide d'installation
-
Epson PowerLite 435W Guide d'installation
-
-
Epson BrightLink 450Wi Guide de démarrage rapide
Autres documents
-
SanDisk Wireless LAN Card Manuel utilisateur
-
Panasonic PTLB20NTE Le manuel du propriétaire
-
-
Lindy Wireless LAN - 11 PCMCIA Card Manuel utilisateur
-
Sanyo POA-WL11 Mode d'emploi
-
Christie DWU1052-Q Manuel utilisateur
-
-
JVC KA-DV300 Manuel utilisateur