Iberital 3 Series Mode d'emploi
- Catégorie
- Cafetières
- Taper
- Mode d'emploi


IBERITAL DE RECAMBIOS, S.A.
Page 1 of 22 manual electr.ce ingles 22-11-2004.doc
TABLE OF CONTENTS
IMPORTANT INDICATIONS
1.- INSTRUCTIONS FOR THE USER (TURN ON)
1.1.- Description
1.2.- Preparation. Turn on
1.3.- Preparing coffee
1.4.- Grinder/dispenser
1.5.- Programming the dose
1.6.- Hot water output
1.7.- Steam output
1.8.- Daily cleaning operations
1.9.- Changing the boiler water
1.10.- Water softener
2.- INSTRUCTIONS FOR THE TECHNICIAN
2.1.- Description of the internal components
2.2.- Water connection
2.3.- Electrical connection
2.4.- Feed unit
2.5.- Boiler
2.5.1.- Spring loaded safety valve
2.5.2.- Pressure eliminating valve
2.5.3.- Optical level control and automatic level device
2.5.4.- Valve unit
2.6.- Motor pump
Appendix A: Product Certifications.
Appendix B: Electric diagrams.
Appendix C: Hydraulic diagrams.
Appendix D: Internal parts.

IBERITAL DE RECAMBIOS, S.A.
Page 2 of 22 manual electr.ce ingles 22-11-2004.doc
IMPORTANT: READ CAREFULLY THE CONTENTS OF THIS
MANUAL AS IT CONTAINS IMPORTANT SAFETY INFORMATION
REGARDING THE INSTALLATION, USE AND MAINTENANCE OF
THE APPLIANCE.
Read this manual before turning on the machine.
1) Keep this manual in a safe place for any eventual future consultation.
2) After unpacking, check that the machine is complete in all its parts.
The packaging (plastic bags, carton packing, nails, etc) must not be left within
reach of children as they are potentially dangerous items.
3) Before connecting the machine make sure that the values rated on the data plate (20)
(located at the left side) correspond to those of the mains supply.
The installation of the appliance must respect the local safety standards in force and must be
carried out, following the manufacturer's instructions, by technically qualified persons
authorized by IBERITAL DE RECAMBIOS, S.A.
The manufacturer accepts no responsibility for situations caused by or arising from the
incorrect installation of this appliance.
The safety of the machine can only be assured when it is correctly grounded to an efficient
earth connection, which has been carried out in conformity with the local safety standards
and regulations in force.
It is important that this fundamental safety measures must be verified, in case of doubt have
the system checked by a technically qualified person.
The manufacturer accepts no liability for damage caused by an incorrect or missing earth
connection.
Check that the current carrying capacity of the system is sufficient to cover the needs of the
maximum power consumption of the appliance, which is indicated in the data plate. In case
of doubt contact a technically qualified person who should also check that the cross section
of the cables used in the system are suitable to the maximum power consumption of the
appliance.
The use of multiple adapters, patch cords and extensions are inadvisable.
Should the situation occur where the use of the above mentioned items is unavoidable then
only use single or multiple adapters and extensions which conform to the local safety
standards and regulations in force and take care not to exceed the maximum current carrying

IBERITAL DE RECAMBIOS, S.A.
Page 3 of 22 manual electr.ce ingles 22-11-2004.doc
capacity marked on the simple adaptors and extensions and maximum power consumption
marked on the multiple adapters.
4) This appliance must be used exclusively for the purpose for which it has been made; this
means for making coffee and supplying hot water and steam for making hot drinks. Any
other use is to be considered improper and therefore dangerous.
The manufacturer accepts no liability for damage caused by or situations arising from the
improper use of the appliance.
5) When using this machine there are several fundamental rules that must be observed such as:
- never touch the machine when you have wet or damp hands or feet.
- never use the machine with bare feet
- do not install the machine in places where cleaning is carried out using
water jets.
- never pull or jerk the power cable when removing it from the main
socket.
- do not allow the machine to be exposed to atmospheric agents (rain,
sand, ice, etc.)
- do not leave the machine in places where the temperature is below
0 ºC without first having emptied the boiler and the hydraulic piping of
water.
- do not allow the machine to be used by children, incapable persons, or
any body who have not read this manual.
- never remove the cover of your machine for repairing or pushing the reset
safety switch. Only Official technicians are authorized by the
manufacturer to remove the cover and reset the machine.
6) Before carrying out any maintenance operations make sure that the machine is disconnected
at the mains either by tripping the circuit breaker.
7) For all cleaning operations follow the indications laid out in this manual.
8) In case any anomalies or irregular running, switch off the machine to attempt personal
maintenance operations. Contact a technically qualified person authorized by IBERITAL.
Any eventual repair work should be carried out by the manufacturer or by an authorized
after sales service center using original spare parts.

IBERITAL DE RECAMBIOS, S.A.
Page 4 of 22 manual electr.ce ingles 22-11-2004.doc
If the above is not respected the safety of the machine could be dangerous.
The connection to the mains must be carried out using a circuit breaker that conform to the
local safety standards and regulations in force.
9) During the installation the machine must be provided with a suitable automatic circuit
breaker which leaves a gap equal to or greater than 3 mm between its contacts.
10) In order to avoid dangerous overheating make sure that the power cord is completely
extended throughout its length.
11) The power cable must not be replaced by the user, if damage to the cable is noticed,
disconnect the machine from the mains and contact a technically qualified person authorized
by IBERITAL.
12) Whenever the machine is not to be used for extended periods make sure it is disconnected
from the mains.
In order to guarantee the continued efficiency of the machine and its correct functioning it is
indispensable that the manufacturer's instructions be followed and the periodic maintenance be
carried out by professionally qualified person.
In particular it is recommended that the safety devices of the machine be periodically
checked.
Do not allow naked hands or other parts of the body to come close to the coffee
dispensing spout or the hot water or steam jets.
The water and steam escaping from the jets is extremely hot and cause burns.
The water jets, steam jets and the filter bowl are extremely hot during normal working
conditions. They must therefore be used with care and only gripped by the handless.
Make sure that the coffee cups are free of water before placing them on the cup
warning shelf.
Only crockery which is specific to this machine should be placed on the cup warning
shelf. In case of doubt, contact your sales center.
The placing of any other objects is therefore to be considered improper and dangerous.

IBERITAL DE RECAMBIOS, S.A.
Page 5 of 22 manual electr.ce ingles 22-11-2004.doc
TECHNICAL SPECIFICATIONS:
* Electronic volume counter dosage (four different doses + Continuous).
* Automatic water filled up of the boiler.
* Motor and rotary pump pressure.
* Double scale manometer for the boiler and pump pressure.
* Electronic temperature control of the heating element.
* Two steams outlet pipes in stainless steel.
* Programmable hot water outlet with CPU's buttons.
* Heating element 1800 W 3800 W 5000 W
* Easy location of the boiler drained-out tap.
* Independent electronic CPU's for each group.
* Starter relay 16/25 A.
DIMENSIONS
Models Wide High Long
1 Group 570 mm 455 mm 430 mm
2 Groups 570 mm 455 mm 755 mm
3 Groups 570 mm 455 mm 925 mm
Important: Specifications are subject to change without notice. Contact the nearest
IBERITAL representative for any question related to the new specifications.

IBERITAL DE RECAMBIOS, S.A.
Page 6 of 22 manual electr.ce ingles 22-11-2004.doc
1.- INSTRUCTIONS FOR THE USER (TURN ON)
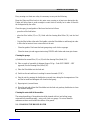
1.1.- DESCRIPTION
1) Coffee feed control buttons CPU
2) Feed button, one expresso coffee
3) Feed button, two expresso coffees
4) Non-stop coffee feed button
5) Feed button, one large coffee
6) Feed button, two large coffees
8A) Steam valve control
8B) Steam lever control
9A) Hot water push control
10) Hot water jet
11) Boiler water level indicator
11A) Element working. Green light.
12) Steam jet
13) Boiler manual filling button
14) Water stopcock (Not included. Must
be installed by an official city
plumber).
15) Pump pressure gauge
16) Boiler pressure gauge
17) Mains switch (Not included. Must be
installed by an official city
thechnician).
18) Three way power switch: OFF,
1=(ON) (Automatic water fill-up ON).
2=Control (heating element ON)
18A) ON/OFF red light.
19) Trip tray
20) Data plate
21) Detachable modular lateral panels
22) Filter one coffee
23) Filter holder, one coffee
24) Filter two coffees
25) Filter holder, two coffees
26) Cleaning filter (blind)
27) CPU lock (old machines only)
28) Boiler drain-out tap
29) Water valve control
ANNA MODEL IBERITAL MODEL
MARLINC MODEL

IBERITAL DE RECAMBIOS, S.A.
Page 7 of 22 manual electr.ce ingles 22-11-2004.doc
1.2.- PREPARATION - TURN ON
a) Turn on the water stopcock (14) at the mains.
b) Switch on the power at the mains (17).
c) Turn the switch (18) to the position 1 and wait for the automatic water level control
to finish filling up the boiler.
Only for 3 groups espresso machine: In case the automatic fill up control would stop
and the lights of the push buttons would flicker, turn the switch (18) off and
immediately turn the switch (18) on to the position 1 another time, and wait for the
automatic water
control to finish filling up the boiler.
d) Turn the switch (18) to the position 2.
Wait for the operating pressure, indicated on the green path of the pressure gauge (16). The
green light (11A) will turn off .
The machine is heated by electricity.
1.3.- PREPARING COFFEE
Fill the filter (22) or (24) with ground coffee and flatten down using the press on
the grinder/dispenser (not included).
Make sure that the border of the filter is clean. Attach the filter holder (23) or (25)
to the group feed unit and make sure that it fits tightly. Press the coffee feed button.
Suggestions for making a good coffee:
The machine should work in tandem with a coffee grinder which should be used to fill up the
dispenser when required and be able to adapt itself to the type of coffee to be ground.
Do not keep ground coffee for long periods. Try and use all the ground coffee before closing
time. The correct feed should take between twenty-five and thirty seconds for either one or
two coffees.
Always use fresh coffee. Do not keep spare supplies for more than fifteen days. Store the
coffee in tightly sealed containers and in a fresh and dry location.
Where possible do not buy pre-ground coffee as it deteriorates rapidly. If pre-ground coffee is
the only available form then buy it in small quantities and vacuum packet, only open the
packet at the moment when it is to be used.
1.4.- COFFEE GRINDER / DISPENSER (not included).
The cutting teeth should always be kept well sharpened. The grinding is set correctly when
the coffee feed is carried out with in twenty five to thirty seconds.
When the teeth are blunt the output of the grinder will fall slightly. To replace the cutting
teeth call the service center.

IBERITAL DE RECAMBIOS, S.A.
Page 8 of 22 manual electr.ce ingles 22-11-2004.doc
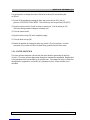
1.5.- PROGRAMING THE DOSE
TOUCH PATH FUNCTIONS
I. TOUCH PATH PERFORMANCE
DOSING TOUCH PATH HOT WATER SWITCH
Important: The two touch path have electric signal with any of the two positions (1 and 2) of
the On-Off switch.
In the position 1, the automatic fill up is working, but the touch path cannot make any coffee
(erogation).
1 SHORT COFFEE
1 LONG COFFEE
2 SHORT COFFEES
2 LONG COFFEES
CONTINUOUS

IBERITAL DE RECAMBIOS, S.A.
Page 9 of 22 manual electr.ce ingles 22-11-2004.doc
In the position 2, it is possible to do coffees (erogations). But it is recommended to begin
doing coffees (erogations) when the machine is warm.
II. ADJUSTING THE TOUCH PATH DOSING.
Press the continuous button during 5 seconds and the LEDs will turn on in the five erogation
selections.
In this moment, the adjustment process of the 4 selections can begin:
Press 1 short coffee button, and when you will have the dosing desired press another time the
1 short coffee button. Now, you can continue with all the other selections. At the end, you
have to wait until the continuous LED will go out.

IBERITAL DE RECAMBIOS, S.A.
Page 10 of 22 manual electr.ce ingles 22-11-2004.doc
In the selections already adjusted, when you are programming any other selections, the LEDs
are gone out. At any time, you can adjust another time one selection already adjusted.
If during the adjustment of a dosing any of the LEDs are winking, the adjustment will not be
memorized. Please check the volumetric counter, in case there would be any dust from the
water supply.
III. ADJUSTMENT OF THE HOT WATER MIXTURE AND
DOSING
1- Press the continuous button during 5 seconds and the LEDs will turn on in the five
erogation selections.

IBERITAL DE RECAMBIOS, S.A.
Page 11 of 22 manual electr.ce ingles 22-11-2004.doc
2- Press the hot water switch .
3- Press another time the hot water button
4- Press the continuous button
IV. ADJUSTMENT OF THE ELECTRONIC PRE-INFUSION
The pre-infusion can be enable and disable, as follows:
To enable this function:
1) Turn Off (position 0) the On-Off switch
2) Press the 1 short coffee button and at the same time turn On the On-Off switch (to
position 1 or 2).
3) The 1 short coffee LED will light
4) Stop pressing the 1 short coffee button
5) Turn Off (position 0) the On-Off switch
6) Finally, turn On the On-Off switch to the position 2 (normal working).
To disable this function:
1) Turn Off (position 0) the On-Off switch
2) Press the 1 long coffee button and at the same time turn On the On-Off switch (to
position 1 or 2)
3) The 1 long coffee LED will light
4) Stop pressing the 1 long coffee button
5) Turn Off (position 0) the On-Off switch
6) Finally, turn On the On-Off switch to the position 2 (normal working)

IBERITAL DE RECAMBIOS, S.A.
Page 12 of 22 manual electr.ce ingles 22-11-2004.doc
V. WASHING PROGRAMME
This is procedure cleans of coffee and dust all the pipes and parts in the group.
1) Put a blind filter in the filterholder of the machine with a special cleaning product.
2) The process begins with several erogations and drain out (7 times). Cleaning all the coffee
residues and dust.
1) When the process has finished, take out the blind filter and put a standard one.
2) Before making coffees another time: Let pass water through the group (for example,
pushing the continuous button until there will not be any cleaning material residual).
VI. WASHING PROGRAMME CYCLE :
1) Turn Off (position 0) the On-Off switch.
2) Press the 2 long coffees button and at the same time turn the On-Off switch to Position
2.
Then, automatically the washing cycle begins. You can stop the washing process at any time
turning Off (position 0) the On-Off switch.
VII. ALARM-WARNING SIGNALS
• Boiler fill up exceeding time
The probe warning signal starts after 1 minute without being in contact with water. The alarm
signal is: winking all the touch path LEDs.
This alarm is dued to a leak of water in the machine or the touch path is not sending any
signal to the auto fill up system.

IBERITAL DE RECAMBIOS, S.A.
Page 13 of 22 manual electr.ce ingles 22-11-2004.doc
Important: when you are doing the water fill up of the boiler process for the first time and this
alarm appears. Then, turn the On-Off switch Off (position 0) and following turn the On-Off
switch On (position 1) another time. (The fill up process takes more than 1 minute).
• Failure in the volumetric counter (5 seconds)
The LED of the erogation being used (1 short coffee, 2 long coffee ...) is winking due to some
failure in the volumetric counter. At the same time, this erogation does not stop.
• Failure in the volumetric counter (erogation)
This alarm appears when the erogation time is too long. At the same time, this problem
appears when the coffee is ground too fine or too many grams.
VIII. 3
RD
RELAY SOFTWARE PROGRAM.
Programming the 3rd relay as automatic water outlet
Auto water outlet (hot and cold):
Please contact the manufacturer of the machine to do this option.

IBERITAL DE RECAMBIOS, S.A.
Page 14 of 22 manual electr.ce ingles 22-11-2004.doc
Programming the 3rd relay as safety device (auto fill up).
Programming the 3
rd
relay in the right touch path, you will have a new safety protection for
the heating element: when there is no water covering the probe, there is no signal coming to
the display nor from the display to the heating element. At the same time, if there is no water
covering the probe for more than 45 seconds, automatically the signal to the display will be
cut and from the display to the heating element too. All this process avoids working the
heating element without water.
In order to program this safety device:
1) Turn Off (position 0) the On-Off switch
2) Press the 1 long coffee, the hot water button and turn On (position 2) the On-Off
switch at the same time.
3) The Leds of the 1 long coffee and 2 short coffees will light.
4) Stop pressing the buttons and turn Off (position 0) the On-Off switch.
5) Turn On (position 2) the On-Off switch.
In case there would be no esternal push button (hot water button): turn the On-Off switch to
the Off position (Position 0), and set a link in the left side touch path. Then, turn the On-Off
switch to position 1 or 2.

IBERITAL DE RECAMBIOS, S.A.
Page 15 of 22 manual electr.ce ingles 22-11-2004.doc
When the programing has finished turn the On-Off switch to the Off (position 0) and get out
the link
IX. PROGRAM OF THE CONTINUOUS BUTTON AS HOT WATER
OR CONTINUOUS. (FOR IBERITAL MODELS 2 gr and 3 gr only)
Programming the continuous button (
*
) as Hot Water button
1) Turn Off (position 0) the On-Off switch.
2) Press the 2 short coffees button, the hot water button and turn On (position 2) the On-
Off switch at the same time.
3) The Leds of the 2 short coffees and 2 long coffees will light.
4) Stop pressing the buttons and turn Off (position 0) the On-Off switch
5) Turn On (position 2) the On-Off switch
Programming the 5
th
button (
*
) as Continuous
The 5th button function (*) will be continuous erogation and the external hot water button, as
hot water button.
1) Turn Off (position 0) the On-Off switch.
2) Press the 2 long coffees button, the hot water button and turn On (position 2) the On-
Off switch at the same time
3) The Leds of the 2 long coffees and the continuous will light.

IBERITAL DE RECAMBIOS, S.A.
Page 16 of 22 manual electr.ce ingles 22-11-2004.doc
4) Stop pressing the buttons and turn Off (position 0) the On-Off switch
5) Turn On (position 2) the On-Off switch
1.6.- HOT WATER OUTPUT
Place a cup or other receptacle under the hot water jet (10). Push the button (9) to start the hot
water feed, release this button to stop it.
1.7.- STEAM OUTPUT
Point the steam jet (12) towards the drip tray (19).
Turn the control (8), to discharge the condensation, until steam escapes from the opening.
Place the steam jet (12) into the recipient containing the liquid which is to be heated. Turn the
control (8) to release the steam. To obtain a frothy cappuccino keep the jet level with the top
of the cold milk, this will create froth.
When the liquid has reached the desired temperature, stop the steam feed by turning the
control (8) on the contrary.
Slide the recipient out from under the steam jet (12). Point the stream jet (12) towards the drip
tray (19).
Briefly turn the control (8) to the right, to discharge any residue which has remained in the
steam jet (12). Clean the outside of the steam jet (12) with a damp clothe or sponge.
1.8.- DAILY CLEANING OPERATIONS
Cleaning the spray filters

IBERITAL DE RECAMBIOS, S.A.
Page 17 of 22 manual electr.ce ingles 22-11-2004.doc
Every evening or at least once a day it is necessary to carry out the following:
Rinse the filters and filter bowls in hot water every evening or at least once during the day.
Further still allow them to soak overnight in water which is initially hot in order to dissolve
the fat deposited by the coffee.
Clean the spray jets and gaskets of the lower feed unit as follows:
- press the coffee feed button.
- place the filter holder (23) or (25), fitted with the cleaning blind filter (26), into the feed
unit.
- Grip the filter holder at the end of the handle; rotate the filter holder to and through in order
to allow the hot water to have a rinse effect on the unit.
- Clean the gasket of the lower feed unit group using a soft cloth or a sponge.
- Clean the steam jets and cappuccinator using URNEX milk frother and steam jets cleaner.
Cleaning the groups
a) Substitute the normal filter (22) or (24) with the cleaning filter (blind) (26).
b) Place a couple of spoonfuls of detergent (bags of 20 gr. - Code 3852 URNEX – NSF
approved) into the cleaning filter (blind) (26).
c) Place the filter holder into the feed unit.
d) Switch on the unit and leave it working for several seconds (15-20").
e) Stop the unit by pressing the feed button a second time; during the decompression of the
unit the hot water and detergent will clean the feed group.
f) Repeat point (e) several times.
g) Rinse the unit and without the filter holder into the feed unit push any feed button to clean
any residual detergent.
Cleaning the outer shell of the machine
The external panelling of the machine should be cleaned with hot (not boiling) soapy
water and then rinsed thoroughly, using a soft cloth or a sponge. Do not use abrasive
substances as these could scratch the surface of the panels.
1.9.- CHANGING THE BOILER WATER

IBERITAL DE RECAMBIOS, S.A.
Page 18 of 22 manual electr.ce ingles 22-11-2004.doc
It is good practice to change the water of the boiler at the end of each working day
as follows:
1) Switch off the machine by turning the three way power switch (18) to the off
position. (ONE GROUP MACHINE: This switch only has two positions [ON-OFF])
2) Open the steam controls (8) until no steam is coming out. (Use the steam jets (12)
with care, during normal working are extremely hot).
3) Close the steam control.
4) Open the drain-out tap (28) until completely empty.
5) Close the drain-out tap (28).
6) Restart the machine by turning the three-way switch (18) to the position 1 and wait
automatic fill up control will have finished filling up the boiler with fresh water.
1.10.- WATER SOFTENER
The water softener eliminates calcium from the water therefore preventing the build up
of inlays. The water softener degenerates through use and must be regenerated. Regeneration
is the procedure which returns them to the original state. The presence of inlays in the boiler,
through lack of regeneration, will nullify all guarantees in force. (Water softener is not
included).

IBERITAL DE RECAMBIOS, S.A.
Page 19 of 22 manual electr.ce ingles 22-11-2004.doc
2.- INSTRUCTIONS FOR THE TECHNICIAN
CAUTION: When the cover of the machine is removed in order to repair or push the
reset button, remember to seal another time the two side panels with NSF silicone.
2.1.- DESCRIPTION OF THE INTERNAL COMPONENTS
29) Pump (250 liters/hour)
30) Boiler
1 group 6 liters
2 groups 14 liters
3 groups 20 liters
31) Spring loaded safety valve
32) Pressure eliminating valve (Empty valve)
33) Boiler heating elements
34) Pressure switch
35) Expansion valve
61) Thermostat for the electronic temperature control of the heating element: this thermostat
is to control the temperature inside the boiler. When this temperature is over the correct
level the machine turns off (stop). In order to turn on the machine push the reset button
located in this thermostat (right side of the machine).
62) Boiler water level probe
2.2.- WATER CONNECTION
IMPORTANT: This Equipment is to be installed to comply with the applicable Federal,
State or Local Plumbing codes having jurisdiction.
La page est en cours de chargement...
La page est en cours de chargement...
La page est en cours de chargement...
La page est en cours de chargement...
La page est en cours de chargement...
La page est en cours de chargement...
La page est en cours de chargement...
La page est en cours de chargement...
La page est en cours de chargement...
La page est en cours de chargement...
La page est en cours de chargement...
La page est en cours de chargement...
La page est en cours de chargement...
La page est en cours de chargement...
La page est en cours de chargement...
La page est en cours de chargement...
La page est en cours de chargement...
La page est en cours de chargement...
-
 1
1
-
 2
2
-
 3
3
-
 4
4
-
 5
5
-
 6
6
-
 7
7
-
 8
8
-
 9
9
-
 10
10
-
 11
11
-
 12
12
-
 13
13
-
 14
14
-
 15
15
-
 16
16
-
 17
17
-
 18
18
-
 19
19
-
 20
20
-
 21
21
-
 22
22
-
 23
23
-
 24
24
-
 25
25
-
 26
26
-
 27
27
-
 28
28
-
 29
29
-
 30
30
-
 31
31
-
 32
32
-
 33
33
-
 34
34
-
 35
35
-
 36
36
-
 37
37
-
 38
38


Iberital 3 Series Mode d'emploi
- Catégorie
- Cafetières
- Taper
- Mode d'emploi
dans d''autres langues
Autres documents
-
Expobar New Elegance Manuel utilisateur
-
-
-
Rancilio CLASSE 11 Manuel utilisateur
-
Ascaso BIG DREAM T Manuel utilisateur
-
-
-
-