BIXOLON XT2-40 Manuel utilisateur
- Catégorie
- Imprimantes d'étiquettes
- Taper
- Manuel utilisateur

User’s Manual
XT2-40 Series
Industrial Label Printer
Ver. 1.00
http://www.bixolon.com

Ver. 1.00
- 2 -
XT2-40 Series
Introduction
XT2-40 series printers have been designed to be connected to various types of electronic
devices such as computer peripheral devices.
※
The main features of the printer are as follows
1. Industrial Label Printer
2. Thermal Transfer / Direct Thermal Printing
3. XT2-40: Max 152mm/s(6ips) printing speed
XT2-43: Max 100mm/s(4ips) printing speed
4. Print Width/Length: 108mm/3,999mm(XT2-40), 105.7mm/2,1859mm(XT2-43),
5. Media Width/Outer Diameter/Inner Diameter/Thickness: 25.4~118mm/203mm /
1~3inch /0.076~0.25mm
6. Ribbon Width/Length/Type: Max 110mm/450m/Wax, Wax Resin, Resin, Outside, Inside
7. Movable Transmissive Sensor, Movable Reflective Sensor
8. 128MByte Flash/32MByte SDRAM
9. Color TFT LCD
10. Option: Auto Cutter, Peeler
11. Support Interface: USB, Serial, Ethernet
It is advisable to read the contents of this manual carefully before using the printer for the first
time.
※
Use only authorized supplies that can be trusted!
- We are not responsible for quality and service for damage caused by the use of
unauthorized products (or recycled ones).

Ver. 1.00
- 3 -
XT2-40 Series
Table of Contents
1. Content Confirmation ........................................................................................................ 7
2. Product Part Names ........................................................................................................... 8
2-1 Printer Part Names .......................................................................................................... 8
2-2 Major Control Part Names ............................................................................................. 11
2-2-1 Control Panel .......................................................................................................... 11
2-2-2 Detailed Descriptions .............................................................................................. 12
3. Installation & Usage ......................................................................................................... 14
3-1 Printer Installation Placings ........................................................................................... 14
3-2 Power Connection ......................................................................................................... 15
3-3 Interface ........................................................................................................................ 16
3-3-1 Standard Interface .................................................................................................. 17
3-4 Media Installation .......................................................................................................... 18
3-4-1 Media Installation Method of Standard Model ......................................................... 18
3-4-2 Media Installation Method for Auto Cutter (optional) Model..................................... 21
3-5 Ribbon Installation ......................................................................................................... 22
3-5-1 Ribbon Type ............................................................................................................ 22
3-5-2 Ribbon Installation Method ...................................................................................... 23
3-5-3 Ribbon Remove Method ......................................................................................... 24
3-5-4 Adjusting ribbon tension Method ............................................................................. 25
3-6 Print Head Load Control Method ................................................................................... 26
3-7 Ribbon Guide Control Method ....................................................................................... 27
4. Printer Setting ................................................................................................................... 32
4-1 Menu Composition ........................................................................................................ 32
4-2 Menu Select Method ..................................................................................................... 34
4-3 Setting Confirm Method................................................................................................. 36
4-4 Exit from current page to ready status .......................................................................... 38
4-5 Icon Definition ............................................................................................................... 40
4-6 Setting Menu Explanation ............................................................................................. 41
4-6-1 Printer Setting ......................................................................................................... 41
4-6-2 Label Setting ........................................................................................................... 43
4-6-3 Devices ................................................................................................................... 44
4-6-4 Printer Control ......................................................................................................... 46
4-7 Label size calibration and Self Test Page ...................................................................... 47
5. Maintenance ...................................................................................................................... 48
5-1 Cleaning Printer ............................................................................................................ 48
5-2 Cleaning Print Head ...................................................................................................... 49
5-3 Cleaning Platen Roller................................................................................................... 50
5-4 Cleaning Auto Cutter (optional) ..................................................................................... 51
5-5 Replacing Platen Roller ................................................................................................. 52
6. Printer Specifications ...................................................................................................... 53

Ver. 1.00
- 4 -
XT2-40 Series
Manual Information
This user’s guide contains basic information for product usage as well as for emergency
measures that may be required.
Safety Information
Warning: Warnings must be heeded carefully in order to prevent serious
physical harm.
Caution: Cautions must be heeded in order to prevent minor injuries, equipment
damage, or data loss.
Symbol Information
AC (Alternating current)
DC (Direct current)
Note, Caution, Warning
USB

Ver. 1.00
- 5 -
XT2-40 Series
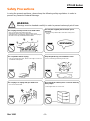
Safety Precautions
In using the present appliance, please keep the following safety regulations in order to
prevent any hazard or material damage.
WARNING
Warnings must be heeded carefully in order to prevent serious physical harm.
Do not plug several products in one multi-outlet.
• This can provoke over-heating and a fire.
• If the plug is wet or dirty, dry or wipe it before usage.
• If the plug does not fit perfectly with the outlet, do not plug in.
• Be sure to use only standardized multi-outlets.
Use only the supplied parts for AC/DC power
enclosed.
• Do not use any other AC/DC enclosed as it may incur
danger.
Do not pull the cable to unplug.
• This can damage the cable, which is the origin of a fire or a
breakdown of the printer.
Keep the plastic bag out of children’s reach.
• If not, a child may put the bag on his head.
Do not plug in or unplug with your hands wet.
• You can be electrocuted.
Do not bend the cable by force or leave it under any
heavy object.
• A damaged cable can cause a fire.

Ver. 1.00
- 6 -
XT2-40 Series
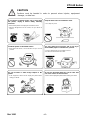
CAUTION
Cautions must be heeded in order to prevent minor injuries, equipment
damage, or data loss.
Do not use the printer when it is out of order. This
can cause a fire or an electrocution.
• Switch off and unplug the printer before calling your dealer.
Do not let water or other foreign objects in the
printer.
•
If this happened, switch off and unplug the printer before
calling your dealer.
Use only approved accessories and do not try to
disassemble, repair or remodel it for yourself.
• Call your dealer when you need these services.
• Do not touch the blade of auto cutter.
Install the printer on the stable surface.
•
If the printer falls down, it can be broken and you can hurt
yourself.
Keep the desiccant out of children’s reach.
• If not, they may eat it.
If you observe a strange smoke, odor or noise from
the printer, unplug it
before taking following
measures.
• Switch off the printer and unplug the set from the mains.
•
After the disappearance of the smoke, call your dealer to
repair it.
PRINTER
DEALER

Ver. 1.00
- 7 -
XT2-40 Series
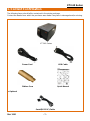
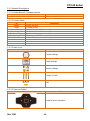
1. Content Confirmation
The following items should all be contained in the printer package.
Contact the dealer from which the purchase was made if any item is damaged and/or missing.
- Product
XT2-40 Series
Power Cord USB Cable
Ribbon Core Quick Manual
-
Optional
Serial(RS-232C) Cable

Ver. 1.00
- 8 -
XT2-40 Series
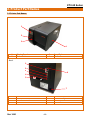
2. Product Part Names
2-1 Printer Part Names
- Front
1
Display Panel
3
Feed Button
2
Power Button
4
Media Cover
- Back
1
Ethernet Port
5
Externel Paper Insert
2
Serial(RS-232C) Port
6
Auto Sensing Button
3
USB Port
7
Power Jack
4
USB Host Port
1
4
1
3
2
4
5
2
6
7
3

Ver. 1.00
- 9 -
XT2-40 Series
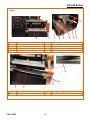
- Internal
1
Print Head Pressure knob
6
Ribbon Supply Hub
2
Print Head Lever
7
Label Supply Hub
3
Front Lower Panel
8
Label Roll Guide
4
Ribbon Return Hub
9
Label Roll Guide Fixing Knob
5
Label Guide
1
Platen Roller
3
Label Sensor Guide
2
Print Head
4
Black Mark & Notch Sensor
1
2
5
6
4
7
8
9
1
2
3
4
3

Ver. 1.00
- 10 -
XT2-40 Series
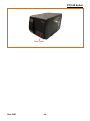
- Printer Option
Auto Cutter

Ver. 1.00
- 11 -
XT2-40 Series
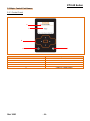
2-2 Major Control Part Names
2-2-1 Control Panel
Number
Explanation
1
Model Name & Firmware version
2
Printer status
3
Direction button
4
Power button
5
Select & Feed button
1
2
3
4
5

Ver. 1.00
- 12 -
XT2-40 Series
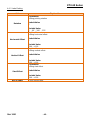
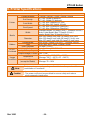
2-2-2 Detailed Descriptions
2-2-2-1 Model Name & Firmware version
List
Explanation
XT2-40 V2.RB0
Model Name & Firmware version
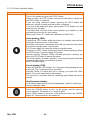
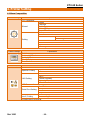
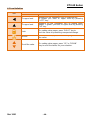
2-2-2-2 Printer Status
List
Explanation
Ready
Ready for print
Pause
Printing pause
Check Ribbon
Ribbon is not installed correctly
Check Media
Media is not installed correctly
Printhead Open
Print head is open
File System Full
The memory is full.
Duplicated Name
A file of the same name already exists
File Not Found
Unable to find file
TPH Over Heat
Print head has reached the maximum temperature
Check Cutter
Media is stuck in the auto cutter blade
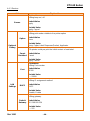
2-2-2-3 Main Icons
List
Explanation
Printer settings
Label settings
Device settings
Printer Control
Exit
2-2-2-4 Direction Button
List
Explanation
Used for menu selection

Ver. 1.00
- 13 -
XT2-40 Series
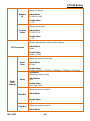
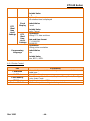
2-2-2-5 Printer Operation Button
List
Explanation
FEED
Turn on the printer and press the FEED button.
When you press the FEED button, the printer will advance media until
the FEED button is released.
If you are using continuous labels, pressing the FEED button will
advance a length of media until the button is released.
If you are using media with gaps, pressing the FEED button once will
advance only one label.
If the label does not stop at the correct position, you need to run the
auto-detection function for your media,
please see Section 4-7 Label size calibration and Self-Test.
Pause printing_FEED
Pressing the FEED button while the printer is in standby mode will set
the printer to pause mode. In this mode,
the printer can receive commands, but it will only process them when
it is reset to standby mode. Pressing the
FEED button again will reset the printer to standby mode.
Pressing the FEED button during printing will interrupt printing. When
the FEED button is pressed again, the printer
resumes printing. Example: While a 10-label print job is r
unning, you
press the FEED button to pause the printer.
Two of the labels have been printed. To resume printing and print the
remaining eight labels, you will need to press
the FEED button again.
Cancel printing_FEED
Press and hold the FEED button for
3 seconds during printing cancels
a print job. The current print job is cancelled.
Example: While a 10-
label print job is running, you press the FEED
button. Two of the labels have been printed.
The print job is cancelled and the remaining eight labels w
ill not be
printed
Used for menu selection
On the Menu page and the Value Settings page, used for selecting a
menu or setting a value.
POWER Button
Press the POWER button to turn on the printer, and the start up
screen appears. The printer is on “ready to print”
status.
When printer is turned on, hold and press down the POWER
button for 3 second will turn the printer off.

Ver. 1.00
- 14 -
XT2-40 Series
3. Installation & Usage
3-1 Printer Installation Placings
• Install the printer in a location that meets the following conditions.
- Allow sufficient space around the printer for proper ventilation.
- Do not place objects close to the back or bottom of the printer, which may hinder the air
circulation.
- Install the printer on a flat and level surface.
- Avoid humid environment.

Ver. 1.00
- 15 -
XT2-40 Series
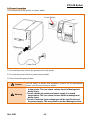
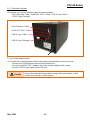
3-2 Power Connection
• Connect power to the printer as shown below.
1) Connect the power cord to the power port on the printer.
2) Connect the power cord to a power source/outlet.
3) Press the printer power button.
Caution
For the safety of people and equipment, please use the appropriate
power cord for your country or region.
Warning
- Be sure to turn off the printer before connecting the power cord
to the printer. This can cause serious electrical damage and
bodily injury.
- Do not operate the printer and power supply in a humid
environment. This can cause serious electrical damage and
bodily injury.
- Do not connect an input voltage beyond the specifications of
the power supply. This may result in product damage and fire.
Power
Button
Power Cord

Ver. 1.00
- 16 -
XT2-40 Series
3-3 Interface
Note
Shielded cables must be used to prevent radiation and reception of
electrical noise. Use the shortest
possible communication cable to
minimize the detection of electrical noise in the cable.
- Serial(RS-232C) Cable (1.8m or less recommended)
- USB B-Type Cable (1.8m or less recommended)
- LAN(Ethernet) Cable (3m or less, CAT-5 or higher UTP Cable)
Caution
- Connecting unshielded communication cables is in violation of EMC
standards. Use the cable approved by us.
- Do not bundle the communication cable with objects that may cause
electrical noise and interference. The printer may be damaged.
- Be aware that the product's electronic components may be damaged
due to discharging of electrostatic energy that accumulates on the
surface of the body or other objects.
Warning
After turning off the power switch of printer, connect and
disconnect the communication cable.
This can cause serious electrical damage and bodily injury.

Ver. 1.00
- 17 -
XT2-40 Series
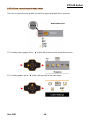
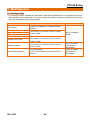
3-3-1 Standard Interface
This printer can use the following types of communication.
- LAN (Ethernet) Cable / Serial (RS-232C) Cable / USB B-Type Cable /
USB A-Type (Storage)
1) Turn off the power button.
2) Connect the communication cable to the printer communication port to be used.
- Connect the LAN(Ethernet) cable to the Ethernet port.
- Connect Serial(RS-232C) cable to the serial port and tighten both screws.
- Connect USB B-Type cable to the USB port.
Caution
Be aware that the product's electronic components may be damaged
due to discharging of electrostatic energy that accumulates on the
surface of the body or other objects.
LAN (Ethernet) Cable
Serial (RS
-
232C) Cable
USB B
-Type Cable
USB
A-Type (Storage)

Ver. 1.00
- 18 -
XT2-40 Series
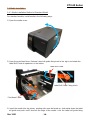
3-4 Media Installation
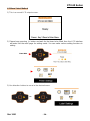
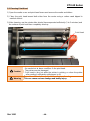
3-4-1 Media Installation Method of Standard Model
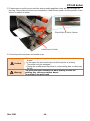
For standard models, install media in the following ways:
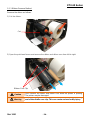
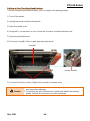
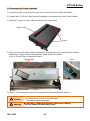
1) Open the media cover.
2) Open the print head lever. Release Label roll guide fixing knob to the right, and rotate the
Label Roll Guide to upward as in the below.
3) Insert the media into the printer, printing side must be faced up. And rotate down the label
roll guide and push until it touches the edge of the media. Lock the Label roll guide fixing
Print Head Lever
Label Roll Guide
Label Roll Guide Fixing Knob

Ver. 1.00
- 19 -
XT2-40 Series
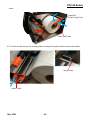
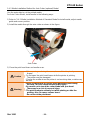
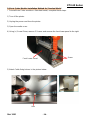
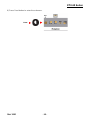
knob.
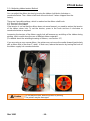
4) Feed the media through the media guide and adjust the guide until it touches the media.
Label
Roll
Guide Fixing Knob
Label Roll Guide
Label Guide
Fixing Guide

Ver. 1.00
- 20 -
XT2-40 Series
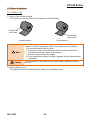
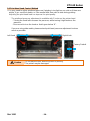
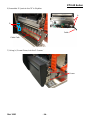
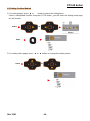
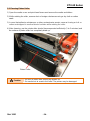
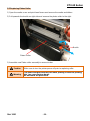
5) Please make sure the sensor position where media gap/black mark will pass through for
sensing. The position of sensor can be adjust by Label Sensor guide, and the position of the
sensor is marked in white.
6) Close the print head lever and media cover.
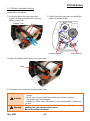
Caution
- When opening or closing the cover, be careful not to pinch your
fingers.
- Do not open the print head levers while the printer is printing.
The printer may be damaged.
- Change the media when the printer is not receiving data, or data may
be lost.
Warning
The print head gets extremly hot while printing or after the
printing, this can cause serious burns.
Do not touch the print head.
Label
Sensor Guide
Black Mark & Notch Sensor
La page est en cours de chargement...
La page est en cours de chargement...
La page est en cours de chargement...
La page est en cours de chargement...
La page est en cours de chargement...
La page est en cours de chargement...
La page est en cours de chargement...
La page est en cours de chargement...
La page est en cours de chargement...
La page est en cours de chargement...
La page est en cours de chargement...
La page est en cours de chargement...
La page est en cours de chargement...
La page est en cours de chargement...
La page est en cours de chargement...
La page est en cours de chargement...
La page est en cours de chargement...
La page est en cours de chargement...
La page est en cours de chargement...
La page est en cours de chargement...
La page est en cours de chargement...
La page est en cours de chargement...
La page est en cours de chargement...
La page est en cours de chargement...
La page est en cours de chargement...
La page est en cours de chargement...
La page est en cours de chargement...
La page est en cours de chargement...
La page est en cours de chargement...
La page est en cours de chargement...
La page est en cours de chargement...
La page est en cours de chargement...
La page est en cours de chargement...
La page est en cours de chargement...
La page est en cours de chargement...
La page est en cours de chargement...
La page est en cours de chargement...
-
 1
1
-
 2
2
-
 3
3
-
 4
4
-
 5
5
-
 6
6
-
 7
7
-
 8
8
-
 9
9
-
 10
10
-
 11
11
-
 12
12
-
 13
13
-
 14
14
-
 15
15
-
 16
16
-
 17
17
-
 18
18
-
 19
19
-
 20
20
-
 21
21
-
 22
22
-
 23
23
-
 24
24
-
 25
25
-
 26
26
-
 27
27
-
 28
28
-
 29
29
-
 30
30
-
 31
31
-
 32
32
-
 33
33
-
 34
34
-
 35
35
-
 36
36
-
 37
37
-
 38
38
-
 39
39
-
 40
40
-
 41
41
-
 42
42
-
 43
43
-
 44
44
-
 45
45
-
 46
46
-
 47
47
-
 48
48
-
 49
49
-
 50
50
-
 51
51
-
 52
52
-
 53
53
-
 54
54
-
 55
55
-
 56
56
-
 57
57


BIXOLON XT2-40 Manuel utilisateur
- Catégorie
- Imprimantes d'étiquettes
- Taper
- Manuel utilisateur
dans d''autres langues
- English: BIXOLON XT2-40 User manual
Documents connexes
Autres documents
-
HellermannTyton Thermal Transfer Printer TT4000+ Le manuel du propriétaire
-
OKI LD630Dn Mode d'emploi
-
OKI LD630D Manuel utilisateur
-
Citizen CLP-631 Guide de démarrage rapide
-
Star Micronics SP500 Series Manuel utilisateur
-
-
Toshiba B-682-QP Manuel utilisateur
-
-
-
Star Micronics SP500 Manuel utilisateur