Bosch HBN742AUC/01 Le manuel du propriétaire
- Taper
- Le manuel du propriétaire

BOSCH
Use & Care Manual
For
Single and Double Built-in Ovens
Models
HBL 73../74../75../76.. andHBN 74../75../76..
© 2002 BSH Home Appliances Corp.

Bosch Oven Introduction
A Special Message
to Our Customers
Dear Bosch Oven Owner:
Thank you and congratulations on the purchase of your Bosch oven.
Whether you are an expert chef or an aspiring cool<, we know that
your new oven will exceed your expectations. Decades of knowledge
and experience are built into this oven making it among the highest
quality, most versatile and most efficient available.
We ask that you read this manual thoroughly before using your new
oven. Please pay particular attention to the Safety Precautions printed
at the front of this book and the numerous safety hints and cautions
placed throughout. Also, be sure to familiarize yourself with the proper
operation of the oven and its cleaning and maintenance procedures.
Adherence to these instructions and procedures will assure that you
realize the full potential of your new Bosch oven as well as maintain it
for years of dependable use.
Thank you and good cooking,
BSH Home Appliances

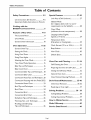
Table of Contents
Table of Contents
Safety Precautions ........................... 2-3
Les Instructions De S_curit_ ................. 4-5
Important (Safety Instructions in French)
Cooking with the
BOSCH Convection Oven .................. 6
Features of Your Oven ........................ 7- I 0
The Control Panel ....................................... 8
Oven Modes .................................................. 9
General Oven Information ...................... 10
Oven Operation ........................... I 1-26
General Oven Tips ..................................... II
Setting the Clock ........................................ 12
Using Oven Timer ...................................... 13
Using Oven Lights ...................................... 13
Selecting the Oven Mode ......................... 14
Time Oven Mode Operation .................. 15
Bake Tips and Techniques ......................... 16
Bake Cook Chart ....................................... 17
Convection Bake Tips and Techniques .. 18
Convection Bake Chart ............................ 19
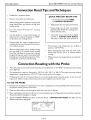
Convection Roast Tips and Techniques. 20
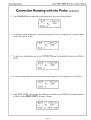
Convection Roasting with the Probe 20.22
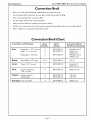
Convection Roast Chart .......................... 23
Broil Tips and Techniques ......................... 24
Broil Chart ................................................... 24
Convection Broil ........................................ 25
Convection Broil Chart ............................ 25
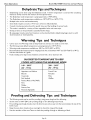
Dehydrate Tips and Techniques ............... 26
Warming Tips and Techniques ............. 26
Proofing and Defrosting
Tips and Techniques ................................... 26
Special Features ........................... 27-30
Loci< Keys (Child Loci<out) ...................... 27
Sabbath Mode
(for religious faiths with "no work"
requirements on the Sabbath) ................ 28
Oven Offset
(calibrate the oven temperature) ........... 28
Language (select English,
Spanish, or French) .................................... 29
Temperature Units
(Fahrenheit or Centigrade) ...................... 29
Clock Format (I 2 hr or 24 hr) ............... 29
BeepVolume ................................................ 30
View Clock .................................................. 30
Default Data ................................................ 30
Oven Care and Cleaning ............. 31-34
Self-Cleaning the Oven ............................. 3 I
Preparing the Oven for Self-Clean ......... 3 I
Setting the Self-Clean Mode .................... 32
General Oven Care ................................... 33
Oven Finishes/Cleaning Methods ........... 34
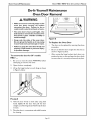
Do-It-Yourself Maintenance ........ 35-40
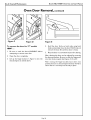
Oven Door Removal ........................... 35-36
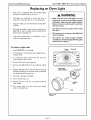
Replacing an Oven Light ........................... 37
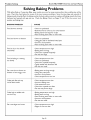
Solving Problems ....................... 38 - 39
Solving Baiting Problems ........................... 38
Solving Operational Problems ................. 39
How to Obtain Service ...................... 39
Model Warranty ................................ 40
Service Data Record .......................... 40
Page I

Safety Precautions Bosch HBL7/HBM7 Oven Use and Care Manual
General Appliance and Oven
SAFETY PRECAUTIONS
Please read all instructions before using this appliance.
WARNING
When properly cared for, your new Bosch oven has
been designed to be a safe,reliable appliance. Read
all instructions carefully before using this oven.
These precautions will reduce the risk of burns,
electric shock, fire, and injury to persons. When
using kitchen appliances, basic safety precautions
must be followed, including the following:
This appliance must be properly installed and
grounded by a qualified technician. Connect only
to properly grounded outlet. See "Grounding
Instructions" found in the Installation Instructions.
This appliance should beserviced only by a qualified
service technician. Contact the nearest
authorized service center for examination,
repair or adjustment.
Do not repair or replace any part of the oven
unless specifically recommended. Refer service to
an authorized servicer.
Do not operate this appliance if it is not working
properly or if it has been damaged, until an
authorized servicer has examined it.
Install or locate this appliance only in accordance
with the Installation Instructions.
Usethis oven only asintended bythe manufacturer.
Ifyou have anyquestions, contactthe manufacturer.
Do not cover or block any openings on this
appliance.
Use this appliance only for its intended use as
described in this manual. Do not use corrosive
chemicals, vapors, or nonfood products in this
appliance. This type of oven isspecifically designed
to heat or cook. It is not designed for industrial or
laboratory use. The use of corrosive chemicals in
heating or cleaning will damage the appliance.
In the event that personal clothing or hair catches
fire, DROP AND ROLL IMMEDIATELY to
extinguish flames.
Do not allow children to use this appliance unless
closely supervised by an adult. Children and pets
should not be left alone or unattended in the area
where the appliance is in use. Never allow children
to sit or stand on any part of the oven.
Do not store items of interest to children above
the oven. Ifchildren should climb onto the appliance
to reach these items, they could be seriously
injured.
To reduce the risk of fire in the oven cavity:
I. Do not store flammable materials in or near the
oven.
2. Do not usewater on a grease fire. Smother fire or
use a dry chemical or foam-type extinguisher.
3. It ishighlyrecommended that afire extinguisher be
readily available and highly visible next to any
cooking appliance.
4. Do not overcook food. Carefully attend oven if
paper, plastic or other combustible materials are
placed inside the oven.
5. Do not use the cavity for storage purposes. Do
not leave paper products, cooldng utensils or food
in the cavity when not being used.
6. If materials insidethe oven should ignite, keep oven
door closed. Turn oven off and disconnect the
circuit at the circuit breaker box.
7. Do not block any vent openings.
8. Be sure the blower fan runs whenever the oven is
in operation. If the fan does not operate, do not
use the oven. Call an authorized service center.
9. Never use the oven to warm or heat a room. This
can damage the oven parts.
10.
For personal safety, wear proper clothing. Loose
fitting or garments with hanging sleeves should
never be worn while using this appliance.
Continued on next page
Page 2

Safety Precautions Bosch HBL7/HBN7 Oven Use and Care Manual
IMPORTANT SAFETY INSTRUCTIONS
Please read all instructions before using this appliance.
SAFETY FOR THE OVEN
• Tie long hair so that it doesn't hang loose.
• Do nottouch heating elements or interior surfaces
ofoven,
The heating elements may be hot even though they
are dark in color. Interior surfaces of an oven
become hot enough to cause burns.
During and after use, do not touch or let clothing
or other flammable materials contact the heating
elements or the interior surfaces of the oven until
they have had sufficient time to cool.
The trim on the top and sides ofthe oven door may "
become hot enough to cause burns.
Use care when opening the door. Open the door
slightly to let hot air or steam escape before
removing or replacing food.
Do not heat unopened food containers. Build-up
of pressure may cause the container to burst and
cause injury.
Always place oven racks in desired location while
oven is cool. Ifa rack must be moved while oven
is hot, do not let pot holder contact the hot
heating elements.
Use only dry pot holders. Moist or damp pot
holders on hot surfaces may result in burns from
steam. Do not let pot holder touch hot heating
elements. Do not use atowel or other bulky cloth.
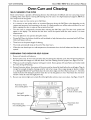
SAFETY FOR THE SELF-CLEANING OVEN
Confirm that the door locks and will not open
once START is touched and the door loci< icon
appears. If the door does not loci<, touch UPPER
CANCEL or LOWER CANCEL and do not run
Self-Clean. Phone 800/735-4328 for service (see
Page 39 for obtaining service).
Do not clean the door gasket. It is essential for a
good seal. Care should be taken not to rub,
damage, move or remove the door gasket.
Do not use commercial oven cleaners or oven
liner protective coatings of any Idnd in or around
any part of the oven.
Clean only oven parts listed in this manual.
Before self-cleaning the oven, remove the broiler
pan, oven racks, other utensils and excess soft
spillage.
WARNING
The California Safe Drinldng Water and
Toxic Enforcement Act requires businesses
to warn customers of potential exposure
to substances which are known by the
State of California to cause cancer or
reproductive harm.
The elimination of soil during self-cleaning
generates some by-products which are on
this list of substances.
To minimize exposure to these substances,
always operate this oven according to the
instructions in this manual and provide
good ventilation to the room during and
immediately after self-cleaning the oven.
Page 3

Safety Instructions Bosch HBL7/HBN7 Oven Use and Care Hanual
INSTRUCTIONS DE SECURITE
pour four et appareil en g n ral
Life toutes les instructions avant d'utiliser cet appareil.
AVERTISSEMENT
Lorsque rentreden est effectu_ defa_on appropri_e,
ce nouveau four Bosch a _t_ congu pour offrir
s_curit_ et fiabilit_. Life attentivement routes
les instructions avant d'utiliser ce four. Ces
precautions permettront de r_duire tout ris-
que de br_lures, de chocs _lectriques,
d'incendie et de blessures. Au moment
d'utiliser des _lectrom_nagers, des
precautions de base doivent &tre observ_es,
incluant ce qui suit.
Cet appareil doit _tre install_ et mis _ la terre de
fa_on appropri_e par un technicien qualifi_.
Brancher seulement sur une prise mise _ la terre.
Voir <<Instructions de mise _ la terre >>dans les
instructions d'installation.
Seul un technicien qualifi_ peut effectuer le service
de cet appareil. Communiquer avec un centre de
service autoris_ pour route v_rification, r_paration
ou r_glage.
Dans le cas o_ des v_tements ou des cheveux
prennent feu, SE LAISSER TOMBER AU SOL ET
SEROULER IMMFDIATEMENT pour _teindre les
flammes.
Ne pas laisser des enfant utiliser cet appareil,
moins d'une surveillance _troite d'un adulte. Les
enfants ou des animaux ne doivent pas &tre laiss_s
seuls ou sans surveillance Iorsque cet appareil est
utilis& Ne jamais hisser les enfants s'asseoir ou
monter sur rappareil.
Ne jamais ranger d'articles, pouvant int_resser les
enfants, au-dessus du four. Si les enfants doivent
monter sur le four pour atteindre ces objets, ils
peuvent se blesser s_rieusement.
Pour r_duire les risques d'incendie dans la
cavit_ du four :
I.
2.
Ne pas r_parer ni remplacer route piece du four _ 3.
moins que cela ne soit recommand&
sp&cifiquement. Consulter un centre de service
autoris_. 4.
Ne pas utiliser cet appareil s'il ne fonctionne pas
ad&quatement ou s'il a &t_ endommag_ sans qu'un
technicien qualifi& ne rait d'abord v_rifi&
Installer cet appareil seulement selon les
instructions d'installation.
Utiliser ce four pour rusage auquel il est destin_
par le fabricant. Pour route question,communiquer
avec le fabricant.
.
.
Ne pas couvrir ni obstruer les ouvertures de cet 7.
appareil. 8.
Utiliser cet appareil seulement pour rusage auquel
il est destin& selon les instructions de ce guide. Ne
pas utiliser de produits corrosifs, chimiques, ou des
produits non alimentaires dans cet appareil. Ce type
de four est congu sp&cifiquement pour chauffer et
cuire. II n'est pas destin_ _ un usage industriel ou
en laboratoire. L'utilisation de produits chimiques
corrosifs pour le chauffage ou le nettoyage peut
endommager rappareil.
Ne pas ranger de mat_riaux inflammables pros
ou dans le four.
Ne pas utiliser d'eau sur un feu de graisse. Ftouffer
le feu ou utiliser un extincteur de type _ mousse
ou chimique sec.
II est recommand_ qu'un extincteur soit disponible
et plac_ visiblement pros de rappareil de cuisson.
Ne pas surcuire les aliments. Faire attention si du
papier, du plastique ou autres mat_riaux
combustibles sont places dans le four.
Ne pas utiliser la cavit_ _ des fins de rangement.
Ne pas laisser de produits en papier, des ustensiles
ou des aliments dans la cavit_ si rappareil n'est
pas utilis_.
Si des mat_riaux dans le four s'enflamment, hisser
la porte du four ferm_e. Me_re le four hors circuit,
d_brancher le circuit _ la bo_te de jonction.
Ne pas obstruer les _vents.
S'assurer que le ventilateur fonctionne Iorsque le
four est en marche. Si le ventilateur ne fonctionne
pas, ne pas utiliser le four. Communiquer avec un
centre de service autoris_.
.
10.
Ne jamais utiliser ce four pour chauffer ou
r_chauffer une pi&ce. Ceci peut endommager les
pi&ces du four.
Pour plus de s_curit_, porter des v_tements
ad_quats. Des v_tements I_ches ou pendants ne
doivent jamais _tre port,s si ron utilise le four.
Suite _ la page suivante
Page 4

Safety Instructions Bosch HBL7/HBN7 Oven Use and Care Hanual
INSTRUCTIONS DE SECURITE IMPORTANTES
Lire toutes les instructions avant d'utiliser cet appareil.
SECURITE POUR LE FOUR
• Les cheveux longs doivent &tre attaches.
• Ne pas toucher aux _l_ments chauffants ni aux
surfaces int_rieures du four.
Les _l_ments chauffants peuvent 6tre chauclsm6me
s'ils sont de couleur fonc_e. Les surfaces
int_rieures du four sont suffisamment chaudes
pour causer des br61ures.
Pendant et apr&s rutilisation, ne pas toucher, ni
laisser des v6tements ou autres mat_riaux
inflammables entrer en contact avec les _l_ments
chauffants ou les surfaces int_rieures du four.
Laisser suffisamment de temps au four pour
refroidir.
• Les garnitures sur le dessus et les c6t_s de la porte
du four peuvent devenir assez chaudes pour causer
des brOlures.
Faire attention en ouvrant la porte du four. Ouvrir
la porte 16g6rement pour laisser rair chaud ou la
vapeur s'6chapper avant d'enlever ou de mettre
des aliments dans le four.
Ne pas faire chauffer des contenants d'aliments
herm6tiques. L'accumulation de pression peut faire
exploser le contenant et causer des blessures.
Toujours placer les tablettes & rendroit d6sir6
Iorsque le four est froicl. Si une tablette dolt 6tre
enlev6e Iorsque le four est chaud, ne pas laisser
les tire-plats entrer en contact avec les 616ments
chauffants.
Utiliser seulement des tire-plats secs. Des tire-plats
humides ou mouill6s sur des surfaces chaudes
peuvent causer des brQlures de vapeur. Ne pas
toucher aux 616ments chauffants. Ne pas utiliser
de serviettes ou autres chiffons.
SECURITE POUR LE FOURAUTO-
NETTOYANT
S'assurer que la porte est verrouill6e et ne peut
s'ouvrir une lois la touche START press6e et que
ricone de porte verrouill6e s'affiche. Si la porte ne
se verrouille pas, presser la touche UPPER
CANCEL ou LOWER CANCEL (annulation
sup6rieure ou annulation inf6rieure) et ne pas
actionner la fonction auto-nettoyante.T616phoner
au 800-735-4328 pour tout service (voir page 39
concernant le service).
Ne pas nettoyer les joints de la porte. Cela est
essentiel pour une bonne 6tanch6it6. II faut faire
attention pour ne pas r6curer, endommager,
d6placer ou enlever le joint de la porte.
Nettoyer seulement les pi6ces indiqu6es dans ce
guide.
Avant d'effectuer le nettoyage du four, enlever le
plateau, les tablettes, les ustensiles et tout
d6versement.
AVERTISSEMENT
Le r_glement <<California Safe Drinking Water
and Toxic Enforcement Act >>exige que les
compagnies avisent les clients du danger potentiel
d'exposition aux substances reconnues par r6tat
de la Californie comme pouvant causer le cancer
ou des probl6mes de sant6 reli6s &la reproduc-
tion.
L'61imination des r6sidus pendant le
fonctionnement auto-nettoyant peut g6n6rer
certains sous produits d6riv6s donn6s dans la
liste.
Afin de minimiser rexposition & ces substances,
toujours faire fonctionner cefour conform6ment
aux instructions de ce guide et assurer une bonne
ventilation & la pi6ce pendant et imm6diatement
apr6s le nettoyage du four.
Page 5

Cooking with the Bosch Convection Oven Bosch HBL7/HBN7 Oven Use and Care Manual
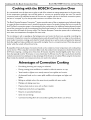
Cooking with the BOSCH Convection Oven
In a conventional oven,the heat source cycles on and offto maintain an average temperature in the oven cavity.
As the temperature gradually rises and falls, gentle air currents are produced within the oven. This natural
convection tends to be inefficient because the currents are irregular and slow. In the Bosch convection system,
the heat is"conveyed" by a fan that provides continuous circulation of the hot air.
The Bosch Genuine European Convection TM system provides state-of-the-art engineering and advanced design
to create the finest convection oven. In standard convection ovens,a fan simply circulates the hot air around the
food.The Bosch convection system is characterized by the combination of an additional heating element located
around the convection fan and the venting panel that distributes heated air in three dimensions: along the sides,
the top and the full depth of the oven cavity. This Genuine European Convection system aids in maintaining a
more even oven temperature throughout the oven cavity.
The circulating air aids in speeding up the baiting process and cooks the food more evenly. By controlling the
movement of heated air, convection cooking produces evenly browned foods that are crispy on the outside yet
moist inside. Convection cooking works best for breads and pastries as well as meats and poultry.Air-leavened
foods like angel food cakes, souffl& and cream puffs rise higher than in a conventional oven. Meats stay juicy and
tender while the outside is flavorful and crisp.
By using Bosch Genuine European Convection,foods can be cooked at a lower temperature and cooldng times
can be shorter. When using the Convection Bake mode, the standard oven temperature should be lowered by
25°E Foods requiring a cooldng time of less than 30 minutes should be checked slightly earlier than normal.
Items that typically cool< for 45 minutes or more should take 15-25% less time. For best results,foods should be
cooked uncovered, in low-sided pans to take advantage of the forced air circulation.When using the Convection
Roast mode, the standard oven temperature does not need to be reduced.
Advantages of Convection Cooking
• Even baiting, browning and crisping are achieved.
• During roasting, juices and flavors are sealed in while the exterior is crisp.
• Yeast breads are lighter, more evenly textured, more golden and crustier.
• Air-leavened foods such as cream puffs, souffl& and meringues are higher and
lighter.
• Baking on multiple racks at the same time is possible with even results.
• Multiple-rack baking savestime.
• Prepare whole meals at once with no flavor transfer.
• Dehydrates herbs, fruits and vegetables.
• Requires no specialized bakeware.
• Savestime and energy.
• Convection broiling allows for extraordinary grilling with thicker cuts of food.
Page 6

Oven Features Bosch HBL7/HBN7 Oven Use and Care Manual
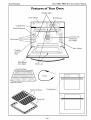
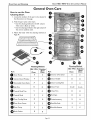
Features of Your Oven
Halogen Lights
Control Panel
Broil Element
Cooling Vents
Probe Receptacle
_(4)
(3)
Rack Levels _ (2)
Model &
Serial #'
Plate
oooooooo
oooooooo
\
\
l
Convection Fan
and Element
(not visible)
Door Gasket
Bake
(not visible)
Do,_r Loci<
Oven Rack Back
Oven Rack Front
Broiler Pan Racks
_)oiler Pan
Cooling Vents
I
I
Page 7

Oven Features Bosch HBL7/HBN7 Oven Use and Care Manual
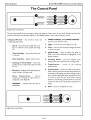
The Control Panel
O
OUpper Cancel
Lower Cancel
Light _ Cooking Mode D --
Time _ Temperature
UpperLower Start 0
Double Oven Control Panel
The control panel allows you to program either the upper or lower oven. As you touch the pads and turn the
control knob, words and numbers appear in the display window. Touch only one pad at a time.
I. Display Window - this window shows the
following information:
• Clock - shows the time of day with a 12-
hour or 24-hour clock option (See Page
12).
• Timer Settings - counts down the time
in minutes.
• Oven Selection - Upper and/or Lower,
• Cooking orTimed Mode - shows the
number of hours and minutes the oven will
be "on."
• Elements - displays which element(s) are
active during a cooldng mode.
• Oven Temperature - Shows
temperature setting in fahrenheit or
centigrade. (See Page 29).
• PREHEAT - indicates that the oven is
preheating.
.
3.
4.
5.
UPPER CANCEL and LOWER CANCEL -
touch to turn off active oven.
Light - touch to turn oven light on or off.
Time - touch to set the timer, change the timer
or clear the timer.
Upper/Lower - touch to select the upper or
lower oven. Oven selected is highlighted in the
display window.
6. Cooking Mode - touch to display oven
temperature, oven selected and cooldng mode.
7. Temperature - touch to set cooking
temperatures.
8. Control Knob - used to set the clock, timers,
select cooldng mode and temperature.Allows for
increasing or decreasing numerals relating to clock
time or timer setting and oven temperature. Push
on knob to pop out the knob when making
selections. Conversely, push the knob in to retract
it back into the control panel after selections are
made.
9. Start - touch to complete an entry.
O
Ligh_
Time Temperature
Cancel _ Start 0
Single Oven Control Panel
Page 8

Oven Features Bosch HBL7/HBN7 Oven Use and Care Manual
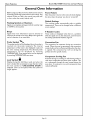
Oven Modes
The following illustrations give an overview of what
happens in the oven with each mode setting. The
arrows represent the location of the heat source during
specific modes. The lower element isconcealed under
the oven floor.
Baking is cooldng with heated air. Both the upper and
lower element cycle to maintain the oven temperature.
In the Warming mode, the oven will use the lower
element to maintain a low temperature to keep food
at serving temperature.
J
CONVECTION BAKE and DEHYDRATE
Convection Bake cooks with heat from athird element
behind the back wall of the oven. The heat is circulated
throughout the oven by the convection fan.
Dehydrating issimilar to convection cooking and holds
an optimum low temperature while circulating the
heated air to remove moisture slowly for food
preservation.
..................................................................................................................Z7...................................................................................................ZZ...................................................................................................................
CONVECTION ROAST
Convection Roast uses the top element, bottom
element and convection fan.
\ J
J
BROIL
Broiling uses intense heat radiated from the upper
element.
f
..........................................................I
• J
CONVECTION BROIL
Convection Broil combines the intense heat from the
upper element with the heat circulated by the
convection fan.
Page 9

Oven Features Bosch HBL7/HBN7 Oven Use and Care Manual
General Oven Information
Before using your Bosch oven for the first time remove
all packing and foreign materials from the oven(s). Any
material of this sort lee in the oven(s) may melt and/
or burn when the oven(s)is(are) used.
Flashing Symbols or Numbers
Signalsan incomplete setting and callsfor another step
or START to be touched.
Power Failure
After the power returns to the oven,the clock displays
the time when the power was lost or turned off.
Default Settings
The cooking modes automatically select a suitable
temperature. These can be changed when a different
one is needed.
Beeps
Signals that more information must be entered or
confirms the receipt of an entry. Beeps also signal the
end of a function or an oven fault.
Probe Symbol
The probe symbol will be displayed when the probe is
inserted into the probe receptacle. The internal
temperature of the meat is also displayed in place of
the oven roasting temperature. The selected probe
temperature can be displayed by touching
TEMPERATURE. Oven temperature can be displayed
by touchingTEMPERATURE two times.
Lock Symbol g
Displays during the Self-Clean mode and when the
door is locked. Do not attempt to open the door when
the lock symbol or UNLOCKING DOOR is
displayed. Door can be opened when the symbol no
longer appears.
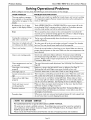
F Number Codes
These codes are displayed when there is a problem
with the signal sent to the electronic control board.
See SolvingOperational Problems,Page 39.
Convection Fan
The convection fan operates during any convection
mode. When the oven is operating in the convection
mode, the fan will turn off automatically when the door
is opened. The convection fan will run during the
preheat time for specific modes.
Component Cooling Fan
Activates during any cooking or self-cleaning mode to
cool inner components and outer door surfaces. This
air is exhausted through the vent located above the
oven door. It continues to run until components have
cooled sufficiently.
Page I0

Oven Operations Bosch HBL7/HBM7 Oven Use and Care Manual
General Oven Tips
Preheating the Oven
• Preheat the oven when using the Bake, Convection
Bake and Convection Roast modes.
• Preheating for Convection Roast when using the
probe is not recommended. See Pages 20 through
22 for details and tips.
• Selecting a higher temperature does not shorten
the preheat time.
• Preheating is necessary for good results when baking
cakes, cooldes, pastry and breads.
• Preheating will help to sear roasts and seal in meat
juices.
• Place oven racks in their proper position before
preheating.
• During preheat, the selected cooking temperature
can be displayed by touching TEMPERATURE.
• A beep will confirm that the oven is preheated and
the selected cooking temperature will be displayed.
• Fast Preheat Bakeand Fast Preheat Convection Bake
can be used when time is crucial.
Operational Suggestions
• Use the cooldng charts as a guide.
• Do not set pans on the opened oven door.
• Use the interior oven light to view the food through
the oven door window rather than opening the door
frequently.
Utensils
• Glass baIting dishes absorb heat. Reduce oven
temperature 25°F when baiting in glass.
• Use pans that give the desired browning. The type
of finish on the pan will help determine the amount
of browning that will occur.
• Shiny,smooth metal or light nonsticldanodized pans
reflect heat, resulting in lighter, more delicate
browning. Cakes and cooldes require this type of
utensil.
• Dark, rough or dull pans will absorb heat resulting
in a browner, crisper crust. Use this type for pies.
• For brown, crisp crusts,use dark nonsticldanodized
or dark, dull metal utensils or glass bakeware.
Insulated baiting pans may increase the length of
cooldng time.
• Do not cookwith the empty broiler pan in the oven,
as this could change cooking performance. Store
the broil pan outside of the oven.
High Altitude Baking
• When cooldngat highaltitude,recipes and cooking
time will vary from the standard. For accurate
information,write the Extension Service,Colorado
State University, Fort Collins, Colorado 80521.
There may be a charge for the bulletins.
Oven Condensation and Temperature
• It is normal for a certain amount of moisture to
evaporate from the food during any cooking
process. The amount depends on the moisture
content of the food. The moisture may condense
on any surface cooler than the inside of the oven,
such as the control panel.
• Your new Bosch oven has an electronic
temperature sensor that accurately maintains the
temperature selected.Your previous oven may have
had a mechanical thermostat that drifted gradually
over time to a higher temperature. It is normal
that you may need to adjust your favorite recipes
when cooldng in a new oven.
Oven Racks
• The oven has rack guides at four levels as shown
in the illustration on Page 7.
• Rack positions are numbered from the bottom rack
guide (#l) to the top (#4).
• Check cooldng charts for best rack positions to
use when cooldng.
• Each level guide consists of paired supports formed
in the walls on each side of the oven cavity.
• Always be sure to position the oven racks before
turning on the oven. Make sure that the racks are
level once they are in position.
• To remove oven rack from the oven, pull rack
forward, lift rack up at front and then remove it.
• To replace an oven rack:
I. Place rear of rack between rack level guides.
2. While lifting front of rack, slide rack in all
the way while lowering the front. Please
refer to illustration on Page 7 ifthere is any
question as to which side is the front of the
rack.
• The racks are designed to stop when pulled
forward to their limit.
CAUTION! Never use aluminum foil to cover
the oven racks or to line the oven. It can cause
damage to the oven liner if heat is trapped under
the foil.
1201240 vs. 1201208 Volt Connection
• Most oven installations will have a 120/240 voltage
connection.
• If your oven is installed with 120/208 voltage, the
preheat time may be slightly longer than with 120/
240 voltage.
• The Self-Clean mode may also require a longer
clean time, depending on the amount of soil.
Page II

Oven Operations Bosch HBL7/HBN7 Oven Use and Care Manual
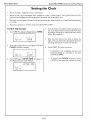
Setting the Clock
• The time of day is displayed in hours and minutes.
• Always set the clock immediately after installation or after a power failure. Once power returns to the
oven, the clock displays the time of day when the power was turned off or lost.
• The clock time will appear during all oven operations except when the timer or a timed cooking operation
is running.
• The oven is preset to a 12-hour clock and indicates AM and PM.
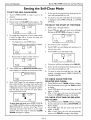
TO SET THE CLOCK:
I. TouchTIME. Thedisplaywillbeginflashing TIMER.
,
-'D1
I'Ll PR
\ I /
TIITIE O
III ICI\
t
Turn rotary knob once to the right or left and
CLOCK will flash in display.
,
\ I /
q:E'] Pn C'
LULI I
ff I _\
TouchTIME again. ENTERTIME will appear in
the display and clock time will flash.
f- IXlTE El T IITIE
El II I_IN I II I1_
\ I /
-I.D1
rL I PFI
,
Turn the knob to the right or left to quicldy move
the clock time forward or backward by 10-minute
increments. Continue to rotate knob until correct
AM or PM is selected.
5. After the initial move of the knob to either the
right or left, turn the knob in the opposite direction
to change the time by I-minute increments.
6. Touch START. The clock is now set.
• If operation is not completed, the oven will
beep periodically as a reminder to set clock
time.Touch START.
• To cancel the CLOCK selection, touch
CANCEL at any time when setting the clock.
Page 12

Oven Operations Bosch HBL7/HBN7 Oven Use and Care Manual
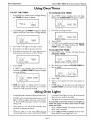
Using Oven Timer
TO SET THE TIMER:
I. Touch TIME once. Display timer will begin flashing
and TIMER will appear in display.
.
\ I /
i]- -i 1
I';11 FI_I TIITIE O
Ill ILK
/ I %-
TouchTIME again and TIMER will appear in display
(below clock time). Oven timer will begin flashing.
,
4.
5.
\ I /
-- •I--II--I TIITIE El
--'-- J I II ILK
He:flll_l TlfflER
/ I \
Turn knob to the right to increase set time.
Turn knob to the left to decrease set time.
If the knob is turned too far to the left past zero,
then the time will roll over to 59 hr 59 min.
,
\ I /
I--I" _--IE
U'_ D
HR:mlIMTIMER
/ I \
Touch START.
T IITIE O
III IEI\
If START is not touched, oven will beep as a
reminder and PRESS STARTwill appear in display
and time will flash.
\ I /
0:35 PRESSSTfiRT
HR:FIII_ITIMER
/ I \
END will appear in display when time ends.
Reminder beeps will sound for up to fifteen
minutes or until any pad is touched.
TO CHANGE THE TIMER:
I. Touch TIME 2 times. Display timer will begin
flashing and CHANGETIMER will appear in display.
\ I /
-" -ILI
_._ I- UOI\IC F TII'-IE O
Cnnl ICIC Ill ICl\
He:FIII'I TIFIEe
/ I \
Turn knob to change set time,
,
4.
i-. EIJ-i
_1"_ _1 I-UOIXICF TII'-IEO
LI IFII ILJlZ III IEIX
HR:flll"l TI FI IlrrlCe
Touch START.
If START is not touched, oven will begin beeping,
timer display will begin flashing and PRESS
START will appear in display.
TO CLEAR THE TIMER:
I. Touch TIME once. Display will begin flashing
CHANGE TIMER.
I
-'-IU \ I / I
_ "C I-IJOI\ll-C TIFqCN
Il l_C_ I_11FII IL]IZ III IEIRHR:fllr'l TI F
2. Turn knob onceto rightand CLEAR TIMERwill
flash in display.
\ I /
I-.DU
_I'L 71 cNn TII'QCN
I_ L E J-II_ III ICI_
HR:flll"l TI FI Ilff[C e
3. Touch TIME.
4.
S,
Timer is now cleared and clock time appears in
display.
If TIME pad is not touched, oven will beep and
CLEARTIMER will continue to flash in display.
Using Oven Lights
A single light pad activates the lights in either oven.
If LIGHT pad istouched when both ovens are off,
lights in both the upper and lower oven will turn
on. Touch LIGHT pad again, and both oven lights
will turn off.
Oven lights turn on and off automatically when
the door is opened and closed.
When an oven is in use, oven lights turn on
automatically when a mode is selected and START
is touched. Oven lights will turn off automatically
when the oven mode is cancelled.
• The lights do not operate in the Self-Clean mode.
To manually control the interior oven lights in
either the upper or lower oven if one or both
ovens are in use:
I. Touch UPPER/LOWER. The display will indicate
which oven is selected.
2.. Touch UPPER/LOWER to highlightthe other oven.
Touch LIGHT to turn lights on or off.
Page 13

Oven Operations Bosch HBL7/HBM7 Oven Use and Care Manual
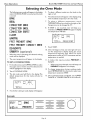
Selecting the Oven Mode
The following oven modes will appear inthe display 5.
when COOKING MODE istouched and the knob
is turned: 6.
BRISE
BROIL 7
COMI)ECTIOMBAISE
COMI)ECTIOMBROIL 8.
COMI)ECTIOMROAST
CLEAM
WARFIIMG
FAST PREHEAT BAKE
FAST PREHEAT [OMPEET BAIZE
9.
DEHYDRATE l0
SABBATH (optional)
• When the oven is operating, the selected cooking
mode will be displayed.
• The oven temperature will appear in the dispaly. I I.
TO SETA COOKING MODE:
I. For double ovens, touch UPPER/LOWER to select
the upper oven or lower oven.The selected oven
will be highlighted in the display. 12.
2. Touch COOKING MODE.
3. The last mode used will flash in the display.The
default temperature for that mode will also be 13.
displayed.
\. I /
_qSFloF BRaE
/ I \
To select a different mode, turn the knob to the
right or left.
The selected mode will appear inthe display,along
with the default temperature for that mode.
To select a different temperature, touch
TEMPERATURE and turn knob to the right or left.
Temperature can be changed by 5°E
If START is not touched, oven will beep as a
reminder and PRESS STARTwill appear in display
and temperature will flash.
\ I /
-,F_noC £RI_E
iD_iJ
-- "J--0 C ¢q t_TOOT
] ]._, p,, ooccc
I INE_I_I _ I I I1\ I
Touch START.
Oven will begin to heat and oven light will turn
on. The temperature display shows the actual
temperature, beginning with 100°E The actual
temperature counts up in 5°F increments until set
temperature is reached.
In modes that require preheat, PREHEAT is
displayed.
• When oven haspreheated, oven will beep and
PREHEAT disappears from display.
To change temperature during cooldng, simply
touchTEMPERATURETurn the knob to select new
temperature and press START.
Once cooking has been completed, touch UPPER
CANCEL or LOWER CANCEL to turn off oven.
]:lZlq pfi
4. If no further setting is made, display will disappear.
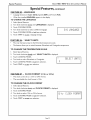
Example:
3S0°F BAKE
6:35 Prl PREHEAT
Upper Cancel Light Cooking Mode
Time Temperature
Lower Cancel Upper/Lower Start
Page 14

Oven Operations Bosch HBL7/HBM7 Oven Use and Care Manual
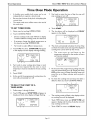
Time Oven Mode Operation
• In double oven models, both ovens can be set
independently to operate a timed mode.
• Be sure that the time-of-day clock is displaying the
correct time.
• The timed mode turns off the oven at the end of
the cool< time.
TO SET TIMED MODE:
,
,
Use knob to enter the time of day the oven will
stop cooking or turn off.
UNPlO c _ I-I-INI IEI-TINIXI
I_l_ll II/CI_ I IUI I
Iblbl I I I F- I-I1- CT
_IjHj J
\ 1 /
O'-I-I _ _Flail_
Ii.,--,L,Am c,TOnT'mE
/ I x
Touch START.
I. Select oven by touching UPPER/LOWER. 5.
2. Touch COOKING MODE.
• The last cooldng mode used will flash in display.
To select adifferent cooking mode,turn the knob.
• If necessary, change the default temperature at
this time by touching TEMPERATURE.
• Turn knob to select different temperature. 6.
3. TouchTIME two times. COOKTIME will appear
in the display and time display will begin flashing.
,
S,
6.
U -IF oE
F7
FnNI I[- [- Tlnlkl
LUI II/EL I IUI I
II_II_II _ ,
oONCT
\ I / I\UILI
rl iI-II- I- NFIE T IITIE
I ,.,.,_,L,, I_l_lUllIIIIE
/ I \
Turn knob to enter cooking time. Keep in mind
that the time required for the oven to reach
temperature must be included in the set cooking
time.
Touch START.
At the end of the programmed cooking time, the
oven will automatically turn off.
TO DELAY THE START OF A
TIMED MODE:
I. Follow steps I through 4 above.
2. TouchTIME again and STOPTIME will appear in
display and clock time display will begin flashing.
U-l-O I- _ I-NNI IEI-TININI
I I I_I_11II/EI_ III_III
II_II_I r
DNOCT
hI_II l_J I
IX I I
I
--" PII--I m
I I-LI-IPI, C T I-IO T II,-tE
_11 I_IF I II IC
/ I I\
The clocl<dme will be displayed and DELAY
appears in the display.
[_ I-NNI I[-I-TINN
I_1_1111/Cl_ I ILII I
_NOCT
I_11 I.._7I
1"I-I nEl ou
"11_1 A m UELI I_I
The clock automatically calculates the time of day
at which the mode starts and stops.The displayed
cooking time counts down by the minute.
• The oven turns on and heats to the
temperature selected for the number of hours
and minutes needed.
iqrlqo F 1-17,XIIIEI-TINN
I_I_IIII/CI_ I ILIII
FII-IOCT
UII_I I
At the end of the programmed cooking time, the
oven will automatically turn off. Display will show
OFF and the oven will beep. Reminder beeps will
sound for up to fifteen minutes until any pad is
touched.
To check the cooking time and stop time after a
delay has been set, touch COOKING MODE.
I-.-!E
_r_ ZJ
\ I /
I_ I-NI\IIIEI-TINI\I
I_I_llIIIEI_ I IUI I
F II-IOCT
I_111_11
/ I \
The cooking mode will flash in the display and the
set cooking time will be displayed.
Touch TIME three times and STOP TIME will
appear in display and the rime-of-day the oven will
stop cooking can be seen.
Touch START to return to DELAY display.
Page 15

Oven Operations Bosch HBL7/HBN7 Oven Use and Care Manual
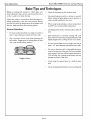
Bake Tips and Techniques
Baiting is cooldng with heated air. Both upper and
lower elements in the oven are used to heat the air but
no fan is used to circulate the heat.
Follow the recipe or convenience food directions for
baiting temperature, time and rack position. Baking
time will vary with the temperature of ingredients and
the size, shape and finish of the baking utensil.
• Check for doneness at the minimum time.
• Use metal bakeware (with or without a nonstick
finish), heatproof glass, glass-ceramic, pottery or
other utensils suitable for the oven.
• When using heatproof glass, reduce temperature
by 25°F from recommended temperature.
General Guidelines
• For best results, bake food on a single rack with at
least I" space between utensils and oven walls.
• Use a maximum of two racks when selecting the
bake mode. Stagger pans or baiting sheets so that
one is not directly above another.
• Use baking sheets with or without sides or jelly roll
pans.
• Dark metal pans or nonstick coatings will cook
faster with more browning. Insulated bakeware will
slightly lengthen the cooking time for most foods.
• For best results, bake food on a single rack with at
least I-I/2" space between utensils and oven walls.
Staggered pans
Do not use aluminum foil or disposable aluminum
trays to line any part of the oven. Foil isan excellent
heat insulator and heat will be trapped beneath it.
This will alter the cooking performance and can
damage the finish of the oven.
• Avoid using the opened door as a shelf to place
pans.
• Tips for SolvingBaking Problems is found on Page 38.
Page 16

Oven Operations Bosch HBL7/HBN7 Oven Use and Care Manual
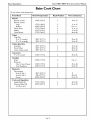
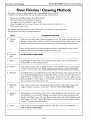
Bake Cook Chart
Do not reduce recipe temperature.
Food Item Oven Temperature Rack Position Time (minutes)
Breads
Biscuits, scratch
Biscuits, canned
Large
Medium
Dinner Rolls
Muffins
Quick Breads
Cakes
Cake Mix,
8" or 9" round(s)
9" x 13" rectangle
Cakes, Specialty
Cupcakes
Pound Cakes
Carrot Cake, scratch
450°F (232°C)
375°F (190°C)
400°F (205°C)
375°F (190°C)
425°F (219°C)
375°F (190°C)
3SO°F(177°C)
350°F(177°C)
3SO°F(177°C)
350°F(177°C)
3SO°F(177°C)
2
2
2
2
2
2
2
2
2
2
IOto 12
Ilto 15
8to II
Ilto 13
15 to 20
40 to 60
30 to 35
34 to 35
19 to 22
48 to 52
30 to 45
Casseroles
9"x 13", scratch 3SO°F(177°C) 2 30 to 45
Cookies
Drop
Brownies,
Choc. Cream Cheese
Choc. Raspberry
Desserts
Pies, pumpldn
Scratch, Step I
Scratch, Step 2
Frozen
2
2
2
2
2
2
2
350°F(177°C)
350°F(177°C)
350°F(177°C)
425°F (219°C)
350°F(I 77°C)
400°F (205°C)
375°F(190°C)
400°F(205°C)
Fruits and Vegetables
Apples, Baked (4)
Potatoes, Baked (4)
6 to 8 oz. each
9to II
35 to 40
22 to 27
15
40 to 50
65 to 75
40 to 45
60 to 70
Page 17

Oven Operations Bosch HBL7/HBN7 Oven Use and Care Manual
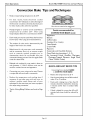
Convection Bake Tips and Techniques
Reduce recipe baiting temperatures by 25°E
For best results, foods should be cooked
uncovered, in low-sided pans to take advantage of
the forced air circulation. Use shiny aluminum pans
for best results unless otherwise specified
Heatproof glass or ceramic can be used. Reduce
temperature by another 25°F when using
heatproof glass dishes for a total reduction of 50°E
Dark metal pans may be used.Note that food may
brown faster when using dark metal bakeware.
The number of racks used is determined by the
height of the food to be cooked.
Baited items, for the most part, cook extremely
well in convection. Don't try to convert recipes
such as custards, quiches, pumpkin pie, or
cheesecakes, which do not benefit from the
convection-heating process. Use the regular Bake
mode for these foods.
Multiple rack cooldng for oven meals is done on
rack positions I, 2 and 3.All four racks can be
used for cooldes, biscuits and appetizers.
Converting your own recipe can be easy.Choose
a recipe that will work well in convection.
Reduce the temperature and cooldng time if
necessary. It may take some trial and error to
achieve a perfect result. Keep track of your
technique for the next time you want to prepare
the recipe using convection.
Tips for Solving Baiting Problems are found on Page
38.
Pans do not need to be staggered.
Foods recommended for
CONVECTION BAKE mode:
Appetizers
Biscuits
Coffee Cakes
Cooldes (2 to 4 racks)
Yeast Breads
Cream Puffs
Popovers
Casseroles and One-Dish Entre6s
Oven Meals (rack positions I, 2, 3)
Air Leavened Foods (Souffl6s, Meringue,
Meringue-Topped Desserts, Angel Food
Cakes, Chiffon Cakes)
QUICK AND EASY RECIPE TIPS
Converting from standard BAKE
to CONVECTION BAKE:
• Reduce the temperature by 25°E
• Use the same baiting time as Bake mode if
under 10 to 15 minutes.
• Foods with a baiting time of less than 30
minutes should be checked for doneness
5 minutes earlier than in standard bake
recipes.
• If food is baited for more than 40 to 45
minutes, bake time should be reduced by
25%.
Page 18
La page charge ...
La page charge ...
La page charge ...
La page charge ...
La page charge ...
La page charge ...
La page charge ...
La page charge ...
La page charge ...
La page charge ...
La page charge ...
La page charge ...
La page charge ...
La page charge ...
La page charge ...
La page charge ...
La page charge ...
La page charge ...
La page charge ...
La page charge ...
La page charge ...
La page charge ...
La page charge ...
La page charge ...
-
 1
1
-
 2
2
-
 3
3
-
 4
4
-
 5
5
-
 6
6
-
 7
7
-
 8
8
-
 9
9
-
 10
10
-
 11
11
-
 12
12
-
 13
13
-
 14
14
-
 15
15
-
 16
16
-
 17
17
-
 18
18
-
 19
19
-
 20
20
-
 21
21
-
 22
22
-
 23
23
-
 24
24
-
 25
25
-
 26
26
-
 27
27
-
 28
28
-
 29
29
-
 30
30
-
 31
31
-
 32
32
-
 33
33
-
 34
34
-
 35
35
-
 36
36
-
 37
37
-
 38
38
-
 39
39
-
 40
40
-
 41
41
-
 42
42
-
 43
43
-
 44
44


Bosch HBN742AUC/01 Le manuel du propriétaire
- Taper
- Le manuel du propriétaire
dans d''autres langues
- English: Bosch HBN742AUC/01 Owner's manual
Documents connexes
-
Bosch Appliances HBN 75 Series Manuel utilisateur
-
Bosch HBL745AUC/02 Manuel utilisateur
-
Bosch Appliances HBL5042AUC/01 Manuel utilisateur
-
-
-
Bosch HDIP054C Le manuel du propriétaire
-
-
Bosch HBLP651UC Mode d'emploi
Autres documents
-
Fagor SHA-730 X Manuel utilisateur
-
Thermador PODC302 Manuel utilisateur
-
-
Fulgor Milano F7SP30B1 Manuel utilisateur
-
Siemens HB30D50U/01 Manuel utilisateur
-
Maytag MEW5524AS Manuel utilisateur
-
GE Monogram Convection Oven ZET2 Manuel utilisateur
-
Jenn-Air JGS8750ADS Manuel utilisateur
-
Bosch Benchmark HBLP451RUC Mode d'emploi