Philips AC4086/01 Manuel utilisateur
- Catégorie
- Purificateurs d'air
- Taper
- Manuel utilisateur

AC4086
Register your product and get support at
www.philips.com/welcome
Always there to help you
Question?
Contact
Philips
User manual 3
Benutzerhandbuch 37
Mode d’emploi 75
Қолданушының нұсқасы 111
Руководство пользователя 147


3
EN
English
Contents
1 Important 4
Safety 4
2 Your combi air purier and
humidier 7
What’s in the box 7
3 Getting started 8
Install lters 8
Prepare for humidication 9
4
Using the appliance 11
Understand the air quality light 11
Understand the humidity light indicator 11
Understand the auto mode 11
Understand the healthy air protect alert 11
Understand the healthy air protect lock 11
Switch on and off the appliance 12
Set the sensitivity of the air quality
sensor 13
Change the fan speed 14
Auto 14
Manual 14
Silent mode 14
Boost power mode 14
Set the timer 15
Set the humidity level 15
Water level 16
5 Cleaning your appliance 17
Clean the body of the appliance 17
Clean the air quality sensor and
humidity sensor 17
Clean the water bucket 18
Clean the humidication lter tray 19
6 Cleaning the pre-lter and
humidication lter 20
Clean the pre-lter 20
Clean the humidication lter 22
Rinse the humidication lter 22
Descale the humidication lter 23
Cleaning schedule 24
7 Replacing the lters 25
Replace the Multi-care lter 25
Replace the activated carbon lter
and the HEPA lter 27
Replace the humidication lter and
water softener 29
Replace the humidication lter 29
Replace the water softener 30
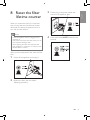
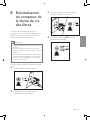
8 Reset the lter lifetime counter 31
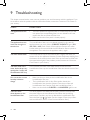
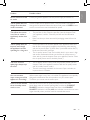
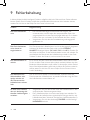
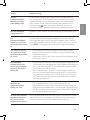
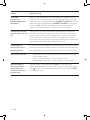
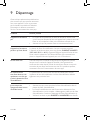
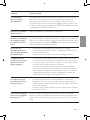
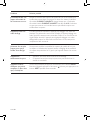
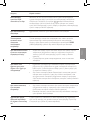
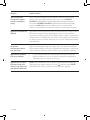
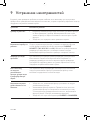
9 Troubleshooting 32
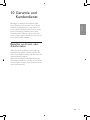
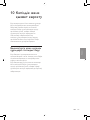
10 Guarantee and service 35
Order parts or accessories 35
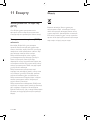
11 Notices 36
Electomagnetic elds (EMF) 36
Compliance with EMF 36
Recycling 36

4
EN
Warning
• Check if the voltage indicated on
the bottom indicated at the rear
of the appliance corresponds to
the local power voltage before
you connect the appliance.
• If the power cord is damaged,
you must have it replaced
by Philips, a service center
authorized by Philips, or similarly
qualied persons in order to
avoid a hazard.
• Do not use the appliance if the
plug, the power cord, or the
appliance itself is damaged.
• This appliance can be used by
children aged from 8 years and
above and persons with reduced
physical, sensory or mental
capabilities or lack of experience
and knowledge if they have been
given supervision or instruction
concerning use of the appliance
in a safe way and understand
the hazards involved. Children
shall not play with the appliance.
Cleaning and maintenance shall
not be made by children without
supervision.
• This appliance is not a toy.
Children should be supervised
to ensure that they do not play
with the appliance.
1 Important
Safety
Read this user manual carefully
before you use the appliance, and
save it for future reference.
Danger
• Do not let water or any other
liquid or ammable detergent
enter the appliance to avoid
electric shock and/or a re
hazard.
• Do not clean the appliance
with water, any other liquid,
or a (ammable) detergent to
avoid electric shock and/or a re
hazard.
• Do not spray any ammable
materials such as insecticides or
fragrance around the appliance.
• The water in the water bucket is
not suitable for drinking. Do not
drink this water and do not use
it to feed animals or to water
plants. When you empty the
water bucket, pour the water
down the drain.

5
EN
English
• Make sure all lters are properly
installed before you switch on
the appliance.
• Only use the original Philips
lters specially intended for this
appliance. Do not use any other
lters.
• Avoid knocking against the
appliance (the air inlet and outlet
in particular) with hard objects.
• Always lift or move the
appliance by both handles at the
sides of the appliance.
• Do not insert your ngers or
objects into the air outlet or
the air inlet to prevent physical
injury or malfunctioning of the
appliance.
• Do not use this appliance when
you have used indoor smoke-
type insect repellents or in
places with oily residues, burning
incense, or chemical fumes.
• Do not use the appliance near
gas appliances, heating devices
or replaces.
• Always unplug the appliance
after use and before you clean it.
• Do not use the appliance in a
room with major temperature
changes, as this may cause
condensation inside the
appliance.
• Do not block the air inlet and
outlet, e.g. by placing items on
the air outlet or in front of the
air inlet.
Caution
• This appliance is not a substitute
for proper ventilation, regular
vacuum cleaning, or use of an
extractor hood or fan while
cooking.
• If the power socket used to
power the appliance has poor
connections, the plug of the
appliance becomes hot. Make
sure that you plug the appliance
into a properly connected
power socket.
• Always place and use the
appliance on a dry, stable, level,
and horizontal surface.
• Leave at least 20cm free space
behind and on both sides of
the appliance and leave at least
30cm free space above the
appliance.
• Do not place anything on top of
the appliance and do not sit on
the appliance.
• Do not place the appliance
directly below an air conditioner
to prevent condensation from
dripping onto the appliance.

6
EN
Do not put fragrance in the
water bucket.
• If you do not use the
humidication function for a long
time, clean the water bucket and
humidication lter tray. Dry the
humidication lter and store
away the water softener.
• If you need to move the
appliance, disconnect the
appliance from the power supply
rst. Then empty the water
bucket. Carry the appliance
horizontally by both handles on
the sides of the appliance.
• To prevent interference, place
the appliance at least 2m away
from electrical appliances that
use airborne radio waves such as
TVs, radios, and radio-controlled
clocks.
• When the appliance is not used
for a long time, bacteria may
grow on the lters. Check the
lters after a long period of
disuse. If the lters are very dirty,
replace them (see the chapter
‘Replace the lters’).
• The appliance is only intended
for household use under normal
operating conditions.
• Do not use the appliance in wet
surroundings or in surroundings
with high ambient temperatures,
such as the bathroom, toilet, or
kitchen.
• The appliance does not remove
carbon monoxide (CO) or
radon (Rn). It cannot be used a
safety device in case of accidents
with combustion processes and
hazardous chemicals.
• Clean the water bucket every
day to keep it clean.
• Only ll the water bucket with
cold tap water. Do not use
ground water or hot water.
• Do not put any substance other
than water in the water bucket.

7
EN
English
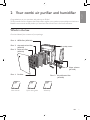
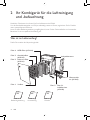
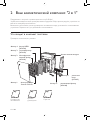
2 Your combi air purifier and humidifier
Congratulations on your purchase, and welcome to Philips!
To fully benet from the support that Philips offers, register your product at www.philips.com/welcome.
Read this user manual carefully before you install and use the unit. Save it for future reference.
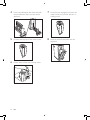
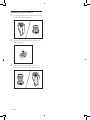
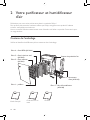
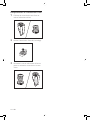
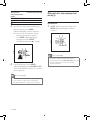
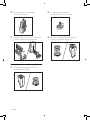
What’s in the box
Check and identify the contents of your package:
Quick start guide
User manual
Warranty
4
3
2
Air quality sensor
Filter 2: Multi-care lter
(AC4141)
Filter 3: Activated carbon lter
(AC4143)
Filter 4: HEPA lter (AC4144)
Filter 5: Humidication lter
(AC4148)
Filter 6: Water softener
(AC4149)
Filter 1: Pre-lter

8
EN
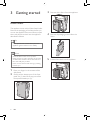
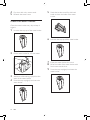
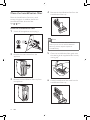
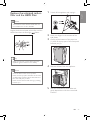
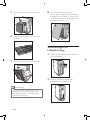
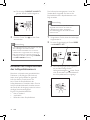
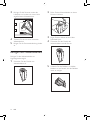
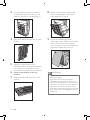
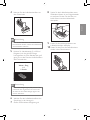
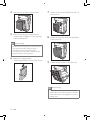
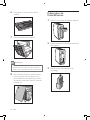
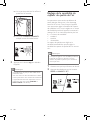
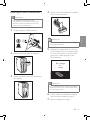
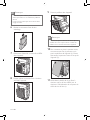
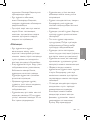
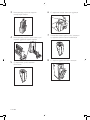
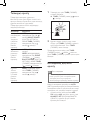
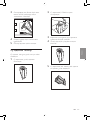
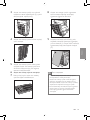
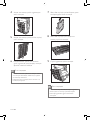
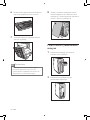
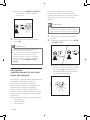
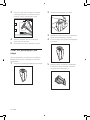
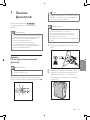
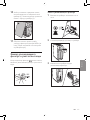
3 Remove all the lters from the appliance.
4 Remove all packaging material from the
lters.
5 Put the lters back into the appliance.
4
3
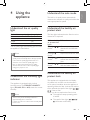
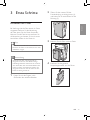
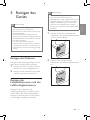
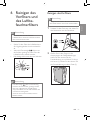
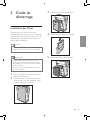
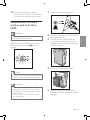
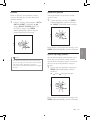
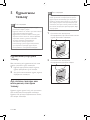
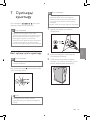
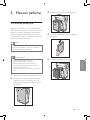
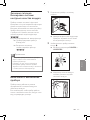
3 Getting started
Install lters
The appliance comes with all lters tted inside.
Remove the packaging of the lters before you
can use the appliance. Remove all lters, unpack
them, and place them back into the appliance
described as follows:
Tip
•
When you remove or insert lters, place the
appliance against a wall for more stability.
Note
• Insert the lters in the correct position.
• Make sure that you place the lters in the order
of HEPA lter, activated carbon lter, Multi-care
lter, and nally the pre-lter.
• Make sure that the side with the tag is pointing
towards you.
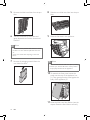
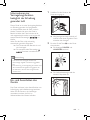
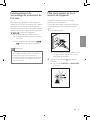
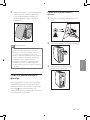
1 Place your ngers in the recesses of the
side panels.
2 Gently pull the bottom part of the front
panel out (1), then lift the top part of the
front panel towards you (2).
4
2
1

9
EN
English
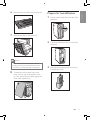
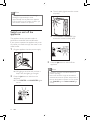
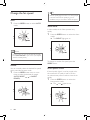
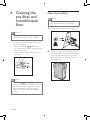
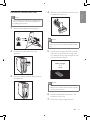
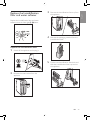
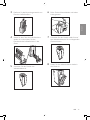
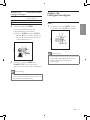
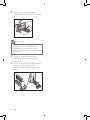
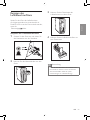
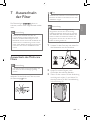
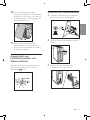
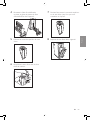
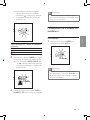
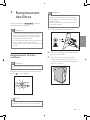
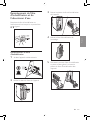
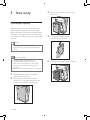
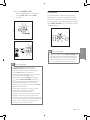
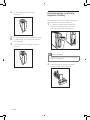
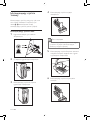
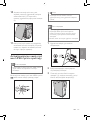
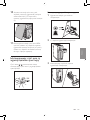
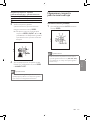
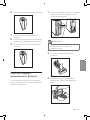
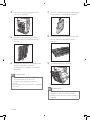
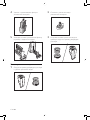
Prepare for humidication
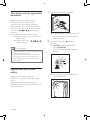
1
Pull the water bucket from the side of the
appliance.
2 Pull the humidication lter tray from the
appliance.
3 Remove the packaging material from the
humidication lter.
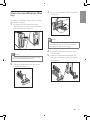
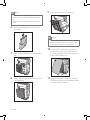
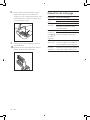
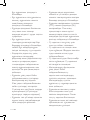
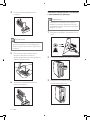
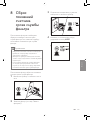
6 Silde the Multi-care lter into the pre-lter.
7 Place the pre-lter in the appliance.
4
1
2
Note
• Make sure that the side with the two clips is
pointing towards you, and that all hooks of the
pre-lter are properly attached to the purier.
8 To reattach the front panel, mount the
panel onto the top of the appliance rst
(1). Then, gently place the panel against the
body of the appliance (2).
4
2
1

10
EN
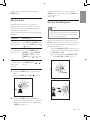
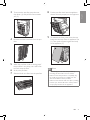
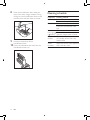
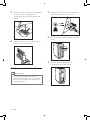
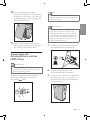
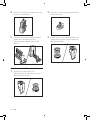
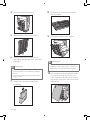
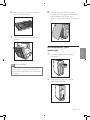
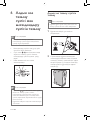
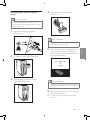
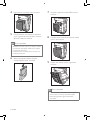
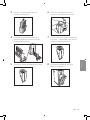
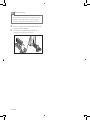
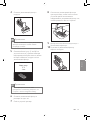
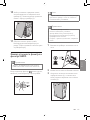
7 Screw the top cap tightly back onto the
water bucket until you feel and hear a
rattling sound.
8 Place the water bucket back into the
appliance.
2
1
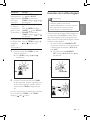
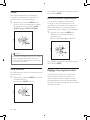
4 Put the humidication lter back and slide
the humidication lter tray back to the
appliance.
5 Unscrew the top cap of the water bucket.
6 Fill the water bucket with cold tap water.

11
EN
English
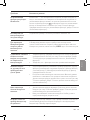
Understand the auto mode
The built-in air quality sensor automatically
measures the ambient air quality, and selects the
most appropriate fan speed.
Understand the healthy air
protect alert
The lter lights indicate that the lter has to be
cleaned or be replaced.
Different healthy
air protect alert
lights
Follow this
Filter light
/
ashes.
Clean the pre-lter and
descale the humidication
lter.
Filter light
ashes.
Replace the Multi-care lter.
Filter light
ashes.
Replace the activated
carbon lter and the HEPA
lter.
Filter light
/
ashes.
Replace the humidication
lter and water softener.
Understand the healthy air
protect lock
This appliance is equipped with the Healthy
air protect lock to make sure that the lters
are in optimal condition when the appliance is
operating. When the lter is almost full and has
to be replaced, the specic lter light (
/ /
/ ) start to ash.
When you do not replace the lter in time:
» The appliance stops operating and it
is locked.
» The specic lter light (
/ / /
) illuminate continuously.
4
Using the
appliance
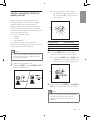
Understand the air quality
light
Color of the air quality light Air quality level
Blue Excellent
Deep purple Good
Purple Fair
Red Bad
The air quality light automatically goes on when
the appliance is switched on.
Note
• The built-in air quality sensor measures the air
quality and automatically selects the appropriate
color of the air quality light. When the air is
clean, the color of the air quality light is in
blue or deep purple. When the air quality
deteriorates, the color of the air quality light
changes to purple or red.
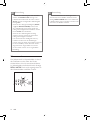
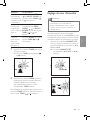
Understand the humidity light
indicator
The appliance is equipped with a built-in
humidity sensor. The CURRENT HUMIDITY
lights (30%, 40%, 50% or 60%) show the current
humidity.
Note
• The accuracy of the humidity indication is
approximately plus or minus 5%.
• It takes some time to measure the humidity level
in the room..

12
EN
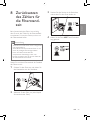
» The air quality light shows the current
air quality.
» The CURRENT HUMIDITY light
shows the current humidity level.
3 Press the button to switch off the
appliance.
Note
• Humidier cannot be used alone without air
purier operating.
• If the water bucket is empty, the humidier is
switched off, but the air purier still operates. In
this way the appliance operates as an air purier
only (PURIFIER light and REFILL WATER light
are on).
Note
• The appliance is locked after the lter light
ashing for approximately 2 weeks.
• Approximately one day before the appliance
locks, it beeps every 30 minutes to inform you
that the lter needs to be replaced.
Switch on and off the
appliance
The appliance always operates under air
purication combined with humidication.
If you want to operate the appliance only as an
air purier, you need to empty the water in the
water bucket.
1 Plug the appliance into the power supply.
» All lights go on twice and you hear a
beep. Then, the lights go out again.
2 Press the button to switch on the
appliance.
» The PURIFIER and HUMIDIFIER lights
are on.

13
EN
English
» The purier beeps twice and the
fan speed light (
) ashes to show
the current sensitivity level of the air
quality sensor.
Fan speed light Sensitivity level
SILENT extra sensitive
sensitive
standard
3 Press the SPEED button to adjust the
sensitivity level of the air quality sensor.
» One of the SPEED lights ( SILENT,
,
or
) goes on to show the preferred
sensitivity level of the air quality sensor.
4 Press and hold the SPEED and HUMIDITY
SET buttons again to conrm the setting.
Note
• When you change the sensitivity, the appliance
automatically starts operating at the set
sensitivity level whenever you switch on the
appliance.
Set the sensitivity of the air
quality sensor
People with certain health problems (for
example: allergies or asthma) have a greater
need for healthy air. For this reason, the
appliance allows you to adjust the sensitivity
of the air quality sensor. If you set it to higher
sensitivity level, the appliance starts cleaning the
air at lower pollution level.
There are 3 sensitivity levels:
• standard
• sensitive
• extra sensitive
The pollution sensor is set to standard
sensitivity. You can adjust the sensitivity of the air
quality sensor in the following way:
Note
• When it is set to a higher sensitivity, the appliance
starts cleaning the air at lower pollution levels to
make the air even cleaner.
1 Make sure the purier is on.
2 Press the SPEED and the HUMIDITY SET
buttons simultaneously.

14
EN
Tip
•
If the air quality light is in blue or in deep purple
color, this means the air quality is good or
excellent, and you can select a lower fan speed.
Silent mode
In silent mode, the air lter operates very
quietly.
1 Press the SPEED button to select the silent
mode.
» The SILENT light goes on.
To change to another fan speed, press the
SPEED button.
Boost power mode
If the air quality light is in red or purple color,
this means the air quality is bad or fair. You
can select boost power mode to clean the air
quickly.
1 Press the SPEED button to select the
boost power mode.
» The
and lights are on.
Change the fan speed
Auto
1 Press the SPEED button to select AUTO
mode.
Note
• In auto mode, you can set the desired humidity
level (40%, 50%, 60% in your room (see chapter
‘Set the humidity level’).
Manual
You can manually select the desired fan speed,
which overrides the auto mode.
1 Press the SPEED button once or more
times to select the desired fan speed
(AUTO, SILENT,
, or BOOST
POWER).

15
EN
English
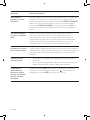
To deactivate the timer function, press the
TIMER button repeatedly until the TIMER light
(
, , or ) is out.
Set the humidity level
Note
• Make sure that the water bucket is lled with
water when you want to use the humidication
function (see the chapter ‘Get started’, section
‘Prepare for humidication’).
You can set the desired humidity level only in
AUTO mode. When the humidity of the room
reaches the desired level, the humidity stays at
this level constantly.
• Press the HUMIDITY SET button once or
more times to set the desired air humidity
to 40%, 50% or 60%.
» The corresponding HUMIDITY SET
light (40%, 50% or 60%) goes on.
To change to another fan speed, press the
SPEED button.
Set the timer
With the timer function, you can let the
appliance operate for a set number of hours.
When the set time has elapsed, the appliance
automatically switches off.
You can use the timer function in the following
situations:
Situations You will see
Choose a fan
speed manually
(see ‘Manual’).
One of the SPEED lights (
,
or BOOST POWER) and
one of the TIMER lights (
, ,
or
) are on.
The appliance
is in auto mode
(see ‘Auto’).
The AUTO light is on.
One of the SPEED lights
(SILENT,
, or BOOST
POWER), and one of the
TIMER lights (
, , or ) are
on.
The appliance is
in silent mode
(see ‘Silent
mode’).
The SILENT light and one of
the TIMER lights (
, , or )
are on.
1 Press the TIMER button to activate the
timer.
» The TIMER light (
, , or ) goes on.
2 Press the TIMER button repeatedly to
choose the number of hours you want the
appliance to operate. The corresponding
TIMER light goes on.

16
EN
Note
• If you do not set the humidity level, the
HUMIDITY SET light goes off. The humidier
humidies the air under AUTO mode and the
preset humidity level is 50%.
• If you change the fan speed (SILENT, , or
BOOST POWER), the humidier automatically
operates according to the fan speed level and
the AUTO mode deactivates.
• If you want to increase the humidity level in
shorter time, you can select higher fan speed.
• The appliance comes with a smart memory
function, it can memorize the settings when
the appliance is switched off (e.g. electricity
shortage). When the appliance is plugged in/
switched on again, it automatically starts at the
previous setting.
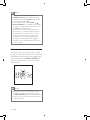
Water level
The water level in the water bucket is visible
through the water level window on the side of
the appliance. When there is not enough water
in the water bucket, the REFILL WATER light
ashes to indicate that you have to rell the
water bucket.
Note
• Appliance can operate under air purication
only when the water in the bucket is out and
the REFILL WATER light ashes. Humidication
function can only be activated when the bucket
is lled with water.

17
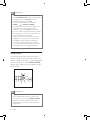
EN
English
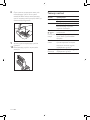
Note
• When the humidity level in the room is very
high, it is possible that condensation develops on
the air quality sensor. As a result, the air quality
light may indicate that the air quality is bad even
though the air quality is good. In this case you
have to clean the air quality sensor or use one of
the manual speed settings.
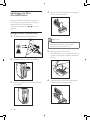
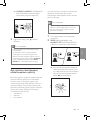
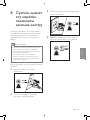
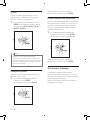
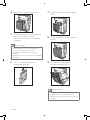
1 Clean the inlet and outlet of the air quality
and air humidity sensors with a soft brush.
2 Remove the cover of the air quality and air
humidity sensors.
3 Clean the sensors, the dust inlet and the
dust outlet with a lightly moistened cotton
swab.
5 Cleaning your
appliance
Note
• Always unplug the appliance before you clean it.
• Never immerse the appliance in water or any
other liquid.
• Never use abrasive, aggressive, or ammable
cleaning agents such as bleach or alcohol to
clean any part of the appliance.
• Only the pre-lter and humidication lter are
washable. Other air purier lters are NOT
washable nor vacuum cleanable.
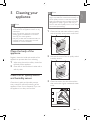
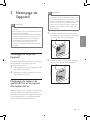
Clean the body of the
appliance
Regularly clean the inside and outside of the
appliance to prevent dust from collecting.
1 Wipe away dust with a soft dry cloth from
the body of the appliance.
2 Clean the air inlet and the air outlet with a
soft dry cloth.
Clean the air quality sensor
and humidity sensor
Clean the air quality and humidity sensors
every month for optimal functioning of the
appliance. Clean it more frequently if you use
the appliance in a dusty environment.

18
EN
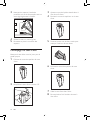
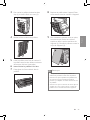
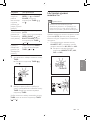
5 Shake the bucket to and fro with both
hands to clean the inside of the water
bucket.
6 Unscrew the top cap of the water bucket.
7 Empty the water bucket into a sink.
8 Rinse the inside of the water bucket with
fresh water several times.
9 Screw the top cap tightly back onto the
water bucket.
4 Dry them with a dry cotton swab.
5 Reattach the sensor cover.
Clean the water bucket
Clean the water bucket every day to keep it
hygienic.
1 Unscrew the top cap of the water bucket.
2 Fill the water bucket for 1/3 with water.
3 Add some mild washing-up liquid to the
water in the water bucket.
4 Screw the top cap tightly back onto the
water bucket.

19EN
English
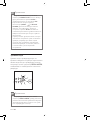
3 Rinse the humidication lter tray under a
running tap.
Note
• If necessary, use a mild detergent to clean the
humidication lter tray. In this case, rinse the
humidication lter tray thoroughly.
4 Dry the humidication lter tray with a
soft, dry cloth.
5 Place the humidication lter back and
slide the humidication lter tray back to
the appliance.
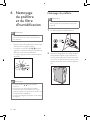
Clean the humidication lter
tray
Clean the humidication lter tray every week
to keep them hygienic.
1 Remove the water bucket out of the
appliance. Then remove the humidication
lter tray from the appliance.
Note
• Remove the water bucket rst before you can
remove the humidication lter tray.
2 Take the humidication lter out of the
humidication lter tray.

20
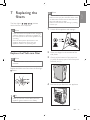
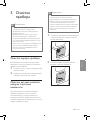
EN
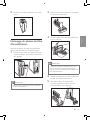
Clean the pre-lter
Note
• Clean the pre-lter for every two weeks to
ensure optimal functioning of the appliance.
1 Switch off the appliance and unplug it.
2 Place your ngers in the recesses of the
side panels, then lift and detach the bottom
of the font panel towards you (1). Gently
lift the top part of the front panel out of
the appliance (2).
4
2
1
6 Cleaning the
pre-filter and
humidification
filter
Note
• Only the pre-lter and humidication lter are
washable. All other lters are not washable.
• Rinse the humidication lter every week
to keep it hygienic.
• When the lter light
/ ashes, you
have to clean the pre-lter and descale the
humidication lter.
• The light ashes approximately for every
two weeks.
Note
• The lter light / keeps ashing for 24 hours.
• After you have cleaned the pre-lter and descale
the humidication lter, the light stops ashing
and the lter lifetime is reset automatically.
• When you turn off the appliance, the light stops
ashing.
La page est en cours de chargement...
La page est en cours de chargement...
La page est en cours de chargement...
La page est en cours de chargement...
La page est en cours de chargement...
La page est en cours de chargement...
La page est en cours de chargement...
La page est en cours de chargement...
La page est en cours de chargement...
La page est en cours de chargement...
La page est en cours de chargement...
La page est en cours de chargement...
La page est en cours de chargement...
La page est en cours de chargement...
La page est en cours de chargement...
La page est en cours de chargement...
La page est en cours de chargement...
La page est en cours de chargement...
La page est en cours de chargement...
La page est en cours de chargement...
La page est en cours de chargement...
La page est en cours de chargement...
La page est en cours de chargement...
La page est en cours de chargement...
La page est en cours de chargement...
La page est en cours de chargement...
La page est en cours de chargement...
La page est en cours de chargement...
La page est en cours de chargement...
La page est en cours de chargement...
La page est en cours de chargement...
La page est en cours de chargement...
La page est en cours de chargement...
La page est en cours de chargement...
La page est en cours de chargement...
La page est en cours de chargement...
La page est en cours de chargement...
La page est en cours de chargement...
La page est en cours de chargement...
La page est en cours de chargement...
La page est en cours de chargement...
La page est en cours de chargement...
La page est en cours de chargement...
La page est en cours de chargement...
La page est en cours de chargement...
La page est en cours de chargement...
La page est en cours de chargement...
La page est en cours de chargement...
La page est en cours de chargement...
La page est en cours de chargement...
La page est en cours de chargement...
La page est en cours de chargement...
La page est en cours de chargement...
La page est en cours de chargement...
La page est en cours de chargement...
La page est en cours de chargement...
La page est en cours de chargement...
La page est en cours de chargement...
La page est en cours de chargement...
La page est en cours de chargement...
La page est en cours de chargement...
La page est en cours de chargement...
La page est en cours de chargement...
La page est en cours de chargement...
La page est en cours de chargement...
La page est en cours de chargement...
La page est en cours de chargement...
La page est en cours de chargement...
La page est en cours de chargement...
La page est en cours de chargement...
La page est en cours de chargement...
La page est en cours de chargement...
La page est en cours de chargement...
La page est en cours de chargement...
La page est en cours de chargement...
La page est en cours de chargement...
La page est en cours de chargement...
La page est en cours de chargement...
La page est en cours de chargement...
La page est en cours de chargement...
La page est en cours de chargement...
La page est en cours de chargement...
La page est en cours de chargement...
La page est en cours de chargement...
La page est en cours de chargement...
La page est en cours de chargement...
La page est en cours de chargement...
La page est en cours de chargement...
La page est en cours de chargement...
La page est en cours de chargement...
La page est en cours de chargement...
La page est en cours de chargement...
La page est en cours de chargement...
La page est en cours de chargement...
La page est en cours de chargement...
La page est en cours de chargement...
La page est en cours de chargement...
La page est en cours de chargement...
La page est en cours de chargement...
La page est en cours de chargement...
La page est en cours de chargement...
La page est en cours de chargement...
La page est en cours de chargement...
La page est en cours de chargement...
La page est en cours de chargement...
La page est en cours de chargement...
La page est en cours de chargement...
La page est en cours de chargement...
La page est en cours de chargement...
La page est en cours de chargement...
La page est en cours de chargement...
La page est en cours de chargement...
La page est en cours de chargement...
La page est en cours de chargement...
La page est en cours de chargement...
La page est en cours de chargement...
La page est en cours de chargement...
La page est en cours de chargement...
La page est en cours de chargement...
La page est en cours de chargement...
La page est en cours de chargement...
La page est en cours de chargement...
La page est en cours de chargement...
La page est en cours de chargement...
La page est en cours de chargement...
La page est en cours de chargement...
La page est en cours de chargement...
La page est en cours de chargement...
La page est en cours de chargement...
La page est en cours de chargement...
La page est en cours de chargement...
La page est en cours de chargement...
La page est en cours de chargement...
La page est en cours de chargement...
La page est en cours de chargement...
La page est en cours de chargement...
La page est en cours de chargement...
La page est en cours de chargement...
La page est en cours de chargement...
La page est en cours de chargement...
La page est en cours de chargement...
La page est en cours de chargement...
La page est en cours de chargement...
La page est en cours de chargement...
La page est en cours de chargement...
La page est en cours de chargement...
La page est en cours de chargement...
La page est en cours de chargement...
La page est en cours de chargement...
La page est en cours de chargement...
La page est en cours de chargement...
La page est en cours de chargement...
La page est en cours de chargement...
La page est en cours de chargement...
La page est en cours de chargement...
La page est en cours de chargement...
La page est en cours de chargement...
La page est en cours de chargement...
La page est en cours de chargement...
La page est en cours de chargement...
La page est en cours de chargement...
La page est en cours de chargement...
La page est en cours de chargement...
La page est en cours de chargement...
La page est en cours de chargement...
La page est en cours de chargement...
La page est en cours de chargement...
La page est en cours de chargement...
-
 1
1
-
 2
2
-
 3
3
-
 4
4
-
 5
5
-
 6
6
-
 7
7
-
 8
8
-
 9
9
-
 10
10
-
 11
11
-
 12
12
-
 13
13
-
 14
14
-
 15
15
-
 16
16
-
 17
17
-
 18
18
-
 19
19
-
 20
20
-
 21
21
-
 22
22
-
 23
23
-
 24
24
-
 25
25
-
 26
26
-
 27
27
-
 28
28
-
 29
29
-
 30
30
-
 31
31
-
 32
32
-
 33
33
-
 34
34
-
 35
35
-
 36
36
-
 37
37
-
 38
38
-
 39
39
-
 40
40
-
 41
41
-
 42
42
-
 43
43
-
 44
44
-
 45
45
-
 46
46
-
 47
47
-
 48
48
-
 49
49
-
 50
50
-
 51
51
-
 52
52
-
 53
53
-
 54
54
-
 55
55
-
 56
56
-
 57
57
-
 58
58
-
 59
59
-
 60
60
-
 61
61
-
 62
62
-
 63
63
-
 64
64
-
 65
65
-
 66
66
-
 67
67
-
 68
68
-
 69
69
-
 70
70
-
 71
71
-
 72
72
-
 73
73
-
 74
74
-
 75
75
-
 76
76
-
 77
77
-
 78
78
-
 79
79
-
 80
80
-
 81
81
-
 82
82
-
 83
83
-
 84
84
-
 85
85
-
 86
86
-
 87
87
-
 88
88
-
 89
89
-
 90
90
-
 91
91
-
 92
92
-
 93
93
-
 94
94
-
 95
95
-
 96
96
-
 97
97
-
 98
98
-
 99
99
-
 100
100
-
 101
101
-
 102
102
-
 103
103
-
 104
104
-
 105
105
-
 106
106
-
 107
107
-
 108
108
-
 109
109
-
 110
110
-
 111
111
-
 112
112
-
 113
113
-
 114
114
-
 115
115
-
 116
116
-
 117
117
-
 118
118
-
 119
119
-
 120
120
-
 121
121
-
 122
122
-
 123
123
-
 124
124
-
 125
125
-
 126
126
-
 127
127
-
 128
128
-
 129
129
-
 130
130
-
 131
131
-
 132
132
-
 133
133
-
 134
134
-
 135
135
-
 136
136
-
 137
137
-
 138
138
-
 139
139
-
 140
140
-
 141
141
-
 142
142
-
 143
143
-
 144
144
-
 145
145
-
 146
146
-
 147
147
-
 148
148
-
 149
149
-
 150
150
-
 151
151
-
 152
152
-
 153
153
-
 154
154
-
 155
155
-
 156
156
-
 157
157
-
 158
158
-
 159
159
-
 160
160
-
 161
161
-
 162
162
-
 163
163
-
 164
164
-
 165
165
-
 166
166
-
 167
167
-
 168
168
-
 169
169
-
 170
170
-
 171
171
-
 172
172
-
 173
173
-
 174
174
-
 175
175
-
 176
176
-
 177
177
-
 178
178
-
 179
179
-
 180
180
-
 181
181
-
 182
182
-
 183
183
-
 184
184
-
 185
185
-
 186
186
-
 187
187
-
 188
188


Philips AC4086/01 Manuel utilisateur
- Catégorie
- Purificateurs d'air
- Taper
- Manuel utilisateur
dans d''autres langues
- Deutsch: Philips AC4086/01 Benutzerhandbuch
Documents connexes
-
Philips AC4084/01 Manuel utilisateur
-
Philips AC4072 Manuel utilisateur
-
Philips AC4014 Manuel utilisateur
-
-
Philips AC4080/10 Manuel utilisateur
-
-
-
-
Philips AC2729/10 Manuel utilisateur
-
Philips AC2729/11 Manuel utilisateur