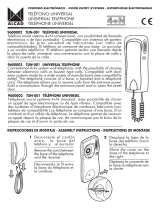
SSS Siedle AIB 150-0 Information produit
- Taper
- Information produit

Produktinformation
Audio-Innenstation
Siedle Basic
Product information
Audio indoor station
Siedle Basic
Information produit
Platine intérieure audio
Siedle Basic
Opuscolo informativo
sulprodotto
Posto interno audio
Siedle Basic
Productinformatie
Audio binnenstation
Siedle Basic
Produktinformation
Audio-svartelefon
Siedle Basic
Produktinformation
Audio-inomhusstation
Siedle Basic
AIB 150-0

6
7

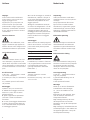
1,50 m / 4.9 feet
1 2
5
3 4

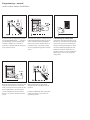
4 An der Türstation die gewünschte
Ruftaste für 4Sekunden gedrückt
halten, bis am Türlautsprecher ein
langgezogener Ton zu hören ist.
Die Ruftaste ist jetzt dem Bus-Innen-
gerät zugeordnet, die Sprechver
bindung besteht nicht mehr.
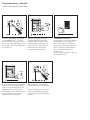
1 Programmiermodus einschalten.
Am BNG/BVNG650… die Taste
Prog.Mode kurz drücken. Die LED1
blinkt im 2SekundenRhythmus für
die Anzeige, dass der Programmier-
modus aktiv ist.
5 Die Ruftaste ist jetzt dem Bus-
Freisprechtelefon fest zugewiesen.
Weitere Teilnehmer nach der glei-
chen Vorgehensweise program-
mieren oder Programmiervorgang
beenden.
2 An der Türstation die Licht/
Programmiertaste 4Sekunden
gedrückt halten. Danach ist ein
langgezogener Quittungston zu
hören, der alle 5Sekunden kurz
wiederholt wird, solange der
Programmiermodus aktiv ist.
4 Sek.
3 Siedle Basic aktivieren
Sprechtaste für 4Sekunden drücken.
Als Bestätigung ist ein langgezo-
gener Quittungston zu hören und
die LED Stummschaltung beginnt zu
blinken. Das BusFreisprech telefon
baut die Sprechverbindung zur
Türstation auf.
Das Bus-Freisprechtelefon ist jetzt im
Programmiermodus.
Programmierung – Manuell
AudioInnenstation Siedle Basic

4 At the door station, hold down the
required call button for 4seconds
until a protracted tone sounds at the
door loudspeaker. The call button
is now assigned to the bus indoor
devices, no speech connection now
exists.
1 Switch on the programming mode.
At the BNG/BVNG650…, press the
programming mode button briey.
The LED1 ashes in a 2second
rhythm to indicate that the program-
ming mode is active.
5 The call button is now rmly
assigned to the handsfree bus tel-
ephone.
Program additional users using the
same procedure or quit the pro-
gramming mode.
2 At the door station, hold down the
light/programming button for 4sec-
onds. A protracted acknowledge-
ment tone is then audible which is
repeated every 5seconds as long
as the programming mode remains
active.
4 Sek.
3 Activating the Siedle Basic
Hold down the speech button for 4
seconds. A protracted acknowledge-
ment tone sounds as conrmation
and the muting LED begins to ash.
The bus handsfree telephone esta-
blishes the speech connection to
the door station. The bus handsfree
telephone is now in the program-
ming mode.
Programming – manual
Audio indoor station Siedle Basic

2
Deutsch
Anwendung
Audio-Innenstation Siedle Basic:
Freisprechstation für die Aufputz-
montage.
Einstiegsgerät mit allen wesentli-
chen Funktionen in Siedle-Qualität.
Reduziertes, ergonomisch opti-
miertes Design mit einfacher
Bedienung, klarer Symbolik und
hervorragender Akustik.
Elektrische Spannung
Einbau, Montage und Service-
arbeiten elektrischer Geräte dürfen
ausschließlich durch eine Elektro-
Fachkraft erfolgen.
Elektrostatische Auadung
Durch elektrostatische Auadung
kann bei direktem Kontakt mit der
Leiterplatte das Gerät zerstört
werden. Vermeiden Sie daher ein
direktes Berühren der Leiterplatte.
Lieferumfang
• AIB150-… (Grundplatte und
Gehäuse mit Leiterplatte)
• Bedienungsanleitung für den
Endkunden
• diese Produktinformation
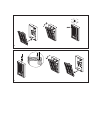
Montage
Kabel auf ca.80mm abmanteln.
1 Empfohlene Einbauhöhe
ca.1,50m bis Gerätemitte.
2 Öffnen des Gerätes, dazu Rast
hebel eindrücken und Frontseite
abnehmen.
3 Bei Montage direkt auf der Wand
die Grundplatte mit 2Schrauben
befestigen. Einbaulage Oben/Top
beachten.
4 Bei Montage auf Schalterdose
Schraubenöffnungen in der Geräte
mitte verwenden. Einbaulage Oben/
Top beachten.
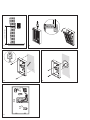
5 Installation nach Anschlussplan
vornehmen. Die Adern des Instal
lationskabels müssen innerhalb des
freien Installationsraumes in der
Grundplatte verstaut werden.
6 Gehäuse auf der Grundplatte
aufsetzen und mit leichtem Druck
schließen.
Demontage
7 Zum Abnehmen des Gehäuses
die Verriegelung nach unten drü
cken. Die Leiterplatte verbleibt im
GehäuseOberteil.
Klemmenbelegung
Ta, Tb In-Home-Bus
ERT Etagenruftaste
Inbetriebnahme
Installation, Inbetriebnahme und
Programmierung sind im System-
handbuch beschrieben (liegt den
Bus-Netzgeräten BNG/BVNG650-...
bei).
Technische Daten
Betriebsspannung:
über In-Home-Bus
Abmessungen (mm) B x H x T:
79x133x23
Application
Audio indoor station Siedle Basic:
Handsfree station for surface
mounting.
Entry-level device with all essen-
tial functions in the accustomed
standard of Siedle quality. Minimized
ergonomically optimized design with
simple operation, clear symbolism
and excellent acoustics.
Electrical voltage
Mounting, installation and servicing
work on electrical devices may only
be performed by a suitably qualied
electrician.
Electrostatic charging
As a result of electrostatic charging,
direct contact with the circuit board
can result in destruction of the
device. Direct contact with the circuit
board must therefore be avoided.
Scope of supply
• AIB150-… (Base plate and
housing with circuit board)
• operating instructions for the end
user
• this product information
Mounting
Strip back cable to appr.80mm.
1 Recommended mounting height
appr.1.50m/4.9ft to centre device.
2 Open the device by pushing in
the locking lever and taking off the
front side.
3 When mounting directly on the
wall, fasten the base plate using
2screws, paying attention that
the plate is the right way up (top
marking).
4 When mounting on a switch box,
use the screw openings in the centre
of the device, paying attention that
the plate is the right way up (top
marking).
English

3
5 Install in accordance with the
wiring diagram. The cores of the
installation cable must be stored
inside the free installation space in
the base plate.
6 Place the housing on the base
plate from above and close by
exerting a slight pressure.
Dismantling
7 To remove the housing, push the
catch downwards. The pcb remains
in the top part of the housing.
Terminal assignment
Ta, Tb In-Home bus
ERT Storey call button
Commissioning
Installation, commissioning and
programming are described in the
system manual (enclosed with line
rectiers BNG/BVNG650-... ).
Specications
Operating voltage: via In-Home bus
Dimensions (mm) W x H x D:
79x133x23
Application
Platine intérieure audio Siedle Basic:
Poste mains libres pour montage
en saillie.
Appareil pour débuter, avec toutes
les fonctions essentielles en qualité
Siedle. Design réduit et optimisé
ergonomiquement, avec commande
simple, symbolique claire et excel-
lente acoustique.
Tension électrique
L’installation, le montage et l’entre-
tien d’appareils électriques ne
doivent être réalisés que par un spé-
cialiste en électricité.
Charge électrostatique
La charge électrostatique peut
détruire l’appareil en cas de contact
direct avec la carte de circuits
imprimés. Evitez par conséquent
tout contact direct avec la carte de
circuits imprimés.
Etendue de la fourniture
• AIB150-… (socle et boîtier avec
carte de circuits imprimés)
• notice d’utilisation pour le
consommateur
• la présente information produit
Montage
Dénuder le câble sur 80mm environ.
1 Hauteur de montage conseillée
env.1,50m du centre de l’appareil.
2 Ouvrir l‘appareil; à ces ns,
enfoncer le levier d‘encliquetage et
retirer la face avant.
3 Dans le cas d’un montage direc
tement au mur, xer le socle à l’aide
de 2vis. Respecter la position de
montage Haut/Top.
4 Dans le cas d’un montage sur
prise, utiliser les orices pour vis
prévus au centre de l’appareil.
Respecter la position de montage
Haut/Top.
Français
5 Effectuer l’installation conformé
ment au schéma de raccordement.
Les ls du câble d’installation
doivent être regroupés dans la zone
d’installation libre du socle.
6 Placer le boîtier sur le socle et
le fermer en exerçant une légère
pression.
Démontage
7 Pour retirer le boîtier, appuyer sur
le verrouillage vers le bas. La carte
de circuits imprimés reste dans la
partie supérieure du boîtier.
Implantation des bornes
Ta, Tb Bus In-Home
ERT Touche d‘appel d‘étage
Mise en service
L’installation, la mise en service et
la programmation sont décrits dans
le manuel système (joint aux blocs
d’alimentation bus BNG/
BVNG650-...).
Caractéristiques techniques
Tension d’entrée : du Bus In-Home
Dimensions (mm) l x H x P :
79x133x23

4
Impiego
Posto interno audio Siedle Basic:
posto interno vivavoce per mon-
taggio appoggio muro.
Apparecchio per principianti con
tutte le funzioni principali nella
qualità Siedle. Design ergonomico,
essenziale, caratterizzato da facilità
d’uso, simbologia chiara e acustica
straordinaria.
Tensione elettrica
Gli interventi di installazione, mon-
taggio e assistenza agli apparecchi
elettrici devono essere eseguiti esclu-
sivamente da elettricisti specializzati.
Carica elettrostatica
In caso di contatto diretto con il cir-
cuito stampato, l’apparecchio può
subire danni irreparabili a causa della
carica elettrostatica. Evitare quindi di
toccare direttamente il circuito stam-
pato.
Kit di fornitura
• AIB150-… (piastra base e scatola
con circuito stampato)
• istruzioni per l’uso per l’utilizzatore
nale
• il presente opuscolo informativo
sul prodotto
Montaggio
Spelare il cavo per circa80mm.
1 Altezza di montaggio raccoman
data circa1,50m no al centro
dell’apparecchio.
2 Aprire l‘apparecchio premendo
sulla leva a scatto e smontare il
frontalino.
3 In caso di montaggio direttamente
a parete, ssare la piastra base con
2viti. Fare attenzione alla posizione
di montaggio superiore.
Italiano
4 In caso di montaggio su scatola di
distribuzione, utilizzare i fori per le
viti al centro dell’apparecchio. Fare
attenzione alla posizione di mon
taggio superiore.
5 Eseguire l’installazione secondo
lo schema di collegamento. I li del
cavo d’installazione devono essere
alloggiati all’interno del vano di
montaggio libero nella piastra base.
6 Applicare la scatola sulla piastra
base e chiuderla con una leggera
pressione.
Smontaggio
7 Per smontare la scatola spingere il
blocco verso il basso. Il circuito stam
pato rimane nella parte superiore
della scatola.
Assegnazione dei morsetti
Ta, Tb In-Home-Bus
ERT Tasto di chiamata dal piano
Messa in funzione
L’installazione, la messa in funzione
e la programmazione sono descritte
nel manuale del sistema (alle-
gato agli alimentatori bus BNG/
BVNG650-...).
Dati tecnici
Tensione d’esercizio: tramite
In-Home-Bus
Dimensioni (mm) Larg. x Alt. x Prof.:
79x133x23
Toepassing
Audio binnenstation Siedle Basic:
Handsfree station voor de opbouw-
montage.
Instap-apparaat met alle wezen-
lke functies in Siedle kwaliteit.
Gereduceerd, ergonomisch geopti-
maliseerd Design met eenvoudige
bediening, duidelke symboliek en
uitstekende akoestiek.
Elektrische spanning
Inbouw, montage en onderhouds-
werkzaamheden aan elektrische
apparaten mogen uitsluitend door
een elektro-vakman worden uitge-
voerd.
Elektrostatische lading
Door elektrostatische lading kan b
een direct contact met de printplaat
het apparaat worden vernietigd.
Vermdt u daarom het direct aan-
raken van de printplaat.
Leveringsomvang
• AIB150-… (basisplaat en behui-
zing met printplaat)
• gebruikershandleiding voor de
eindgebruiker
• deze productinformatie
Montage
Kabel op ca.80mm afmantelen.
1 Aanbevolen inbouwhoogte
ca.1,50m tot midden van het
apparaat.
2 Openen van het apparaat, daar
voor de hefboom indrukken en
frontpaneel afnemen.
3 B montage direct op de muur
de basisplaat met 2schroeven
bevestigen. Let op de inbouwpositie
boven/top.
4 B montage op schakelaardoos de
schroefopeningen in het midden van
het apparaat gebruiken. Let op de
inbouwpositie boven/top.
Nederlands

5
5 Installatie volgens aansluitschema
uitvoeren. De aders van de instal
latiekabel moeten binnen de vre
installatieruimte in de basisplaat
worden weggestopt.
6 Behuizing boven op de basisplaat
plaatsen en met lichte druk sluiten.
Demontage
7 Voor het verwderen van de behui
zing de vergrendeling naar beneden
drukken. De printplaat blft in het
bovenste deel van de behuizing.
Klemmenindeling
Ta, Tb In-Home-Bus
ERT etage-oproeptoets
Ingebruikname
Installatie, ingebruikname en pro-
grammering zn beschreven in het
systeemhandboek (meegeleverd
b de Bus-netvoedingen BNG/
BVNG650-...).
Technische gegevens
Gebruiksspanning: via de
In-Home-Bus
Afmetingen (mm) B x H x D:
79x133x23
Anvendelse
Audio-svartelefon Siedle Basic:
Håndfri station til frembygnings-
montage.
Basisapparat med alle væsent-
lige funktioner i Siedle-kvalitet.
Reduceret, ergonomisk design med
nem betjening, klare symboler og
fremragende akustik.
Elektrisk spænding
Indbygning og montering af samt
servicearbejde på elektrisk materiel
må kun foretages af en aut. elinstal-
latør.
Elektrostatisk opladning
Elektrostatisk opladning kan øde-
lægge enheden ved direkte kontakt
med printpladen. Undgå derfor
direkte berøring af printpladen.
Leveringsomfang
• AIB150-… (bundplade og kabinet
med printplade)
• betjeningsvejledning til slutbru-
geren
• denne produktinformation
Montage
Ca.80mm kabel asoleres.
1 Anbefalet monteringshøjde
ca.1,50m til enhedens midte.
2 Apparatet åbnes ved at trykke
kseringsarmen ind og tage front
siden af.
3 Ved montering direkte på væg
fastgøres bundpladen med 2skruer.
Det er vigtigt at være opmærksom
på korrekt placering af enheden:
“Oben/Top“.
4 Ved montering i tilslutningsdåse
anvendes skrueåbninger i enhedens
midte. Vær opmærksom på korrekt
placering af enheden: “Oben/Top“.
Dansk
5 Installationen foretages ifølge til
slutningsdiagram. Installationskablets
ledere skal opbevares indvendigt i
bundpladen på den frie installati
onsplads.
6 Sæt kabinettet på bundpladen og
luk med et let tryk.
Afmontering
7 Kabinettet tages af ved at trykke
låsen nedad. Printpladen forbliver i
kabinettets overdel.
Klemmekonfiguration
Ta, Tb In-Home-bus
ERT Etageopkaldstast
Ibrugtagning
Installation, idriftsætning og pro-
grammering er beskrevet i System-
håndbogen (vedlagt bus-strømforsy-
ningerne BNG/BVNG650-...).
Tekniske data
Driftsspænding: via In-Home-Bus
Mål (mm) b x h x d: 79x133x23

6
Användning
Audio-inomhusstation Siedle Basic:
Högtalande telefon för utanpålig-
gande montering.
En första apparat med alla väsent-
liga funktioner i Siedle-kvalitet.
Reducerad, ergonomiskt optimerad
design, enkel att använda, klar sym-
bolik och utmärkt akustik.
Elektrisk spänning
Installation, montering och servicear-
beten på elektriska apparater får
utföras endast av behörig eltekniker.
Elektrostatisk laddning
När elektrostatisk laddning kommer
direkt i kontakt med kretskortet, kan
apparaten förstöras. Undvik därför
att direkt beröra kretskortet.
Leveransomfång
• AIB150-… (bottenplatta och hölje
med kretskort)
• bruksanvisning för slutkunden
• denna produktinformation
Montage
Skala av ungefär80mm på kabeln.
1 Rekommenderad monteringshöjd
ca1,50m till mitten på apparaten.
2 För att kunna öppna apparaten,
tryck in spärrhaken och ta av fram
sidan.
3 Vid montering direkt på väggen,
sätt fast bottenplattan med
2skruvar. Beakta monteringsläget
Oben/Top (Upp).
4 Vid montering på kopplingsdosa,
använd skruvöppningarna mitt på
apparaten. Beakta monteringsläget
Oben/Top (Upp).
5 Utför installationen enligt anslut
ningsschemat. Installationskabelns
ledare måste stoppas in i det fria
installationsutrymmet i botten
plattan.
Svenska
6 Placera höljet på bottenplattan
och stäng genom att lätt trycka till.
Demontering
7 För att ta av höljet, tryck låsningen
nedåt. Kretskortet blir kvar i höljets
överdel.
Klämtilldelning
Ta, Tb In-Home-buss
ERT Våningsplansknapp
Idrifttagning
Installationen, idrifttagningen och
programmeringen beskrivs i system-
handboken (ligger till-sammans
med buss-nätaggregatet BNG/
BVNG650-...).
Tekniska data
Driftsspänning: via In-Home-bussen
Mått (mm) B X H X D: 79x133x23

7

S. Siedle & Söhne
Telefon- und Telegrafenwerke OHG
Postfach 1155
78113 Furtwangen
Bregstraße 1
78120 Furtwangen
Telefon +49 7723 63-0
Telefax +49 7723 63-300
www.siedle.de
© 2015/11.15
Printed in Germany
Best. Nr. 0-1101/049083
-
 1
1
-
 2
2
-
 3
3
-
 4
4
-
 5
5
-
 6
6
-
 7
7
-
 8
8
-
 9
9
-
 10
10
-
 11
11
-
 12
12


SSS Siedle AIB 150-0 Information produit
- Taper
- Information produit
dans d''autres langues
- italiano: SSS Siedle AIB 150-0 Informazioni sul prodotto
- English: SSS Siedle AIB 150-0 Product information
- Deutsch: SSS Siedle AIB 150-0 Produktinformation
- Nederlands: SSS Siedle AIB 150-0 Productinformatie
- dansk: SSS Siedle AIB 150-0 Produkt information
- svenska: SSS Siedle AIB 150-0 Produktinformation
Documents connexes
-
SSS Siedle Siedle BTS 850-0 Information produit
-
-
-
-
-
-
-
-
-