
| www.phanteks.com
INSTALLATION GUIDE
VERSION 1.0
Installationsanleitung | Guide d’installation | Guía de instalación | 安装指南
Legenda
Legende | Légende | Leyenda | 传奇
Remove | Entfernen | Retirer | Eliminar | 拆除
Install | Installieren | Installer | Instalar | 安装
01
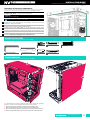
THIS MANUAL IS FOR THE FOLLOWING MODELS
PH-PLEDKT_NV5_DBK01
PH-PLEDKT_NV5_DWT01
NV5 Premium D-RGB Kit | Black
NV5 Premium D-RGB Kit | White
Phanteks will not take responsibility for any damages incurred due to incorrect
installation or usage of this product.
Phanteks übernimmt keine Verantwortung für Schäden, die durch eine falsche
Installation oder Verwendung dieses Produkts entstehen.
Phanteks décline toute responsabilité en cas de dommages résultant d’une
installation ou d’une utilisation incorrecte de ce produit.
Phanteks no se responsabilizará de los daños ocasionados por la instalación o el uso
incorrectos de este producto.
Phanteks 不会承担因用户安装失误造成的任何损失,请仔细阅读本说明书。
EN
DE
FR
ES
CN
SCOPE OF DELIVERY
Lieferumfang | Contenu de la livraison | Alcance de la entrega | 附件内容
Dieses Handbuch gilt für die folgenden Modelle | Ce manuel concerne les modèles
suivants | Este manual es para los siguientes modelos | 此手册适用于以下型号
Online Manual
Online-Handbuch
Manuel en ligne
Manual en Linea
在线手册
NV5 Motherboard Cover
x1
NV5 Premium D-RGB Kit
x1
Thumb Screw
x1
D-RGB Output Cables
x3
D-RGB Hub Input Cable
x1 SATA Cable
x1
D-RGB Hub
x1
DIGITAL
INPUT SATA
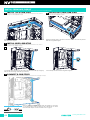
PANEL REMOVAL
Ausbau des Panels | Retrait du panneau | Eliminación de paneles | 拆除面板
1
2
3
4
It is recommended to remove all external panels before starting the installation
process. For further instructions please check the NV5 chassis manual.
Remove the top panel by loosen the thumb screws and slide it back.
Remove the glass panel by loosen the thumb screws and slide it back.
Remove the front glass panel by removing the two screws and slide it to the left.
Remove the right side panel by loosen the two thumb screws and slide it back.
1 -
2 -
3 -
4 -

INSTALLATION GUIDE | www.phanteks.com
02
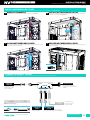
INSTALL BOTTOM D-RGB STRIP
02 Installieren Sie den unteren D-RGB-Streifen | Installer la bande D-RVB inférieure | Instale la
tira D-RGB inferior | 安装底部 D-RGB 灯带
INSTALL TOP D-RGB STRIP
01 Installieren Sie den oberen D-RGB-Streifen | Installer la bande supérieure D-RVB | Instale la
tira superior D-RGB | 安装顶部 D-RGB 灯带
INSTALL SIDE D-RGB STRIP
03 Installieren Sie den seitlichen D-RGB-Streifen | Installer la bande latérale D-RVB | Instale la
tira lateral D-RGB | 安装侧面 D-RGB 灯带
CONNECT D-RGB STRIPS
04 D-RGB-Streifen anschließen | Connecter les bandes D-RVB | Conecte tiras D-RGB | 连接 D-RGB 灯带
INSTALL PREMIUM D-RGB KIT
Installieren Sie das Premium D-RGB-Kit | Installer le kit D-RVB Premium | Instale el kit Premium D-RGB | 安装 D-RGB 套件
1 2
Connect D-RGB LED Strip 2x
Slide the D-RGB strip gently in the top of the NV5 chassis. The D-RGB strip secures itself
with intergraded magnets.
To install the side D-RGB strip, align the bottom with the lower D-RGB strip and gently
slide it to the back to align it with the top D-RGB strip.
With all D-RGB strips installed, connect them all together by connecting
it to the Digital Output cable provided with the D-RGB Kit Hub. For further
instructions see chapter ‘Connect D-RGB Kit to Hub’ on page 3.
The D-RGB strip secures itself with intergraded magnets.
Slide the D-RGB strip gently in the bottom of the NV5 chassis. The D-RGB strip secures
itself with intergraded magnets.

INSTALLATION GUIDE | www.phanteks.com
INSTALLATION GUIDE
Installationsanleitung | Guide d’installation | Guía de instalación | 安装指南
VERSION 1.0
D-RGB Output Cables 2x
03
FROM NV5
CHASSIS DIGITAL
INPUT SATA
INSTALL MOTHERBOARD COVER
02 Installieren Sie die Motherboard-Abdeckung | Installer le couvercle de la carte mère | Instale
la cubierta de la placa base | 安装主板供电灯带
REMOVE GROMMETS
01 Entfernen Sie die Ösen | Supprimer les GromMets | Retire los ojales | 拆除保护胶盖
ALIGN MOTHERBOARD COVER
03 Richten Sie die Motherboard-Abdeckung aus | Aligner le couvercle de la carte mère | Alinear
la cubierta de la placa base | 向下扣紧
SECURE MOTHERBOARD COVER
04 Sichere Motherboard-Abdeckung | Couverture sécurisée de la carte mère | Cubierta de placa
base segura | 锁紧螺丝
INSTALL MOTHERBOARD COVER
Installieren Sie die Motherboard-Abdeckung | Installer le couvercle de la carte mère | Instale la cubierta de la placa base | 安装主板供电灯带
D-RGB LED
STRIPS MOTHERBOARD
COVER
NV5 PREMIUM D-RGB KITNV5 PREMIUM D-RGB KIT
EXPANSION
PORT
POWER SUPPLY
Position 1
Position 2
Thumb Screw 1x
CONNECT D-RGB KIT TO HUB
Schließen Sie das D-RGB-Kit an den Hub an | Connecter le kit D-RVB au hub | Conecte el kit D-RGB al concentrador | 连接HUB供电
1
2
Netzteil | Bloc d’alimentation |
Unidad de fuente de alimentación
| 供电接口
Erweiterungsport | Port
d’extension | Puerto de
expansión | 扩展接口
D-RGB-Kit | Kit D-RVB | Kit
D-RGB | D-RGB 套件
Motherboard-Abdeckung | Couverture de la
carte mère | Cubierta de la placa base | 主板盖
NV5 D-RGB-Controller |
Contrôleur NV5 D-RGB |
Controlador NV5 D-RGB
| NV5 D-RGB 控制器
Remove the two highlighted rubber grommets. These can be gently pulled out.
Slide the motherboard cover down to secure it initialy.
Connect the D-RGB strips to the included RGB hub in two
of the three DIGITAL ports. Next connect the INPUT to the
NV5 D-RGB controller, with the nal step to connect the
SATA to the power supply.
There are two positions on how to place the motherboard cover.
Use the thumb screw to secure the motherboard cover.

| www.phanteks.com
Importer EU
Axpertec Int. B.V. (EU)
Sydneystraat 33
3047 BP Rotterdam
The Netherlands
Phanteks Taiwan Inc.
11F., No. 150, Jian 1st Rd.,
Zhonghe Dist. New Taipei City 235
Taiwan
Importer US
Axpertec Inc. (US)
20465 E Walnut Dr. N
City of Industry, California 91789
United States
-
 1
1
-
 2
2
-
 3
3
-
 4
4


Phanteks NV5 Premium LED Kit Le manuel du propriétaire
- Taper
- Le manuel du propriétaire
- Ce manuel convient également à
dans d''autres langues
Documents connexes
-
Phanteks ENTHOO Serie Le manuel du propriétaire
-
-
-
-
Phanteks Eclipse p400S Le manuel du propriétaire
-
-
-
-