Omron Healthcare M6_AC Manuel utilisateur
- Catégorie
- Unités de pression artérielle
- Taper
- Manuel utilisateur

1
EN
Important Safety Information
Warning: Indicates a potentially hazardous situation which, if not avoided, could result in death or
serious injury.
(General Usage)
Consult your physician before using the device in pregnancy including pre-eclampsia, or if diagnosed with
arrhythmia or arteriosclerosis.
Do not use the device on the injured arm or the arm under medical treatment.
Do not apply the arm cuff on the arm while being on an intravenous drip or blood transfusion.
Consult your physician before using the device on the arm with an arterio-venous (A-V) shunt.
Do not use the device with other medical electrical (ME) equipment simultaneously.
Do not use the device in the area the HF surgical equipment, MRI, or CT scanner exists, or in the oxygen rich
environment.
The air tube or the AC adapter cable may cause accidental strangulation in infants.
Contained small parts that may cause a choking hazard if swallowed by infants.
(AC Adapter (optional) Usage)
Do not use the AC adapter if the device or the power cord is damaged. Turn off the power and unplug the power
cord immediately.
Plug the AC adapter into the appropriate voltage outlet. Do not use in a multi-outlet plug.
Never plug in or unplug the power cord from the electric outlet with wet hands.
Caution: Indicates a potentially hazardous situation which, if not avoided, may result in minor or
moderate injury to the user or patient or damage to the equipment or other property.
(General Usage)
Always consult your physician. Self-diagnosis of measurement results and self-treatment are dangerous.
People with severe blood flow problems, or blood disorders, should consult a physician before using the device,
as the arm cuff inflation can cause bruising.
13J2297
HEM-7322-E_A_M_EN.fm Page 1 Monday, November 11, 2013 3:18 PM

2
Important Safety Information
If there are any abnormalities during the measurement, remove the arm cuff.
Do not use this device on infants or persons who cannot express their intentions.
Do not inflate the arm cuff more than necessary.
Do not use the device for any purpose other than measuring blood pressure.
Use only the approved arm cuff for this device. Use of other arm cuffs may result in incorrect measurement results.
Do not use a mobile phone or other devices that emit electromagnetic fields, near the device. This may result in
incorrect operation of the device.
Do not disassemble the monitor or arm cuff.
Do not use in a location with moisture, or a location where water may splash on the device. This may damage the
device.
Do not use the device in a moving vehicle (car, airplane).
Do not take measurements more than necessary. It may cause bruising due to blood flow interference.
Consult your physician before using the device if you had a mastectomy.
(AC Adapter (optional) Usage)
Fully insert the power plug into the outlet.
When disconnecting the power plug from the outlet, do not pull the power cord. Be sure to pull from the power plug
safely.
When handling the power cord, take care not to do the following:
Wipe the dust off from the power plug.
Unplug monitor when not in use.
Disconnect the power plug before cleaning.
Use only the original AC adapter designed for this device. Use of unsupported adapters may damage and/or may
be hazardous to the device.
Do not damage. Do not break it.
Do not tamper with it. Do not forcibly bend or pull.
Do not twist. Do not bundle during use.
Do not pinch. Do not place under heavy objects.
HEM-7322-E_A_M.book Page 2 Friday, November 8, 2013 1:37 PM

3
Important Safety Information
EN
(Battery Usage)
Do not insert the batteries with their polarities incorrectly aligned.
Use only 4 “AA” alkaline or manganese batteries with this device. Do not use other types of batteries. Do not use
new and used batteries together.
Remove the batteries if the device will not be used for three months or more.
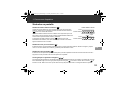
General Precautions
• Do not forcibly crease the arm cuff or the air tube excessively.
• Do not press the air tube while taking a measurement.
• To unplug the air plug, pull on the air plug at the connection with the monitor, not the tube itself.
• Do not drop the monitor or subject device to strong shocks or vibrations.
• Do not inflate the arm cuff when it is not wrapped around your arm.
• Do not use the device outside the specified environment. It may cause an inaccurate reading.
• Read and follow the "Important information regarding Electro Magnetic Compatibility (EMC)" in the
"6. Specifications".
• Read and follow the "Correct Disposal of This Product" in "6. Specifications" when disposing of the device and any
used accessories or optional parts.
HEM-7322-E_A_M.book Page 3 Friday, November 8, 2013 1:37 PM

4
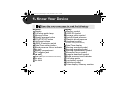
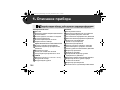
1. Know Your Device
Monitor
Display
Cuff wrap guide lamp
Memory button
Weekly average button
START/STOP button
Up/Down buttons
USER ID selection switch
Date/Time setting button
Blood pressure colour indicator
Air jack
Battery compartment
AC adapter jack
Arm cuff
Arm cuff (Arm circumference 22-42cm)
Air plug
Air tube
Display
Memory symbol
USER ID symbol
Average value symbol
Systolic blood pressure
Diastolic blood pressure
Heartbeat symbol
(Flashes during measurement)
Date/Time display
Morning average symbol
Evening average symbol
Morning hypertension symbol
Movement error symbol
Irregular heartbeat symbol
Blood pressure level indicator
Cuff wrap guide
Low battery symbol
Deflation symbol
Pulse display / Memory number
Open the rear cover page to read the following:
The letter identifiers on the rear cover page correspond to those in the body of this page.
A
B
C
D
E
F
G
H
I
J
K
L
M
N
O
P
Q
R
S
T
U
V
W
X
Y
Z
AA
AB
AC
AD
AE
AF
HEM-7322-E_A_M.book Page 4 Friday, November 8, 2013 1:37 PM

5
1. Know Your Device
EN
Display Symbols
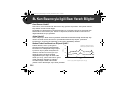
Irregular Heartbeat Symbol ( )
When the monitor detects an irregular rhythm two or more times during the
measurement, the irregular heartbeat symbol ( ) will appear on the
display with the measurement values.
An irregular heartbeat rhythm is defined as a rhythm that is 25% less or 25%
more than the average rhythm detected while the monitor is measuring the
systolic and diastolic blood pressure.
If the irregular heartbeat symbol ( ) displays with your measurement
results, we recommend you consult your physician. Follow the directions
of your physician.
Movement Error Symbol ( )
The movement error symbol is displayed if you move your body during the measurement. Please remove the arm
cuff, and wait 2-3 minutes. Take another measurement, remain still during measurement.
Average Value Symbol ( )
The average value symbol is displayed when you press and hold the memory button for more than 3 seconds. The
most recent average value appears on the display screen.
Cuff Wrap Guide Lamp ( /)
If the cuff was wrapped too loosely, it may cause unreliable results. If the wrapping of cuff is too loose, the cuff wrap
guide Lamp lights in “orange”. Otherwise lights in “green”. This is the function which is used as an aid in
determining if the cuff is wrapped snugly enough.
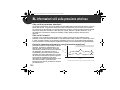
Normal Heartbeat
Irregular Heartbeat
Pulse
Blood pressure
Blood pressure
Short
Long
Pulse
HEM-7322-E_A_M.book Page 5 Friday, November 8, 2013 1:37 PM

6
1. Know Your Device
Blood Pressure Colour Indicator
If your systolic or diastolic pressure is above the standard range (135 mmHg for the
systolic blood pressure and/or 85 mmHg for the diastolic blood pressure), the blood
pressure colour indicator will light in “orange” when the measurement result is displayed. If
they are within the standard range, the blood pressure colour indicator will light in “green”.
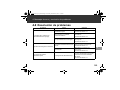
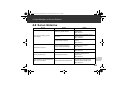
The JNC7* Guideline recommends the following guideline.
These are from statistical values for blood pressure.
* JNC7: The Seventh Report, 2003 Dec, of the Joint National Committee on Prevention, Detection, Evaluation, and Treatment of High
Blood Pressure.
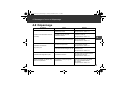
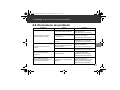
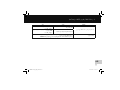
General Guidelines for Blood Pressure
Prehypertension at Office Hypertension at Home
Systolic Blood Pressure 120-139 mmHg 135 mmHg
Diastolic Blood Pressure 80-89 mmHg 85 mmHg
HEM-7322-E_A_M.book Page 6 Friday, November 8, 2013 1:37 PM

7
EN
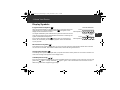
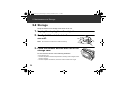
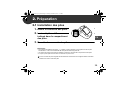
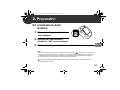
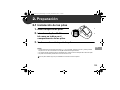
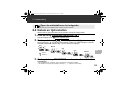
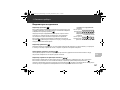
2. Preparation
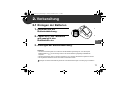
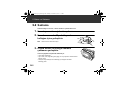
2.1
Battery Installation
1. Remove the battery cover.
2. Insert 4 “AA” batteries as
indicated in the battery
compartment.
3. Replace the battery cover.
Notes:
• When the low battery symbol ( ) appears on the display, turn the monitor off, then replace all batteries
at the same time. Long life alkaline batteries are recommended.
• The measurement values continue to be stored in memory even after the batteries are replaced.
• The supplied batteries may have a shorter life.
Disposal of used batteries should be carried out in accordance with the national/local regulations for the
disposal of batteries.
HEM-7322-E_A_M.book Page 7 Friday, November 8, 2013 1:37 PM

8
2. Preparation
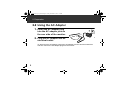
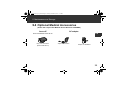
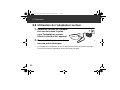
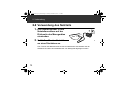
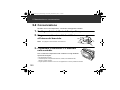
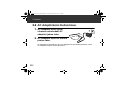
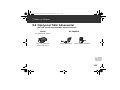
2.2
Using the AC Adapter
1. Insert the AC adapter plug
into the AC adapter jack on
the rear side of the monitor.
2. Plug the AC adapter into an
electrical outlet.
To disconnect the AC adapter, unplug the AC adapter from the electrical outlet first
and then remove the AC adapter plug from the monitor.
HEM-7322-E_A_M.book Page 8 Friday, November 8, 2013 1:37 PM

9
2. Preparation
EN
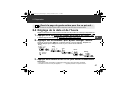
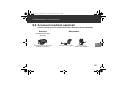
2.3
Setting the Date and Time
Set the monitor to the correct date and time before taking a measurement for the first time.
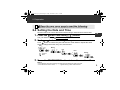
1. Press the Date/Time setting ( ) button.
The year flashes on the Date/Time display.
2. Push or button to change the year.
Push button to confirm the year and then the month flashes. Repeat the same
steps to change the month, day, hour, and minutes.
3. Press the START/STOP button to turn the monitor off.
Notes:
• If the batteries have been replaced, the date and time setting will need to be reset.
• If the date and time are not set, “-/ - -:--” appears during or after measurement.
Open the rear cover page to read the following:
The letter identifiers on the rear cover page correspond to those in the body of this page.
H
V
Year
Month
Day
Hour
Minute
Change Confirm
Change Confirm
Change Confirm
Change Confirm
Change Confirm
: Forward
: Back
HEM-7322-E_A_M.book Page 9 Friday, November 8, 2013 1:37 PM

10
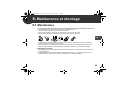
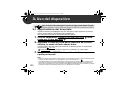
3. Using the Device
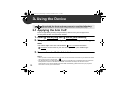
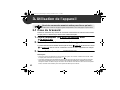
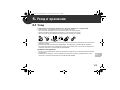
3.1
Applying the Arm Cuff
Remove tight-fitting clothing or tight rolled up sleeve from your left upper arm.
Do not place the arm cuff over thick clothes.
1. Insert the air plug into the air jack securely.
2. Wrap the arm cuff firmly in place around your left upper
arm.
The bottom edge of the arm cuff should be 1 to 2 cm above the elbow.
Air tube
is on the inside of your arm and aligned with your middle finger.
3. Secure closed with the fabric fastener.
Notes:
• When you take a measurement on the right arm, the air tube will be at the side of your elbow. Be careful
not to rest your arm on the air tube. ---
• The blood pressure can differ between the right arm and the left arm, and therefore also the measured
blood pressure values can be different. OMRON recommends to always use the same arm for
measurement. If the values between both arms differ substantially, please check with your physician
which arm to use for your measurement.
Open both the front and rear covers to read the following:
The letter identifiers on the cover pages correspond to those in the body of this page.
N
J
a
O
b
HEM-7322-E_A_M.book Page 10 Friday, November 8, 2013 1:37 PM

11
3. Using the Device
EN
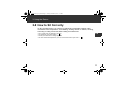
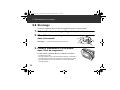
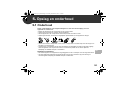
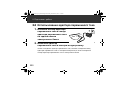
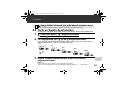
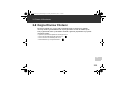
3.2
How to Sit Correctly
To take a measurement, you need to be relaxed and comfortably seated, under
comfortable room temperature. Avoid bathing, drinking alcohol or caffeine, smoking,
exercising or eating 30 minutes before taking a measurement.
• Sit on a chair with your feet flat on the floor.
• Sit upright with your back straight. ---
• Sit with your back and arm being supported.
• The arm cuff should be placed on your arm at the same level as your heart. ---
c
d
HEM-7322-E_A_M.book Page 11 Friday, November 8, 2013 1:37 PM

12
3. Using the Device
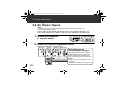
3.3
Taking a Measurement
Notes:
• To cancel a measurement, press the START/STOP button to release the air in the arm cuff.
• Remain still while taking a measurement.
The monitor is designed to take measurements and store the measurement values in
the memory for 2 people using USER ID 1 and USER ID 2.
1. Select your USER ID (1 or 2).
2. Press the START/STOP button.
The arm cuff starts to inflate automatically.
If your systolic pressure is
more than 210 mmHg
After the arm cuff starts to inflate, press and
hold the START/STOP button until the
monitor inflates 30 to 40 mmHg higher than
your expected systolic pressure.
Notes:
• The monitor will not inflate above 299 mmHg.
• Do not apply more pressure than necessary.
START INFLATE
DEFLATE
COMPLETE
Cuff Wrap Guide Lamp
HEM-7322-E_A_M.book Page 12 Friday, November 8, 2013 1:37 PM

13
3. Using the Device
EN
3. Remove the arm cuff.
4. Press the START/STOP button to turn the monitor off.
The monitor automatically stores the measurement result in its memory.
It will automatically turn off after 2 minutes.
Note: Wait 2-3 minutes before taking another measurement. Waiting between measurements allows the
arteries to return to the condition prior to taking a measurement.
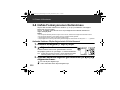
Using the Guest Mode
The monitor stores measurement values for 2 users in the memory. The guest mode
can be used to take a single measurement for another user. No measurement values
are stored in the memory when the guest mode is selected.
1. Press and hold the START/STOP
button for more than 3 seconds.
The USER ID symbol and the Date/Time display will disappear.
2. Release the START/STOP button when the Date/Time
display turns off.
The arm cuff will start to inflate automatically.
Always consult your physician. Self-diagnosis of measurement results and self-treatment are dangerous.
HEM-7322-E_A_M.book Page 13 Friday, November 8, 2013 1:37 PM

14
3. Using the Device
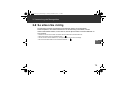
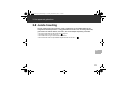
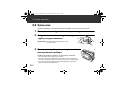
3.4
Using the Memory Function
The monitor automatically stores the results up to 100 sets for each user (1 and 2).
It can also calculate an average value based on the last 3 measurement values taken
within 10 minutes.
Notes:
• If there are only 2 measurement values in the memory for that period, the average will be based on these
2 values.
• If there is 1 measurement value in the memory for that period, this is displayed as the average.
• If the memory is full, the monitor will delete the oldest value.
• When viewing the measurement value taken without setting the date and time, “-/ - -:--” is displayed
instead of the date and time.
To View the Measurement Values Stored in Memory
1. Select your USER ID (1 or 2).
2. Press the button.
The Memory number appears for a second before the
pulse rate is displayed. The newest set is numbered “1”.
Note: The cuff wrap guide result appears on the display with the
measurement values. The cuff wrap guide lamp will not light.
3. Press the or button to view the values stored in the
memory.
: To the older values
: To the more recent values
HEM-7322-E_A_M.book Page 14 Friday, November 8, 2013 1:37 PM

15
3. Using the Device
EN
To View the Average Value
1. Select your USER ID (1 or 2).
2. Press and hold the button for more
than 3 seconds.
Notes:
• If the previous measurement was taken without setting the date and time,
the average value is not calculated.
• If there are no measurement values stored in the memory, the screen to the
right is displayed.
HEM-7322-E_A_M.book Page 15 Friday, November 8, 2013 1:37 PM

16
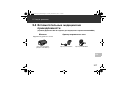
3. Using the Device
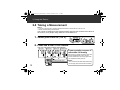
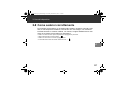
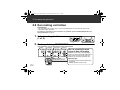
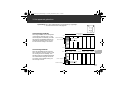
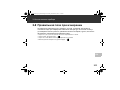
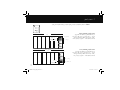
To View the Weekly Average Value
The monitor calculates and displays weekly averages for the measurements taken in
the morning and evening within 8 weeks for each user.
Note: The week begins Sunday at 2:00.
1. Select your USER ID (1 or 2).
2. Press the button.
The morning average for “THIS WEEK” appears on the display.
Note: The morning hypertension symbol ( ) appears if the morning weekly average is
above 135/85 mmHg.
Press the button again, and the evening average for “THIS WEEK”
appears on the display.
Press the or button to display the previous weeks.
This week
Morning average
Last week
Morning average
7 weeks ago
Morning average
Continue to
press...
This week
Evening average
Last week
Evening average
7 weeks ago
Evening average
2 weeks ago
Morning average
2 weeks ago
Evening average
HEM-7322-E_A_M.book Page 16 Friday, November 8, 2013 1:37 PM

17
3. Using the Device
EN
Note: If there are no measurement values stored in the memory, the
screen to the right is displayed.
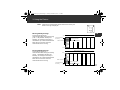
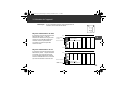
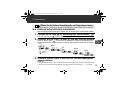
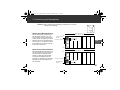
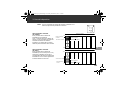
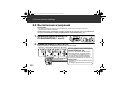
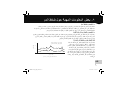
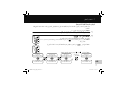
Morning Weekly Average
This is the average for the
measurements taken during the morning
(4:00 - 11:59) between Sunday and
Saturday. An average for each day is
calculated for up to three measurements
taken within 10 minutes of the first
measurement of the morning.
Evening Weekly Average
This is the average for the
measurements taken during the evening
(19:00 - 1:59) between Sunday and
Saturday. An average for each day is
calculated for up to three measurements
taken within 10 minutes of the last
measurement of the evening.
First measurement of
the morning
Within 10 minutes
11:59
4:00
Measurements of the morning
Up to 3 measurements
Morning Blood Pressure
Measurement
Measurement
Measurement
Measurement
Measurement
Measurement
Sunday Monday Tuesday Wednesday Thursday Friday Saturday
Measurements of the evening
Last measurement of
the evening
Within 10 minutes
1:59
19:00
Up to 3 measurements
Evening Blood Pressure
Measurement
Measurement
Measurement
Measurement
Measurement
Measurement
Sunday Monday Tuesday Wednesday Thursday Friday Saturday
HEM-7322-E_A_M.book Page 17 Friday, November 8, 2013 1:37 PM

18
3. Using the Device
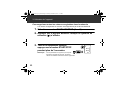
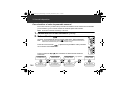
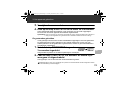
To Delete All the Values Stored in Memory
The values stored in the memory are deleted by USER ID.
1. Select your USER ID (1 or 2).
2. Press the Memory button, while the memory symbol ( )
appears.
3. While holding the button down,
press the START/STOP button for
more than 3 seconds.
Note: You cannot partially delete the values stored in the
memory. All values for the user you select will be
deleted.
HEM-7322-E_A_M.book Page 18 Friday, November 8, 2013 1:37 PM

19
EN
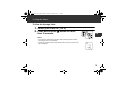
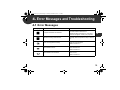
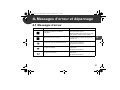
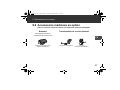
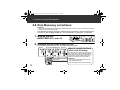
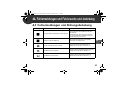
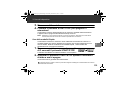
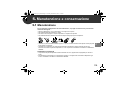
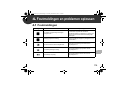
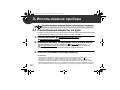
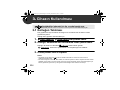
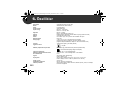
4.
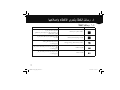
Error Messages and Troubleshooting
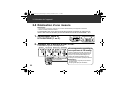
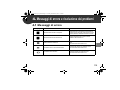
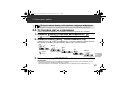
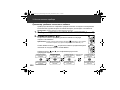
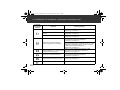
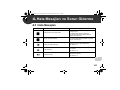
4.1
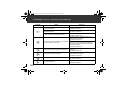
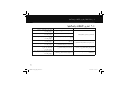
Error Messages
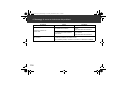
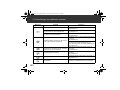
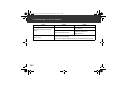
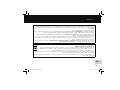
Display Cause Solution
Irregular heartbeats are detected.
Remove the arm cuff. Wait 2-3 minutes and
then take another measurement.
Repeat the steps in section 3.3. If this error
continues to appear, contact your physician.
Movement during measurement.
Carefully read and repeat the steps in section
3.3.
Arm cuff is applied too loosely.
Apply the arm cuff tighter.
Refer to section 3.1.
The batteries are low.
You should replace the batteries with new
ones ahead of time.
Refer to section 2.1.
The batteries are exhausted.
You should replace the batteries with new
ones at once.
Refer to section 2.1.
HEM-7322-E_A_M.book Page 19 Friday, November 8, 2013 1:37 PM

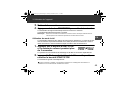
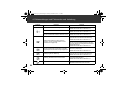
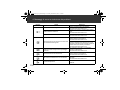
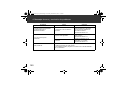
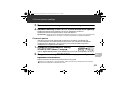
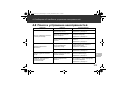
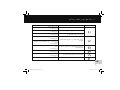
20
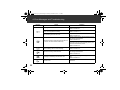
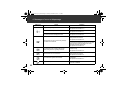
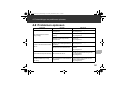
4. Error Messages and Troubleshooting
Air plug is disconnected.
Insert the air plug securely.
Refer to section 3.1.
Arm cuff is applied too loosely.
Apply the arm cuff tighter.
Refer to section 3.1.
Air is leaking from the arm cuff.
Replace the arm cuff with a new one.
Refer to section 5.3.
Movement during measurement and the arm
cuff has not been inflated sufficiently.
Repeat measurement. Remain still and do not
talk during measurement.
Refer to section 3.3.
If “E2” appears repeatedly, inflate the arm cuff
manually until it is 30 to 40 mmHg above your
previous measurement result.
Refer to section 3.3.
The arm cuff was inflated above 299 mmHg
when inflating the arm cuff manually.
Do not inflate the arm cuff above 299 mmHg.
Refer to section 3.3.
Movement during measurement.
Repeat measurement. Remain still and do not
talk during measurement.
Refer to section 3.3.
Clothing is interfering with the arm cuff.
Remove any clothing interfering with the arm
cuff.
Refer to section 3.1.
Device error.
Contact your OMRON retail outlet or
distributor.
Display Cause Solution
HEM-7322-E_A_M.book Page 20 Friday, November 8, 2013 1:37 PM
La page est en cours de chargement...
La page est en cours de chargement...
La page est en cours de chargement...
La page est en cours de chargement...
La page est en cours de chargement...
La page est en cours de chargement...
La page est en cours de chargement...
La page est en cours de chargement...
La page est en cours de chargement...
La page est en cours de chargement...
La page est en cours de chargement...
La page est en cours de chargement...
La page est en cours de chargement...
La page est en cours de chargement...
La page est en cours de chargement...
La page est en cours de chargement...
La page est en cours de chargement...
La page est en cours de chargement...
La page est en cours de chargement...
La page est en cours de chargement...
La page est en cours de chargement...
La page est en cours de chargement...
La page est en cours de chargement...
La page est en cours de chargement...
La page est en cours de chargement...
La page est en cours de chargement...
La page est en cours de chargement...
La page est en cours de chargement...
La page est en cours de chargement...
La page est en cours de chargement...
La page est en cours de chargement...
La page est en cours de chargement...
La page est en cours de chargement...
La page est en cours de chargement...
La page est en cours de chargement...
La page est en cours de chargement...
La page est en cours de chargement...
La page est en cours de chargement...
La page est en cours de chargement...
La page est en cours de chargement...
La page est en cours de chargement...
La page est en cours de chargement...
La page est en cours de chargement...
La page est en cours de chargement...
La page est en cours de chargement...
La page est en cours de chargement...
La page est en cours de chargement...
La page est en cours de chargement...
La page est en cours de chargement...
La page est en cours de chargement...
La page est en cours de chargement...
La page est en cours de chargement...
La page est en cours de chargement...
La page est en cours de chargement...
La page est en cours de chargement...
La page est en cours de chargement...
La page est en cours de chargement...
La page est en cours de chargement...
La page est en cours de chargement...
La page est en cours de chargement...
La page est en cours de chargement...
La page est en cours de chargement...
La page est en cours de chargement...
La page est en cours de chargement...
La page est en cours de chargement...
La page est en cours de chargement...
La page est en cours de chargement...
La page est en cours de chargement...
La page est en cours de chargement...
La page est en cours de chargement...
La page est en cours de chargement...
La page est en cours de chargement...
La page est en cours de chargement...
La page est en cours de chargement...
La page est en cours de chargement...
La page est en cours de chargement...
La page est en cours de chargement...
La page est en cours de chargement...
La page est en cours de chargement...
La page est en cours de chargement...
La page est en cours de chargement...
La page est en cours de chargement...
La page est en cours de chargement...
La page est en cours de chargement...
La page est en cours de chargement...
La page est en cours de chargement...
La page est en cours de chargement...
La page est en cours de chargement...
La page est en cours de chargement...
La page est en cours de chargement...
La page est en cours de chargement...
La page est en cours de chargement...
La page est en cours de chargement...
La page est en cours de chargement...
La page est en cours de chargement...
La page est en cours de chargement...
La page est en cours de chargement...
La page est en cours de chargement...
La page est en cours de chargement...
La page est en cours de chargement...
La page est en cours de chargement...
La page est en cours de chargement...
La page est en cours de chargement...
La page est en cours de chargement...
La page est en cours de chargement...
La page est en cours de chargement...
La page est en cours de chargement...
La page est en cours de chargement...
La page est en cours de chargement...
La page est en cours de chargement...
La page est en cours de chargement...
La page est en cours de chargement...
La page est en cours de chargement...
La page est en cours de chargement...
La page est en cours de chargement...
La page est en cours de chargement...
La page est en cours de chargement...
La page est en cours de chargement...
La page est en cours de chargement...
La page est en cours de chargement...
La page est en cours de chargement...
La page est en cours de chargement...
La page est en cours de chargement...
La page est en cours de chargement...
La page est en cours de chargement...
La page est en cours de chargement...
La page est en cours de chargement...
La page est en cours de chargement...
La page est en cours de chargement...
La page est en cours de chargement...
La page est en cours de chargement...
La page est en cours de chargement...
La page est en cours de chargement...
La page est en cours de chargement...
La page est en cours de chargement...
La page est en cours de chargement...
La page est en cours de chargement...
La page est en cours de chargement...
La page est en cours de chargement...
La page est en cours de chargement...
La page est en cours de chargement...
La page est en cours de chargement...
La page est en cours de chargement...
La page est en cours de chargement...
La page est en cours de chargement...
La page est en cours de chargement...
La page est en cours de chargement...
La page est en cours de chargement...
La page est en cours de chargement...
La page est en cours de chargement...
La page est en cours de chargement...
La page est en cours de chargement...
La page est en cours de chargement...
La page est en cours de chargement...
La page est en cours de chargement...
La page est en cours de chargement...
La page est en cours de chargement...
La page est en cours de chargement...
La page est en cours de chargement...
La page est en cours de chargement...
La page est en cours de chargement...
La page est en cours de chargement...
La page est en cours de chargement...
La page est en cours de chargement...
La page est en cours de chargement...
La page est en cours de chargement...
La page est en cours de chargement...
La page est en cours de chargement...
La page est en cours de chargement...
La page est en cours de chargement...
La page est en cours de chargement...
La page est en cours de chargement...
La page est en cours de chargement...
La page est en cours de chargement...
La page est en cours de chargement...
La page est en cours de chargement...
La page est en cours de chargement...
La page est en cours de chargement...
La page est en cours de chargement...
La page est en cours de chargement...
La page est en cours de chargement...
La page est en cours de chargement...
La page est en cours de chargement...
La page est en cours de chargement...
La page est en cours de chargement...
La page est en cours de chargement...
La page est en cours de chargement...
La page est en cours de chargement...
La page est en cours de chargement...
La page est en cours de chargement...
La page est en cours de chargement...
La page est en cours de chargement...
La page est en cours de chargement...
La page est en cours de chargement...
La page est en cours de chargement...
La page est en cours de chargement...
La page est en cours de chargement...
La page est en cours de chargement...
La page est en cours de chargement...
La page est en cours de chargement...
La page est en cours de chargement...
La page est en cours de chargement...
La page est en cours de chargement...
La page est en cours de chargement...
La page est en cours de chargement...
La page est en cours de chargement...
La page est en cours de chargement...
La page est en cours de chargement...
La page est en cours de chargement...
La page est en cours de chargement...
La page est en cours de chargement...
La page est en cours de chargement...
La page est en cours de chargement...
La page est en cours de chargement...
La page est en cours de chargement...
La page est en cours de chargement...
La page est en cours de chargement...
La page est en cours de chargement...
La page est en cours de chargement...
La page est en cours de chargement...
La page est en cours de chargement...
La page est en cours de chargement...
La page est en cours de chargement...
La page est en cours de chargement...
La page est en cours de chargement...
La page est en cours de chargement...
La page est en cours de chargement...
La page est en cours de chargement...
La page est en cours de chargement...
La page est en cours de chargement...
La page est en cours de chargement...
La page est en cours de chargement...
La page est en cours de chargement...
La page est en cours de chargement...
La page est en cours de chargement...
La page est en cours de chargement...
La page est en cours de chargement...
La page est en cours de chargement...
La page est en cours de chargement...
La page est en cours de chargement...
La page est en cours de chargement...
La page est en cours de chargement...
La page est en cours de chargement...
La page est en cours de chargement...
La page est en cours de chargement...
La page est en cours de chargement...
La page est en cours de chargement...
La page est en cours de chargement...
La page est en cours de chargement...
La page est en cours de chargement...
La page est en cours de chargement...
La page est en cours de chargement...
La page est en cours de chargement...
La page est en cours de chargement...
La page est en cours de chargement...
La page est en cours de chargement...
La page est en cours de chargement...
La page est en cours de chargement...
La page est en cours de chargement...
La page est en cours de chargement...
La page est en cours de chargement...
La page est en cours de chargement...
La page est en cours de chargement...
La page est en cours de chargement...
La page est en cours de chargement...
La page est en cours de chargement...
-
 1
1
-
 2
2
-
 3
3
-
 4
4
-
 5
5
-
 6
6
-
 7
7
-
 8
8
-
 9
9
-
 10
10
-
 11
11
-
 12
12
-
 13
13
-
 14
14
-
 15
15
-
 16
16
-
 17
17
-
 18
18
-
 19
19
-
 20
20
-
 21
21
-
 22
22
-
 23
23
-
 24
24
-
 25
25
-
 26
26
-
 27
27
-
 28
28
-
 29
29
-
 30
30
-
 31
31
-
 32
32
-
 33
33
-
 34
34
-
 35
35
-
 36
36
-
 37
37
-
 38
38
-
 39
39
-
 40
40
-
 41
41
-
 42
42
-
 43
43
-
 44
44
-
 45
45
-
 46
46
-
 47
47
-
 48
48
-
 49
49
-
 50
50
-
 51
51
-
 52
52
-
 53
53
-
 54
54
-
 55
55
-
 56
56
-
 57
57
-
 58
58
-
 59
59
-
 60
60
-
 61
61
-
 62
62
-
 63
63
-
 64
64
-
 65
65
-
 66
66
-
 67
67
-
 68
68
-
 69
69
-
 70
70
-
 71
71
-
 72
72
-
 73
73
-
 74
74
-
 75
75
-
 76
76
-
 77
77
-
 78
78
-
 79
79
-
 80
80
-
 81
81
-
 82
82
-
 83
83
-
 84
84
-
 85
85
-
 86
86
-
 87
87
-
 88
88
-
 89
89
-
 90
90
-
 91
91
-
 92
92
-
 93
93
-
 94
94
-
 95
95
-
 96
96
-
 97
97
-
 98
98
-
 99
99
-
 100
100
-
 101
101
-
 102
102
-
 103
103
-
 104
104
-
 105
105
-
 106
106
-
 107
107
-
 108
108
-
 109
109
-
 110
110
-
 111
111
-
 112
112
-
 113
113
-
 114
114
-
 115
115
-
 116
116
-
 117
117
-
 118
118
-
 119
119
-
 120
120
-
 121
121
-
 122
122
-
 123
123
-
 124
124
-
 125
125
-
 126
126
-
 127
127
-
 128
128
-
 129
129
-
 130
130
-
 131
131
-
 132
132
-
 133
133
-
 134
134
-
 135
135
-
 136
136
-
 137
137
-
 138
138
-
 139
139
-
 140
140
-
 141
141
-
 142
142
-
 143
143
-
 144
144
-
 145
145
-
 146
146
-
 147
147
-
 148
148
-
 149
149
-
 150
150
-
 151
151
-
 152
152
-
 153
153
-
 154
154
-
 155
155
-
 156
156
-
 157
157
-
 158
158
-
 159
159
-
 160
160
-
 161
161
-
 162
162
-
 163
163
-
 164
164
-
 165
165
-
 166
166
-
 167
167
-
 168
168
-
 169
169
-
 170
170
-
 171
171
-
 172
172
-
 173
173
-
 174
174
-
 175
175
-
 176
176
-
 177
177
-
 178
178
-
 179
179
-
 180
180
-
 181
181
-
 182
182
-
 183
183
-
 184
184
-
 185
185
-
 186
186
-
 187
187
-
 188
188
-
 189
189
-
 190
190
-
 191
191
-
 192
192
-
 193
193
-
 194
194
-
 195
195
-
 196
196
-
 197
197
-
 198
198
-
 199
199
-
 200
200
-
 201
201
-
 202
202
-
 203
203
-
 204
204
-
 205
205
-
 206
206
-
 207
207
-
 208
208
-
 209
209
-
 210
210
-
 211
211
-
 212
212
-
 213
213
-
 214
214
-
 215
215
-
 216
216
-
 217
217
-
 218
218
-
 219
219
-
 220
220
-
 221
221
-
 222
222
-
 223
223
-
 224
224
-
 225
225
-
 226
226
-
 227
227
-
 228
228
-
 229
229
-
 230
230
-
 231
231
-
 232
232
-
 233
233
-
 234
234
-
 235
235
-
 236
236
-
 237
237
-
 238
238
-
 239
239
-
 240
240
-
 241
241
-
 242
242
-
 243
243
-
 244
244
-
 245
245
-
 246
246
-
 247
247
-
 248
248
-
 249
249
-
 250
250
-
 251
251
-
 252
252
-
 253
253
-
 254
254
-
 255
255
-
 256
256
-
 257
257
-
 258
258
-
 259
259
-
 260
260
-
 261
261
-
 262
262
-
 263
263
-
 264
264
-
 265
265
-
 266
266
-
 267
267
-
 268
268
-
 269
269
-
 270
270
-
 271
271
-
 272
272
-
 273
273
-
 274
274
-
 275
275
-
 276
276
-
 277
277
-
 278
278
-
 279
279
-
 280
280
-
 281
281
-
 282
282
-
 283
283
-
 284
284
-
 285
285
-
 286
286


Omron Healthcare M6_AC Manuel utilisateur
- Catégorie
- Unités de pression artérielle
- Taper
- Manuel utilisateur
dans d''autres langues
- italiano: Omron Healthcare M6_AC Manuale utente
- Deutsch: Omron Healthcare M6_AC Benutzerhandbuch
- Nederlands: Omron Healthcare M6_AC Handleiding
- Türkçe: Omron Healthcare M6_AC Kullanım kılavuzu
Documents connexes
-
Omron Healthcare HEM-7154-E Manuel utilisateur
-
Omron HEM-7154-E Manuel utilisateur
-
-
Omron HEM-7155T-EBK Le manuel du propriétaire
-
Omron Healthcare HEM-7155T-EBK Manuel utilisateur
-
Omron M3 Comfort - HEM-7155-E Le manuel du propriétaire
-
Omron Healthcare HEM-7155-E Manuel utilisateur
-
Omron HEM-7600T-E Le manuel du propriétaire
-
Omron Healthcare HEM-7360-E Manuel utilisateur
-
Omron Healthcare HEM-7361T-EBK Manuel utilisateur
Autres documents
-
Omron RX-3 RX-3 Manuel utilisateur
-
Omron HEM-RML31-B Manuel utilisateur
-
A&D UA-1030T Manuel utilisateur
-
Konig Electronic HC-BLDPRESS20 Le manuel du propriétaire
-
A&D UA-1020 Manuel utilisateur
-
Hartmann Tensoval Le manuel du propriétaire
-
-
Beurer BM 55 Le manuel du propriétaire
-
Beurer BM 67 Le manuel du propriétaire
-
BIOS 3AL1-3E Manuel utilisateur