Avery Dennison 9906 Quick Reference Manual
- Catégorie
- Imprimer
- Taper
- Quick Reference Manual
Ce manuel convient également à

Monarch is a trademark of Avery Dennison
Retail Information Services LLC.
Avery Dennison is a trademark of Avery Dennison Corp.
TC9906EUQR Rev. AD 9/12 2010 Avery Dennison Corp. All rights reserved.
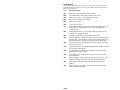
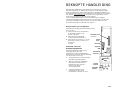
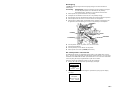
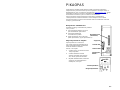
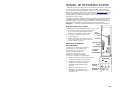
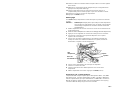
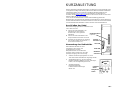
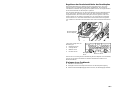
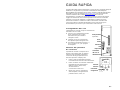
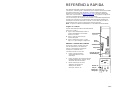
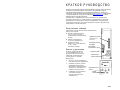
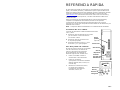
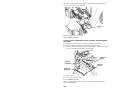
Serial Port
Host USB
Device USB
Power Cable
Connection
Parallel Port
(optional)
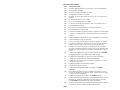
QUICK REFERENCE
This Quick Reference contains supply loading and general care
and maintenance procedures for the Monarch® 9906 printer. For
more detailed information, refer to the Operator’s Handbook
available on our Web site (www.monarch.com
). For information
about creating formats, configuring the printer, or programming
the printer, refer to the Packet Reference Manual on our Web
site.
Review the safety information in the Regulatory Compliance
document included with your printer. Information in this
document supercedes information in previous versions. Check
our Web site for the latest documentation and
release information.
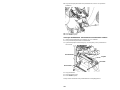
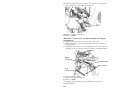
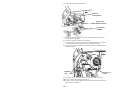
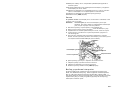
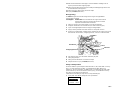
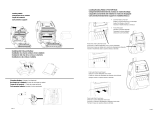
Connecting the Cables
The power supply automatically
switches between 115V and 230V.
1. Plug the power cable into the
socket and the other end into
a grounded electrical outlet.
2. Connect the communications
cable into the appropriate port.
3. Turn on the printer. Press ( I )
to turn on and ( O ) to turn off
the printer.
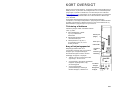
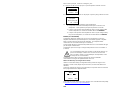
Using the Control Panel
The control panel consists of a four-
line LCD display, three function
buttons, and two navigation buttons.
The function of each button varies
depending on the task.
The LCD display:
Indicates power when text or
other information is shown
Indicates conditions requiring
immediate attention (low battery,faults, errors) using a red
background
Shows menu prompts, printer settings, function button
assignments, values, etc.
Function
Buttons
Navigation
Buttons
MPCL
Online
FEED
TLabel MENU

2-EN
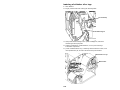
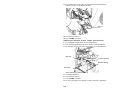
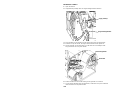
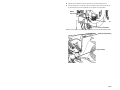
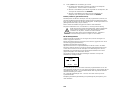
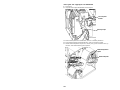
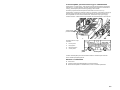
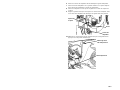
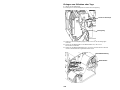
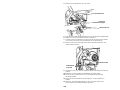
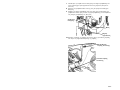
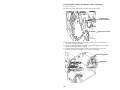
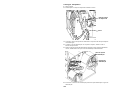
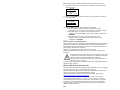
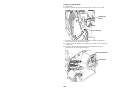
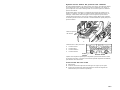
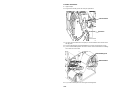
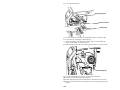
Printhead Tab
Retaining Latch
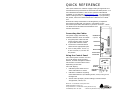
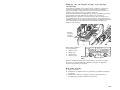
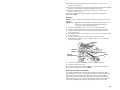
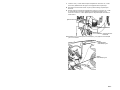
Loading Labels or Tags
1. Open the cover.
2. Unlock the printhead by turning the retaining latch.
3. Lift the printhead assembly using the printhead tab until the
assembly locks into place.
4. Place the roll of supply on the supply holder, located against
the inside of the printer.
5. Adjust the supply holder guide so that it barely touches the
roll, making sure the supply roll turns freely.
Supply Holder Guide
Supply Holder

EN-3
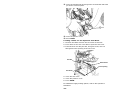
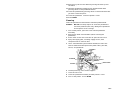
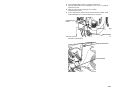
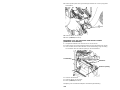
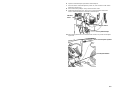
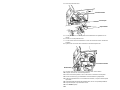
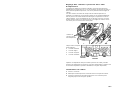
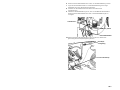
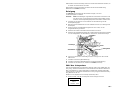
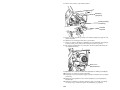
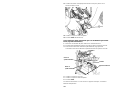
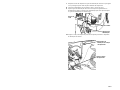
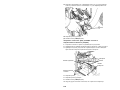
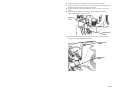
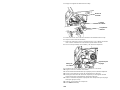
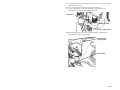
6. Push down on the supply lever to unlock the supply guide.
7. Lay the label strip across the supply guide so that a few
inches extend past the front of the printer.
8. Tuck the supply under the nibs and in between the die cut
sensor.
9. Adjust the supply guide so that it barely touches the supply.
Push up on the supply lever to lock the supply guides into
place.
10. Hold the printhead assembly by the printhead tab while
pushing the printhead release.
Printhead Release
Printhead Tab
Supply Lever
Nibs
Die Cut
Sensor

4-EN
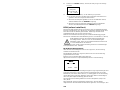
11. Close the printhead by pressing down on the thumb well until
you hear it click into place.
12. Close the printer’s cover.
13. Press FEED.
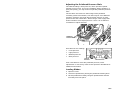
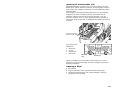
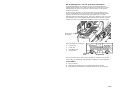
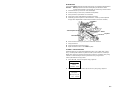
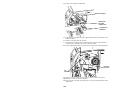
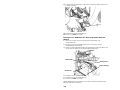
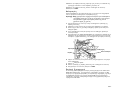
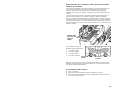
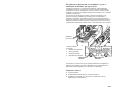
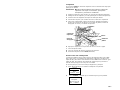
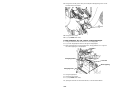
Loading Labels for the Optional Peel Mode
1. Remove the labels from the first 10 inches of the liner.
2. Press down on the exit cover tabs to open the exit cover.
3. Feed the liner over the peel bar, along the chute, and out
through the lower opening in the exit cover.
4. Close the exit cover.
5. Close the printer’s cover.
6. Press FEED.
For additional supply loading options, refer to the Operator’s
Handbook.
Peel Roller
Lower Opening
Platen Roller
Peel Bar

EN-5
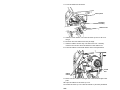
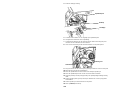
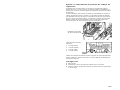
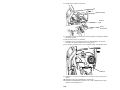
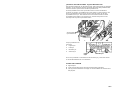
Adjusting the Printhead Pressure Dials
The default setting is least pressure, which provides optimal
printing in most cases. If you see smudging, ribbon wrinkling, or
poor print quality, you may need to adjust the printhead pressure
dials.
The two dials are located on either edge of the printhead
assembly (inside and outside). The dials may be set to different
positions; however, the inside dial should be equal to or more
pressure than the outside dial. When using 4” wide supply both
knobs should be set at equal pressure. Use a coin or flathead
screwdriver to adjust the dials.
Each dial has four settings:
Least pressure
Light pressure
Medium pressure
Most pressure
Print a test label to check the printhead pressure; make
adjustments as necessary. Refer to the Operator’s Handbook for
additional information.
Loading Ribbon
1. Open the cover.
2. Unlock the printhead by turning the printhead retaining latch.
3. Lift the printhead assembly using the printhead tab until the
assembly locks into place.
Printhead
Pressure Dials
Least
Pressure
Most Pressure

6-EN
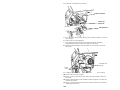
4.
Push the deflector tab down.
5. Slide the extra ribbon core onto the take-up reel as far as it
will go.
6. Remove the new ribbon from the package.
7. Slide the ribbon all the way onto the back reel. Carefully
unwind a few inches from the bottom of the ribbon roll.
8. Feed the ribbon under both ribbon rollers and printhead.
9. Make sure the ribbon is straight and centered throughout the
path.
10. Tape the ribbon to the take-up core.
11. Rotate the take-up core until the leader is past the printhead.
Take-u
p
Reel
Printhead
Assembly
Deflector Tab
Thumb
well
Ribbon
Rollers

EN-7
12.
Remove any slack in the ribbon by turning the take-up reel
clockwise.
13. Hold the printhead assembly by the printhead tab while
pressing down on the printhead release.
14. Close the printhead by pressing down on the thumb well until
you hear it click into place.
15. Close the printhead. Close the printer’s cover.
16. Press FEED.
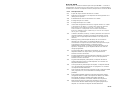
Cleaning
Clean the printhead as described to maintain printhead life.
Caution: Do not use sharp objects to clean the printhead or
touch the printhead; this may damage the printhead
and require a service charge.
1. Turn off the printer, open the cover and the printhead
assembly.
2. Remove the label roll and ribbon (when cleaning the
printhead).
3. Press down on the exit cover tabs to open the exit cover.
4. Spray the supply path, including supply sensor, with
compressed air to remove dust.
5. Use a CLEAN-STRIP (part number 120350) to clean and
remove adhesive build-up from the platen roller, peel bar,
sensor, and printhead.
6. Let the printer dry, then reload supplies.
7. Close the exit cover.
8. Close the printhead assembly and the printer’s cover.
9. Turn on the printer. Press FEED.
Platen Roller
Printhead
Sensor
Peel Bar

8-EN
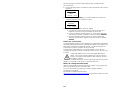
Selecting the Interpreter
The 9906 printer includes four Interpreter options; MPCL, MLI,
WMS XML, and Easy-Plug. For more information about MLI refer
to the MLI Quick Reference, for more information about WMS
XML refer to the XML Quick Reference, for more information
about Easy-Plug refer to the Easy-Plug Manual included on the
CD-ROM.
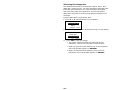
From the Main Menu, select Setup, then:
1. Press or until Interpreter is on the display.
SETUP
Interpreter
MPCL
CHANGE BACK
2. Press CHANGE then press until Easy-Plug is on the display.
MAIN MENU
Interpreter
Easy-Plug
SET CANCEL
3. Press SET to save the change.
The printer reboots automatically after selecting an
interpreter. This process may take several seconds.
When you print test labels with MLI set as the interpreter,
the model number appears as M9906MLI.
When you print test labels with Easy-Plug set as the
interpreter, the model number appears as M9906EP.

EN-9
RFID (if installed)
The 9906 printer with RFID has been engineered to program
(encode) an RFID (Radio Frequency Identification) label
(commonly called “RFID tags”) before the label’s format is
printed. RFID tags contain an embedded RFID inlay (chip and
antenna).
RFID is only available using die cut or black mark supplies.
The printer supports Class 1 Generation 2 (C1Gen2) protocol
encoding.
RFID supplies can be damaged by static electricity.
Ground yourself by touching metal, such as the
printer’s metal base, before handling the supplies.
The UHF radio operates in the 902 – 928 MHz frequency range
in accordance with FCC Rules and Regulations.
RFID Setup Menu
Use the RFID Setup Menu to Read a tag, set the RF Power, and
Clear Data.
The Read Tag menu item lets you read the EPC data
programmed into an RFID tag.
Refer to the RFID Web Setup Utility at
http://www.servisource1.com/prnutil/rfidsetup
to set the RF
Power setting.
The printer stores the number of successful and failed
programmed tags. Clear this record using the Clear Data menu
item. Depending on your application and volume of labels
printed, you may want to clear this data daily or after each batch.
To access the RFID settings, from the Main Menu select Setup,
then RFID.
If the RFID tag is not programmable for any reason, the label
may print with an overstrike pattern, indicating that it should not
be used. Your System Administrator should set the desired Error
Action accordingly.
If you see RFID errors 740 – 749, see your System
Administrator.
Refer to the Operator’s Handbook and Application Notes for more
information.
SETUP
← RFID →
SELECT BACK

10-EN
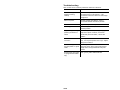
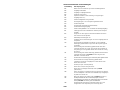
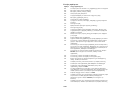
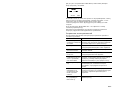
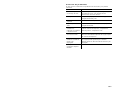
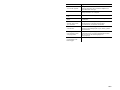
Troubleshooting
This section lists common problems and their solutions.
Problem Action
Error message
appears during
startup
Turn off the printer, wait fifteen seconds
and then turn on the printer. Call
Customer Service if the error message
reappears.
Does not print.
Check supply and ribbon, send a
corrected format and batch packet.
Does not feed. Adjust the printhead pressure dials.
Partially printed data.
Clean the printhead, send a corrected
format packet.
Light/Heavy printing,
printing shadows or
voids.
Clean the printhead, change supply,
adjust the print contrast, check the
printhead pressure dials, check the
ribbon.
Serial bar codes do
not scan.
Leave printhead unlatched when not in
use, use a print speed of 2.5 ips, adjust
the print contrast.
Liner is wrapped
around platen or peel
roller.
Carefully remove the liner. Make sure
the liner tears at the saw-toothed tear
edge when using backfeed and peel
mode.
Printer does not read
or program the RFID
tag.
See your System Administrator

EN-11
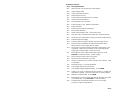
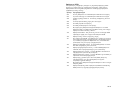
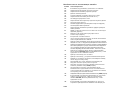
Common Errors
Error Description/Action
002 Name must be 1 to 8 characters inside quotes.
005 Invalid supply width.
018 Invalid code page selection.
025 Data length is too long.
101 Format referenced by batch not in memory.
400 Invalid character following {.
403 Field separator was not found.
409 Printer memory is full. Delete unused items.
410 Parity mismatch.
411 Framing error (baud rate mismatch).
412 Flow control mismatch.
413 Online receive buffer is full. Check flow control.
611 Font, bar code, or density in the batch does not fit the format.
612 Data in this line of the batch is missing or doesn’t match format.
613 Reference point off supply.
614 Portion of field off supply or invalid character in the packet.
703
Printer sensed a calibration of different-sized black marks.
Make sure the correct supply type is loaded.
704
Printer has not sensed a supply mark when expected or is out
of supplies. Make sure your printer is set to the appropriate
supply type. Reload supply. Clean the sensor.
751
Printer did not sense a black mark when expected. Press
ESCAPE to continue printing. Change supply.
752 Printer sensed a mark in the wrong place.
753 Printer sensed a mark that is too long.
754
Check for a ribbon jam or remove any slack in the ribbon. Load
a new ribbon.
755 Printhead is open. Close the printhead.
756 Load supply and/or clean the sensor.
757
Load supply (supply length mismatch). Press FEED.
758
Supply is not seen, on-demand sensor is broken, or a label was
removed too quickly. Check for a label jam or reload supplies.
763
Waiting to dispense label. Press FEED.
765
Printhead has less than 8 bad dots and can shift bar code fields
to avoid bad dots. Press ESCAPE to continue printing.
768
Printhead has more than 8 bad dots or is not connected.
Connect or replace the printhead.

12-EN
RFID Errors
See the RFID Application Notes for more information. Check with your System
Administrator about the format. The printer does not recalibrate (feed a blank
label) after an RFID error.
Error Description/Action
052
Data type in the RFID Data Field is invalid.
053
The starting block in the RFID Data Field is invalid.
226
Rule Record Line xx. Upload device is invalid.
228
Memory class identifier is invalid.
229
Byte code is invalid.
230
Lock code is invalid.
715 Invalid data length/data mismatch in the RFID Data Field. This
error also occurs when there is an error in the Expanded
C1Gen2 fields.
732 RFID Hardware Error. A non-RFID printer received a format
containing an RFID Data Field.
740
Command, hardware, or memory allocation error.
741 RFID tag missing - not found in the area inside the printer where
the RFID tag is programmed. Check supply loading. Make sure
the RFID tag was not moved out of the programmable range.
742 Tag erase failed. The RFID tag was found in the RF Field, but
could not be erased.
743 Program tag failed. The RFID tag was found in the RF Field, but
could not be programmed.
744 Tag locked fail. The RFID tag is unable to be programmed
because it is already locked.
746 Lock tag fail. The RFID tag has not been locked to prevent
reprogramming.
747 Time out failure. An RFID command (read, program, etc.) has
failed to complete in the maximum amount of allowed time.
748 Invalid data length/data mismatch from RFID interrogator
module.
749 RFID Verify Fail. The RFID verification process failed after
writing (programming) tag.

DA-1
Seriel port
Værts-USB
Enhedens
US
B
Tilslutning af
netledning
Parallel port
(valgfri)
KORT OVERSIGT
Denne korte oversigt beskriver, hvordan der fyldes medie på Monarch®
9906-printeren, og hvordan den vedligeholdes. Der er mere detaljerede
oplysninger i Operator’s Handbook, som du finder på vores websted
(www.monarch.com
). Oplysninger om at oprette formater og konfigurere
eller programmere printeren finder du i Packet Reference Manual på
vores websted.
Gennemgå sikkerhedsoplysningerne i dokumentet Regulatory
Compliance, som følger med printeren. Oplysningerne i dette dokument
erstatter oplysningerne i tidligere versioner. Tjek vores websted for ny
dokumentation og oplysninger om nye versioner.
Tilslutning af kablerne
Strømforsyningen skifter automatisk mellem
115V og 230V.
1. Sæt netledningen i stikket
og i en jordforbundet
stikkontakt.
2. Sæt kommunikationskablet
i den tilhørende port.
3. Tænd printeren. Tryk på ( I )
for at tænde og på ( O ) for at
slukke printeren.
Brug af betjeningspanelet
Betjeningspanelet består af et
LCD-display med fire linjer, tre funktions-
knapper og to navigationsknapper.
De enkelte knappers funktion varierer
afhængigt af opgaven. Displayet:
Tænder, når der er tekst eller andre
oplysninger, der skal vises
Viser tilstande, der kræver umiddelbar
indgriben (opbrugt batteri, fejl),
på rød baggrund
Viser menuprompter,
printerindstillinger, tildeling af
funktionsknapper, værdier m.m.
MPCL
Online
FEED
TLabel
MENU
Funktions
-kna
pp
er
Navigations
-knapper

2-DA
Printhovedtap
Udløsergreb
Isætning af etiketter eller tags
1. Åbn dækslet.
2. Frigør printhovedet ved at dreje på udløsergrebet.
3. Løft printhovedanordningen vha. printhovedtappen, indtil hele
anordningen låses på plads.
4. Anbring medierullen i medieholderen, som er placeret langs
indersiden af printeren.
5. Juster medieholderens styr, så det lige akkurat berører rullen, men
vær opmærksom på, at rullen skal kunne dreje ubesværet.
Medieholderens styr
Medieholder

DA-3
6.
Tryk mediehåndtaget ned for at frigøre mediestyret.
7. Anbring etiketstrimlen over mediestyret, så ca. 5 cm er synlig på
printerens forside.
8. Anbring mediet under udspringene og mellem
udstansningssensoren.
9. Juster mediestyret, så det kun lige akkurat berører mediet. Skub
mediehåndtaget op for at låse mediestyrene på plads.
10. Hold i printhovedtappen på printhovedanordningen, mens du trykker
på printhovedudløseren.
Printhovedudløser
Printhovedtap
Udspring
Mediehåndtag
Udstansnings-
sensor

4-DA
11.
Luk printhovedet ved at trykke på fordybningen til tommelfingeren,
indtil du kan høre, at det klikker på plads.
12. Luk printerens dæksel.
13. Tryk på FEED (Fremfør).
Isætning af etiketter til den valgfri peel-tilstand
1. Fjern etiketterne på de første 25 cm af bærebanen.
2. Tryk på udføringsdækslets tapper for at åbne udføringsdækslet.
3. Før bærebanen over peel-listen langs slisken og ud gennem den
udføringsdækslets nederste åbning.
4. Luk udføringsdækslet.
5. Luk printerens dæksel.
6. Tryk på FEED (Fremfør).
Der er flere oplysninger om isætning af medie i Operator’s Handbook.
Peel-valse
Nederste åbning
Fremføringsvalse
Peel-liste

DA-5
Mindst
tr
y
k
Størst tr
y
k
Justering af printhovedets tryk
Standardindstillingen er så lille et tryk som muligt, hvilket i de fleste
tilfælde giver optimal udskrivning. Det kan være nødvendigt at justere
printhovedets tryk i tilfælde af udtværing, rynket farvebånd eller dårlig
udskriftskvalitet.
De to knapper er placeret på printhovedets kant (ind- og udvendigt).
Knapperne kan have forskellige positioner; men trykket skal på
indersiden være lig med eller større end på ydersiden. Hvis der
anvendes et medie, der er 4” bredt, skal begge knapper indstilles til
samme tryk. Brug en mønt eller en fladbladet skruetrækker til justering
af trykket.
Hver knap har fire
indstillinger.
Mindst tryk
Let tryk
Medium tryk
Størst tryk
Udskriv en testetiket for at kontrollere printhovedets tryk. Foretag
justeringer, hvis det er nødvendigt. Du finder yderligere oplysninger i
Operator’s Handbook.
Isætning af bånd
1. Åbn dækslet.
2. Frigør printhovedet ved at dreje printhovedets udløsergreb.
3. Løft printhovedanordningen vha. printhovedtappen, indtil hele
anordningen låses på plads.
Knapper til justering
af printhovedets tryk

6-DA
4.
Tryk deflektortappen ned.
5. Skub den ekstra båndkerne så langt som muligt over på
optagningsrullen.
6. Tag det nye bånd ud af emballagen.
7. Skub båndet helt over på den bageste rulle. Rul forsigtigt ca. 5 cm af
i bunden af båndrullen.
8. Før forsigtigt båndet under de to båndvalser og printhovedet.
9. Sørg for, at båndet er lige og centreret langs hele banen.
10. Sæt båndet fast på optagningskernen med tape.
11. Drej optagningskernen, indtil indløbsstrimlen har passeret
printhovedet.
12. Fjern eventuelt slæk på båndet ved at dreje optagningsrullen med
uret.
Løft rullen op
Printhovedanordning
Deflektortap
Fordybning til
tommelfingeren
Bǻndvalser

DA-7
13.
Hold i printhovedtappen på printhovedanordningen, mens du trykker
på printhovedudløseren.
14. Tryk på fordybningen til tommelfingeren, indtil du hører, at det
klikker på plads, for at lukke printhovedet.
15. Luk printhovedet. Luk printerens dæksel.
16. Tryk på FEED (Fremfør).
Rengøring
Du skal rengøre printhovedet som beskrevet, for at det kan holde
længe.
Forsigtig: brug ikke skarpe genstande til rengøring af printhovedet,
og rør ikke ved printhovedet. Det kan beskadige
printhovedet, så en servicetekniker skal udskifte det.
1. Sluk printeren, og åbn dækslet og printhovedanordningen.
2. Fjern etiketrullen og båndet (mens printhovedet rengøres).
3. Tryk på udføringsdækslets tapper for at åbne udføringsdækslet.
4. Brug trykluft til at fjerne støv og smuds fra sensoren.
5. Brug en CLEAN-STRIP (varenummer 120350) til rengøring og til at
fjerne klæbestof, som har sat sig fast på fremføringsvalsen, peel-
listen og printhovedet.
6. Lad printeren tørre, før du sætter bånd og medie i igen.
7. Luk udføringsdækslet.
8. Luk printhovedanordningen og printerens dæksel.
9. Tænd printeren. Tryk på FEED (Fremfør).
Valg af fortolker
9906-printeren har fire fortolkere: MPCL, MLI, WMS XML og Easy-Plug. Der er
flere oplysninger om MLI i MLI Quick Reference, om WMS XML i XML Quick
Reference og om Easy-Plug i Easy-Plug Manual, som medfølger på cd-rom.
Vælg Setup i hovedmenuen, og:
1. Tryk på eller , indtil Interpreter vises på displayet.
SETUP
Interpreter
MPCL
CHANGE BACK
Fremførings
Printhoved
Sensor
Peel-liste

8-DA
2. Tryk på CHANGE og derefter på , indtil Easy-Plug vises på displayet.
MAIN MENU
Interpreter
Easy-Plug
SET CANCEL
3. Tryk på SET for at gemme ændringen.
Printeren genstarter automatisk, når der er valgt fortolker. Det kan
tage flere sekunder.
Modelnummeret vises som M9906MLI, når der udskrives testetiketter
med MLI valgt som fortolker.
Modelnummeret vises som M9906EP, når der udskrives testetiketter
med Easy-Plug valgt som fortolker.
RFID (hvis installeret)
9906-printeren med RFID er udviklet til at kode en RFID-etiket (Radio Frequency
Identification) (i daglig tale kaldet en "RFID-tag") inden udskrivning af etikettens
format. RFID-tags indeholder et integreret RFID-mønster (chip og antenne).
RFID er kun tilgængelig, når der anvendes udstandsede forbrugsstoffer eller
forbrugsstoffer med sort mærke.
Printeren understøtter 2. generation klasse 1-protokolkodning (C1Gen2).
RFID-forbrugsstoffer kan beskadiges af statisk elektricitet. Sørg for
jordforbindelse, f.eks. ved at berøre metal (printerens metalbund),
inden håndtering af forbrugsstofferne.
UHF-radioen fungerer på frekvensområdet 902 – 928 MHz i
overensstemmelse med FCC-reglerne og -bestemmelserne.
Menu til opsætning af RFID
Brug menuen RFID Setup (Opsætning af RFID) til at læse en tag, indstille HF-
effekten og slette data.
Via menupunktet Read Tag (Læs tag) kan du læse EPC-data programmeret på
en RFID-tag.
Se RFID Web Setup Utility på http://www.servisource1.com/prnutil/rfidsetup
for
at få HF-effekten vist.
Printeren indeholder et antal fungerende og ikke-fungerende programmerede
tags. Slet dem vha. menupunktet Clear Data (Slet data). Det kan være
nødvendigt at slette disse dagligt eller efter hvert parti afhængigt af formålet
med og mængden af etiketter, der udskrives.
Vælg Setup (Opsætning) i hovedmenuen og derefter RFID for at få adgang til
RFID-indstillingerne.
Hvis RFID-taggen af en eller anden årsag ikke kan programmeres, overskrives
etiketten muligvis med et stregmønster for at vise, at den ikke skal anvendes.
Systemadministratoren kan angive, hvad der skal ske i tilfælde af fejl.
Kontakt systemadministratoren, hvis RFID-fejl 740 – 749 vises.
Se Operator’s Handbook og Application Notes for at få flere oplysninger.
SETUP
← RFID →
SELECT BACK
La page est en cours de chargement...
La page est en cours de chargement...
La page est en cours de chargement...
La page est en cours de chargement...
La page est en cours de chargement...
La page est en cours de chargement...
La page est en cours de chargement...
La page est en cours de chargement...
La page est en cours de chargement...
La page est en cours de chargement...
La page est en cours de chargement...
La page est en cours de chargement...
La page est en cours de chargement...
La page est en cours de chargement...
La page est en cours de chargement...
La page est en cours de chargement...
La page est en cours de chargement...
La page est en cours de chargement...
La page est en cours de chargement...
La page est en cours de chargement...
La page est en cours de chargement...
La page est en cours de chargement...
La page est en cours de chargement...
La page est en cours de chargement...
La page est en cours de chargement...
La page est en cours de chargement...
La page est en cours de chargement...
La page est en cours de chargement...
La page est en cours de chargement...
La page est en cours de chargement...
La page est en cours de chargement...
La page est en cours de chargement...
La page est en cours de chargement...
La page est en cours de chargement...
La page est en cours de chargement...
La page est en cours de chargement...
La page est en cours de chargement...
La page est en cours de chargement...
La page est en cours de chargement...
La page est en cours de chargement...
La page est en cours de chargement...
La page est en cours de chargement...
La page est en cours de chargement...
La page est en cours de chargement...
La page est en cours de chargement...
La page est en cours de chargement...
La page est en cours de chargement...
La page est en cours de chargement...
La page est en cours de chargement...
La page est en cours de chargement...
La page est en cours de chargement...
La page est en cours de chargement...
La page est en cours de chargement...
La page est en cours de chargement...
La page est en cours de chargement...
La page est en cours de chargement...
La page est en cours de chargement...
La page est en cours de chargement...
La page est en cours de chargement...
La page est en cours de chargement...
La page est en cours de chargement...
La page est en cours de chargement...
La page est en cours de chargement...
La page est en cours de chargement...
La page est en cours de chargement...
La page est en cours de chargement...
La page est en cours de chargement...
La page est en cours de chargement...
La page est en cours de chargement...
La page est en cours de chargement...
La page est en cours de chargement...
La page est en cours de chargement...
La page est en cours de chargement...
La page est en cours de chargement...
La page est en cours de chargement...
La page est en cours de chargement...
La page est en cours de chargement...
La page est en cours de chargement...
La page est en cours de chargement...
La page est en cours de chargement...
La page est en cours de chargement...
La page est en cours de chargement...
La page est en cours de chargement...
La page est en cours de chargement...
La page est en cours de chargement...
La page est en cours de chargement...
La page est en cours de chargement...
La page est en cours de chargement...
La page est en cours de chargement...
La page est en cours de chargement...
La page est en cours de chargement...
La page est en cours de chargement...
La page est en cours de chargement...
La page est en cours de chargement...
La page est en cours de chargement...
La page est en cours de chargement...
La page est en cours de chargement...
La page est en cours de chargement...
La page est en cours de chargement...
La page est en cours de chargement...
La page est en cours de chargement...
La page est en cours de chargement...
La page est en cours de chargement...
La page est en cours de chargement...
La page est en cours de chargement...
La page est en cours de chargement...
La page est en cours de chargement...
La page est en cours de chargement...
La page est en cours de chargement...
La page est en cours de chargement...
La page est en cours de chargement...
La page est en cours de chargement...
La page est en cours de chargement...
La page est en cours de chargement...
La page est en cours de chargement...
La page est en cours de chargement...
La page est en cours de chargement...
La page est en cours de chargement...
La page est en cours de chargement...
La page est en cours de chargement...
La page est en cours de chargement...
La page est en cours de chargement...
La page est en cours de chargement...
La page est en cours de chargement...
-
 1
1
-
 2
2
-
 3
3
-
 4
4
-
 5
5
-
 6
6
-
 7
7
-
 8
8
-
 9
9
-
 10
10
-
 11
11
-
 12
12
-
 13
13
-
 14
14
-
 15
15
-
 16
16
-
 17
17
-
 18
18
-
 19
19
-
 20
20
-
 21
21
-
 22
22
-
 23
23
-
 24
24
-
 25
25
-
 26
26
-
 27
27
-
 28
28
-
 29
29
-
 30
30
-
 31
31
-
 32
32
-
 33
33
-
 34
34
-
 35
35
-
 36
36
-
 37
37
-
 38
38
-
 39
39
-
 40
40
-
 41
41
-
 42
42
-
 43
43
-
 44
44
-
 45
45
-
 46
46
-
 47
47
-
 48
48
-
 49
49
-
 50
50
-
 51
51
-
 52
52
-
 53
53
-
 54
54
-
 55
55
-
 56
56
-
 57
57
-
 58
58
-
 59
59
-
 60
60
-
 61
61
-
 62
62
-
 63
63
-
 64
64
-
 65
65
-
 66
66
-
 67
67
-
 68
68
-
 69
69
-
 70
70
-
 71
71
-
 72
72
-
 73
73
-
 74
74
-
 75
75
-
 76
76
-
 77
77
-
 78
78
-
 79
79
-
 80
80
-
 81
81
-
 82
82
-
 83
83
-
 84
84
-
 85
85
-
 86
86
-
 87
87
-
 88
88
-
 89
89
-
 90
90
-
 91
91
-
 92
92
-
 93
93
-
 94
94
-
 95
95
-
 96
96
-
 97
97
-
 98
98
-
 99
99
-
 100
100
-
 101
101
-
 102
102
-
 103
103
-
 104
104
-
 105
105
-
 106
106
-
 107
107
-
 108
108
-
 109
109
-
 110
110
-
 111
111
-
 112
112
-
 113
113
-
 114
114
-
 115
115
-
 116
116
-
 117
117
-
 118
118
-
 119
119
-
 120
120
-
 121
121
-
 122
122
-
 123
123
-
 124
124
-
 125
125
-
 126
126
-
 127
127
-
 128
128
-
 129
129
-
 130
130
-
 131
131
-
 132
132
-
 133
133
-
 134
134
-
 135
135
-
 136
136
-
 137
137
-
 138
138
-
 139
139
-
 140
140
-
 141
141
-
 142
142
-
 143
143
-
 144
144


Avery Dennison 9906 Quick Reference Manual
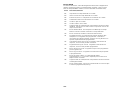
- Catégorie
- Imprimer
- Taper
- Quick Reference Manual
- Ce manuel convient également à
dans d''autres langues
- italiano: Avery Dennison 9906
- English: Avery Dennison 9906
- español: Avery Dennison 9906
- Deutsch: Avery Dennison 9906
- русский: Avery Dennison 9906
- Nederlands: Avery Dennison 9906
- português: Avery Dennison 9906
- dansk: Avery Dennison 9906
- svenska: Avery Dennison 9906
- suomi: Avery Dennison 9906
Documents connexes
-
Avery Dennison 9906 Printer Quick Reference Manual
-
Avery Dennison 6057 Quick Reference Manual
-
-
-
Avery Dennison 9855 Printer Operator's Handbook
-
-
-
-
Avery Dennison Pathfinder 6032 Le manuel du propriétaire
-
Autres documents
-
Paxar Monarch 9805 Manuel utilisateur
-
 PATHFINDER 6057 Manuel utilisateur
-
 PATHFINDER 6057 Guide de référence
-
 Printronix Auto ID M4l2 User's Setup Guide
-
CAB A+ Manuel utilisateur
-
IFM DTI911 Mode d'emploi
-
Olivetti PR2 Plus Le manuel du propriétaire
-
-
HP Smart Tank Wireless 450 Le manuel du propriétaire
-
HP Smart Tank Plus 559 Wireless All-in-One Guide de démarrage rapide


