
VERMEIREN
Regina
I N S T R U C T I O N M A N U A L
M O D E D ’ E M P L O I

Instructions to the specialist dealer
This instruction manual is part and parcel of the product and must accompany every product sold.
Version: B, 2013-09
All rights reserved, including translation.
No part of this manual may be reproduced in any form what so ever (print, photocopy, microfilm or any other process) without
written permission of the publisher, or processed, duplicated or distributed by using electronic systems.
© N.V. Vermeiren N.V. 2013
Instructions pour les distributeurs
Ce manuel d'instructions fait partie du produit et doit accompagner chaque produit vendu.
Version : B, 2013-09
Tous droits réservés, y compris la traduction.
Aucune partie de ce manuel ne peut être reproduite, sous quelque forme que ce soit (imprimée, photocopie, microfilm ou tout autre
procédé) sans l'autorisation écrite du publicateur, ni traitée, dupliquée ou distribuée à l'aide de systèmes électroniques.
© N.V. Vermeiren N.V. 2013

Regina
2013-09
Page1
Contents
Preface ................................................................................................. 2
1 Product description ................................................................. 3
1.1 Intended Use ................................................................................................................ 3
1.2 Technical specifications .............................................................................................. 4
1.3 Drawing ....................................................................................................................... 5
1.4 Location identification plate ........................................................................................ 5
1.5 Explanation of symbols ............................................................................................... 6
1.6 Accessories .................................................................................................................. 6
1.7 For your safety ............................................................................................................ 6
2 Use ............................................................................................. 7
2.1 Remarks on electromagnetic compatibility (EMC) .................................................... 7
2.2 Carrying the shell chair ............................................................................................... 8
2.3 Recommendations to use the shell chair Regina ......................................................... 8
2.4 Inclination of shell chair ............................................................................................ 10
2.5 Operating manual control .......................................................................................... 10
2.6 Cable connections ..................................................................................................... 11
2.7 Running wheels / Parking brakes .............................................................................. 11
2.8 Mounting or removing of tray ................................................................................... 12
2.9 Mounting or removing of headrest ............................................................................ 12
2.10 Use of safety harness ................................................................................................. 12
2.11 Taking curbs by using ramps ..................................................................................... 13
2.12 Transport in the car .................................................................................................... 13
3 Installation and adjustment .................................................. 14
3.1 Tools .......................................................................................................................... 14
3.2 Manner of delivery .................................................................................................... 14
3.3 Adjusting the seat height ........................................................................................... 14
3.4 Mounting the fifth wheel ........................................................................................... 15
4 Maintenance ........................................................................... 15

Regina
2013-09
Page2
Preface
First of all we want to thank you for putting your trust in us by selecting one of our products.
Vermeiren products are the result of many years of research and experience. During the
development, special attention was given to the ease of use and the serviceability of the
product.
The lifetime for the product is strongly influenced by the care and maintenance of the
product.
This manual will help you get acquainted with the operation of your product.
Following the user instructions and the maintenance instructions are an essential part of the
warranty.
This manual reflects the latest product developments. Vermeiren has the right to introduce
changes without the obligation to adapt or replace previously delivered models.
For any further questions, please consult your specialist dealer.

Regina
2013-09
Page3
1 Product description
1.1 Intended Use
The Regina shell chair is developed entirely for your comfort.
The shell chair is designed for sitting of 1 person.
The shell chair has been designed exclusively for people with limited mobility and weak
muscles so be careful with the use of the shell chair.
The shell chair is suited for indoor use.
You will need a helper for indoor transporting of the Regina, and the chair might also need
its own storage place.
The different types of accessories, and the construction allow full use by persons disabled
by:
paralysis
weak/malformed limbs
injuries of the joints
heart insuffiencies and poor blood circulation
balance disturbances
cachexia (decrease in muscle)
and also for aged persons.
The indication to use this product must take into account the following elements:
body size and weight (max. load 120 kg)
physical and psychological condition
home environment
The shell chair should only be used on surfaces where all four wheels are touching the
ground and where there is sufficient contact to propel the wheels equally.
The shell chair should not be used as a ladder, nor is it a transport for heavy or hot objects.
When used on mats, carpeted floors or loose floor coverings, the floor covering can get
damaged.
It is necessary to choose the best fitted model for the size/build of the patient.
Use only Vermeiren approved accessories.
The manufacturer is not liable for damage caused by the lack of or improper service or as a
result of not following instructions from this manual.
Compliance with the user and maintenance instructions are an essential part of the
guarantee conditions.

Regina
2013-09
Page4
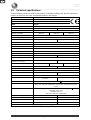
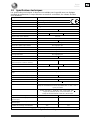
1.2 Technical specifications
Technical terms below are valid for the product in standard settings and with the upholstery.
If other accessories are used, the tabulated values will change.
Make
V
ermeiren
Address
V
ermeirenplein 1/15, B-2920 Kalmthout
Type Shell chai
r
Model Regina
Maximum occupant mass 120 kg
Description Min. Max.
Overall length 665 mm
Effective seat width 380 mm 440 mm 480 mm
Overall width (with table) 925 mm
Overall width (without table) 700 mm
Overall height 1330 mm 1355 mm
Total mass Approx. 35 kg
Mass of heaviest part Not applicable
Maximum load of tray 0,5 kg
Static stability downhill 6% (in standard configuration)
Static stability uphill 6% (in standard configuration)
Obstacle climbing Not applicable
Seat plane angle -3° +28°
Effective seat depth 500 mm
Seat surface height at front edge
(without seat cushions)
395 mm 420 mm
Thickness seat cushions 60 mm 80 mm 100 mm
Backrest angle -3° +28°
Backrest height 855 mm
Distance between legrest and seat Not applicable
Angle between seat and legrest 1,3° 70°
Armrests height 250 mm
Color of upholstery Braun/
chocolate
Black / black
Operator control IP20, Uin: 24V
Actuator Max. Load: Push 4000N / Pull 3000N
Duty cycle: 2min ON / 18min OFF or 10%, max. 5 switching cycles per
minute
Power supply / Transformator
Input: 100-240 V
, 50/60 Hz, max. 1,5A, Output: 24V
Protection class: IP20
Insulation class: II
Duty cycle: 2min ON / 18min OFF
Storage and use temperature + 5 °C + 40 °C
Storage temperature (electronics) -20°C +50°C
Use temperature (electronics) +10°C +40°C
Storage and use humidity 30% 70%
We reserve the right to introduce technical changes. Measurement tolerance ± 15 mm / 1,5 kg / °
Table 1: Technical specifications

Regina
2013-09
Page5
The shell chair complies to the requirements set up in:
ISO 7176-8: Requirements and test methods for static, impact and fatigue strengths.
EN 1021-1, EN1021-2: Resistance to ignition of upholstered parts
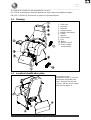
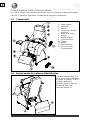
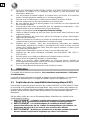
1.3 Drawing
1.4 Location identification plate
The location of the
identification plate is on the
metal frame (backside shell
chair). Remove first the rear
cover , with the velcro straps,
from the side plates .
1. Shell chair
2. Headrest
3. Backrest
4. Safety harness
5. Wheels with brakes
6. Frame
7. Legrest
8. Seat cushion
9. Tray
10. Motor
11. Manual control
12. Power supply /
transformator

Regina
2013-09
Page6
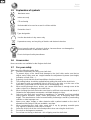
1.5 Explanation of symbols
1.6 Accessories
No accessories are available for the Regina shell chair.
1.7 For your safety
Take note of the following safety hints:
l Follow the instructions for using your shell chair.
l To prevent injury of the hands and damage to the shell chair, make sure that no
objects and or body parts are caught between the adjustment systems (seat height,
inclination of shell chair, ...).
l Regularly check that the wheel immobilizers function correctly.
l The parking brakes should be applied before getting into and out the shell chair.
l If you want to pick up something (lying in front of, on the side, or to the rear of the
shell chair), you should not lean too far out to avoid tipping over.
l When moving through doors, arches, etc. ensure that there is enough room at the
sides so there is no damage to the shell chair.
l When inclining the shell chair make sure there is sufficient room around and above it.
Otherwise the adjustment movements could lead damage or injury.
l Only use your shell chair according to regulations. For example, avoid uncontrolled
rolling against obstacles (steps, curbs, doorframes, etc) or dropping down from
ledges. The manufacturer cannot assume liability for damage caused by overloading,
collision or other improper use.
l Never cross steps, ledges or other obstacles with a patient seated on the chair. If
alternatives like ramps or lifts are available, use them.
l When transporting the shell chair, never pick it up by grasping movable parts
(e.g. legrest) or when the shell chair is inclined.
l Leave the shell chair in the not inclined position when not using the shell chair.
l Do not sit on the legrest or armrests.
l Do not lean on the leg or backrest - risk of tipping over the shell chair.
Type designation
Not intended to be used as a seat in a Motor vehicle
CE conformit
y
Indoor use onl
y
Maximum mass
Protection class II
Use the electronics in dr
y
rooms onl
y
Se
p
arate recover
y
and rec
y
clin
g
of electric and electronic devices
Do not open the electric, electronic devices, because these can damage the
seal and the electric or electronic devices.
Short-circuit-proof safety transformer

Regina
2013-09
Page7
l Be careful when using possible causes of fire such as cigarettes since they may set
the seat and back covers alight.
l Never exceed the maximum load (120 kg).
l Use the shell chair on level surfaces, with all 4 casters contacting the ground.
l
Use only Vermeiren approved accessories, spare parts or electronic components.
l Use the safety belt and the safety harness as much as possible and definitely for
persons that make extreme movements.
l Do not use the shell chair in: environment where combustible or explosive gases or
vapors may be present, close to open fires or other heat sources (such as furnaces,
ovens or direct sunlight), in a humid environment or outdoors. (for the electronic
parts).
l Do not use the power supply as a toy or to play games.
L Use only power sockets conforming to VDE (220 V / 230 V, 50 Hz) for plugging in.
L Plugs must only be pulled out by grasping the plug itself; never pull on the cable.
L Do not open the electric, electronic devices.
L Make sure that all power cables are laid without kinks, shearing or other mechanical
damages and that they not are strangled in the wheels and no mechanical strain
should be placed on the cables.
L All cables should be laid that nobody can fall over the cables.
2 Use
This chapter describes the everyday use. These instructions are for the user and the
specialist dealer.
The product is delivered fully assembled by your specialist dealer. The instructions intended
for the specialist dealer on how to set up the shell chair are given in § 3.
2.1 Remarks on electromagnetic compatibility (EMC)
Your shell chair has been tested according EN 61000-3-2 and EN 61000-3-3 for EMC-
compliance. We wish to point out that sources of electromagnetic waves are liable to create
interferences. The electronics of the shell chair itself could affect other electric appliances
too.
To reduce the effect of electromagnetic sources of interference, please read the following
warnings:
L WARNING: The shell chair might disturb the operation of devices in its
environment that emit electromagnetic field.
L WARNING: The driving performance of the shell chair can be influenced by
electromagnetic fields (e.g. electricity generators or high power sources).
L WARNING: Avoid using any portable TV or radio in the immediate environment of
your shell chair for as long as it is turned on.
L WARNING: Avoid using any transmitter-receiver in the immediate environment of
your shell chair for as long as it is turned on.
L WARNING: If involuntary movements or braking occur, turn off the shell chair as
soon as it is safe to do so.
Interfering electromagnetic fields may have a negative effect on the shell chair’s electronic
systems. These can include:
Uncontrollable behavior by the shell chair
Unintentional movements
In the presence of very strong or enduring interfering fields, the electronic systems could
even break down entirely or suffer permanent damage.

Regina
2013-09
Page8
Possible sources of radiation include:
Portable receiver and transmitter installations (receiver and transmitter with fixed
antenna)
- Transmitting and receiving sets
- Portable TV, radio systems
- Other personal transmitting devices
Mobile medium-range transmitting and receiving devices
- Fixed transmitting and receiving sets
- Fixed mobile transmitting and receiving devices
- Fixed radio, TV systems
Other home devices
- CD player
- Notebook
- Microwave oven
- Cassette recorder
- etc.
Devices like electric shavers and hair dryers will have no influence provided that they
function perfectly and their cabling be in an excellent condition. Please conform to the
operating instructions accompanying such electric instruments to ensure trouble free
operating of your shell chair.
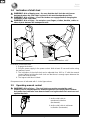
2.2 Carrying the shell chair
The best way to carry the shell chair is to make use of the wheels and roll the shell chair.
If this is not possible, firmly grasp the frame with two persons on the fixed side parts. Do not
use the wheels, legrest to grasp the shell chair.
2.3 Recommendations to use the shell chair Regina
2.3.1 Transfer in and out the chair
L
WARNING: Risk of injury – Adjust the safety harness that no strangulation of the
patient can appear and the patient can sit comfortable in the chair.
L WARNING: Risk of injury – Adjust the safety harness as close as possible to the
body of the patient so the patient cannot slide out the safety harness.
L WARNING: Risk of tipping over – Be sure that the shell chair do not tip over
backwards when the shell chair is placed in his most backwards position.
L CAUTION: In case you cannot perform the transfer in a safe manner, ask
someone to assist you.
The transfer from the patient in the shell chair shall be according the instructions below:
1. Check brakes from the shell chair are engaged.
2. Place the shell chair in his most position to the front (minimum inclination: -3°) with the
manual control.
3. Disengage the brakes.
4. Position the shell chair as close as possible to the chair, couch or bed from you
wish to transfer. Check that the cables cannot strangled between the wheels. (It is not
necessary to pull the power cable out the wall socket because it is not permitted to
transport the shell chair over long distances when the patient is sitting in the shell chair).
5. Check brakes from the shell chair are engaged and that the safety belt is good
fixated to the shell chair.
6. Transfer to the chair.
7. Mount the safety harness.

Regina
2013-09
Page9
8. Check that the safety harness is placed correct (as close as possible to the body of the
patient). If needed adjust the safety harness.
9. Place the chair in his most backwards position (maximum inclination: +28°).
The transfer from the patient out the shell chair shall be according the instructions below:
1. Check that the brakes from the shell chair are engaged.
2. Place the shell chair in his most position to the front (minimum inclination: -3°) with the
manual control.
3. Disengage the brakes.
4. Position the shell chair as close as possible to the chair, couch or bed to you wish to
transfer. Check that the cables cannot strangled between the wheels. (It is not
necessary to pull the power cable out the wall socket because it is not permitted to
transport the shell chair over long distances when the patient is sitting in the shell chair.)
5. Unfasten the safety harness.
6. Transfer out the chair.
2.3.2 Correct position in the chair
Some recommendations for a comfortable use of the chair:
Position your backside as close as possible to the backrest.
Make sure your upper legs are horizontal – If needed adjust the seat height.
2.3.3 Moving / transporting the chair
L
WARNING: Risk of clamping – Be careful passing through restricted passages
(e.g. doors).
L WARNING: Risk of burns – Be careful when using in hot or cold environments
for a sufficient amount of time and when touching - Surfaces can assume the
environment temperatures.
L WARNING: Risk of injury – There should be no people or objects under the shell
chair during transportation.
L
WARNING: Risk of injury – Check that the connecting cables not come in contact
with the floor or can strangle between the wheels during transport.
1. Check brakes from the shell chair are engaged.
2. Transfer the patient out the chair.
3. Pull the power cable out the wall socket, if you need to move the shell chair to a place
that the power cable is not long enough.
4. Disengage the brakes.
5. Transport the chair to the desired place on an horizontal underground. Check that the
cables cannot strangled between the wheels.
6. Engage the brakes.
7. Transfer the patient in the chair.
8. Mount the power cable in the nearest wall socket and put the cables in a position that
nobody can fall over the cables.

Regina
2013-09
Page10
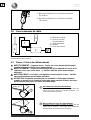
2.4 Inclination of shell chair
L
WARNING: Risk of tipping over – Be sure that the shell chair do not tip over
backwards when the shell chair is placed in his most backwards position.
L WARNING: Risk of injury – Check the brakes are engaged before changing the
inclination of the shell chair.
L WARNING: Risk of injury – Do not place your fingers, clothes, buckles, cables or
other objects between the entrapment zone.
Inclination of the shell chair:
1. Engage the brakes.
2. Plug the power supply in the power socket. Wait at least 15 seconds before using
the manual control.
3. The inclination of the shell chair can be adjusted from +28° to -3° with the manual
control. (When inclining the shell chair see that there is enough space between the
shell chair and the wall).
4. The legrest shall also inclined.
Entrapment zone is indicated with in the figure above.
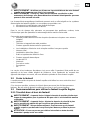
2.5 Operating manual control
L
WARNING: Risk of injury – The shell chair may not be operated by small
children, frail or infirmed persons without supervision or nearby small children.
Only authorized staff who have been trained in using the shell chair must use and
operate the chair.
Minimum inclination: -3°
Maximum inclination: +28°
Incline shell chair to
maximum inclination
(backwards).
Incline shell chair to minimum
inclination (frontwards).

Regina
2013-09
Page11
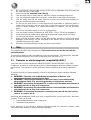
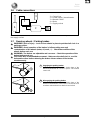
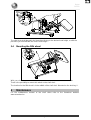
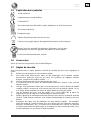
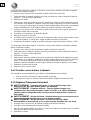
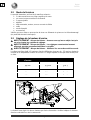
2.6 Cable connections
First connect all the cables to the control box and in the last connect the power cable to
the supply socket.
2.7 Running wheels / Parking brakes
L
WARNING: Risk of injury – Lock all four wheels in place to put the shell chair in a
parking position.
L WARNING: Good operation of the brakes is influenced by wear and
contamination of the wheels (water, oil, mud, …) – Check the condition of the
wheels before each use.
L WARNING: The brakes are adjustable and can wear – Check the operation of the
brakes before each use.
L CAUTION: Risk of unintended movement – Make sure the shell chair is on a flat
horizontal surface before releasing the brakes. Never release all the brakes
simultaneously.
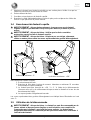
Engaging the parking brakes
With your foot, press the black brake plate of the
wheels downwards till it locks in place. The wheels
cannot roll.
Disengaging the parking brakes
With your foot, press the black brake plate of the
wheels in the direction of the frame. The wheels have
now been released and can both roll and swivel.
1
2
1 = Control box
2 = Power supply / transformator
3 = Manual control
4 = Motor
5 = Supply socket
4
1
3
2
5

Regina
2013-09
Page12
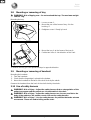
2.8 Mounting or removing of tray
L
WARNING: Risk of tipping over – Do not overload the tray. The maximum weight
shall be 1 kg.
Mounting the tray:
1. Loosen screw .
2. Mount the pen of the frame of tray to the
bushing .
3. Retighten screw firmly by hand.
4. Mount the tray to the frame of the tray .
5. Put the two holes into direction of the chair.
To remove the tray you can repeat the steps in opposite direction.
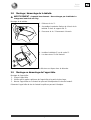
2.9 Mounting or removing of headrest
Mounting the headrest:
1. Take the headrest.
2. Check that the large edge is placed to the bottom.
3. Mount the headrest to the back of the shell chair by the elastic.
Remove the headrest from the back of the shell chair by the elastic.
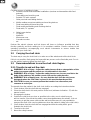
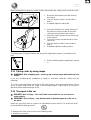
2.10 Use of safety harness
L
WARNING: Risk of injury – Adjust the safety harness that no strangulation of the
patient can appear and the patient can sit comfortable in the chair.
L WARNING: Risk of injury – Adjust the safety harness as close as possible to the
body of the patient so the patient cannot slide out the safety harness.
L WARNING: Risk of injury – Use the safety harness for patients that make extreme
movements. These can lead to falling out the chair.

Regina
2013-09
Page13
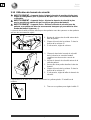
When the patient has spasm or make restless movements the safety harness shall be used.
1. Mount the waist belt around the waist of
the patient.
2. Click the buckle of belt into buckle of
belt .
3. If needed adjust the waist belt.
1. Mount the buckle of the safety harness in
the buckle on the front side of the shell
chair and just below the seat cushion.
2. Mount the safety harness around the body
of the patient.
3. Cross the harness around the back of the
shell chair.
4. Click the buckle of belt into buckle of
belt .
5. If needed adjust the safety harness.
The adjustment of the belt shall be with the plastic adjustment system mounted on the
belt.
1. Pull the belt through the adjustment system
.
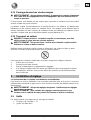
2.11 Taking curbs by using ramps
L
WARNING: Risk of tipping over – Never go up or down ramps without the aid of a
helper.
If you are considering the installation of ramps to overcome obstacles, kindly note the
following:
The chair is intended firstly and mostly to be used inside on level and solid surfaces. Never
go up or down ramps that are rough or have bumpy edges. Limit yourself to ascents or
descents with a maximum angle of 6%.
2.12 Transport in the car
L
DANGER: Risk of injury – The shell chair is not suited for use as a seat in a
motor vehicle.
L WARNING: Risk of injury – See that the chair is attached properly in the car or
the truck.
Never use your shell chair as a seat in an automobile or other vehicle. The shell chair shall
be marked with following symbol.
To transport the shell chair in the car use following steps:
1. Remove accessories.

Regina
2013-09
Page14
2. Store accessories safely.
3. Place the chair in the luggage place.
4. If the chair and the passenger compartment is NOT separated, attach the frame of
the chair securely to the vehicle. You can use the available safety belts in the vehicle.
3 Installation and adjustment
The instructions in this chapter are for the specialist dealer.
To find a service facility or specialist dealer near you, contact the nearest Vermeiren facility.
A list of Vermeiren facilities can be found on the last page.
L WARNING: Risk of unsafe settings - Use only the settings described in this
manual.
L WARNING: Variation of allowed adjustments can still change the stability of your
product (tilt back or sideways).
3.1 Tools
To set up the chair the following tools are needed.
Wrench set n° 17
Allen key set n° 6
3.2 Manner of delivery
The Vermeiren product shall be delivered with:
1 frame with shell chair and 4 wheels
1 wheel not mounted on the shell chair
1 legrest
Tray
Manual control, motor, power supply and cables
Tools
Manual
Accessories
Before use check if everything is included and that no products are damaged (example by
transport, ...).
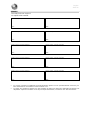
3.3 Adjusting the seat height
L
WARNING: Risk of injury – Make sure that no objects and or body parts are
caught between the adjustment systems.
L WARNING: Risk of injury – Adjusting can only be done by authorized people.
L WARNING: Risk of injury – Check that all screws have been properly fastened.
You can adjust the shell chair in 2 different seat heights (step: 25 mm) by adjusting the frame
and also adjust the seat height by changing the thickness of the seat cushion. The shell
chair must not be removed during this process.
Thickness seat cushion Seat height Frame Position
60 mm 455 mm Hole 1
80 mm 475 mm Hole 1
100 mm 495 mm Hole 1
60 mm 480 mm Hole 2
80 mm 500 mm Hole 2
100 mm 520 mm Hole 2
Table 2: Seat heights

Regina
2013-09
Page15
The shell chair shall placed in the Vermeiren factory to the desired seat height, so with the
purchase you must decide the correct seat height.
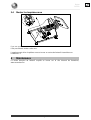
3.4 Mounting the fifth wheel
With your shell chair there is 1 wheel delivered that is not mounted on the shell chair.
There is the possibility to mount this wheel on the shell chair.
The location for the fifth wheel is in the middle of the shell chair. Mounted on the bushing .
4 Maintenance
For the maintenance manual of the shell chairs refer to the Vermeiren website:
www.vermeiren.be.

Regina
2013-09
Page1
Table des matières
Préface ................................................................................................. 2
1 Description du produit ............................................................ 3
1.1 Utilisation prévue ........................................................................................................ 3
1.2 Spécifications techniques ............................................................................................ 4
1.3 Composants ................................................................................................................. 5
1.4 Emplacement de la plaque d'identification ................................................................. 5
1.5 Explication des symboles ............................................................................................ 6
1.6 Accessoires .................................................................................................................. 6
1.7 Règles de sécurité ........................................................................................................ 6
2 Utilisation ................................................................................. 7
2.1 Explication de la compatibilité électromagnétique (EMC) ......................................... 7
2.2 Porter le fauteuil .......................................................................................................... 8
2.3 Recommandations pour utiliser le fauteuil coquille Regina ....................................... 8
2.4 Basculement du fauteuil coquille .............................................................................. 10
2.5 Utilisation de la télécommande ................................................................................. 10
2.6 Raccordements de câble ............................................................................................ 11
2.7 Roues / Freins de stationnement................................................................................ 11
2.8 Montage / démontage de la tablette ........................................................................... 12
2.9 Montage ou démontage de l’appui-tête. .................................................................... 12
2.10 Utilisation du harnais de sécurité .............................................................................. 13
2.11 Passage de marches via des rampes .......................................................................... 14
2.12 Transport en voiture .................................................................................................. 14
3 Installation et réglage ............................................................ 14
3.1 Outils ......................................................................................................................... 14
3.2 Mode de livraison ...................................................................................................... 15
3.3 Réglage de la hauteur d'assise ................................................................................... 15
3.4 Monter la cinquième roue ......................................................................................... 16
4 Maintenance ........................................................................... 16

Regina
2013-09
Page2
Préface
Nous tenons tout d'abord à vous remercier de nous avoir fait confiance en choisissant l'un
de nos produits.
Les produits Vermeiren sont le résultat de nombreuses années de recherche et
d'expérience. Au cours du développement, une attention spéciale a été portée sur la facilité
d'utilisation et les possibilités d'entretien du produit.
La durée de vie attendue de votre produit est fortement influencée par l'entretien et la
maintenance dont il bénéficie.
Ce manuel vous aidera à connaître le fonctionnement de votre produit.
Le respect des instructions d'utilisation et des instructions de maintenance est une condition
essentielle de la garantie.
Ce manuel reflète les derniers développements du produit. Vermeiren est autorisé à
apporter des modifications sans devoir pour autant adapter ou remplacer les modèles
fournis précédemment.
Pour toute question, consultez votre distributeur.

Regina
2013-09
Page3
1 Description du produit
1.1 Utilisation prévue
Le fauteuil coquille Regina a entièrement été développé pour votre confort.
Ce fauteuil coquille est prévu pour 1 personne.
Le fauteuil coquille a été dessiné pour les personnes à mobilité réduite dont le tonus
musculaire s’affaiblit.
Le fauteuil coquille est destiné à une utilisation en intérieur.
Vous aurez besoin d’une assistance pour le transport en intérieur, et le fauteuil peut avoir
besoin de son propre endroit de stockage.
Les différents types d'accessoires et la construction permettent une utilisation complète par
des personnes souffrant des handicaps suivant:
paralysie,
faiblesses/malformations des articulations,
lésions des articulations,
insuffisances cardiaques et mauvaise circulation sanguine,
troubles de l'équilibre,
cachexie (perte musculaire),
et les personnes gériatriques
Quant aux contre-indications, il y a lieu de tenir compte des facteurs suivants:
taille et poids (max. load 120 kg)
de l’état physique et psychologique,
de l'environnement de vie,
Votre fauteuil coquille ne doit être utilisé que sur des surfaces où les quatre roues touchent
le sol et où le contact est suffisant pour entraîner les roues de manière équilibrée.
Le fauteuil coquille ne fait pas office d'engin d'escalade ou pour transporter des objets
chauds ou lourds.
En cas d'utilisation sur des paillassons, moquettes ou revêtements de sols non fixés, le
revêtement de sol peut être endommagé.
Il est nécessaire de choisir le modèle qui correspond au mieux à la taille et la corpulence du
patient.
Utilisez uniquement des accessoires approuvés par Vermeiren.
Le fabricant n'est pas responsable des dommages causés par l'absence ou l'inadéquation
de l'entretien, ou par le non-respect des instructions de ce manuel.
Le respect des instructions d'utilisation et des instructions de maintenance est une condition
essentielle de la garantie.
La page est en cours de chargement...
La page est en cours de chargement...
La page est en cours de chargement...
La page est en cours de chargement...
La page est en cours de chargement...
La page est en cours de chargement...
La page est en cours de chargement...
La page est en cours de chargement...
La page est en cours de chargement...
La page est en cours de chargement...
La page est en cours de chargement...
La page est en cours de chargement...
La page est en cours de chargement...
La page est en cours de chargement...
La page est en cours de chargement...
La page est en cours de chargement...
La page est en cours de chargement...
La page est en cours de chargement...
La page est en cours de chargement...
La page est en cours de chargement...
-
 1
1
-
 2
2
-
 3
3
-
 4
4
-
 5
5
-
 6
6
-
 7
7
-
 8
8
-
 9
9
-
 10
10
-
 11
11
-
 12
12
-
 13
13
-
 14
14
-
 15
15
-
 16
16
-
 17
17
-
 18
18
-
 19
19
-
 20
20
-
 21
21
-
 22
22
-
 23
23
-
 24
24
-
 25
25
-
 26
26
-
 27
27
-
 28
28
-
 29
29
-
 30
30
-
 31
31
-
 32
32
-
 33
33
-
 34
34
-
 35
35
-
 36
36
-
 37
37
-
 38
38
-
 39
39
-
 40
40


dans d''autres langues
- English: Vermeiren Regina User manual
Documents connexes
-
Vermeiren Charme Manuel utilisateur
-
Vermeiren Coraille Manuel utilisateur
-
-
Vermeiren Normandie 2F Manuel utilisateur
-
Vermeiren Languedoc Manuel utilisateur
-
-
-
Vermeiren 9302 Manuel utilisateur
-
-
