Caloric CVI34-SS Le manuel du propriétaire
- Catégorie
- Hottes
- Taper
- Le manuel du propriétaire
Ce manuel convient également à

1
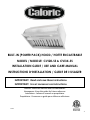
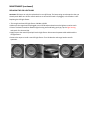
BUILT-IN (POWER PACK) HOOD / HOTTE ENCASTRABLE
MODEL / MODÈLE: CVI28-SS & CVI34-SS
INSTALLATION GUIDE / USE AND CARE MANUAL
INSTRUCTIONS D’INSTALLATION / GUIDE DE L’USAGER
Installer: Leave this manual with the homeowner.
Homeowner: Keep this guide for future reference.
Installateur : Laissez ce manuel au propriétaire.
Propriétaire : Conservez ce guide pour référence ultérieure.
2020A
IMPORTANT: Read and save these instructions.
IMPORTANT: Lire et conserver ces instructions.

Table of Contents
IMPORTANT SAFETY PRECAUTIONS ................................................ 3-4
INSTALLATION INSTRUCTIONS ....................................................5-10
OPERATING THE HOOD .................................................................. 11
MAINTENANCE ............................................................................. 13
WARRANTY .................................................................................. 15
APPROVED FOR RESIDENTIAL USE ONLY.
READ AND SAVE THESE INSTRUCTIONS.
PLEASE READ THE ENTIRE INSTRUCTIONS BEFORE YOU BEGIN.
INSTALLATION OF THE UNIT MUST RESPECT ALL BUILDING CODES.
IMPORTANT: Keep these instructions in order to provide them to the electrical inspector in your area.
INSTALLER: Please leave these instructions with the owner of the unit.
OWNER: Keep these instructions for future reference.
SECURITY WARNING: Turn off the power circuit in the electrical panel and lock the front panel before
connecting the wires of this unit.
Requirements: 120V c.a., 60Hz branch circuit of 15V c.a., 20Hz, of 15 or 20A
.

IMPORTANT SAFETY PRECAUTIONS
READ AND SAVE THESE INSTRUCTIONS
CAUTION:
For residential use only. Do not use to exhaust hazardous or explosive materials and/or vapors.
CAUTION:
Range hood may have very sharp edges. Please wear protective gloves when installing, cleaning or
servicing the unit.
This appliance must be installed by a qualified technician. The manufacturer declines all
responsibility in case of failure to adhere to safety standards. Install this hood in accordance with
all the specified requirements.
WARNING
To reduce the risk of fire, electric shock or injury to persons, observe the following:
• Use this unit only in the manner intended by the manufacturer. If you have any questions, contact the manufacturer.
• Before servicing or cleaning the unit, switch power off at the service panel and lock the service disconnecting means
to prevent power from being switched on accidentally. If the service disconnecting means cannot be locked, securely
fasten a noticeable warning device, such as a tag, to the service panel.
• Installation work and electrical wiring must be done by a qualified person in accordance with all applicable codes &
standards, including fire-rated construction.
• Sufficient air is needed for proper combustion and exhausting of gases through the chimney (chimney) of fuel
burning equipment to prevent back-drafting.
• Follow the heating equipment manufacturer’s guideline and safety standards such as those published by the
National Fire Protection Association (NFPA) and the local code authorities.
• When cutting or drilling into wall or ceiling, do not damage electrical wiring and other hidden utilities.
• Ducted fans must always be vented to the outdoors.
• Do not make alterations to the original wiring.
• Do not attempt to repair or replace any part of your hood unless it is specifically recommended in this manual.
• All other servicing should be referred to a qualified technician.
CAUTION:
To reduce risk of fire and to properly exhaust air, be sure to duct air outside - do not vent exhaust air into
spaces within walls, ceilings, attics, crawl spaces, or garages.
Automatically operated device - to reduce risk of injury disconnect from power supply before servicing.

WARNING
TO REDUCE THE RISK OF FIRE, USE ONLY METAL DUCTWORK.
WARNING: TO REDUCE THE RISK OF A RANGE TOP GREASE FIRE
• Never leave a range unattended.
• Boil overs cause smoking and greasy spillovers that may ignite. Heat oils slowly on low or medium setting.
• Always turn hood ON when cooking at high heat or when flambéing food (i.e. Crepes Suzette, Cherries Jubilee,
Flambés, etc.…).
• Clean the unit’s surfaces frequently including the fan wheels. Grease can accumulate on fan or filters.
• Use proper pan size. Always use cookware appropriate for the size of the surface element.
WARNING: TO REDUCE THE RISK OF INJURY TO PERSONS, IN THE EVENT OF A COOKTOP
GREASE FIRE, OBSERVE THE FOLLOWING:
• Smother flames with a close-fitting lid, cookie sheet, or metal tray, and then turn off the burner.
• If the flames do not go out immediately, EVACUATE AND CALL THE FIRE DEPARTMENT.
• Never pick up a flaming pan - you may BURN YOURSELF.
• DO NOT USE WATER, including wet dishcloths or towels - a violent steam explosion will result.
• Use an extinguisher ONLY if:
a) You know you have a class ABC extinguisher, and you already know how to operate it.
b) The fire is small and contained in the area where it started.
c) The fire department has been called.
d) You can fight the fire with your back to an exit.

INSTALLATION INSTRUCTIONS
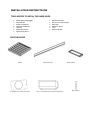
TOOLS NEEDED TO INSTALL THE RANGE HOOD
▪ Safety gloves and goggles
▪ Electrical drill
▪ Phillips screwdriver
▪ Flathead screwdriver
▪ Hammer
▪ Adjustable wrench
▪ Sheet metal sheers
▪ Needle nose pliers
▪ Scissors (to cut duct tape)
▪ Duct tape
▪ Marker or pencil
▪ Level
▪ Measuring tape
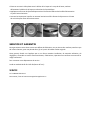
PARTS INCLUDED
Filters Grease tunnel Filter spacer
6" adapter for vertical evacuation 3.25" x 10" Adapter for horizontal evacuation
Qty: 10 pcs

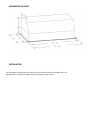
DIMENSIONS OF HOOD
INSTALLATION
The information contained herein is based on sources that we believe to be reliable, but is not
guaranteed by us, may be incomplete and/or may change without notice.

Roof cap
Round air duct
Round air duct
Wall cap
A MINIMUM OF 26”
ABOVE AN ELECTRIC
COOKING SURFACE AND
28" ABOVE A GAS
COOKING SURFACE ARE
REQUIRED
BEFORE INSTALLING THE HOOD
▪ For the most efficient airflow exhaust use a straight run or as few elbows as possible.
▪ Vent unit to the outside only.
▪ At least two people are required for installation.
▪ Remove the range hood from the carton packaging and place on a flat surface for assembly.
CAUTION:
THIS APPLIANCE SHOULD BE PROPERLY GROUNDED.
▪ This hood must be power supplied 120 V, 60 Hz, and connected to an individual, properly
grounded circuit (3-prong outlet).
▪ If the electrical supply does not meet above requirements, call a licensed electrician before
proceeding.
▪ Route house wiring as close as possible to the installation location, in the ceiling or back wall.
▪ The hood must be connected to the house wiring in accordance with the local codes and norms.
WALL FRAMING FOR ADEQUATE SUPPORT
THIS VENT HOOD IS HEAVY. ADEQUATE STRUCTURE AND SUPPPORT MUST BE PROVIDED IN ALL TYPESOF
INSTALLATIONS. THE HOOD MUST BE SECURED TO A HORIZONTAL SUPPORT.
PREPARING THE INSTALLATION
▪ The exhaust air must not be discharged into a chimney which is used for exhausting fumes from other
appliances burning gas or other fuels.
▪ Determine the exact location of the vent hood. Mark the location. Find the centerline of the cooktop.
▪ Plan the route for venting exhaust to the outdoors. Use the shortest and straightest duct route possible.
Long duct runs, elbows and transitions will reduce the performance of the hood. Use as few of them as
possible. Larger ducting may be required for longer duct runs.
▪ Install a wall cap with damper or roof cap at the exterior opening. Join the wall or roof cap to the
ductwork.
▪ Connect round metal ductwork to cap and work back towards the hood location. Use 2" metal foil duct
tape to seal the joints.
Option 1: Option 2:

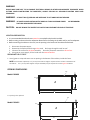
INSTALLATION DRAWINGS
▪ The minimum hood distance above cooktop must not be less
than 26” for an electric cooking surface and no less than 28"*
for a gas cooking surface.
* Distances over 30" are at the installer’s and users’ discretion, providing that ceiling
height permits.
ELECTRICAL INSTALLATION REQUIREMENTS
WARNING
THIS RANGE HOOD MUST BE PROPERLY GROUNDED. TURN OFF ELECTRICAL POWER AT SERVICE ENTRANCE BEFORE
WIRING. CHECK TO MAKE SURE THAT THE ELECTRIC CORD IS NOT IN CONTACT WITH THE SHARP EDGES OF THE
APPLIANCE.
IMPROPER GROUNDING CAN RESULT IN A RISK OF ELECTRIC SHOCK. CONSULT A QUALIFIED ELECTRICIAN IF THE
GROUNDING INSTRUCTIONS ARE NOT COMPLETELY UNDERSTOOD OR IF THERE IS DOUBT AS TO WHETHER THE
APPLIANCE IS PROPERLY GROUNDED. DO NOT USE AN EXTENSION CORD. IF THE POWER SUPPLY CORD IS TOO
SHORT, HAVE A QUALIFIED ELECTRICIAN INSTALL AN OUTLET NEAR THE APPLIANCE.
▪ This appliance must be plugged into an outlet that is properly installed and grounded. In the event of an
electrical short circuit, grounding reduces the risk of electric shock by providing an escape wire for the
electric current. This appliance is equipped with a cord having a grounding wire with a grounding plug.
▪ Position the outlet offset so that the power cord will not interfere with the round duct.
▪ Make sure this does not interfere with a mounting area.
LOCATION REQUIREMENTS
IMPORTANT: Observe the provisions of all applicable codes and regulations.
Refer the installation of the hood to a qualified installer. It is the installer's responsibility to respect the required
separation distances.
Install the range hood away from any area exposed to drafts, such as windows, doors, and heating vents.
Observe the dimensions indicated for the opening to be cut in the cupboard. These dimensions take into account the
minimum values of separation clearances. Before cutting, also refer to the instructions on the cooktop or cooker,
above which you will place the hood.
The hood is factory-configured for installation with exterior discharge through the roof or wall.
Seal each opening cut in the ceiling or wall for the installation of the hood with duct tape.

WARNING
PLEASE MAKE SURE NOT TO DO DAMAGE ELECTRICAL WIRING OR OTHER NON-APPARENT EQUIPMENT WHEN
CUTTING. WHEN CONSTRUCTING THE CARPENTRY, ALWAYS FOLLOW ALL APPLICABLE BUILDING CODES AND
STANDARDS.
WARNING: AT LEAST TWO (2) PERSONS ARE NECESSARY TO LIFT AND POSITION THEHOOD.
WARNING: BE CAREFUL WHEN INSTALLING THE HOOD AS IT MAYHAVESHARP EDGES. WE RECOMMEND
THAT YOU WEAR PROTECTIVEGLOVES.
CAUTION: DO NOT REMOVE THE PROTECTIVE PLASTIC FILM COVERING THE HOOD AT THISSTAGE.
LOCATION PREPARATION
• It is recommended that the exhaust system be set up before the hood is installed.
• Before cutting, make sure that the separation distances for the fittings in the walls and/or roof are adequate.
• Before mounting the cabinet to the wall, cut the opening in the bottom of the cabinet beforehand.
1.
Disconnect the power source.
2.
Determine the method of discharge to be used: discharge through the wall or roof.
3.
Choose a flat surface for the hood assembly. Place the protective material on this surface.
4.
Using two or more people, lift the hood over the covered surface.
PREPARING THE CUT-OUT
1. Use a jigsaw or reciprocal saw to cut an opening in the bottom of the cabinet, inside the frame.
NOTE: For frameless cupboards, a ¾" (1.9 cm) front and rear edge is required to form a frame in the bottom of
the cabinet. A ¾" (1.9 cm) thick support rod (not included) may be required for certain types of cabinets.
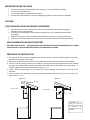
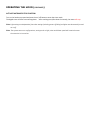
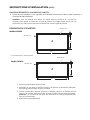
OPENING DIMENSIONS
3/4”
Model CVI28-SS
3/4”
A = Opening in the cupboard
3/4”
Model CVI34-SS
3/4”
16.5”
28”
16.5’’
34’’

1. Remove the decorative panel from the rangehood.
2. Cut a hole in the bottom of the cabinet, using the dimensions shown in the table above,
according to the model.
3. Insert the hood in the cabinet and secure with the (4) mounting screws from the inner side
of the range hood. Make certain that the hood is secure before releasing. Note: Wood
blocking might be necessary if there is no frame to secure the mounting screws.
4. Replace the decorative panel.
2. Complete the closet preparation according to the instructions for the type of home evacuation. Determine the
location of the ventilation openings and cut out the openings in the cupboards, walls and / or soffits.
COMPLETING THE INSTALLATION
1. Re-install the filters.
2. Plug in the 3-tong plug in the properly grounded outlet that you was installed in the cupboard above
the cooking surface
3. Verify the operations of the hood and the lamps. See section “OPERATING THE HOOD”. If the hood
does not operate, determine if a circuit breaker has opened or a home fuse is blown. Disconnect the
power source and inspect the wiring connections.
NOTE: To get the most out of the new range hood, read the following section, "Operating the hood".

OPERATING THE HOOD
The range hood is designed to extract smoke, fumes and odors from the cooktop area. For best results, turn on the
fan before starting cooking and let it run for several minutes after cooking is complete in order to allow cooking
odors, steam or smoke to evacuate from the kitchen.
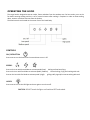
The hood controls are located on the center front of the hood body.
CONTROLS
ON / OFF BUTTON:
Press once to turn the hood on and a second time to turn it off.
SPEEDS:
Press on the icon with three blades to activate speed1 (low): boiling and low heat frying.
Press on the icon with four blades to activate speed2 (medium): intense boiling, frying and cooking with wok.
Press on the icon with five blades to activate speed 3 (high): grilling and frying and/or intense cooking with wok.
LIGHTS:
Press once to turn on the LED lights and once again to turn them off.
CAUTION: DO NOT touch the lights until switched OFF and cooled.

OPERATING THE HOOD (CONTINUED)
ACTIVATE AUTOMATIC STOP FUNCTION
Turn on the hood at any speed and press the on / off button to enter the timer mode.
The digital timer will then start counting down. After reaching zero (after about 3 minutes), the motor will stop.
Note: Light settings are independent from other settings (including power-off delay) and lights must be manually turned
on or off.
Note: The system saves user configurations, settings such as light, timer and blower speed will remain the same
the next time it is turned on.

MAINTENANCE
SAFETY WARNING: NEVER PUT YOUR HAND INTO AREA HOUSING THE FAN
For optimal operation, clean range hood, surfaces and filters regularly. Regular care will help preserve the
appearance of the range hood.
CLEANING THE EXTERIOR SURFACES
Clean periodically with hot soapy water and clean cotton cloth. Do not use corrosive or abrasive detergent or
steel wool pads, which will scratch and damage the stainless-steel surface. For heavier soil, use a liquid
degreasing cleaner. Use a stainless-steel cleaner to clean the surface of the hood. Avoid getting cleaning solution
onto or into the control panel. Follow directions of the stainless-steel cleaner.
CAUTION
USE SOFT TOWEL TO WIPE OFF THE CLEANING SOLUTION, GENTLY RUB OFF ANY STUBBORN SPOTS. USE DRY SOFT TOWEL
TO DRY THE HOOD. ALWAYS SCRUB LIGHTLY WITH CLEAN COTTON CLOTH AND IN THE DIRECTION OF THE GRAIN.
DO NOT ALLOW DEPOSITS TO ACCUMULATE OR REMAIN ON THE HOOD. DO NOT USE ORDINARY STEEL WOOL OR STEEL
BRUSHES. SMALL BITS OF STEEL MAY ADHERE TO THE SURFACE AND CAUSE RUSTING.
DO NOT ALLOW SALT SOLUTIONS, DISINFECTANTS, BLEACHES OR CLEANING COMPOUNDS TO REMAIN IN CONTACT WITH
STAINLESS STEEL FOR EXTENDED PERIODS. MANY OF THESE COMPOUNDS CONTAIN CHEMICALS, WHICH MAY BE
HARMFUL. RINSE WITH WATER AND WIPE DRY WITH A CLEAN CLOTH.
CLEANING THE GREASE FILTER
The filters are intended to filter out residue and grease from cooking and are required to be kept clean. Filters
should be cleaned after every 30 hours of use (or once a month, depending on use). Remove and clean by hand in
soapy water or in the dishwasher. Dry filters and re-install. If cleaning the filters in the dishwasher, use a non-
phosphate detergent. The use of detergent with phosphate may cause discoloration of the filters but will not
affect their performance. This discoloration is not covered by the warranty.
REPLACING THE FILTERS
If filters wear out due to prolonged use, please contact your service/parts provider for replacement filters.
NOTE: ALSO REPLACE DAMAGED FILTER THAT IS BENT, HAS PUNCTURED OR BROKEN MESH OR BROKEN FRAME.
CLEANING THE STAINLESS-STEEL SURFACE
Regularly wash surface with dry cloth or clean cloth soaked in warm water and mild soap or liquid dish detergent.
Always clean following the grain. Always rinse thoroughly with clear water (2-3 times) and wipe dry completely.
Specially designed stainless-steel cleaners can also be used.

MAINTENANCE (continued)
REPLACING THE LED LIGHT BULBS
CAUTION: LED lamps can only be replaced with a new LED lamp. The lamp rating must be equal to the one
already used. Make sure all the control switches are off and the hood is unplugged, or the breaker is OFF.
Replacing the LED light fixture:
• This range hood uses LED light fixture: 3W Max 12VLED
• Make sure the range hood is unplugged or turn OFF breaker and make sure the lights are cool to touch.
• Place a flat-head screwdriver between light housing and hood body, gently pry up the light housing
and search for the metal clip.
• Apply force to the metal clip and pull out the light fixture. Disconnect the power cable and discard the
old light fixture.
• Reverse the steps to install a new LED light fixture. Turn ON breaker and range hood to test for
operation.

SERVICE AND WARRANTY
LIMITED WARRANTY
This warranty applies only to the original purchaser and may not be transferred. This warranty is
applicable within Canada only, to hoods installed for normal, non-commercial use in PRIVATE SINGLE-
FAMILY HOUSEHOLDS.
Caloric™ warrants this product to be free from defects in material or workmanship for a period of ONE YEAR from
the date of original purchase. During the warranty period, Caloric™ will, at its option, repair or replace, without
charges, any product or part which is found to be defective under normal use and service. This warranty covers parts
and labour from a Caloric™ authorized company, up to a maximum of one (1) hour. Proof of payment to the service
company is required.
THERE ARE NO OTHER WARRANTIES, EXPRESS OR IMPLIED, INCLUDING BUT NOT LIMITED TO, IMPLIED
WARRANTIES OR MERCHANT ABILITY OR FITNESS FOR A PARTICULAR PURPOSE.
Proof of purchase/original invoice and serial number is required for warranty claims. Keep a photocopy easily
accessible.
This warranty will be void if the serial plate has been removed or disfigured.
EXCLUSIONS – This Caloric™ warranty does not cover: • Aluminum or SS baffle filters, lights or glass canopies,
blower wheel damage • Regular maintenance and service (except by an authorized Caloric ™ repair center) •
Damage resulting from accident, alteration, misuse, abuse, fire, flood, acts of God, improper installation, installation
not in accordance with electrical codes, or use of consumables or cleaning products not approved by Caloric™ •
Repair of an appliance used in other than a normal, single-family household, or in a manner that is contrary to the
operation or installation instructions. • Cosmetics damage or freight damage caused by a 3rd party freight company.
• Service to product that is not easily accessible due to unusual, exceptional, or difficult installation • Service calls to
instruct how to use the appliance • Expenses for travel and transportation if your appliance is in a remote area where
service by an authorized Caloric™ servicer is not available.
The cost of repair or replacement under these exclusions shall be borne by the customer and agreed to before a
servicer is dispatched.
Caloric™ SHALL NOT BE LIABLE FOR INCIDENTAL, CONSEQUENTIAL OR SPECIAL DAMAGES ARISING
OUT OD OR IN CONNECTION WITH PRODUCT USE OR PERFORMANCE.
For a Caloric™ authorized repair center please contact us at:
1-844-455-3474 ext. 2 or service@caloricappliances.ca
We do the utmost to ensure that the provided information is complete and accurate, however, images and
specifications are subject to change without notice. Visit our website at www.caloricappliances.ca for the latest
version of this manual.
In Canada CALORIC™ is a registered trademark of J.A.K. North America Inc.

Table des matières
IMPOPTANTES MESURES DE SÉCURITÉ......................................... 17-18
INSTRUCTIONS D’INSTALLATION ........................................................ 19-25
MODE D’EMPLOI ............................................................................ 26
ENTRETIEN ................................................................................... 27
SERVICE ET GARANTIE ................................................................... 29
APPROUVÉ POUR LES APPAREILS À UTILISATION RÉSIDENTIELLE SEULEMENT. LISEZ
CES INSTRUCTIONS ET CONSERVEZ-LES
VEUILLEZ LIRE CES INSTRUCTIONS AU COMPLET AVANT DE COMMENCER.
L’INSTALLATION DE L’APPAREIL DOIT RESPECTER TOUS LES CODES EN VIGUEUR.
IMPORTANT: Conservez ces instructions afin de pouvoir les remettre à l’inspecteur-électricien de votre région.
INSTALLATEUR: Veuillez laisser ces instructions avec l’appareil pour le propriétaire.
PROPRIÉTAIRE: Veuillez conserver ces instructions pour pouvoir vous y référer plus tard.
AVERTISSEMENT DE SÉCURITÉ: Coupez l’alimentation du circuit dans le panneau électrique et verrouillez le panneau
avant de raccorder les fils de cet appareil.
Exigence: 120V c.a., 60Hz circuit de dérivation de 15V c.a., 20Hz, de 15 ou 20A
.

IMPORTANTES MESURES DE SÉCURITÉ
AVERTISSEMENT
Pour usage domestique seulement. Ne pas utiliser pour évacuer des vapeurs ou des matières dangereuses ou
explosives.
ATTENTION
Cette hotte peut avoir des bords très tranchants; veuillez porter des gants de protection lors de l'installation,
du nettoyage ou de l'entretien del'appareil.
Cet appareil doit être installé par un technicien qualifié. Le fabricant décline toute responsabilité en cas de
défaut de se conformer aux normes de sécurité. Installez cette hotte en respectant toutes les exigences
spécifiées.
AVERTISSEMENT
Afin de réduire les risques d’incendie, d’électrocution ou de blessures corporelles, suivez les directives
suivantes :
▪ N’utilisez cet appareil que de la façon prévue par le manufacturier. Si vous avez des questions,
contactez le manufacturier à l’adresse ou au numéro de téléphone indiqué dans la garantie.
▪ Avant de réparer ou de nettoyer l’appareil, coupez l’alimentation électrique en verrouillant le
panneau électrique afin d’éviter sa remise en marche accidentelle. Si le panneau électrique
ne peut pas être verrouillé, fixez-y un avertissement bien en évidence telle qu’une étiquette
de couleur vive.
▪ Les travaux d’installation et de raccordement électriques doivent être effectués par une
personne qualifiée, conformément aux codes et aux standards de construction, incluant ceux
concernant la protection contre les incendies.
▪ Une quantité d’air adéquate est requise afin d’assurer une bonne combustion et l’évacuation
des gaz par la cheminée (dans le cas des équipements alimentés au gaz) afin de prévenir les
retours de cheminée.
▪ Conformez-vous aux instructions et aux standards de sécurité des manufacturiers
d’équipement de chauffage ainsi que les codes et standards locaux.
▪ Veillez à ne pas endommager le câblage électrique ou d’autres équipements non apparents
lors de la découpe ou du perçage du mur ou du plafond.
▪ Les ventilateurs avec conduits doivent toujours évacuer l’air vers l’extérieur.
▪ Ne faites pas de modifications au câblage d'origine.
▪ N'essayez pas de réparer ou de remplacer quelque partie que ce soit de votre hotte, sauf s'il
est spécifiquement recommandé dans ce manuel.
▪ Toutes les autres réparations devraient être effectuées par un technicien qualifié.
AVERTISSEMENT
Afin de réduire les risques d’incendie, assurez-vous d’évacuer l’air vers l’extérieur. Ne pas évacuer l’air
dans des espaces restreints comme l’intérieur des murs, du plafond, le grenier, faux plafond ou garage.
Dispositif automatique - pour réduire les risques de blessures, débranchez l’appareil avant d’effectuer
l'entretien.

AVERTISSEMENT :
AFIN DE RÉDUIRE LES RISQUES D’INCENDIE, N’UTILISEZ QUE DES CONDUITS
DE MÉTAL.
AVERTISSEMENT : AFIN DE RÉDUIRE LES RISQUES DE FEU DE CUISINIÈRE :
▪ Toujours mettre la hotte en marche lorsque vous cuisinez.
▪ Ne jamais laisser les appareils de cuisson sans surveillance lorsqu’ils sont réglés à feu vif.
Les débordements engendrent de la fumée et des déversements graisseux qui pouvant
s’enflammer. Chauffez l’huile lentement, à feu doux ou moyen.
▪ Il est essentiel d’avoir la hotte en marche lorsque vous cuisinez à feu vif ou que vous
cuisinez des mets flambés (par ex. : Crêpes Suzette, Cerises jubilées, Steaks au poivre
flambés, etc.).
▪ Nettoyez régulièrement les palmes des roues du ventilateur. Ne pas laisser la graisse
s’accumuler sur le ventilateur, les filtres ou les conduits d’évacuation.
▪ Utilisez le bon format de casserole. Servez-vous toujours de casseroles et d’ustensiles
appropriés à la dimension de la surface chauffante.
AVERTISSEMENT: AFIN D’ÉVITER TOUT RISQUE DE BLESSURES LORS D’UN FEU DE
CUISINIÈRE, SUIVEZ CES DIRECTIVES :
▪ Étouffez les flammes avec un couvercle hermétique, une tôle à biscuits ou un plateau
métallique et ensuite éteindre le brûleur.
▪ Si les flammes ne s’éteignent pas immédiatement, ÉVACUEZ LES LIEUX ET APPELEZ LES
POMPIERS.
▪ Ne prenez jamais une casserole en flamme dans vos mains. Vous pour riez-vous brûler.
▪ N’UTILISEZ PAS D’EAU, y compris un linge à vaisselle ou une serviette mouillée car cela
pourrait occasionner une violente explosion de vapeur.
▪ N’utilisez un extincteur QUE DANS LE CAS OÙ :
a) Vous savez qu’il s’agit d’un extincteur de classe ABC et que vous en connaissez
le fonctionnement.
b) L’incendie est petit et limité à l’endroit où il a débuté.
c) Les pompiers ont été avisés.
d) Vous pouvez combattre l’incendie en ayant accès à une sortie de secours.

INSTRUCTIONS D’INSTALLATION
OUTILS NÉCESSAIRES POUR INSTALLER LA HOTTE
▪ Gants et lunettes de protection
▪ Perceuse électrique
▪ Tournevis Phillips (tête étoilée)
▪ Tournevis à tête plate
▪ Marteau
▪ Clé à molette
▪ Pinces à bec
▪ Ciseaux (pour couper du ruban pour conduit)
▪ Ruban pour conduit
▪ Marqueur ou crayon
▪ Niveau
▪ Ruban à mesurer
PIÈCES INCLUSES
Filtres Accumulateur de gras Séparateur de filtres
Qté: 1 0 pcs
Adaptateur/clapet 6" Adaptateur/clapet 10" X 3.25"
(Pour évacuation verticale) (Pour évacuation horizontale)

DIMENSIONS
Les renseignements que cette fiche contient sont fondés sur des sources que nous croyons fiables, mais nous ne pouvons
les garantir et ils peuvent par ailleurs être incomplets et/ou changés sans préavis.
AVANT D'INSTALLER LA HOTTE
▪ Pour un échappement d'air plus efficace, nous recommandons une installation le plus rectiligne
possible et d'utiliser aussi peu de coudes que possible.
▪ Évacuez l'air vers l'extérieur seulement. Ne pas évacuer l’air dans des espaces restreints comme
l’intérieur des murs, plafond, grenier, faux plafond ou garage.
▪ À cause du poids et de la dimension de la hotte, deux ou plusieurs personnes sont nécessaires pour
déplacer et installer la hotte de façon sécuritaire.
▪ Retirez la hotte de son emballage et la déposer sur une surface plane pour l’assemblage.
La page charge ...
La page charge ...
La page charge ...
La page charge ...
La page charge ...
La page charge ...
La page charge ...
La page charge ...
La page charge ...
-
 1
1
-
 2
2
-
 3
3
-
 4
4
-
 5
5
-
 6
6
-
 7
7
-
 8
8
-
 9
9
-
 10
10
-
 11
11
-
 12
12
-
 13
13
-
 14
14
-
 15
15
-
 16
16
-
 17
17
-
 18
18
-
 19
19
-
 20
20
-
 21
21
-
 22
22
-
 23
23
-
 24
24
-
 25
25
-
 26
26
-
 27
27
-
 28
28
-
 29
29


Caloric CVI34-SS Le manuel du propriétaire
- Catégorie
- Hottes
- Taper
- Le manuel du propriétaire
- Ce manuel convient également à
dans d''autres langues
- English: Caloric CVI34-SS Owner's manual
