La page est en cours de chargement...

C1 Wi-Fi Security
Camera
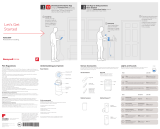
Quick Installation Guide
M37745
RCHC4100WF1002
RCHC4100WF1011
Read before installing.
Input/entrada: 5 V 2 A
Download the Honeywell Home app
NOTE: Have your WiFi password available and confirm your
router communicates at 2.4 GHz before installation.
1 Make sure bluetooth is enabled on your mobile device.
2 Search for Honeywell Home in the App
Store or Google Play.
3 Download the Honeywell Home app.
GET IT ON

2
Launch the Honeywell
Home app
1 Launch the Honeywell Home app.
2 Create an account (if necessary),
or sign in to your Honewell Home
account. Tap ADD DEVICE or the plus
sign.
3 Select the C1 WiFi Camera to install,
then follow the instructions in the
Honeywell Home app to name the
camera and its location.
Connect the power cord
1 Remove the camera base and
plug the power cord’s USB
end into the camera.
2 Reinsert the camera base
and plug the camera into a
power outlet.
3 Wait until the LED on the
camera blinks blue (about 1
minute), then tap NEXT.
NOTE: If the LED turns solid red,
it means the connection mode
timed out. Unplug the camera and plug it back in.
Installation

3
Connect
Connect to Wi-Fi
NOTE: Be sure you are on the same WiFi
network you wish to connect your camera
to.
1 Choose your WiFi network from the
list. Tap NEXT.
2 Enter your WiFi password, if
necessary. Tap DONE.
NOTE: The camera will beep during some
steps in this process.
Connect to mobile device
1 Enable bluetooth on your mobile
device.
2 The app will look for the camera.
• For one camera, it will connect
automatically.
• For more than one camera, the app
will prompt you to select one camera
at a time. Each camera has a unique
MAC ID printed on the back. Use
that ID to select the camera you
want to connect.
3 A QR code will display in the app. To
connect your camera to the app, hold the QR code approximately 38
inches (720 cm) from the camera lens.
4 The camera LED turns purple and the camera beeps.

4
Wi-Fi connection LEDs
During WiFi connection, the LED indicates the following.
LED Camera state
Blinking Green Connecting to WiFi network.
Solid Green Connected to WiFi network.
Solid Red (for 2
seconds)
Connection failed. LED will then turn solid purple.
Solid Purple QR Code scan complete.
Go to “Connect to WiFi” on page 3.
Blinking Blue Camera has lost bluetooth connection. Unplug
camera and plug it back in. See “Connect the power
cord” on page 2 for instructions.
Options
Choose your Geofencing and Membership options (if you skip them you can change
them easily later).
Placement
With stand
Place the camera in a desired location for
viewing and recording.
On the wall
You can also mount the camera directly to
the wall without the stand.

5
Operation
Remove/replace the stand
The stand is connected to the camera by a magnet.
If you want to remove the stand to hang the camera on
the wall or replace the SD card, simply pull the stand
off of the camera. To replace, just snap it back on the
camera.
Honeywell Home app experience
When you launch the application, your Home screen is
displayed.
All of your devices (cameras, thermostats, water leak
detectors, etc.) are displayed. Select a camera from the
list to view live video from that camera.
Testing smoke/CO alarm detection
If your smoke or carbon monoxide alarm goes off and your camera is on, it
will send you an alert that a smoke or CO alarm has been detected.
To test this feature, press and hold the Test button on your smoke/CO
detector for at least 5 seconds or 3 cycles of the detector’s alarm. A shorter
test might not trigger a sound event.

6
Camera overview
Stand
Power cord
LED indication
Camera lens
SD card and slotReset hole
Reset
If your WiFi connection fails or you need to connect to a different WiFi network,
insert one end of a paperclip into the reset hole. Press and hold it for 5 seconds to
reset the WiFi connection.
To reset all settings to factory defaults, press and hold the paperclip in the reset
hole for 10 seconds.
SD card
The camera comes with an encrypted 8GB SD card installed. It stores images if the
camera’s connection to the cloud is lost. You can replace it with any compatible
SD card.

7
Status LED
The camera has an LED that gives device status.
LED Camera state
During installation
Blinking Blue Powered up. Ready to begin setup.
Solid Blue Connected to App. Ready to complete setup.
Solid Purple QR Code scan complete.
Go to “Connect to WiFi” on page 3.
Blinking Green Connecting to WiFi network.
Solid Green Connected to WiFi and operating.
Solid Red Setup timed out. Unplug camera, plug it back in, and
restart the process.
During operation
Blinking Green Connecting to WiFi network.
Solid Green Connected to WiFi and operating.
Blinking Red Not connected to WiFi.

8
FCC Regulations
§ 15.19 (a)(3)
This device complies with part 15 of the FCC Rules. Operation is subject to the fol-
lowing two conditions: (1) This device may not cause harmful interference, and (2)
this device must accept any interference received, including interference that may
cause undesired operation.
§ 15.21
Changes or modifications not expressly approved by the party responsible for
compliance could void the user‘s authority to operate the equipment.
§ 15.105(b)
This equipment has been tested and found to comply with the limits for a Class
B digital device, pursuant to part 15 of the FCC Rules. These limits are designed
to provide reasonable protection against harmful interference in a residential
installation. This equipment generates, uses and can radiate radio frequency ener-
gy and, if not installed and used in accordance with the instructions, may cause
harmful interference to radio communications. However, there is no guarantee that
interference will not occur in a particular installation. If this equipment does cause
harmful interference to radio or television reception, which can be determined by
turning the equipment off and on, the user is encouraged to try to correct the inter-
ference by one or more of the following measures:
• Reorient or relocate the receiving antenna.
• Increase the separation between the equipment and receiver.
• Connect the equipment into an outlet on a circuit different from that to which the
receiver is connected.
• Consult the dealer or an experienced radio/TV technician for help.

9
FCC Radiation Exposure Statement:
This equipment complies with FCC radiation exposure limits set forth for an
uncontrolled environment. This equipment should be installed and operated with
minimum distance 20cm between the radiator & your body.
This device and its antenna(s) must not be co-located or operating in conjunction
with any other antenna or transmitter.
IC Regulations
This device contains license-exempt transmitter(s)/receiver(s) that comply with
Innovation, Science and Economic Development Canada’s license-exempt RSS(s).
Operation is subject to the following two conditions:
1. This device may not cause interference.
2. This device must accept any interference, including interference that may cause
undesired operation of the device.
IC Radiation Exposure Statement:
This equipment complies with IC RSS102 radiation exposure limits set forth for an
uncontrolled environment. This equipment should be installed and operated with
minimum distance 20cm between the radiator & your body.

10
FAQ
Why did the camera not detect the smoke alarm
sound when I tested it for compatibility?
The camera is programmed to detect a series of
alarm sounds in case of smoke or fire provided that
the smoke alarm device has beeped or sounded for
at least 5 seconds. When you enable the intelligent
sound detection feature and test the smoke alarm
device, please press-and-hold the Test button on your
smoke alarm device for AT LEAST FIVE SECONDS.
How soon can I get the alert on my app once it’s
detected as a smoke alarm at my home/office?
If the camera detected the smoke alarm sound,
our camera will send the notification immediately
to you or an approved person on your account. It
normally takes up to 30 seconds for the email and
push notifications to be sent, but delivery times are
subject to the limitations of your network and WiFi
performance.
How do I get the alert/notification of smoke alarm?
If you have the intelligent sound detection feature
enabled, the camera will send the app notification
as “Smoke alarm detected from CAM at your HOME/
OFFICE” and send a message to the registered email
address once the alarm sound is detected by the
camera.
What is the minimum distance required to detect
the smoke alarm?
The camera is designed to detect anywhere within
49 feet or 15 meters distance from the sound source
even with door open or closed at your home. Once
you have placed the camera in the desired and
permanent location, you should test the intelligent
sound detection feature with your detector to ensure
normal operation and that the alert is being sent to
the app.
What should the audio sensitivity be set at,
especially for successful smoke alarm detection?
If your camera has been installed within a reasonable
distance (approx. 32.8 feet or 10 meters) of the
detector, you can keep it at normal sensitivity level.
After you place the camera in the desired, permanent
location, you should test the intelligent sound
detection feature with your detector to ensure normal
operation and that the alert is being sent to the app.
How do I conduct a test trial of smoke alarm?
To use the intelligent sound detection feature, you
must first test your camera with your detector. To
test the smoke alarm detection functionality, place
the camera in the location where you intend to keep
it and then press Test button on your smoke/ CO
detector and hold for at least 5 seconds or hold until
3 cycles of alarm sounds are heard. Otherwise, the
C1 will not detect the alarm sound. It is especially
important to do this to avoid any false alerts from
other similar sounding devices in your house (like
microwaves, etc.)
Will this camera detect smoke alarm sounds from
devices of all brands? What brands of smoke and
carbon monoxide detectors are recognized by the
Intelligent Sound Detection feature on C1 WiFi
Security Camera?
Camera is compatible with detectors of these
manufacturers: Honeywell, Kidde, Nest, First Alert.
The camera is designed to detect all alarm sounds
which generate alarm sounds for more than 5
seconds. If your detector brand is not that listed
above, you can still test the camera for compatibility
with your detector by following the instructions
above.
Is there a chance to have a high detection rate
if I install this camera facing the smoke alarm
direction?
Our camera microphone is designed to detect the
sound coming from all directions. So, you can place
your camera wherever you want to focus, but follow
the instructions above to ensure compatibility by
testing it the first time you use it.
I see that sometimes the camera sends a false
alarm (prompted by sounds from my microwave) as
“smoke detected”, what should I do?
To provide the best experience to the customer, the
camera is programmed to detect any alarm-like
sound. If the false alarm continues try changing
the sensitivity level to “low” in sound configuration
page. In all events, once you change the setting you

11
will need to re test the camera with your detector to
ensure that it detects the alarm sounds and delivers
an alert to the app.
Will this camera detect the sound if the camera is
installed on the second floor and the smoke alarm
emanates from first floor?
The camera is designed to detect the smoke alarm
sound as long as the distance of the camera from
the source of the beeping smoke detector is within
49 feet or 15 meters, even if it is partitioned by
glass/ door. You will need to test the camera with
the detector to ensure that it is working and sending
alerts to the app.
Will this camera always listen for smoke alarm
sound AND any other sound detection as well?
We programmed the camera to detect any sound
which meets certain criteria on the sensitivity level
at which you configured the camera. The camera
will send the smoke alert notification if the detected
sound gets classified as a smoke alarm (based on
internal libraries), otherwise the camera will send out
the notification simply as “sound detected”.
Can I program my camera to receive audio alerts
from beeping smoke alarms only, and no other
audio sounds?
Not right now. However, we continue to upgrade the
App features and this customization could be part of
future releases of the App.
My camera keeps sending me many sound detected
alert notifications every day. What should I do? Is
there a way to avoid this?
As our camera’s microphone sensitivity is very sharp,
it will report whatever audio it hears and discerns in
your premises. To avoid getting inundated with many
notifications, you can adjust the audio sensitivity
level and set it as “Low” on our sound configuration
page on the app. Once you change the audio
sensitivity level you should retest the detector and
camera to ensure that the intelligent sound detection
feature is working and that alerts are being sent to
the app.
My camera is working fine, but I hear no audio in
the stored video clip. Why?
Please check if the volume on your smart device
is turned on. If the volume on your smart device is
set correctly, and you still don’t hear audio in your
video clip, try power cycling the camera (unplug the
camera’s power outlet, wait for about 30 seconds and
power the camera back on. Wait for the camera to
reboot, and that should solve the problem).
What will the camera do next, once it detected
beeping smoke alarm sound? Will it also send a
message to a fire station?
As this is a DoItYourself camera, it would not notify
fire station. For further peace of mind, you can
upgrade to professionally monitored security from
Resideo.
The camera will send you an in-app and email
notification like any other audio or motion detected
event. It could take up to 30 seconds or more, subject
to your network and WiFi performance, for the
notifications to be sent across. The camera would
also generate a 30 second video clip that can be
accessed via the App.
Are these cameras recording everything and
sending to any other private cloud service?
No. Unlike other products on the market, our
cameras do not hog your bandwidth with continuous
recording. We also take customer data privacy
and security seriously and provide end to end
encryption and security in our cameras and cloud
implementation, which includes AES 256 encryption,
hardware authentication crypto-encryption, secure
session and streaming authentication, etc.
The cameras are designed to detect any suspicious
motion and/or any sound (including smoke alarm
sound) at your home. The detection algorithm
operates on the camera firmware and the
notifications are relayed to you via the cloud.
In the event of a motion or audio detected event, only
detected sound will be recorded for 30 seconds and
sent to the cloud for you to view the clips through
your App or download the clip to your smart device
memory as required.
How long will it take to create recorded video,
once the camera detects smoke alarm or any other
sound?
The process starts almost immediately, but it could

33-00407EFS-05
www.resideo.com
©2020 Resideo Technologies, Inc. All rights reserved.
The Honeywell Home trademark is used under license from
Honeywell International, Inc. This product is manufactured by
Resideo Technologies, Inc. and its affiliates.
Tous droits réservés. La marque de commerce Honeywell Home est
utilisée avec l’autorisation d’Honeywell International, Inc. Ce produit
est fabriqué par Resideo Technologies, Inc. et ses sociétés affiliées.
Todos los derechos reservados. La marca comercial Honeywell Home
se utiliza bajo licencia de Honeywell International, Inc. Este producto
es fabricado por Resideo Technologies, Inc. y sus afiliados.
Resideo Technologies, Inc.
1985 Douglas Drive North, Golden Valley, MN 55422
1-800-633-3991
33-00407EFS—05 M.S. Rev. 04-21 | Printed in United States
take 30 seconds or longer depending on your network and WiFi performance to view the new clips on your
Honeywell Home App.
My smoke detector is 10/20 years old. Will this camera detect the sound?
It should, but you should test the compatibility of the detector and the camera before first use by following the
testing procedure described in this FAQ.
Need help?
• Web: resideo.com
• Phone: 18006333991
The operation of this equipment
is subject to the following two
conditions: (1) this equipment
or device may not cause harmful
interference, and (2) this
equipment or device must accept
any interference, including
interference that may cause
undesired operation.

M37745
RCHC4100WF1002
RCHC4100WF1011
Lire avant l’installation.
ENTRÉE : 5 V 2 A
Guide d’installation
rapide
Caméra de sécurité
Wi-Fi C1
Téléchargez l’application Honeywell Home
REMARQUE : Ayez en main le mot de passe du réseau WiFi et assurez-vous que
le routeur est réglé sur une fréquence de 2,4 GHz.
1 Assurez-vous que Bluetooth est activé sur
votre appareil mobile.
2 Cherchez Honeywell Home dans l’App Store
ou sur Google Play.
3 Téléchargez l’application Honeywell Home.

2
Lancez l’application
Honeywell Home
1 Lancez l’application Honeywell Home.
2 Créez un compte (si nécessaire)
ou connectez-vous à votre compte
Honeywell Home. Appuyez sur AJOUTER
UN APPAREIL ou sur le signe plus (+).
3 Sélectionnez la caméra WiFi C1 à
installer, puis suivez les instructions
de l’application Honeywell Home
pour nommer la caméra et son
emplacement
Branchez le cordon d’alimentation
1 Retirez le socle de la caméra et branchez l’embout USB du cordon
d’alimentation à la caméra.
2 Remettez le socle sous la
caméra et branchez le cordon
d’alimentation à une prise
électrique.
3 Attendez environ 1 minute
que le voyant DEL devienne
bleu et clignote, puis touchez
NEXT (SUIVANT).
REMARQUE : Si le voyant DEL
devient rouge fixe, cela signifie
que le mode de connexion est expiré. Débranchez et rebranchez la caméra.
Installation

3
Connexion
Connexion à un réseau
Wi-Fi
REMARQUE : Assurez-vous d’être connecté
au même réseau WiFi que celui auquel
vous souhaitez connecter votre caméra.
1 Sélectionnez votre réseau WiFi à partir
de la liste. Touchez NEXT (SUIVANT).
2 Entrez le mot de passe du réseau WiFi,
au besoin. Touchez DONE (TERMINÉ).
REMARQUE : La caméra émet des signaux
sonores à certaines étapes de la procédure.
Connexion à un appareil mobile
1 Activez Bluetooth sur votre appareil
mobile.
2 L’application recherche la caméra.
• Pour une seule caméra, la connexion
se fait automatiquement.
• Lorsqu’il y a plusieurs caméras,
l’application vous demande de
sélectionner une caméra à la fois.
Chaque caméra possède une
adresse MAC unique imprimée au
dos. Utilisez cette adresse pour
sélectionner la caméra que vous
désirez connecter.
3 L’application affiche un code QR. Pour
connecter la caméra à l’application,
maintenez le code QR à une distance
de 7 à 20 cm (de 3 à 8 pouces) devant l’objectif de la caméra.
4 Lorsque la connexion est réussie, le voyant DEL devient mauve et la
caméra émet un signal sonore.

4
Voyant DEL lors de la connexion Wi-Fi
Lors de la connexion au réseau WiFi, le voyant DEL indique l’état de la caméra.
DEL État de la caméra
Vert clignotant Connexion au réseau WiFi.
Vert fixe Connexion au réseau WiFi.
Rouge fixe
(pendant 2
secondes)
Échec de la connexion. Le voyant DEL devient ensuite
mauve fixe.
Mauve fixe Balayage du code QR terminé. Go to « Connexion à un
réseau WiFi », à la page 3.
Bleu clignotant La connexion Bluetooth a été perdue. Débranchez et
rebranchez la caméra. Reportez-vous aux instructions
de la section « Branchez le cordon d’alimentation », à la
page 2.
Options
Choisissez les options Geofence et les options d’adhésion (si vous sautez cette
étape, vous pouvez facilement modifier ces options plus tard).
Placement
Avec le socle
Placez la caméra à l’endroit souhaité.
Sur le mur
Vous pouvez également fixer la caméra directe-
ment sur un mur, sans le socle

5
Fonctionnement
Enlever ou remettre le socle en place
Le socle est connecté à la caméra par un aimant.
Si vous voulez enlever le socle pour fixer la caméra à un mur
ou remplacer la carte SD, détachez simplement le socle de
la caméra. Pour le remettre, il suffit de le replacer sous la
caméra.
Fonctionnement de l’application
Honeywell Home
Lorsque vous lancez l’application, la page d’accueil s’affiche.
Tous vos appareils (caméras, thermostats, détecteurs de
fuites d’eau, etc.) sont affichés. Sélectionnez une caméra pour
visionner son signal vidéo en direct.
Test de détection de l’alarme du détecteur de
fumée ou de monoxyde de carbone
Si l’alarme de votre détecteur de fumée ou de monoxyde de carbone se déclenche
et que votre caméra est activée, vous recevrez une alerte vous avisant qu’une
alarme du détecteur de fumée ou de monoxyde de carbone a été détectée.
Pour tester cette fonction, maintenez enfoncé le bouton de test de votre détecteur
de fumée ou de monoxyde de carbone pendant au moins cinq secondes ou trois
cycles d’alarme du détecteur. Un test plus court pourrait ne pas déclencher le son.
Pour voir la liste d’alarmes compatibles, visitez le site Resideo.com.

6
Aperçu de la caméra
Socle
Câble
d’alimentation
Voyant DEL
Objectif de la
caméra
Fente et
carte SD
Bouton de
réinitialisation
Réinitialisation
Si la connexion WiFi est interrompue ou si vous devez vous connecter à un réseau
différent, pressez le bouton de réinitialisation en insérant l’extrémité d’un trom-
bone dans l’ouverture. Maintenez-le enfoncé pendant 5 secondes pour réinitialiser
la connexion WiFi.
Pour restaurer les paramètres par défaut, maintenez le trombone enfoncé dans
l’ouverture pendant 10 secondes.
Carte SD
Une carte SD chiffrée de 8 Go est préinstallée dans la caméra. Celle-ci enregistre
les images si la connexion au nuage est interrompue. Vous pouvez la remplacer
avec n’importe quelle autre carte SD compatible.

7
Voyant DEL d’état
La caméra est munie d’un voyant DEL indiquant son état.
DEL État de la caméra
Pendant l’installation
Bleu clignotant Allumée. Prête à commencer l’installation.
Bleu fixe Connectée à l’application. Prête à terminer la
configuration.
Mauve fixe Balayage du code QR terminé.
Go to « Connexion à un réseau WiFi », à la page 3.
Vert clignotant Connexion au réseau WiFi.
Vert fixe Connectée au réseau WiFi et en état de marche.
Rouge fixe Délai de configuration expiré. Débranchez et
rebranchez la caméra, puis recommencez la procédure.
En fonctionnement
Vert clignotant Connexion au réseau WiFi.
Vert fixe Connectée au réseau WiFi et en état de marche.
Rouge
clignotant
Non connectée au réseau WiFi.

8
Règlements de la FCC
§ 15.19 (a)(3)
Cet appareil est conforme à la partie 15 des règlements de la FCC. Son fonctionne-
ment est soumis aux deux conditions suivantes : (1) cet appareil ne doit pas causer
d’interférences nuisibles et (2) doit accepter toutes les interférences reçues, nota-
mment celles à l’origine d’un fonctionnement indésirable.
§ 15.21
Les modifications qui ne sont pas expressément autorisées par la partie respons-
able de la conformité peuvent annuler le droit de l’utilisateur à utiliser l’appareil.
Les modifications qui ne sont pas expressément autorisées par la partie respons-
able de la conformité peuvent annuler le droit de l’utilisateur à utiliser l’appareil.
§ 15.105(b)
Cet équipement a subi des tests prouvant sa conformité aux limites prescrites
pour les appareils numériques de classe B, selon la partie 15 des règlements de la
FCC. Ces limites ont été conçues pour fournir une protection raisonnable contre
les interférences nuisibles lorsque l’appareil est utilisé dans un environnement rés-
identiel. Cet équipement génère, utilise et peut émettre de l’énergie radiofréquence
et, s’il n’est pas installé et utilisé conformément aux instructions, peut causer des
interférences nuisibles aux communications radio. Toutefois, il n’y a aucune garan-
tie que ces interférences ne puissent survenir dans une installation donnée. Si cet
équipement cause des interférences nuisibles à la réception de signaux de radio ou
de télévision, ce qui peut être déterminé en l’éteignant et en l’allumant, l’utilisateur
peut essayer de corriger ces interférences par les mesures suivantes :
• Réorienter ou déplacer l’antenne réceptrice.
• Augmenter la distance entre l’équipement et le récepteur.
• Brancher l’équipement sur un circuit différent de celui sur lequel le récepteur est
branché.
• Consulter le détaillant ou un technicien expérimenté en radio/télévision.
/