Chambers BPDH2500AS0 Le manuel du propriétaire
- Catégorie
- Humidificateurs
- Taper
- Le manuel du propriétaire

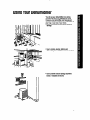
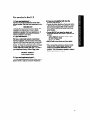
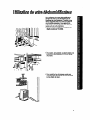
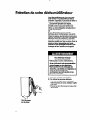
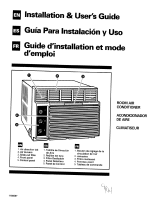
DEHUMIDIFIER
Use & Care Guide
Full light
Humidistat
(except 15 pint model)
(except 15 pint model)
Rw grille
(except 15 pint model)
Evaporator cdl
(not shown)
Model
and seria
number label
Front grille
(on cabinet under
Drain hose
water pan)
connection
morn
VIEW
REAR VlEW
Part No. 1162709 Rev. A
a-sa

Contents
Page
important Safety instructions ........................ .2
Before Using Your Dehumidifier
...................
.3
Install properly
................................................. 3
Electrical requirements ................................... .4
Using Your Dehumldifier ................................ .5
15 pint model
..................................................
.6
25, 30, 40 and 50 pint models
........................
.6
Setting the water level adjustment ................. .8
Water disposal methods
.................................
.9
Carlng For Your Dehumldifier ...................... -10
if You Need Servlce Or Assistance ............. .12
Warranty
.........................................................
16
Thank you for buying this dehumidifier. Please
complete the form below. Have this information
ready if you need senrice or call with a question.
l
Copy model and serial numbers from label (see
diagram on front cover) and purchase date from
sales slip.
l
Keep this book and sales slip together in a
handy place.
Model Number
Serial Number
Purchase Date
Service Company Phone Number
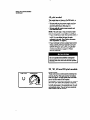
mportant Safety
nstructions
To reduce the risk of fire, eiectrkai shock
or personal Injury when using your dehu-
midifier, follow these basic precautions:
l
Read all instructions before using your
dehumldifier.
l
Complete the installation and electrical
requirements as described in “Before
Using Your Dehumidlfier” on pages 3
and 4.
l
Never allow children to operate or play
with the dehumidifier.
l
Never clean dehumidifier part8 with
flammable fluids. The fumes can create a
fire hazard or explosion.
. FOR YOUR SAFETY.
DO NOT STORE OR USE GASOLINE OR
OTHER FLAMMABLE VAPORS AND
LIQUIDS IN THE ViCiNiTY OF THIS OR ANY
OTHER APPUANCE. THE FUMES CAN
CREATE A FIRE HAZARD OR EXPLOSION.
It is your responsibility to be sure your dehu-
midifier:
l
Is properly installed on a floor, table or shelf
that is reasonably level and strong enough to
support unit with a full pan of water. Unit can
weigh between 22.5 kg (50 Ibs.) and 33.8 kg
(75 Ibs.), depending on the amount of water
collected in the pan.
l
Is the correct size for the area you want to
dehumidify.
l
Is connected to the proper kind of outlet, with
the correct electrical supply and grounding.
(See “Electrical requirements” on page 4.)
l
Is used only for jobs expected of home
dehumidifiers.
l
Is not used by children or anyone unable to
operate it properly.
l
Is properly maintained.
l
Is used in an area where the room tempera-
ture will not fall below 18.3% (65°F).
- SAVE THESE INSTRUCTiONS -
DO NOT REMOVE TECH SHEET from inside
cabinet. Your service technician will need this
information.

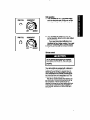
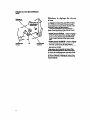
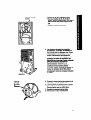
Before Using Your Dehumidifier
Install properly
12
inchss
Personal injury Hazard
Because your dehumidifier weighs be-
tween 225 kg (50 ibs.) and 83.8 kg (75 ibs.),
depending on the amount of water coi-
iected In the pan, it Is recommended that
you use proper lifting technlquee when
lifting or moving your unit. Failure to do ao
could result in personal injury.
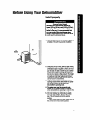
1. Allow at least 30.5 cm (12 inches) of space on
all sides of the unit for good air circulation.
:
,
2. Install the unit on a floor, table or shelf. When
installing the unit on a table or shelf, be sure it
is strong enough to support the unit with a full
pan of water. A table or shelf may be a better
position from which to handle the water pan.
Do not sit or stand on this product. The height
of a table or shelf may help prevent icing of
coils due to colder air near the floor (such as
can be found in a basement).
3. Keep all outside doors, windows and other
openings closed when dehumidifier is operat-
ing. Humid outdoor air will add to the
dehumidifier’s operating load.
4. The water pan must be properly posi-
tioned, on the hangers inside the cabinet,
when dehumidifier is operating in order for the
automatic shut-off to operate correctly.
5. On most models, two rollers let you easily
move the dehumidifier. Remove the water
pan. Tilt unit forward and roll to another
position.
If your model does not have rollers, pick up
the unit to move it to another position.

Beet;J$g Your Dehumidifier
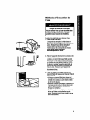
Electrical requirements
OBSERVE ALL GOVERNING CODES AND
ORDINANCES.
Electrical ground is required on this
appliance.
A 115 volt, 60 Hz., AC only, 15 ampere fused
electrical supply is recommended. (Time delay
fuse or circuit breaker is recommended.) It is
recommended that a separate circuit serving only
this appliance be provided. Do not use an
extension cord.
DO NOT, UNDER ANY CIRCUMSTANCES,
REMOVE THE POWER SUPPLY CORD
GROUND PRONG.
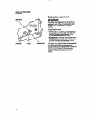
Recommended grounding method
For your personal safety, this appliance must be
grounded. This appliance is equipped with a
power supply cord having a B-prong grounding
plug. To minimize possible shock hazard, the
cord must be plugged into a mating grounding
type wall receptacle, grounded in accordance
with all local codes and ordinances. If a mating
wall receptacle is not available, it is the responsi-
bility of the customer to have a properly
grounded, 3-prong wall receptacle installed by a
qualified electrician.

Using Your Dehumidifier
You will use your dehumidifier more during
months when you’re not heating your home.
However, your dehumidifier can help prevent
excessive moisture and keep you comfortable all
year long, in any area of your home.
l
Use in a basement to help prevent moisture
damage.
l
Use in cooking, laundry, bathing and
dishwashing areas which have excess moisture.
l
Use to prevent moisture damage anywhere
books or valuables are stored.

Usi:ttpz Dehumidifier
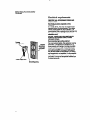
PAN FULL
0
HUMIDISTAT
15 pint model
This model does not have an On/Oft Switch, a
De-leer Control or a Humidistat.
l
To turn unit on-plug power supply cord into
electrical outlet. Be sure to use the correct
grounding technique. (See page 4.)
l
To turn unti off-unplug power supply cord
from electrical outlet.
NOTE: This unit may or may not have a water
level control. (Refer to the diagram on page 9.)
l
lf your model has a water level control switch, it
will automatically turn the unit off when the pan
is full. You can adjust the level of water
collected in the pan. (See Setting the water
level adjustment” on page 9.)
l
lf your unit does not have a water level control
switch, the pan should be checked often and
emptied when it is 54 to % full. You may also
choose one of the alternate water disposal
methods described on page 9 in “Water
disposal methods.”
Do not operate dehumidifier d tempers-
tures below 16.3% (65’F). The coils msy
become iced over and unit will not operate
pwerly.
25,30, 40 and 50 pint models
Control panel
These units have a control panel containing two
controls-the Pan Full Light and the Humidistat.
Pan Full Light-This light glows when the water
pan is full and needs to be emptied.
Humidistat-This controls the amount of moisture
left in the room. When the humidity in the room
increases, the unit automatically starts. When the
humidity decreases to the selected level, the unit
automatically stops. The unit will run constantly
when control is set to DRYEST.

.
PAN FULL HUMIDISTAT
0
I
PAN FULL
HUMIDISTAT
0
OFF
DRYEST
Unit operetion
1. Turn Humidistat to OFF. Plug power supply
cord into electrical outlet. Be sure to use the
correct grounding technique. (See page 4.)
2 Turn Humidistat left toward DRYEST for
normal operation. Set at 5 or 6 to start. Adjust
later, if necessary.
lt you need more dehumidification, turn
Humidistat left to a higher number. If you need
less, turn Humidistat right to a lower number.
3. Stop the unit manually by turning Humidistat
right to OFF.
De-icer control
Do not operate dehumidifier at tempem-
tures below 18.3% (65°F). The coils msy
become iced over and unit will not operate
pwerly.
Your dehumidifier is equipped with a feature to
help you get the most comfort from your new
appliance by permitting it to operate down to
18.3% (65’F). lf your dehumidifier runs when
room temperature and humidii conditions are
tow, frost can form on its evaporator coil. This
interferes with proper operation.
The De-icer Control senses frost build-up on
the evaporator coil and automatically shuts off
the compressor. The fan continues to run,
drawing air across the coil and melting the frost.
When the coil is defrosted, the compressor is
automatically restarted, and dehumidifying is
resumed.

Using Your Dehumidifier
Contlnusd
Watsr tsvsl
adjustment
Nor&al fill
Maximum RII
Setting the water level
adiustment
The-Water Level Adjustment can be set in two
positions to turn off the unit automatically when
the pan is full. This prevents the danger of
overflow.
Pan must be in proper position for Water Level
Control Switch to work.
l
NORMAL FILL-et Water Level Adjustment to
the indentation on the left side. The water pan
and water will weigh approximately 7.2 kg
(16 lbs.) and water pan will be % full.
l
MAXMUM FILL-et Water Level Adjustment to
the raised area on the right side. The water pan
and water will weigh approximately 10.8 kg
(24 Ibs.) and water pan will be % full.
The Water Level Control Switch will automatically
turn off the dehumidifier at the fill level you
selected when pan is properly placed. Loosen the
screw to move the Water Level Adjustment.
Retighten screw when adjusted to desired
setting.

Personal injury Hazard
Do not use the water that collects in the
water pan for drinklng purposes. it is not
sanitary and coukf cause iliness.
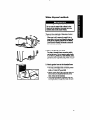
There are three methods of disposing of water.
1. Empty pan manually.
When pan is full, remove it, empty it into a
large sink or tub, and put it back in place. Be
sure pan lo properly placed so the Water
Level Control Switch will work to shut off
the unit automatically.
2. Place unit directly over drain.
Pan has a threaded hose connection which
can be left open. Cut out opening with a knife
or 19 mm (%.) wood drill. Once opened, hose
connection will continually drain water from the
pan. Be sure to keep unit directly over a drain.
3. Attach garden hose to the threaded hose
connection to carry water to drain.
l
Pan has a threaded hose connection which
can be left open. Cut out opening with a
knife or 19 mm (w) wood drill.
l
Attach garden hose. Be sure hose does not
kink or bend. It should lie flat from unit to
drain. (Hose is not included.)
l
Once hose connection is opened, pan will
continually drain through the hose. Be sure
to keep hose flat and in drain.

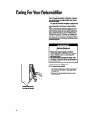
Caring For Your Dehumidifier
Your dehumidifier is designed to serve you year-
round. lt needs practically no attention. However,
you should check your dehumidifier and inspect
the coils annually.
You may call a service company to perform this
annual checkup or you can do it yourself. Cost of
annual inspection is the owner’s responsibility.
OR
lt you are familiar with electrical appliances and
their functions, below we have listed instructions
which would allow you to do the inspection and
maintenance yourself. However, we suggest you
contact a qualified se&e company to perform
this service, as we will not be held responsible for
any personal injury or damages, should you elect
to service this unit.
Electrical Shock and
Personal injury Hazard
l
Disconnect power supply cord from
receptacle before performing any main@
nanca Failure to do so could resuit in
electrical shock.
l
Be careful when cleaning the coils. Fins
are sharp. Failure to do so could result in
personal injury.
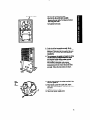
1. Disconnect power supply cord.
2. To remove outer cabinet:
l
To take off the plastic front grills, remove the
two screws at the bottom. Drop grille down
and take out.
l
Remove the socket head screws on each
side of cabinet.
Socket -imat screws
(on l idm of cabinet)
10

Top flange screws
A
Fan
motor
oil
tubes
l
Remove the top flange ecrews.
l
For 25,30,40 and 50 pint modeis:
Remove the rear grille. Pull down at bottom
and drop grille down.
l
Lii cabinet from base.
3. Coils should be inspected annually. Brush
clean, if necessary, with warm water and mild
detergent. Rinse and dry thoroughly. Be sure
power supply cord is disconnected from
reeelptaclr
4. The compressor is sealed and needs no oiling.
The fan motor is preiubricated and does
not require further oiling under normal
operating conditions. However, if the
dehumidifier is operated under severe
environmental conditions (dust, dirt, high
temperatures) the fan motor should be oiled
annually. Follow the instructions in step 5.
5. Oil the motor through the tubes provided. Use
SAE %20 grade oil.
6. Wash plastic parts with a soft cloth, warm
water and mild detergent. Rinse and dry with a
soft cloth.
7. Replace cabinet and grilles.
8. Reconnect power supply cord.
11

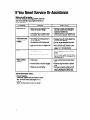
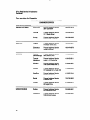
If You Need Service Or Assistance
Before you call for service . . .
lt you are having an operating problem, check the
chart to see what the cause might be before you
call for assistance.
PROBLEM
Unit won’t run.
CHECK IF
l
Power cord is plugged into a live
circuit with proper voltage.
WHAT TO DO
l
Firmly plug power cord into electri-
cal outlet. Check circuit voltage at
fuse/circuit breaker box.
Unit blows fuses
or trips circuit
breaker.
l
Fuse has blown or circuit breaker
has tripped. Also check if a tims-
delay fuse has been used.
l
Time-delay fuse being used is of
correct capacity.
l
An extension cord is being used.
Unit ices over.
l
Coils are iced over or clogged with
lint.
l
Humidity is too low.
l
Replace fuse with a time-delay fuse
of the correct capacity. Reset circuit
breaker.
l
Replace fuse with a time-delay fuse
of the correct capacity.
l
Do not use an extension cord with
this or any other appliance.
l
See “Unit ices over” section in this
chart, or clean lint from coils (see
pages 1 O-l 1 for instructions).
l
Do not operate unit when humidity
is low.
l
Room temperature is too cool.
l
Do not operate unit in temperatures
below 18.3% (65°F). Damage to the
unit could occur.
Water collects
on floor.
l
Unit is level.
l
Hose is kinked or drain is clogged.
l
Water pan is overflowing.
l
Level unit front-to-back and side-to-
side.
l
Remove clog from drain or unkink
hose.
l
Remove and empty water pan. Be
sure to replace pan properly and
check to see that the unit is level.
Special dehumidifier needs . . .
l
Annual Inspection
Clean coils, inspect drain and hoses. If neces-
sary, oil the fan motor (see pages 1 O-l 1).
l
Moving
When moving, keep the unit in an upright
position.
12

For service in the U.S.
1. If you need assistance* . .
Call our Consumer Assistance Center tele-
phone number. Dial free from anywhere in the
U.S.:
l-800-253-1301
and talk wifh one of our trained consultants. The
consulfant can instruct you in how to obtain
satisfactory operation from your appliance or, if
service is necessary, recommend a qualified
service company in your area.
2. If you need 8ervlce+ . . .
We have a nationwide network of authorized
service companies. Our service technicians are
trained to fulfill the product warranty and provide
after-warranty service, anywhere in the United
States. To locate the authorized sewice company
in your area, call our Consumer Assistance
Center telephone number (see Step 1) or look in
your telephone directory Yellow Page under:
APPu*HcEI- HaJsEHoLD-
NAJOR-BENICELREPAIR
3. ff you need replacement parts* . . .
To locate replacement parts in your area, refer to
Step 2 above or call our Consumer Assistance
Center number in Step 1.
4. If you are not satlsfled wlth how the
problem was solvd . . .
l
Contact the Major Appliance Consumer Action
Panel (MACAP). MACAP is a group of indepen-
dent consumer experts that voices consumer
views at the highest levels of the major appli-
ance industry.
l
Contact MACAP only when the dealer and
authorized servicer have failed to resofve your
problem.
Major Appliance Consumer Action Panel
20 North Wacker Drive
Chicago, IL 60606
l
MACAP will in turn inform us of your action.
l
When requesting assistance, please provide:
model number, serial number, date of pur-
chase, and a complete description of the
problem This information is needed in order to
better respond to your request.
13

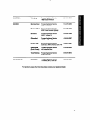
gYt~nNcl Service Or Assistance
For service in Canada:
PROCARE APPUANCE SERVlCE4NGLlS LlMlTED
CONSUMER SERVlCES
Direct sewice branches:
BRlTlSH COLUMBIA Vancouver Procare Appliance Service
2991 Grandview
604X32-741 6
Victoria Procare Appliance Sewice
3117 Steele Street
604-386-2206
Surrey Procare Appliance Service
Unit #2,6145 - 130th St.
604-590-6422
ALBERTA
Calgary Procare Appliance Service
#15 6025 12th St. S.E.
403-253-9267
Edmonton
Procare Appliance Sewice
12235 Fort Road
4034746576
ONTARIO
Toronto
(hllsslsoauga)
Toronto
(Markham)
Windsor
London
Hamilton
Barrle
Ottawa
Procare Appliance Service
5945 Ambler Drive
416-624-2600
Procare Appliance Service
Unit #l , 110 Torbay Rd.
416-475-9511
Procare Appliance Service
3160 Grand Marais Ave. E.
519-9443551
Prccare Appliance Sewice
317 Adelaide St. S., Suite 109
519-666-6633
Procare Appliance Sewice
310 Kenora Avenue
416-560-7444
Procare Appliance Service
4 Alliance Blvd.
705-726-3922
Procare Appliance Sewice
28 Capital Drive
613-225-0510
SASKATCHEWAN
Regina
Procare Appliance Service
660 Henderson Drive
306-569-9681
Saskatoon
Procare Appliance Sewice
1505 Ontario Avenue
306-652-9285
14

MANITOBA Winnipeg
Procare Appliance Service
1683 Church Avenue
204-694-5308
QUEBEC Montreal East
Montreal West
Procare Appliance Service
8620 Pie IX Blvd.
Prccare Appliance Service
6230 Trans Canada Highway
Brosserd
Procare Appliance Service
9605 F. lgnace St.
Chkoutimi
Prccare Appliance Service
163 Bosse Street W.
Quebec City
Procare Appliance Service
418-871-5251
5275 Boul. Wilfrid Harnel, Suite 140
Sherbrooke
Procare Appliance Service
(Rock Forest) 483 Industrial Blvd.
Trois Rivieres Prccare Appliance Service
6183 Cotieil St.
514-376-5260
514-735-8402
514-397-l 840
418-543-0267
819-564-6565
819-375-9674
NOVA SCOTIA
Dartmouth
Procare Appliance Service
10 Akerley Blvd., Suite 23
902-468-6634
For service in areas other than those listed, contact your Appliance Dealer.
15

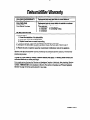
Dehumidifier Warranty
LENGTH OF WARRANTY
FULL ONE-YEAR WARRANTY
From Date of Purchase
FULL FIVE-YEAR
WARRANTY
From Date of Purchase
WE WILL NOT PAY FOR
WE WILL PAY FOR
Replacement parts and repair labor to correct defects in
materials or workmanship.
Replacement parts to correct defects in materials or workman-
ship in the sealed refrigeration system.
These parts are:
1. Compressor 4. Drier-Strainer
2. Evaporator
5. Connecting Tubing
3. Condenser
A
Service calls to:
1. Correct the installation of the dehutidiiier.
2. Instruct you how to use the dehumidifier.
3. Replace house fuses or correct house wiring.
B. Pickup and delivery. This product is designed to ba repaired in the home.
C. Damage to the dehumidifier caused by accident, misuse, fire, flood, acts of God or use of
products not mentioned in this manual.
D. Repairs to parts or systems caused by unauthorized modifications made to the appliance.
Service under the full warranties must be provided by an authorized service company. This warranty
gives you specific legal rights, and you may also have other rights which vary from state to state or
province to province.
Outside the United States or Canada, a different warranty may apply. For details, please contact your
authorized distributor or military exchange.
lf you need service, first see the “Service and Assistance” section of this book. After checking Sewice
and Assistance,” additional help can be found by calling our Consumer Assistance Center telephone
number, 1-800-253-l 301, from anywhere in the U.S. For service in Canada, see ‘Procare Appliance
Sewice” on page 14 for the service branch in your area.
Printed in U.S.A.

DiSHUMIDIFICATEUR
Guide d’utilisation
et d’entretien
Ecioirege int6grai
(except6 lo mod&i0
de t5 pinto@
Humidirtat
(except6 IO mod&i0
ck 15 pinks)
/
Grille avent
Tableau do
commanck
(except6 IO mod&i0
de 15 pin-)
Grille l rrih
(except6 IO mod&
ck 15 pinks)
6wpuntin &
I’&aporateur
(non iliu8M)
drie (our ie mwbie
/
kiquetta indiquant
l ou8iebac~eau)
mod&h et numko dr
Connexion
Bich
du tuyau
da vidange
\-
WE AVANT
WE ARRIERE
Pike No 1162709 Rd. A

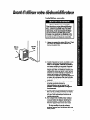
Avant d’utiliser votre dbhumidificateur
Installation correcte
30,s
cm
SO,5
cm
t2po
Danger de blearurer corporellw
Etant donni que votre d&humldlflcateur
p&oe entre 22.5 kg (50 iba) et 33.8 kg (75
lb&),
l
uhrant la quantitk d’eau recueillie
danr le bat, il ert recommande d’utiliser
dea techniquw de levage approprl6es
breque VOW
l
oulevez ou d6placez votre
appareil. Le d6faut de suivre ce8 con8eila
pourrait causer une blessure corporella
1. Laisser un espace d’au moins 30,5 cm (12 po)
tout autour de I’appareil pour assurer une
bonne circulation d’air.
2. Installer I’appareil sur le sol, une table ou une
etagere. Lorsqu’on pose lkppareil sur une
table ou une Otagere, #assurer que cellesci
sont assez solides pour supporter l’appareil
avec un bat plein d’eau. Une table ou une
Btagke peut Qtre une meilleure solution pour
pemwttre de manipuler le bat a eau. Ne pas
s’asseoir ou se tenir debout sur I’appareil. La
hauteur de la table ou de ktaglrre peut
contribuer Ir emp6cher le givre des serpentins
en raison de la presence d’air plus froid p&s
du plancher (tel qu’on le rencontrerait dans un
sous-sol).
3. Fermer toutes les portes extkieures. fen&es
et autres ouvertures lorsque le
deshumidificateur est en marche. L’air
exterieur humide augmentera la charge de
fonctionnement.
4. Le bat P eau doit Qre posltionni comme II
taut, sur les crochets 2r l’interieur du msuble,
lorsque le dkhumidificateur est en marche
afin que l’arr6t automatique fonctionne de
mankre approprike.
5. Sur la plupart des modhles, deux rouleaux
vous permetfent de deplacer facilemant le
deshumidificateur. Enlever le bat B eau.
Pencher l’appareil vers l’avant et le rouler
dans une autre position.
Si votre modele n’a pas de rouleaux,
soulever l’appareil pour le d6placer dans une
autre position.
3

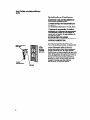
~ua~~~d’utlliser votre d6ehumidiflcateur
iw10 h a br0ch08
aver terre
Cordon -
dklimentation
\
Broche da mire
~IaterreJ
Prim
mural0
dutyPi
3 brochea
ewe terra
/
Sphifications 6lectriques
RESPECTER TOUS LES REGLEMENTS ET
CODES GOUVERNEMENTAUX.
La masse Blectrique est Indlspeneabie pour
cet appareil.
Une alimentation Blectrique de 115 volts, 60 Hz.
courant altematif seulement. avec un fusible de
15 amperes est recommandee. (Un fusible 21
retardemant ou un disjoncteur est racommand8).
II est prkferable d’utiliser un circuit &pare ne
servant qu’a cet appareil. Ne pas employer de
ralbnge Blectrique.
NE PAS ENLEVER. EN AUCUNE
CIRCONSTANCE, LA BROCHE DE TERRE DU
CORDON D’AUMENTATION.
MOthode recommandke de mise & terre
Pour votre s&uriG personnelle, cet appareil doif
Btre mis a la terre. Get appareil est muni d’un
cordon d’alimentation ayant une fiche a 3
broches avec mise a la terre. Pour minimiser Is
danger Oventuel de choc, le cordon doit Qtre
branch6 dans une prise compatible de type mural
avec mise a la terre, mis a la tens conforrn~ment
B tous les reglements et codes locaun Si I’on ne
dispose pas dune prfse murale compatible, il
appartient au client de faire installer une prise
murale a 3 broches avec mise a la terre
appropride par un &ctricien qualifie.

Table des matihes
Page
Importantes consigner de sewrite
...............
.2
Avant d’utiiiser votre d~ehumidificateur
....... .
Installation
correcte .......................................
.3
Sp&ziiications
&ctriques
..............................
.4
Utilisation
de votre tiehumidificateur
.......... .5
Le modele de 15 pintes
..................................
6
Les modeles de 25. 30, 40 et 50 pintes
........ .6
Effectuer le rdglage du niveau Beau
.............
.8
Mhodes d’lvacuation
de l’eau ....................
.9
Entretlen de votre &humldfficateur
.......... 10
Si vous avez beroln de service ou d’aide
.. .12
Garantie .......................................................... 16
Noue vous remerclone d’avoir achetb ce
dsshumidificateur. Priere de remplir l’imprime
ci-dessous. Lorsque vous avez besoin du service
aprbs-vents ou d&ire2 poser une question, ayet
lee renseignements suivants B porthe de main.
l
Copiez les num&os de modele et de s&fe qui
figurent sur l’etiquette (voir le diagramme sur le
couvercle avant) et la date de I’achat sur la
fiche ds vente.
l
Consewez la pr&ente brochure et la fiche de
vente ensemble, dans un endroit accessible.
Nutiro du modsle
Nun-ho de eerie
Date de I’achat
Nuns&o de telephone de I’entreprise
d’entretien
NE PAS ENLEVER LA FICHE TECHNIQUE de
l’intirieur du rneuble. Votre technicien d’entretien
aura besoin de ces renseignements.
2
Importantes con-
signes de sQcurit6
Pour rWrlre Ie rlaque d’lncendl@ de choc
dlectrique ou de bleaeure corporelle Ion de
I’utlllsatbn de votre d&ehumldtfkateur,
l
ulvez tea p&cautions da bare:
8 Liaez toutes lee conelgnee avant d’utiliwr
votre d&humfdlficateur.
8 Achevez i’lnetallatlon et conformez-voue
aux epWflcation8 &ctrlque8 tel que
dewit au chapltre “Avant d’utiliser votre
d~shumidifiiateur” en pagea 3 et 4.
l
Ne laissez jamais fes enfants fake
fonctionner le deehumidificateur ou jouer
B proximitk de celukl.
8 Ne nettoyez jamaie lee pi&ces du
d&humidifiiateur aver dee liquidea
Inflammables. Lee vapeurs rfsquent de
c&r un danger d’incendie ou d’explooion.
8 POUR VOTRE SECURlTE 8
NE PAS EMMAGASINER OU UTILISER
D’ESSENCE OU D’AUTRES VAPEURS ET
LIGUIDES INFLAMMABLES
A
PROXlMlTE
DE CET APPAREIL OU DE N’IMPORTE
QUEL AUTRE APPAREIL LES VAPEURS
PEUVENT CREER UN DANGER D’INCENDIE
OU UNE EXPLOSION.
Vous Qtes responsable de vous assurer que
votre d&humidificateur:
l
Est install6 de rnaniere appropride sur le sol,
une table ou une Btagere qui esf
raisonnablement ds niveau et suffisamment
solide pour supporter l’appareil avec un bat
plein deau. L’appareil peut peser entre
22,5 kg (50 Ibs.) et 33.8 kg (75 Ibs.), suivant
la quantite d’eau recueillie dans le bat.
l
Est de la taille convenable pour la zone que
vous voulez d&humidifier.
l
Est branch6 au type de prise approprfd, a
I’alimentation hlectrique et la mise P la terre
qu’il faut. (Voir ‘SpBcifications Blectriques” a
la page 4.)
l
N’est ernploye que pour des tlches qui sont
aftendues de deshumidificateurs de maison
d’habitation.
l
N’est pas utilise par des enfants ou
quiconque n’est pas en rnesure de le faire
fonctionner comms il faut.
. Est bien entretenu.
. Est utilisd dans un endroif air la temperature
ambiante ne tombera pas en-dessous de
18,3”C (65°F).
- CONSERVER CES CONSIGNES -
La page est en cours de chargement...
La page est en cours de chargement...
La page est en cours de chargement...
La page est en cours de chargement...
La page est en cours de chargement...
La page est en cours de chargement...
La page est en cours de chargement...
La page est en cours de chargement...
La page est en cours de chargement...
La page est en cours de chargement...
La page est en cours de chargement...
La page est en cours de chargement...
-
 1
1
-
 2
2
-
 3
3
-
 4
4
-
 5
5
-
 6
6
-
 7
7
-
 8
8
-
 9
9
-
 10
10
-
 11
11
-
 12
12
-
 13
13
-
 14
14
-
 15
15
-
 16
16
-
 17
17
-
 18
18
-
 19
19
-
 20
20
-
 21
21
-
 22
22
-
 23
23
-
 24
24
-
 25
25
-
 26
26
-
 27
27
-
 28
28
-
 29
29
-
 30
30
-
 31
31
-
 32
32


Chambers BPDH2500AS0 Le manuel du propriétaire
- Catégorie
- Humidificateurs
- Taper
- Le manuel du propriétaire
dans d''autres langues
- English: Chambers BPDH2500AS0 Owner's manual
Documents connexes
Autres documents
-
Whirlpool RH123A1 Manuel utilisateur
-
Roper X18004A0 Le manuel du propriétaire
-
-
Coolerator ar2400xa0 Le manuel du propriétaire
-
AirKing 3016C Mode d'emploi
-
Grandview Edge Series Fixed Frame Screen Manuel utilisateur
-
-
-
 Coolerator AR1800XA2 Manuel utilisateur
-
