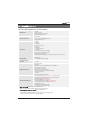
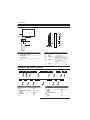
Haier LE32B7000C Manuel utilisateur
- Catégorie
- Téléviseurs LCD
- Taper
- Manuel utilisateur
Ce manuel convient également à

LE32B7000C
LE40B7000CF
Please read this manual carefully before operating the unit,and keep it for
future reference.

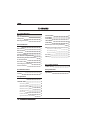
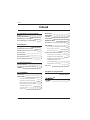
Welcome
Important Information
01 Safety Warnings
2
2
Safety notice
Warning and cautions
3
4
Caution
Base Stand Assembly Instruction
02 Introduction
5
Main Features 5
Main Parameter 5
Installation 5
6
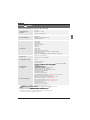
PC Supported Mode
6
Wall Mounting Installation Guidelines
Front Control Panel
7
8
Rear/Side Sockets
8
Connecting to your Haier TV
Common Interface
9
11
Remote Control
03 Remote Control
12
Teletext
13
Installation Guide
04 Operation
14
CHANNEL MENU 14
Auto Tuning (DVB-T) 14
Auto Tuning (DVB-C) 15
DTV Manual Tuning (DVB-T)
DTV Manual Tuning (DVB-C)
ATV Manual Tu
Channel edit
Signal Information (Only for DTV)
ning
16
16
16
PICTURE MENU 17
18
Audio
MENU
17
Clock
MENU
17
SETUP
MENU
LOCK
MENU
EPG Menu(Electronic Program Guide)
19
PVR File System(only for TV)
19
Prepare to record the program
20
18
Record the program
20
Play the recording
20
Time shift
21
USB Player
22
Trouble shooting
05 Trouble shooting
24
icationSpecif 27
Common Interface
16
17
17
06 Specification

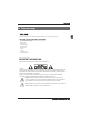
Thanks for buying this 32"/40" LED LCD TV.This guide will help you set up and begin using your TV.
IMPOR
TANT INFORMATION
READ ALL INSTRUCTIONS BEFORE USE AND KEEP FOR FUTURE REFERENCE.
CAUTION
TO REDUCE THE RISK OF ELECTRIC SHOCK, DO NOT REMOVE COVER (OR BACK).NO USER SERVICEABLE PARTS INSIDE.
FOR ANY PROBLEMS, REFER SERVICING TO THE CUSTOMER HELP LINE. THERE IS A LIGHTNING ARROW SYMBOL IN
THE TRIANGLE: THIS SYMBOL INDICATES HIGH VOLTAGE IS PRESENT INSIDE. IT IS DANGEROUS TO MAKE ANY KIND OF
CONTACT WITH ANYINSIDE PART OF THIS PRODUCT.
THERE IS A EXCLAMATION MARK IN THE TRIANGLE: THIS SYMBOL ALERTS YOU THAT IMPORTANT LITERATURE
CONCERNING OPERATION AND MAINTENANCE HAS BEEN INCLUDED WITH THIS PRODUCT.
CAUTION:TO REDUCE THE RISK OF ELECTRIC SHOCK AND FIRE, DO NOT PUT THE TV SET NEAR
SOURCES OF HUMIDITY. DO NOT USE ANY ABRASIVE CLEANERS WHICH MAY SCRATCH OR DAMAGE
THE LCD SCREEN. AVOID CONTACT WITH OBJECTS THAT MAY SCRATCH THE LCD SCREEN.
NOTE: SERVICING THE UNIT YOURSELF IS UNAUTHORISED AND COULD LEAD TO INJURY OR PRODUCT
DAMAGE. REFER ALL SERVICING TO THE CUSTOMER HELPLINE.
Now you can get star
ted!
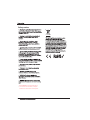
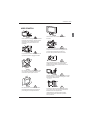
01 Safety warnings
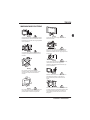
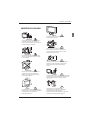
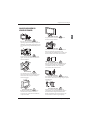
32”/40” HD Digital LED LCD TV
Remote control
AAA battery x2
Instruction Manual
Quick start guide
Warranty Card
Screws
Stand
AV adaptor cable
YPbPr adaptor cable

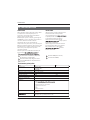
Safety notice
EN-3
CAUTION:When the apparatus was in
electrostatic circumstance, it maybe
malfunction and need to reset by user.

Dim:515*320mm(不包括底座)
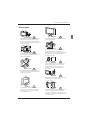
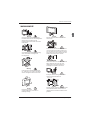
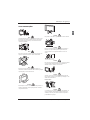
Warning
High voltages are used in the operation of this
television receiver. Do not remove the cabinet
back from your set. Refer servicing to qualified
service personnel.
Warning
To prevent fire or electrical shock hazard, do
not expose the television receiver to rain or
moisture.
Warning
Do not drop or push objects into the
television cabinet slots or openings. Never
spill any kind of liquid on the television
receiver.
Caution
Do not block the ventilation holes in the back
cover. Adequate ventilation is essential to
prevent failure of electrical components.
Caution
Do not trap the power supply cord under the
television receiver.
Caution
Never stand on, lean on, or suddenly push the
television or its stand. You should pay special
attention to children. Serious injury may result if
it should fall.
Caution
Do not place your television on an unstable cart,
stand, shelf or table. Serious injury to an
individual , and damage to the television, may
result if it should fall.
Caution
When the television receiver is not used for an
extended period of time, it is advisable to
disconnect the AC power cord from the AC
outlet.
Caution
If the television is to be built into a compartment
or similar enclosure, the minimum distances must
be maintained. Heat build-up can reduce the
service life of your television, and can also be
dangerous.
WARNING AND CAUTIONS
EN-4

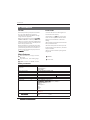
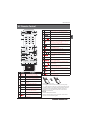
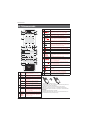
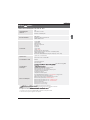
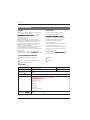
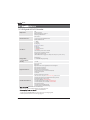
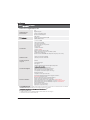
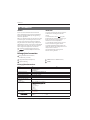
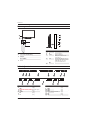
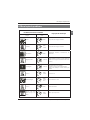
Panel
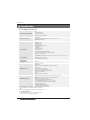
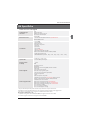
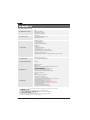
PAL-B/G ,I , D/K
PAL/SECAM/MPEG2/MPEG4/H.264
AC 100
-
240V 50/60Hz
2x8W
Analog RGB(PC) x1; PC audio x1
H nterface (HDMI) x 3
Composite Input x 1
YPbPr x 1
SCART Input x 1
32" 40"
CI x 1
USB x 2
RF x 1
Composite video input >=350
YPbPr >=400
Headphone x 1
COAXIAL x 1
TV System
Video Signal System
Input Power Voltage
Power consumption
Standby Power consumption
Audio Output Power (THD 7%)
Signal Input
Signal output
Horiz
TVline
SECAM-B/G , D/K , L
≤0.30W
DVB-T, DVB-C
INSTALLATIONCAUTION
*Locate the TV in the room where light does
not strike the screen directly.
*Total darkness or a r
tion on the picture
screen can cause eyestrain. Soft and indirect
lighting is recommended for comfortable
viewing.
*Allow enough space between the TV and the
wall to permit ventilation.
*Avoid excessively warm locations to prevent
possible damage to the cabinet or premature
component failure.
*Do not cover the ventilation openings when
using theTV.
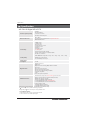
Main parameter
Main features
4 NICAM˗
5 T ˗ime-shift
3
HDMI interface and SCART
Interface˗
High luminance, wide viewing
angle˗
2
Used as Television, display terminal,
PC display˗
1
Never tamper with any components inside the
TV, or any other adjustment controls not
described in this manual. All LED-TV's are high
voltage electrical equipment.
When you clean dust or any water dr
SCREEN or CABINET or around any of the
buttons or connectors, the power cabled should
be removed from the power socket. Wipe the TV
with a soft, dry, dust free cloth.
During thunderstorms, unplug the power cable
and aerial / antenna cable to prevent damage to
your TV and any other devices connected to it.
All repairs to this TV should only be performed
b
TV service
personnel.
02 Introdution
Introduction
EN-5
1000(DTV);99(ATV)Storage channel number
60W 74W

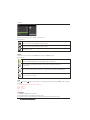
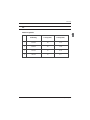
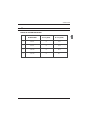
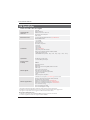
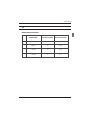
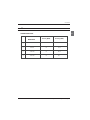
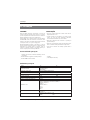
SUPPORTED MODE
PC
3
1024x768
60
1
640x480
60 31.47
2
800x600
60 37.88
48.36
RESOLUTION
V.Freq.(KHz) H.Freq.(KHz)
4
1360x768
60 47.7
Introduction
EN-6
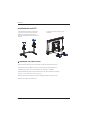
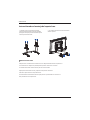
Base Stand Assembly Instruction
Locate the TV in a room where light does not strike the screen directly. Total darkness or a
reflection on the screen can cause eyestrain. Soft and indirect lighting is recommended for
comfortable viewing.
Allow enough space between the TV and the wall to permit ventilation.
Please do not attempt to rotate the TV on the stand.
Avoid excessively warm locations to prevent possible damage to the cabinet or premature
component failure.
INSTALLATION NOTES
2. Attach the stand base set to the bottom
4pcs black screws.
1.Place the TV with the display side down on a flat
surface. Use a cloth to protect the display. Attach the
the supplied 4pcs silver screws.

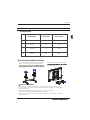
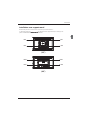
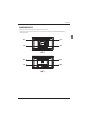
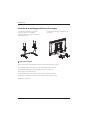
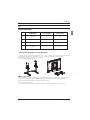
WALL MOUNTING INSTALLATION GUIDELINES
(40”)
(32”)
This television can be wall mounted as follows:
M6
M6
M6
M6
400mm
200mm
200mm
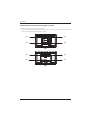
Introduction
EN-7
holes on the back of the television.
1
M6
M6
M6
M6
200mm

Introduction
EN-8
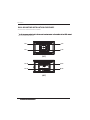
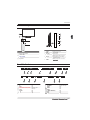
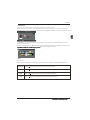
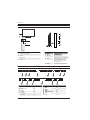
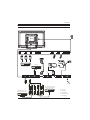
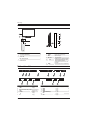
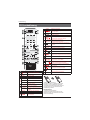
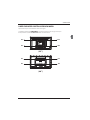
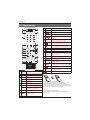
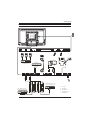
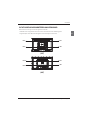
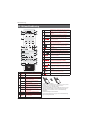
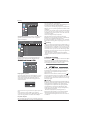
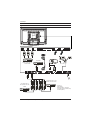
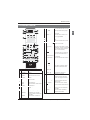
Rear/Side Sockets
input/output
SCART
input
HDMI1
PC AUDIO
input
HDMI2
input
HDMI3
input
input
VGA
input
RF
2
3
1
4
6
5
7
8
9
10
11
13
12
14
Remote control sensor.
Indicator LED:
RED: STAND BY.
Key board.
SOURCE
Displa1
3
2
4
5
y the input source menu.
MENU
Display main MENU.
CH+/CH-
In TV mode,press CH+ or CH- to change
the channel up and down.
In MENU, press CH+ or CH- to select items .
POWER
VOL+/VOL-
Adjust sound level.
In MENU,adjust the item that you selected.
Front control panel
3
2
30 30
1
≤8m
MENU
CH+
CH-
VOL+
VOL-
2
SOURCE
1
4
3
POWER
5
VOL +
CH +
CH -
MENU
SOURCE
POWER
VOL -
COMMON INTERFACE(CI)
input
AV
input
analogue audio output
HEADPHONE
YPbPr
input
digital audio output
DIGITAL AUDIO OUTPUT( )COAXIAL
input
USB2
input
USB1
HDMI1 HDMI2 HDMI3
SCART
PC AUDIO
VGA
R F
COMMON INTERFACE(CI)
USB1 USB2
HEADPHONE
AV
YPbPr
DIGITAL AUDIO OUTPUT
(COAXIAL)

Introduction
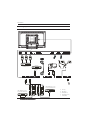
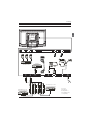
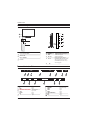
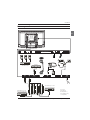
Connecting to your Haier TV
G Green Y
B Blue PbCb
W WhiteAUDIOL
R Red AUDIORPrCr
Y Yellow VIDEO
Amplifier
EN-9
CVBSDVD Player or other
machine with YPbPrYCbCr
*5
%
5<
:
CVBSDVD Player or other
machine with CVBSSVideo
HDMI1 HDMI2 HDMI3
SCART
PC AUDIO
VGA
R F
COMMON INTERFACE(CI)
USB1 USB2
HEADPHONE
AV
YPbPr
DIGITAL AUDIO OUTPUT
(COAXIAL)
AudioVideo machine
with HDMI interfaces

EN-10
Introduction
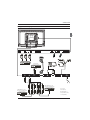
Connecting a DVD player / Satellite / cable
set top box receiver / games console / PC or
Laptop
There are several options to connecting a DVD
player / Satellite or Cable set top box receiver /
games console / PC or Laptop to your TV.
Option 1 SCART
Connect a SCART cable (not supplied)
from the SCART socket on the TV to the DVD
player / Satellite or cable set top box receiver or
games consol.
To select the device connected with the
SCART cable press the SOURCE button on the
remote and use the keys to select SCART
and press the OK button.
Note:- The TV will default to the SCART
connection wh
en the TV is switched on.
Option 2 HDMI1/HDMI2/HDMI3
If the device you want to connect to the TV
is switched on, switch off the device first.
Connect a HDMI cable (not supplied) from
the HDMI socket on the TV to the DVD player /
Satellite or cable receiver or games consol.
Switch on the device you have just
connected to the TV
To select the device connected with the
HDMI cable press the SOURCE button on the
remote and use the keys to select HDMI and
press the O
Note: Only HDMI2 supports ARC function,HDMI1
and HDMI3 don’t support.
K button.
Option 3 AV Audio Visual
(Yellow/White/Red)
Make sure that both TV and the device are
switched off before connectin
g.
Connect the AV cables (not supplied) from
the Video (yellow) and Audio (white, red)
sockets on the TV to the DVD player or games
console etc.
To select the device connected with the
cable press the SOURCE button on the
remote and use the keys to select AV and
press the OK button.
Option 4 YPbPr
(Green/Blue/Red)+(White/Red)
Make sure that both TV and the device are
switched off before connecting.
Connect the cables (not supplied) from the
YPbPr IN sockets Y, Pb, Pr (green, blue, red) and
L-Audio-R (white, red) on the TV to the DVD player
or games console etc.
AV
To select the device connected with the
cable press the SOURCE button on the
remote and use theͩƷ keys to select and
pre
ss the OK button.
Option 5 VGA (15pin Sub-D)
Connect a VGA cable (not supplied) from the
VGA socket on the TV to the PC / Laptop.
To select the PC / Laptop connected with the
VGA cable press the SOURCE button on the
remote and use the keys to select PC and
press the OK button.
Note VGA is video only. For audio from your
PC/Laptop you need to connect a separate
cable from the PC Audio (3.5mm jack) to the
headphone socket on you PC/Laptop (3.5mm
jack)
Option 6 USB
Most USB sticks can be connected to your TV
and some digital cameras may also work.
Connect USB stick (not supplied) or a USB
cable (not s
upplied) to the TV.
To select the USB device connected to the TV,
press the SOURCE button on the remote and
use the keys to select USB and press the
OK button.
Note 2. Apple iPhones and iPods are not
compatible with your TV.
Note 3. When connecting any device to the USB
connection, keep the USB cable length as short
as possible.
Option 7
Option 8
YPbPr
YPbPr
Note1:Only *.jpg , *.mp3 , *.txt , *.avi ,*.mp4 , files will
work, other file types are not guaranteed and may not.
HEADPHONE OUTPUT
is a digital audio connection used to
connect audio equipment, for example home
theatres and other digi
tal HiF
i systems over
short distances. The signal is transmitted over
either a coaxial cable with RCA connectors.
Make sure that both TV and the device are
switched off before connecting.
Connect the AV cables (not supplied) from
the socket on the TV to the Home Theater
sound system or digital HiFi system etc.
Insert the plug of the earphone into the headphone
socket on the TV. The TV speakers are now muted.
Alternatively you can also plug in external speakers if
required.
DIGITAL AUDIO OUT(COAXIAL)
COAXIAL
COAXIAL
Connecting to your Haier TV

EN-11
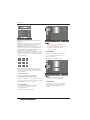
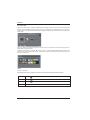
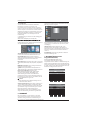
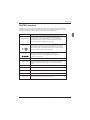
The common interface (CI) slot is designed to
accept the conditional Access (CA) Module and
Smart card in order to view the pay TV
programmes and additional services.
Contact your Common Interface service provider
to get more information about the modules and
subscription.
Please noted that CA modules and smart cards
are neither supplied nor optional accessories
from us.
COMMON INTERFACE
Introduction
Common Interface option.
CAM Removed
CAM Inserted
Channel
Picture
Audio
Clock
Setup
Lock
Auto Scan
Signal Information
Manual Scan
Program Edit
Common Interface
Return Move OK
OK
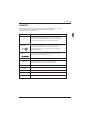
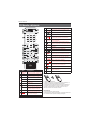
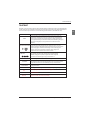
MENU

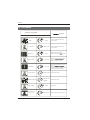
Press to turn the TV on or off.
(Power)
S.MODE
Press to select the sound mode.
P.MODE
Press to select the picture mode.
0-9
Press to enter a channel number
or password.
Q.VIEW
Press to switch to the last viewed
channel.
SLEEP
Press to set the sleep timer.
VOL +/-
Press to adjust the volume level.
(Mute)
Press to turn the sound on or off.
AUDIO(I/II)
Press to select Mono,Nicam stereo
for ATV channel.Select Audio
language for DTV channel.
SUBTITLE
Press to turn the subtitle on or off.
Press to open a favorite channel
list.In teletext mode,press to
hold a page.
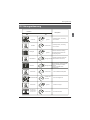
03 Remote Control
Remote Control
SCREEN
Press to change picture aspect ratio.
Press to open the on-screen menu.In teletext
mode,press to open the INDEX page.
Press to navigate the on-screen menu.
Press to confirm a selection.OK
In teletext mode,press to enter mix mode.
(reverse)
(forward)
Press to fast forward or reverse playback in
multimedia mode and timeshift (Red and
Green button in teletext mode)
mode.
Press to turn on/off the teletext function,and
change TTX mode.
SOURCE
Press to open the input source list.
No function.
P
Press to change the channel.
Press to display the channel information.
In teletext mode,press to revealthe hidden
information.
Press to open the channel list.In teletext mode,
press to size the teletext.
3D WORLD
No function.
Press to close the on-screen menu.In teletext
mode,press to hide the text.
16
17
18
19
20
21
22
23
24
25
26
Press to select previous or next file.(yellow and
blue button in teletext mode)
(previous)
(next)
Press to stop multimedia playback,stop timeshift
or record in DTV mode.
GUIDE
Press to display electronic programme guide
in TV mode. In teletext mode,press to enter a
secondary page.
(REC)
Press to record the TV program you are watching
in DTV mode.
Press to play/pause in multimedia mode,
timeshift in DTV mode.
(play/pause)
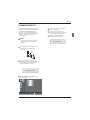
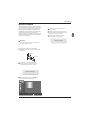
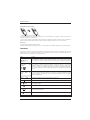
Insert Batteries into the Remote Contol
1. Remove the battery cover.
2. Inserting the 2 AAA 1.5V batteries making sure the polarity
(+ or -) of the batteries matches the polarity marks inside the unit.
3. Mount the battery cover. Replace with new batteries when the
TV set begins to show the following symptoms:Operation is
unsteady or erratic. Sometimes the TV set does not function
with Remote Control Unit.
Remark:
1) Alkaline Battery Recommeded.
2) Remove batteries when they are exhausted or if the remote
control is not to be used for
long time.
EN-12

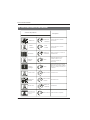
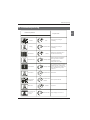
E
TEXT
SELECTING A PAGE
DIRECT ACCESS
TO THE ITEMS
SUB CGUIDE/ ODE
HOLDFAV/
REVEALINFO/
?
Press:
You will obtain :
TELETEXT
Enter the number of the page required using the 0 to 9 up/down. Example:
page 120, enter 120. The number is displayed top left, the counter turns and
then the page is displayed. Repeat this operation to view another page. If
the counter continues to search, this means that the page is not
transmitted. Select another number.
Coloured are as are displayed at the bottom of the screen. The 4 coloured
keys are used to access the items or corresponding pages. The coloured
areas flash when the item or the page is not yet available.
This returns to the contents page (usually page 100).
Press the bu
tton and enter the 4-digit number to enter a secondary page.
To freeze the page.
To display or hide the concealed information (games solutions).
This is used to call or exit teletext modes. The summary appears with a list
of items that can be accessed. Each item has a corresponding 3 digit page
number.
Teletext is an information system broadcast by certain channels which can be consulted like
a newspaper. It also offers access to subtitles for viewers with hearing problems or who are
not familiar with the transmission language(cable networks, satellite channels, etc.)
Remote Control
EN-13
MIXBACK/
This will superimpose the teletext data on top of the TV picture. Press
button again to return to full text.
EXITEXIT/
Hide the teletext.
SIZECH.LIST/
Switch the image to top,bottom.
INDEX

Operation
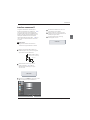
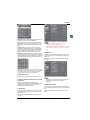
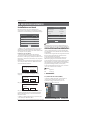
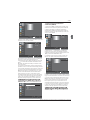
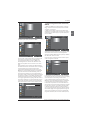
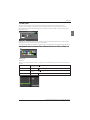
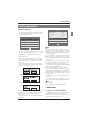
04 OPERATION
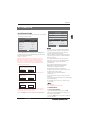
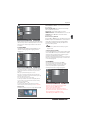
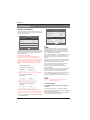
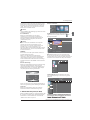
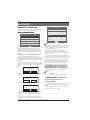
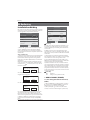
The First Time Setup screen will appear when the TV is first switched
on or reset to the factory setting.
Installation Guide
1).Press the ͩƷ buttons to navigate the menu and buttons
to change the settings. Select your desired language ,Home/Shop
Mode to be displayed on the menu.
2). Press the buttons to select AIR/Cable means DVB-T,DVB-C.
If you select DVB-C, you will select Full or Quick way to
scan.Also you can select Auto Scan mode. DTV+ATV or
DTV only, or ATV only.
First Time Setup
OSD Language English
Mode Setting Home Mode
Country France
Start
Auto Scan DTV+ATV
Antenna Type Air
First Time Setup
OSD Language English
Mode Setting Home Mode
Country France
Start
Auto Scan DTV+ATV
Antenna Type Cable
Cable Quick
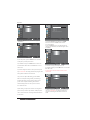
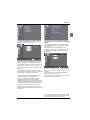
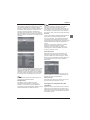
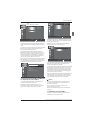
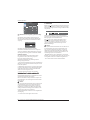
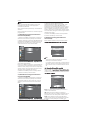
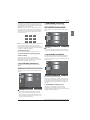
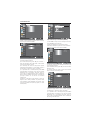
3). Channel tuning will commence. This operation
may take up to . The display will show
the progress of the tuning and the number of
channels found.
4). If you want to skip the DTV tuning, press the
MENU button to interrupt the tuning half way.
You will then go straight to ATV tuning.
5). After tuning is complete, the channels are
arranged in a preset order. If you wish to skip channels,
modify the preset order or rename
channels, select
Programme Edit under the
C
6). The old password is 0000, you can’t use 0000 as new
7). If you select Italy here, this TV will not have USB recording
and Time Shift function.
8). The default country is France, users need to select to
correct country.
password.
hannel menu.
some minutes
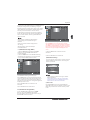
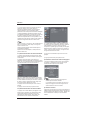
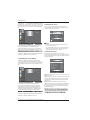
1. 1)Auto Tuning (DVB-T)
1. CHANNEL MENU
1). Press the MENU button and then press theͩƷ
buttons to select the CHANNEL menu and then press
the OK button or Right button.
2). Press the ͩƷ buttons to select Auto Scan and then
press the OK button.
In the UK to connect to cable TV you will require the
appropriate cable TV's company's 'set top box' to be
connected to the TV. Please refer to the cable TV's
instructions manual for further details.
EN-14
HOME or Shop modes
1.When the unit is turn on for the very first time, it will show
Initialization set-up menu. After the OSD language is set, the
user can choose between "shop mode" and "home mode".
When the screen shows the following setting menu and the
cursor stays on the "home mode" choice, press to adjust,
and "OK" to enter the menu.
Select the usage mode?
shop mode is for shop usage only.
Shop mode
Home mode
If "Shop mode" is choosen, the following menu will displayed.
Areyousuretochangeto
Shopmode?
OK
Cancel
Choose "OK" to enter the next prompt menu
Shop modeisthemostenergymode
OK
Cancel
Continue?
Choose "Cancel" to go back to the Initialization set-up menu,
and the cursor will stay at the "home mode" choice. choose it to
go the next menu to choose the country.
First Time Setup
DTV Digital TV
ATV Analogue TV (not used in UK)

Channel
Picture
Audio
Clock
Setup
Lock
Auto Scan
Signal Information
Manual Scan
Channel Edit
Common Interface
Return Move OK
OK
MENU
Operation
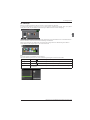
3). Press the buttons to select Antenna Type to Air
means DVB-T.
5). In the Mode item, press the buttons to select tune
mode: ATV / DTV / DTV + ATV. Press the
ͩbutton to select
Start to start.
6). Channel tuning will commence. This operation may take
up to . The display will show the progress of the
tuning and the number of channels found.
7). If you want to skip the DTV tuning, press the MENU
button to interrupt the tuning half way. You will then go
straight toATV tuning. You may repeat the above step if
you also want to skip the ATV tuning. An installation
reminder will appear the next time you turn on the TV,
if no cha
nnel is found.
8). After tuning is complete, the channels are arranged in a
preset order. If you wish to skip channels, modify the preset
order or rename channels, select P
rogramme Edit under the
channel menu.
some minutes
Channel
Picture
Audio
Clock
Setup
Lock
Scanning Ch12
Digital Channels Found:
DTV: 3
Radio: 0
Data: 0
Analog Channels Found: 0
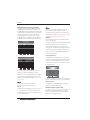
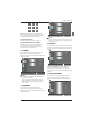
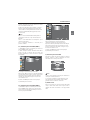
1.2 )Auto Tuning (DVB-C)
1). Press the MENU button and then press theͩƷ
buttons to select the CHANNEL menu and then
press the OK button.
2). Press theͩƷ buttons to select Auto Tuning and
then press the OK button,select Antenna Type to cable
mean DVB-C.
3). Press theͩbutton and then press the buttons
to select the country you will operate the TV.
Channel
Picture
Audio
Clock
Setup
Lock
Antenna Type Air
Country
France
Mode DTV+ATV
Start
Channel
Picture
Audio
Clock
Setup
Lock
Antenna Type Cable
Country
France
Mode DTV+ATV
Start
Channel
Picture
Audio
Clock
Setup
Lock
Quick
Full
Advanced
4). In Country mode, press the buttons to select the
country where you will operate the TV.
4). In the Mode menu, press the buttons to select ATV /
DTV / DTV + ATV.
6). Channel tuning will commence. This operation may
take up to The display will show the
progress of the tuning and the number of channels
found.
some minutes.
EN-15
5). Select start to enter the menu as below, to select
search mode.
Return Move OK
OK
MENU
Skip
MENU
Exit
EXIT
Return Move OK
OK
MENU
Return Move OK
OK
MENU

Channel
Picture
Audio
Clock
Setup
Lock
Digital Scan Ch5
Start
Operation
2. 1 )DTV Manual Tuning (DVB-T)
All the channels including ATV, DTV and Radio
can be tuning by one time,if the Tune Type is
DTV+ATV .
All the stored channels will be disappear after
auto tuning .
After auto tuning , the channel will skip to
the first DTV channel.
2). Press theͩƷ buttons to select DTV Manual Tuning
and then press the OK button, if you select Air in Auto
Scan, you will enter DVB-T manual scan menu.
4). Press the MENU button to return back to the
main menu.
5). Press the EXIT button to exit the menu.
2. 2 )DTV Manual Tuning (DVB-C)
1). Press the MENU button and then press theͩƷ
buttons to select the CHANNEL menu and then
press the OK button.
3). The DTV Manual Tuning screen will pop up.
Press the buttons to select the desired UHF channel
or press the OK button then input channel number. Select
Start to commence the search of that channel. When the
signal has been tuned, the picture and signal strength will
be displayed on the screen.
1). Press the MENU button and then press the
buttons to select the CHANNEL menu and then
press the OK button.If you select Cable in Auto scan,you
will enter DVB-C manual scan menu.
ͩƷ
Channel
Picture
Audio
Clock
Setup
Lock
Frequency 474000K
Symbol Rate 6875K
Modulaton Auto
Start
2). The DVB-C Manual Tuning screen will pop up.
P
/ks/s/Modulation), press OK to input Frequency and symbol,
press to change Modulation press Start to commence
the search of that channel. When the signal has been tuned,
the picture and signal strength will be displayed on the
screen.
ress theͩƷbuttons to select(Frequency /Symbol
3). Press the MENU button to return back to the
main menu.
4). Press the EXIT button to exit the menu.
3) ATV Manual tuning :
You can change the sound system to search theanalog TV
channels and fine tune the channels , then storage the
channels you selected.
1. Press teletext red button to storage to channels
after manual tuning .
2. If the number save to is the same as the number
Current CH, when you press Red button,the save to
number will cover the Current CH number.
Save to 1
System BG
Current CH1
Search
Frequency 44.25 MHz
Fine tune
Save
ATV Manual Tuning
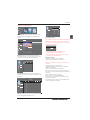
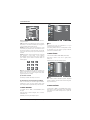
4). Channel edit:
Press the ͊or͌ Buttons to select Channel Edit in the
Channel Menu. Then press the OK Button to enter the sub-
Menu. Then you will need to select the channel you wish
to edit.
EN-16
7). If you want to skip the DTV tuning, press the MENU button to
interrupt the tuning half way. You will then go straight to
ATV tuning. You may repeat the above step if you also want to
skip the ATV tuning. An installation reminder will appear the
next time you turn on the TV,if no channel is found.
8). After tuning is complete, the channels are arranged in a
preset order. If you wish to skip channels, modify the preset
order or rename channels, select P
rogramme Edit under
the channel menu.
Frequency
Strength 54
177.50 MHz
Return Move OK
OK
MENU
Return Move OK
OK
MENU
Return
MENU

12
abc
3
def
4
ghi
5
jkl
6
mno
7
pqrs
8
tuv
9
wxyz
Operation
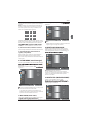
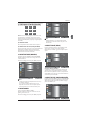
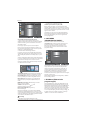
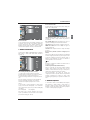
5). Common Interface
This menu can display the CI card' s information.
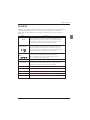
The second item of the MENU is PICTURE MENU.
You can adjust picture effect here, such as
contrast, brightness, etc.
Press ͩƷ to move, press to adjust.
2. PICTURE MENU
Channel
Picture
Audio
Clock
Setup
Lock
Picture Mode
NR Medium
Dynamic Contrast Medium
Aspect Ratio 16:9
Color Temp Normal
2). is available in PC mode only which
can adjust Horizontal position, vertical
position, size and phase.
1).There are three colors temperature modes
can be selected normal, warm, cool.
PC Setting
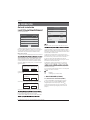
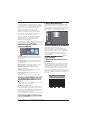
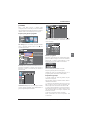
3.AUDIO MENU
The third item of the MENU is the AUDIO MENU.
You can adjust the sound effect here such as
treble, bass, balance etc.
Press ͩƷ to move, press to adjust.
Channel
Picture
Audio
Clock
Setup
Lock
Sound Mode Standard
Treble 0
Bass 0
Balance
0
Auto Volume On
Surround
Sound Off
Auto
Audio
Description
SPDIF
001 The HITS
003 UKTV Br’tldeas
004 f th
005 Ideal World
006 Colourbars100
001 Kiss
002 Smash Hits!
003 Kerrang!
002 TMF
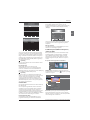
Delete
Channel Edit
DTV
DTV
DTV
DTV
DTV
DTV
Radio
Radio
Radio
Move Skip
FAV
Delete: Press the Red Button to delete the channel you
highlighted.
SKIP: Press the Yellow Button to select the Skip function
and a SKIP icon will be displayed next to the program and
it will be skipped when changing the channel.
MOVE: Press the Green Button to highlight the select the
channel you want to move. An icon will display ahead the
channel number. Then press the / Buttons to a new
position and press the Green Button to confirm.
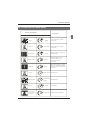
Rename: (For ATV only) Press the Blue Button for renaming
the channel. Press the number key circularly to enter a new
name and press the OK Button to confir
m (the number key
as the following table).
FAV: Press the FAV Button (instead of color Buttons) to set
the favourite channel. (If you want to view the Favorite
Channel List you need to exit Program Edit Menu and then
press the FAV Button.)
6). Signal Information (Only for DTV)
Press the Buttons to select the Signal Information
in the Channel Menu. Then press the OK Button to show the
related information of the current channel.
Auto volume: only available when the input
signal volume is too large or distortion.
EN-17
Return Move OK
OK
MENU
Return Move OK
OK
MENU
Return
Move
OK
MENU
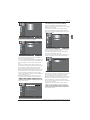
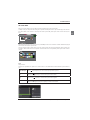
Setup
Lock
The fourth item of the menu is the CLOCK MENU
You can adjust the clock, power on/off time,
sleep timer etc .Press ͩƷ to move, press OK
to adjust.
4.CLOCK MENU
K

Operation
Channel
Picture
Audio
Clock
Setup
Lock
Sleep Timer Off
Date 2010
04 30
On Time
f
Auto
Sleep
On
Time
Zone
Of Time
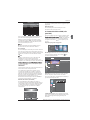
5.SETUP MENU
The fifth item of the MENU is the SETUP MENU. You can
adjust the OSD language, Audio language,Subtitle
language etc.
In PVR File system menu you can set up USB disk for PVR.
Auto Standby(4hr)
PVR File system
1.If after 4 hours from switch on and no changes have
been made to the TV, for example no channel or volume
changes,the TV will start the automatic power down
sequence.
And pop-up window will appear on screen.
Channel
Picture
Audio
Clock
Lock
O E
A Languages
Off
Blue Screen
Off
SD
Language nglish
udio
Subtitle
Country
PVR
File System
TimeshiftRecord Time
1 hour
France
Teletext Language
Auto Standby
4hr
On
Shop Mode
HDMI CEC Control
Setup
PVR Settings
Move Left
Move Right
Select
Exit
OK
EXIT
File Manager Device List
Scheduled Record
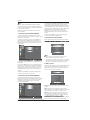
6.LOCK MENU
The sixth item of the menu is the LOCK MENU
You can lock system, set password, block program
and set parental guidance Once you set the lock
system on you must input the password before
searching the channels or change any programs.
Restore factory default will clear all the programs
and password.
Channel
Picture
Audio
Clock
Enter Password ----
Enable Off
New Password ----
Channel Locks
Parental Rating None
Setup
Lock
Timeshift Record Time: To set the max Timeshift
Record Time.
Auto Standby (4hr): To set the unit to standby
after any 4hours operation.
Shop mode: To set Shop mode to on or o.
HDMI CEC Cntrol: To set CEC function to on or off.
OSD Time: Press or to select the menu
display time.
Restore Factory Default
Press the or Buttons to select Restore Factory
Default and press the OK Button to enter the first
setup. Once confirmed, all the settings will be
cleared. This should be used if you experience
any issues with your TV.
standby. To override the automatic shutdown press any
button on the remote control.
2. To cancel the automatic power-down
On the Option Menu select Auto standby(4hr),The TV
screen returns to the Option Menu and Auto standby
(4hr) option will display.
Auto standby (4hr) OFF
After 150 seconds the TV will automatically switch to
To return to auto shutdown after 4 hours repeat the
above except use the left arrow key to select .on(4 hours)
Auto Sleep
If after 15 minutes there is no signal input, the TV will switch
off to Auto Sleep, when the Auto Sleep function is set to ON.
The clock time is automatically set when the TV is able to
receive DTV.
18-NE
Return Move OK
OK
MENU
Return Move OK
OK
MENU
Return Move OK
OK
MENU
The default pass word is 0000, If you forget the
password, you can use the super password:9443.
Channel Locks: Press ͩƷ to choose the
program ,press OK button to block
the program. If you want unblock the program,
pls enter the main menu , input the password,choose
the program,then press OK button again.
Parental Rating: Pre
ss to choose rating.
Software Updated (USB)
Press the or Buttons to select Software Update (USB)
in the Channel Menu. Then press the OK Button to update
software by using a USB. Follow the software upgrade
instructions provided with the softw
are.
Note: We recommend you perform a factory reset (refer to
Restore Factory Default in Setup menu) to ensure the unit
is successfully upgraded.

Operation
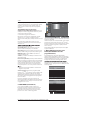
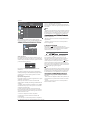
PROGRAM GUIDE
Record
ScheduleInformation
Reminder
2010/04/29 02
:
19
001 Nine Digital NINE MORNING NEWS
002 Nine Digital NINE MORNING NEWS
003 GO
TMZ
...
PROGRAM GUIDE
001
Nine
Digital
01:00-02: NINE MORNING NEWS
-03:00 HE ELLEN DEGENERES S...
- HE VIEW
DAYS OF OUR LIVES
NTERTAINMENT TONIGHT
AGICAL TALES
HE SHAK
INE AFTERNOON NEWS
00
02:00 T
03:00 04:00 T
04:00-05:00
05:00-05:30 E
05:30-06:00 M
06:00-06:30 T
06:30-07:00 N
Record
Information
Service
Reminder
To see what is going to be broadcast after the current
program, press Yellow (Schedule) Button. To view a
different channel, use the or Buttons to highlight the
channel and then press the or Buttons. To exit the
EPG Menu, press the GUIDE or EXIT Button. Press it (Service)
again to return.
Please refer to the bottom of the EPG screen
for the basic remote control key functions.
Record
In EPG mode, press the Red Button on the remote control
to select a program to be recorded. You will then enter
Scheduled Record menu for record setting. (Refer to the
section of PVR file system.)
Please ensure a compatible Hard Disc Drive or USB
device is inserted into the USB input to schedule
recordings. If your storage device is not compatible, you
If you have set a timed recording, your TV will automatically
turn on when the program is set to record and will
automatically turn off after the recording is complete.
During a timed recording however the picture and volume
will be mute (there will be no display), however the unit
will be on. You can press the STANDBY Button to turn the
picture and volume back on.
Reminder (Blue Button)
In the EPG Menu, press the BLUE Button to set a program
r
eminder. The below Reminder Menu will then be displayed
and you can use the or Buttons to set the program
reminder details. You will be able to set reminder to occur
once, Daily or Weekly.
Frequency
Channel
Minute
Hour
Month
Date
Reminder
Off
The HITS
0
17
Nov
19
17:03 19/11/2004
OK
Schedule List
You may press Red button to view the scheduled programs
list. Also you may delete the programs you have scheduled.
INFO (Green Button)
In the EPG Menu, press the GREEN Button to view more
information about the current program.
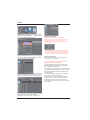
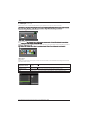
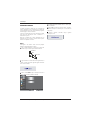
8.PVR File System (only for DTV)
Press Menu Key,select setup submenu.Press the or
Buttons to select PVR File System, then press the OK
Button to enter sub-Menu and then use the or
Buttons to scroll through the options.
The EPG (Electronic Programme Guide) Menu provides
you with detailed broadcast program information. Press
the GUIDE Button and a pop-up Menu will be displayed with
program inform
ation about the channel you are currently
watching. You will be able to see up to seven days of
program information. To view the next day or more use
the or Buttons to highlight the date and then press
the or Buttons to scroll through the available dates.
will be asked to format it. In Setup menu, enter the PVR File
System Menu Device List to format your device.
WARNING
When formatting the USB device it will delete all the files
stored on the USB device.
7.EPG Menu(Electronic Program Guide)
19-NE
La page charge ...
La page charge ...
La page charge ...
La page charge ...
La page charge ...
La page charge ...
La page charge ...
La page charge ...
La page charge ...
La page charge ...
La page charge ...
La page charge ...
La page charge ...
La page charge ...
La page charge ...
La page charge ...
La page charge ...
La page charge ...
La page charge ...
La page charge ...
La page charge ...
La page charge ...
La page charge ...
La page charge ...
La page charge ...
La page charge ...
La page charge ...
La page charge ...
La page charge ...
La page charge ...
La page charge ...
La page charge ...
La page charge ...
La page charge ...
La page charge ...
La page charge ...
La page charge ...
La page charge ...
La page charge ...
La page charge ...
La page charge ...
La page charge ...
La page charge ...
La page charge ...
La page charge ...
La page charge ...
La page charge ...
La page charge ...
La page charge ...
La page charge ...
La page charge ...
La page charge ...
La page charge ...
La page charge ...
La page charge ...
La page charge ...
La page charge ...
La page charge ...
La page charge ...
La page charge ...
La page charge ...
La page charge ...
La page charge ...
La page charge ...
La page charge ...
La page charge ...
La page charge ...
La page charge ...
La page charge ...
La page charge ...
La page charge ...
La page charge ...
La page charge ...
La page charge ...
La page charge ...
La page charge ...
La page charge ...
La page charge ...
La page charge ...
La page charge ...
La page charge ...
La page charge ...
La page charge ...
La page charge ...
La page charge ...
La page charge ...
La page charge ...
La page charge ...
La page charge ...
La page charge ...
La page charge ...
La page charge ...
La page charge ...
La page charge ...
La page charge ...
La page charge ...
La page charge ...
La page charge ...
La page charge ...
La page charge ...
La page charge ...
La page charge ...
La page charge ...
La page charge ...
La page charge ...
La page charge ...
La page charge ...
La page charge ...
La page charge ...
La page charge ...
La page charge ...
La page charge ...
La page charge ...
La page charge ...
La page charge ...
La page charge ...
La page charge ...
La page charge ...
La page charge ...
La page charge ...
La page charge ...
La page charge ...
La page charge ...
La page charge ...
La page charge ...
La page charge ...
La page charge ...
La page charge ...
La page charge ...
La page charge ...
La page charge ...
La page charge ...
La page charge ...
La page charge ...
La page charge ...
La page charge ...
La page charge ...
La page charge ...
La page charge ...
La page charge ...
La page charge ...
La page charge ...
La page charge ...
La page charge ...
La page charge ...
La page charge ...
La page charge ...
La page charge ...
La page charge ...
La page charge ...
La page charge ...
La page charge ...
La page charge ...
La page charge ...
La page charge ...
La page charge ...
La page charge ...
La page charge ...
La page charge ...
La page charge ...
La page charge ...
La page charge ...
La page charge ...
La page charge ...
La page charge ...
La page charge ...
La page charge ...
La page charge ...
La page charge ...
La page charge ...
La page charge ...
La page charge ...
La page charge ...
La page charge ...
La page charge ...
La page charge ...
La page charge ...
La page charge ...
La page charge ...
La page charge ...
La page charge ...
La page charge ...
La page charge ...
La page charge ...
La page charge ...
La page charge ...
La page charge ...
La page charge ...
La page charge ...
-
 1
1
-
 2
2
-
 3
3
-
 4
4
-
 5
5
-
 6
6
-
 7
7
-
 8
8
-
 9
9
-
 10
10
-
 11
11
-
 12
12
-
 13
13
-
 14
14
-
 15
15
-
 16
16
-
 17
17
-
 18
18
-
 19
19
-
 20
20
-
 21
21
-
 22
22
-
 23
23
-
 24
24
-
 25
25
-
 26
26
-
 27
27
-
 28
28
-
 29
29
-
 30
30
-
 31
31
-
 32
32
-
 33
33
-
 34
34
-
 35
35
-
 36
36
-
 37
37
-
 38
38
-
 39
39
-
 40
40
-
 41
41
-
 42
42
-
 43
43
-
 44
44
-
 45
45
-
 46
46
-
 47
47
-
 48
48
-
 49
49
-
 50
50
-
 51
51
-
 52
52
-
 53
53
-
 54
54
-
 55
55
-
 56
56
-
 57
57
-
 58
58
-
 59
59
-
 60
60
-
 61
61
-
 62
62
-
 63
63
-
 64
64
-
 65
65
-
 66
66
-
 67
67
-
 68
68
-
 69
69
-
 70
70
-
 71
71
-
 72
72
-
 73
73
-
 74
74
-
 75
75
-
 76
76
-
 77
77
-
 78
78
-
 79
79
-
 80
80
-
 81
81
-
 82
82
-
 83
83
-
 84
84
-
 85
85
-
 86
86
-
 87
87
-
 88
88
-
 89
89
-
 90
90
-
 91
91
-
 92
92
-
 93
93
-
 94
94
-
 95
95
-
 96
96
-
 97
97
-
 98
98
-
 99
99
-
 100
100
-
 101
101
-
 102
102
-
 103
103
-
 104
104
-
 105
105
-
 106
106
-
 107
107
-
 108
108
-
 109
109
-
 110
110
-
 111
111
-
 112
112
-
 113
113
-
 114
114
-
 115
115
-
 116
116
-
 117
117
-
 118
118
-
 119
119
-
 120
120
-
 121
121
-
 122
122
-
 123
123
-
 124
124
-
 125
125
-
 126
126
-
 127
127
-
 128
128
-
 129
129
-
 130
130
-
 131
131
-
 132
132
-
 133
133
-
 134
134
-
 135
135
-
 136
136
-
 137
137
-
 138
138
-
 139
139
-
 140
140
-
 141
141
-
 142
142
-
 143
143
-
 144
144
-
 145
145
-
 146
146
-
 147
147
-
 148
148
-
 149
149
-
 150
150
-
 151
151
-
 152
152
-
 153
153
-
 154
154
-
 155
155
-
 156
156
-
 157
157
-
 158
158
-
 159
159
-
 160
160
-
 161
161
-
 162
162
-
 163
163
-
 164
164
-
 165
165
-
 166
166
-
 167
167
-
 168
168
-
 169
169
-
 170
170
-
 171
171
-
 172
172
-
 173
173
-
 174
174
-
 175
175
-
 176
176
-
 177
177
-
 178
178
-
 179
179
-
 180
180
-
 181
181
-
 182
182
-
 183
183
-
 184
184
-
 185
185
-
 186
186
-
 187
187
-
 188
188
-
 189
189
-
 190
190
-
 191
191
-
 192
192
-
 193
193
-
 194
194
-
 195
195
-
 196
196
-
 197
197
-
 198
198
-
 199
199
-
 200
200
-
 201
201
-
 202
202
-
 203
203
-
 204
204
-
 205
205
-
 206
206
-
 207
207
-
 208
208
-
 209
209


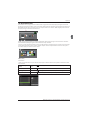
Haier LE32B7000C Manuel utilisateur
- Catégorie
- Téléviseurs LCD
- Taper
- Manuel utilisateur
- Ce manuel convient également à
dans d''autres langues
- italiano: Haier LE32B7000C Manuale utente
- español: Haier LE32B7000C Manual de usuario
- Deutsch: Haier LE32B7000C Benutzerhandbuch
- Nederlands: Haier LE32B7000C Handleiding
- português: Haier LE32B7000C Manual do usuário
Documents connexes
-
Haier LE32C800C Le manuel du propriétaire
-
Haier LE29C810C Manuel utilisateur
-
Haier LE40B650CF Le manuel du propriétaire
-
Haier LE24G610CF Manuel utilisateur
-
-
-
-
-
-
Autres documents
-
Changhong Electric LED40D2080ST2 Mode d'emploi
-
DGM LTV-1914WHTC Manuel utilisateur
-
Nordmende 19 TFT LCD Le manuel du propriétaire
-
Hyundai E320D Manuel utilisateur
-
Salora 24LCF-5000TDW Manuel utilisateur
-
-
Lenco LED-4022 Guide de démarrage rapide
-
Infiniton INTV-40M510 Le manuel du propriétaire
-
Sunstech TLEXI1663HD Manuel utilisateur
-