Hamilton Beach 67850 Mode d'emploi
- Catégorie
- Fabricants de jus
- Taper
- Mode d'emploi

READ BEFORE USE
LIRE AVANT UTILISATION
LEA ANTES DE USAR
Visit www.hamiltonbeach.com for our
complete line of products and Use and
Care Guides – as well as delicious recipes,
tips, and to register your product online
Rendez-vous sur www.hamiltonbeach.ca
pour notre liste complète de produits et de
nos manuels utilisateur – ainsi que nos
délicieuses recettes et nos conseils
Visite www.hamiltonbeach.com (
EE. UU.)
o
www.hamiltonbeach.com.mx (México)
para ver otros productos de Hamilton Beach
o para contactarnos
Questions
Please call us – our friendly
associates are ready to help.
USA: 1.800.851.8900
Preguntas
Por favor llámenos – nuestros
amables representantes están
listos para ayudar.
EE. UU.: 1.800.851.8900
MEX: 800 71 16 100
Le invitamos a leer cuidadosamente este
instructivo antes de usar su aparato.
Questions
N’hésitez pas à nous appeler –
nos associés s’empresseront
de vous aider.
CAN : 1.800.267.2826
English ...................... 2
Français ................... 17
Español ................... 34
Premium Big Mouth™ Juice Extractor
Centrifugeuse
Big Mouth
MC
Premier
Extractor de Jugo
Big Mouth™ Primero

2
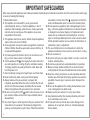
IMPORTANT SAFEGUARDS
1. Read all instructions.
2. This appliance is not intended for use by persons with
reduced physical, sensory, or mental capabilities, or lack of
experience and knowledge, unless they are closely supervised
and instructed concerning use of the appliance by a person
responsible for their safety.
3. This appliance shall not be used by children. Keep the appliance
and its cord out of reach of children.
4. Close supervision is necessary when any appliance is used near
children. Children should be supervised to ensure that they do
not play with the appliance.
5. To protect against risk of electric shock, do not immerse cord,
plug, or motor base in water or other liquid.
6. Turn the appliance OFF( ), then unplug from outlet when not in
use, before putting on or taking off parts, and before cleaning.
To unplug, grasp the plug and pull from the outlet. Never pull
from the power cord.
7. Avoid contacting moving parts. Keep fingers out of feed chute.
8. Never feed food by hand—always use the food pusher.
9. Always make sure the juice extractor is properly and
completely assembled before the motor is turned ON. The unit
will not turn ON unless properly assembled. Do not release
safety locking latches while juice extractor is in operation.
10. Be sure to turn switch to OFF ( ) position after each use of your
juice extractor. Make sure the motor stops completely before
disassembling.
11. Do not put fingers or other objects into the juice extractor feed
chute while it is in operation. If food becomes lodged in the
opening, use food pusher to push it down. When this method is
not possible, turn the motor OFF ( ), unplug the cord from the
outlet, and disassemble juicer to remove the remaining food.
12. Do not operate any appliance with a damaged supply cord or
plug, or after the appliance malfunctions or has been dropped
or damaged in any manner. Supply cord replacement and
repairs must be conducted by the manufacturer, its service
agent, or similarly qualified persons in order to avoid a hazard.
Call the provided customer service number for information on
examination, repair, or adjustment.
13. The use of attachments not recommended or sold by the
appliance manufacturer may cause fire, electric shock, or injury.
14. Do not use outdoors.
15. Do not let cord hang over edge of table or counter, or touch hot
surfaces, including stove.
16. Do not leave juice extractor unattended while it is operating.
17. Blades are sharp; handle carefully. Do not touch the small
cutting blades in the base of the stainless steel strainer basket.
18. Keep hair, clothing, and jewelry, as well as spatulas and other
utensils, away from feed chute during operation to prevent the
possibility of severe injury to persons and/or damage to the
appliance.
19. Do not use the appliance if the rotating strainer basket or juice
cover is damaged or has visible cracks.
20. Always use the juice extractor on a dry, level surface.
21. Any maintenance other than cleaning should be performed
by an authorized service center.
22. To reduce the risk of personal injury and/or damage to the
appliance, do not use bent, dented, or otherwise damaged
strainer basket.
When using electrical appliances, basic safety precautions should always be followed to reduce the risk of fire, electric shock, and/or injury
to persons, including the following:

3
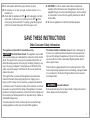
Other Consumer Safety Information
This appliance is intended for household use only.
w WARNING
Electrical Shock Hazard: This appliance is provided
with a polarized plug (one wide blade) to reduce the risk of electric
shock. The plug fits only one way into a polarized outlet. Do not
defeat the safety purpose of the plug by modifying the plug in any
way or by using an adapter. If the plug does not fit fully into the
outlet, reverse the plug. If it still does not fit, have an electrician
replace the outlet.
The length of the cord used on this appliance was selected to
reduce the hazards of becoming tangled in or tripping over a
longer cord. If a longer cord is necessary, an approved extension
cord may be used. The electrical rating of the extension cord must
be equal to or greater than the rating of the appliance. Care must
be taken to arrange the extension cord so that it will not drape over
the countertop or tabletop where it can be pulled on by children or
accidentally tripped over.
To avoid an electrical circuit overload, do not use another high-
wattage appliance on the same circuit with this appliance.
The strainer basket is a delicate screen. If bent or damaged, do
not use, as it could break into small pieces and cause personal
injury and/or damage the appliance. Call our toll-free customer
service number to order a new basket. Replace basket when it
shows signs of wear.
This machine is equipped with motor overload protection. If the
motor stops during operation due to overheating, unplug and allow
it to cool down for 15 minutes. Plug machine back in to resume
normal operation.
w WARNING
Laceration Hazard.
Extra-wide feed chute. Do not place hands or fingers down feed
chute. Always use the food pusher.
SAVE THESE INSTRUCTIONS
23. Do not operate without the pulp container in place.
24. Do not place on or near a hot gas or electric burner or in a
heated oven.
25. Check that the appliance is OFF ( ) before plugging cord into
wall outlet. To disconnect, turn the control to OFF ( ); then
remove plug from wall outlet. To unplug, grasp the plug and
pull from the outlet. Never pull from the power cord.
26. CAUTION! In order to avoid a hazard due to inadvertent
resetting of the thermal cut-out, this appliance must not be
supplied through an external switching device, such as a timer,
or connected to a circuit that is regularly switched on and off
by the utility.
27. Do not use appliance for other than intended purpose.

4
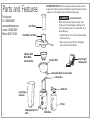
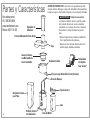
Lid
Parts and Features
w WARNING
Laceration Hazard.
Micro-mesh strainer basket may fly apart
during use if it is damaged, resulting in the
risk of cuts and bruises. To reduce the risk of
personal injury:
• Always inspect micro-mesh strainer basket
before each use.
• Never use a cracked, bent, or damaged
micro-mesh strainer basket.
Food Pusher
Stainless Steel
Micro-Mesh
Strainer Basket
Extra-Wide Feed Chute
Removable Drip-Free Juice Spout
Strainer Bowl
Large Pulp
Container
Locking Arm
Motor Base
To order parts:
US: 1.800.851.8900
www.hamiltonbeach.com
Canada: 1.800.267.2826
Mexico:
800 71 16 100
Pitcher
Pitcher Lid
BEFORE FIRST USE: Wash everything except the base in warm,
soapy water. Rinse and dry immediately. Never immerse the base
in water or other liquids; wipe it with a damp sponge.
Easy Sweep™
Cleaning Tool
Illuminating Control
Knob

5
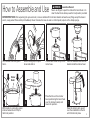
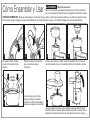
How to Assemble and Use
7
Raise the locking arm up and
over the indentation in the lid
until it clicks into place.
BEFORE FIRST USE: After unpacking the juice extractor, remove cardboard from strainer basket and wash everything except the base in
warm, soapy water. Rinse and dry immediately. Never immerse the base in water or other liquids; wipe it with a damp sponge.
4
6
Place the stainless steel strainer
basket inside the strainer bowl.
With hands on outer edge, press
strainer basket down firmly to
latch into position.
3
Place strainer bowl on top of the
motor base.
w WARNING
Laceration Hazard.
Never use fingers to push food down the feed chute or to
clear the feed chute. Always use the food pusher provided.
2
While holding tab, tilt spout
down and slide in.
1
Turn strainer bowl over, push
tab in.
Place the lid over the strainer
bowl, positioning the feed chute
over the strainer basket, and
lower into position.
5
Strainer
Basket

6
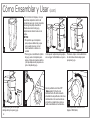
How to Assemble and Use (cont.)
10
Push removable drip-free spout
down into place for juicing.
12
Rotate control knob to OFF ( ).
Plug into outlet. The ring around
the control knob will illuminate
blue, when plugged in and if
properly assembled.
1311
Place pitcher with lid under the
juice spout.
9
Place the pulp container into
position by tilting the container
slightly.
8
To minimize cleanup, place a
plastic grocery bag in pulp
container to collect pulp. When
juicing is completed, simply
remove grocery bag containing
pulp.
NOTES:
• Do not allow pulp container to
overfill since this may prevent
correct operation or damage the
unit.
• For optimal juice yield, empty the
pulp bin and clean the strainer
and lid after each pitcher full of
juice.
Rotate control knob LOW or HIGH.

7
Wash fruits and vegetables.
NOTE: Most fruits and vegetables
such as apples, carrots, and
cucumbers will not need to be cut
since they will fit into feed chute
whole. It is recommended that
fruits or vegetables such as all
citrus, melons, or mangoes are
peeled before placing in unit for
best juice flavor.
15
Juice will flow into pitcher and
separated pulp will accumulate
in pulp container.
NOTE: Pulp container can be
emptied during juicing by turning
juice extractor OFF ( ) and then
carefully removing pulp container.
(Replace empty pulp container
before continuing to juice.)
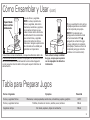
Fruit or Vegetables Examples Speed
Firm Fruits and Vegetables Apples, Peeled Oranges, Carrots, Beets, Cucumbers, Ginger HIGH
Soft Fruits and Vegetables Strawberries, Pitted Peaches, Watermelons, Grapes, Tomatoes LOW
Leafy Greens Spinach, Kale, Beet Greens LOW
Juicing Chart
14
Small Ridge
Inside Feed
Chute
With the motor running, place food
in the feed chute.
Slide the food
pusher down the feed chute by
aligning the groove in the food
pusher with the small ridge on
the inside of the top of the feed
tube.
How to Assemble and Use (cont.)
To extract the maximum amount
of juice, always push food pusher
down slowly.

8
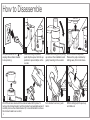
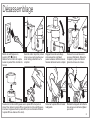
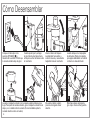
How to Disassemble
1 3
5 7
4
Turn juice extractor OFF ( ) and
unplug. Allow strainer basket
to stop turning.
Release the locking arm by lifting
up and over the indentation and
gently lowering to the counter.
Lift off the strainer bowl with the strainer basket still in place. To
remove the strainer basket, turn the strainer bowl upside down and
carefully remove the strainer basket. (It is recommended to remove
the strainer basket over a sink.)
Lift off lid with food pusher.
Remove the pulp container by
sliding away from motor base.
2
When removing the pitcher,
push drip-free spout into the up
position to prevent drips on the
counter.
8
While holding tab, tilt spout up
and slide out.
6
Turn strainer bowl over; push
tab in.

9
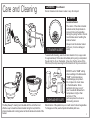
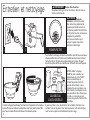
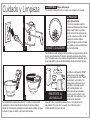
Care and Cleaning
w WARNING
Shock Hazard.
Do not immerse motor base in water or any other liquid.
1 2
DISHWASHER-SAFE
w CAUTION
Laceration Hazard.
The center of the strainer basket
contains small, sharp blades to
process fruits and vegetables
during the juicing function. Do not
touch blades when handling the
strainer basket.
Always treat the strainer basket
with care; it can be damaged
easily.
DO NOT use the “SANI” setting
when washing in the dishwasher.
“SANI” cycle temperatures
could damage your product.
Do not place the motor base
in the dishwasher. Some
part distortion may occur if
your household dishwasher’s
temperature is higher than
normal or if the
parts are placed too close to
the heating element.
The Easy Sweep™ cleaning tool included with the unit is the most
effective way to clean the strainer basket. Using the tool, hold the
strainer basket under running water and brush inside and outside of the
basket.
Discoloration of the plastic may occur with some fruit and vegetables.
To help prevent this, wash all parts immediately after use.
STRAINER BASKET
3 4
To assist with cleaning, soak the strainer basket in hot, soapy water
for approximately 10 minutes immediately after juicing is completed.
If pulp is left to dry on the basket, it may clog the fine pores of the
filter mesh, thereby lessening the effectiveness of the juice extractor.

10
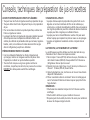
Juicing Tips, Techniques, and Recipes
PURCHASING AND STORING FRUITS AND VEGETABLES:
• Always wash fruits and vegetables before juicing.
• Always use fresh fruits and vegetables for juicing.
• To save money and obtain fresher produce, purchase fruits or
vegetables that are in season.
• Most fruits and hardier-type vegetables can be stored at cool
room temperature. More delicate and perishable items such as
berries, leafy greens, celery, cucumbers, and herbs should be
stored in the refrigerator until required.
PREPARING FRUITS AND VEGETABLES:
• It is recommended that fruits or vegetables such as oranges,
melons, or mangoes are peeled before placing in juice extractor
for best juice flavor.
• All fruits with pits and large seeds such as nectarines, peaches,
apricots, plums, and cherries MUST be pitted before juicing.
USING THE PULP:
• The remaining pulp left after juicing fruits or vegetables is
mostly fiber and cellulose which, like the juice, contain vital
nutrients necessary for the daily diet and can be used in many
ways. Pulp can be frozen for later use.
• There are a number of recipes that use pulp. You can also use
pulp to thicken casseroles or soups.
• Pulp is great used in the garden for compost.
SOY MILK, ALMOND MILK, AND RICE MILK:
This juice extractor may be used to make soy milk, almond milk,
and rice milk. Follow these steps:
1. Soak 1 cup (237 ml) of soybeans, almonds, or rice in 4 cups
(946 ml) of water for 8 to 12 hours covered in the refrigerator.
2. Drain nuts and discard water. Cover nuts, beans, or rice with
1 1/2 cups (355 ml) fresh water.
3. Slowly ladle the nuts, beans, or rice with the water into the
food chute.
4. Place cheesecloth in a container. Pour mixture into a tight
woven cheesecloth and let stand until completely drained.
Squeeze cheesecloth, if necessary. Refrigerate milk
immediately.
NOTES:
• Almonds must be soaked 8 to 12 hours before juicing.
• Soy milk should be boiled to improve the flavor.
• Vanilla, honey, and sugar may be added to enhance the flavor of
each milk type.

11
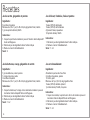
Carrot, Ginger and Apple Juice
Ingredients:
6 medium carrots
1/ 4-inch-thick (0.6 cm) slice fresh ginger (about 1-inch [2.5-cm]
diameter)
1 large Granny Smith apple
Directions:
1. Cut apple as needed to fit through the chute of the juice
extractor.
2. Juice the ingredients in the order listed.
3. Stir and serve immediately.
Serves: 2
Blueberry, Raspberry, Strawberry and Apple Juice
Ingredients:
1 cup (237 ml) blueberries
1 cup (237 ml) raspberries
4 large strawberries, hulled
1/4 of a Granny Smith apple
Directions:
1. Juice the ingredients in the order listed.
2. Stir and serve immediately
Serves: 1–2
Recipes
Beet, Orange, Ginger and Carrot Juice
Ingredients:
1 large beet, trimmed
1 medium orange, peeled
3 medium carrots
1/ 4-inch-thick (0.6 cm) slice fresh ginger (about 1-inch [2.5-cm]
diameter)
Directions:
1. Cut beet, orange and carrots as needed to fit through the chute
of the juice extractor.
2. Juice the ingredients in the order listed.
3. Stir and serve immediately.
Serves: 1–2
Go-Getter Green Juice
Ingredients:
4 medium kale leaves
2 medium carrots, trimmed
1/2 lemon, peeled
1-inch (2.5-cm) piece fresh ginger
1 cup (237 ml) baby spinach leaves
1 medium Granny Smith apple
Directions:
1. Cut carrots, apple and lemon as needed to fit through the chute
of the juice extractor.
2. Juice the ingredients in the order listed.
3. Stir and serve immediately
Serves: 1–2

12
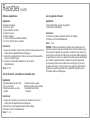
Veggie Cocktail
Ingredients:
8 medium tomatoes
1 small lemon, peeled
1 large rib celery
1 medium carrot
1 onion slice
1 teaspoon (5 ml) Worcestershire sauce
1/2 teaspoon (2.5 ml) salt, if desired
Directions:
1. Cut tomatoes, lemon and carrot as needed to fit through the
chute of the juice extractor.
2. Juice the ingredients in the order listed except Worcestershire
sauce and salt.
3. Stir in Worcestershire sauce and salt. Serve immediately.
Serves: 2–3
Pomegranate Blueberry Juice
Ingredients:
2 cups (473 ml) pomegranate seeds
1 cup (237 ml) blueberries
Directions:
1. Juice the ingredients in the order listed.
2. Stir and serve immediately.
Serves: 1–2
Test Kitchen Tip: Use just the seeds of a pomegranate for juicing
since the membranes will make the juice bitter. To deseed the
pomegranate, start by making a thin slice from the bottom to make
it stable for cutting. Cut out the core at the top. Make shallow cuts
to section into 6 wedges. Gently break the pomegranate apart and
pry the seeds out with your fingers. Pomegranate juice can stain, so
we suggest wearing gloves and something like an old T-shirt. Work
over a bowl to catch the seeds and drips before placing in the juice
extractor.
Recipes (cont.)
Kale, Cucumber and Cilantro Green Juice
Ingredients:
6 large leaves kale
1 large cucumber
1 rib celery with leaves
1 medium lime, peeled
2 small handfuls cilantro
1 medium Granny Smith apple
Directions:
1. Cut cucumber and apple as needed to fit through the chute of the
juice extractor.
2. Juice the ingredients in the order listed.
3. Stir and serve immediately
Serves: 1–2

13
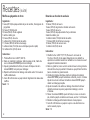
Citrus Ginger Muffins
Ingredients:
1 cup (237 ml) pulp reserved from a carrot, orange and ginger juice
1/2 cup (118 ml) milk
1/4 cup (59 ml) vegetable oil
1 large egg
1/3 cup (78 ml) sugar
1 teaspoon (5 ml) vanilla extract
1 1/2 cups (355 ml) all-purpose flour
1 tablespoon (15 ml) baking powder
1/2 teaspoon (2.5 ml) salt
Directions:
1. Preheat oven to 400°F (204°C).
2. In a large mixing bowl, beat pulp, milk, oil, egg, sugar on
MEDIUM until blended.
3. Gradually add flour, baking powder and salt on LOW speed until
just blended.
4. Spoon mixture evenly between 12 muffin cups.
5. Bake 20 to 22 minutes or until lightly browned on muffin tops.
Serves: 12
Berry Chocolate Brownies
Ingredients:
1/2 cup (118 ml) butter
1 cup (237 ml) semi-sweet chocolate chips
1 cup (237 ml) sugar
1 cup (237 ml) pulp reserved from a berry juice
3 large eggs
1 tablespoon (15 ml) vanilla extract
1 1/4 cups (296 ml) all-purpose flour
1/2 cup (118 ml) baking cocoa
1 teaspoon (5 ml) salt
Directions:
1. Heat oven to 350°F (177°C). Line a 13- x 9- inch (33- x 23-cm)
baking pan with nonstick foil or spray a foil-lined pan with
nonstick cooking spray.
2. In a large microwavable bowl, microwave the butter and
chocolate chips on medium power for 2 minutes or until butter is
melted and chips are shiny.
3. With a hand mixer, beat chocolate mixture on MEDIUM until
blended, about 1 minute. Add sugar and continue to beat on
HIGH until mixture is lighter in color.
4. Add eggs and vanilla to chocolate mixture. Continue to beat on
medium until well blended, about 2 minutes.
5. Reduce speed to LOW, add flour, baking cocoa and salt, and beat
until smooth, about 1 to 2 minutes.
6. Spread mixture evenly into prepared baking pan.
7. Bake 26 to 30 minutes or until toothpick inserted in center comes
out clean.
Serves: 16
Recipes (cont.)

14
Recipes (cont.)
Secret Garden Lasagna
Ingredients:
2 tablespoons (30 ml) olive oil
1 large onion, chopped
6 large garlic cloves, minced
1 28-ounce (794-g) can crushed
tomatoes
1 6-ounce (170-g) can tomato
paste
1 cup (237 ml) pulp reserved
from a green juice
1 tablespoon (15 ml) dried basil
2 teaspoons (10 ml) dried
oregano, divided
1 teaspoon (5 ml) salt
1/ 2 teaspoon (2.5 ml) black
pepper
12 lasagna noodles, divided
15 ounces (425 g) part-skim
ricotta cheese
1 cup (237 ml) grated Parmesan
cheese
2 large eggs
4 cups (946 ml) shredded
mozzarella cheese, divided
Directions:
1. In a large saucepot over medium-high heat, heat the oil. Add the
onion and garlic. Cook and stir until the onion is clear and garlic is
golden, about 4 minutes.
2. Stir in crushed tomatoes, tomato paste, pulp, basil, 1 teaspoon
(5 ml) oregano, salt. Heat until mixture comes to a boil, reduce
heat, and simmer for 1 hour.
3. Spread 1 cup (237 ml) of sauce mixture in bottom of a 13- x 9-inch
(33- x 23-cm) baking dish. Layer 3 lasagna noodles over sauce.
4. In a medium bowl, mix ricotta cheese, Parmesan cheese, eggs
and remaining oregano. Spread 1/4 of mixture over noodles in
crock. Sprinkle with 1 cup (237 ml) mozzarella cheese. Repeat
layers 3 more times, ending with sauce. Top with remaining
mozzarella cheese.
5. Cover with nonstick foil or foil face down sprayed with nonstick
cooking spray.
6. Bake 1 hour, remove foil, and bake an additional 20 minutes.
Serves: 12
Wholesome Vegetarian Chili
Ingredients:
2 tablespoons (30 ml) olive oil
1 large onion, chopped
2 large garlic cloves, minced
1 medium green pepper,
coarsely chopped
1 large carrot, shredded
1 medium zucchini, shredded
1 large celery stalk, sliced
1 can (28 oz. [794 g]) whole
tomatoes, broken
2 cans (4 oz. [113 g] each)
chopped green chilies, drained
1 can (15 oz. [425 g]) black
beans, drained
1 can (15 oz. [425 g]) cannelini
beans, drained
1 1/2 cups (355 ml) reserved
pulp from a green juice
1 teaspoon (5 ml) dried basil
1 teaspoon (5 ml) salt
1/ 2 teaspoon (2.5 ml) coarse
black pepper
1/ 4 teaspoon (1.3 ml) ancho chili
pepper
Directions:
1. Heat oil in Dutch oven over medium-high heat. Cook onions and
garlic for 2 minutes. Add green pepper, carrots, zucchini and
celery and cook an additional 5 minutes.
2. Stir in remaining ingredients and cook over low heat for 40
minutes.
Serves: 8–10

15
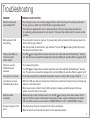
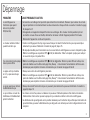
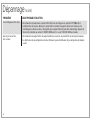
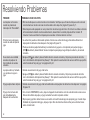
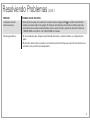
Troubleshooting
PROBLEM PROBABLE CAUSE/SOLUTION
Machine will not work
when switched ON.
• The locking arm may not be correctly engaged. Check to see if the locking arm is properly positioned in
the two grooves on either side of the lid. Refer to page 5, Steps 6 and 7.
• This machine is equipped with motor overload protection. If the motor stops during operation due
to overheating, unplug and allow it to cool down for 15 minutes. Plug machine back in to resume normal
operation.
Motor appears to stall
when juicing.
• The juicing action may be too vigorous. Try slower juicing action by pushing the food pusher down more
slowly. Refer to page 7, Step 15.
• Wet pulp can build up under the lid or pulp container. Turn unit OFF ( ) and unplug. Empty the pulp bin;
then clean lid and strainer basket.
Excess pulp building up
in the micro-mesh
strainer basket.
• Turn OFF ( ) and unplug. Remove strainer basket and clean mesh walls with the Easy Sweep™ cleaning
tool. This will remove excess fiber buildup which could be inhibiting the juice flow. Refer to pages 8 and 9.
Pulp is too wet and
insufficient juice is
produced.
• Try a slower juicing action.
• Turn OFF ( ) and unplug. Remove strainer basket and clean mesh walls with the Easy Sweep™ cleaning
tool. This will remove excess fiber buildup which could be inhibiting the juice flow. Refer to pages 8 and 9.
Juice sprays out of spout. • Try slower juicing action by pushing the food pusher down more slowly. Refer to page 7, Step 15.
Juice drips out of spout
immediately after juicing.
• With motor ON, raise and lower food pusher in feed chute several times. The action forces remaining pulp
and juice out of strainer bowl.
• Drip-free juice spout is down for juicing. When juicing is complete, push drip-free spout into the up
position to prevent drips on the counter.
Machine vibrates
excessively.
• Buildup of pulp in mesh of strainer basket. Turn unit OFF ( ) and unplug. Clean strainer basket. Refer to
page 9. If machine vibration continues after cleaning, this could be a sign of a damaged strainer basket.
Call our toll-free customer service number at 1.800.851.8900 in the U.S. or 1.800.267.2826 in Canada.
No juice coming out of the
spout.
• Pulp has built up. Clean out wet pulp from lid, strainer, and pulp bin.
• Drip-free spout is up. Ensure drip-free spout is in the down/open position.

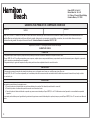
16
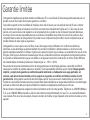
Limited Warranty
This warranty applies to products purchased and used in the U.S. and Canada. This is the only express warranty for this product and
is in lieu of any other warranty or condition.
This product is warranted to be free from defects in material and workmanship for a period of five (5) years from the date of original
purchase in Canada and three (3) years from the date of original purchase in the U.S. During this period, your exclusive remedy is
repair or replacement of this product or any component found to be defective, at our option; however, you are responsible for all
costs associated with returning the product to us and our returning a product or component under this warranty to you. If the product
or component is no longer available, we will replace with a similar one of equal or greater value.
This warranty does not cover glass, filters, wear from normal use, use not in conformity with the printed directions, or damage to
the product resulting from accident, alteration, abuse, or misuse. This warranty extends only to the original consumer purchaser or
gift recipient. Keep the original sales receipt, as proof of purchase is required to make a warranty claim. This warranty is void if the
product is used for other than single-family household use or subjected to any voltage and waveform other than as specified on the
rating label (e.g., 120V ~ 60 Hz).
We exclude all claims for special, incidental, and consequential damages caused by breach of express or implied warranty. All
liability is limited to the amount of the purchase price. Every implied warranty, including any statutory warranty or condition
of merchantability or fitness for a particular purpose, is disclaimed except to the extent prohibited by law, in which case such
warranty or condition is limited to the duration of this written warranty. This warranty gives you specific legal rights. You may have
other legal rights that vary depending on where you live. Some states or provinces do not allow limitations on implied warranties or
special, incidental, or consequential damages, so the foregoing limitations may not apply to you.
To make a warranty claim, do not return this appliance to the store. Please call 1.800.851.8900 in the U.S. or 1.800.267.2826 in Canada
or visit hamiltonbeach.com in the U.S. or hamiltonbeach.ca in Canada. For faster service, locate the model, type, and series numbers
on your appliance.

17
PRÉCAUTIONS IMPORTANTES
1. Lire toutes les instructions.
2. Cet appareil n’est pas destiné à être utilisé par des personnes dont
les capacités physiques, sensorielles ou mentales sont réduites, ou
manquant d’expérience et de connaissance, sauf si elles sont étroitement
surveillées et instruites sur l’utilisation de l’appareil par une personne
responsable de leur sécurité.
3. Cet appareil ne devrait pas être utilisé par des enfants. Garder l’appareil
et son cordon hors de la portée des enfants.
4. Une surveillance étroite est requise pour tout appareil utilisé près des
enfants. Surveiller que les enfants ne jouent pas avec l’appareil.
5. Pour protéger contre le risque de choc électrique, ne pas immerger le
cordon, la fiche ou la base de moteur dans l’eau ou autre liquide.
6. Fermer l’appareil ( ), puis le débrancher de la prise lorsqu’il n’est pas
utilisé, avant d’assembler ou de désassembler des pièces ou avant de
le nettoyer. Pour le débrancher, tenir la fiche et la retirer de la prise. Ne
jamais tirer sur le cordon.
7. Éviter le contact avec les pièces en mouvement. Veiller à ne pas mettre
les doigts dans la trémie.
8. Ne jamais introduire d’aliments à la main — se servir toujours du
poussoir.
9. Toujours s’assurer que la centrifugeuse est correctement et
complètement assemblée avant de mettre le moteur en marche.
L’appareil ne s’allumera pas s’il n’est pas correctement assemblé. Laisser
les verrous de sécurité fermés pendant que la centrifugeuse est en
fonctionnement.
10. S’assurer de mettre la centrifugeuse sur la position OFF ( /arrêt) après
chaque utilisation. S’assurer que le moteur est complètement arrêté
avant de démonter l’appareil.
11. Ne mettre ni les doigts ni aucun objet dans la trémie de la centrifugeuse
lorsque celle-ci est en marche. Si des aliments se coincent dans
l’ouverture, se servir du poussoir pour les enfoncer. Lorsque cela n’est
pas possible, ÉTEINDRE ( ) le moteur, débrancher le cordon de la prise
et démonter la centrifugeuse pour procéder au retrait des aliments
coincés.
12. Ne pas faire fonctionner un appareil électroménager avec un cordon
ou une fiche endommagée, ou lorsque l’appareil ne fonctionne pas
bien ou a été échappé ou endommagé d’une manière quelconque. Le
remplacement et la réparation du cordon d’alimentation doivent être
faits par le fabricant, son agent de service ou toute personne qualifiée
de façon à éviter tout danger. Appeler le numéro de service à la clientèle
fourni pour des renseignements concernant l’examen, la réparation ou
l’ajustement.
13. L’utilisation d’accessoires non recommandés ni vendus par le fabricant
d’appareil peut causer un incendie, un choc électrique ou des blessures.
14. Ne pas utiliser l’appareil à l’extérieur.
15. Ne pas laisser le cordon pendre au bord d’une table ou d’un comptoir, ni
venir en contact avec des surfaces chaudes, y compris la cuisinière.
16. Ne pas vous éloigner de la centrifugeuse lorsque celle-ci est en marche.
17. Les lames du couteau sont coupantes. Les manipuler avec soin. Ne
pas toucher aux petites lames dans le socle du panier-filtre en acier
inoxydable.
18. Ne pas approcher de la trémie, cheveux, vêtements, bijoux, spatules ou
ustensiles pendant la marche de l’appareil, afin d’éviter tout risque de
blessure grave ou d’endommagement de la machine.
19. Ne pas utiliser l’appareil si le panier-filtre pivotant ou le couvercle de la
centrifugeuse présentent des dommages ou des fissures apparentes.
Pour utiliser un appareil électroménager, vous devez toujours prendre des mesures élémentaires de sécurité pour réduire le risque
d’incendie, d’électrocution et/ou de blessure corporelle, en particulier les mesures suivantes :

18
Autres renseignements de sécurité pour les consommateurs
Cet appareil est destiné à un usage domestique uniquement.
w AVERTISSEMENT
Risque de choc électrique : Cet appareil est
fourni avec une fiche polarisée (une broche large) pour réduire le
risque d’électrocution. Cette fiche n’entre que dans un seul sens
dans une prise polarisée. Ne contrecarrez pas l’objectif sécuritaire
de cette fiche en la modifiant de quelque manière que ce soit
ou en utilisant un adaptateur. Si vous ne pouvez pas insérer
complètement la fiche dans la prise, inversez la fiche. Si elle refuse
toujours de s’insérer, faire remplacer la prise par un électricien.
La longueur du cordon installé sur cet appareil a été sélectionnée
afin de réduire les risques d’enchevêtrement ou de faux pas
causés par un fil trop long. L’utilisation d’une rallonge approuvée
est permise si le cordon est trop court. Les caractéristiques
électriques de la rallonge doivent être équivalentes ou supérieures
aux caractéristiques de l’appareil. Prendre toutes les précautions
nécessaires pour installer la rallonge de manière à ne pas la faire
courir sur le comptoir ou sur une table pour éviter qu’un enfant ne
tire sur le cordon ou trébuche accidentellement.
Pour éviter la surcharge du circuit électrique, ne pas utiliser un
autre appareil à haute puissance sur le même circuit que cet
appareil.
Le panier-filtre est délicat. Ne pas l’utiliser si’l est tordu ou
endommagé, car il pourrait se briser en petits morceaux et
occasionner des blessures ou endommager l’appareil. Composer
notre numéro d’appel sans frais de service aux clients afin de
commander un nouveau panier-filtre. Remplacer le panier-filtre
quand il montre des signes d’usure.
Cet appareil est équipé d’un dispositif contre les surcharges.
Si le moteur s’arrête pendant qu’il est en marche à cause d’une
surchauffe, débrancher et laisser refroidir l’appareil pendant
15 minutes. Rebrancher l’appareil et continuer l’opération.
w AVERTISSEMENT
Risque de déchirures.
Trémie extra-large. Ne pas introduire les mains ou les doigts
dans la trémie. Toujours utiliser le poussoir.
20. Toujours utiliser la centrifugeuse sur une surface sèche et plane.
21. Tout entretien autre que le nettoyage devrait être effectué par un centre
de service autorisé.
22. Pour réduire le risque de blessures personnelles et/ou
d’endommagement de l’appareil, ne pas utiliser un panier-filtre déformé,
bosselé ou autrement endommagé.
23. Ne pas faire fonctionner sans installer le récipient à pulpe.
24. Ne pas placer l’appareil sur ou près d’un brûleur à gaz ou électrique
chaud ou dans un four chauffé.
25. S’assurer que l’appareil est OFF ( /arrêt) avant de brancher la fiche
dans la prise de courant. Pour débrancher, tourner la commande à et
mettre à OFF ( /arrêt) puis débrancher la fiche de la prise de courant.
Pour débrancher, saisir la fiche et la retirer de la prise. Ne pas tirer sur le
cordon d’alimentation.
26. ATTENTION ! Afin d’éviter un danger découlant d’une
réinitialisation accidentelle du rupteur thermique, se dispositif ne
doit pas être alimenté par l’entremise d’un appareil de connexion
externe, comme une minuterie, ou connecté à un circuit qui est
régulièrement mis sous et hors tension par le service public.
27. N’utiliser cet appareil que pour les fonctions auxquelles il est
destiné.
CONSERVER CES INSTRUCTIONS

19
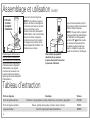
Couvercle
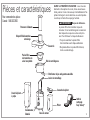
Pièces et caractéristiques
w AVERTISSEMENT
Risque de déchirures.
Le panier-filtre micromèches risque de
s’envoler s’il est endommagé et occasionner
des risques de coupures ou des ecchymo-
ses. Pour diminuer le risque de blessure :
• Toujours examiner le panier-filtre
micromèches avant chaque utilisation.
• Ne jamais utiliser un panier-filtre fissuré,
tordu ou endommagé.
Pousseur d’aliments
Panier-filtre
micromèches en
acier inoxydable
Dispositif d’alimentation
extra-large
Distributeur de jus anti-gouttes amovible
Bol de centrifugeuse
Grand récipient
à pulpe
Levier de verrouillage
Base de moteur
Pour commander des pièces :
Canada : 1.800.267.2826
Pichet
Couvercle du pichet
AVANT LA PREMIÈRE UTILISATION : Laver tous les
éléments à l’exception du socle, à l’eau savonneuse
tiède, puis les rincer et les essuyer immédiatement. Ne
jamais immerger le socle dans l’eau ou autre liquides.
La nettoyer à l’aide d’une éponge humide.
Outil de
nettoyage
Easy Sweep
MC
Commutateur
illuminé

20
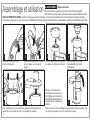
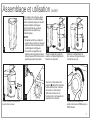
Assemblage et utilisation
7
Relever le levier de verrouillage et le passer par-dessus l’échancrure
du couvercle jusqu’à ce qu’il se verrouille en place.
AVANT LA PREMIÈRE UTILISATION : Une fois la centrifugeuse sortie de l’emballage, ôter le carton du panier-filtre et laver tous les éléments à l’exception du socle, à
l’eau savonneuse tiède, puis les rincer et les essuyer immédiatement. Ne jamais immerger le socle dans l’eau ou autre liquides. La nettoyer à l’aide d’une éponge humide.
4
6
Placer le panier-filtre en acier
inoxydable dans le bol de la
centrifugeuse.
3
Placer le bol de la centrifugeuse
au-dessus de la base du moteur.
w AVERTISSEMENT
Risque de déchirures.
Ne jamais utiliser les doigts pour pousser les aliments dans le dispositif
d’alimentation ou pour le nettoyer. Toujours utiliser le pousseur d’aliments fourni.
2
Maintenir la languette et incliner
le bec verseur vers le bas et
insérer.
1
Retourner le panier-filtre et
insérer la languette.
Placer le couvercle de la
centrifugeuse sur le bol de
centrifugeuse, en plaçant le
dispositif d’alimentation sur
le panier-filtre et abaisser en
position.
Avec les mains sur le bord extérieur, appuyer fermement sur le
panier-filtre vers le bas, afin de le verrouiller en position.
5
Panier-filtre
La page est en cours de chargement...
La page est en cours de chargement...
La page est en cours de chargement...
La page est en cours de chargement...
La page est en cours de chargement...
La page est en cours de chargement...
La page est en cours de chargement...
La page est en cours de chargement...
La page est en cours de chargement...
La page est en cours de chargement...
La page est en cours de chargement...
La page est en cours de chargement...
La page est en cours de chargement...
La page est en cours de chargement...
La page est en cours de chargement...
La page est en cours de chargement...
La page est en cours de chargement...
La page est en cours de chargement...
La page est en cours de chargement...
La page est en cours de chargement...
La page est en cours de chargement...
La page est en cours de chargement...
La page est en cours de chargement...
La page est en cours de chargement...
La page est en cours de chargement...
La page est en cours de chargement...
La page est en cours de chargement...
La page est en cours de chargement...
La page est en cours de chargement...
La page est en cours de chargement...
La page est en cours de chargement...
La page est en cours de chargement...
-
 1
1
-
 2
2
-
 3
3
-
 4
4
-
 5
5
-
 6
6
-
 7
7
-
 8
8
-
 9
9
-
 10
10
-
 11
11
-
 12
12
-
 13
13
-
 14
14
-
 15
15
-
 16
16
-
 17
17
-
 18
18
-
 19
19
-
 20
20
-
 21
21
-
 22
22
-
 23
23
-
 24
24
-
 25
25
-
 26
26
-
 27
27
-
 28
28
-
 29
29
-
 30
30
-
 31
31
-
 32
32
-
 33
33
-
 34
34
-
 35
35
-
 36
36
-
 37
37
-
 38
38
-
 39
39
-
 40
40
-
 41
41
-
 42
42
-
 43
43
-
 44
44
-
 45
45
-
 46
46
-
 47
47
-
 48
48
-
 49
49
-
 50
50
-
 51
51
-
 52
52


Hamilton Beach 67850 Mode d'emploi
- Catégorie
- Fabricants de jus
- Taper
- Mode d'emploi
dans d''autres langues
- English: Hamilton Beach 67850 User guide
- español: Hamilton Beach 67850 Guía del usuario
- português: Hamilton Beach 67850 Guia de usuario
Documents connexes
-
Hamilton Beach 67850 Manuel utilisateur
-
-
-
Hamilton Beach Big Mouth Manuel utilisateur
-
Hamilton Beach 67840 Mode d'emploi
-
-
-
-
Hamilton Beach 67801 Mode d'emploi
-