Marcum Technologies Wireless Panner Manuel utilisateur
- Taper
- Manuel utilisateur

Wireless
Camera Panner
www.MarCumtech.com
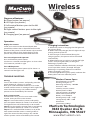
Diagram of features:
A: Power button [on panner]
B: LED light [on panner]
C: Left control button: pans to the left
[on remote]
D: Right control button: pans to the right
[on remote]
E: Charging port [on panner]
Operation:
Deploy the camera:
Lower your camera to the desired depth, then
position the cable in the u-shaped channel on the
bottom of the panner. Use the retainer clip to anchor
the camera cable in place. Open the legs of the
panner and position it above the hole in the ice.
Turn on and operate the panner:
Press and hold the power button
(A) about 3-4 seconds until the light is on. Press the C
or D button to pan left or right.
Turn o the panner:
Press and hold the power button (A) for about 3-4
seconds until the light is o.
TROUBLE SHOOTING:
Pairing:
Turn on the wireless panner, and quickly press the
power button (A) 3 times in 3 seconds.
Next, press and hold either button(C or D) on the
remote until the motor is rotating to left or right. This
means that the pairing is OK, and the wireless
panner can be controlled by this remote.
Using a new remote:
If the remote is lost, you rst must order a new
remote. Once you have a new remote:
Step 1: Turn on the wireless panner, and quickly
press the power button (A) 6 times in 6 seconds, the
LED light will turn o automatically in 10 seconds.
Step 2: Turn the wireless panner back on and quickly
press the power button (A) 3 times in 3 seconds;
Step 3: Press and hold either button(C or D) of the
new remote until the motor is rotating to left or
right. This means that the pairing is OK, and the
wireless panner can be controlled by this remote.
Charging instruction:
1. When the panner is charging, the LED light will
be pulsing slowly.
2. When it has fully charged, the LED light will stop
pulsing and always be o.
3. If the charger is disconnected during the
charging process, the panner will be turned o
automatically.
4. When the panner is working, a steady LED light
means a fully charged battery. If the light is
ickering in a pattern, the
number of ickers indicates the battery strength
out of a possible 4 levels. [Example: the light
ickering in a repeating pattern of 2 indicates
battery strength is 2 out of 4]
5. The LED light ickering very quickly indicates the
battery does not have sucient power.
Wireless Panner Specs
Work frequency: 315mHZ
Working voltage:3.7V
Receiving sensitivity: -105bBM
Distance:< 10m
Stand-by current: ≤10mA
Rotate speed: 12 RPM
Charging power: 5V/500mA
Power consumption: 0.2W
Battery: 3.7V/2200mA
Working temp:-15—+65
Storage temp:-20—+70
Dimension
227mm*62.5*50mm
MarCum Technologies
3943 Quebec Ave N
Minneapolis, MN 55427

Mode d’emploi pour Panner sans fil
www.MarCumtech.com
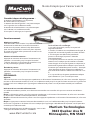
Caractéristiques du diagramme :
A: Bouton d`alimentation (sur le panner)
B: Lumière DEL (sur le panner)
C: Bouton de contrôle gauche : vue panoramiques
vers la gauche (sur la télécommande)
D: Bouton de contrôle droite : vue panoramiques
vers la droite (sur la télécommande)
E: Port pour la recharge (sur le panner)
Fonctionnement :
Déployer la caméra :
Faire descendre votre caméra à la profondeur voulue.
Positionnez le câble dans le canal en forme de U
en-dessous du panner. Utilisez le clip de maintien
pour ancrer le câble de la caméra en place. Séparez
les pattes du panner et les positionner au-dessus du
trou dans la glace.
Allumer et faire fonctionner :
Appuyez et maintenir le bouton d`alimentation (A)
pendant 3-4 secondes jusqu`à ce que la lumière
s`allume. Appuyez sur le bouton de contrôle C ou D
la vue panoramique gauche ou droite.
Éteindre le panner :
Appuyez et maintenir le bouton d`alimentation (A)
pendant 3-4 secondes jusqu`à ce que la lumière
s`éteigne.
Instructions de recharge :
1. Lors de la charge du panner, le voyant DEL
clignote lentement.
2. Une fois la batterie est complètement chargée, le
voyant DEL cessera de clignoter et restera allumée.
3. Si le chargeur est débranché pendant le
processus de charge, le panner s`éteindra
automatiquement.
4. Lorsque le panner est en marche, un voyant DEL
continue vous indique que la batterie est entière-
ment chargée. Si le voyant clignote en séquence, le
nombre de clignotements indique la puissance de
la batterie (possibilité de quatre niveaux). (Exemple
: Une séquence de deux clignotants indiquent la
puissance de la batterie a atteint un niveau de 2 sur
4.)
5. Le voyant DEL qui clignote rapidement indique
que la batterie n`a pas assez de puissance.
MarCum Technologies
3943 Quebec Ave N
Minneapolis, MN 55427
Batterie de rechange pour la télécommande – A23 12 Volt
Chargeur de batterie auxiliaire – 5V/500mA
DÉPANNAGE :
Appairer
TAllumez le panner sans l et appuyez rapidement sur le bouton d`alimentation (A) 3 fois en 3 secondes. Appuyez
ensuite sur le bouton de contrôle (C ou D) sur la télécommande jusqu`à ce que le moteur tourne vers la gauche ou
la droite. Cela vous indique que l`appairage est eectué et le panner sans l peut être contrôlé par la télécom-
mande.
Utilisation d'une nouvelle télécommande:
Si la télécommande est perdue, vous devez en commander une nouvelle. Dès que vous recevez une télécom-
mande:
Étape 1 : Allumez le panner sans l et appuyez rapidement sur le bouton d`alimentation (A) 6 fois en 6 secondes.
Le voyant DEL s`éteindra automatiquement en 10 secondes.
Étape 2 : Allumez de nouveau le panner sans l et appuyez rapidement sur le bouton d`alimentation (A) 3 fois en 3
secondes.
Étape 3 : Appuyez et maintenir le bouton de contrôle (C ou D) sur la télécommande jusqu`à ce que le moteur
tourne vers la gauche ou la droite. Cela vous indique que l`appairage a été eectué et le panner sans l peut être
contrôlé par la télécommande.
-
 1
1
-
 2
2


