Haier LE40M600SF Manuel utilisateur
- Catégorie
- Téléviseurs LCD
- Taper
- Manuel utilisateur
Ce manuel convient également à

LE48M600SF
LE40M600SF

Welcome
Important Information
01 Safety Warnings
2
2
Safety notice
Warning and cautions
3
4
Main Parameter
Base Stand Assembly Instruction
02 Introduction
5
7
Wall Mounting Installation Guidelines
Front Control Panel
8
9
Rear/Side Sockets
9
Connecting to your Haier TV
Common Interface
10
12
Remote Control
03 Remote Control
13
Teletext
14
Installation Guide
04 Operation
15
CHANNEL MENU 16
Auto Tuning (DVB-T) 16
Auto Tuning (DVB-C) 17
DTV Manual Tuning (DVB-T)
DTV Manual Tuning (DVB-C)
17
18
22
SOUND
MENU
21
TIME
MENU
21
OPTION
MENU
LOCK
MENU
EPG Menu(Electronic Program Guide)
22
21
PVR function
23
Prepare to record the program
23
Record the program
24
Play the record
24
Timeshift function
25
Prepare to record the program
25
USB Drive Storage Format
25
Record a paused DTV program
to USB storage device
25
Timeshift limitations
26
USB Player
27
Trouble shooting
05 Trouble shooting
28
PICTURE MENU 21
ATV Manual Tuning 20
Program edit
CI information
20
21
DVB-S2
18
First Time Installation
18
Satellite Managment
Program Edit
Signal Information
CI Information
EPG(Electronic program guide)
18
20
20
20
20
Specification 31
06 Specification
Auto Tuning (DVB-S2) 17

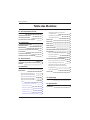
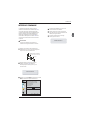
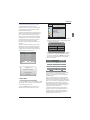
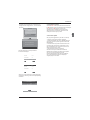
Thanks for buying this 40"/48" LED LCD TV . This guide will help you set up and
begin using your TV.
IMPOR
TANT INFORMATION
READ ALL INSTRU
CTIONS BEFORE USE AND KEEP FOR FUTURE REFERENCE.
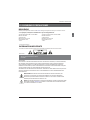
CAUTION
TO REDUCE THE RISK OF ELECTRIC SHOCK, DO NOT REMOVE COVER (OR BACK).NO USER SERVICEABLE PARTS INSIDE.
FOR ANY PROBLEMS, REFER SERVICING TO THE CUSTOMER HELP LINE. THERE IS A LIGHTNING ARROW SYMBOL IN
THE TRIANGLE: THIS SYMBOL INDICATES HIGH VOLTAGE IS PRESENT INSIDE. IT IS DANGEROUS TO MAKE ANY KIND OF
CONTACT WITH ANYINSIDE PART OF THIS PRODUCT.
THERE IS A EXCLAMATION MARK IN THE TRIANGLE: THIS SYMBOL ALERTS YOU THAT IMPORTANT LITERATURE
CONCERNING OPERATION AND MAINTENANCE HAS BEEN INCLUDED WITH THIS PRODUCT.
CAUTION:TO REDUCE THE RISK OF ELECTRIC SHOCK AND FIRE, DO NOT PUT THE TV SET NEAR
SOURCES OF HUMIDITY. DO NOT USE ANY ABRASIVE CLEANERS WHICH MAY SCRATCH OR DAMAGE
THE LCD SCREEN. AVOID CONTACT WITH OBJECTS THAT MAY SCRATCH THE LCD SCREEN.
NOTE: SERVICING THE UNIT YOURSELF IS UNAUTHORISED AND COULD LEAD TO INJURY OR PRODUCT
DAMAGE. REFER ALL SERVICING TO THE CUSTOMER HELPLINE.
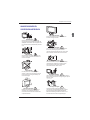
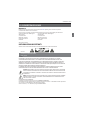
Now you can get star
ted!
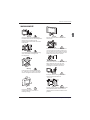
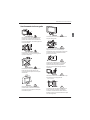
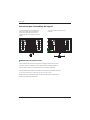
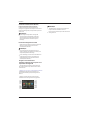
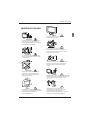
40" FULL HD 1080P Digital LED LCD TV
Remote control
Instruction Manual
Quick start guide
AAA ba x2ttery
01 Safety warnings
Stand
48" FULL HD 1080P Digital LED LCD TV
Remote control
Instruction Manual
Quick start guide
AAA ba x2ttery
Stand

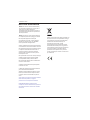
Safety notice
EN-3
Warning: To avoid any injury caused by lean
of the product, please always ensure the
whole product was placed within the table
surface in horizontal.
CAUTION:When the apparatus was in
electrostatic circumstance, it maybe
malfunction and need to reset by user.

Dim:515*320mm(不包括底座)
Warning
High voltages are used in the operation of this
television receiver. Do not remove the cabinet
back from your set. Refer servicing to qualified
service personnel.
Warning
To prevent fire or electrical shock hazard, do
not expose the television receiver to rain or
moisture.
Warning
Do not drop or push objects into the
television cabinet slots or openings. Never
spill any kind of liquid on the television
receiver.
Caution
Do not block the ventilation holes in the back
cover. Adequate ventilation is essential to
prevent failure of electrical components.
Caution
Do not trap the power supply cord under the
television receiver.
Caution
Never stand on, lean on, or suddenly push the
television or its stand. You should pay special
attention to children. Serious injury may result if
it should fall.
Caution
Do not place your television on an unstable cart,
stand, shelf or table. Serious injury to an
individual , and damage to the television, may
result if it should fall.
Caution
When the television receiver is not used for an
extended period of time, it is advisable to
disconnect the AC power cord from the AC
outlet.
Caution
If the television is to be built into a compartment
or similar enclosure, the minimum distances must
be maintained. Heat build-up can reduce the
service life of your television, and can also be
dangerous.
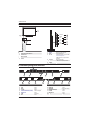
WARNING AND CAUTIONS
EN-4

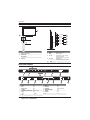
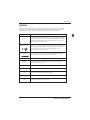
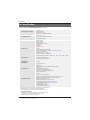
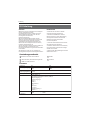
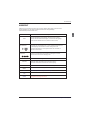
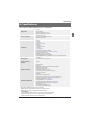
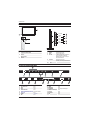
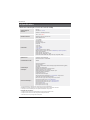
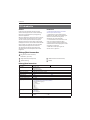
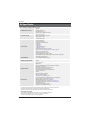
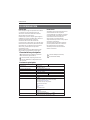
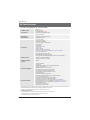
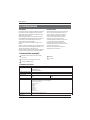
Panel
PAL-B/G ,I , D/K
PAL/SECAM/MPEG2/MPEG4/H.264
AC 100
-
240V 50/60Hz
Analog RGB(PC) x1; PC audio x1
High-Definition Multimedia Interface (HDMI) x 2
Composite Input x 1
YPbPr x 1
SCART Inputx 1
78W
40
CI x 1
USB x 1;LNB IN x1
RF Co-Ax x 1
Composite video input >=350
YPbPr >=400
Headphone x 1
TV System
Video Signal System
Input Power Voltage
Power consumption
Standby Power consumption
Audio Output Power
Signal Input
Signal output
Horizontal definition (TV line)
SECAM-B/G , D/K , L ,
≤0.50W
DVB-T, DVB-C,DVB-S2
INSTALLATIONCAUTION
*Locate the TV in the room where light does
not strike the screen directly.
*Total darkness or a reflection on the picture
screen can cause eyestrain. Soft and indirect
lighting is recommended for comfortable
viewing.
*Allow enough space between the TV and the
wall to permit ventilation.
*Avoid excessively warm locations to prevent
possible damage to the cabinet or premature
component failure.
*Do not cover the ventilation openings when
using theTV.
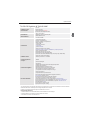
Main parameter
Main features
4 NICAM;
5 T ;ime-shift
3
HDMI interface and SCART
Interface;
High luminance, wide viewing
angle;
2
Used as Television, display terminal,
PC display;
1
Never tamper with any components inside the
TV, or any other adjustment controls not
described in this manual. All LED-TV's are high
voltage electrical equipment.
When you clean dust or any water drops off the
SCREEN or CABINET or around any of the
buttons or connectors, the power cabled should
be removed from the power socket. Wipe the TV
with a soft, dry, dust free cloth.
During thunderstorms, unplug the power cable
and aerial / antenna cable to prevent damage to
your TV and any other devices connected to it.
All repairs to this TV should only be performed
by qualified TV service
personnel.
02 Introdution
Introduction
EN-5
5000(DVB-S2);510(DTV);100(ATV)Storage channel number
SCART Output x 1
COAXIAL Output x 1
48
88W
2x10W

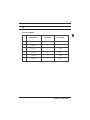
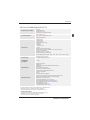
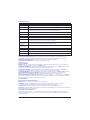
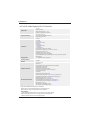
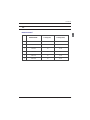
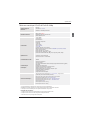
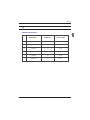
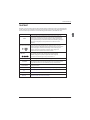
SUPPORTED MODE
PC
3
5
1024x768
1280x1024
60
60
1
640x480
60
31.47
2
800x600
60
37.88
48.36
63.98
RESOLUTION
V.Freq.(Hz) H.Freq.(KHz)
4
1366x768
60
47.7
Introduction
EN-6
6
1920x1080
60
66.64

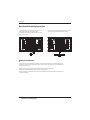
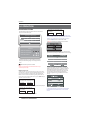
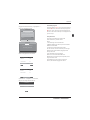
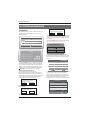
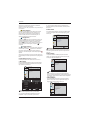
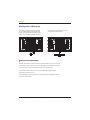
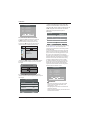
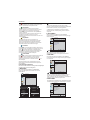
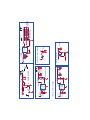
Base Stand Assembly Instruction
1. Place the TV with the display side down on a
flat surface. Use a cloth to protect the
display.Position the stand base pillar onto the
bottom of the TV.
2. Attach the stand base plate to the stand pole
by firmly tightening the supplied screws.
INSTALLATION NOTES
Locate the TV in a room where light does not strike the screen directly. Total darkness or a
reflection on the screen can cause eyestrain. Soft and indirect lighting is recommended for
comfortable viewing.
Allow enough space between the TV and the wall to permit ventilation.
Avoid excessively warm locations to prevent possible damage to the cabinet or premature
component failure.
Please do not attempt to rotate the TV on the stand.
Introduction
EN-7

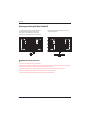
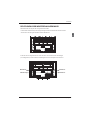
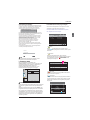
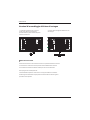
WALL MOUNTING INSTALLATION GUIDELINES
2.Use the four screws provided to fix the TV onto a wall mounting bracket (not included)
via the four VESA standard holes on the back of the television.
Introduction
EN-8
This television can be wall mounted as follows:
1.Place the LED LCD Television onto a solid surface. Please place some soft material over the front of
the screen to protect it from any damage.
M6X8mm
M6X8mm
100mm
200mm
M6X8mm
M6X8mm

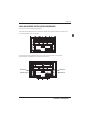
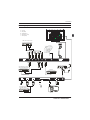
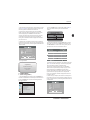
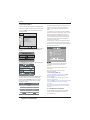
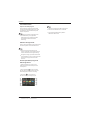
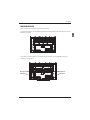
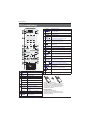
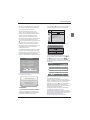
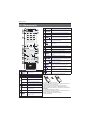
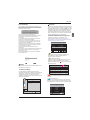
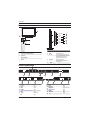
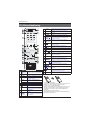
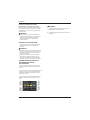
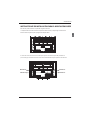
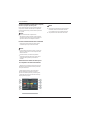
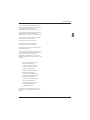
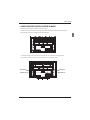
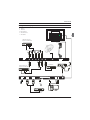
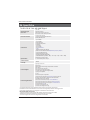
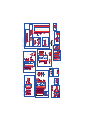
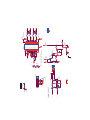
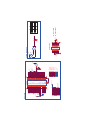
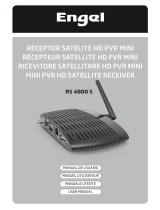
Rear/Side Sockets
1
2
3
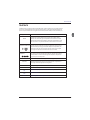
Remote control sensor.
Indicator LED:
RED: STANDBY.
Key board.
1
SOURCE
Display the input source menu.
MENU
Display main MENU.
3
4
CH+/CH-
In TV mode,press CH+ or CH- to change
the channel up and down.
In MENU, press CH+ or CH- to select items .
STANDBY
2
VOL+/VOL-
Adjust sound level.
In MENU,adjust the item that you selected.
5
Introduction
Front control panel
EN-9
SOURCE
MENU
CH+
CH-
VOL+
VOL-
STANDBY
1
2
3
4
5
3
2
30 30
1
≤8m
AC-INPUT
100-240V~50/60Hz
VIDEO/Y Pb Pr L R
DIGITAL AUDIO OUTPUT
(COAXIAL)
SCARTLNB IN
R F
VGA
PC AUDIO
COMMON INTERFACE(CI)
HEADPHONE
HDMI1(ARC)
HDMI2USB
1
VIDEO
2
input
3
L/R AUDIO
input
4
input
5
digital audio output
input
10
PC AUDIO
input
11
HEADPHONE analogue audio output
12
YPbPr
input
13
14
input
15
input
3
1
7
8 9
10
11
14
AC Power Source
DIGITAL AUDIO OUTPUT(COAXIAL)
6
input
LNB IN
HDMI1(ARC)
COMMON INTERFACE(CI)
VGA INPUT
ANT
input
4
5 6
2
12
13 15
7
input/output
SCART
8
input
USB
9
input
HDMI2

Introduction
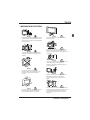
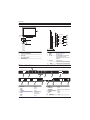
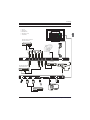
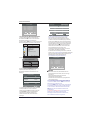
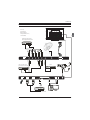
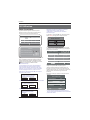
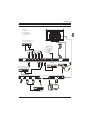
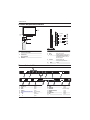
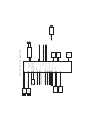
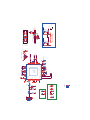
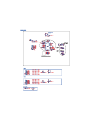
Connecting to your Haier TV
RY W
Audio/Video machine
with HDMI interfaces
CVBS, DVD Player or other
machine with CVBS/S-Video.
G Green (Y)
B Blue (Pb/Cb)
W White(AUDIO-L )
R Red (AUDIO-R, Pr/Cr)
Y Yellow (VIDEO)
CVBS, DVD Player or other
machine with YPbPr/YCbCr.
R F
VGA
PC AUDIO
COMMON INTERFACE(CI)
HEADPHONE
HDMI1(ARC)
HDMI2USB
GRB RW
Amplifier
AC-INPUT
100-240V~50/60Hz
VIDEO/Y Pb Pr L R
DIGITA L AUDI O OU TP UT
(COAXIAL)
SCART
CAUTION
RISK
OF
ELECTRIC
SHOCK
!
DO
NOT
OPEN
!
ATTENTION
RISQUE
DE
CHOC
ELECTRIQUE
!
NE
PAS
OUVRIR
!
EN-10
LNB IN

EN-11
Introduction
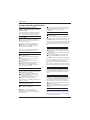
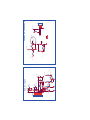
Connecting a DVD player / Satellite / cable
set top box receiver / games console / PC or
Laptop
There are several options to connecting a DVD
player / Satellite or Cable set top box receiver /
games console / PC or Laptop to your TV.
Option 1 SCART
Connect a SCART cable (not supplied)
from the SCART socket on the TV to the DVD
player cable set top box receiver or
games consol.
To select the device connected with the
SCART cable press the SOURCE button on the
remote and use the▼▲keys to select SCART
and press the OK button.
Note: The TV will default to the SCART
connection when the TV is switched on.
Option 2 HDMI
If the device you want to connect to the
is switched on, switch off the device first.
Connect a HDMI cable (not supplied) from
the HDMI socket on the TV to the DVD player cable
receiver or games consol.
Switch on the device you have just
connected to the TV
To select the device connected with the
HDMI cable press the SOURCE button on the
remote and use the▼▲keys to select HDMI and
press the OK button.
Option 3 AV Audio Visual
(Yellow/White/Red)
Make sure that both TV and the device are
switched off before connecting.
Connect the AV cables (not supplied) from
the Video (yellow) and Audio (white, red)
sockets on the TV to the DVD player or games
console etc.
To select the device connected with the
AV cable press the SOURCE button on the
remote and use the▼▲keys to select AV and
press the OK button.
Option 4 COMPONENT
(Green/Blue/Red)+(White/Red)
Make sure that both TV and the device are
switched off before connecting.
TV
Connect the cables (not supplied) from the
COMPONENT IN sockets Y, Pb, Pr (green,
blue, red) and L-Audio-R (white, red) on the TV
to the DVD player or games console etc.
To select the device connected with the
COMPONENT cable press the SOURCE button on the
remote and use the keys to select and
▼▲ YPbPr
press the OK button.
Option 5 VGA (15pin Sub-D)
Connect a VGA cable (not supplied) from the
VGA socket on the TV to the PC / Laptop.
To select the PC / Laptop connected with the
VGA cable press the SOURCE button on the
remote and use the keys to select PC and
▼▲
press the OK button.
Note VGA is video only. For audio from your
PC/Laptop you need to connect a separate
cable from the PC Audio (3.5mm jack) to the
headphone socket on you PC/Laptop (3.5mm
jack)
Option 6 USB
Most USB sticks can be connected to your TV
and some digital cameras may also work.
Connect USB stick (not supplied) or a USB
cable (not supplied) to the TV.
To select the USB device connected to the TV,
press the SOURCE button on the remote and
use the keys to select USB and press the
▼▲
OK button.
Note1:Only *.jpg and *.mp3 files will work,
other file types are not guaranteed and may not.
Note 2. Apple iPhones and iPods are not
compatible with your TV.
Note 3. When connecting any device to the USB
connection, keep the USB cable length as short
as possible.
Option 7 HEADPHONE OUTPUT
Insert the plug of the earphone into the headphone
socket on the TV. The TV speakers are now muted.
Alternatively you can also plug in external speakers if
required.
Option 8 DIGITAL AUDIO OUTPUT(COAXIAL)
COAXIAL is a digital audio connection used to
connect audio equipment, for example home
theatres and other digital HiFi systems over
short distances. The signal is transmitted over
either a coaxial cable with RCA connectors.
Make sure that both TV and the device are
switched off before connecting.
Connect the AV cables (not supplied) from
the socket on the TV to the Home Theater COAXIAL
sound system or digital HiFi system etc.
Connecting to your Haier TV
Option 9 LNB INPUT
Connect the satallite cable with the LNB Port on the
back.
After that, you can turn on the engine. Press “Source”
to switch into the DVB-S2 mode and start the channel
search.

EN-12
The common interface (CI) slot is designed to
accept the conditional Access (CA) Module and
Smart card in order to view the pay TV
programmes and additional services.
Contact your Common Interface service provider
to get more information about the modules and
subscription.
Please noted that CA modules and smart cards
are neither supplied nor optional accessories
from us.
COMMON INTERFACE
Introduction
CHANNEL
PICTURE
SOUND
TIME
OPTION
LOCK
Auto Tuning
ATV Manual Tuning
Programme Edit
Signal Information
DTV Manual Tuning
Software Update(USB)
CI Information
OK
OK
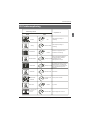
BACK MOVE OK
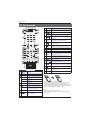
MENU

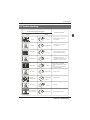
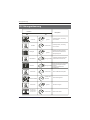
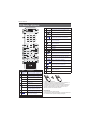
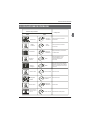
Press to turn the TV on or off.
(Power)
S.MODE
Press to select the sound mode.
P.MODE
Press to select the picture mode.
0-9
Press to enter a channel number
or password.
Q.VIEW
Press to switch to the last viewed
channel.
SLEEP
Press to set the sleep timer.
VOL +/-
Press to adjust the volume level.
(Mute)
Press to turn the sound on or off.
AUDIO(I/II)
Press to select Mono,Nicam stereo
for ATV channel.Select Audio
language for DTV channel.
SUBTITLE
Press to turn the subtitle on or off.
Press to open a favorite channel
list.In teletext mode,press to
hold a page.
03 Remote Control
Remote Control
EN-13
SCREEN
Press to change picture aspect ratio.
Press to open the on-screen menu.In teletext
mode,press to open the INDEX page.
Press to navigate the on-screen menu.
Press to confirm a selection.OK
Press to return to the previous screen.In teletext
mode,press to enter mix mode.
(reverse)
(forward)
Press to fast forward or reverse
playbadk in multimedia mode.
In teletext mode,press to open or close teletext page.
SOURCE
Press to open the input source list.
No function.
P
Press to change the channel.
Press to display the channel information.
In teletext mode,press to revealthe hidden
information.
Press to open the channel list.In teletext mode,
press to switch the image to top,bottom or full.
3D WORLD
These models do not support 3D feature.
Press to close the on-screen menu.In teletext
mode,press to hide the text.
16
17
18
19
20
21
22
23
24
25
26
Press to select previous or next file.
(previous)
(next)
Press to stop multimedia playback.
GUIDE
Press to display electronic programme guide
in TV mode. Press to enter the teletext subpage.
(REC)
Press to record the TV program you are watching
in DTV mode.
Press to play/pause in multimedia mode.(play/pause)
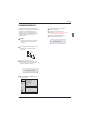
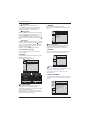
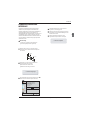
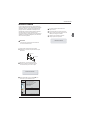
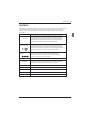
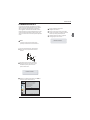
Insert Batteries into the Remote Control
1. Remove the battery cover.
2. Inserting the 2 AAA 1.5V batteries making sure the polarity
(+ or -) of the batteries matches the polarity marks inside the unit.
3. Mount the battery cover. Replace with new batteries when the
TV set begins to show the following symptoms:Operation is
unsteady or erratic. Sometimes the TV set does not function
with Remote Control Unit.
Remark:
1) Alkaline Battery Recommeded.
2) Remove batteries when they are exhausted or if the remote
control is not to be used for long time.

EN-14
E
TEXT
SELECTING A PAGE
DIRECT ACCESS
TO THE ITEMS
INDEX
SUB PAGE
HOLD
REVEAL
Press:
You will obtain :
TELETEXT
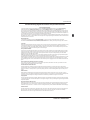
Enter the number of the page required using the 0 to 9 up/down. Example:
page 120, enter 120. The number is displayed top left, the counter turns and
then the page is displayed. Repeat this operation to view another page. If
the counter continues to search, this means that the page is not
transmitted. Select another number.
Coloured are as are displayed at the bottom of the screen. The 4 coloured
keys are used to access the items or corresponding pages. The coloured
areas flash when the item or the page is not yet available.
This returns to the contents page (usually page 100).
Certain pages contain sub-pages which are automatically displayed
successively. This key is used to stop or resume sub-page acquisition.
The indication appears top left.
To freeze the page.
To display or hide the concealed information (games solutions).
This is used to call or exit teletext modes. The summary appears with a list
of items that can be accessed. Each item has a corresponding 3 digit page
number. If the channel selected does not broadcast teletext, the indication
100 will be displayed and the screen will remain blank (in this case, exit
teletext and select another channel).
Teletext is an information system broadcast by certain channels which can be consulted like
a newspaper. It also offers access to subtitles for viewers with hearing problems or who are
not familiar with the transmission language(cable networks, satellite channels, etc.)
Remote Control
Teletext,program,image are displayed together.
MIX
Exit the teletext.
EXIT
Switch the image to top,bottom,full.
SIZE

Operation
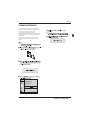
04 OPERATION
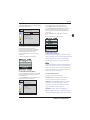
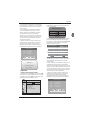
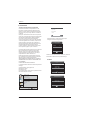
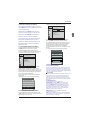
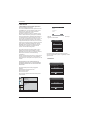
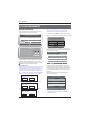
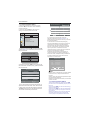
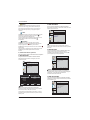
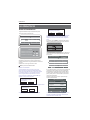
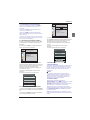
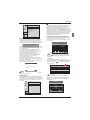
The installation guide only appear when the TV first time
turn on or reset to factory set.
Installation Guide
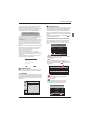
1).Press the ▲▼ buttons to navigate the menu and
change the settings. Press the OK button to confirm.
Select your desired language to be displayed on the
menu.
2). Press the buttons to select DVB-T/DVB-
C/ and then press the OK button to confirm.
▲▼
DVB-S2
a. If you select DVB-T, the next step is to select the Tune
type and country then press the OK button to start tuning.
b. If you select DVB-C, the next step is to config the
DVB-C system like (scan type / Frequency/ Network
ID/Symbol(KS/S) then press OK button to into the
tune type and country select menu, this step is the
same as DVB-T, select the tune type (DTV/ATV).
Choose the right country, press OK button to start
tuning.
Note: The default password is 0000.
EN-15
OK
Greece
Nederlands
Germany
Portugal
Poland
Italy
Hungary
Luxembourg
Norway
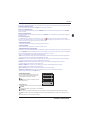
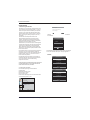
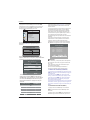
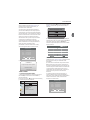
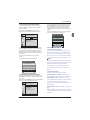
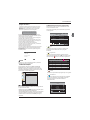
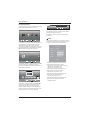
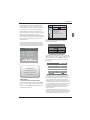
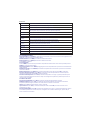
HOME or Shop modes
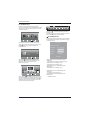
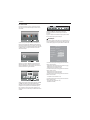
1.When the unit is turn on for the very first time, it will show
Initialization set-up menu. After the OSD language is set, the
user can choose between "shop mode" and "home mode".
When the screen shows the following setting menu and the
cursor stays on the "home mode" choice, press
◀▶ to adjust,
and "OK" to enter the menu.
Select the usage mode?
shop mode is for shop usage only.
Shop mode
Home mode
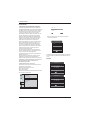
If "Shop mode" is choosen, the following menu will displayed.
Are you sure to change to
Shop mode?
OK
Cancel
Press "OK" to enter the next prompt menu
Shop mode is the most energy mode.
OK
Cancel
Continue?
Choose "Cancel" to go back to the Initialization set-up
menu, and the cursor will stay at the "home mode"choice.
choose it to go the next menu to choose the country.
Password
Please enter old password
Please enter new password
Confirm new password
Please select an OSD language
OK
English
French
Italiano
Spanish
Deutsch
Nederlands
Portuguese
Polski
Greek
Russian
Czech
Magyar
Romanian
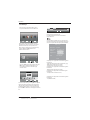
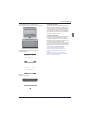
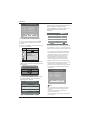
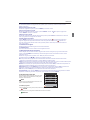
c. If you select DVB-S2, you may select to load default
DVB-S2 channel list or select to start a new channel
search.
DVB-S2
Note:
There are no recording and timeshift functions if you
choose Italy in this step.

Operation
EN-16
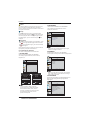
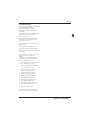
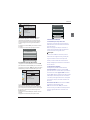
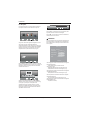
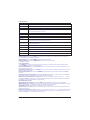
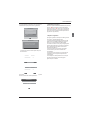
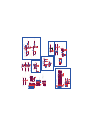
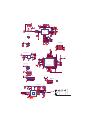
1. 1)Auto Tuning (DVB-T)
1. CHANNEL MENU
Programme(s)
Programme(s)
Programme(s)
Programme(s)
1
ATV
CHANNEL
PICTURE
SOUND
TIME
OPTION
LOCK
Auto Tuning
ATV Manual Tuning
Programme Edit
Signal Information
DTV Manual Tuning
Software Update(USB)
CI Information
OK
OK
BACK MOVE OK
MENU
1). Press the MENU button and then press the buttons
to select the CHANNEL menu and then press the OK button.
▼▲
2). Press the buttons to select Auto Tuning and then
press the OK button.
▼▲
6) Congratulations
Congratulations!!!
Completed Initial Quick Setup.
Enjoy your Haier TV
Press OK to Exit
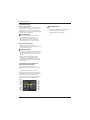
3). Press the buttons to select DVB-T/DVB-C/
Press select DVB-T and then press the OK button to
confirm.
▼▲ DVB-S2
4). In the Tune Type menu, press the buttons to select
ATV / DTV / DTV + ATV. Press the button and then press
the buttons to select the country where you will
operate the TV. Press the OK button to confirm
◀▶
▼
◀▶▼▲
5). After tuning is complete, the channels are arranged in a
preset order. If you wish to skip channels, modify the preset
order or rename channels, select
Programme Edit under the
Channel menu.
OK
Greece
Nederlands
Germany
Portugal
Poland
Italy
Hungary
Luxembourg
Norway
5). Channel tuning will commence. This operation may take
up to minutes. The display will show the progress of
the tuning and the number of channels found.
6). If you want to skip the ATV tuning, press the MENU
button to interrupt the tuning half way. A pop-up screen
will be displayed, press the◀button to select YES to
confirm. You will then go straight to DTV tuning. You may
repeat the above step if you also want to skip the DTV
tuning. An installation reminder will appear the next time
you turn on the TV.
7). After tuning is complete, the channels are arranged in a
preset order. If you wish to skip channels, modify the preset
order or rename channels, select P
rogramme Edit under the
channel menu.
some
Programme(s)
Programme(s)
Programme(s)
Programme(s)
1
ATV
DVB-S2
3). Channel tuning will commence. This operation may take
up to The display will show the progress of
the tuning and the number of channels found.
4). If you want to skip the ATV tuning, press the MENU
button to interrupt the tuning half way. A pop-up screen
will be displayed, press the button to select YES to
confirm. You will then go straight to DTV tuning. You may
repeat the above step if you also want to skip the DTV
tuning. An installation reminder will appear the next time
you turn on the TV.
some minutes.
◀

Operation
EN-17
3). Press the▼▲buttons to select DVB-T/DVB-C/ .
Press select DVB-C and then press the OK button to
confirm.
4). Press buttons to select Scan type/Symbol (Ks/S)
press the OK button to confirm.
5). In the Tune Type menu, press the buttons to
select ATV / DTV / DTV + ATV. Press the button
and then press the buttons to select the
country where you will operate the TV. Press the
OK button to confirm.
DVB-S2
▼▲
◀▶
▼
◀▶▼▲
OK
Greece
Nederlands
Germany
Portugal
Poland
Italy
Hungary
Luxembourg
Norway
6). Channel tuning will commence. This operation may
take up to The display will show the
progress of the tuning and the number of channels
found.
7). If you want to skip the ATV tuning, press the MENU
button to interrupt the tuning half way. A pop-up screen
will be displayed, press the◀button to select YES to
confirm. You will then go straight to DTV tuning. You
may repeat the above step if you also want to skip the
DTV tuning. An installation reminder will appear the
next time you turn on the TV.
8). After tuning is complete, the channels are arranged
in a preset order. If you wish to skip channels, modify
the preset order or rename channels, select P
rogramme
Edit under the channel menu.
some minutes.
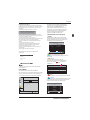
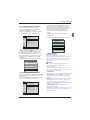
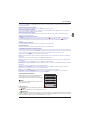
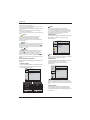
2. 1 ) DTV Manual Tuning (DVB-T)
All the channels including ATV, DTV and Radio
can be tuning by one time,if the Tune Type is
DTV+ATV .
All the stored channels will be disappear after
auto tuning .
After auto tuning , the channel will skip to
the first DTV channel.
1). Press the MENU button and then press the▼▲
buttons to select the CHANNEL menu and then
press the OK button.
Programme(s)
Programme(s)
Programme(s)
Programme(s)
1
ATV
1.3 Auto Tuning (DVB-S2)
2). Press the▼▲ buttons to select Auto Tuning and
then press the OK button.
3). Press the ▼▲ buttons to select DVB-T/DVB-C/DVB-S2,
Press select DVB-S2 and then press the OK button
to confirm.
4). Press BLUE key to start a new channel search; Press
Exit key to skip the channel search to load the default
channel list.
1). Press the MENU button and then press the
▼▲
buttons to select the CHANNEL menu and then
press the OK button.
DVB-S2
1.2 )Auto Tuning (DVB-C)
2). Press the▼▲buttons to select Auto Tuning and then
press the OK button.
1). Press the MENU button and then press the▼▲ buttons
to select the CHANNEL menu and then press the OK button.
CHANNEL
PICTURE
SOUND
TIME
OPTION
LOCK
Auto Tuning
ATV Manual Tuning
Programme Edit
Signal Information
CADTV Manual Tuning
Software Update(USB)
CI Information
OK
OK
BACK MOVE OK
MENU

Operation
EN-18
4). Press the MENU button to return back to the
main menu.
5). Press the EXIT button to exit the menu.
2. 2 )DTV Manual Tuning (DVB-C)
3). The DTV Manual Tuning screen will pop up.
Press the◀▶buttons to select the desired UHF
channel and then press the OK button to
commence the search of that channel. When the
signal has been tuned, the picture and signal
strength will be displayed on the screen.
1). Press the MENU button and then press the
buttons to select the CHANNEL menu and then
press the OK button.
2). Press the buttons to select CADTV Manual
Tuning and then press the OK button.
▼▲
▼▲
490000
16
NO SIGNAL
D
CHANNEL
PICTURE
SOUND
TIME
OPTION
LOCK
Auto Tuning
ATV Manual Tuning
Programme Edit
Signal Information
DTV Manual Tuning
Software Update(USB)
CI Information
OK
OK
BACK MOVE OK
MENU
CHANNEL
PICTURE
SOUND
TIME
OPTION
LOCK
Auto Tuning
ATV Manual Tuning
Programme Edit
Signal Information
CADTV Manual Tuning
Software Update(USB)
CI Information
OK
OK
BACK MOVE OK
MENU
2). Press the▼▲buttons to select DTV Manual Tuning
and then press the OK button.
3). The CADTV Manual Tuning screen will pop up.
Press the▼▲buttons to select(Frequency /Symbol
(ks/s/QAM Type QAM) press the OK button to commence
the search of that channel. When the signal has been
tuned, the picture and signal strength will be displayed
on the screen.
4). Press the MENU button to return back to the main
menu.
5). Press the EXIT button to exit the menu.
3.DVB-S2 Operation
3.1First Time Installation
Please press the source button to enter input menu
and use/ direction buttons to select DVB-S2 and press
OK key to confirm. The Channel List for ASTRA is
already installed. You are now ready to watch TV.
If you are using different satellites please follow the
system settings instructions to set up the satellite.
If you are using more than one Satellite you need to
assign the satellites the correct DiSEqC-LNB that is
used in your satellite installation.
3.2 Satellite Managment
Configure the settings of satellites.
Satellites' list: Press to select a satellite,
whose settings will be shown at right side.
LNB Type: Press
◀ /▶/OK to show the list of LNB
Types which is shown as frequencies of local
oscillator. You also can enter frequency by User
Single, User Dual at bottom of the list.
LNB Power: Press
◀ /▶to set the LNB power.
22K: Press
◀ /▶to switch on or off the 22K,which is
set with auto when LNB Type is dual local oscillator.
▼/▲

Operation
Toneburst: Enable or Disable the toneburst switcher.
DiSEqC1.0:
DiSEqC1.1:
Motor:
DiSEqC1.2:
DiSEqC1.3:
Motor Settings:
Select the right port up to 4 for the right LNB.
Select the right port up to 16 for the right LNB.
Press LEFT/RIGHT to select DiSEqC1.2 or DiSEqC1.3. Then Press OK to
show the menu to set position.
Move the motor to a right position to lock the signal.
Move the motor according to the local and satellite positions.
Select DiSEqC and press OK to open.
Move Auto:
Move Continue:
Move Step[1]:
Store Position:
Goto Position:
Goto Reference:
Press LEFT/RIGHT to start to move West/East. It will be stopped
automatically when the signal is locked.
Press LEFT/RIGHT to start to move West/East. It will keep moving until you stop it.
Press LEFT/RIGHT to move just a step.
Store current position of motor.
Press LEFT/RIGHT to goto the position stored.
Rest all the positions.
Goto X: Goto the position calculated from the local and satellite positions.
3.2.1 Satellite settings
Add satellites: Press RED to add a new satellite, in which you must input an unique longitude, and edit the
satellite's name with soft keyboard.
Edit satellites: Press GREEN to edit the focused satellite.
Delete satellite: Press YELLOW to delete the focused satellite.
Press OK to confirm.
3.2.2 Transponder
Press GUIDE to switch the list to show transponders of the focused satellite. Also you can press GUDIE to switch
back to satellites' list.
Add transponder:
Press RED to add a new transponder. It can't save an existing TP under the same satellite.
Edit transponder:
Press GREEN to edit the focused transponder. It can't save an existing TP under the same satellite.
Delete transponder:
Press YELLOW to delete the focused transponder. Press OK to confirm.
Single Transponder Scan:
Press BLUE to pop the menu of scanning setting. After configuring the settings, Press OK to start scanning.
Multi-Transponder Scan:
Press OK to select transponders with the mark”√",then press BLUE to pop the menu of scanning setting. After
Configuring the settings, press OK to start multi-transponder scanning.
3.2.3 Channel search
Single Satellite Scan:
Press BLUE to pop the menu of scanning settings.
Scan Mode: Press
◀/▶ to select default, which scan the default transponders built in, Blind Scan and NetWork,
which scan with NIT on.
Crytped: Press
◀/▶to select All Channels or FTA Channels;
Service Type: Press
◀/▶to select ALL , DTV or Radio.Press OK to start scanning with the above settings.
Multi-Satellites Scan:
Press OK to select satellites with the mark “√" ,then press BLUE to pop the menu of scanning setting. After
Configuring like single satellite scan, press OK to start multi-satellites scan.
EN-19
La page est en cours de chargement...
La page est en cours de chargement...
La page est en cours de chargement...
La page est en cours de chargement...
La page est en cours de chargement...
La page est en cours de chargement...
La page est en cours de chargement...
La page est en cours de chargement...
La page est en cours de chargement...
La page est en cours de chargement...
La page est en cours de chargement...
La page est en cours de chargement...
La page est en cours de chargement...
La page est en cours de chargement...
La page est en cours de chargement...
La page est en cours de chargement...
La page est en cours de chargement...
La page est en cours de chargement...
La page est en cours de chargement...
La page est en cours de chargement...
La page est en cours de chargement...
La page est en cours de chargement...
La page est en cours de chargement...
La page est en cours de chargement...
La page est en cours de chargement...
La page est en cours de chargement...
La page est en cours de chargement...
La page est en cours de chargement...
La page est en cours de chargement...
La page est en cours de chargement...
La page est en cours de chargement...
La page est en cours de chargement...
La page est en cours de chargement...
La page est en cours de chargement...
La page est en cours de chargement...
La page est en cours de chargement...
La page est en cours de chargement...
La page est en cours de chargement...
La page est en cours de chargement...
La page est en cours de chargement...
La page est en cours de chargement...
La page est en cours de chargement...
La page est en cours de chargement...
La page est en cours de chargement...
La page est en cours de chargement...
La page est en cours de chargement...
La page est en cours de chargement...
La page est en cours de chargement...
La page est en cours de chargement...
La page est en cours de chargement...
La page est en cours de chargement...
La page est en cours de chargement...
La page est en cours de chargement...
La page est en cours de chargement...
La page est en cours de chargement...
La page est en cours de chargement...
La page est en cours de chargement...
La page est en cours de chargement...
La page est en cours de chargement...
La page est en cours de chargement...
La page est en cours de chargement...
La page est en cours de chargement...
La page est en cours de chargement...
La page est en cours de chargement...
La page est en cours de chargement...
La page est en cours de chargement...
La page est en cours de chargement...
La page est en cours de chargement...
La page est en cours de chargement...
La page est en cours de chargement...
La page est en cours de chargement...
La page est en cours de chargement...
La page est en cours de chargement...
La page est en cours de chargement...
La page est en cours de chargement...
La page est en cours de chargement...
La page est en cours de chargement...
La page est en cours de chargement...
La page est en cours de chargement...
La page est en cours de chargement...
La page est en cours de chargement...
La page est en cours de chargement...
La page est en cours de chargement...
La page est en cours de chargement...
La page est en cours de chargement...
La page est en cours de chargement...
La page est en cours de chargement...
La page est en cours de chargement...
La page est en cours de chargement...
La page est en cours de chargement...
La page est en cours de chargement...
La page est en cours de chargement...
La page est en cours de chargement...
La page est en cours de chargement...
La page est en cours de chargement...
La page est en cours de chargement...
La page est en cours de chargement...
La page est en cours de chargement...
La page est en cours de chargement...
La page est en cours de chargement...
La page est en cours de chargement...
La page est en cours de chargement...
La page est en cours de chargement...
La page est en cours de chargement...
La page est en cours de chargement...
La page est en cours de chargement...
La page est en cours de chargement...
La page est en cours de chargement...
La page est en cours de chargement...
La page est en cours de chargement...
La page est en cours de chargement...
La page est en cours de chargement...
La page est en cours de chargement...
La page est en cours de chargement...
La page est en cours de chargement...
La page est en cours de chargement...
La page est en cours de chargement...
La page est en cours de chargement...
La page est en cours de chargement...
La page est en cours de chargement...
La page est en cours de chargement...
La page est en cours de chargement...
La page est en cours de chargement...
La page est en cours de chargement...
La page est en cours de chargement...
La page est en cours de chargement...
La page est en cours de chargement...
La page est en cours de chargement...
La page est en cours de chargement...
La page est en cours de chargement...
La page est en cours de chargement...
La page est en cours de chargement...
La page est en cours de chargement...
La page est en cours de chargement...
La page est en cours de chargement...
La page est en cours de chargement...
La page est en cours de chargement...
La page est en cours de chargement...
La page est en cours de chargement...
La page est en cours de chargement...
La page est en cours de chargement...
La page est en cours de chargement...
La page est en cours de chargement...
La page est en cours de chargement...
La page est en cours de chargement...
La page est en cours de chargement...
La page est en cours de chargement...
La page est en cours de chargement...
La page est en cours de chargement...
La page est en cours de chargement...
La page est en cours de chargement...
La page est en cours de chargement...
La page est en cours de chargement...
La page est en cours de chargement...
La page est en cours de chargement...
La page est en cours de chargement...
La page est en cours de chargement...
La page est en cours de chargement...
La page est en cours de chargement...
La page est en cours de chargement...
La page est en cours de chargement...
La page est en cours de chargement...
La page est en cours de chargement...
La page est en cours de chargement...
La page est en cours de chargement...
La page est en cours de chargement...
La page est en cours de chargement...
La page est en cours de chargement...
La page est en cours de chargement...
La page est en cours de chargement...
La page est en cours de chargement...
La page est en cours de chargement...
La page est en cours de chargement...
La page est en cours de chargement...
La page est en cours de chargement...
La page est en cours de chargement...
La page est en cours de chargement...
La page est en cours de chargement...
La page est en cours de chargement...
La page est en cours de chargement...
La page est en cours de chargement...
La page est en cours de chargement...
La page est en cours de chargement...
La page est en cours de chargement...
La page est en cours de chargement...
La page est en cours de chargement...
La page est en cours de chargement...
La page est en cours de chargement...
La page est en cours de chargement...
La page est en cours de chargement...
La page est en cours de chargement...
La page est en cours de chargement...
La page est en cours de chargement...
La page est en cours de chargement...
La page est en cours de chargement...
La page est en cours de chargement...
-
 1
1
-
 2
2
-
 3
3
-
 4
4
-
 5
5
-
 6
6
-
 7
7
-
 8
8
-
 9
9
-
 10
10
-
 11
11
-
 12
12
-
 13
13
-
 14
14
-
 15
15
-
 16
16
-
 17
17
-
 18
18
-
 19
19
-
 20
20
-
 21
21
-
 22
22
-
 23
23
-
 24
24
-
 25
25
-
 26
26
-
 27
27
-
 28
28
-
 29
29
-
 30
30
-
 31
31
-
 32
32
-
 33
33
-
 34
34
-
 35
35
-
 36
36
-
 37
37
-
 38
38
-
 39
39
-
 40
40
-
 41
41
-
 42
42
-
 43
43
-
 44
44
-
 45
45
-
 46
46
-
 47
47
-
 48
48
-
 49
49
-
 50
50
-
 51
51
-
 52
52
-
 53
53
-
 54
54
-
 55
55
-
 56
56
-
 57
57
-
 58
58
-
 59
59
-
 60
60
-
 61
61
-
 62
62
-
 63
63
-
 64
64
-
 65
65
-
 66
66
-
 67
67
-
 68
68
-
 69
69
-
 70
70
-
 71
71
-
 72
72
-
 73
73
-
 74
74
-
 75
75
-
 76
76
-
 77
77
-
 78
78
-
 79
79
-
 80
80
-
 81
81
-
 82
82
-
 83
83
-
 84
84
-
 85
85
-
 86
86
-
 87
87
-
 88
88
-
 89
89
-
 90
90
-
 91
91
-
 92
92
-
 93
93
-
 94
94
-
 95
95
-
 96
96
-
 97
97
-
 98
98
-
 99
99
-
 100
100
-
 101
101
-
 102
102
-
 103
103
-
 104
104
-
 105
105
-
 106
106
-
 107
107
-
 108
108
-
 109
109
-
 110
110
-
 111
111
-
 112
112
-
 113
113
-
 114
114
-
 115
115
-
 116
116
-
 117
117
-
 118
118
-
 119
119
-
 120
120
-
 121
121
-
 122
122
-
 123
123
-
 124
124
-
 125
125
-
 126
126
-
 127
127
-
 128
128
-
 129
129
-
 130
130
-
 131
131
-
 132
132
-
 133
133
-
 134
134
-
 135
135
-
 136
136
-
 137
137
-
 138
138
-
 139
139
-
 140
140
-
 141
141
-
 142
142
-
 143
143
-
 144
144
-
 145
145
-
 146
146
-
 147
147
-
 148
148
-
 149
149
-
 150
150
-
 151
151
-
 152
152
-
 153
153
-
 154
154
-
 155
155
-
 156
156
-
 157
157
-
 158
158
-
 159
159
-
 160
160
-
 161
161
-
 162
162
-
 163
163
-
 164
164
-
 165
165
-
 166
166
-
 167
167
-
 168
168
-
 169
169
-
 170
170
-
 171
171
-
 172
172
-
 173
173
-
 174
174
-
 175
175
-
 176
176
-
 177
177
-
 178
178
-
 179
179
-
 180
180
-
 181
181
-
 182
182
-
 183
183
-
 184
184
-
 185
185
-
 186
186
-
 187
187
-
 188
188
-
 189
189
-
 190
190
-
 191
191
-
 192
192
-
 193
193
-
 194
194
-
 195
195
-
 196
196
-
 197
197
-
 198
198
-
 199
199
-
 200
200
-
 201
201
-
 202
202
-
 203
203
-
 204
204
-
 205
205
-
 206
206
-
 207
207
-
 208
208
-
 209
209
-
 210
210
-
 211
211
-
 212
212
-
 213
213
-
 214
214
-
 215
215
-
 216
216


Haier LE40M600SF Manuel utilisateur
- Catégorie
- Téléviseurs LCD
- Taper
- Manuel utilisateur
- Ce manuel convient également à
dans d''autres langues
- italiano: Haier LE40M600SF Manuale utente
- English: Haier LE40M600SF User manual
- español: Haier LE40M600SF Manual de usuario
- Deutsch: Haier LE40M600SF Benutzerhandbuch
- Nederlands: Haier LE40M600SF Handleiding
Documents connexes
-
Haier LE40B8000TF Manuel utilisateur
-
-
-
-
-
-
-
Haier LE40B650CF Le manuel du propriétaire
-
-
Autres documents
-
Changhong Electric LED40D2080ST2 Mode d'emploi
-
Polaroid TVLED24HD Le manuel du propriétaire
-
 High One UHD 4K HI5003UHD-MM Le manuel du propriétaire
-
Nordmende 19 TFT LCD Le manuel du propriétaire
-
Listo 24 HD-CAC842 Le manuel du propriétaire
-
Approx APPMPR1TDT Manuel utilisateur
-
Approx DTT Player/Recorder Manuel utilisateur
-
Lenco LED-4022 Guide de démarrage rapide
-
 Engel RS 4800 S Manuel utilisateur
-
Velleman DVBTR Manuel utilisateur

