Monogram ZISS420DKSS Guide d'installation
- Taper
- Guide d'installation

Owner’s
Manual
Side-by-Side
36", 42", 48"
Built-In Refrigerators
monogram.com
GE is a trademark of the General Electric Company. Manufactured under trademark license.

Consumer Information
Built-In Refrigerators
2
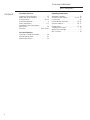
Contents
Consumer Services
Important Phone Numbers ............27
Model and Serial Numbers .............3
Problem Solver ..................22–25
Product Registration ..................3
Safety Instructions .................. 4–7
Smartwater Filter Performance
Data Sheet ........................26
Warranty .................. Back Cover
Care and Cleaning
Cleaning—Outside and Inside. . . . . . . . . . 19
Moving and Vacation .................21
Master Light Switch ..................20
Operating Instructions
Automatic Icemaker ..................12
Climate Control Drawer .........13, 14, 16
Control Lock .......................14
Ice and Water Dispenser ...........10, 11
Shelves and Bins. . . . . . . . . . . . . . . . . 16, 17
Storage Pans ....................15, 16
Temperature Controls .................8
Water Filter Cartridge .................9
WiFi Connect .......................18

3
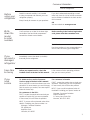
If you
received a
damaged
refrigerator
Immediately contact the dealer (or builder)
that sold you the refrigerator.
Save time
& money
Before you request service, check the
Problem Solver in the back of this manual.
It lists causes of minor operating problems
that you can correct yourself.
If you
need
service
To obtain service, see the Consumer
Services page in the back of this manual.
We’re proud of our service and want you to be
pleased. If for some reason you are not happy
with the service you receive, here are steps to
follow for further help.
For customers in the USA:
FIRST, contact the people who serviced your
appliance. Explain why you are not pleased.
In most cases, this will solve the problem.
NEXT, if you are still not pleased, write all the
details—including your phone number—to:
Manager, Customer Relations
GE Appliances
Appliance Park
Louisville, KY 40225
For customers in Canada:
FIRST, contact the people who serviced your
appliance. Explain why you are not pleased.
In most cases, this will solve the problem.
NEXT, if you are still not pleased, write all
the details–including your phone number to:
Manager, Consumer Relations
Mabe Canada Inc.
1 Factory Lane, Suite 310
Moncton, N.B. E1C 9M3
Consumer Information
Built-In Refrigerators
Before
using your
refrigerator
Read this manual carefully. It is intended
to help you operate and maintain your new
refrigerator properly.
Keep it handy for answers to your questions.
If you don’t understand something or need
more help, there is a list of toll-free consumer
service numbers included in the back section
of this manual.
OR
Visit our website at: monogram.com
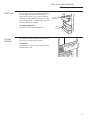
Write
down the
model
& serial
numbers
You’ll see them on a label in the lower right
hand side of the fresh food compartment
beneath the climate control drawer.
Before sending in the Product Registration
card, please write these numbers here:
Model Number
Serial Number
Use these numbers in any correspondence or
service calls concerning your refrigerator.

4
IMPORTANT SAFETY INSTRUCTIONS
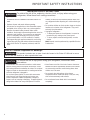
IMPORTANT SAFETY INSTRUCTIONS
WARNING
To reduce the risk of fire, explosion, electric shock, or injury when using your
refrigerator, follow these basic safety precautions:
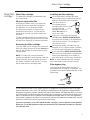
Ŷ In refrigerators with automatic icemakers, avoid contact
with the moving parts of the ejector mechanism, or with
the heating element that releases the cubes. Do not place
fingers or hands on the automatic ice making mechanism
while the refrigerator is plugged in.
Ŷ Do not clean glass shelves or covers with warm water
when they are cold. Glass shelves and covers may
break if exposed to sudden temperature changes or
impact, such as bumping or dropping. Tempered glass is
designed to shatter into many small pieces if it breaks.
Ŷ Keep fingers out of the “pinch point” areas; clearances
between the doors and between the doors and cabinet
are necessarily small. Be careful closing doors when
children are in the area.
Ŷ Do not touch the cold surfaces in the freezer
compartment when hands are damp or wet, skin may
stick to these extremely cold surfaces.
Ŷ Do not refreeze frozen foods which have thawed
completely.
To reduce the risk of injury when using your refrigerator, follow these basic
precautions.
Ŷ This refrigerator must be properly installed and located in
accordance with the Installation Instructions before it is
used.
Ŷ Replace all parts and panels before operating.
Ŷ Do not store or use gasoline or other flammable vapors
and liquids in the vicinity of this or any other appliance.
Ŷ Because of potential safety hazards under certain
conditions, we strongly recommend against the use of an
extension cord. However, if you must use an extension
cord, it is absolutely necessary that it be a UL-listed
(in the United States) or a CSA certified (in Canada),
3-wire grounding type appliance extension cord having
a grounding type plug and outlet and that the electrical
rating of the cord be 15 amperes (minimum) and 120
volts.
Ŷ To prevent suffocation and entrapment hazards to
children, remove the fresh food and freezer doors from
any refrigerator before disposing of it or discontinuing its
use.
Ŷ Do not allow children to climb, stand or hang on the door
handles or the shelves in the refrigerator. They could
seriously injure themselves.
Ŷ Unplug the refrigerator :
• To disconnect power to the refrigerator. It cannot be
turned off by any setting on the control panel.
• To clean, replace a burned out light bulb, or make
repairs.
Note: Repairs must be performed by a qualified Service
Professional.
CAUTION
State of California Proposition 65 Warnings:
WARNING
This product contains one or more chemicals known to the State of California to cause
cancer and birth defects or other reproductive harm.

5
IMPORTANTES INSTRUCTIONS DE SÉCURITÉ
Ŷ Dans les réfrigérateurs qui ont des machines à glaçons,
évitez tout contact avec les éléments mobiles du mécanisme
d’éjection ou avec l’élément chauffant situé à la partie
inférieure de la machine à glaçons. Ne mettez jamais
vos doigts ou vos mains sur le mécanisme de fabrication
automatique de glaçons quand le réfrigérateur est branché.
Ŷ Ne nettoyez pas les clayettes ou les couvercles en verre
avec de l’eau tiède quand ceux-ci sont froids. Les clayettes
et couvercles en verre peuvent se casser s’ils sont exposés
à des changements soudains de température ou si vous les
cognez ou les faites tomber. Le verre trempé est conçu pour
se briser en petits morceaux en cas de casse.
Ŷ Ne laissez jamais vos doigts dans des endroits où ils
risquent d’être pincés. L’écartement entre les portes et
l’armoire est nécessairement petit. Faites attention de fermer
les portes quand des enfants se trouvent à proximité.
Ŷ Ne touchez jamais les surfaces froides dans le compartiment
congélation quand vos mains sont humides ou mouillées.
Votre peau peut coller à ces surfaces extrêmement froides.
Ŷ Ne recongelez pas les aliments surgelés qui ont
complètement dégelé.
ATTENTION
Pour réduire le risque de blessures lorsque vous utilisez votre réfrigérateur, veuillez suivre
ces consignes de sécurité :
Ŷ Vous devez bien installer et placer votre réfrigérateur,
conformément aux Instructions d’installation avant de
l’utiliser.
Ŷ Remettez toutes les pièces et panneaux en place avant
d’utiliser l’appareil.
Ŷ Ne conservez jamais ou n’utilisez jamais d’essence ou
d’autres liquides ou gaz inflammables à proximité de votre
réfrigérateur ou de tout autre appareil électroménager.
Ŷ Nous déconseillons fortement l’utilisation d’une rallonge
à cause des risques potentiels dans certaines conditions.
Cependant, si l’utilisation d’un cordon prolongateur est
nécessaire, ce dernier doit obligatoirement être homologué
UL (aux USA) ou CSA (au Canada), à trois brins avec
mise à la terre pour appareil électroménager et doit être
équipé d’une fiche et d’une prise femelle avec terre. Les
caractéristiques électriques du cordon prolongateur doivent
être de 15 ampères (minimum) et de 120 volts.
Ŷ Pour éviter les risques d’asphyxie et d’enfermement pour
les enfants. Démontez les portes du congélateur et du
compartiment de réfrigération avant de le mettre au rebut ou
d’interrompre son utilisation.
Ŷ Ne permettez jamais aux enfants de grimper, de monter, de
se tenir ou de se pendre aux étagères de votre réfrigérateur.
Ils peuvent endommager le réfrigérateur et se blesser
sérieusement.
Ŷ Débranchez votre réfrigérateur :
• Pour débrancher le réfrigérateur. L’alimentation
électrique du réfrigérateur ne peut pas être coupée par
l’intermédiaire du panneau de commande.
• Débranchez votre réfrigérateur avant de le nettoyer,
Avant de remplacer une ampoule grillée, et de le réparer.
NOTE : Nous vous recommandons fortement de faire
accomplir tout service par un technicien qualifié.
IMPORTANTES CONSIGNES DE SÉCURITÉ
AVERTISSEMENT
Pour réduire le risque d’incendie, d’explosion, de choc électrique ou de blessures
lorsque vous utilisez votre réfrigérateur, veuillez suivre ces consignes de sécurité :
Avertissements de la Proposition 65 de l’État de la Californie :
AVERTISSEMENT
Ce produit contient une ou plusieurs substances chimiques reconnues par l’État
de Californie pour causer le cancer et des anomalies congénitales ou d’autres problèmes
liés à la reproduction.

6
IMPORTANT SAFETY INSTRUCTIONS
USE OF EXTENSION CORDS
Because of potential safety hazards under certain conditions, we strongly recommend against the use of an extension
cord. However, if you must use an extension cord, it is absolutely necessary that it be a UL-listed (in the United States)
or a CSA-listed (in Canada), 3-wire grounding type appliance extension cord having a grounding type plug and outlet
and that the electrical rating of the cord be 15 amperes (minimum) and 120 volts.
READ AND FOLLOW THIS SAFETY INFORMATION CAREFULLY.
SAVE THESE INSTRUCTIONS
Do not, under any circumstances, cut or remove the third (ground) prong from the power cord.
For personal safety, this appliance must be properly grounded.
The power cord of this appliance is equipped with a
3-prong (grounding) plug which mates with a standard
3-prong (grounding) wall outlet to minimize the possibility
of electric shock hazard from this appliance.
Have the wall outlet and circuit checked by a qualified
electrician to make sure the outlet is properly grounded.
Where a standard 2-prong wall outlet is encountered, it
is your personal responsibility and obligation to have it
replaced with a properly grounded 3-prong wall outlet. Do
not use an adapter.
The refrigerator should always be plugged into its own
individual electrical outlet which has a voltage rating
that matches the rating plate. This provides the best
performance and also prevents overloading house wiring
circuits which could cause a fire hazard from overheated
wires.
Never unplug your refrigerator by pulling on the power
cord. Always grip plug firmly and pull straight out from the
outlet.
Repair or replace immediately all power cords that have
become frayed or otherwise damaged. Do not use a cord
that shows cracks or abrasion damage along its length or
at either end.
When moving the refrigerator away from the wall, be
careful not to roll over or damage the power cord.
CONNECTING ELECTRICITY
WARNING
Electrical Shock Hazard.
Plug into a grounded 3-prong outlet
Do not remove the ground prong
Do not use an adapter
Failure to follow these instructions can result in
death, fire, or electrical shock.
WARNING
Suffocation and child entrapment hazard.
Remove fresh-food and freezer doors from the refrigerator, prior to disposal. Failure to do so can result in
child entrapment which can lead to death or brain damage.
Child entrapment and suffocation are not problems of
the past. Junked or abandoned refrigerators are still
dangerous even if they will sit for “just a few days.” If you
are getting rid of your old refrigerator, please follow the
instructions below to help prevent accidents.
Before You Throw Away Your Old Refrigerator or
Freezer:
Ŷ Take off the fresh food and freezer doors.
Ŷ Leave the shelves in place so that children may not
easily climb inside.
Refrigerants
All refrigeration products contain refrigerants, which under
federal law must be removed prior to product disposal. If
you are getting rid of an old refrigeration product, check
with the company handling the disposal about what to do.
PROPER DISPOSAL OF YOUR OLD REFRIGERATOR
IMPORTANT:
WARNING
Explosion Hazard.
Keep flammable materials and vapors, such as gasoline, away from freezer. Failure to do so can result in
fire, explosion, or death.
INSTALLATION

7
IMPORTANTES INSTRUCTIONS DE SÉCURITÉ
LISEZ ET SUIVEZ SOIGNEUSEMENT CES MESURES DE SÉCURITÉ.
CONSERVEZ CES INSTRUCTIONS
UTILISATION DE RALLONGES ÉLECTRIQUES
Nous vous recommandons fortement de ne pas utiliser de rallonge électrique, à cause d’un danger de risques possibles de sécurité
dans certaines conditions. Cependant, si vous devez absolument utiliser un cordon rallonge électrique, il est absolument requis que
vous utilisiez un cordon rallonge trifilaire, avec mise à la terre, certifié UL (aux États-Unis) ou ACNOR (au Canada), avec prise et
fiche à trois conducteurs, et à notation électrique de 15 ampères (minimum) et 120 volts.
BRANCHEMENTS ÉLECTRIQUES
AVERTISSEMENT
Risque de choc électrique.
Branchez l’appareil dans une prise triple avec terre.
Ne retirez pas la broche de terre.
N’utilisez pas d’adaptateur.
Le non-respect de ces instructions peut entraîner des
risques d’incendies, des chocs électriques
ou la mort.
Ne coupez pas ou n’enlevez pas, sous aucun prétexte, la troisième broche de mise à la terre du cordon
d’alimentation. Pour des raisons de sécurité, cet appareil doit être correctement mis à la terre.
Le cordon d’alimentation de cet appareil est équipé d’une fiche
à trois broches (pour une mise à la terre) qui s’adapte à la prise
de courant standard à 3 broches (pour une mise à la terre) pour
minimiser les risques de chocs électriques par cet appareil.
Faites vérifier la prise murale et le circuit électrique par
un électricien qualifié pour s’assurer que le système est
correctement mis à la terre.
Dans le cas d’une prise biphasée, l’installateur a la
responsabilité et l’obligation de la remplacer par une prise
triphasée correctement mise à la terre. N’utilisez pas
d’adaptateur.
Le réfrigérateur doit toujours être branché à sa propre prise
électrique d’une tension nominale correspondant à celle
indiquée sur sa plaque signalétique.
Une alimentation électrique à 115 volts CA, 60 Hz, avec
un fusible de 15 ou 20 ampères et une mise à la terre est
nécessaire. Ceci permet d’obtenir un meilleur rendement et
évite de surcharger les circuits électriques du domicile qui risque
d’occasionner un incendie en surchauffant.
Ne débranchez jamais le réfrigérateur en tirant sur le cordon
d’alimentation. Prenez toujours fermement la fiche en main et
tirez pour la sortir de la prise.
Réparez ou remplacez immédiatement tout cordon électrique
usé ou endommagé. N’utilisez pas un cordon fissuré ou
présentant des dommages dus aux frottements soit sur sa
longueur ou aux extrémités.
Lorsque vous éloignez votre réfrigérateur du mur, faites
attention à ne pas le faire rouler sur le cordon d’alimentation
afin de ne pas l’endommager.
MISE AU REBUT APPROPRIÉE DE VOTRE ANCIEN RÉFRIGÉRATEUR
AVERTISSEMENT
Un enfant risque de suffoquer ou d’y être emprisonné.
Démontez les portes du compartiment de réfrigération et du compartiment de congélation du réfrigérateur, avant
mettre celui-ci au rebut. Le non-respect de cette recommandation peut entraîner l’enfermement d’un enfant qui peut
entraîner la mort ou des lésions cérébrales.
Les enfants pris au piège ou morts d’asphyxie sont toujours
d’actualité. Les réfrigérateurs jetés ou abandonnés restent
dangereux même si vous ne les laissez au rebut que pour «
quelques jours ». Si vous voulez jeter votre ancien réfrigérateur,
suivez les instructions suivantes pour empêcher les accidents.
Avant de jeter votre ancien réfrigérateur ou
congélateur:
Ŷ Démontez les portes du compartiment de réfrigération et du
compartiment de congélation.
Ŷ Laissez les clayettes en place, pour éviter que des enfants
puissent facilement grimper dans votre réfrigérateur.
Fluides frigorigènes
Les appareils réfrigérants contiennent des fluides frigorigènes
qui conformément à la législation fédérale doivent être retirés
avant la mise au rebut de l’appareil. Si vous mettez au rebut un
ancien réfrigérateur contenant des fluides frigorigènes, vérifiez
la procédure à suivre auprès de la compagnie responsable de
l’élimination.
IMPORTANT:
INSTALLATION
AVERTISSEMENT
Risque d’explosion.
Conservez les matériaux et vapeurs inflammables tels que l’essence à l’écart de votre congélateur. Une explosion,
un incendie voire la mort pourrait en résulter.

Pust this button to activate Monogram
Connect. See page 18 for more information
or go to www.monogram.com/connect to
download the App.
8
Temperature Controls
Built-In Refrigerators
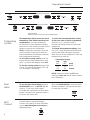
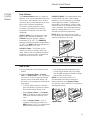
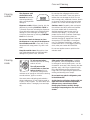
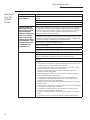
Temperature
controls
The temperature display shows the actual
temperature of the freezer and fresh food
compartments. The actual temperature
will vary from the set temperature based on
factors such as door opening, amount of food,
defrost cycling and room temperature.
NOTE: Frequent door openings or door left
open for periods of time may increase the
internal temperature of the freezer and fresh
food compartments temporarily.
To turn off the cooling system in both the
freezer and fresh food compartments, press
either (+) pad until both displays show OFF.
To turn the cooling system on, press either
(-) pad. The preset temperatures of 0°F and
37°F will appear in the display.
To check the current temperature setting
for the fresh food or freezer compartment,
press the (+) or (-) pad once. After 5
seconds, the display will return to the actual
temperature.
To change the temperature settings, press
the (+) or (-) pads to desired temperature set
point for fresh food and freezer separately.
Allow 24 hours for the refrigerator to reach the
temperature you have set.
NOTE: Setting the controls to OFF stops
cooling, but does not shut off electrical power
to the refrigerator.
Door
alarm
WiFi
Connect
To turn the Door Alarm feature on, press
DOOR ALARM once. The ACTIVE light will
come on. To turn it off, press it again.
On models with a dispenser, the Door Alarm
feature is located on the dispenser panel on
the front of the freezer door.
When the DOOR ALARM is active, the alarm
will flash and beep if you keep the door open
for more than 2 minutes.
Preset Settings:
Allow 24 hours to reach these preset temperatures.
Dispenser Models
Non-Dispenser Models
Temperature Ranges
Low High
34°F 42°F Fresh
Food
1°C 5°C
-6°F 4°F Freezer
-21°C -15°C

9
Water filter
cartridge
Water Filter Cartridge
Built-In Refrigerators
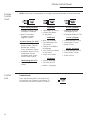
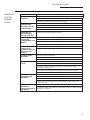
Water filter cartridge
The water filter cartridge is located behind the
top access panel.
When to replace the filter
On dispenser models, there is a replacement
indicator light for the water filter cartridge on
the dispenser. On non-dispenser models,
the replacement indicator is located on the
temperature control panel. This light will turn
orange to tell you that you need to replace the
filter soon.
The filter cartridge should be replaced when the
replacement indicator light turns red or if the flow
of water to the dispenser or icemaker decreases.
Removing the filter cartridge
If you are replacing the cartridge, first remove the
old one by slowly turning it to the left. Do not pull
down on the cartridge. A small amount of water
may drip down.
NOTE: To reduce the risk associated with
property damage due to water leakage, read and
follow instructions before installation and use of
this system. Installation and use MUST comply
with all state and local plumbing codes.
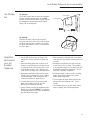
Installing the filter cartridge
1
Fill the replacement cartridge with water
from the tap to allow for better flow from the
dispenser immediately after installation.
2
Line up the arrow on
the cartridge and the
cartridge holder. Place
the top of the new
cartridge up inside the
holder. Do not push it
up into the holder.
3
Slowly turn it to the right until the filter
cartridge stops. DO NOT OVERTIGHTEN.
As you turn the cartridge, it will automatically
raise itself into position. The cartridge will
move about 1/2 turn.
4
On dispenser models, run water from the
dispenser for 1-1/2 gallons (about 3 minutes)
to clear the system and prevent sputtering.
5
Press and hold the RESET WATER FILTER
pad, located on the dispenser or temperature
control panel depending on the model, for
three seconds to clear the red or amber light.
NOTE: A newly installed water filter cartridge
may cause water to spurt into the icemaker.
Filter bypass plug
You must use the filter bypass plug when a
replacement filter cartridge is not available. The
icemaker will not operate without the filter or filter
bypass plug.
)RUWKHPD[LPXPEHQH¿WRI\RXU¿OWUDWLRQV\VWHP*($SSOLDQFHVUHFRPPHQGVWKHXVHRI*($SSOL-
DQFHVEUDQGHG¿OWHUVRQO\8VLQJ*($SSOLDQFHVEUDQGHG¿OWHUVLQ*($SSOLDQFHV+RWSRLQWDQG
0RQRJUDPUHIULJHUDWRUVSURYLGHVRSWLPDOSHUIRUPDQFHDQGUHOLDELOLW\*($SSOLDQFHV¿OWHUVPHHWULJRU-
RXVLQGXVWU\16)VWDQGDUGVIRUVDIHW\DQGTXDOLW\WKDWDUHLPSRUWDQWIRUSURGXFWVWKDWDUH¿OWHULQJ\RXU
ZDWHU*($SSOLDQFHVKDVQRWTXDOL¿HGQRQ*($SSOLDQFHVEUDQGHG¿OWHUVIRUXVHLQ*($SSOLDQFHV
DQG+RWSRLQWUHIULJHUDWRUVDQGWKHUHLVQRDVVXUDQFHWKDWQRQ*($SSOLDQFHVEUDQGHG¿OWHUVPHHW*(
Appliances standards for quality, performance and reliability.
,I\RXKDYHTXHVWLRQVRUWRRUGHUDGGLWLRQDO¿OWHUFDUWULGJHVYLVLWRXUZHEVLWHDWZZZJHZDWHU-
¿OWHUVFRPRUFDOO*($SSOLDQFHV3DUWVDQG$FFHVVRULHV&XVWRPHUVLQ&DQDGD
FDOO
Cartridge
Holder
Filter Bypass
Plug
SmartWater

10
Dispenser
with
glass-touch
controls
How it Works
The electronic controls on the dispenser are
truly interactive. The control panel is equipped
with a proximity sensor that causes the panel
to light up as you approach the dispenser
(approx. 2 inches). To make a selection,
simply touch the graphic for the feature you
want, and the halo for that feature will light up.
When you walk away from the refrigerator, the
lighted graphics switch off automatically.
Spill Shelf
Ice & Water Dispenser (on some models)
Built-In Refrigerators
How to Use
To dispense water or ice: select WATER ,
CUBED ICE or CRUSHED ICE . Then
press the glass gently against the top of the
dispenser cradle.
The spill shelf is not self-draining. To reduce
water spotting, the shelf and its grille should
be cleaned regularly.
If no water is dispensed when the refrigerator
is first installed, there may be air in the water
line system. Press the dispenser cradle for at
least two minutes to remove trapped air from
the water line and to fill the water system. To
flush out impurities in the water line, throw
away the first gallon of water.
CAUTION
Never put fingers or
any other objects into the ice crusher
discharge opening.
ATTENTION
Ne mettez jamais les
doigts ou d’autres objets dans l’ouverture
du distributeur.
Locking the Dispenser:
Touch CONTROL LOCK for
3 seconds to lock the dispenser
and control pad. To unlock,
touch it again for 3 seconds.
Dispenser Light:
This feature turns the light on
and off. The light also comes
on when the dispenser cradle is
pressed. If this light burns out,
contact factory service.
Door Alarm:
To turn the Door Alarm feature on,
touch DOOR ALARM once. To
turn it off, press it again.
When the DOOR ALARM is
active, the alarm will flash and
beep if you keep the door open
for more than 2 minutes.

11
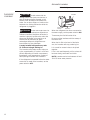
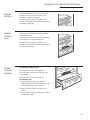
Ice storage
bin
To remove:
Lift up the access door to reach the icemaker.
Set the icemaker power switch to the OFF
position. With the access door closed, support
the storage bin at the bottom while slightly
lifting. Pull bin straight out.
To replace:
Slide the bin back until the tab on the bin
locks into the slot on the shelf. If the bin does
not go all the way back, remove it and rotate
the drive mechanism 1/4 turn. Then push the
bin back again.
Important
facts about
your ice
& water
dispenser
• Do not add ice from trays or bags to the
storage bin. It may not crush or dispense
well.
• Avoid overfilling glass with ice and use of
narrow or extra-tall glasses. Backed-up ice
can jam the chute or cause the door in the
chute to freeze shut. If ice is blocking the
chute, push it through with a wooden spoon.
• Beverages and foods should not be quick-
chilled in the ice storage bin. Cans, bottles
or food packages in the storage bin may
cause the icemaker or auger to jam.
• To keep dispensed ice from missing the
glass, put the glass close to, but not
touching, the dispenser opening.
• Some crushed ice may be dispensed even
though you selected CUBES. This happens
occasionally when a few cubes accidentally
get directed to the crusher.
• After crushed ice is dispensed, some water
may drip from the chute as small particles of
ice melt.
• Sometimes a mound of ice chips will form
on the door in the ice chute. This condition
is normal and usually occurs when you have
dispensed crushed ice repeatedly. The ice
chips will eventually evaporate.
• Dispensed water is not ice cold. For colder
water, simply add crushed ice or cubes
before dispensing water.
• The first glass of water dispensed may be
warmer than the following ones. This is
normal.
• To eliminate drips on the spill shelf, tilt the
glass in slightly when dispensing water.
Rotate
Drive
Mechanism
Ice Storage Bin
Access Door
Ice & Water Dispenser (on some models)
Built-In Refrigerators

12
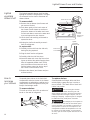
Automatic
icemaker
CAUTION
Avoid contact with the
moving parts of the ejector mechanism, or
with the heating element (located on the
bottom of the icemaker) that releases the
cubes. Do not place fingers or hands on the
automatic ice making mechanism while the
refrigerator is plugged in.
ATTENTION
Évitez tout contact avec les
pièces mobiles du mécanisme d’éjection ou
l’élément chauffant (situé dans le bas de la
machine à glaçons) qui libère les cubes. Ne
placez pas les doigts ou les mains sur le
mécanisme de production de glace
automatique lorsque le réfrigérateur est
branché dans la prise électrique.
A newly-installed refrigerator may take
12–24 hours to begin making ice.
The icemaker will produce seven cubes per
cycle—approximately 15 cycles in a 24-hour
period, depending on freezer compartment
temperature, room temperature, number of
door openings and other use conditions.
If the refrigerator is operated before the water
connection is made to the icemaker, set the
power switch to OFF.
When the refrigerator has been connected to
the water supply, set the power switch to ON.
Throw away the first full bucket of ice.
Be sure nothing interferes with the sweep of
the feeler arm.
When the bin fills to the level of the feeler
arm, the icemaker will stop producing ice.
It is normal for several cubes to be joined
together.
If ice is not used frequently, old ice cubes will
become cloudy, taste stale and shrink.
NOTE: Icemaker works best between 40 and
120 PSI home water pressure.
Automatic Icemaker
Built-In Refrigerators
Feeler Arm
Icemaker
Power
Switch

13
Climate
Control
drawer
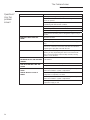
How it Works
The Climate Control feature is a system of
dampers, a fan, and a temperature thermistor.
The Climate Control drawer can be used to
chill items quickly, thaw foods quickly or store
items at their optimum temperatures.
The drawer is tightly sealed to prevent
the drawer’s temperature from causing
temperature fluctuations in the rest of the
refrigerator.
SELECT TEMP—Use this feature to store
items at their optimum temperatures. The
CITRUS setting will maintain a drawer
temperature of 39–47°F. The PRODUCE
setting will maintain the drawer temperature at
31–38°F. The MEAT setting will maintain the
drawer temperature at 27–37°F.
EXPRESS CHILL—This feature can be
used to cool items in minutes, rather than
hours. Extra cool air is circulated throughout
the drawer. Once the cycle is complete, the
drawer will revert to the OFF mode.
EXPRESS THAW—This feature thaws items
in hours rather than days. Food is gently
thawed in a cool environment by circulating
air throughout the drawer. Temperature is
maintained in the drawer by cycling a small
heater off and on as needed. Once the thaw
cycle is complete, the pan will automatically
adjust to a temperature of 27–37°F to store
the food at its optimum temperature.
NOTE: When the controls on the Climate
Control drawer are turned off, the drawer will
maintain temperatures at 42-48°.
How to Use
1 Empty the drawer. Place the items in the
drawer.
2 Select the Express Thaw,™ Express
Chill™ or Select Temp™ pad. The display
will come on. Press the pad until the light
appears next to the desired setting. Use
the chart on the next page to determine the
best setting.
• To stop a feature before it is finished,
press that feature’s pad until no options
are selected and the display is off.
• During Express Thaw™ and Express
Chill,™ the display on the controls will
count down the time remaining in the
cycle.
• After the Express Thaw™ cycle is
complete, the drawer will reset to the
MEAT setting (27–37°F) to help preserve
thawed items until they are used.
• The displayed actual temperature of the
Climate Control drawer may vary slightly
from the SET temperature based on usage
and operation environment.
NOTE: For food safety reasons, it is
recommended that foods be wrapped in
plastic wrap when using Express Thaw™.
This will help contain meat juices and improve
thawing performance.
Express Thaw™
Express Chill™
Climate Control Drawer
Built-In Refrigerators

14
Climate
Control
chart
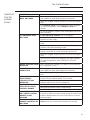
NOTE: Results may vary depending on packaging, starting temperature and other food traits.
Climate Control Drawer
Built-In Refrigerators
&LWUXV6HWWLQJ±)
• Oranges, Lemons, Limes,
Pineapple, Cantaloupe
• Beans, Cucumbers,
Tomatoes, Peppers,
Eggplant, Squash
3URGXFH6HWWLQJ±)
• Strawberries, Raspberries,
Kiwifruit, Pears, Cherries,
Blackberries, Grapes,
Plums, Nectarines, Apples
• Asparagus, Broccoli, Corn,
Mushrooms, Spinach,
Cauliflower, Kale, Green
Onions, Beets, Onions
0HDW6HWWLQJ±)
• Raw Meat, Fish and
Poultry
15 Minutes
• 1 Beverage Can (12 oz)
• 2 Small Juice Boxes
(6–8 oz each)
0LQXWHV
• Wine (750 ml bottle)
• 2 to 6 Beverage Cans
(12 oz each)
• 2 Plastic 20 oz Bottles
of Beverage
• 4 to 6 Small Juice Boxes
(6–8 oz each)
• 3 Foil Juice Packets
45 Minutes
• 2 Liter of Beverage
• 1/2 Gallon of Juice
• Gelatin—1 package
/EVKRXUV
• Individually Wrapped
Filet Mignon (0.5 lb)
• Hamburger Patties (0.5 lb)
/EVKRXUV
• Chicken Breasts (1.5 lbs)
• Ground Beef (1.5 lbs)
• Steak (1.5 lbs)
/EVKRXUV
• Chicken Breasts (3.0 lbs)
• Ground Beef (3.0 lbs)
• Steak (3.0 lbs)
Control
lock
Control Lock
Press and hold this pad for 3 seconds to lock
the settings for the Climate Control drawer. To
unlock, press and hold for another 3 seconds.

15
Sealed
deli pan
Use the Sealed Deli Pan for the convenient
storage of lunch meats and cheese, hors
d’oeuvres, spreads and snacks.
Excess water that may accumulate in the
bottom of the drawers should be emptied and
the drawers wiped dry.
Storage Pans and Climate Control Drawer
Built-In Refrigerators
Sealed
produce
pans
The top pan is designed to provide constant
high humidity levels.
Make sure the drawers are closed completely
to maintain the correct humidity level.
Excess water that may accumulate in the
bottom of the drawers should be emptied and
the drawers wiped dry.
Drawer
and pan
removal
To remove a drawer or pan:
1. Pull the pan out to the stop position.
2. Lift the front of the pan up and out of the
wire holder.
3. Lift the back of the pan up and out.
To replace a pan:
1. Place the back of the pan in the wire
holder, making sure the wire holder fits into
the grooves on the back of the pan.
2. Lower the front of the pan into the wire
holder.
3. Press firmly on the top of the pan to snap it
into the wire holder.

The lighted vegetable drawer shelf provides
lighting for the lower compartments. The lights
are recessed into the shelf to illuminate the
drawers below.
To remove shelf:
1. Remove the top drawer (see Drawer and
pan removal section).
2. Push down gently on the back center of
the climate control drawer top surface to
release the bottom of the water tank cover.
Pull out and down to remove the water tank
cover and expose the wire harness.
3. Lift the shelf and carefully pull forward to
expose the wires.
4. Unplug the shelf and carefully remove it
from the refrigerator.
To replace shelf:
1. Carefully set the shelf onto the side rails,
leaving the plug exposed.
2. Plug the shelf into the refrigerator.
3. Carefully slide the shelf into place.
4. Insert the water tank cover top first so that
it goes up behind the gasket hanging down
from the vegetable drawer shelf. Gently
push the bottom of the water tank cover
until the bottom snaps into the the top of
the Climate Control Drawer cover.
5. Replace the drawer (see Drawer and pan
removal section).
16
Lighted Drawer Cover and Shelves
Built-In Refrigerators
How to
rearrange
your shelves
Tempered glass shelves in the fresh food
compartment and wire shelves in the freezer
compartment are adjustable, enabling you to
make efficient shelf arrangements to fit your
family’s food storage needs.
To remove shelves:
Tilt shelf up at front, then lift it up and out of
tracks on rear wall of refrigerator.
To replace shelves:
Select desired shelf height. With shelf front
raised slightly, engage top lugs in tracks at
rear of cabinet. Then lower front of shelf until
it locks into position.
CAUTION
Do not clean glass shelves
or covers with warm water when they are cold.
Glass shelves and covers may break if exposed to
sudden temperature changes or impact, such as
bumping or dropping. Tempered glass is designed
to shatter into many small pieces if it breaks.
ATTENTION
Ne nettoyez pas les clayettes ou
les couvercles en verre avec de l’eau tiède quand
ceux-ci sont froids. Les clayettes et couvercles en
verre peuvent se casser s’ils sont exposés à des
changements soudains de température ou si vous
les cognez ou les faites tomber. Le verre trempé
est conçu pour se briser en petits morceaux en cas
de casse.
Lighted
vegetable
drawer shelf
Water Tank
Cover
Water Tank Cover
Climate
Control
Drawer Top
Surface
Lighted
Vegetable
Drawer Shelf

All door bins, except for the deep gallon door
bin, are adjustable using one of 2 tabs on
each end of the bin. They can be moved up
and down to many different positions to meet
your storage needs. The deep gallon door bin
can be removed for cleaning.
To remove any bin:
Lift the bin up and slide it toward you.
17
Bins and Freezer Baskets
Built-In Refrigerators
Door bins
Adjustable
Door Bin
Gallon
Door Bin
Freezer
baskets
Wire slide-out freezer baskets can be pulled
out for easy access to frozen foods.
To remove:
Pull basket out. Lift the front of the basket up
and then take it out.

18
WiFi Connect
Built-In Refrigerators
WiFi
Connect
REGULATORY INFORMATION
FCC/IC Compliance Statement:
This device complies with Part 15 of the FCC Rules. Operation is subject to the following two
conditions:
1. This device may not cause harmful interference.
2. This device must accept any interference received, including interference that may cause
undesired operation.
This equipment has been tested and found to comply with the limits for a Class B digital
device, pursuant to Part 15 of the FCC Rules. These limits are designed to provide reasonable
protection against harmful interference in a residential installation. This equipment generates
uses and can radiate radio frequency energy and, if not installed and used in accordance with
the instructions, may cause harmful interference to radio communications. However, there is
no guarantee that interference will not occur in a particular installation. If this equipment does
cause harmful interference to radio or television reception, which can be determined by turning
the equipment off and on, the user is encouraged to try to correct the interference by one or
more of the following measures:
• Reorient or relocate the receiving antenna.
• Increase the separation between the equipment and receiver.
• Connect the equipment into an outlet on a circuit different from that to which the receiver is
connected.
• Consult the dealer or an experienced radio/television technician for help.
Labelling: Changes or modifications to this unit not expressly approved by the manufacturer
could void the user’s authority to operate the equipment.
ConnectPlus module only (or similar communication module)
RF Exposure - This device is only authorized for use in a mobile application. At least 20 cm of
separation distance between the ConnectPlus device and the user’s body must be maintained
at all times.
*Select Models Only
Monogram WiFi Connect (for customers in the United States):
Monogram WiFi Connect Enabled*
Your refrigerator is Monogram WiFi Connect Enabled. A WiFi communication card is built into
the product allowing it to communicate with your Smart Phone for remote monitoring, control,
and notifications. Please visit www.monogram.com/connect to learn more about connected
appliance features, and to learn what connected appliance App’s will work with your Smart
Phone.
WiFi Connectivity: For assistance with the appliance or the network connectivity (for models
that are WiFi enable), please call 1-800-220-6899.

19
Cleaning
outside
The dispenser spill
shelf and the area
beneath it should be
cleaned periodically
with a mild liquid dish
detergent.
Dispenser cradle—Before cleaning, lock the
dispenser by touching CONTROL LOCK for
3 seconds to prevent activating the dispenser.
Clean with warm water and a mild liquid dish
detergent. Rinse thoroughly and wipe dry.
Unlock the dispenser by touching CONTROL
LOCK for 3 seconds.
Do not use chemical cleaners to clean
the dispenser or any part of the dispenser.
Door handles and trim—Clean with a cloth
dampened with soapy water. Dry with a soft
cloth.
Keep the outside clean. Wipe with a clean
cloth lightly dampened with mild liquid dish
detergent. Dry with a clean, soft cloth.
Do not wipe the refrigerator with a soiled
dish cloth or wet towel. These may leave a
residue that can damage the finish. Do not
use scouring pads, powdered cleaners, bleach
or cleaners containing bleach because these
products can scratch and damage the finish.
Stainless steel—Regularly clean and polish
the stainless steel door panels and handles
(on some models) with a commercially
available stainless steel cleaner such as
Stainless Steel Magic™ to preserve and
protect the fine finish. Stainless Steel Magic
and the Monogram polishing cloth are
available through GE Appliances Parts and
Accessories, 877.959-8688, or monogram.
com. For Stainless Steel Magic, order part
number WX10X15. For Monogram polishing
cloth, order part number WX72X10001.
Do not use appliance wax or polish on the
stainless steel.
Care and Cleaning
Built-In Refrigerators
Cleaning
inside
To help prevent odors.
leave an open box of baking
soda in the unit.
Turn off power at the
circuit breaker or fuse box
before cleaning. If this is
not practical, wring excess
moisture out of sponge or cloth when cleaning
around switches, lights or controls.
Use warm water and baking soda solution—
about a tablespoon (15 ml) of baking soda to
a quart (1 liter) of water. This both cleans and
neutralizes odors. Thoroughly rinse and wipe
dry.
Other parts of the refrigerator—including
door gaskets, meat and vegetable drawers,
ice storage bin and all plastic parts—can be
cleaned the same way. After cleaning the door
gaskets, apply a thin layer of petroleum jelly
to the door gaskets sealing surface on the
hinge side. This helps keep the gaskets from
sticking and bending out of shape.
Do not wash any plastic refrigerator parts
in the dishwasher.
Avoid cleaning cold glass shelves with hot
water because the extreme temperature
difference may cause them to break.
Handle glass shelves carefully. Rough
handling of tempered glass can cause it to
shatter.

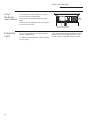
Using
the Master
Light switches
This feature turns off the lights in the fresh
food and freezer compartments.
The switches are located behind the grille
panel
at the top of the refrigerator. Lift up the panel
to access the switches.
Fresh Food and Freezer
Master Light Switches
Refrigerator
Lights
There is LED lighting in the fresh food and
freezer compartments.
An authorized technician will need to replace
the LED lights.
If this assembly needs to be replaced, call GE
Appliances Service at1.800.432.2737 in the
United States or 1.800.561.3344 in Canada.
Care and Cleaning
Built-In Refrigerators
Grille
Panel
20
La page est en cours de chargement...
La page est en cours de chargement...
La page est en cours de chargement...
La page est en cours de chargement...
La page est en cours de chargement...
La page est en cours de chargement...
La page est en cours de chargement...
La page est en cours de chargement...
-
 1
1
-
 2
2
-
 3
3
-
 4
4
-
 5
5
-
 6
6
-
 7
7
-
 8
8
-
 9
9
-
 10
10
-
 11
11
-
 12
12
-
 13
13
-
 14
14
-
 15
15
-
 16
16
-
 17
17
-
 18
18
-
 19
19
-
 20
20
-
 21
21
-
 22
22
-
 23
23
-
 24
24
-
 25
25
-
 26
26
-
 27
27
-
 28
28


Monogram ZISS420DKSS Guide d'installation
- Taper
- Guide d'installation
dans d''autres langues
Documents connexes
-
GE ZISP420DHSS Le manuel du propriétaire
-
GE Monogram ZISS420DMSS Manuel utilisateur
-
Monogram ZISP480DKSS Manuel utilisateur
-
GE Monogram Refrigerator Bottom-Freezer Built-In Refrigerators Manuel utilisateur
-
GE Monogram ZISW48DC Manuel utilisateur
-
-
GE ZISS420NKSS Le manuel du propriétaire
-
Monogram ZISB480DNII Le manuel du propriétaire
-
-
Autres documents
-
GE Profile TFX26KRDAA Manuel utilisateur
-
-
GE TFX25PADBB Manuel utilisateur
-
 GE Monogram Refrigerator Side-by-Side Built-In Refrigerators Manuel utilisateur
-
Hotpoint CSX25GPCWW Manuel utilisateur
-
-
GE Profile GTS18ICSRBB Le manuel du propriétaire
-
 GE Monogram Refrigerator Built-In Refrigerators Manuel utilisateur
-
GE TFX22PPBCC Manuel utilisateur
-
GE Monogram ZIF360NHRH Manuel utilisateur

