Pfaff select 150 Le manuel du propriétaire
- Catégorie
- Machines à coudre
- Taper
- Le manuel du propriétaire

Owner´s manual

This household sewing machine is designed to comply with IEC/EN 60335-2-28 and UL1594.
IMPORTANT SAFETY INSTRUCTIONS
When using an electrical appliance, basic safety precautions should always be followed,
including the following:
Read all instructions before using this household sewing machine.
DANGER - To reduce the risk of electric shock:
• A sewing machine should never be left unattended when plugged in. Always unplug this
sewing machine from the electric outlet immediately after using and before cleaning.
• Always unplug before changing bulb. Replace bulb with same type rated 15 Watt.
WARNING - To reduce the risk of burns, À re,
electric shock, or injury to persons:
• This sewing machine is not intended for use by persons (including children) with reduced
physical, sensory or mental capabilities, or lack of experience and knowledge, unless they
have been given supervision or instruction concerning use of the sewing machine by a
person responsible for their safety.
• Children should be supervised to ensure that they do not play with the sewing machine.
• Use this sewing machine only for its intended use as described in this manual. Use only
attachments recommended by the manufacturer as contained in this manual.
• Never operate this sewing machine if it has a damaged cord or plug, if it is not working
properly, if it has been dropped or damaged, or dropped into water. Return the sewing
machine to the nearest authorized dealer or service center for examination, repair,
electrical or mechanical adjustment.
• Never operate the sewing machine with any air openings blocked. Keep ventilation
openings of the sewing machine and foot controller free from the accumulation of lint,
dust, and loose threads.
• Keep À ngers away from all moving parts. Special care is required around the sewing
machine needle.
• Always use the proper needle plate. The wrong plate can cause the needle to break.
• Do not use bent needles.
• Do not pull or push fabric while stitching. It may deÁ ect the needle causing it to break.
• Wear safety glasses.
• Switch the sewing machine off (“0”) when making any adjustment in the needle area, such
as threading needle, changing needle, threading bobbin, or changing presser foot, etc.
• Always unplug the sewing machine from the electrical outlet when removing covers,
lubricating, or when making any other user servicing adjustments mentioned in the
instruction manual.
• Never drop or insert any object into any opening.
• Do not use outdoors.
• Do not operate where aerosol (spray) products are being used or where oxygen is being
administrated.
• To disconnect, turn all controls to the off (“0”) position, then remove plug from outlet.
• Do not unplug by pulling on cord. To unplug, grasp the plug, not the cord.
SAVE THESE INSTRUCTIONS

Contents
Introduction
Parts of your select™ sewing machine ....4
Standard accessories ....................................5
Stitch overview .............................................6
Stitch table - Non-elastic ......................... 6-7
Stitch table - Stretch stitches ................... 7-8
Operate your sewing machine
Lid ..................................................................9
Connecting the foot control ........................9
Main switch ...................................................9
Accessory tray ............................................10
Using the free arm ......................................10
Bobbin winding .................................... 11-14
Changing the bobbin .................................15
Threading .............................................. 16-17
Threading the twin needle ......................17
Bringing up the bobbin thread .................18
Thread cutter...............................................18
Presser foot lifter ........................................19
Changing the presser foot .........................19
The IDT™ system
(Integrated Dual Feed) ..............................20
Changing the needle ..................................21
Setting the needle thread tension ............21
Dropping the feed dogs ............................21
Stitch width dial .........................................22
Needle position dial ...................................22
Reverse sewing ...........................................23
Stitch length adjustment dial ....................23
Adjust stitch length ................................23
Buttonhole ..............................................23
Stretch stitches........................................23
Stitch selection - Easy Select System .......24
Utility stitches ........................................24
Stretch stitches........................................24
Utility and stretch stitch combinations ..24
Utility stitches and practical sewing
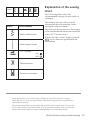
Explanation of the sewing chart ..............25
Needle thread tension ..............................26
Topstitching ................................................26
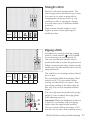
Straight stitch ..............................................27
Zigzag stitch ................................................27
Blindhem stitch ..........................................28
Overlock stitch ............................................29
Elastic stitch ................................................30
Hemming with the twin needle ...............30
Buttonholes ........................................... 31-32
Free Motion Sewing ...................................33
Sewing on buttons................................ 33-34
Sewing on zippers ....................................34
Optional presser feet ............................ 35-38
Maintenance and trouble-shooting
Changing the needle plate ........................39
Cleaning and oiling ....................................39
Changing the light bulb ............................40
Trouble-shooting .................................. 41-42

4
24
23
22
1
2
3
4
6
7
89
10
11
12
13
25
16
15
20
21
5
14
26 27
18
17
19
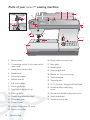
Introduction
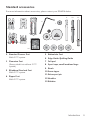
1 Main switch
2 Connection socket “foot control with
main cord”
3 Handwheel release disk
4 Handwheel
5 Carrying handle
6 Bobbin winder
7 Lid with stitches
8 Extra spool pin
9 Spool pin with spool cap
10 Take-up lever
11 Needle thread tension dial
12 Threading path
13 Thread cutter
14 Sewing lamp (max. 15 watt)
15 Presser foot lifter
Parts of your select™ sewing machine
16 Removable accessory tray
17 Base plate
18 Needle plate
19 Stitch length dial
20 Button for “reverse sewing”
21 Stitch selection
22 Thread guide
23 IDT™ System / Integrated Dual Feed
24 Needle holder with À xing
screw
25 Presser foot holder with presser foot
26 Stitch width dial
27 Needle position dial

5
34
5
6
7
8
91011
12
13
01
Introduction
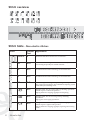
0 Standard Presser Foot
With IDT™ system
1 Clearview Foot
(Fancy-stitch foot without IDT™
system)
3 Blindhem/Overlock Foot
With IDT™ system
4 Zipper Foot
With IDT™ system
Standard accessories
For more information about accessories, please contact your PFAFF® dealer.
5 Buttonhole Foot
6 Edge Guide/Quilting Guide
7 Felt pad
8 Spool caps, small/medium/large
9 Brush
10 Seam ripper
11 Extra spool pin
12 Needles
13 Bobbins

6 Introduction
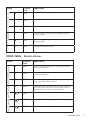
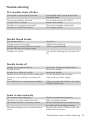
Stitch table - Non-elastic stitches
Stitch Presser
Foot
Application
A/B/C 5
Standard buttonhole for blouses or bed linen .
D 0/3
For invisible hemming with simultaneous seam/
overcasting. Especially for stretch material.
E 0/1
A traditional decorative stitch e.g. for towel borders.
F 0/1
A traditional decorative stitch e.g. for towel borders.
G 0/1
For all straight stitching and topstitching work up to 6 mm
For serging and appliqué. Also suitable for tapering, eyelet
embroidery and cording work.
0/1
Straight stitch: For all sewing and top-stitching operations
which require a left needle position.
Zigzag stitch: For serging, appliqué and tapering.
0/1
Straight stitch: For most sewing and top-stitching
operations.
Zigzag: for most zigzag operations.
0/1
Straight stitch: For all sewing and top-stitching operations
which require a right needle position.
Zigzag stitch: For serging, appliqué, tapering and cording
work.
Stitch overview

7Introduction
Stitch Presser
Foot
Application
H 0/3
For invisible hemming on woven materials.
I 0/1
A traditional decorative stitch.
K 0/3
For Á at overlapped seams.
L 0/1
For overcasting, sewing on elastic, darning tears and
inserting patches.
M 0/1
For overcasting, sewing on elastic, darning tears and
inserting patches.
LI 0/1
A traditional decorative stitch.
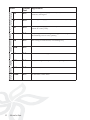
Stitch table - Stretch stitches
Stitch Presser
Foot
Application
D 0/1
Elastic closing and serging seam. The material must be
turned by 180 degrees.
E 0/1
For top-stitching and overstitching stretch materials, e.g.
cuffs, hems and panels.
F 0/1
A decorative stitch for top-stitching or whip stitching
hems, e.g. pajamas and sweatsuits.
G 0/1
For stretch seams, e.g. inside seams as well as seams on
sportswear and workwear. For sewing elastic bands on
elastic materials or seams on stretch materials.
0/1
For elastic seams which require a left needle position.
0/1
For elastic seams which require a center needle position.
0/1
A traditional decorative stitch e.g. for towel borders.

8 Introduction
Stitch Presser
Foot
Application
H 0/1
Elastic closing and serging seams for jersey. The material must be
turned by 180 degrees.
I 0/3
A closing and serging seam for materials which fray easily.
K 0/3
A closing and serging seam for sturdy materials or materials
which do not fray easily.
L 0/1
For joining two À nished edges with a gap between, e.g.
hemstitching. Also for crazy quilting.
M 0/1
For sewing on elastic thread, overstitching terry.
KM 0/1
A loose decorative stitch.
LI 0/1
An ornamental stitch, e.g. for bath accessories.
FG 0/1
A top-stitching seam for patchwork and quilting.
LK 0/1
A decorative, elastic stitch.
LMK 0/1
A decorative, elastic stitch.

9Operate your sewing machine
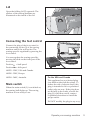
Lid
Open the folding lid (7) upwards. The
stitches of the sewing machine are
illustrated on the inside of the lid.
Connecting the foot control
Connect the plug of the foot control to
the connecting socket (2) of the sewing
machine and to the wall socket. The
sewing speed is regulated by pressing the
foot control.
You can regulate the sewing speed by
moving the slide on the front part of the
foot control.
Position
= half speed
Position = full speed
AE023 - 120V, USA and Canada
AE020 - 230V, Europe
AE024 - 240V, Australia
Main switch
When the main switch (1) is switched on,
the sewing bulb lights up. The sewing
machine is now ready to use.
For the USA and Canada
This appliance has a polarized plug
(one blade wider than the other). To
reduce the risk of electric shock, this
plug is intended to À t in a polarized
outlet only one way. If the plug does
not À t fully in the outlet, reverse the
plug. If it still does not À t, contact
a qualiÀ ed electrician to install the
proper outlet.
DO NOT modify the plug in any way.

10 Operate your sewing machine
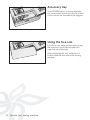
Accessory tray
Your PFAFF® select™ sewing machine
has a removable accessory tray (16) which
is also used as an extended work support.
Using the free arm
In order to sew using the free arm, swing
the accessory tray to the left and lift it
upwards out of the hole.
When replacing the tray, make sure it
is Á ush with the free arm of the sewing
machine.

11
A
Operate your sewing machine
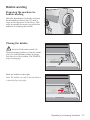
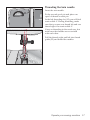
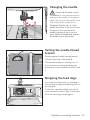
Bobbin winding
Preparing the machine for
bobbin winding
Hold the handwheel (4) À rmly and turn
the handwheel release disc (3) until it
stops in the direction of the arrow. This
stops the needle from moving while the
machine is winding the bobbin.
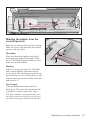
Placing the bobbin
Switch off the main switch (1)
Place the empty bobbin so that the small
pin (A) of the bobbin winder (6) snaps
into the slot of the bobbin. The PFAFF®
logo is facing up.
Push the bobbin to the right
Note: The bobbin can only be wound when it
is moved fully to the right.

12
A
B
C
A
B
Operate your sewing machine
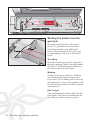
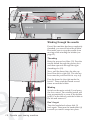
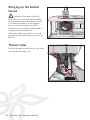
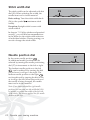
Winding the bobbin from the
spool pin
Place the sewing thread on the spool
pin (9). To guarantee free movement
of the thread and to give additional
hold to the thread spool, À t a spool cap
corresponding to the size of the thread
spool.
Threading
Place the thread into guide A and pull it
through opening B and to the right under
the hook C. Wind the thread clockwise a
few times around in the bobbin.
Winding
Switch on the main switch (1). Hold the
end of the thread À rmly and press the
foot control. The winding action will stop
automatically as soon as the bobbin is full.
Cut the thread, push the bobbin to the left
and remove it.
Don’t forget:
Turn the handwheel release disk (3) fully
back again. Then turn the handwheel (4)
towards you until it snaps into place.

13
A
B
C
Operate your sewing machine
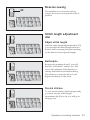
Winding the bobbin from the
second spool pin
Push the second spool pin (8) into its hole.
Slide on a spool cap and place the thread
spool on the spool pin.
Threading
Place the thread into guide A and pull
it through opening B to the right under
hook C. Wind the thread clockwise a few
times around the bobbin.
Winding
Switch on the main switch (1). Hold the
end of thread À rmly and press the the
foot control. The winding action will stop
automatically as soon as the bobbin is full.
Cut the thread, push the bobbin to the left
and remove it.
Don’t forget:
Turn the handwheel release disk (3)
back again. Then turn the handwheel (4)
towards you until it snaps into place.
TIP: If the machine is already threaded, you
can easily wind thread from the second spool
pin without having to unthread the machine.

14
C
Operate your sewing machine
Winding through the needle
Even if the machine has been completely
threaded, you can still wind the bobbin.
First make sure to stop the needle from
moving while winding the bobbin (see
page 11).
Threading
Raise the presser foot lifter (15). Pass the
needle thread through the presser foot
and then upwards through the right
threading slot (12).
Now, pull the thread into the take-up
lever from left to right (10). The take-up
lever must be positioned at its very top.
Pass the thread to the right under the
hook C. Then wind the thread several
times around the bobbin.
Winding
Switch on the main switch (1) and press
the foot control. The winding action will
stop automatically as soon as the bobbin
is full. Cut the thread, push the bobbin to
the left and remove it.
Don’t forget:
Turn the handwheel release disk (3)
back again. Then turn the handwheel (4)
towards you until it snaps into place.

15
C
A
B
D
E
E
Operate your sewing machine
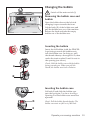
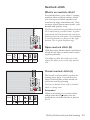
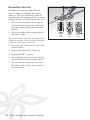
Inserting the bobbin
Insert the full bobbin (with the PFAFF®
logo facing towards the bobbin case)
into the bobbin case. In doing so, pull
the thread sideways through slot A, then
under the tension plate B until it rests in
the opening (see arrow).
Check: Hold the bobbin case with the bobbin
facing towards you. When you pull the
thread, the bobbin must turn clockwise.
Inserting the bobbin case
Lift latch E and slide the bobbin case
onto the hook pin C as far as it will go.
Opening D of the bobbin case must face
upwards.
Check: Pull the bobbin thread sharply. The
bobbin case must not fall out of the hook.
Changing the bobbin
Switch off the main switch (1)
Removing the bobbin case and
bobbin
Open the bobbin door at the left side
swinging it open towards the front.
Lift the latch (E) of the bobbin case and
pull the bobbin case out of the machine.
Release the latch and take the empty
bobbin out of the bobbin case.

16
B
A
D
CEG
F
H
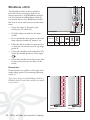
Operate your sewing machine
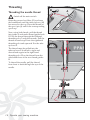
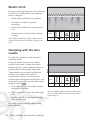
Threading
Threading the needle thread
Switch off the main switch
Raise the presser foot lifter (15) and turn
the handwheel until the take-up lever (10)
has moved to the top. Place the thread on
the spool pin (9) and À t the corresponding
spool cap.
Now, using both hands, pull the thread
into guide A and under thread guide hook
B. Pass the thread through the lefthand
threading slot C and downwards. Pull the
thread around stop D into the righthand
threading slot and upwards E to the take-
up lever F.
The thread must be pulled into the
take-up lever F from left to right and
downwards again in the right hand
threading slot. Floss the thread from the
side behind one of the two thread guides
H.
To thread the needle, pull the thread
from front to back through the eye of the
needle.

17
C
Operate your sewing machine
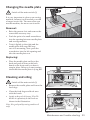
Threading the twin needle
Insert the twin needle.
Fit the second spool pin and place one
spool of thread on each pin.
In the left threading slot (12) you will À nd
tension disk C. During threading, make
sure that you pass one thread left and one
thread right over tension disk C.
Carry on threading in the usual way, but
make sure the threads are not twisted
with each other.
Pull the threads right and left into thread
guide (22) and thread the needles.

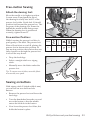
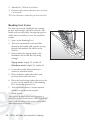
18 Operate your sewing machine
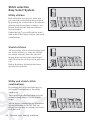
Bringing up the bobbin
thread
Switch off the main switch (1)
Raise the presser foot. Hold the needle
thread and turn the handwheel towards
you until the needle is in the highest
position and the bobbin thread has
formed a loop. Pull the needle thread to
bring up the bobbin thread.
Close the bobbin case/hook cover and
pull the thread under the presser foot to
the left.
Thread cutter
Pull the threads from the back to the front
over the thread cutter (13).

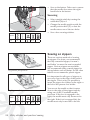
19Operate your sewing machine
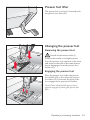
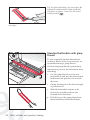
Presser foot lifter
The presser foot is raised or lowered with
the presser foot lifter (15).
Changing the presser foot
Removing the presser foot
Switch off the main switch (1)
Position the needle at its highest point.
Press the presser foot upwards at the front
and down at the back at the same time so
that it disengages from the presser foot
holder (25).
Engaging the presser foot
Place the presser foot under the presser
foot holder (25) so that when the presser
foot lifter (15) is lowered, the pins of the
foot engage in the presser foot holder.
Check: Please check that the presser foot is
properly engaged by raising the presser foot
lifter.

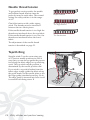
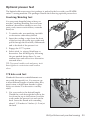
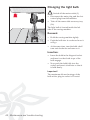
20 Operate your sewing machine
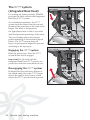
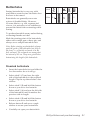
The IDT™ system
(Integrated Dual Feed)
For sewing any fabric precisely PFAFF®
provides the ideal solution: the Integrated
Dual Feed, IDT™ system.
As on industrial machines, the IDT™
system feeds the fabric from the top and
bottom at the same time at the same stitch
length. The fabric is fed precisely.
On light fabrics such as silk or rayon the
dual feed prevents puckering of the seam.
The even feeding action also ensures
perfect matching of checked and striped
fabrics. The IDT™ system keeps all
layers of quilt projects aligned to prevent
stretching of the top layers.
Engaging the IDT™ system
Raise the presser foot. Press the IDT™
system down until it engages.
Important! For all work with the
Integrated Dual Feed IDT™ system, use
presser feet with the center back cut-out.
Disengaging the IDT™ system
Hold the Dual Feed with two À ngers at
the ribbed ankle. Press the IDT™ system
down, then pull it away from you and
release the IDT™ system slowly upward.
La page est en cours de chargement...
La page est en cours de chargement...
La page est en cours de chargement...
La page est en cours de chargement...
La page est en cours de chargement...
La page est en cours de chargement...
La page est en cours de chargement...
La page est en cours de chargement...
La page est en cours de chargement...
La page est en cours de chargement...
La page est en cours de chargement...
La page est en cours de chargement...
La page est en cours de chargement...
La page est en cours de chargement...
La page est en cours de chargement...
La page est en cours de chargement...
La page est en cours de chargement...
La page est en cours de chargement...
La page est en cours de chargement...
La page est en cours de chargement...
La page est en cours de chargement...
La page est en cours de chargement...
La page est en cours de chargement...
La page est en cours de chargement...
-
 1
1
-
 2
2
-
 3
3
-
 4
4
-
 5
5
-
 6
6
-
 7
7
-
 8
8
-
 9
9
-
 10
10
-
 11
11
-
 12
12
-
 13
13
-
 14
14
-
 15
15
-
 16
16
-
 17
17
-
 18
18
-
 19
19
-
 20
20
-
 21
21
-
 22
22
-
 23
23
-
 24
24
-
 25
25
-
 26
26
-
 27
27
-
 28
28
-
 29
29
-
 30
30
-
 31
31
-
 32
32
-
 33
33
-
 34
34
-
 35
35
-
 36
36
-
 37
37
-
 38
38
-
 39
39
-
 40
40
-
 41
41
-
 42
42
-
 43
43
-
 44
44


Pfaff select 150 Le manuel du propriétaire
- Catégorie
- Machines à coudre
- Taper
- Le manuel du propriétaire
dans d''autres langues
- English: Pfaff select 150 Owner's manual
Documents connexes
-
Pfaff select 4.0 Le manuel du propriétaire
-
Pfaff Expression 2026 Le manuel du propriétaire
-
-
-
-
-
-
-