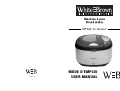
WHITE & BROWN MP 546 LA TESSARA Le manuel du propriétaire
- Catégorie
- Machines à pain
- Taper
- Le manuel du propriétaire
Ce manuel convient également à

24
Machine à pain
Machine à pain
Br
Br
ead maker
ead maker
MP 546 “La Tessara”
MODE D’EMPLOI
MODE D’EMPLOI
USER MANUAL
USER MANUAL
04/04 - V2

ADVISES
ADVISES
CAUTION :
• Always fill the bread pan with the ingredient in the order mentionned below :
1- Butter and oil
2- Liquids : water, milk …
3- 1/3 of the flour
4- Sugar
5- Salt
6- Powdred milk
7- The 2/3 of the flour (to cover the ingredient)
8- Yeast (only in contact with flour). To make bread, use bread yeast.
• “Ultra fast” function:
The bread maker can bake loaf in less than 1 hour, with “ultra fast” function, the bread
is a little more dense with these settings. We advice you to use hot water (48-50°C) and
a quick rising yeats.
• Spelt flour:
In order to have a slightly bread, we advice you to use spelt flour.
• We advice you to wait 30 minutes before eating the bread.
Caution :
• Never open the appliance when using.
• If the blade is still in the bread, loosen it with the hook (8)
CLEANING
CLEANING
• Switch the appliance off and let it cool down before cleaning.
• Bread pan : rub inside and outside with a damp cloth. Do not use any sharp or abrasi-
ve agents.
• Kneading bar : if it is difficult to remove the kneading bar from the axe, you can soak
the bread pan in water for some minutes.
• Cover and window : the cover can be removed for cleaning. Clean the cover and
appliance inside and outside with a piece of soft damp cloth.
232
LA TESSARA
du pain pour tous !
Dans la Rome antique la fabrication du pain était déjà très
élaborée et la misère omniprésente. Très tôt, pour éviter les
troubles, les Empereurs
distribuèrent
gratuitement le pain
aux chômeurs de plus
en plus nombreux.
Bientôt le phénomène
prit une ampleur inouïe
et le nombre de
bénéficiaires quintupla
en moins d’un siècle.
A la fin de l’Empire
romain, ce droit au
pain gratuit devint un
droit héréditaire et le
jeton que l’on devait
présenter contre le pain se transmettait de père en fils.
C’est ce jeton, symbole du « droit au pain pour tous », qui est
appelé LA TESSARA.

USE OF THE APPLIANCE
USE OF THE APPLIANCE
Before using the appliance for the first time :
Please clean the bread pan and the inside housing. The bread pan is non-stick coated.
Put a drop of oil in the bread pan and bake for 10 minutes with nothing inside on pro-
gram 1, to stop the appliance, push “start” button for few seconds. Clean once more
time. Place the kneading blade on the axe in the baking area.
Connection :
- Remove the bread pan.
- Place the kneating blade on its axe in the baking area.
- Put the ingredient in the bread pan. All ingredients, including the liquid ingredients,
should be at room temperature. Respect the following order.
- Put the bread pan in the appliance and close the cover.
- Connect the appliance and press the “on/off” button. When the appliance is connec-
ted, a beep is heard and “3:00” appears on the display after a short time. The two
dots between the “3” and “00” are fixed. The appliance is ready to work and is set
automaticaly on programme 1 (normal bread).
- Select the programme, the weight of the bread and the colour of the bread.
- Set the time delay if required.
- Press the “start” button, the “:” flash. For the “basic”, “french”, “whole wheate”,
“milk bread” functions, short beeps are heard during the second kneading process.
They inform you when fruits or nuts may be added.
- At the end of the baking programme, one beep is heard and the appliance switches
automatically to keep warm for 60 minutes. When 10 beeps are heard, the programme
is finished. If you want to remove the bread before the end of the process, press the
“Start” button. Open the cover and take out the brand pan with an oven-cloth or with
the hook. Turn the bread pan over and shake lightly until the bread comes out. If the
kneading bar is still in the bread, loosen it with the hook. Let the bread cool down for
30 minutes.
- Press the “off” button.
Using the hook :
22 3
CONSIGNES DE SÉCURITÉ
CONSIGNES DE SÉCURITÉ
Dans toute utilisation d’appareils électriques,
des précautions de base sont à respecter.
Lire attentivement cette notice avant la première utilisation de l’appareil.
• Vérifier que le voltage indiqué sur la plaque signalétique de l’appareil correspond
bien à celui de votre installation électrique. Si ce n’est pas le cas, adressez-vous au
revendeur et ne branchez pas l’appareil.
• Ne jamais laisser l’appareil sans surveillance lorsqu’il est en fonctionnement.
• Ne jamais laisser à la portée des enfants et ne pas les laisser utiliser l’appareil seuls.
• Cet appareil est destiné à un usage domestique. Il doit être utilisé selon les
instructions du manuel. Ne jamais l’employer pour d’autres usages.
• Ne jamais plonger l’appareil dans l’eau ou tout autre liquide. Respecter les
instructions pour le nettoyage.
• Ne jamais utiliser l’appareil à l’extérieur. Cet appareil doit être utilisé dans un endroit
sec.
• Ne pas utiliser l’appareil avec les mains mouillées ou humides.
• Ne jamais utiliser l’appareil sur ou près de surfaces chaudes.
• Ne jamais déplacer ou débrancher l’appareil en tirant sur le cordon d’alimentation.
• Débrancher l’appareil avant de le nettoyer ou d’effectuer le remplacement d’un
élément.
• Vérifier régulièrement l’état du cordon d’alimentation. Ne jamais utiliser l’appareil si
le cordon d’alimentation, la prise ou l’appareil sont endommagés.
• Le cordon d’alimentation ne doit en aucun cas être en contact avec les parties chau-
des de l’appareil. Si le cordon chauffe anormalement, contacter un réparateur agréé.
• Ne jamais réparer l’appareil vous-même. Vous perdriez le bénéfice de la garantie.
Comme tout appareil électrique, il doit être réparé par une personne qualifiée.
De même, le changement du cordon d’alimentation représente un réel danger et il est
nécessaire de contacter un réparateur agréé.
When the kneading bar is in the bread,
loosen it with this object.
Take out the brand pan with
this part of hook.
FRANÇAIS
FRANÇAIS
WHITE & BROWN vous félicite d’avoir choisi ce produit et vous remercie de votre confiance.
Pour votre confort et votre sécurité, votre article a été vérifié à toutes les étapes de sa fabrication et a
passé avec succès tous nos tests de qualité. Nos produits sont conçus pour vous plaire tant par leur
design que par leur facilité d’utilisation et dans l’objectif constant de vous apporter complète satisfaction.

Précautions spécifiques :
• Ne jamais toucher les surfaces chaudes de l’appareil.
• Avant d’utiliser l’appareil, le placer dans un endroit dégagé, de façon à ce que l’air
puisse circuler tout autour. Veiller à ce qu’aucun objet ne soit posé dessus.
• La longueur du cordon de cet appareil a été calculée pour réduire les risques
d’accidents. Si il est trop court, utiliser une rallonge en veillant à ne pas la laisser
pendre sur la surface de travail et prendre toutes les précautions utiles pour qu’on ne
puisse pas se prendre les pieds dedans ou la tirer accidentellement.
• Au cours de son fonctionnement, l’appareil ne doit pas être mis en contact avec des
matériaux inflammables, par exemple des rideaux, tissus, etc…
• Ne pas utiliser sur une surface craignant la chaleur ni à proximité d’une plaque de
cuisson électrique ou à gaz.
• Débrancher l‘appareil lorsqu’il n’est pas en fonctionnement ou pour le nettoyer.
Toujours veiller à ce que l’appareil soit en position « arrêt » avant de le débrancher.
• Prendre toutes les précautions nécessaires pour sortir la cuve
lorsqu’elle est chaude
• L’appareil doit être utilisé dans une pièce où la température ambiante est comprise
entre 15 et 34 °C afin de donner des résultats satisfaisants.
LE FABRICANT NE SAURAIT ÊTRE TENU POUR RESPONSABLE
DE LA MAUVAISE UTILISATION DE L’APPAREIL.
CONSERVER SOIGNEUSEMENT CE MODE D’EMPLOI.
4
THE FUNCTIONS
THE FUNCTIONS
1- Basic : kneading, rising and baking normal bread.
2- French : kneading, rising and baking with a longer rising time
3- Whole wheat : kneading, rising and baking of whole wheat bread
4-
Quick : kneading, rise and baking quickly
5- Milk bread : kneading, rising and baking milk bread
6- Ultra fast I : kneading, rising and baking 500g bread in a short time
7-
Ultra fast II : kneading, rising and baking 750g bread in a short time
8- Dough : kneading and rising without baking
9- Jam : mixing and baking fruit with suggar
10-
Cake 1 : kneading, rising and baking cake
11- Cake 2 : kneading, rising and baking cake
12- Bake : only baking, without keading nor rising
OPERA
OPERA
TING TIME
TING TIME
Progr./Weight 500g 750g Some examples
1.Basic 2h53 3h00 French bread
2.French 3h40 3h50 French bread
3.Whole wheat 3h32 3h40 Whole weat bread
4.Quick 1h40 --- Cereals bread
5.Milk bread 2h50 2h55 Milk bread
6.Ultra fast I 0h58 --- “Quick rising yeats” bread
7.Ultra fast II --- 0h58 “Quick rising yeats” bread
8.Dough 1h30 --- Dough
9.Jam 1h20 --- Jam
10.Cake 1 2h50 --- Cake
11.Cake 2 2h55 3h00 Cake
12.Bake 1h00 --- ---
21

20
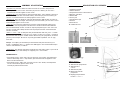
DESCRIPTION DE L
DESCRIPTION DE L
’APP
’APP
AREIL
AREIL
1. Hublot de contrôle
2. Tableau de bord
3. Poignée d’ouverture et de fermeture
4. Bouches d’aération
5. Bouton M/A
6. Cuve à pain
7. Pale de pétrissage
8. Crochet
9. Verre doseur
10. Cuillère doseuse
T
ableau de bord :
11. Ecran de contrôle
12. Sélection des programmes
13. Sélection de la
cuisson
14. Sélection du poids
15. Démarrage/arrêt du
programme
16. Réglage programmation
horaire « + » et « - »
5
SUMMAR
SUMMAR
Y OF OPERA
Y OF OPERA
TION
TION
• Function (12) : press this button to select one of the 12 functions. One pressure
corresponds with one function. Each time you press this button, you can hear a
sound and the function appears on the screen.
• Cooking (13) :
press this button to select the bread colour : light, medium or dark. One
pressure corresponds with one kind of cooking. Each time you press this button, you
can hear a sound and the kind of cooking appears on the screen.
• W
eight (14) : press this button to select the bread weight : 500g or 750g. One pressu-
re corresponds with one weight. Each time you press this button, you can hear a sound
and the weight appears on the screen.
• Start (15) :
once you have selected your function, weight and bread cooking press
this button to start the programme. You will hear a sound and the two dots between
hour and minute begin to flash. In order to stop the programme, press the “start” but-
ton for 2 seconds until a beep confirms that the program has been switched off (the
two dots are fixed).
• T
imer “+” and “-” (16) : to delay the time your breadmaker will start, press “+” button
to go to the hour you desire ( one pressure = 10 min), if necessary use the “-” button to
decrease the time and press “START” button. Before using this programme, we advice
you to try some recipes. Do not use any easily perishable ingredients such as eggs,
fresh milk…
Example : it is 8.30pm, you would like your bread to be ready the next morning at 7
o’clock, so 10h30 later. Press “+” button until 10:30 appears. The bread will be ready in
10 hours and 30 minutes, at 7.00 am
• Keep warm : your bread is kept warm for 60 minutes after baking stops. If you want to
take the bread out just after baking has stopped, press “start” button.
WARNING DISPLAY :
• If the display shows “H:HH” after you have pressed “start” button, the temperature
inside is still too high. Press “stop” button, open the lid and let the appliance cool
down from 10 to 20 minutes.
• If the display shows “E:EE” after you have pressed “start” button, the temperature
sensor is diconnected, please check sensor
carrefully by authorized technician.
11
16
16
13
14
15
12
1
4
2
3
5
7
6
9
10
8

DESCRIPTION DU T
DESCRIPTION DU T
ABLEAU DE BORD
ABLEAU DE BORD
• Prog (12) : appuyer sur cette touche pour sélectionner votre programme parmi les 12
disponibles (voir page 7). Une pression correspond à un programme.
A chaque pression un bip se fait entendre et les programmes défilent à l’écran.
•
Cuisson (13) : appuyer sur cette touche pour sélectionner la dorure du pain : croûte
légèrement dorée, moyennement dorée ou bien dorée. Une pression correspond à un
type de dorure. A chaque pression un bip se fait entendre et les modes de cuisson
défilent à l’écran.
•
Poids (14) : appuyer sur cette touche pour sélectionner la taille du pain : 500 g ou 750 g.
Une pression correspond à une taille de pain. A chaque pression un bip se fait enten-
dre et les poids défilent à l’écran.
•
Démarrage (15) : lorsque vous avez sélectionné votre programme, la taille du pain et le
type de cuisson désiré, appuyez sur la touche « démarrage » pour lancer le programme,
un bip se fait entendre et les deux points entre les heures et les minutes clignotent.
Pour arrêter le programme, appuyer environ 2 secondes sur la touche « démarrage »,
un bip se fait entendre et les deux points entre les heures et les minutes sont fixes.
• Programmation horaire « + » et « - » (16) : pour différer le démarrage de la machine.
Sélectionner le programme, le poids et la cuisson du pain : le temps nécessaire à la
réalisation complète du pain apparaît.
Appuyer ensuite sur la touche « + » jusqu’à l’affichage du temps désiré (une pression
= 10 minutes), appuyer sur la touche « - » pour réduire la durée si nécessaire, votre
pain sera ainsi prêt à la fin du temps affiché.
Appuyer sur la touche “démarrer” pour activer la programmation horaire.
Avant d’utiliser cette fonction, nous vous conseillons de tester quelques recettes au
préalable. Eviter d’utiliser des denrées périssables telles que les œufs ou le lait frais.
Exemple : il est 20h30. Vous voudriez que votre pain soit prêt à 7h demain matin, c’est à
dire dans 10h30. Appuyez sur la touche « + » jusqu’à ce que 10:30 apparaisse. Le pain
sera prêt dans 10h30 soit à 7h le lendemain matin.
•
Maintien au chaud. Le pain est automatiquement maintenu au chaud pendant 60
minutes après la fin de la cuisson.
Si vous souhaitez retirer le pain juste après la cuisson, appuyez sur la touche
« démarrage » pendant 2 secondes pour arrêter le programme.
6
DESCRIPTION OF THE APPLIANCE
DESCRIPTION OF THE APPLIANCE
1. Control windows
2. Control panel
3. Handle
4. Air vent
5. On / off knob
6. Bread pan (tank + blade)
7. Kneading blade
8. Hook
9. Measuring jug
10. Measuring spoon
Control panel
11. Display
12. Functions setting
13. Cooking setting
14. Weight setting
15. Start / Stop the programme
16. Timer “+” and “-”
19
1
4
2
3
5
11
16
16
13
14
15
12
9
10
7
6
8
-
 1
1
-
 2
2
-
 3
3
-
 4
4
-
 5
5
-
 6
6


WHITE & BROWN MP 546 LA TESSARA Le manuel du propriétaire
- Catégorie
- Machines à pain
- Taper
- Le manuel du propriétaire
- Ce manuel convient également à
dans d''autres langues
Autres documents
-
 GALA MD 10259 Le manuel du propriétaire
-
Platinum XBM1029S Manuel utilisateur
-
Breadman TR520BC Mode d'emploi
-
LAGRANGE FAIT MAISON Le manuel du propriétaire
-
Steba BM 1BM 2BM 3 Le manuel du propriétaire
-
-
 De Dietrich MAP-5511 Le manuel du propriétaire
-
Black and Decker B6000C Le manuel du propriétaire
-
Mellerware 26500B Manuel utilisateur
-
Rubbermaid 2060354 Guide d'installation

