La page est en cours de chargement...

LD630T/LD640T
User’s Guide

- 2 -
P
REFACE
Every effort has been made to ensure that the information in this document is complete, accurate, and
up-to-date. The manufacturer assumes no responsibility for the results of errors beyond its control. The
manufacturer also cannot guarantee that changes in software and equipment made by other
manufacturers and referred to in this manual will not affect the applicability of the information in it.
Mention of software products manufactured by other companies does not necessarily constitute
endorsement by
the manufacturer.
While all reasonable efforts have been made to make this document as accurate and helpful as possible,
we make no warranty of any kind, expressed or implied, as to the accuracy or completeness of the
information contained herein.
All rights are reserved by Oki Data Corporation. Unauthorized copying, transferring, translating, or
related actions are prohibited. You must obtain written permission from Oki Data Corporation
before
doing any of the above.
© 2012 Oki Data Corporation
OKI is a registered trademark of Oki Electric Industry Co., Ltd.
Energy Star is a trademark of the United States Environmental Protection Agency.
Microsoft, Windows, Windows Server and Windows Vista are registered trademarks of Microsoft
Corporation.
Apple, Macintosh, Rosetta, Mac and Mac OS are registered trademarks of Apple Inc.
Other product names and brand names are registered trademarks or trademarks of their
proprietors.
As an Energy Star Program Participant, the manufacturer has determined that this product
meets the Energy Star guidelines for energy efficiency.
This product complies with the requirements of the Council Directives 2004/108/EC (EMC) ,
2006/95/EC (LVD) ,1999/5/ EC (R&TTE) and 2011/65/EU(RoHS), as amended where
The following cables were used to evaluate this product to achieve EMC directive
2004/108/EC compliance and configurations other than this may affect that compli
ance.
CABLE TYPE CORECABLE TYPE LENGTH
(METRE)
CORE SHIELD
Power
1.8
1.8
1.8
1.8
USB
LAN
Serial
Parallel
3.0
WARNING! This is a class A product as defined in EN55022. In a domestic environment
this product may cause radio interference, in which case the user may be required to
take adequate measures.
applicable, on the
approximation of the laws of the member states relating to Electromagnetic
Compatibility, Low Voltage, Radio & Telecommunications Terminal Equipment, Energy related
Products and Restriction on the use of certain Hazardous Substances in electrical and
electronic equipment.

-3-
M
ANUFACTURER
Oki Data Corporation,
4-11-22 Shibaura, Minato-ku,
Tokyo 108-8551,
Japan
For all sales, support and general enquiries contact your local distributor.
I
MPORTER
TO
THE
EU/A
UTHORISED
REPRESENTATIVE
OKI Europe Limited (trading as OKI Printing Solutions)
Blays House
Wick Road
Egham
Surrey, TW20 0HJ
United Kingdom
For all sales, support and general enquiries contact your local distributor.
E
NVIRONMENTAL
INFORMATION

- 4 -
■ Table of Contents
※ Manual Information & Usage Precautions .................................................................. 5
1. Content Confirmation .................................................................................................... 9
2. Product Part Names..................................................................................................... 10
3. Installation & Usage ..................................................................................................... 12
3-1 Power Connection .................................................................................................... 12
3-2 Interface Cable Connection ...................................................................................... 13
3-3 Paper Installation ...................................................................................................... 15
3-4 Ribbon Installation .................................................................................................... 16
3-5 Buttons and LED ....................................................................................................... 20
3-6 Test printing .............................................................................................................. 22
4. Self-Test ........................................................................................................................ 23
5. Detailed features .......................................................................................................... 24
5-1 Printer setting using utility program ........................................................................... 24
5-2 Stand-alone Configuration Mode .............................................................................. 25
5-3 Pause/Cancel ........................................................................................................... 26
5-4 Media Calibration ...................................................................................................... 27
5-5 Smart Media Detection ............................................................................................. 28
5-6 Gap Sensor Auto Calibration Mode .......................................................................... 28
5-7 Black Mark Sensor Auto Calibration Mode ............................................................... 29
5-8 Manual Calibration Mode .......................................................................................... 30
5-9 Cover Closing Mode ................................................................................................. 31
5-10 Data Dump Mode .................................................................................................... 31
5-11 Factory Reset .......................................................................................................... 32
5-12 The Peel-Off (Option).............................................................................................. 32
5-13 Using Fan-Fold Paper ............................................................................................. 34
5-14 Auto Cutter (Option) ................................................................................................ 35
5-15 Real-Time Clock (Option) ....................................................................................... 36
6. Cleaning Head .............................................................................................................. 37
6-1 Cleaning Head .......................................................................................................... 37
6-2 Cleaning Sensors, Roller or/and Paper Path ............................................................ 38
7. Appendix ....................................................................................................................... 39
7-1 Specifications ............................................................................................................ 39
7-2 Label Types .............................................................................................................. 39

- 5 -
LD630T/LD640T
■ Manual Information
※ Manual Information & Usage Precautions
This user’s guide contains basic information for product usage as well as for emergency
measures that may be required.
※ The following separate manuals provide more detailed content on various technological
issues and areas.
1. Windows Driver Manual
This manual provides information on the installation instructions and main functions
of the Windows Driver.
2. Unified Label Utility-II Manual
This manual provides information on the usage of software for function selection of
this product, operating condition modification, etc.
3. Programming (SLCS) Manual
This manual provides information on label printer commands.
4. True Font Downloader Manual
This manual provides information on the usage of the font downloader that can
download True Fonts and facilitate their usage as Device Fonts.
5. Network Interface Manual
This manual provides information on the configuration and usage of Ethernet
interface.
6. Net Configuration Tool Manual
This manual provides information on the usage of the net configuration tool that can
configure Ethernet interface configuration on this product.
We at Oki Data maintain ongoing efforts to enhance and upgrade the functions and quality
of all our products. In following, product specifications and/or user’s guide content may
be changed without prior notice.

- 6 -
LD630T/LD640T
■ Safety Precautions
In using the present appliance, please keep the following safety regulations in order to
prevent any hazard or material damage.
WARNING
Violating following instructions can cause serious injury or death.
Do not bend the cable by force or leave it under any
heavy object.
• A damaged cable can cause a fire.
Do not plug in or unplug with your hands wet.
• You can be electrocuted.
Keep the plastic bag out of children’s reach.
• If not, a child may put the bag on his head.
Do not pull the cable to unplug.
• This can damage the cable, which is the origin of a fire or a
breakdown of the printer.
You must use only the supplied adapter.
• It is dangerous to use other adapters.
Do not plug several products in one multi-outlet.
• This can provoke over-heating and a fire.
• If the plug is wet or dirty, dry or wipe it before usage.
• If the plug does not fit perfectly with the outlet, do not plug in.
• Be sure to use only standardized multi-outlets.
PROHIBIT
ED
PROHIBIT
ED
PROHIBIT
ED
PROHIBIT
ED
PROHIBIT
ED
ONLY SUPPLIED ADAPTER
PROHIBIT
ED

- 7 -
LD630T/LD640T
CAUTION
Violating following instructions can cause slight wound or damage the appliance
.
Be careful not to get your fingers pinched when
opening or closing the paper cover. Also be careful
the paper cover does not slip off and drop.
Do not use the printer when it is out of order. This
can cause a fire or an electrocution.
• Switch off and unplug the printer before calling your dealer.
Do not let water or other foreign objects in the
printer.
• If this happened, switch off and unplug the printer before
calling your dealer.
Use only approved accessories and do not try to
disassemble, repair or remodel it for yourself.
• Call your dealer when you need these services.
• Do not touch the blade of auto cutter.
Install the printer on the stable surface.
• If the printer falls down, it can be broken and you can hurt
yourself.
If you observe a strange smoke, odor or noise from
the printer, unplug it before taking following
measures.
• Switch off the printer and unplug the set from the mains.
• After the disappearance of the smoke, call your dealer to
repair it.
TO UNPLUG
DISASSEMBLING
PROHIBITED
PROHIBIT
ED
PROHIBIT
ED
TO UNPLUG
PRINTER
PRINTER
PRINTER
PRINTER
DEALER
PRINTER
MECHANICAL
HAZARD

- 8 -
LD630T/LD640T
■ Other Precautions
The copyright for this user’s guide and various other manuals is property of the Oki Data
Corporation. Any copying or conversion into electronic firm and saving of this material
without the express written permission of Oki Data Corporation. is strictly prohibited.
Use of the information contained in this manual is not subject to any patent liability. This
manual has been prepared with utmost care and attention to detail but may contain certain
errors and/or omissions.
Oki Data Corporation. is not legally liable for any damages resulting from the use of the
information in this manual.
Oki Data Corporation. and its affiliates are not legally liable (United States excluded) for
any damages, loss, costs, and/or expenses that result from the breakdown, malfunction,
and/or misuse of the product due to violation or neglect of the operation and maintenance
information and instructions provided by the Oki Data Corporation., as well as from the
unauthorized alteration, repair, and/or modification of the product by the user and/or third
party.
Oki Data Corporation. is not legally liable for any damages and/or issues resulting from the
use of options and/or parts that are not authentic Oki Data products or authorized products.

- 9 -
LD630T/LD640T
1. Content Confirmation
The following items should all be contained in the printer package.
Contact the dealer from which the purchase was made if any item is damaged and/or
missing.
LD630T/LD640T
Power Cord
AC Adapter
1" Ribbon Core adapter
Ribbon take
up core
CD
User Documents
(Setup Guide, Safety/Warranty)

- 10 -
LD630T/LD640T
2. Product Part Names
Feed Button
Cover Lever
Printer Head
Paper Holder
Upper Gap Sensor
Cover STD
Black-Mark &
Notch Sensor
Pause Button
Paper Cover
Ribbon Assembly
Lower Gap Sensor

- 11 -
LD630T/LD640T
Power Switch
IEEE1284(Parallel)
USB
Fan-Fold or External Paper Cover
Power Jack
RS-232C(Serial)
Auto Cutter
(Option)
Label Peel-off
(Option)

- 12 -
LD630T/LD640T
3. Installation & Usage
※ CAUTION
- Be careful not to get your fingers pinched when opening or closing the paper cover.
Make sure to open the paper cover all the way until it locks into the open position.
- When loading roll paper, be careful not to get your fingers pinched between the paper roll
and the paper holder.
- Do not touch the cutter with your hands or do not put something into the cutter. Doing so
could result in an injury.
3-1 Power Connection
Connect power to the printer as shown below.
1) Turn off the printer power switch.
2) Check to see that the AC adapter voltage matches that of the power source.
3) Connect the AC adapter jack to the printer power connector.
4) Connect the power cord to the AC adapter.
5) Connect the power cord to a power source/outlet.
OFF
Power Switch
Power Cord
AC Adapter

- 13 -
LD630T/LD640T
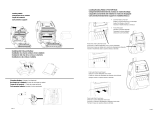
3-2 Interface Cable Connection
3-2-1 Standard Model
Connect the interface cable as shown below.
This printer supports the following communications interface standards.
- RS-232C(Serial) Cable
- IEEE1284(Parallel) Cable
- USB B-Type Cable
1) Turn off the power switch.
2) Connect the communication cable to the printer communication port to be used.
- Connect the RS-232C(Serial) Cable to the SERIAL port.
and tighten the screw on both sides.
This port requires a shielded cable less then 1.8m long.
- Connect the IEEE1284(Parallel) Cable to the PARALLEL port.
and fasten the clips on both sides.
This port requires a shielded cable with ferrite core less then 1.8m long.
- Connect USB B-Type cable to the USB port.
This port requires a shielded cable less then 1.8m long.
USB Cable
RS-232C(Serial) Cable
IEEE1284(Parallel) Cable

- 14 -
LD630T/LD640T
3-2-2 Ethernet Model
Connect the interface cable as shown below.
This printer supports the following communications interface standards.
- RS-232C(Serial) Cable
- LAN(Ethernet) Cable
- USB A-Type(WLAN Dongle only)
- USB B-Type Cable
1) Turn off the power switch.
2) Connect the communication cable to the printer communication port to be used.
- Connect the RS-232C(Serial) Cable to the SERIAL port.
and tighten the screw on both sides.
This port requires a shielded cable less then 1.8m long.
- Connect the LAN(Ethernet) Cable to the ETHERNET port.
This port requires a cable less then 3.0m long.
- Connect USB A-Type(WLAN Dongle only) to the HOST port.
- Connect USB B-Type Cable to the USB port.
This port requires a shielded cable less then 1.8m long.
USB B-Type Cable
RS-232C(Serial) Cable
LAN(Ethernet) Cable
USB A-Type
(WLAN Dongle only)

- 15 -
LD630T/LD640T
3-3 Paper Installation
1) Open the Paper Cover.
2) Spread the Paper Holder and insert
paper roll.
3) Open the Ribbon Assembly and then pull the paper so that it extends out of the front
of the printer. Push the paper under both of the Paper Guide.
* Whether the paper label is wound inwards or outwards, its printing surface must
face up.
4) If you use Black-Mark or Notch paper roll, please lift up the paper and match the
sensor position adjust the black mark or notch hole.
5) Close the Ribbon Assembly until a click sound is heard, close the Paper Cover.
Moveable Black-Mark Sensor
and Notch Sensor
●
●
Paper Guide
Ribbon Assembly
Paper Cover
Paper Holder

- 16 -
LD630T/LD640T
3-4 Ribbon Installation
3-4-1 Type of Ribbon
1) Type by Film Coating Location
- Take note before ribbon purchase that only ribbons facing outward can be used.
Outside Ribbon
Inside Ribbon
※ Note
- Follow the procedure described below to determine the coating surface of the ribbon.
• Ribbon test using adhesive material
- Perform contact test in order to determine which side is coated if there are useable
labels.
• Complete the following steps to carry out the contact test
- Remove the liner from the label
- Put a piece of adhesive surface of the label on the outer/inner surface of the ribbon,
and apply pressure.
- Remove the label from the ribbon
- Check whether adhesive surface of the label is stained by black ink ribbon.
2) Ribbon core size adapter
- This printer can use a one-inch or half-inch core ribbon.
- For a 1 - inch core ribbon a ribbon core adapter must be used with the ribbon and the
used ribbon take up core. (Adapters and used ribbon take up core were shipped with
the printer).
- When replacing a used ribbon remove the core adapters (if they were used) and the
exposed ribbon core from the used ribbon. These items are required for use with the
new ribbon.
Do not discard.
one-inch
half-inch
Coated Area
(Surface
to be printed)
Coated Area
(Surface to be printed)
( O )
( X )

- 17 -
LD630T/LD640T
3-4-2 Inserting a One - Inch Ribbon Core Adapter
1) Insert the ribbon core adapter into the new ribbon core and the used ribbon take up
core. (keep note of ribbon printing direction)
2) Open the ribbon assembly and insert the
ribbon and core by pushing from left to
right.
3) Apply tape to the leading edge of the
ribbon and fasten it to the used ribbon
take up core.
4) Press on both sides of the ribbon assembly to close it for printing.
3-4-3 Inserting a Half-Inch Core Ribbon
1) Open the ribbon assembly and insert the
ribbon and the used ribbon take up core
by pushing from left to right. (keep note of
ribbon printing direction)
2) Apply tape to the leading edge of the
ribbon and fasten it to the used ribbon
take up core.
3) Press on both sides of the ribbon assembly to close it for printing.
Tape
Tape
Core (one-inch)
Ribbon Core Adapter

- 18 -
LD630T/LD640T
3-4-4 Knob Adjustment by Ribbon Length
Ribbon lengths of 74m, 100m (0.5” core), and 300m (1” core) can all be used with this
product. Adjust the knob accurately according to the ribbon length (74 ~ 300 m).
Exercise care as print quality and operation can be affected.
The product is shipped with a default
setting for a ribbon length of 300m
(1” core). To use a 74m (0.5” core)
ribbon, adjust (rotate) the knob in the
direction of 74m prior to use.
When the cover is outside the knob
as shown in the image A, the ribbon
length is set to 74m. If the cover is
inside the knob as shown in Image
B, the ribbon length is set to 300m.
Image-A (74m)
Image -B (300m)
■ Knob Adjustment
- Grasp the ribbon while it is fitted and rotate the knob as shown in the image.
Knob
Cover
Knob
Ribbon

- 19 -
LD630T/LD640T
3-4-5 Narrow Ribbon Installation
When using ribbons of widths of 110mm or
smaller, install in a centered position on the
Ribbon Core Adapter.
3-4-6 Ribbon Removal
1) Use a knife or other sharp-edged object to cut the ribbon.
(Take care not to injure hands)
2) Open the ribbon assembly and remove the ribbon and core by pushing from left to right.
3) Remove the ribbon core adapter from the ribbon and core.
3-4-7 Ribbon Sensor Activation
Ribbon detection sensor is disabled by default factory settings. Check the settings related
to ribbon detection sensor if printing does not stop when the printer is out of ribbon or
ribbon is broken.
* Ribbon detection sensor can be enabled by command control. And default setting can
be changed by Unified Label Utility-II.
※ CAUTION
1. When replacing a ribbon, keep the now exposed core of the old ribbon as it will be
required for use as the used ribbon take up core for the new ribbon.
2. As the ribbon core adapter is required for continuous use, make sure not to misplace it.
Cutting

- 20 -
LD630T/LD640T
3-5 Buttons and LED
3-5-1 Button Operations
Printer state
before
operation
Button
Operation procedure
Printer operation mode
Feed/
Cancel
Pause
Power OFF
Depress
-
• Apply power while
depressing the button
• Hold the button for about
five seconds
Self-test Printing Mode.
Print
Standby
Depress
-
• Depress the button softly
and release it immediately
Feed Mode
Print
Standby
-
Depress
• Depress the button for two
seconds and continue to
hold
Stand-alone
configuration Mode
During
printing
Depress
-
• Depress and hold the
button
Print Cancel Mode
During
printing
-
Depress
• Depress the button softly
and release it immediately
Print Pause Mode
1/250