Philips HD3198 Manuel utilisateur
- Catégorie
- Cuiseurs multiples
- Taper
- Manuel utilisateur
Ce manuel convient également à

EN User manual 1 FR Mode d’emploi 23
2
a
k
g
h
i
j
b
c
d
e
f
l
n
m
o
v
t
u
s
q
r
p
http://www.philips.com/welcome
User manual
http://www.philips.com/welcome
Recipe
http://www.philips.com/welcome
Warranty
a
b
d e f
c
ihg
1
1 2
3
4 5
6
7
9
8
10
3
HD3198
Specifications are subject to change without notice
© 2018 Koninklijke Philips N.V.
All rights reserved
HD3198_UM_FR_v3.0
Always there to help you
Register your product and get support from
Question?
Contact
Philips
www.philips.com/welcome

11 12
13 14
15 16
17
18
19 20
21
22
23
24
25
26
32
3S
31
3029
2827
33
34
40
42
39
3S
41
36
35
37
38
43
45
3S
44

1
EN
English
Contents
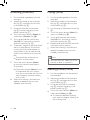
1 Your multicooker 2
2 Important 2
Safety 2
Electromagnetic elds (EMF) 5
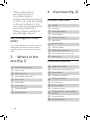
3 What’s in the box (g. 1) 6
4 Overview (g. 2) 6
Product overview 6
Controls overview 6
Menus overview 7
5 Using the multicooker (g. 3) 8
Before rst use 8
Cooking rice (Riz) 8
Making risotto (Risotto) 9
Cooking cereal (Céréales) 9
Making soup (Soupe/Sauce) 10
Steam (Vapeur) 10
Stew (Mijoter) 10
Slow cooking (Slow cooking) 11
Baking (Four) 11
Roasting (Rissoler) 12
Frying (Frire) 12
Making pizza (Pizza) 12
Making omelette (Omelette) 13
Boiling pasta (Pâtes) 13
Boiling (Bouillir) 14
Making beverage (Compote) 14
Making conture (Conture) 14
Making yogurt (Yaourt) 15
Reheating (Réchauer) 15
Manual (Manuel) 15
Multi-stage cooking 16
MyRecipe (MyRecipe) 16
Warm keeping 17
Setting up the cooking time 17
Preset time for delayed
cooking 18
Setting up the WiFi
connection 18
Setting up the child lock 18
6 Cleaning and Maintenance 19
Interior 19
Exterior 19
Accessories 19
7 Recycling 19
8 Guarantee and service 19
9 Specications 20
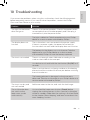
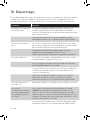
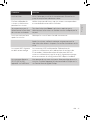
10 Troubleshooting 21

2
EN
1 Your
multicooker
Congratulations on your purchase, and
welcome to Philips!
To fully benet from the support that
Philips oers, register your product at
www.philips.com/welcome.
2 Important
Safety
Read this user manual carefully before
you use the appliance, and save it for
future reference.
Danger
• Do not immerse the
multicooker in water, nor
rinse it under the tap.
•
The appliance must not be
immersed.
Warning
•
This appliance shall
not be used by children
from 0 year to 8 years.
This appliance can be
used by children aged
from 8 years and above
if they are continuously
supervised and they have
been given supervision or
instruction concerning use
of the appliance in a safe
way and understand the
hazards involved.
•
This appliance can be
used by people with
reduced physical, sensory
or mental capabilities or
lack of experience and
knowledge if they have
been given supervision or
instruction concerning use
of the appliance in a safe
way and understand the
hazards involved.
•
Keep the appliance and
its cord out of reach of
children ages less than 8
years.
•
Cleaning and maintenance
shall not be made by
children unless they
are older than 8 and
supervised.
•
Children shall not play with
the appliance.
•
Cooking appliances should
be positioned in a stable
situation with the handles
(if any) positioned to avoid
spillage of the hot liquids.
•
T
his appliance is intended
to be used in household
and similar applications
such as:
•
sta kitchen areas in
shops, oces and other
working environments;
•
farm houses;
•
by clients in hotels,
motels and other

3
EN
English
residential type
environments;
•
bed and breakfast type
environments.
•
Make sure that the
damaged power cord
is replaced by Philips, a
service center authorized
by Philips or similarly
qualied persons in order
to avoid a hazard.
•
Make sure to avoid spillage
on the power connector to
avoid a potential hazard.
•
Always follow the
instructions and use the
appliance properly to avoid
potential injury.
•
CAUTION: Surface of the
heating element is subject
to residual heat after use.
•
The appliance is not
intended to be operated
by means of an external
timer or a separate
remote-control system.
•
To satisfy RF exposure
requirements, this device
should be operated with a
separation distance of at
least 20 centimeters from
all persons when the
Wi-Fi router is switched on.
The antenna used for the
transmitter must not be
co-located in conjunction
with any other antenna or
transmitter.
•
Check if the voltage
indicated on the
multicooker corresponds
to the local power voltage
before you connect it.
•
Check if the steam valve is
clear before every cooking
and becomes block during
the cooking.
•
If the steam valve is
blocked, the pressure will
increase in the appliance
and the jet of steam could
hurt and scald users.
•
During cooking, steam can
only come out from the
steam valve. If steam starts
to come out between the
top lid and main body,
immediately power o
the multicooker. Check
if the sealing ring is in
place, in good condition
and stacked with foreign
objects/food residues. If
there are foreign objects/
food residues, clean
them up. If there is no
foreign object, return it
to the service center for
checking and sealing ring
replacement if necessary.
Note that sealing ring
lifetime is limited and
depend on cooking and
maintenance frequency.
•
During cooking, water or
liquid food can’t come
out from the inner pot.

4
EN
The only exception is
that water condenses
around the steam valve
and small amount of
water condensate leaks
on the back side of the
multicooker if top lid was
opened during cooking,
this can be easily wiped
o by clean cloth and
continuous cooking. If any
water/liquid food starts to
come out directly from the
steam valve or between
the top lid and main body,
immediately power o
the multicooker. Check
if the amount of water in
inner pot doesn’t exceed
allowed limit, amount of
food corresponds to the
recipe, cooking mode and
timing selection are correct
and the multicooker is
used according to the
user manual. Check if the
sealing ring is in place,
in good condition and
stacked with foreign
objects/food residues. If
there are foreign objects/
food residues, clean them
up. If there is no foreign
object and the multicooker
is used according to the
user manual, return it
to the service center for
checking and repair if
necessary.
•
Only connect the
multicooker to a grounded
power outlet. Always
make sure that the plug
is inserted rmly into the
power outlet.
•
Do not use the appliance
if the plug, the power cord,
the inner pot, the sealing
ring, or the main body is
damaged.
•
Do not let the power cord
hang over the edge of the
table or worktop on which
the multicooker stands.
•
Make sure the heating
element, the temperature
sensor, and the outside of
the inner pot are clean and
dry before you put the plug
in the power outlet.
•
Do not plug in the
multicooker or touch any of
the buttons on the control
panel with wet hands.
•
Do not put too much
cooking oil in the inner pot
to deep fry ingredients.
Caution
•
Never use any accessories
or parts from other
manufacturers or that
Philips does not specically
recommend. If you use
such accessories or parts,
your guarantee becomes
invalid.
•
Do not expose the
multicooker to high

5
EN
English
temperatures, nor place
it on a working or still hot
stove or cooker.
•
Do not expose the
multicooker to direct
sunlight.
•
Place the multicooker on a
stable, horizontal, and level
surface.
•
Always put the inner pot in
the multicooker before you
put the plug in the power
outlet and switch it on.
•
Do not place the inner pot
directly over an open re to
cook dishes.
•
Do not use the inner pot if
it is deformed.
•
The accessible surfaces
may become hot when the
multicooker is operating.
Take extra caution when
touching the multicooker.
•
Beware of hot steam
coming out of the steam
vent during cooking or out
of the multicooker when
you open the lid. Keep
hands and face away from
the multicooker to avoid
the steam.
•
The inner pot and steamer
during and after cooking
process, may be hot and
heavy.
•
Do not lift and move the
multicooker while it is
operating.
•
Do not exceed the
maximum water level
indicated in the inner pot
to prevent overow.
•
Do not place the cooking
utensils inside the pot
during cooking, warm
keeping or reheating.
•
Only use the cooking
utensils provided. Avoid
using sharp utensils.
•
To avoid scratches, it is
not recommended to
cook ingredients with
crustaceans and shellsh.
Remove the hard shells
before cooking.
•
Do not insert metallic
objects or alien substances
into the steam vent.
•
Do not place a magnetic
substance on the lid. Do
not use the multicooker
near a magnetic substance.
•
Always let the multicooker
cool down before you
clean or move it.
•
Always clean the
multicooker after use. Do
not clean the multicooker
in dishwasher.
•
Always unplug the
multicooker if not used for
a longer period.

6
EN
•
If the multicooker is
used improperly or
for professional or
semiprofessional purposes,
or if it is not used according
to the instructions in this
user manual, the guarantee
becomes invalid and
Philips refuses liability for
any damage caused.
Electromagnetic elds
(EMF)
This Philips appliance complies with all
applicable standards and regulations
regarding exposure to electromagnetic
elds.
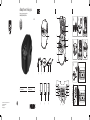
3 What’s in the
box (fig. 1)
a
Multicooker main unit
b
Power cord
c
Measuring cup
d
Detachable steam tray
e
Rice scoop
f
Soup ladle
g
User manual
h
Recipe booklet
i
Warranty card
4 Overview (fig. 2)
Product overview
a
Top lid
b
Inner pot
c
Lid release button
d
Control panel
e
Heating element
f
Main body
g
Power socket
h
Cooker handle
i
Water level indications
j
Detachable steam vent cap
k
Sealing ring
Controls overview
l
Keep-warm button
m
Cooking time/preset button
n
Menu button
o
Temperature button
p
Cooking functions
q
WiFi indicator
r
Display screen
s
Decrease button
t
MyRecipe/Multi-stage cooking
button
u
Increase button
v
Start/O button

7
EN
English
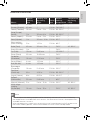
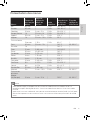
Menus overview
Menus
Default
cooking
time
Cooking time
regulating
range
Preset
time
Default
cooking
temperature
Temperature
regulating
range
Rice (Riz) 40 min / 1-24 hr 130-140°C /
Risotto (Risotto) 40 min / 1-24 hr 130-140°C /
Cereal (Céréales) 10 min 5 min - 2 hr 1-24 hr 90-100°C /
Soup (Soupe/
Sauce) 1 hr 20 min-4 hr 1-24 hr 90-100°C /
Steam (Vapeur) 20 min 5 min - 2 hr 1-24 hr 100°C /
Stew (Mijoter) 1 hr 20 min - 10 hr 1-24 hr 95°C /
Slow cooking
(Slow cooking) 5 hr 1-15 hr 1-24 hr 80°C /
Bake (Four) 45 min 20 min - 2 hr / 130°C 40-160°C
Roast (Rissoler) 1 hr / / 130°C /
Fry (Frire) 15 min 5-60 min / 145-160°C /
Pizza (Pizza) 35 min 10-60 min / 130°C /
Omelette
(Omelette) 10 min 5-20 min / 120°C /
Pasta (Pâtes) 4 min 1-15 min / 100°C /
Boil (Bouillir) 4 min 1-15 min / 100°C /
Beverages
(Compote) 10 min 5-40 min 1-24 hr 100°C /
Conture
(Conture) 6 hr 4-10 hr 1-24 hr 90-100°C /
Yogurt (Yaourt) 8 hr 6-12 hr 1-24 hr 40±3°C /
Reheat
(Réchauer) 25 min 5-60 min / 85°C /
Manual (Manuel) 2 hr 5 min - 10 hr 1-24 hr 100°C 30-160°C
Multi-stage
cooking
(MyRecipe) 10 min 5 min - 15 hr / 120°C 30-160°C
Note
•
You can adjust the cooking temperature for the baking and manual functions. For baking,
the temperature is available from 40°C to 160°C; for the manual function, the temperature is
available from 30°C to 160°C.
•
After the cooking has started, you can touch the Start/Cancel button (On/O) to deactivate
the current cooking process, and the multicooker will switch to the standby mode.

8
EN
5 Using the
multicooker
(fig. 3)
Note
•
For all menus, do not exceed the MAX
indication on the inside of the inner pot
when putting food, liquid or ingredients
in it, otherwise the food may overow
during cooking.
•
The cooking time does not display
straight from the beginning for rice (Riz)
and risotto (Risotto). displays on
the screen during most of the cooking
time as the multicooker needs to detect
the water/liquid and ingredient volume
in the initial preparation stage. When the
multicooker detects the actual cooking
time needed, the remaining cooking
time displays on the screen. For cereal
(Céréales), steam (Vapeur), soup (Soupe/
Sauce), conture (Conture), beverage
(Compote), boil (Bouillir) and pasta
(Pâtes), displays on the screen
before the water/liquid is brought to boil.
When the water/liquid starts boiling, the
set cooking time displays on the screen.
•
Refer to the recipe booklet for more
details on cooking with each menu.
•
Within 30 seconds after the multicooker
is plugged in, you can reset the
multicooker including the WiFi module
to factory mode. To do so, touch
increase "+" for 5 to 10 seconds and
"--:--" displays on the screen. All the
saved recipes and the previous WiFi
connection will be removed after reset.
Tip
•
To select a certain menu, touch the
menu button (Menu) repeatedly. You
can also touch the menu button (Menu)
once, and then touch the increase (+) or
decrease (-) button to do so.
Before rst use
1
Take out all the accessories from
the inner pot, and remove the
packaging material of the inner pot.
2
Clean all parts of the multicooker
thoroughly before using it for the
rst time (see chapter ‘Cleaning and
Maintenance’).
Note
•
Make sure all parts are completely dry
before you start using the multicooker.
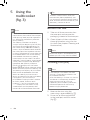
Cooking rice (Riz)
Note
•
If the voltage is unstable at the area
you live, it is possible that food in the
multicooker overows.
•
After the cooking is nished, stir the rice
and loosen it immediately to release
excessive moisture for uy rice.
•
Depending on the cooking conditions,
the bottom portion of the rice may
become slightly browned.
1
Measure the rice using the
measuring cup provided (g.
a
).
2
Rinse rice, put the washed rice
in the inner pot, and ll in water
(g.
b
).

9
EN
English
Note
•
For details about the ratio of rice and
water, refer to the recipe booklet.
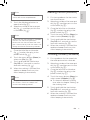
3
Touch the lid release button to
open the lid (g.
c
).
4
Wipe the outside of the inner pot
dry (g.
d
), and then put it in the
multicooker (g.
e
).
Note
•
Make sure that the inner pot is in proper
contact with the heating element.
•
Make sure that the outside of the inner
pot is clean and dry, and that there is no
foreign residue on the heating element.
5
Close the lid of the multicooker
(g.
f
), and put the plug in the
power socket (g.
g
).
6
Touch the menu button (Menu) to
select rice (Riz) (g.
h
).
7
Touch and hold the start button
(On/O) for 3 seconds to conrm
and start cooking (g.
i
).
8
When the cooking is nished, the
appliance beeps and turns into
warm keeping automatically.
Note
•
The appliance remains at warm keeping
for 12 hours, after that it beeps and
cease warm keeping process.
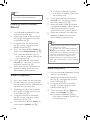
Making risotto (Risotto)
1
Put the ingredients for the risotto
into the inner pot.
2
Wipe the outside of the inner pot
dry (g.
d
), and then put it in the
multicooker (g.
e
).
3
Close the lid of the multicooker
(g.
f
), and put the plug in the
power socket (g.
g
).
4
Touch the menu button (Menu) to
select risotto (Risotto) (g.
j
).
5
Touch and hold the start button
(On/O) for 3 seconds to conrm
and start cooking (g.
i
).
6
When the cooking is nished, the
appliance beeps and turns into
warm keeping automatically.
Cooking cereal (Céréales)
1
Put ingredients for the cereal into
the inner pot and stir a little bit.
2
Wipe the outside of the inner pot
dry (g.
d
), and then put it in the
multicooker (g.
e
).
3
Close the lid of the multicooker
(g.
f
), and put the plug in the
power socket (g.
g
).
4
Touch the menu button (Menu) to
select cereal (Céréales) (g.
k
).
»
To choose a dierent cooking
time, refer to chapter "Setting up
the cooking time".
5
Touch and hold the start button
(On/O) for 3 seconds to conrm
and start cooking (g.
i
).
6
When the cooking is nished, the
appliance beeps and turns into
warm keeping automatically.

10
EN
Note
•
For details about the ratio of food and
liquid, refer to the recipe booklet.
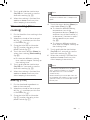
Making soup (Soupe/
Sauce)
1
Put food and ingredients for the
soup into the inner pot.
2
Wipe the outside of the inner pot
dry (g.
d
), and then put it in the
multicooker (g.
e
).
3
Close the lid of the multicooker
(g.
f
), and put the plug in the
power socket (g.
g
).
4
Touch the menu button (Menu) to
select soup (Soupe/Sauce) (g.
l
).
»
To choose a dierent cooking
time, refer to chapter "Setting up
the cooking time".
5
Touch and hold the start button
(On/O) for 3 seconds to conrm
and start cooking (g.
i
).
6
When the cooking is nished, the
appliance beeps and turns into
warm keeping automatically.
Steam (Vapeur)
1
Pour some water into the inner pot.
2
Put the steam tray in the inner pot,
put the food in a bowl, and then put
the bowl on the steam tray.
3
Wipe the outside of the inner pot
dry (g.
d
), and then put it in the
multicooker (g.
e
).
4
Close the lid of the multicooker
(g.
f
), and put the plug in the
power socket (g.
g
).
5
Touch the menu button (Menu) to
select Steam (Vapeur) (g.
m
).
»
To choose a dierent cooking
time, refer to chapter "Setting up
the cooking time".
6
Touch and hold the start button
(On/O) for 3 seconds to conrm
and start cooking (g.
i
).
7
When the water is brought to boil,
the appliance beeps, the remaining
steaming time displays on the
screen and starts counting down.
8
When the cooking is nished, the
appliance beeps and turns into
warm keeping automatically.
Note
•
When steaming food, do not immerse
the steam tray in water.
•
displays on the screen before the
water/liquid is brought to boil. When the
water/liquid starts boiling, the remaining
steaming time displays on the screen.
•
After the steaming is nished, use a
kitchen glove or a cloth to remove the
bowl and steam basket, as they could be
very hot.
Stew (Mijoter)
1
Put the food and ingredients for the
stew in the inner pot.
2
Wipe the outside of the inner pot
dry (g.
d
), and then put it in the
multicooker (g.
e
).
3
Close the lid of the multicooker
(g.
f
), and put the plug in the
power socket (g.
g
).
4
Touch the menu button (Menu) to
select stew (Mijoter) (g.
n
).
»
To choose a dierent cooking
time, refer to chapter "Setting up
the cooking time".

11
EN
English
5
Touch and hold the start button
(On/O) for 3 seconds to conrm
and start cooking (g.
i
).
6
When the cooking is nished, the
appliance beeps and turns into
warm keeping automatically.
Slow cooking (Slow
cooking)
1
Put the food for slow cooking in the
inner pot.
2
Wipe the outside of the inner pot
dry (g.
d
), and then put it in the
multicooker (g.
e
).
3
Close the lid of the multicooker
(g.
f
), and put the plug in the
power socket (g.
g
).
4
Touch the menu button (Menu) to
select slow cooking (Slow cooking)
(g.
o
).
»
To choose a dierent cooking
time, refer to chapter "Setting up
the cooking time".
5
Touch and hold the start button
(On/O) for 3 seconds to conrm
and start cooking (g.
i
).
6
When the cooking is nished, the
appliance beeps and turns into
warm keeping automatically.
Baking (Four)
1
Put the food and ingredients to
bake in the inner pot.
2
Wipe the outside of the inner pot
dry (g.
d
), and then put it in the
multicooker (g.
e
).
3
Close the lid of the multicooker
(g.
f
), and put the plug in the
power socket (g.
g
).
Note
•
If you bake other food with a
temperature above 140°C, keep the lid
open.
4
Touch the menu button (Menu) to
select bake (Four) (g.
p
).
»
To choose a dierent baking
temperature, touch the
temperature button (Temp) rst,
and then touch the increase (+)
or decrease (-) button to select
the temperature you need.
(g.
q
)
»
To choose a dierent cooking
time, refer to chapter "Setting up
the cooking time".
5
Touch and hold the start button
(On/O) for 3 seconds to conrm
and start cooking (g.
i
).
6
When the cooking is nished, the
appliance beeps and turns into
warm keeping automatically.
Note
•
If the baking temperature is set below
80°C, when the cooking is nished,
the appliance turns into standby
automatically.
•
When removing the inner pot from the
multicooker after cooking, use a kitchen
glove or a cloth, as the inner pot could
be very hot.

12
EN
Roasting (Rissoler)
1
Put food and ingredients into the
inner pot.
2
Wipe the outside of the inner pot
dry (g.
d
), and then put it in the
multicooker (g.
e
).
3
Close the lid of the multicooker
(g.
f
), and put the plug in the
power socket (g.
g
).
4
Touch the menu button (Menu) to
select roast (Rissoler) (g.
r
).
5
Touch and hold the start button
(On/O) for 3 seconds to conrm
and start cooking (g.
i
).
6
There are 2 stages of roasting. When
the rst stage (about 35 minutes)
is over, the multicooker beeps as
a reminder for you to open the lid,
and turn the food over in the inner
pot.
»
The remaining cooking time
displays on the screen.
7
Touch the menu button (Menu)
to start the second stage (about
25 minutes).
»
If the menu button (Menu) is not
touched after the rst stage is
over, the multicooker will turn into
warm keeping until the cooking
time is over.
8
When the cooking is nished, the
appliance beeps and turns into
standby automatically.
Frying (Frire)
1
Put food and ingredients into the
inner pot.
2
Wipe the outside of the inner pot
dry (g.
d
), and then put it in the
multicooker (g.
e
).
3
Put the plug in the power socket (g.
g
).
4
Touch the menu button (Menu) to
select fry (Frire) (g.
s
).
5
Touch and hold the start button
(On/O) for 3 seconds to conrm
and start cooking (g.
i
).
6
Keep the lid open and stir the food
constantly with a spatula.
7
When the cooking is nished, the
appliance beeps and turns into
standby automatically.
Note
•
Do not put too much cooking oil in the
inner pot to deep fry ingredients.
Making pizza (Pizza)
1
Put the ingredients for the pizza in
the inner pot.
2
Wipe the outside of the inner pot
dry (g.
d
), and then put it in the
multicooker (g.
e
).
3
Close the lid of the multicooker
(g.
f
), and put the plug in the
power socket (g.
g
).
4
Touch the menu button (Menu) to
select pizza (Pizza) (g.
t
).
»
To choose a dierent cooking
time, refer to chapter "Setting up
the cooking time".

13
EN
English
5
Touch and hold the start button
(On/O) for 3 seconds to conrm
and start cooking (g.
i
).
6
When the cooking is nished, the
appliance beeps and turns into
warm keeping automatically.
Note
•
If you cook with frozen pizza, you can
adjust the cooking time according to your
own preference. The pizza gets browner
as the cooking time increases.
Making omelette
(Omelette)
1
Put the ingredients for the omelette
in the inner pot.
2
Wipe the outside of the inner pot
dry (g.
d
), and then put it in the
multicooker (g.
e
).
3
Close the lid of the multicooker
(g.
f
), and put the plug in the
power socket (g.
g
).
4
Touch the menu button (Menu) to
select omelette (Omelette) (g.
u
).
»
To choose a dierent cooking
time, refer to chapter "Setting up
the cooking time".
5
Touch and hold the start button
(On/O) for 3 seconds to conrm
and start cooking (g.
i
).
6
When the cooking is nished, the
appliance beeps and turns into
standby automatically.
Boiling pasta (Pâtes)
1
Fill the inner pot with some water.
Note
•
Do not exceed the MAX indication on
the inside of the inner pot.
2
Wipe the outside of the inner pot
dry (g.
d
), and then put it in the
multicooker (g.
e
).
3
Close the lid of the multicooker
(g.
f
), and put the plug in the
power socket (g.
g
).
4
Touch the menu button (Menu) to
select pasta (Pâtes) (g.
v
).
»
To choose a dierent cooking
time, refer to chapter "Setting up
the cooking time".
5
Touch and hold the start button
(On/O) for 3 seconds to conrm
and start cooking (g.
i
).
6
When the water is brought to boil,
the multicooker beeps as a reminder
for you to open the lid and put the
pasta in the inner pot.
7
After the pasta is put in the inner
pot, touch the menu button (Menu)
to resume the cooking process.
8
Keep the lid open and constantly
stir the pasta with a spatula.
9
When the cooking is nished, the
appliance beeps and turns into
standby automatically.

14
EN
Boiling (Bouillir)
1
Fill the inner pot with some water.
Note
•
Do not exceed the MAX indication on
the inside of the inner pot.
2
Wipe the outside of the inner pot
dry (g.
d
), and then put it in the
multicooker (g.
e
).
3
Close the lid of the multicooker
(g.
f
), and put the plug in the
power socket (g.
g
).
4
Touch the menu button (Menu) to
select boil (Bouillir) (g.
w
).
»
To choose a dierent cooking
time, refer to chapter "Setting up
the cooking time".
5
Touch and hold the start button
(On/O) for 3 seconds to conrm
and start cooking (g.
i
).
6
When the water is brought to boil,
the multicooker beeps as a reminder
for you to open the lid and put the
food in the inner pot.
7
After the food is put in the inner
pot, close the lid and touch the
menu button (Menu) to resume the
cooking process.
8
When the cooking is nished, the
appliance beeps and turns into
standby automatically.
Making beverage
(Compote)
1
Put the ingredients for the beverage
in the inner pot.
2
Wipe the outside of the inner pot
dry (g.
d
), and then put it in the
multicooker (g.
e
).
3
Close the lid of the multicooker
(g.
f
), and put the plug in the
power socket (g.
g
).
4
Touch the menu button (Menu) to
select beverage (Compote) (g.
x
).
»
To choose a dierent cooking
time, refer to chapter "Setting up
the cooking time".
5
Touch and hold the start button
(On/O) for 3 seconds to conrm
and start cooking (g.
i
).
6
When the cooking is nished, the
appliance beeps and turns into
warm keeping automatically.
Making conture
(Conture)
1
Put the ingredients for the conture
in the inner pot.
2
Wipe the outside of the inner pot
dry (g.
d
), and then put it in the
multicooker (g.
e
).
3
Close the lid of the multicooker
(g.
f
), and put the plug in the
power socket (g.
g
).
4
Touch the menu button (Menu) to
select conture (Conture) (g.
y
).
»
To choose a dierent cooking
time, refer to chapter "Setting up
the cooking time".
5
Touch and hold the start button
(On/O) for 3 seconds to conrm
and start cooking (g.
i
).

15
EN
English
6
When the cooking is nished, the
appliance beeps and turns into
warm keeping automatically.
Making yogurt (Yaourt)
1
Whisk the ingredients for the yogurt
well and put them in the inner pot.
2
Wipe the outside of the inner pot
dry (g.
d
), and then put it in the
multicooker (g.
e
).
3
Close the lid of the multicooker
(g.
f
), and put the plug in the
power socket (g.
g
).
4
Touch the menu button (Menu) to
select yogurt (Yaourt) (g.
z
).
»
To choose a dierent cooking
time, refer to chapter "Setting up
the cooking time".
5
Touch and hold the start button
(On/O) for 3 seconds to conrm
and start cooking (g.
i
).
6
When the cooking is nished, the
appliance beeps and turns into
standby automatically.
Reheating (Réchauer)
1
Loosen the food and evenly
distribute it in the inner pot.
2
If needed, pour some water onto the
food to prevent it from becoming
too dry. The quantity of the water
depends on the amount of food.
3
Wipe the outside of the inner pot
dry (g.
d
), and then put it in the
multicooker (g.
e
).
4
Close the lid of the multicooker
(g.
f
), and put the plug in the
power socket (g.
g
).
5
Touch the menu button (Menu) to
select reheat (Réchauer) (g.
{
).
»
To choose a dierent cooking
time, refer to chapter "Setting up
the cooking time".
6
Touch and hold the start button
(On/O) for 3 seconds to conrm
and start cooking (g.
i
).
7
When the cooking is nished, the
appliance beeps and turns into
warm keeping automatically.
Manual (Manuel)
You can use the manual function to
cook food with more control over the
cooking time and temperature.
1
Put food and ingredients into the
inner pot.
2
Wipe the outside of the inner pot
dry (g.
d
), and then put it in the
multicooker (g.
e
).
3
Close the lid of the multicooker
(g.
f
), and put the plug in the
power socket (g.
g
).
4
Touch the menu button (Menu) to
select manual (Manuel) (g.
|
).
»
To choose a dierent cooking
temperature, touch the
temperature button (Temp) rst,
and then touch the increase (+)
or decrease (-) button to select
the temperature you need.
(g.
q
)
»
To choose a dierent cooking
time, refer to chapter "Setting up
the cooking time".
5
Touch and hold the start button
(On/O) for 3 seconds to conrm
and start cooking (g.
i
).
6
When the cooking is nished, the
appliance beeps and turns into
warm keeping automatically.

16
EN
Note
•
If you select a temperature below 80°C,
the multicooker automatically turns into
standby after the cooking process is
nished.
•
If you select a temperature above 140°C,
the top lid must be open during cooking.
Multi-stage cooking
With the multi-stage cooking function,
you can set up to 9 stages of cooking
processes with dierent time and
temperature.
For example, you can set the rst stage
for 5 minutes at 160°C, the second stage
for 10 minutes at 100°C and the last
stage for 20 minutes at 80°C.
1
When the multicooker is at standby
mode, touch the multi-stage
cooking button (MyRecipe). (g.
}
)
»
"1" displays on the screen.
2
Refer to chapter "Setting up the
cooking time" and select the
cooking time for stage 1.
3
To choose a dierent cooking
temperature, touch the temperature
button (Temp) rst, and then touch
the increase (+) or decrease (-)
button to select the temperature
you need for stage 1. (g.
~
)
4
Touch the multi-stage cooking
button (MyRecipe) again and move
to stage 2. (g.
)
»
"2" displays on the screen.
5
Set the cooking time and
temperature for stage 2.
6
Repeat the above steps until you
have set all the stages you need,
and then touch and hold the start
button (On/O) for 3 seconds to
conrm and start cooking (g.
i
).
MyRecipe (MyRecipe)
Saving MyRecipe settings
Within 10 minutes after the stage
cooking is nished, you can save the
cooking stages in "MyRecipe".
1
Touch and hold (MyRecipe) for
3 seconds. (g.
€
)
»
“F1” displays on the screen.
2
Touch the increase (+) or decrease
(-) button to select one of the slots:
F1, F2, F3, F4 or F5 (g.
).
3
Touch the multi-stage cooking
button (MyRecipe) to conrm and
save the cooking stages to the
designated slot (g.
‚
).
Note
•
You can save up to 5 multi-stage
cooking recipes in MyRecipe, and they
are saved as F1, F2, F3, F4 an F5.
•
To replace one of the current multi-
stage cooking recipes with a new setting,
follow the same steps above to do so.
When you are at step 2, make sure that
you select a slot with the multi-stage
cooking recipe you no longer need, and
then touch the multi-stage cooking
button (MyRecipe) to conrm and save
the new setting to the same slot.
•
The total cooking time for all the cooking
stages has a maximum limitation of 24
hours.

17
EN
English
Selecting already saved
MyRecipe (
MyRecipe
) settings
1
At standby mode, touch and hold
the multi-stage cooking button
(MyRecipe) for 3 seconds. (g.
€
)
»
“F1” displays on the screen.
2
Touch the increase (+) or decrease
(-) button to select one of previously
saved MyRecipe settings: F1, F2, F3,
F4 or F5 (g.
).
3
Touch and hold the start button
(On/O) for 3 seconds to conrm
and start cooking (g.
i
).
Warm keeping
The multicooker provides you with easy
control over the keep-warm mode.
•
After you have selected the cooking
function using the menu button
(Menu), if you start the cookign
process directly, the keep-warm
indicator will light up. After the
cooking is nished, the multicooker
will switch to keep-warm mode
directly.
•
After you have selected the cooking
function using the menu button
(Menu), if you touch the keep-warm
button (Chaud) rst, and then start
the cooking process, the keep-warm
indicator will be o. After the cooking
is nished, the multicooker will be in
standby mode.
Note
•
At standby mode, you can touch the
keep-warm button (Chaud) to switch to
warm keeping.
•
In keep-warm mode, you can touch the
keep-warm button (Chaud) to switch to
standby.
Setting up the cooking
time
You can adjust the cooking time for
some menus. Refer to the chapter
"Menus Overview" and see the cooking
time regulating range of dierent menus.
1
Select the cooking menu you need.
2
Touch the cooking time button
(Temps de cuisson) (g.
ƒ
).
»
The hour unit ashes on the
screen.
3
Touch the increase (+) or decrease
(-) button to set the hour unit
(g.
„
).
4
After the hour unit is set, touch the
cooking time button (Temps de
cuisson) again (g.
…
).
»
The minute unit ashes on the
screen.
5
Touch the increase (+) or decrease
(-) button to set the minute unit
(g.
†
).
6
Touch and hold the start button
(On/O) for 3 seconds to conrm
the cooking time and start cooking
(g.
i
).

18
EN
Preset time for delayed
cooking
You can set the preset cooking timefor
some menus. Refer to the chapter
"Menus Overview" and see the preset
time of dierent menus.
1
Select the cooking menu you need.
2
Touch and hold the preset
time button (Départ diéré) for
3 seconds. (g.
‡
)
»
The hour unit ashes on the
screen.
3
Touch the increase (+) or decrease
(-) button to set the hour unit
(g.
ˆ
).
4
After the hour unit is set, touch
the preset time button (Temps de
cuisson) again (g.
‰
).
5
Touch the increase (+) or decrease
(-) button to set the minute unit
(g.
Š
).
6
Touch and hold the start button
(On/O) for 3 seconds to conrm
the preset time and start cooking
(g.
i
).
Note
•
The cooking process will be nished
when the preset time has elapsed. For
example, if you set a preset time of 8
hours, the dishes will be ready 8 hours
later.
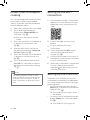
Setting up the WiFi
connection
1
Download the Philips “Multicooker”
App to your smart phone from the
App Store, or by scanning the QR
code.
2
Launch the App on your smart
phone.
3
Plug in and switch on the
multicooker.
4
Touch and hold the WiFi button
until the WiFi indicator blinks
orange. (g.
‹
)
5
Follow the onscreen instructions in
the App to connect the multicooker
to your smart phone.
6
When the multicooker is connected
to your smart phone, the WiFi
indicator will be continuously lit
with the color blue.
Setting up the child lock
To protect your child from using the
multicooker or avoid any misoperation,
you can activate the child lock during a
cooking process.
•
Touch and hold the menu button
(Menu) for 3 seconds to activate the
child lock (g.
Œ
).
»
The child lock icon lights up on
the display.
•
To unlock, touch and hold the menu
button (Menu) for 3 seconds again
(g.
).
»
The child lock icon lights o.
La page est en cours de chargement...
La page est en cours de chargement...
La page est en cours de chargement...
La page est en cours de chargement...
La page est en cours de chargement...
La page est en cours de chargement...
La page est en cours de chargement...
La page est en cours de chargement...
La page est en cours de chargement...
La page est en cours de chargement...
La page est en cours de chargement...
La page est en cours de chargement...
La page est en cours de chargement...
La page est en cours de chargement...
La page est en cours de chargement...
La page est en cours de chargement...
La page est en cours de chargement...
La page est en cours de chargement...
La page est en cours de chargement...
La page est en cours de chargement...
La page est en cours de chargement...
La page est en cours de chargement...
La page est en cours de chargement...
La page est en cours de chargement...
La page est en cours de chargement...
La page est en cours de chargement...
La page est en cours de chargement...
La page est en cours de chargement...
La page est en cours de chargement...
La page est en cours de chargement...
-
 1
1
-
 2
2
-
 3
3
-
 4
4
-
 5
5
-
 6
6
-
 7
7
-
 8
8
-
 9
9
-
 10
10
-
 11
11
-
 12
12
-
 13
13
-
 14
14
-
 15
15
-
 16
16
-
 17
17
-
 18
18
-
 19
19
-
 20
20
-
 21
21
-
 22
22
-
 23
23
-
 24
24
-
 25
25
-
 26
26
-
 27
27
-
 28
28
-
 29
29
-
 30
30
-
 31
31
-
 32
32
-
 33
33
-
 34
34
-
 35
35
-
 36
36
-
 37
37
-
 38
38
-
 39
39
-
 40
40
-
 41
41
-
 42
42
-
 43
43
-
 44
44
-
 45
45
-
 46
46
-
 47
47
-
 48
48
-
 49
49
-
 50
50


Philips HD3198 Manuel utilisateur
- Catégorie
- Cuiseurs multiples
- Taper
- Manuel utilisateur
- Ce manuel convient également à
dans d''autres langues
- English: Philips HD3198 User manual
Documents connexes
-
Philips CONNECTE HD3198/77 Le manuel du propriétaire
-
-
-
-
-
-
-
-
-
Autres documents
-
Tefal RK8121CA Manuel utilisateur
-
-
Moulinex MK8121 Le manuel du propriétaire
-
Moulinex MK815800 Le manuel du propriétaire
-
SEB RK302E00 RIZ CEREALES & CO Le manuel du propriétaire
-
Morphy Richards BIBO 562000 Le manuel du propriétaire
-
KitchenAid 5KCF0201EBK Mode d'emploi
-
KitchenAid 5KCF0103EMS Le manuel du propriétaire
-
T-Fal P4221435 Le manuel du propriétaire
-