GE CSB42 Le manuel du propriétaire
- Catégorie
- Frigos
- Taper
- Le manuel du propriétaire

ENGLISH/FRANÇAIS/
ESPAÑOL
Write the model and serial
numbers here:
Model # _________________
Serial # _________________
Find these numbers on a label
on the left side, near the middle
of the refrigerator compartment.
49-60814 Rev. 1 10-18 GEA
PSB42
PSB48
CSB42
CSB48
OWNER’S MANUAL &
INSTALLATION
INSTRUCTIONS
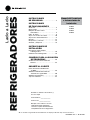
REFRIGERATORS
Side by Side
GE is a trademark of the General Electric Company. Manufactured under trademark license.
SAFETY INSTRUCTIONS .....3
USING THE REFRIGERATOR
Controls ..........................5
Dispenser .........................7
Automatic Icemaker ................8
Water Filter .......................9
Climate Controlled Drawer .........10
Storage Drawers ...................11
Shelves .......................... 12
Bins and Baskets ................. 13
Care and Cleaning ................ 14
INSTALLATION INSTRUCTIONS
Preparing to Install the
Refrigerator ...................... 16
Installing the Refrigerator .......... 19
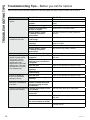
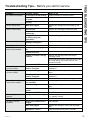
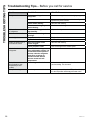
TROUBLESHOOTING TIPS . . 26
Normal Operating Conditions ......25
CONSUMER SUPPORT
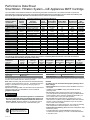
MWF Performance Data Sheet ......29
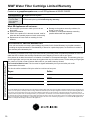
MWF Water Filter Cartridge
Limited Warranty ...............30
Warranty ........................ 31
Consumer Support ................32

2 49-60814 Rev. 1
THANK YOU FOR MAKING GE APPLIANCES A PART OF YOUR HOME.
Whether you grew up with GE Appliances, or this is your first, we’re happy to have you in the family.
We take pride in the craftsmanship, innovation and design that goes into every GE Appliances
product, and we think you will too. Among other things, registration of your appliance ensures that we
can deliver important product information and warranty details when you need them.
Register your GE appliance now online. Helpful websites and phone numbers are available in the
Consumer Support section of this Owner’s Manual. You may also mail in the pre-printed registration
card included in the packing material.

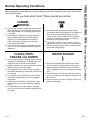
49-60814 Rev. 1 3
SAFETY INFORMATION
READ AND SAVE THESE INSTRUCTIONS
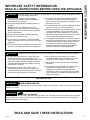
IMPORTANT SAFETY INFORMATION
READ ALL INSTRUCTIONS BEFORE USING THE APPLIANCE
CAUTION
To reduce the risk of injury when using your refrigerator, follow these basic safety precautions.
Ŷ 'RQRWFOHDQJODVVVKHOYHVRUFRYHUVZLWKZDUP
water when they are cold. Glass shelves and
covers may break if exposed to sudden temperature
changes or impact, such as bumping or dropping.
Tempered glass is designed to shatter into many
small pieces if it breaks.
Ŷ .HHSILQJHUVRXWRIWKH³SLQFKSRLQW´DUHDV
clearances between the doors and between the
doors and cabinet are necessarily small. Be careful
closing doors when children are in the area.
Ŷ 'RQRWWRXFKWKHFROGVXUIDFHVLQWKHIUHH]HU
compartment when hands are damp or wet, skin
may stick to these extremely cold surfaces.
Ŷ 'RQRWUHIUHH]HIUR]HQIRRGVZKLFKKDYHWKDZHG
completely.
Ŷ ,QUHIULJHUDWRUVZLWKDXWRPDWLFLFHPDNHUVDYRLG
contact with the moving parts of the ejector
mechanism, or with the heating element that
UHOHDVHVWKHFXEHV'RQRWSODFHILQJHUVRUKDQGV
on the automatic ice making mechanism while the
IUHH]HULVSOXJJHGLQ
WARNING
To reduce the risk of fire, explosion, electric shock, or injury when using your refrigerator, follow
these basic safety precautions:
Ŷ 7KLVUHIULJHUDWRUPXVWEHSURSHUO\LQVWDOOHG
DQGORFDWHGLQDFFRUGDQFHZLWKWKH,QVWDOODWLRQ
,QVWUXFWLRQVEHIRUHLWLVXVHG
Ŷ 8QSOXJWKHUHIULJHUDWRUEHIRUHPDNLQJUHSDLUVRU
cleaning.
NOTE: Power to the refrigerator cannot be
disconnected by any setting on the control panel.
NOTE: Repairs must be performed by a qualified
Service Professional.
Ŷ 5HSODFHDOOSDUWVDQGSDQHOVEHIRUHRSHUDWLQJ
Ŷ 'RQRWXVHDQH[WHQVLRQFRUG
Ŷ 'RQRWVWRUHRUXVHJDVROLQHRURWKHUIODPPDEOH
vapors and liquids in the vicinity of this or any other
appliance.
Ŷ 'RQRWVWRUHH[SORVLYHVXEVWDQFHVVXFKDVDHURVRO
cans with a flammable propellant in this appliance.
Ŷ 7RSUHYHQWVXIIRFDWLRQDQGHQWUDSPHQWKD]DUGV
WRFKLOGUHQUHPRYHWKHIUHVKIRRGDQGIUHH]HU
doors from any refrigerator before disposing of it or
discontinuing its use.
Ŷ 7RDYRLGVHULRXVLQMXU\RUGHDWKFKLOGUHQVKRXOGQRW
stand on, or play in or with the appliance.
Ŷ &KLOGUHQDQGSHUVRQVZLWKUHGXFHGSK\VLFDOVHQVRU\
or mental capabilities or lack of experience and
knowledge can use this appliance only if they are
supervised or have been given instructions on safe
XVHDQGXQGHUVWDQGWKHKD]DUGVLQYROYHG
Ŷ 7KLVDSSOLDQFHLVLQWHQGHGWREHXVHGLQKRXVHKROG
and similar applications such as: staff kitchen areas
LQVKRSVRIILFHVDQGRWKHUZRUNLQJHQYLURQPHQWV
IDUPKRXVHVE\FOLHQWVLQKRWHOVPRWHOVEHG
EUHDNIDVWDQGRWKHUUHVLGHQWLDOHQYLURQPHQWV
catering and similar non-retail applications.
INSTALLATION
WARNING
EXPLOSION HAZARD
.HHSIODPPDEOHPDWHULDOVDQGYDSRUVVXFKDVJDVROLQHDZD\IURPUHIULJHUDWRU)DLOXUHWRGRVRFDQUHVXOWLQILUH
explosion, or death.
WARNING
Tip Over Hazard.
These appliances are top heavy, especially with any doors open, and must be secured to prevent tipping forward
which could result in death or serious injury. Read and follow the entire installation instructions for securing the
appliance with the anti-tip system.

4 49-60814 Rev. 1
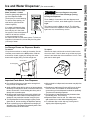
Do not, under any circumstances, cut or remove the third (ground) prong from the power cord.
For personal safety, this appliance must be properly grounded.
The power cord of this appliance is equipped with a
3-prong (grounding) plug which mates with a standard
SURQJJURXQGLQJZDOORXWOHWWRPLQLPL]HWKH
SRVVLELOLW\RIHOHFWULFVKRFNKD]DUGIURPWKLVDSSOLDQFH
Have the wall outlet and circuit checked by a qualified
electrician to make sure the outlet is properly
grounded.
Where a standard 2-prong wall outlet is encountered, it
is your personal responsibility and obligation to have it
replaced with a properly grounded 3-prong wall outlet.
'RQRWXVHDQDGDSWHU
The refrigerator should always be plugged into its own
individual electrical outlet which has a voltage rating
that matches the rating plate.
$9ROW$&+]RUDPSIXVHGJURXQGHG
electrical supply is required. This provides the best
performance and also prevents overloading house
ZLULQJFLUFXLWVZKLFKFRXOGFDXVHDILUHKD]DUGIURP
overheated wires.
Never unplug your refrigerator by pulling on the power
cord. Always grip plug firmly and pull straight out from
the outlet.
,PPHGLDWHO\GLVFRQWLQXHXVHRIDGDPDJHGVXSSO\
FRUG,IWKHVXSSO\FRUGLVGDPDJHGLWPXVWEH
replaced by a qualified service professional with an
DXWKRUL]HGVHUYLFHSDUWIURPWKHPDQXIDFWXUHU
When moving the refrigerator away from the wall, be
careful not to roll over or damage the power cord.
CONNECTING ELECTRICITY
WARNING
ELECTRICAL SHOCK HAZARD
Plug into a grounded 3-prong outlet
'RQRWUHPRYHWKHJURXQGSURQJ
'RQRWXVHDQDGDSWHU
)DLOXUHWRIROORZWKHVHLQVWUXFWLRQVFDQUHVXOWLQGHDWKILUHRUHOHFWULFDOVKRFN
SAFETY INFORMATION
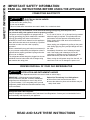
IMPORTANT SAFETY INFORMATION
READ ALL INSTRUCTIONS BEFORE USING THE APPLIANCE
READ AND SAVE THESE INSTRUCTIONS
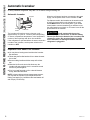
PROPER DISPOSAL OF YOUR OLD REFRIGERATOR
WARNING
SUFFOCATION AND ENTRAPMENT HAZARD
)DLOXUHWRIROORZWKHVHGLVSRVDOLQVWUXFWLRQVFDQUHVXOWLQGHDWKRUVHULRXVLQMXU\
IMPORTANT: Child entrapment and suffocation
are not problems of the past. Junked or abandoned
refrigerators are still dangerous even if they will sit
IRU³MXVWDIHZGD\V´,I\RXDUHJHWWLQJULGRI\RXUROG
refrigerator, please follow the instructions below to help
prevent accidents.
Before You Throw Away Your Old Appliance
Ŷ7DNHRIIWKHIUHVKIRRGDQGIUHH]HUGRRUV
Ŷ Leave the shelves in place so that children may not
easily climb inside.
Refrigerant and Foam Disposal:
'LVSRVHRIDSSOLDQFHLQDFFRUGDQFHZLWK)HGHUDODQG/RFDO5HJXODWLRQV&RQWDFW\RXUORFDODXWKRULWLHVIRUWKH
environmentally safe disposal of your appliance.

49-60814 Rev. 1 5
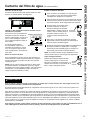
Controls
USING THE REFRIGERATOR: Controls
7KHWHPSHUDWXUHFRQWUROVDUHSUHVHWLQWKHIDFWRU\DW)&IRUWKHUHIULJHUDWRUFRPSDUWPHQWDQG)&IRU
WKHIUHH]HUFRPSDUWPHQW$OORZKRXUVIRUWKHWHPSHUDWXUHWRVWDELOL]HWRWKHSUHVHWUHFRPPHQGHGVHWWLQJV
The temperature controls display the SETWHPSHUDWXUHLQWKHUHIULJHUDWRUDQGIUHH]HU7KHDFWXDOWHPSHUDWXUHPD\
vary slightly from the SET temperature based on usage and operating environment.
NOTE: The refrigerator is shipped with protective film covering the temperature controls.
,IWKLVILOPZDVQRWUHPRYHGGXULQJLQVWDOODWLRQUHPRYHLWQRZ
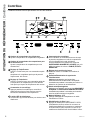
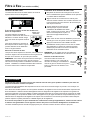
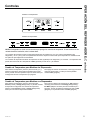
'LVSHQVH0RGHOV
Non-dispense Models
Changing the Temperature for Dispense Models
To change the temperature, press and release the
Freezer or Fridge pad. The display will show the set
temperature. To change the temperature, press either the
Freezer or Fridge pad until the desired temperature is
displayed.
To turn OFF cooling system, press and hold Fridge
and Ice Maker simultaneously for 3 seconds. When the
cooling system is OFF the display should read OFF.
Changing the Temperature for Non-dispense Models
To change the temperature, press and release the
(+) or (-) pad to the desired temperature set point for
IUHVKIRRGDQGIUHH]HUVHSDUDWHO\$OORZKRXUVIRUWKH
refrigerator to reach the temperature you have set.
To turn OFF cooling system, press and hold either (+)
pad until both displays show OFF.

6 49-60814 Rev. 1
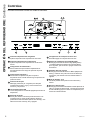
Controls
USING THE REFRIGERATOR: Controls
Refrigerator temp control
$GMXVWIUHH]HUFRPSDUWPHQWWHPSHUDWXUH
Fresh food temp control
Adjust fresh food compartment temperature.
TurboFreeze™ setting
$FWLYDWH7XUER)UHH]HWRTXLFNO\UHVWRUHIUHH]HU
temperatures after frequent door openings.
TurboCool™ setting
Activate TurboCool to quickly restore fresh food
temperature after frequent door openings.
Lock controls
Press and hold 3 seconds to lock out ice and water
dispenser and all feature and temperature buttons.
LED dispenser light
/('OLJKWLQJWKDWFDQEHWXUQHGRQRIIWROLJKW\RXU
dispenser.
Door Alarm
6RXQGVWRDOHUWZKHQWKHIUHH]HURUIUHVKIRRGGRRUV
have been open for more than 2 minutes. Press and
hold Door Alarm pad and it will toggle the sound
between low, high and off.
Ice maker setting
7XUQ\RXULFHPDNHUVRQRII
Cooling system On/Off
3UHVVDQGKROG)ULGJH,FH0DNHUVLPXOWDQHRXVO\IRU
3 seconds to turn the cooling system on or off.
Metric/English units
3UHVVDQGKROG,FH0DNHUGRRUDODUPVLPXOWDQHRXVO\
for 3 seconds to switch between Metric & English
units.
Display mode, °C/°F
&KDQJHWHPSHUDWXUHGLVSOD\EHWZHHQ)DKUHQKHLWDQG
Celsius.
Reset water filter
3UHVVDQGKROGWKH5(6(7),/7(5%XWWRQIRUQRQ
dispense models or press and hold the WATER button
for dispense models to reset the filter indicator.
Not all features available on all models.

49-60814 Rev. 1 7
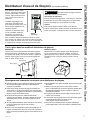
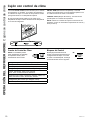
Ice and Water Dispenser (On some models.)
USING THE REFRIGERATOR:,FHDQG:DWHU'LVSHQVHU
To dispense water or ice: select
Water, Crushed, or Cubed.
Press the glass gently against the
top of the dispenser cradle.
The drip tray is not self-draining.
To reduce water spotting, the
shelf and its grille should be
cleaned regularly.
,IQRZDWHULVGLVSHQVHGZKHQ
the refrigerator is first installed,
there may be air in the water
line system. Press the dispenser
cradle for at least two minutes
to remove trapped air from
the water line and to fill the water system. To flush out
impurities in the water line, throw away the first gallon
OLWHUVRIZDWHU
CAUTION
Never put fingers or any other
objects into the ice crusher discharge opening.
Locking the Dispenser:
Touch Lock for 3 seconds to lock the dispenser and
control pad. To unlock, touch Lock again for 3 seconds.
Light:
This feature turns the light on and off. The light also
FRPHVRQZKHQWKHGLVSHQVHUFUDGOHLVSUHVVHG,IWKLV
light burns out, contact factory service.
Important Facts About Your Dispenser
Ŷ'RQRWDGGLFHIURPWUD\VRUEDJVWRWKHVWRUDJHELQ,W
may not crush or dispense well.
Ŷ$YRLGRYHUILOOLQJJODVVZLWKLFHDQGXVHRIQDUURZJODVVHV
Backed-up ice can jam the chute or cause the door in the
FKXWHWRIUHH]HVKXW,ILFHLVEORFNLQJWKHFKXWHSRNHLW
through with a wooden spoon.
Ŷ%HYHUDJHVDQGIRRGVVKRXOGQRWEHTXLFNFKLOOHGLQWKH
ice storage bin. Cans, bottles or food packages in the
storage bin may cause the icemaker or auger to jam.
Ŷ7RNHHSGLVSHQVHGLFHIURPPLVVLQJWKHJODVVSXWWKH
glass close to, but not touching, the dispenser opening.
Ŷ6RPHFUXVKHGLFHPD\EHGLVSHQVHGHYHQWKRXJK\RX
selected Cubed. This happens occasionally when a few
cubes have been left in the crusher.
Ŷ$IWHUFUXVKHGLFHLVGLVSHQVHGVRPHZDWHUPD\GULSIURP
the chute.
Ŷ6RPHWLPHVDVPDOOPRXQGRIVQRZZLOOIRUPRQWKHGRRU
in the ice chute. This condition is normal and usually
occurs when you have dispensed crushed ice repeatedly.
The snow will eventually evaporate.
Ŷ7KHILUVWJODVVRIZDWHUGLVSHQVHGPD\EHZDUPHUWKDQ
the following ones. This is normal.
Ŷ'LVSHQVHGZDWHULVQRWLFHFROG)RUFROGHUZDWHUVLPSO\
add crushed ice or cubes before dispensing water.
Ŷ7RHOLPLQDWHGULSVRQWKHGULSWUD\WLOWWKHJODVVLQ
slightly when dispensing water.
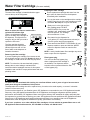
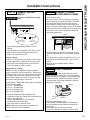
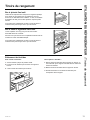
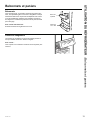
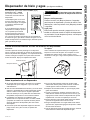
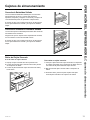
Ice Storage Drawer on Dispenser Models
To remove:
Lift up the access door to reach the icemaker. Set the
icemaker power switch to the OFF position. With the
access door closed, support the storage bin at the
bottom while slightly lifting. Pull bin straight out.
To replace:
Slide the bin back until the tab on the bin locks into the
VORWRQWKHVKHOI,IWKHELQGRHVQRWJRDOOWKHZD\EDFN
UHPRYHLWDQGURWDWHWKHGULYHPHFKDQLVPWXUQ7KHQ
push the bin back again.
Drive
Mechanism
Rotate
Drip Tray
,FH6WRUDJH%LQ
$FFHVV'RRU

49-60814 Rev. 1
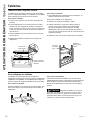
Automatic Icemaker
USING THE REFRIGERATOR:$XWRPDWLF,FHPDNHU
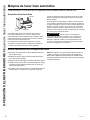
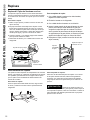
Important Facts About Your Icemaker
A newly-installed refrigerator may take 12–24 hours to begin making ice.
Automatic Icemaker
The icemaker will produce seven cubes per cycle—
approximately 15 cycles in a 24-hour period, depending
RQIUHH]HUFRPSDUWPHQWWHPSHUDWXUHURRPWHPSHUDWXUH
number of door openings and other use conditions.
,IWKHUHIULJHUDWRULVRSHUDWHGEHIRUHWKHZDWHUFRQQHFWLRQ
is made to the icemaker, set the power switch on the
icemaker to OFF.
When the refrigerator has been connected to the water
supply, set the power switch on the icemaker to
ON
.
)RUGLVSHQVHPRGHOVWKHLFHPDNHUFDQEHWXUQHGRQDQG
off using the power switch on the icemaker or by using
the Ice MakerEXWWRQRQWKHFRQWUROSDQHO,I\RXXVHWKH
control panel to turn the icemaker off you will have to use
the control panel to turn it back on. The same is true for the
power switch on the icemaker.
CAUTION
Avoid contact with the moving
parts of the ejector mechanism, or with the heating
element (located on the bottom of the ice maker) that
releases the cubes. Do not place fingers or hands
on the automatic ice making mechanism while the
refrigerator is plugged in.
)HHOHU$UP
,FHPDNHU
Power
Switch
Ŷ<RXPD\KHDUDEX]]LQJVRXQGHDFKWLPHWKHLFHPDNHU
fills with water.
Ŷ7KURZDZD\WKHILUVWIHZEDWFKHVRILFHWRDOORZWKHZDWHU
line to clear.
Ŷ%HVXUHQRWKLQJLQWHUIHUHVZLWKWKHVZHHSRIWKHIHHOHU
arm.
Ŷ:KHQWKHELQILOOVWRWKHOHYHORIWKHIHHOHUDUPWKH
LFHPDNHUZLOOVWRSSURGXFLQJLFH,WLVQRUPDOIRUVHYHUDO
cubes to be joined together.
Ŷ,ILFHLVQRWXVHGIUHTXHQWO\ROGLFHFXEHVZLOOEHFRPH
cloudy, taste stale and shrink.
NOTE: ,QKRPHVZLWKORZHUWKDQDYHUDJHZDWHUSUHVVXUH
you may hear the icemaker cycle multiple times when
PDNLQJRQHEDWFKRILFH,FHPDNHUZRUNVEHVWEHWZHHQ
DQGSVLN3D

49-60814 Rev. 1 9
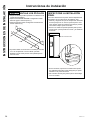
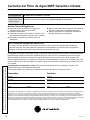
USING THE REFRIGERATOR: :DWHU)LOWHU&DUWULGJH
Water Filter Cartridge (On some models.)
Water filter cartridge
The water filter cartridge is located behind the upper
cover at the top of the refrigerator.
When to replace the filter on models with a
replacement indicator light
There is a replacement indicator
light for the water filter cartridge on
the dispenser. This light will turn
orange to tell you that you need to
replace the filter soon.
The filter cartridge should be
replaced when the replacement
indicator light turns red or if the
flow of water to the dispenser or
icemaker decreases.
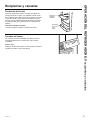
Removing the filter cartridge
,I\RXDUHUHSODFLQJWKHFDUWULGJHILUVWUHPRYHWKHROG
one by slowly turning it to the left. Do not pull down on
the cartridge. A small amount of water may drip down.
NOTE: To reduce the risk associated with property
damage due to water leakage, read and follow
instructions before installation and use of this system.
,QVWDOODWLRQDQGXVH0867FRPSO\ZLWKDOOVWDWHDQGORFDO
plumbing codes.
Installing the filter cartridge
1
)LOOWKHUHSODFHPHQWFDUWULGJHZLWKZDWHUIURPWKH
tap to allow for better flow from the dispenser
immediately after installation.
2
Line up the arrow on the cartridge and the cartridge
holder. Place the top of the new cartridge up inside
the holder. Do not push it up into the holder.
3
Slowly turn it to the right until the
ILOWHUFDUWULGJHVWRSV'2127
29(57,*+7(1$V\RXWXUQWKH
cartridge it will automatically raise
itself into position. The cartridge
ZLOOPRYHDERXWDWXUQ
4
Run water from the dispenser for
JDOORQVOLWHUVDERXWWKUHHPLQXWHVWR
clear the system and prevent sputtering.
5
3UHVVDQGKROGWKH5(6(7),/7(5%XWWRQIRUQRQ
dispense models or press and hold the WATER
button for dispense models to reset the filter
indicator.
NOTE: A newly installed water filter cartridge may cause
water to spurt from the dispenser.
Filter bypass plug
You must use the filter bypass plug
when a replacement filter cartridge is
not available. The dispenser and the
icemaker will not operate without the filter
or filter bypass plug.
Cartridge
Holder
)LOWHU
Bypass
Plug
To reduce the risk associated with choking, do not allow children under 3 years of age to have access to
small parts during the installation of this product.
The disposable filter cartridge should be replaced every 6 months at the rated capacity, or sooner if noticeable
reduction in flow rate occurs.
)RUWKHPD[LPXPEHQHILWRI\RXUILOWUDWLRQV\VWHP*($SSOLDQFHVUHFRPPHQGVWKHXVHRI*($SSOLDQFHVEUDQGHG
ILOWHUVRQO\8VLQJ*($SSOLDQFHVEUDQGHGILOWHUVLQ*($SSOLDQFHVDQG+RWSRLQWUHIULJHUDWRUVSURYLGHVRSWLPDO
SHUIRUPDQFHDQGUHOLDELOLW\*($SSOLDQFHVILOWHUVPHHWULJRURXVLQGXVWU\16)VWDQGDUGVIRUVDIHW\DQGTXDOLW\WKDW
are important for products that are filtering your water. GE Appliances has not qualifed non-GE Appliances branded
filters for use in GE Appliances and Hotpoint refrigerators and there is no assurance that non-GE Appliances
branded filters meet GE Appliances standards for quality, performance and reliability.
If you have questions, or to order additional filter cartridges, visit our website at gewaterfilters.com or call
GE Appliances Parts and Acessories, 877.959.8688. In Canada, call 800.661.1616.
WARNING
'LVSHQVH0RGHOV
1RQ'LVSHQVH0RGHOV

10 49-60814 Rev. 1
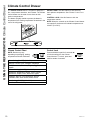
Climate Control Drawer
USING THE REFRIGERATOR:&OLPDWH&RQWURO'UDZHU
The Climate Control feature is a system of dampers, a
fan, a temperature thermistor, and a heater. The Climate
Control drawer can be used to store items at their
optimum temperatures.
The drawer is tightly sealed to prevent the drawer’s
temperature from causing temperature fluctuations in the
rest of the refrigerator.
SELECT TEMP—8VHWKLVIHDWXUHWRVWRUHLWHPVDW
their optimum temperatures. See Climate Control Chart
below.
CONTROL LOCK—8VHWKLVIHDWXUHWRORFNWKH
temperature controls.
NOTE: When the controls on the Climate Control drawer
are turned off, the drawer will maintain temperatures at
)&
Climate Control Chart
NOTE: Results may vary
depending on packaging, starting
temperature and other food traits.
Control Lock
Press and hold this pad for 3 seconds
to lock the settings for the Climate
Control drawer. To unlock, press and
hold for another 3 seconds.
Citrus Setting (39–47°F) (3.9-8.3°C)
Oranges, Lemons, Limes, Pineapple, Cantaloupe
Beans, Cucumbers, Tomatoes, Peppers, Eggplant,
Squash
Produce Setting (31–38°F) (-0.6 - 3.3°C)
6WUDZEHUULHV5DVSEHUULHV.LZLIUXLW3HDUV&KHUULHV
Blackberries, Grapes, Plums, Nectarines, Apples
Asparagus, Broccoli, Corn, Mushrooms, Spinach,
&DXOLIORZHU.DOH*UHHQ2QLRQV%HHWV2QLRQV
Meat Setting (27–37°F) (-2.8 - 2.8°C)
5DZ0HDW)LVKDQG3RXOWU\

49-60814 Rev. 1 11
USING THE REFRIGERATOR: 6WURUDJH'UDZHUV
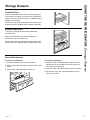
Storage Drawers
Sealed Deli Pan
8VHWKH6HDOHG'HOL3DQIRUWKHFRQYHQLHQWVWRUDJHRI
lunch meats and cheese, hors d’oeuvres, spreads and
snacks. The pan and shelf to which it is attached can be
adjusted to any height.
Excess water that may accumulate in the bottom of the
drawers should be emptied and the drawers wiped dry.
Sealed Produce Pan
The top pan is designed to provide constant high
humidity levels.
Make sure the drawers are closed completely to
maintain the correct humidity level.
Excess water that may accumulate in the bottom of the
drawers should be emptied and the drawers wiped dry.
Drawer/Pan Removal
To remove a drawer/pan:
1.3XOOWKHGUDZHUSDQRXWWRWKHVWRSSRVLWLRQ
2./LIWWKHIURQWRIWKHGUDZHUSDQXSDQGRXWRIWKHZLUH
holder.
3./LIWWKHEDFNRIWKHGUDZHUSDQXSDQGRXW
To replace a drawer/pan:
1.3ODFHWKHEDFNRIWKHGUDZHUSDQLQWKHZLUHKROGHU
making sure the wire holder fits into the grooves on
WKHEDFNRIWKHGUDZHUSDQ
2./RZHUWKHIURQWRIWKHGUDZHUSDQLQWRWKHZLUHKROGHU
3.3UHVVILUPO\RQWKHWRSRIWKHGUDZHUSDQWRVQDSLW
into the wire holder.

12 49-60814 Rev. 1
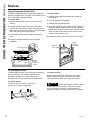
Shelves
USING THE REFRIGERATOR: Shelves
Lighted Vegetable Drawer Shelf
The lighted vegetable drawer shelf provides lighting for
the lower compartments. The lights are recessed into the
shelf to illuminate the drawers below.
To remove shelf:
1. Remove the top drawer (see Drawer/pan removal
section).
2. Push down gently on the back center of the climate
control drawer top surface to release the bottom of the
water tank cover. Pull out and down to remove the water
tank cover and expose the wire harness.
3. Lift the shelf and carefully pull forward to expose the
wires.
4.8QSOXJWKHVKHOIDQGFDUHIXOO\UHPRYHLWIURPWKH
refrigerator.
To replace shelf:
1. Carefully set the shelf onto the side rails, leaving the
plug exposed.
2. Plug the shelf into the refrigerator.
3. Carefully slide the shelf into place.
4.,QVHUWWKHZDWHUWDQNFRYHUWRSILUVWVRWKDWLWJRHVXS
behind the gasket hanging down from the vegetable
drawer shelf. Gently push the bottom of the water tank
cover until the bottom snaps into the the top of the
&OLPDWH&RQWURO'UDZHUFRYHU
5. Replace the drawer (see Drawer/pan removal section).
Water Tank Cover
Climate
Control
'UDZHU7RS
Surface
Water Tank
Cover
Lighted
Vegetable
'UDZHU6KHOI
To rearrange shelves
Tempered glass shelves in the fresh food compartment
DQGZLUHVKHOYHVLQWKHIUHH]HUFRPSDUWPHQWDUH
adjustable, enabling you to make efficient shelf
arrangements to fit your family’s food storage needs.
To remove shelves:
Tilt shelf up at front, then lift it up and out
of tracks on rear wall of refrigerator.
To replace shelves:
Select desired shelf height. With shelf front raised
slightly, engage top lugs in tracks at rear of cabinet.
Then lower front of shelf until it locks into position.
CAUTION
Handle glass shelves carefully. Glass
shelves and covers may break if exposed to impact,
such as bumping or dropping. Tempered glass is
designed to shatter into many small pieces if it breaks.

49-60814 Rev. 1 13
USING THE REFRIGERATOR: Bins and Baskets
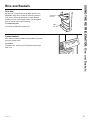
Bins and Baskets
Door bins
All door bins, except for the deep gallon door bin, are
adjustable using one of 2 tabs on each end of the bin.
They can be moved up and down to many different
positions to meet your storage needs. The deep gallon
door bin can be removed for cleaning.
To remove any bin:
Lift the bin up and slide it toward you.
Adjustable
'RRU%LQ
Gallon
'RRU%LQ
Freezer baskets
:LUHVOLGHRXWIUHH]HUEDVNHWVFDQEHSXOOHGRXWIRUHDV\
DFFHVVWRIUR]HQIRRGV
To remove:
Pull basket out. Lift the front of the basket up and then
take it out.

14 49-60814 Rev. 1
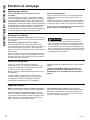
Care and Cleaning
CARE AND CLEANING
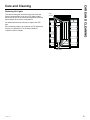
Cleaning the Outside
The stainless steel panels, door handles and trim.
The stainless steel doors and door handles can be
cleaned with a commercially available stainless steel
FOHDQHU&OHDQHUVZLWKR[DOLFDFLGVXFKDV%DU.HHSHUV
)ULHQG6RIW&OHDQVHUZLOOUHPRYHVXUIDFHUXVWWDUQLVK
DQGVPDOOEOHPLVKHV8VHRQO\DOLTXLGFOHDQVHUIUHH
of grit and rub in the direction of the brush lines with a
GDPSVRIWVSRQJH'RQRWXVHDSSOLDQFHZD[RUSROLVK
on the stainless steel.
Silver-accented plastic parts.
Wash parts with soap or other mild detergents. Wipe
clean with a sponge, damp cloth or paper towel.
'RQRWXVHVFRXULQJSDGVSRZGHUHGFOHDQHUVEOHDFKRU
cleaners containing bleach because these products can
scratch and weaken the paint finish.
Should drip tray need cleaning use lime remover.
Cleaning the Inside
To help prevent odors, leave an open box of baking
VRGDLQWKHUHIULJHUDWRUDQGIUHH]HUFRPSDUWPHQWV
Unplug the refrigerator before cleaning.
,IWKLVLVQRWSUDFWLFDOZULQJH[FHVVPRLVWXUHRXWRI
sponge or cloth when cleaning around switches, lights or
controls.
8VHDQDSSOLDQFHZD[SROLVKRQWKHLQVLGHVXUIDFH
between the doors.
8VHZDUPZDWHUDQGEDNLQJVRGDVROXWLRQ²DERXWD
tablespoon (15 ml) of baking soda to a quart (1 liter) of
ZDWHU7KLVERWKFOHDQVDQGQHXWUDOL]HVRGRUV5LQVHDQG
wipe dry.
Behind the Refrigerator
Be careful when moving the refrigerator away from
the wall. All types of floor coverings can be damaged,
particularly cushioned coverings and those with
embossed surfaces.
Raise the leveling legs located at the bottom front of the
refrigerator.
Pull the refrigerator straight out and return it to position
by pushing it straight in. Moving the refrigerator in a side
direction may result in damage to the floor covering or
refrigerator.
Lower the leveling legs until they touch the floor.
When pushing the refrigerator back, make sure you
don’t roll over the power cord or water supply line.
Preparing for Vacation
CAUTION
'RQRWFOHDQJODVVVKHOYHVRUFRYHUV
with warm water when they are cold. Glass shelves and
covers may break if exposed to sudden temperature
changes or impact such as bumping or dropping.
Tempered glass is designed to shatter into many small
pieces if it breaks.
'RQRWZDVKDQ\SODVWLFUHIULJHUDWRUSDUWVLQWKH
dishwasher.
Set the icemaker power switch to the OFF position
and be sure to shut off the water supply to the
refrigerator.
For long vacations or absences, remove food from
WKHUHIULJHUDWRUIUHH]HU6HWWKHFRQWUROWR2))DQG
clean the interior with a baking soda solution of one
tablespoon (15 ml) of baking soda to one quart (1 liter)
of water. Leave the door open.
For shorter vacations, remove perishable foods and
leave controls at regular settings. However, if the room
WHPSHUDWXUHLVH[SHFWHGWRGURSEHORZ)&
follow the same instructions as for long vacations.

49-60814 Rev. 1 15
CARE AND CLEANING
Care and Cleaning
Replacing the Lights
/('/LJKWV
Light
Columns
The columns along the back wall of the fresh food and
IUHH]HUFRPSDUHPHQWVDUHOLWXSE\/('OLJKWVORFDWHG
behind the top pan in the fresh food compartment and the
ERWWRPEDVNHWLQWKHIUHH]HUFRPSDUWPHQW
$QDXWKRUL]HGWHFKQLFLDQZLOOQHHGWRUHSODFHWKH/('
light.
,IWKLVDVVHPEO\QHHGVWREHUHSODFHGFDOO*($SSOLDQFHV
6HUYLFHDWLQWKH8QLWHG6WDWHVRU
LQ&DQDGD

16 49-60814 Rev. 1
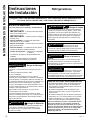
BEFORE YOU BEGIN
Read these instructions completely and carefully.
•
IMPORTANT — Save these instructions for
local inspector’s use.
•
IMPORTANT — Observe all governing codes
and ordinances.
• Note to Installer – Be sure to leave these
instructions with the Consumer.
• Note to Consumer –.HHSWKHVHLQVWUXFWLRQVIRU
future reference.
• Skill level – ,QVWDOODWLRQRIWKLVDSSOLDQFHUHTXLUHV
basic mechanical skills.
• Completion time –5HIULJHUDWRU,QVWDOODWLRQ
15 minutes
• Proper installation is the responsibility of the
installer.
• Product failure due to improper installation is not
covered under the Warranty.
Installation
Instructions
Refrigerator
Questions? Call 800.GE.CARES (800.432.2737) or visit our Website at: GEAppliances.com
In Canada, call 1.800.561.3344 or visit our Website at: GEAppliances.ca
INSTALLATION INSTRUCTIONS
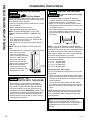
WARNING
Tip Over Hazard.
These appliances are top heavy, especially with any
doors open, and must be secured to prevent tipping
forward which could result in death or serious injury.
Read and follow the entire installation instructions for
securing the appliance with the anti-tip system.
WARNING
Explosion Hazard.
.HHSIODPPDEOHPDWHULDOVDQGYDSRUVVXFKDV
JDVROLQHDZD\IURPDSSOLDQFH)DLOXUHWRGRVRFDQ
result in fire, explosion, or death.
WARNING
To reduce the risk associated with
choking, do not allow children under 3 years of age to
have access to small parts during the installation of
this product.
CAUTION
Lifting Hazard
This unit is very heavy. To reduce the risk of
person injury during maneuvering and installing
this appliance, 4 people are required for proper
installation.
CAUTION
.HHSILQJHUVRXWRIWKH³SLQFKSRLQW´
DUHDVFOHDUDQFHVEHWZHHQWKHGRRUVDQGEHWZHHQ
the doors and cabinet are necessarily small. Be
careful closing doors when children are in the area.
WARNING
Electrical Shock Hazard.
Plug into a grounded 3-prong outlet.
'RQRWUHPRYHWKHJURXQGSURQJ
'RQRWXVHDQDGDSWHU
,PPHGLDWHO\GLVFRQWLQXHXVHRIDGDPDJHGVXSSO\
FRUG,IWKHVXSSO\FRUGLVGDPDJHGLWPXVWEH
replaced by a qualified service professional with an
DXWKRUL]HGVHUYLFHSDUWIURPWKHPDQXIDFWXUHU
'RQRWXVHDQH[WHQVLRQFRUGZLWKWKLVDSSOLDQFH
)DLOXUHWRIROORZWKHVHLQVWUXFWLRQVFDQUHVXOWLQGHDWK
fire, or electrical shock.
)ROORZWKHLQVWUXFWLRQVLQWKHVHFWLRQ*URXQGLQJWKH
unit.
This appliance must be installed with a means in the
fixed house wiring or circuit breaker for disconnecting
the appliance from the electrical supply after
installation.
REFRIGERATOR LOCATION
• 'RQRWLQVWDOOWKHUHIULJHUDWRUZKHUHWKH
WHPSHUDWXUHZLOOJREHORZ)&EHFDXVH
it will not run often enough to maintain proper
temperatures.
• 'RQRWLQVWDOOWKHUHIULJHUDWRUZKHUHWKH
WHPSHUDWXUHZLOOJRDERYH)&EHFDXVHLW
will not perform properly.
• 'RQRWLQVWDOOWKHUHIULJHUDWRULQDORFDWLRQH[SRVHGWR
water (rain, etc.) or direct sunlight.
• ,QVWDOOLWRQDIORRUVWURQJHQRXJKWRVXSSRUWLWIXOO\
loaded.
For proper installation, the refrigerator/freezer
must be placed on a level surface of hard material
the same height as the rest of the flooring. This
surface should be strong enough to support a fully
loaded refrigerator, or approximately
1,500 lbs. (680.39 kg) each.

49-60814 Rev. 1 17
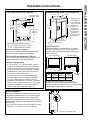
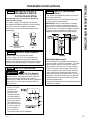
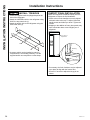
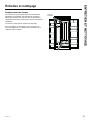
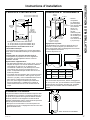
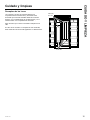
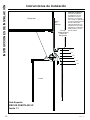
THE INSTALLATION SPACE
Water And Electrical Locations
The opening must be prepared with the electrical
and the cold water supply located as shown.
The Cutout Depth Must Be 24” (60.96 cm)
The refrigerator will project forward, slightly beyond
adjacent cabinetry for standard installation.
Additional Specifications
$YROW+]RUDPSSRZHUVXSSO\LV
required. An individual properly grounded branch
FLUFXLWRUFLUFXLWEUHDNHULVUHFRPPHQGHG,QVWDOO
a properly grounded 3-prong electrical receptacle
recessed into the back wall. Electrical must be
located on the rear wall as shown.
• The water line can enter the opening through
the floor or back wall. The water line should be
´2'FRSSHUWXELQJRU6PDUW&RQQHFW
kit
between the cold water line and water connection
location, long enough to extend to the front of the
UHIULJHUDWRU,QVWDOODWLRQRIDQHDVLO\DFFHVVLEOH
shut-off valve in the water line is required.
*Finished Width
6-3/4"
Electrical
Area
85" max
Finished
Opening
75" From Floor
to Bottom
of Electrical
Area
24"
5"
5"
3 1/2"
Water Supply
3 1/2"
42" Models 16-1/4"
48" Models 18-1/4"
6-3/4"
*The finished cutout width must be:
´FPIRU´PRGHOV
´FPIRU´PRGHOV
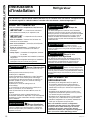
INSTALLATION INSTRUCTIONS
Installation Instructions
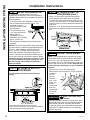
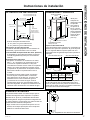
DIMENSIONS AND CLEARANCES
* Shipping height.
The refrigerator
can be adjusted
to fit into a cutout
WKDWLV´
(214.63 cm)
LQKHLJKW8VH
leveling legs
and wheels for
DPD[LPXP´
(2.54 cm) height
adjustment.
Product Clearances
These refrigerators are equipped with a 3-position
door stop. The factory-set 115° door swing can be
adjusted to 90° if clearance to adjacent cabinets or
walls is restricted.
'RRU6ZLQJ
'RRU6ZLQJ
)RUDGRRUVZLQJDOORZ´FPPLQ
clearance to a wall, for framed and stainless steel
PRGHOV,IWKHGRRUVWRSSRVLWLRQLVXVHGSDQDFFHVV
is maintained, but pan removal is restricted.
Models A B C
´ ´
(33.02cm)
´
FP
´
(67.63cm)
´ ´
FP
´
FP
´
(72.71cm)
*84"
From
Floor
26-1/8"
Depth Including Handles:
28-7/8"
42" or 48"
Frame to Frame
41", or 47"
Case Width
*83-1/2"
at
Rear
23-7/8"
Behind
Frame
C
*Min. Distance
to Wall
B
A
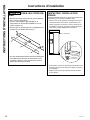
SIDE PANELS
Side panels must be used whenever the sides of the
UHIULJHUDWRUZLOOEHH[SRVHG7KH´FPVLGH
panels will slip into the side case trim. Secure the
panels to the refrigerator with stick-on hook and loop
fastener strips. Order the side panels from the cabinet
manufacturer.
• Cut a notch in the top front corner as shown to allow
clearance for corner keys in the front side trim.
'HSHQGLQJRQLQVWDOODWLRQKHLJKW
*84"
2-9/16"
24"
*3" to 4"
3/16"
1-7/8"

49-60814 Rev. 1
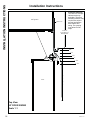
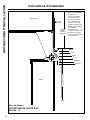
Installation Instructions
INSTALLATION INSTRUCTIONS
3/4"
1/4"
1/2"
3/4"
1"
1-1/4"
1-1/2"
23-9/16"
From Rear of
Refrigerator
Case Trim
Refrigerator
Door
Stainless Steel
Top View
90° DOOR SWING
Scale 1:1
Frameless Cabinets:
The case trim overlaps
cabinets at the top
and sides. Therefore,
frameless cabinets may
require filler strips to
prevent interference
with cabinet door
swing. The opening
must allow for filler
strips.

49-60814 Rev. 1 19
INSTALLATION INSTRUCTIONS
Installation Instructions
TOOLS AND MATERIALS
REQUIRED
• Tinsnips to cut banding
• Stepladder
´%LWH[WHQVLRQ
• Tape measure
• Gloves
´'U\ZDOOVFUHZV
• 5-Gal. Bucket with cover
´6SLULWOHYHO
• Appliance hand truck
• Tubing cutter
´RSHQHQGZUHQFK
• #2 Phillips screwdriver
'ULOODQGDSSURSULDWHELWV
´´VRFNHW
• Safety glasses
´RSHQHQGZUHQFK
• Pliers
´´&RPER5DFKHW
´ORQJ[IRU$QWL7LSVXSSRUW
´FRSSHUZDWHUOLQHWXELQJRU6PDUW&RQQHFW
Refrigerator Tubing kits
• Water shut-off valve
• Custom panels for doors and grille panel
• Screws to secure refrigerator to cabinetry
• Stick-on hook and loop fastener strips for
´VLGHSDQHOV
HARDWARE SUPPLIED
• Water filter bypass plug
• Toekick
´QXWDQGIHUUXOH
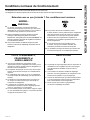
GROUNDING THE REFRIGERATOR
WARNING
Electrical Shock Hazard.
)DLOXUHWRIROORZWKHVHLQVWUXFWLRQVFDQUHVXOWLQGHDWK
fire, or electrical shock.
The power cord of this appliance is equipped
with a 3-prong (grounding) plug which mates
with a standard 3-prong (grounding) wall receptacle
WRPLQLPL]HWKHSRVVLELOLW\RIHOHFWULFVKRFNKD]DUGIURP
this appliance.
Have the wall outlet and circuit checked by a qualified
electrician to make sure the outlet is properly grounded.
Where a standard 2-prong wall outlet is encountered, it
is your personal responsibility and obligation to have it
replaced with a properly grounded 3-prong wall outlet.
'212781'(5$1<
&,5&8067$1&(6&8725
5(029(7+(7+,5'*5281'
3521*)5207+(32:(5
&25'
'212786($1$'$37(5
3/8*72&211(&7
7+(5()5,*(5$72572$3521*287/(7
'212786($1(;7(16,21&25':,7+7+,6
$33/,$1&(
FLOORING
)RUSURSHULQVWDOODWLRQWKLVUHIULJHUDWRUPXVWEH
placed on a level surface of hard material that is
at the same height as the rest of the flooring. This
surface should be strong enough to support a fully
loaded refrigerator, or approximately 1,500 lbs.
NJ
NOTE: Protect the finish of the flooring. Cut a large
section of the cardboard carton and place under
the refrigerator where you are working.

20 49-60814 Rev. 1
Installation Instructions
INSTALLATION INSTRUCTIONS
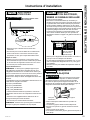
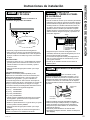
STEP 3 INSTALL WATER LINE
WARNING
Connect to potable water supply
only.
• A cold water supply is required for automatic
icemaker operation. The water pressure must be
EHWZHHQDQGSVLN3D
5RXWH´2'FRSSHURU6PDUW&RQQHFW
plastic
tubing between house cold water line and the water
connection location.
• The tubing should be long enough to extend to the
front of the refrigerator. Allow enough tubing to
accommodate the bend leading into the water line
connection.
NOTE: The only GE Appliances approved plastic
tubing is supplied in the SmartConnect
Refrigerator
7XELQJNLWV'RQRWXVHDQ\RWKHUSODVWLFZDWHUVXSSO\
line because the line is under pressure at all times.
Other types of plastic may crack or rupture with age
and cause water damage to your home.
SmartConnect
5HIULJHUDWRU7XELQJ.LWVDUHDYDLODEOH
in the following lengths:
¶P:;;
¶P:;;
¶P:;;
¶P:;;
Shut off the main water supply.
Turn on the nearest faucet long enough to clear the
line of water.
,QVWDOODVKXWRIIYDOYHEHWZHHQWKHLFHPDNHUZDWHU
valve and cold water pipe in a basement or cabinet.
The shut-off valve should be located where it will be
easily accessible.
• Turn on the main water supply and flush debris.
Run about a quart of water through the tubing into
a bucket. Shut off the water supply at the shut-off
valve.
NOTE: Saddle type shut-off valves are included in
many water supply kits. Before purchasing, make
sure a saddle type valve complies with your local
plumbing codes.
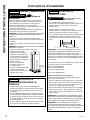
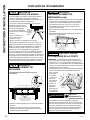
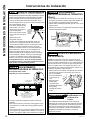
STEP 1 REMOVE PACKAGING
WARNING
Tip Over Hazard.
The refrigerator is much heavier at the top than at the
bottom—be careful when moving. When using a hand
truck, handle from the side only.
• Carefully cut banding at the top and bottom, remove
the outer carton.
• Slide out the back corner posts (2).
• Slide the carton off the top of the cabinet.
NOTE: ,7,61271(&(66$5<72/$<7+(
&$%,1(7'2:1,125'(5725(029(7+(
6.,'
• The unit is secured to the skid with 4 slotted tie-
GRZQVWUDSV5HPRYHWKHVL[´EROWVIURPWKH
base channels in the tie-downs.
5HPRYHWKHVL[´EROWVVHFXULQJWKHVWUDSVWR
the skid.
NOTE: '2127$77(0377252//81,72))
6.,'
• The support blocks on the bottom of the refrigeration
case must be removed
before the refrigerator is
taken off the skid or damage
will occur. Carefully tilt the
refrigerator and slide the
blocks out from beneath.
• Remove the toekick and set
aside for final installation.
• Lift the refrigerator off the
skid with an appliance dolly.
Handle from the sides.
Remov
e
Tie Dow
n
Toekick
Floor
Cold Water Line
STEP 2 MOVE THE
REFRIGERATOR INTO THE HOUSE
• Re-use the corner posts from the packaging to
protect stainless steel models. Run the appliance
dolly straps over the posts and under the handles.
• Leave the protective film on the refrigerator until
installation is complete. IMPORTANT: Never lift the
refrigerator by the handle or push against the grille
SDQHOWKLVFRXOGFDXVHGDPDJHRUPLVDOLJQPHQW
• Avoid laying the unit on its back or side to prevent
sealed system restrictions.
NOTE: Commonwealth of Massachusetts
3OXPELQJ&RGHV&05VKDOOEHDGKHUHGWR
Saddle valves are illegal and use is not permitted
in Massachusetts. Consult with your licensed
plumber.
La page est en cours de chargement...
La page est en cours de chargement...
La page est en cours de chargement...
La page est en cours de chargement...
La page est en cours de chargement...
La page est en cours de chargement...
La page est en cours de chargement...
La page est en cours de chargement...
La page est en cours de chargement...
La page est en cours de chargement...
La page est en cours de chargement...
La page est en cours de chargement...
La page est en cours de chargement...
La page est en cours de chargement...
La page est en cours de chargement...
La page est en cours de chargement...
La page est en cours de chargement...
La page est en cours de chargement...
La page est en cours de chargement...
La page est en cours de chargement...
La page est en cours de chargement...
La page est en cours de chargement...
La page est en cours de chargement...
La page est en cours de chargement...
La page est en cours de chargement...
La page est en cours de chargement...
La page est en cours de chargement...
La page est en cours de chargement...
La page est en cours de chargement...
La page est en cours de chargement...
La page est en cours de chargement...
La page est en cours de chargement...
La page est en cours de chargement...
La page est en cours de chargement...
La page est en cours de chargement...
La page est en cours de chargement...
La page est en cours de chargement...
La page est en cours de chargement...
La page est en cours de chargement...
La page est en cours de chargement...
La page est en cours de chargement...
La page est en cours de chargement...
La page est en cours de chargement...
La page est en cours de chargement...
La page est en cours de chargement...
La page est en cours de chargement...
La page est en cours de chargement...
La page est en cours de chargement...
La page est en cours de chargement...
La page est en cours de chargement...
La page est en cours de chargement...
La page est en cours de chargement...
La page est en cours de chargement...
La page est en cours de chargement...
La page est en cours de chargement...
La page est en cours de chargement...
La page est en cours de chargement...
La page est en cours de chargement...
La page est en cours de chargement...
La page est en cours de chargement...
La page est en cours de chargement...
La page est en cours de chargement...
La page est en cours de chargement...
La page est en cours de chargement...
La page est en cours de chargement...
La page est en cours de chargement...
La page est en cours de chargement...
La page est en cours de chargement...
La page est en cours de chargement...
La page est en cours de chargement...
La page est en cours de chargement...
La page est en cours de chargement...
La page est en cours de chargement...
La page est en cours de chargement...
La page est en cours de chargement...
La page est en cours de chargement...
-
 1
1
-
 2
2
-
 3
3
-
 4
4
-
 5
5
-
 6
6
-
 7
7
-
 8
8
-
 9
9
-
 10
10
-
 11
11
-
 12
12
-
 13
13
-
 14
14
-
 15
15
-
 16
16
-
 17
17
-
 18
18
-
 19
19
-
 20
20
-
 21
21
-
 22
22
-
 23
23
-
 24
24
-
 25
25
-
 26
26
-
 27
27
-
 28
28
-
 29
29
-
 30
30
-
 31
31
-
 32
32
-
 33
33
-
 34
34
-
 35
35
-
 36
36
-
 37
37
-
 38
38
-
 39
39
-
 40
40
-
 41
41
-
 42
42
-
 43
43
-
 44
44
-
 45
45
-
 46
46
-
 47
47
-
 48
48
-
 49
49
-
 50
50
-
 51
51
-
 52
52
-
 53
53
-
 54
54
-
 55
55
-
 56
56
-
 57
57
-
 58
58
-
 59
59
-
 60
60
-
 61
61
-
 62
62
-
 63
63
-
 64
64
-
 65
65
-
 66
66
-
 67
67
-
 68
68
-
 69
69
-
 70
70
-
 71
71
-
 72
72
-
 73
73
-
 74
74
-
 75
75
-
 76
76
-
 77
77
-
 78
78
-
 79
79
-
 80
80
-
 81
81
-
 82
82
-
 83
83
-
 84
84
-
 85
85
-
 86
86
-
 87
87
-
 88
88
-
 89
89
-
 90
90
-
 91
91
-
 92
92
-
 93
93
-
 94
94
-
 95
95
-
 96
96


GE CSB42 Le manuel du propriétaire
- Catégorie
- Frigos
- Taper
- Le manuel du propriétaire
dans d''autres langues
- English: GE CSB42 Owner's manual
- español: GE CSB42 El manual del propietario
Documents connexes
-
GE Cafe Series CFE28UELDS Le manuel du propriétaire
-
GE GWE19JSLSS Le manuel du propriétaire
-
GE GNE27ESMSS Mode d'emploi
-
-
 GE Profile Series PWE23KYNFS Le manuel du propriétaire
-
GE PSB42YSRSS Le manuel du propriétaire
-
GE GTE21GMLES Le manuel du propriétaire
-
GE GIE21GMLES Manuel utilisateur
-
-
GE UCC15NJII Mode d'emploi

Autres documents
-
Cafe CSB48WSKSS Manuel utilisateur
-
-
-
Igloo FR834 Le manuel du propriétaire
-
AYA AFC2704BKAQUA Mode d'emploi
-
Electrolux ERO2820 Manuel utilisateur
-
Monogram ZIC30GNNII Guide d'installation
-
-
Monogram ZKMV Manuel utilisateur
-
 iio ALBR1372WL Manuel utilisateur
