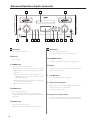
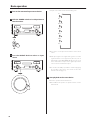
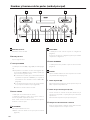
TEAC NR-7CD Le manuel du propriétaire
- Catégorie
- Lecteur CD
- Taper
- Le manuel du propriétaire

NR-7CD
D01307621A
Z
Network CD Integrated Amplifier
OWNER’S MANUAL
MODE D’EMPLOI
MANUAL DEL USUARIO
For information about this unit’s network functions,
see the TEAC HR Streamer User’s Manual.
The Owner’s Manual and TEAC HR Streamer User’s
Manual can be downloaded from the TEAC Global
Site (http://www.teac-global.com/).
To play back files on USB flash drives and to use the
unit connected to a network, install the dedicated
app (free) on a smartphone or tablet, and connect it
to the same network as the unit.
ENGLISH
FRANÇAIS
ESPAÑOL

2
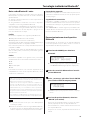
IMPORTANT SAFETY INSTRUCTIONS
CAUTION: TO REDUCE THE RISK OF ELECTRIC SHOCK,
DO NOT REMOVE COVER (OR BACK). NO USER-
SERVICEABLE PARTS INSIDE. REFER SERVICING TO
QUALIFIED SERVICE PERSONNEL.
<
The lightning flash with arrowhead symbol, within an
equilateral triangle, is intended to alert the user to the
presence of uninsulated “dangerous voltage” within the
product’s enclosure that may be of sufficient magni-
tude to constitute a risk of electric shock to persons.
B
The exclamation point within an equilateral triangle is
intended to alert the user to the presence of important
operating and maintenance (servicing) instructions in
the literature accompanying the appliance.
WARNING: TO PREVENT FIRE OR SHOCK
HAZARD, DO NOT EXPOSE THIS APPLIANCE TO
RAIN OR MOISTURE.
CAUTION
o DO NOT REMOVE THE EXTERNAL CASES OR CABINETS TO EXPOSE
THE ELECTRONICS. NO USER SERVICEABLE PARTS ARE INSIDE.
o IF YOU ARE EXPERIENCING PROBLEMS WITH THIS PRODUCT,
CONTACT THE STORE WHERE YOU PURCHASED THE UNIT FOR
A SERVICE REFERRAL. DO NOT USE THE PRODUCT UNTIL IT HAS
BEEN REPAIRED.
o USE OF CONTROLS OR ADJUSTMENTS OR PERFORMANCE OF
PROCEDURES OTHER THAN THOSE SPECIFIED HEREIN MAY RESULT
IN HAZARDOUS RADIATION EXPOSURE.
1) Read these instructions.
2) Keep these instructions.
3) Heed all warnings.
4) Follow all instructions.
5) Do not use this apparatus near water.
6) Clean only with dry cloth.
7) Do not block any ventilation openings. Install in accordance
with the manufacturer’s instructions.
8) Do not install near any heat sources such as radiators, heat
registers, stoves, or other apparatus (including amplifiers) that
produce heat.
9) Do not defeat the safety purpose of the polarized or grounding-
type plug. A polarized plug has two blades with one wider than
the other. A grounding type plug has two blades and a third
grounding prong. The wide blade or the third prong are pro-
vided for your safety. If the provided plug does not fit into your
outlet, consult an electrician for replacement of the obsolete
outlet.
10) Protect the power cord from being walked on or pinched par-
ticularly at plugs, convenience receptacles, and the point where
they exit from the apparatus.
11) Only use attachments/accessories specified by the manufacturer.
12) Use only with the cart, stand, tripod,
bracket, or table specified by the man-
ufacturer, or sold with the apparatus.
When a cart is used, use caution when
moving the cart/apparatus combination
to avoid injury from tip-over.
13) Unplug this apparatus during lightning storms or when unused
for long periods of time.
14) Refer all servicing to qualified service personnel. Servicing is
required when the apparatus has been damaged in any way,
such as power-supply cord or plug is damaged, liquid has been
spilled or objects have fallen into the apparatus, the apparatus
has been exposed to rain or moisture, does not operate nor-
mally, or has been dropped.
o The apparatus draws nominal non-operating power from the
AC outlet with its POWER or STANDBY/ON switch not in the ON
position.
o The mains plug is used as the disconnect device; the disconnect
device shall remain readily operable.
o Caution should be taken when using earphones or headphones
with the product because excessive sound pressure (volume)
from earphones or headphones can cause hearing loss.
CAUTION
o Do not expose this apparatus to drips or splashes.
o Do not place any objects filled with liquids, such as vases, on
the apparatus.
o Do not install this apparatus in a confined space such as a
book case or similar unit.
o The apparatus should be located close enough to the AC
outlet so that you can easily reach the power cord plug at any
time.
o If the product uses batteries (including a battery pack or
installed batteries), they should not be exposed to sunshine,
fire or excessive heat.
o CAUTION for products that use replaceable lithium batter-
ies: there is danger of explosion if a battery is replaced with
an incorrect type of battery. Replace only with the same or
equivalent type.
WARNING
Products with Class ! construction are equipped with a power
supply cord that has a grounding plug. The cord of such a prod-
uct must be plugged into an AC outlet that has a protective
grounding connection.
IN USA/CANADA, USE ONLY ON 120 V SUPPLY.

EN
3
V
Precautions concerning batteries
Misuse of batteries could cause them to rupture or leak leading to
fire, injury or the staining of nearby things. Please read and observe
the following precautions carefully.
o Be sure to insert the batteries with correct positive (¥) and
negative (^) orientations.
o Use batteries of the same type. Never use different types of bat-
teries together.
o If the remote control is not used for a long time (more than a
month), remove the batteries to prevent them from leaking.
o If the batteries leak, wipe away the leakage inside the battery
compartment and replace the batteries with new ones.
o Do not use batteries of types other than those specified. Do not
mix new batteries with old ones or use different types of batter-
ies together.
o Do not heat or disassemble batteries. Never throw batteries into
fire or water.
o Do not carry or store batteries with other metallic objects. The
batteries could short circuit, leak or explode.
o Never recharge a battery unless it is confirmed to be a recharge-
able type.
Laser information
This product contains a semiconductor laser system inside the cabi-
net and is classified as a “CLASS 1 LASER PRODUCT”.
To prevent being exposed to the laser beam, do not try to open the
enclosure.
Laser:
Type: EP-C101
Manufacturer: GUANGDONG EVER BRIGHT GROUP CO.,LTD.
Laser output: Less than 0.3 mW
Wavelength: 790 ±25 nm
Model for USA
This product has been designed and manufactured according to
FDA regulations “title 21, CFR, chapter 1, subchapter J, based on the
Radiation Control for Health and Safety Act of 1968”, and is classified
as class ! laser product. There is not hazardous invisible laser radiation
during operation because invisible laser radiation emitted inside of
this product is completely confined in the protective housings.
The label required in this regulation is as follows:
For European Customers
Disposal of electrical and electronic equipment
and batteries and/or accumulators
a) All electrical/electronic equipment and waste batteries/
accumulators should be disposed of separately from the
municipal waste stream via collection facilities designated by
the government or local authorities.
b) By disposing of electrical/electronic equipment and waste
batteries/accumulators correctly, you will help save valuable
resources and prevent any potential negative effects on
human health and the environment.
c) Improper disposal of waste electrical/electronic equipment
and batteries/accumulators can have serious effects on the
environment and human health because of the presence of
hazardous substances in the equipment.
d) The Waste Electrical and Electronic Equipment (WEEE)
symbols, which show wheeled bins that have been
crossed out, indicate that electrical/electronic equip-
ment and batteries/accumulators must be collected
and disposed of separately from household waste.
If a battery or accumulator contains more than the
specified values of lead (Pb), mercury (Hg), and/or
cadmium (Cd) as defined in the Battery Directive
(2006/66/EC), then the chemical symbols for those
elements will be indicated beneath the WEEE symbol.
e) Return and collection systems are available to end users. For
more detailed information about the disposal of old electri-
cal/electronic equipment and waste batteries/accumulators,
please contact your city office, waste disposal service or the
shop where you purchased the equipment.
Pb, Hg, Cd

4
Wireless equipment precautions
Compliance of radio transmitter and
interference
Model for USA
Declaration of Conformity
Responsible party: TEAC AMERICA, INC.
Address: 1834 Gage Road, Montebello, California,
U.S.A.
Telephone number : 1-323-726-0303
This device complies with Part 15 of the FCC Rules. Operation
is subject to the following two conditions: (1) this device may
not cause harmful interference, and (2) this device must accept
any interference received, including interference that may cause
undesired operation.
Labeling of authorization
FCC ID: XEG-NR7CD
Model for Canada
Compliance of radio transmitter
This device complies with Industry Canada RSS standard(s).
Operation is subject to the following two conditions:
1) This device may not cause interference
2) This device must accept any interference, including interfer-
ence that may cause undesired operation of the device.
Labeling of authorization
IC: 1559C-NR7CD
Compliance of interference
This Class B digital apparatus complies with Canadian ICES-003.
Model for EEA (European Economic Area)
This product has the function of broadband transmitter using
2.4GHz Band.
Use frequency range: 2400 MHz – 2480 MHz
Maximum output power: Bluetooth® Class 2 (less than 2.5 mW)
Hereby, TEAC Corporation declares that the radio
equipment type is in compliance with Directive
2014/53/EU., and the other Directives, and
Commission Regulations.
The full text of the EU declaration of conformity is available at the
following internet address: Please contact us by e-mail.
http://www.teac-audio.eu/en/
TEAC Corporation
1-47 Ochiai, Tama-shi, Tokyo, 206-8530, Japan
CAUTION
Authorization of wireless devices are different in countries or
regions. Please use only in the country where you purchased the
product.
o Depending on the country, restrictions on the use of Bluetooth
wireless technology might exist.
Confirm the laws and regulations of the country or region where
you want to use the unit before use.
Radiation Exposure requirements
This equipment meets the regulation, which is recognized interna-
tionally, for the case of human exposure to radio waves generated
by the transmitter.
Statement of compliance
Model for USA
This equipment complies with FCC radiation exposure limits set
forth for an uncontrolled environment and meets the FCC radio fre-
quency Exposure Guidelines.
Model for Canada
This equipment complies with IC RSS-102 radiation exposure limits set
forth for an uncontrolled environment.
Model for EEA (European Economic Area)
This equipment complies with EN.62311; Assessment of electronic
and electrical equipment related to human exposure restrictions
for electromagnetic fields; the harmonised standard of DIRECTIVE
2014/53/EU.
CAUTION
Changes or modifications not expressly approved by the party
responsible for compliance could void the user’s authority to
operate the equipment.

EN
5
Trademarks and copyrights
“DSD” is a registered trademark.
The Bluetooth® word mark and logos are registered trademarks
owned by Bluetooth SIG, Inc. and any use of such marks by TEAC
CORPORATION is under license.
Qualcomm aptX is a product of Qualcomm Technologies International,
Ltd.
Qualcomm is a trademark of Qualcomm Incorporated, registered in
the United States and other countries, used with permission. aptX is
a trademark of Qualcomm Technologies International, Ltd., registered
in the United States and other countries, used with permission.
Wi-Fi is a trademark or registered trademark of Wi-Fi Alliance.
Apple, iPad, iPhone and iPod touch are trademarks of Apple Inc.,
registered in the U.S. and other countries. App Store is a service mark
of Apple Inc.
LDAC™ and LDAC logo are trademarks of Sony Corporation.
Other company names, product names and logos in this document
are the trademarks or registered trademarks of their respective
owners.
Information about copyrights and licensing related to open-source
software is provided in the separate “Important Notice Regarding
Software” document.
Information for interference
(FCC requirements)
This equipment has been tested and found to comply with the lim-
its for a Class B digital device, pursuant to Part 15 of the FCC Rules.
These limits are designed to provide reasonable protection against
harmful interference in a residential installation.
This equipment generates, uses, and can radiate radio frequency
energy and, if not installed and used in accordance with the instruc-
tions, may cause harmful interference to radio communications.
However, there is no guarantee that interference will not occur in a
particular installation.
If this equipment does cause harmful interference to radio or televi-
sion reception, which can be determined by turning the equipment
off and on, the user is encouraged to try to correct the interference
by one or more of the following measures.
o Reorient or relocate the equipment and/or the receiving
antenna.
o Increase the separation between the equipment and receiver.
o Connect the equipment into an outlet on a circuit different from
that to which the receiver is connected.
o Consult the dealer or an experienced radio/TV technician for
help.

6
Contents
IMPORTANT SAFETY INSTRUCTIONS ...............................2
Wireless equipment precautions ...................................4
Trademarks and copyrights . . . . . . . . . . . . . . . . . . . . . . . . . . . . . . . . . . . . . . . . 5
Included items ....................................................6
Downloading the remote app .....................................6
Using the TEAC Global Site .........................................6
Product registration ...............................................6
Before use .........................................................7
Maintenance ......................................................7
Using the remote control ..........................................7
Discs ..............................................................8
Connecting speakers ..............................................9
Connections ......................................................10
Network connections .............................................12
Names and functions of parts (remote control) ....................13
Names and functions of parts (main unit) .........................14
Connecting headphones .........................................15
Upconversion ....................................................16
Display ...........................................................17
Basic operation ...................................................18
Listening to CDs ..................................................21
Bluetooth® wireless technology ...................................23
Settings ..........................................................25
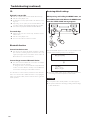
Troubleshooting ..................................................27
Specifications .....................................................29
Thank you for choosing TEAC.
Read this manual carefully to get the best performance from this
unit.
After reading it, keep it in a safe place for future reference.
For information about this unit’s network functions, see the TEAC HR
Streamer User’s Manual.
o The Owner’s Manual and TEAC HR Streamer User’s Manual can be
downloaded from the TEAC Global Site (http://www.teac-global.
com/).
o To use network functions and USB playback, you must also use
an iPad or other iOS device that has the dedicated app (free)
installed and is connected to the same network as the unit.
Check to be sure the box contains all the included items shown
below.
Please contact the store where you purchased this unit if any of these
items are missing or have been damaged during transportation.
Power cord × 1
Remote control (RC-1328) × 1
Batteries for remote control (AAA) × 2
Felt pads × 3
Owner’s manual (this document, including warranty) × 1
o For information about the warranty, users living in the USA and
Canada should see page 86 and the back cover (warranty
document). Users living in Europe and other regions should see
page 87.
o The TEAC HR Streamer User’s Manual can be downloaded from
the TEAC Global Site (http://www.teac-global.com/).
Downloading the remote app
To use network and USB playback functions, you must also use an
iPad or other device that has the dedicated app (free) installed and
is connected to the same network.
How to download the app for iOS devices including iPad
Search for “TEAC HR Streamer” in the App Store.
o Release is planned for an Android version (as of January 2017).
See the product website for details.
Using the TEAC Global Site
You can download updates for this unit from the TEAC Global Site:
http://teac-global.com/
1) Open the TEAC Global Site.
2) In the TEAC Downloads section, click the desired language to
open the Downloads website page for that language.
NOTE
If the desired language does not appear, click Other Languages.
3) Click the “Search by Model Name” section to open the
Downloads page for that product. (Users in Europe should click
the product name in the “Products” section instead.)
4) Select and download the updates that are needed.
Product registration
Customers in the USA, please visit the following TEAC website to
register your TEAC product online.
http://audio.teac.com/support/registration/
Included items

EN
7
V
Placement precautions
o Do not install this unit in a location that could become hot.
This includes places that are exposed to direct sunlight or near
a radiator, heater, stove or other heating equipment. Moreover,
do not place it on top of an amplifier or other equipment that
generates heat. Doing so could cause discoloration, deformation
or malfunction.
o When installing this unit, leave a little space (at least 3 cm or 1")
between it and walls and other devices in order to allow good
heat dissipation.
If you put it in a rack, for example, leave at least 5 cm (2") open
above it and at least 10 cm (4") open behind it.
Failure to provide these gaps could cause heat to build up inside
and result in fire.
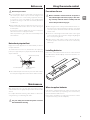
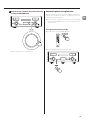
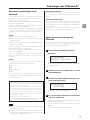
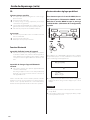
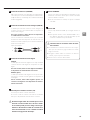
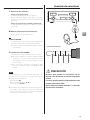
Note about pinpoint feet
High-precision metal pinpoint feet are attached firmly to the bot-
tom plate of this unit.
The stands for these feet are loose, but when the unit is placed in
position, it is supported by these pinpoint feet, which will effectively
disperse vibrations.
Chassis Pinpoint foot (metal)
Foot-stand (metal)
Screws that attach
foot-stand
o The included felt pads are intended to protect the surface where
the unit is placed. Apply them to the bottoms of the foot-stands.
Maintenance
Wipe dirt from the top cover and other panel surfaces using a
soft cloth that has been slightly dampened with a diluted neutral
cleanser.
Do not wipe with chemical cleaning cloths, thinner or other chemi-
cal agents. Doing so could damage the surface.
V
For your safety, disconnect the power cord from
the outlet before cleaning.
Before use Using the remote control
Precautions for use
V
Misuse of batteries could cause them to rupture or
leak, which might result in fire, injury or the stain-
ing of nearby materials. Please carefully read and
observe the precautions on page 3.
o When using the remote control, point it toward the remote con-
trol signal receiver on the main unit from a distance of 5 m (16 ft)
or less. Do not place obstructions between the main unit and the
remote control.
o The remote control might not work if the remote control signal
receiver on the unit is exposed to direct sunlight or bright light. If
this occurs, try moving the unit.
o Beware that use of this remote control could cause the unin-
tentional operation of other devices that can be controlled by
infrared rays.
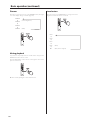
Installing batteries
Remove the cover from the back of the remote control and insert
two AAA batteries with their ¥/^ oriented as shown in the case.
Replace the cover.
When to replace batteries
If the distance required between the remote and the main unit
decreases or if the unit stops responding to the remote buttons,
replace both batteries with new ones.
Dispose of the used batteries according to the instructions on them
or requirements set by your local municipality.

8
Discs
o If the side of the disc that has the data encoded on it (unlabeled
side) becomes dirty with fingerprints or dust, use a soft cloth to
wipe the surface from the center directly toward the edge.
Always clean discs before storing them. Leaving a disc in an
unclean state might degrade its sound quality.
o Never use record cleaners, antistatic treatments, thinners or
similar chemicals to clean discs. Such chemicals could harm the
surface of the disc.
o Do not leave discs in places that are exposed to direct sunlight or
that are very humid or hot.
o When writing something on the label side of a disc, use a felt tip
permanent marker. The use of a ballpoint pen or other pen with
a hard tip could damage the disc, making it unplayable.
o After you finish playing a disc, always put it back into its case for
storage. Failure to do so could result in warping and scratches.
o Do not apply labels or other materials to discs. Do not use a disc
that has sticky residue left on its surface after removing tape or
a sticker, for example. If such a disc is loaded, it might become
stuck in the unit or damage the unit.
o Never use commercially-available CD stabilizers. Doing so could
make the disc unplayable or damage the unit.
o Do not use cracked discs because they could damage the unit.
o Never use discs with irregular shapes, including heart-shaped
and octagonal discs, because they could damage the unit.
o Do not use printable discs, which allow printing on the label
side. Since the surface of such a disc has been specially treated,
if loaded, it might become stuck in the unit or damage the unit.
If you have any questions about how to handle a CD-R or CD-RW
disc, contact the manufacturer of the disc directly.
The following marks appear on disc labels and disc cases. This unit
can play discs that have these marks without using an adapter.
This unit cannot play discs that do not have these marks.
Types of discs that can be played on this unit and
their marks
CDs with the “COMPACT disc DIGITAL AUDIO” logo (12 cm,
8 cm)
o This logo appears on disc labels and packages.
If you try to play any other type of disc with this unit, loud
noises that could damage speakers or harm hearing might
occur. Never try to play any type of disc other than those
shown above.
o This unit cannot play DVD video, DVD audio, video CD, DVD-ROM
and CD-ROM discs, for example.
o This unit might not be able to properly play Dual Discs, Copy
Control CDs or other special CDs that do not conform to the
Red Book CD standard. Operation and sound quality cannot be
guaranteed when special discs are used in this unit. If playback of
a special disc should cause trouble, contact the seller of the disc.
CD-R/CD-RW discs
This unit can play CD-R/CD-RW discs that are in audio CD format.
o Be sure to finalize discs created by CD recorders.
Depending on the quality of the disc and the condition of the
recording, playback might not be possible. For details, see
the operation manual for the device you are using.
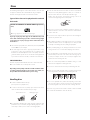
Handling discs
o Load discs with their labeled sides up.
(CDs only have one playable side.)
o To remove a disc from its case, always press down on the center
of the case first and then hold the disc by its edges.
Removal from case Holding by edges
o Be careful when handling discs. If the side that contains the data
(unlabeled side) is scratched, smudged with fingerprints or oth-
erwise dirty or marred, errors could occur during playback.

EN
9
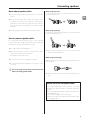
Notes about speaker cables
o Use commercially-available speaker cables to connect the
speakers.
o Use the shortest speaker cables possible. The longer the cable,
the greater the resistance value and the more that damping
performance is reduced. Moreover, length also increases imped-
ance and capacitance, degrading the sound quality of high
frequencies.
o Use left and right speaker cables that have the same length.
How to connect speaker cables
Use commercially-available speaker cables to connect the ¥
terminal of the unit to the ¥ terminal of the speaker and the ^
terminal of the unit to the ^ terminal of the speaker.
o Use speakers with at least 4Ω impedance.
o If the exposed tip of the core wire of a speaker cable contacts
another cord or terminal, a short could occur.
Never allow a speaker cable to short.
o Do not connect more than one amplifier to a speaker.
o Do not bundle speaker cables with power cords. Doing so could
cause noise.
V
The power plug should always be disconnected
when connecting speaker cables.
When using bare wires
Loosen the cap and insert the core wire into the hole in the termi-
nal. Then, tighten the cap.
When using spade lugs
Loosen the cap and insert the lug between the cap and base of the
terminal. Then, tighten the cap.
o When using a spade lug to connect, use one with an inside
diameter of at least 8 mm (3/8").
When using banana plugs
With the cap tightened, insert the plug into the opening in the end
of the terminal.
o Carefully read the instructions for the banana plugs that you are
using.
Notice about the European model
In accordance with European safety regulations, connecting
banana plugs to speaker terminals is not allowed on European
models.
The holes into which banana plugs could be inserted have been
covered with black caps.
Connect speakers using bare wires or spade lugs.
If a black cap should become separated from its terminal, return
it to its original position.
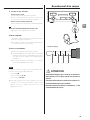
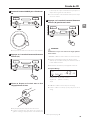
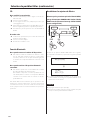
Connecting speakers

10
LR
A B
C D F
E
A
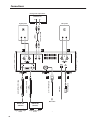
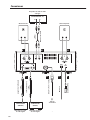
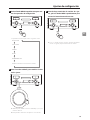
Connections
Digital audio output
device
Digital audio output
device
DIGITAL OUT
(COAXIAL)
DIGITAL OUT
(OPTICAL)
RCA coaxial digital cable
Optical digital cable
RCA audio cables
Included power cord
c
Wall outlet
Right speaker Left speaker
Analog audio output device
Audio output
(LINE OUT, etc.)
LAN cable
USB flash drive

EN
11
A SPEAKER terminals
Use commercially-available speaker cables to connect the ¥
terminal of the unit to the ¥ terminal of the speaker and the ^
terminal of the unit to the ^ terminal of the speaker (page 9).
B Analog audio input (LINE IN) connectors
Use these to input 2-channel analog audio signals. Connect an
analog audio output device to these RCA connectors.
Use commercially-available cables for connections.
Connect this unit’s R input connector to the R output connec-
tor of the audio output device, and this unit’s L input connector
to the L output connector of the other device.
RCA audio cables
L
R
L
R
C Digital audio input connectors
COAXIAL
Use this to input digital audio. Connect the coaxial digital audio
output connector of a digital audio device to it.
Use a commercially-available RCA coaxial digital cable
for connection.
OPTICAL
Use these to input digital audio. Connect optical digital audio
output connectors of digital audio devices to them.
Use commercially-available optical digital cables with
rectangular connectors for connection.
D Power inlet (~IN)
Connect the supplied power cord here.
After all other connections are complete, connect the power
cord’s plug to a wall outlet.
V
Do not use any power cord other than the one
included with this unit. Use of other power cords
could result in fire or electric shock. Unplug the
cord from the outlet when not using the unit for a
long time.
E ETHERNET port
Connect a commercially-available LAN cable to this port when
you want to connect this unit to a wired network or the Internet.
o When switching input sources, this port is labeled “NET”.
F USB port
Connect USB flash drives that contain audio files here.
o USB flash drive playback requires operation using a device
(with the dedicated app) that is on the same network as this
unit.
V
Complete all other connections before turn-
ing the unit on.
o Carefully read the manuals of the devices that you are
connecting and follow their instructions when making
connections.
o Do not bundle connecting cables with power cords. Doing
so could cause noise.
o Connect all plugs completely.

12
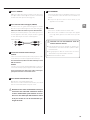
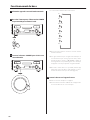
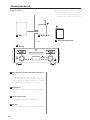
Network connections
a NAS (Network Attached Storage)
Use to store audio files.
Operation as a UPnP server is necessary to use it as a media
server. MinimServer is the media server recommended for use
with this unit.
b Wi-Fi
™
router
Use Wi-Fi to connect the iPad or other device to this unit and
the NAS.
c iPad or other device
Install the app to control this unit (page 6).
d NR-7CD
This unit. The IP address is acquired from the DHCP server.
Connection example
a
b
c
d
iPad or other device
NAS
Wi-Fi™ router
NR-7CD
LAN cable
To Internet
o The Wi-Fi router must be connected to the
Internet when installing apps on the iPad or
other device, when updating the NET firmware
of this unit, and when listening to Internet radio.

EN
13
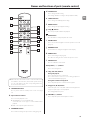
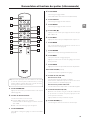
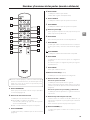
Names and functions of parts (remote control)
d FILTER button
Use to change the filter setting.
This changes the filter according to the input (PCM or DSD).
e SHUFFLE button
Use to change the shuffle playback setting.
f REPEAT button
Use to change the repeat playback setting.
g Stop (
8
) button
Press to stop CD, NET or Bluetooth playback.
h MUTE button
Press this button to temporarily mute the sound.
i METER button
Use to set level meter brightness and turn operation on and off
(page 20).
j DIMMER button
Use this button to change the brightness of the display.
k MENU button
Use to enter setting mode (page 25).
Press when in setting mode to return to the previous screen.
l ENTER button
Press to confirm the selected item.
m Up/down (k/j) buttons
Use to select setting items.
n Skip (
.
/
/
) buttons
During CD playback
Use to skip to the previous or next track.
Press and hold for at least one second during playback to
search forward/backward (page 22).
During NET and Bluetooth playback
Use to skip to the previous or next track in the playlist.
o Play/pause (7/9) button
When the input source is CD, NET or Bluetooth and playback is
stopped or paused, press to start playback.
Press during playback to pause.
p VOLUME (+/−) buttons
Use to adjust the speaker and headphone volumes.
o When the main unit and the remote control both have but-
tons with the same functions, this manual explains how to
use one of the buttons. The other corresponding button can
be used in the same manner.
e
d
c
a
f
b
g
h
i
j
k
l
m
n
o
p
a STANDBY/ON button
Press to put the unit into standby mode or turn it on (page
18).
b Input selection buttons
Use to select the playback source.
o The USB button is not used with this unit.
Select NET and use the app to control USB flash drive
playback.
o LINE 1 is the only line input for this device.
c UPCONVERT button
Use to show and change the upconversion setting (page 16).

14
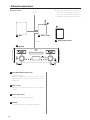
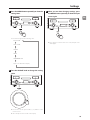
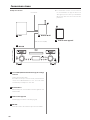
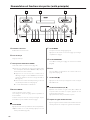
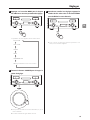
Names and functions of parts (main unit)
A Level meters
These show the output levels.
B Disc tray
Load a disc here.
C POWER switch
Use to turn the unit on and off (page 18).
o If the display or level meters are dark even though the
POWER switch is set to ON, one of the following conditions
is possible.
o The power is on, but the display brightness is set to
DIMMER 0 and/or the level meter operation setting is
DIM0 or OFF (page 26).
o The automatic power saving function has activated, put-
ting the unit into standby (page 27).
o The power cord is disconnected.
D SOURCE knob
Use to select the input source.
Use to change setting values when a menu item is shown.
Turn when the menu is open to change the item shown or the
setting value.
E ENTER button
Press to confirm the selected item.
o Press when the unit is in standby to turn it on (page 19).
F MENU button
Use to enter setting mode (page 25).
Press when in setting mode to change the setting item.
G UPCONVERT button
Use to show and change the upconversion setting (page 16).
H Display
This display shows information about the audio playing back
and menu screens (page 17).
I Stop (8) button
Press to stop CD, NET or Bluetooth playback.
J Play/pause (7/9) button
When the input source is CD, NET or Bluetooth and playback is
stopped or paused, press to start playback.
Press during playback to pause.
K Remote control signal receiver
This receives signals from the remote control. When operating
the remote control, point it at the remote control signal receiver.
EDC F G H I J K L M N O
A B A

EN
15
L Skip (.//) buttons
During CD playback
Use to skip to the previous or next track.
Press and hold for at least one second during playback to
search forward/backward (page 22).
During NET and Bluetooth playback
Use to skip to the previous or next track in the playlist.
M Tray open/close (-) button
Press to open and close the disc tray.
N VOLUME knob
Use to adjust the volume. Turn right to increase and left to
decrease the volume.
o Volume settings are saved separately for speaker and head-
phone outputs.
O PHONES jack
Connect headphones (3.5mm stereo mini plug) here.
o This headphone amp circuit uses a four-pole connector with
independent left and right for grounding. Ordinary plugs
with 3 or 4 poles can be used.
o If headphones are connected to this unit, audio will not be
output from the SPEAKER terminals on the rear panel.
NOTE
The following buttons on the unit and the remote control function
with CD, NET and Bluetooth playback.
Stop (8) button
Play/pause (7/9) button
Skip (.//) buttons
o This unit cannot be used to create playlists, for example, on
another unit connected to it. Playlists must be created and
other settings must be made to enable playback on connected
devices.
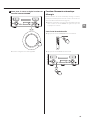
Connecting headphones
Wiring illustration
L+ R+ L− R−
V
CAUTION
While wearing headphones, do not connect or dis-
connect them or turn the unit on or off.
Doing so could result in a sudden loud noise that
could harm your hearing.
Always set the volume to minimum (−∞ dB) before
putting headphones on.

16
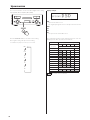
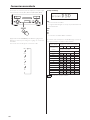
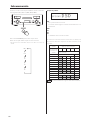
Upconversion
The conversion function can be used when digital audio is being
input (CD, NET*, Bluetooth, OPT1, OPT2, COAX).
Press the UPCONVERT button to show the current setting.
Press it again to change the upconversion setting.
*For USB flash drive playback, set the input source to NET.
OFF
DSD
2Fs
4Fs
8Fs
Display example
UPCONV
DSD
OFF
Upconversion will not occur.
The original input signal is sent as is directly to the D/A converter.
DSD
2Fs
4Fs
8Fs
The upconversion shown will be used.
The relationships between input sampling frequencies and sam-
pling frequencies after upconversion are as follows.
Input source Upconversion setting
Input sampling
frequency
OFF 2Fs 4Fs 8Fs DSD
Sampling frequency after upconversion
[kHz] [kHz] [MHz]
32 32 64 128 256 8.0
44.1 44.1 88.2 176.4 352.8 11.2
88.2 88.2 88.2 176.4 352.8 11.2
176.4 176.4 176.4 176.4 352.8 11.2
352.8 352.8 352.8 352.8 352.8 11.2
48 48 96 192 384 12.2
96 96 96 192 384 12.2
192 192 192 192 384 12.2
384 384 384 384 384 12.2
DSD [MHz] [MHz] [MHz]
2.8 2.8 2.8 2.8 2.8 2.8
5.6 5.6 5.6 5.6 5.6 5.6
These values are not converted.

EN
17
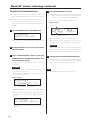
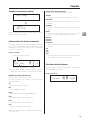
Display
When the unit is turned on
WELCOME
c
TEAC
NR-7CD
After messages like the above appear, the input source will be
shown on the display.
Input source information
The input source information screen will appear after turning the
unit on as well as after about 10 seconds pass without operation on
a setting screen.
Display example
-
51
.5
OPT1
PCM 44k
Input signal status Volume
Input source name
o Turning the VOLUME knob will change the volume, and the vol-
ume will appear to the right of the input signal status.
Input source name
This shows the name of the selected source.
The names on the display correspond to the selected connectors as
follows.
CD
CD player in this unit
NET
ETHERNET port, USB port
COAX
RCA COAXIAL digital audio input connector
OPT1
Optical digital audio input connector 1
OPT2
Optical digital audio input connector 2
LINE
Analog audio input connectors
o When using Bluetooth, the name of the connected device is
shown.
Input signal status
This shows the input source signal status.
UNLOCK!
The unit cannot synchronize with the input signal.
NOT AUDIO!
A signal with a format that cannot be played is being received.
NETWORK!
The input source is NET, but the unit is not connected to a
network.
READY
The input source is NET and it is connected, but no audio signal
is being received.
WAV 44k
DSD 2.8M
DSD 5.6M
FLAC96k, etc.
These are abbreviations of the input signal type and sampling
frequency.
SBC
AAC
aptX
LDAC
When the input source is Bluetooth, abbreviations of the codec
type and sampling frequency are shown.
Volume display
The volume setting shown will be enlarged when you turn this
unit’s VOLUME knob.
Display example
Volume -
60
.0dB

18
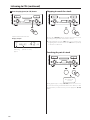
Basic operation
1 Turn on the connected input source devices.
2 Shift the POWER switch to its ON position to
turn the unit on.
3 Turn the SOURCE knob to select an input
source.
The input sources will be shown in the following order
CD
NET
Bluetooth
OPT1
OPT2
COAX
LINE
o You can also use the input selection buttons on the remote
control.
o If the input signal is not a digital audio signal or is an audio
signal format that is not supported by this unit, such as
Dolby Digital or DTS, “NOT AUDIO!” will appear on the screen
and no audio will be output. Set the digital output of the
connected device to PCM audio output.
o To use NET or the USB port, install the dedicated app (page
6) on an iPad or other device, and connect it to the same
network as this unit (page 12).
4 Start playback on the source device.
Refer to the operation manual of that device.
o CD and Bluetooth operation are explained in later sections
of this manual.

EN
19
5 Play the source, and then adjust the volume by
turning the VOLUME knob.
o The volume operation screen will appear.
Automatic power saving function
When the automatic power saving function is ON, this unit will auto-
matically enter standby mode if there is no playback and it is not
operated for 30 minutes (page 27).
o Even when audio is playing back, automatic power saving will
also function if the VOLUME knob is set to a value at which sound
cannot be heard.
Turning the unit on from standby
o Press the remote control STANDBY/ON button.
o Press the ENTER button on the front of the unit.

20
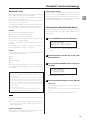
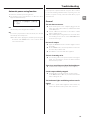
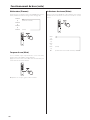
Dimmer
Each time you press the remote control DIMMER button, the bright-
ness of the display changes as follows (page 26).
DIMMER3
c
DIMMER2
c
DIMMER1
c
DIMMER0
(normal brightness)
(Unlit)
Muting playback
If you want to temporarily mute the volume of this unit, press the
MUTE button on the remote control.
Press the MUTE button on the remote control again to return to the
previous volume level.
o When muted, adjusting the volume will unmute it.
Level meters
Press the remote control METER button to change level meter
brightness and turn the meters on and off.
DIM3
c
DIM2
c
DIM1
c
DIM0
c
OFF
(Unlit)
(Unlit, meters stopped)
Basic operation (continued)
La page est en cours de chargement...
La page est en cours de chargement...
La page est en cours de chargement...
La page est en cours de chargement...
La page est en cours de chargement...
La page est en cours de chargement...
La page est en cours de chargement...
La page est en cours de chargement...
La page est en cours de chargement...
La page est en cours de chargement...
La page est en cours de chargement...
La page est en cours de chargement...
La page est en cours de chargement...
La page est en cours de chargement...
La page est en cours de chargement...
La page est en cours de chargement...
La page est en cours de chargement...
La page est en cours de chargement...
La page est en cours de chargement...
La page est en cours de chargement...
La page est en cours de chargement...
La page est en cours de chargement...
La page est en cours de chargement...
La page est en cours de chargement...
La page est en cours de chargement...
La page est en cours de chargement...
La page est en cours de chargement...
La page est en cours de chargement...
La page est en cours de chargement...
La page est en cours de chargement...
La page est en cours de chargement...
La page est en cours de chargement...
La page est en cours de chargement...
La page est en cours de chargement...
La page est en cours de chargement...
La page est en cours de chargement...
La page est en cours de chargement...
La page est en cours de chargement...
La page est en cours de chargement...
La page est en cours de chargement...
La page est en cours de chargement...
La page est en cours de chargement...
La page est en cours de chargement...
La page est en cours de chargement...
La page est en cours de chargement...
La page est en cours de chargement...
La page est en cours de chargement...
La page est en cours de chargement...
La page est en cours de chargement...
La page est en cours de chargement...
La page est en cours de chargement...
La page est en cours de chargement...
La page est en cours de chargement...
La page est en cours de chargement...
La page est en cours de chargement...
La page est en cours de chargement...
La page est en cours de chargement...
La page est en cours de chargement...
La page est en cours de chargement...
La page est en cours de chargement...
La page est en cours de chargement...
La page est en cours de chargement...
La page est en cours de chargement...
La page est en cours de chargement...
La page est en cours de chargement...
La page est en cours de chargement...
La page est en cours de chargement...
La page est en cours de chargement...
-
 1
1
-
 2
2
-
 3
3
-
 4
4
-
 5
5
-
 6
6
-
 7
7
-
 8
8
-
 9
9
-
 10
10
-
 11
11
-
 12
12
-
 13
13
-
 14
14
-
 15
15
-
 16
16
-
 17
17
-
 18
18
-
 19
19
-
 20
20
-
 21
21
-
 22
22
-
 23
23
-
 24
24
-
 25
25
-
 26
26
-
 27
27
-
 28
28
-
 29
29
-
 30
30
-
 31
31
-
 32
32
-
 33
33
-
 34
34
-
 35
35
-
 36
36
-
 37
37
-
 38
38
-
 39
39
-
 40
40
-
 41
41
-
 42
42
-
 43
43
-
 44
44
-
 45
45
-
 46
46
-
 47
47
-
 48
48
-
 49
49
-
 50
50
-
 51
51
-
 52
52
-
 53
53
-
 54
54
-
 55
55
-
 56
56
-
 57
57
-
 58
58
-
 59
59
-
 60
60
-
 61
61
-
 62
62
-
 63
63
-
 64
64
-
 65
65
-
 66
66
-
 67
67
-
 68
68
-
 69
69
-
 70
70
-
 71
71
-
 72
72
-
 73
73
-
 74
74
-
 75
75
-
 76
76
-
 77
77
-
 78
78
-
 79
79
-
 80
80
-
 81
81
-
 82
82
-
 83
83
-
 84
84
-
 85
85
-
 86
86
-
 87
87
-
 88
88


TEAC NR-7CD Le manuel du propriétaire
- Catégorie
- Lecteur CD
- Taper
- Le manuel du propriétaire
dans d''autres langues
- English: TEAC NR-7CD Owner's manual
- español: TEAC NR-7CD El manual del propietario
Documents connexes
-
TEAC NT-505 Manuel utilisateur
-
TEAC NT-503 Le manuel du propriétaire
-
TEAC AI-101DA Le manuel du propriétaire
-
TEAC NT-503DAB Le manuel du propriétaire
-
-
-
-
-
-
TEAC HA-P50 Le manuel du propriétaire