
EL SERIES
PORTABLE AIR CONDITIONER
Instructions for use. Keep these instructions
Visit www.delonghi.com for a list of service
centers near you.
ELECTRIC CHARACTERISTICS
115 V~ 60 Hz
CONDITIONNEUR D’AIR PORTATIF
Mode d’emploi . Conservez cette notice
Visitez www.delonghi.com pour y voir une liste
des centres de réparation proches de chez vous.
CARACTÉRISTIQUES ÉLECTRIQUES
115 V~ 60 Hz
SISTEMA DE AIRE
ACONDICIONADO PORTÁTIL
Repase y guarde estas instrucciones.
Lea cuidadosamente este instructivo
antes de usar su aparato.
Visite www.delonghi.com para ver la lista
de centros de servicios cercanos a usted.
CARACTERISTICAS ELECTRICAS:
115 V~ 60 Hz

2
EN FR ES
pag. 4 page 17 pág. 31

3
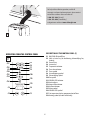
A
B
B1
B2
B3
B8
B7
B6
B4
A4
A3
A2
A1
A7
A11
A9
A8
A13
A6
B9 B10 B11
A5
A10
A12
B5

4
Important safeguard
• The appliance is not intended for use by
persons (including children) with reduced
physical, sensory or mental capabilities, or
lack of experience and knowledge, unless they
have been given supervision or instruction
concerning use of the appliance by a person
responsible for their safety.
• Children should be supervised to ensure that
they do not play with the appliance.
• If the SUPPLY CORD is damaged, it must be
replaced by the manufacturer, its service agent
or similarly qualied persons in order to avoid
a hazard.
• The appliance shall be installed in accordance
with national wiring regulations.
As the appliance is powered by electricity, the
possibility of electrical shock cannot be excluded.
The following safety precautions must therefore be
followed:
• After removing the packaging, check the
condition of the appliance. If in doubt, do not
use the appliance and contact professionally
qualied personnel.
• Before use, always check the condition of the
power cord.
• It is dangerous to modify or alter the
characteristics of the appliance in any way.
• This appliance must be connected to an ecient
“grounding” system. Have the electrical system
checked by a qualied electrician.
• Before each cleaning or maintenance operation,
always disconnect the plug from the power
outlet.
• Never submerge the appliance in water.
• Do not use the appliance outdoors.
• Do not obstruct the entrances and exits of air.
• When the appliance is connected to the mains,
keep the following safety rules in mind:
• Do not touch the appliance with wet or damp
hands;
• Do not use the appliance with bare or wet feet;
• Do not pull on the power cord or appliance to
detach the plug from the power outlet;
• Do not move the appliance by pulling the power
cable.
• keep the appliance far from the reach of children;
• Do not insert foreign bodies into the appliance;
• Do not insert metal objects into the apertures.
Danger! Rotating parts; contact with the internal
fan could cause electric shock or injury.
• do not leave the appliance exposed to
atmospheric agents;
• If you wish to permanently eliminate the
appliance, after disconnecting the plug from
the power outlet it is recommended to make it
unusable by severing the power cord.
• In the event of a fault and/or malfunction, turn
the appliance o without tampering with it.
For all repairs, contact an authorized technical
service centre only and request the use of
original spare parts and accessories.
• Avoid the use of power cord extensions.
1.1 Designated use
This appliance must be used exclusively in domestic
environment and for the intended purpose for
which it was designed. All other uses are considered
improper and therefore hazardous. The manufacturer
shall not be held liable for any damage caused by
improper, erroneous and irresponsible use, and/or
due to repairs made by unqualied personnel.
1.2 Installing the appliance
• The appliance must be installed in compliance
with national standards regulating electrical
systems.
• Do not operate your air conditioner in a wet
room such as a bathroom or laundry room.
• Do not install the appliance in rooms containing
gas, oil or sulphur or near sources of heat.
• Do not use the appliance on sloping surfaces.
• Keep the appliance at least 20” (52cm) away
from ammable substances (alcohol, etc.) or
pressurised containers (e.g. aerosol cans).
• Do not rest objects on top of the appliance.
• When transporting, the appliance must be kept
upright. If this is not possible secure the unit at

5
• an angle, do not lie it horizontally.
• Before transporting the unit, drain the unit.
• After transportation, wait at least 6 hours before
• switching the unit on.
1.3 Enviromental information
• The materials used for packaging can be
recycled. You are therefore recommended to
dispose of them in special dierentiated waste
collection containers.
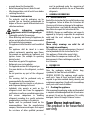
Specic information regarding
appliances with R32 refrigerant gas
• Thoroughly read all of the warnings.
• When defrosting and cleaning the appliance, do
not use any tools other than those recommended
by the manufacturing company.
• The appliance shall be stored in a well-ventilated
area;
• The appliance shall be stored in a room
without continuously operating open ames
(for example an operating gas appliance) and
ignition sources (for example an operating
electric heater).
• Do not burn any part of the appliance.
• Refrigerant gases can be odorless.
• This appliance contains R32 refrigerant gas.
(For more details on the refrigerant, see back
cover).
• Do not puncture any part of the refrigerant
circuit.
• The servicing shall be performed only as
recommended by the manufacturer.
• The appliance must be stored in a safe place in
order to prevent damage to the unit.
• Individuals who operate or work on the
refrigerant circuit must have the appropriate
certication issued by an accredited organisation
that ensures competence in handling
refrigerants according to a specic evaluation
recognized by associations in the industry.
• Repairs must be performed based on the
recommendations from the manufacturing
company. Maintenance and repairs that require
the assistance of other qualified personnel
must be performed under the supervision of
an individual specified in the use of flammable
refrigerants.
1. GENERAL INFORMATION
1.1 Instruction for Use
Read all the Instruction for Use carefully before using
the appliance. Failure to follow this Instruction for
Use may result in burns or damage to the appliance.
The manufacturer is not liable for damage deriving
from failure to respect this Instruction for Use.
WARNING: Changes or modications not expressly
approved by the party responsible for compliance
could void the user’s authority to operate the
equipment.
Please note:
These safety warnings are valid for all
De’Longhi air conditioners.
If the appliance is passed to other persons, they must
also be provided with this Instruction for Use.
This appliance is tted with a special safety
device. When the compressor switches o, this
device prevents it from switching on again for at
least 3 minutes.
2. BEFORE USE
Important!
Store the packaging material (plastic bags,
styrofoam) far from the reach of children.
CHOKING HAZARD. The appliance might contain
small parts. Some of those small parts might be
required to get disassembled during cleaning and
maintenance operations. Handle with care and keep
small parts out of reach of children.
2.1 Checking the appliance
After removing the packaging, make sure the product
is complete and undamaged and that all accessories
are present. Do not use the appliance if it is visibly
damaged. Contact De’Longhi Customer Services.
Save these instructions
This product is for household
use only

6
INTRODUCTION
Thank you for choosing a De’Longhi product. Please take a few
moments to read the instructions to avoid risks or damage to the
appliance.
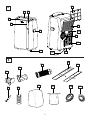
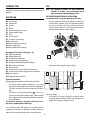
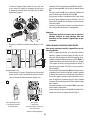
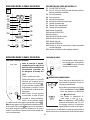
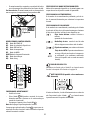
DESCRIPTION
Description of the appliance (See page 3 - A)
A1 Air outlet grid
A2 Control panel
A3 Handles
A4 Wheels
A5 Remote control signal receiver
A6 Remote control storage
A7 Filter
A8 Air intake grille
A9 Air exhaust hose housing
A10 Air intake grille
A11 Lower drainage hose with cap
A12 Power supply cable
A13 Upper drainage hose with cap
Description of accessories (See page 3 - B)
B1 Wall ange with cap
B2 Window outlet vent
B3 Assembled air exhaust hose
B4 Window bracket with locking pin
B5 Additional window bracket with locking pin
B6 Water drain tube with cap
B7 Remote control
B8 End of season dust cover (on some models only)
B9 End of season accessories bag (on some models only)
B10 Foam stripping
B11 Evaporator water drain tube
Electrical connection
Before plugging the appliance into the outlet, check that:
• The outlet’s power supply corresponds to the value
indicated on the rating label on the back of the appliance;
• The outlet and electrical circuit are adequate for the appli-
ance;
• The outlet is a 3-hole grounded outlet . If this is not
the case, you must choose another outlet. Failure to follow
these important safety instructions absolves the manufac-
turer of all liability.
If it becomes necessary, the power cable must be re-
placed by a qualied professional only.
The instructions below will enable you to prepare your air
conditioner for operation as eciently as possible. Before use,
make sure the air intake and outlet grilles are unobstructed.
USE
Note: This appliance features an auto evaporative
function to remove excess condensate water
during cooling and dehumidiying modes.
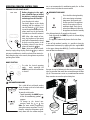
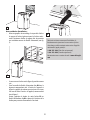
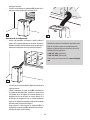
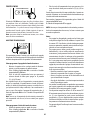
AIR CONDITIONING WITH WALL INSTALLATION
For optimal results set up your appliance in this way:
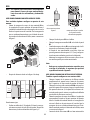
• Fit the assembled air exhaust hose B3 in the housing at
the back of the appliance. Align the open lock symbol on
the air hose with the arrow on the back of the unit. Turn
air hose counter clockwise until the closed lock symbol is
aligned with the arrow, as shown in gure 1.
1
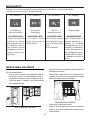
• Respect the distances given in gure 2 below.
Proceed as follows:
• Drill a hole ø 5,25 inches (134 mm) in an outside wall or
through a wooden kickboard. Respect the dimensions and
height of the hole given in gure 2 and 3.
50 cm
50 cm
50 cm
20 in 20 in
20 in
80 cm
50 cm
50 cm
20 in
20 in
32 in
90 cm
36 in
2

7
134
Ø 5,25 in
3
in the wooden
kickboard of a French
window or panel
in the wall:
you are
recommended to insulate the
section of wall using
suitable insulation
• Fit the wall ange B1 into the hole.
• Fit the assembled hose B3 into the wall ange B1.
• When the air hose B3 is not connected, the drilled hole can
be closed with the ange cap B1.
• When installing the air conditioner, you should leave a door
slightly open little as 1/2“(1 cm) to guarantee correct ven-
tilation and room pressure.
• Keep the air hoses as short and free of curves as possible to
avoid constrictions.
Note:
• As special tools are required for this type of
installation, we suggest you have the appliance in-
stalled by specialized personnel.
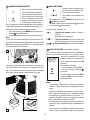
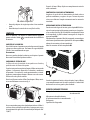
AIR CONDITIONING WITH WINDOW INSTALLATION
You can also set up in a double-hung window:
• Place the window bracket in the window sill, extend the
bracket fully within the window frame, x the bracket in
place using the locking pin. Attach the provided foam strip-
ping B10 to the top of the window bracket and then lower
the window onto the bracket. (Should the window bracket
be too large for the window, the plastic can be cut with a
saw by a qualied professional.)
• Fit the air exhaust hose B3 in the relevant housing located
on the rear side of the appliance. Align the open lock sym-
bol on the air hose with the arrow on the back of the unit,
turn air hose counter clockwise until the closed lock symbol
is aligned with the arrow, as shown in gure 1
• Connect the window outlet vent B2 to the other end of the
exhaust hose.
• Insert the window outlet vent B2 of the exhaust hose into
the slot of the window bracket (g. 4).
4
Other set-up methods:
• Thanks to the locking pins, it’s possible to use the window
bracket also for sliding windows. Position the hole of the
bracket so to allow a correct installation of the exhaust hose
(see g. 5).
5
• If you have a casement window (gure 6) proceed as fol-
lows:
• Fit the assembled air exhaust hose B3 in the relevant hous-
ing located on the rear side of the appliance, align the open
lock symbol on the air hose with the arrow on the back of
the unit, turn air hose counter clockwise until the closed
lock symbol is aligned with the arrow, as shown in gure 1,
then, apply the window outlet B2 to the air exhaust hose
B3 and place it outside the window to exhaust the hot air.

8
6
For help with installation, operation, and for all
accessories and spare/replacement parts, please contact
our toll free customer service call center at:
1-800-322-3848 [US only]
1-888-335-6644 [Canada only]
or log onto our website at www.delonghi.com
OPERATING FROM THE CONTROL PANEL
C1C2
C4
C11
C13
C18
C9
C7
C5
C6
C3
C16
C14
C12
C10
C15
C17
C8
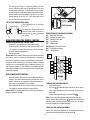
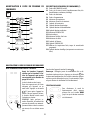
DESCRIPTION OF THE CONTROL PANEL (C)
C1 ON/STAND-BY (on/o) key
C2 Mode selection key (air conditioning, dehumidifying, fan,
heating)
C3 Decrease key
C4 Increase key
C5 Temperature indicator
C6 Timer hour indicator
C7 Timer symbol
C8 Air conditioning symbol
C9 Dehumidifyìng symbol
C10 Fan symbol
C11 ECO REAL FEEL indicator
C12 Arctic whisper
C13 Auto air ow indicator
C14 Air ow indicators
C15 Alarm symbol
C16 ECO REAL FEEL symbol
C17 Set temperature display, programmed on/o time
C18 Heating symbol (on some models only)
C

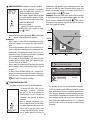
9
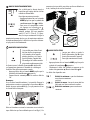
OPERATING FROM THE CONTROL PANEL
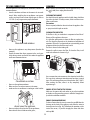
TURNING THE APPLIANCE ON/OFF
Before plugging in the appli-
ance, check the caps on back of
the unit are correctly inserted
on drainage hose A11 and A13.
Insert the plug in the socket.
Two dashes appear on the display
indicating that the appliance is in
stand-by. Touch the (C1) key to
turn on the appliance. When the ap-
pliance comes on, the last function
set before it was shut o is activated.
NOTE: After a few seconds of inac-
tivity, the brightness of the control
panel will be automatically reduced
and in the next few minutes it will
be further reduced. To turn the ap-
pliance o, touch the key.
Note: Never turn o the air condi-
tioner by simply pulling the plug. Touch the key in order to
put your air conditioner in stand-by and wait a few minutes be-
fore pulling the plug. In this manner, the appliance can perform
operating status checks.
MODE SELECTION
To select the desired operating
mode, touch repeatedly the
MODE key until the desired function
is selected.
AIR CONDITIONING MODE
This is ideal for hot and humid weather
when the room needs to be both cooled
and dehumidied.
To correctly set this mode:
• Touch repeatedly the MODE key un-
til the air conditioning symbol
appears.
• To change to the desired tem-
perature, touch the or key.
Note: The most suitable temperatures,
during the summer range from 75 to 81°F.
However, setting the temperature signi-
cantly lower than the outdoor tempera-
ture is not recommended. In conditioning mode, the air ow
can be selected only from the remote control.
DEHUMIDIFYING MODE
This is ideal for reducing humidity
in the room (spring and autumn,
damp rooms, rainy periods, etc).
For this type of use, the appliance
must be set up same as in the air
conditioner mode. That is, the air
exhaust hose B3 must be tted to
the appliance to allow the humidity
to be discharged outside. To correctly set this mode:
• Touch repeatedly the MODE key until the dehumidifying
symbol appears.
• The appliance automatically chooses the best air ow.
Note:
In case of high ambient humidity, it is possible to drain the
condensation continuously by applying the tube supplied B11
to the upper drainage hose A13 (g. 7) and thus allowing the
water to ow into a container.
Unscrew the cap by following the directions and inserting the
tube. Pay attention that water does not overow onto the oor
(g. 8). If the connector is not in use, to avoid overow onto the
oor, remember to screw the cap back into place.
yes no
7
8

10
FAN MODE
When using this mode, the air ex-
haust hose B3 does not need to be
attached to the appliance
To correctly set this mode:
• Touch repeatedly the MODE key until the fan symbol
appears.
• Select the desired air ow by touching the increase C3
or decrease C4 buttons.
The air ows available are:
Minimum air ow: when maximum quiet
operation is desired.
Medium air ow: when the noise level needs
to be low but with a good comfort level.
Maximum air ow: for maximum performance.
HEATING MODE on some models only)
This is ideal in spring and autumn when
outdoor temperatures are not particu-
larly severe. For this mode, the appli-
ance should be prepared in the same
way as for air conditioning, with the air
exhaust hose B3 attached.
To set this mode:
•
Touch repeatedly the MODE button
until the heating symbol is
displayed.
• Touch increase C3 or decrease
C4 buttons to adjust the desired
temperature.
Notes:
• In this mode, the air ow is selected automatically by the
appliance and cannot be set manually.
• When operating in very cold rooms, the appliance defreezes
automatically, momentarily interrupting normal operation. In
this case, “ Lt “ appears on the display. During this operation, it
is normal for the noise made by the appliance to change.
• In this mode, you may have to wait a few minutes before
the appliance starts providing warm air.
• In this mode, the fan may operate for short periods, even
though the set temperature has already been reached.
• If the display comes on and shows the “HL” alarm, empty
the internal tray following the instructions in the Section
“End of Season operations”. At the end, touch again the
button to restore the heating function.
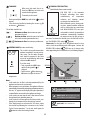
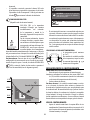
ECO REAL FEEL FUNCTION
available only from remote control)
ECO REAL FEEL is the innovative
De’Longhi technology that works
simultaneously on temperature
reduction and humidity control,
securing the best comfort level.
With traditional systems, during work-
ing time, optimal comfort conditions
may be reached but not secured over
time. With ECO REAL FEEL, once opti-
mal comfort is reached, the portable air
conditioner automatically modulates
the compressor and air ow, to keep it
over time. To activate the function, press the Eco Real Feel but-
ton. The ECO REAL FEEL symbol appears.
Please note: For this type of use, the appliance must be set up
same as in the air conditioning mode. After approx. 1 minute, the
ECO REAL FEEL indicator C11 turns on. It changes color
when approaching the best comfort level (see following diagram).
Perfect!
Perfect!
ORANGE LIGHT: Room conditions far
from optimal level.
GREEN LIGHT: Most people feel good
room conditions, near optimal level.
BLUE LIGHT: Best comfort level.
Perfect!
Perfect!
Perfect!
HUMIDITY
TEMPERATURE
HIGH
MEDIUM
LOW
HIGH
MEDIUM
LOW
Operating curve

11
• The well-being feeling is a subjective condition: for this
reason, dierent people may judge dierently the same
environmental conditions. In particularly severe environ-
mental conditions (high temperature or humidity outside,
poor insulation, too many people, high heat in the room,
strong exposure to the sun, etc...) this device may not be
able to reach the best comfort level.
SELECT THE TEMPERATURE SCALE
The temperature can be displayed
in °C or °F.
To change the temperature unit of
measure touch both the increase/
decrease keys and for about
10 seconds.
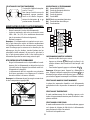
OPERATING FROM THE REMOTE CONTROL
INSERTING OR REPLACING THE BATTERIES
• Remove the cover on the rear of the remote control;
• Insert or replace the batteries with two new LR03 “AAA”
1.5V batteries, inserting them correctly (see the directions
inside the battery compartment);
• Replace the cover.
Please note: If the remote control unit is replaced or discarded,
the batteries must be removed and disposed of in accordance
with current legislation as they are harmful to the environment.
Do not mix old and new batteries. Do not mix alkaline, standard
(carbon-zinc) or rechargeable (nickel-cadmium) batteries. Do
not dispose of batteries in re. Batteries may explode or leak.
If the remote control is not be used for a certain length of time,
remove the batteries.
USING THE REMOTE CONTROL
• Point the remote control at the receiver A5 on the air con-
ditioner. The remote control must be no more than 16ft/5
meters away from the appliance (without obstacles be-
tween the remote control and the receiver).
• The remote control must be handled with care. Do not drop
it or expose it to direct sunlight or sources of heat.
Please note: The remote control can be safely stored in the ap-
propriate compartment A6.
16ft/5 meters
DESCRIPTION OF THE REMOTE CONTROL
D1) ON/STAND-BY button
D2) Air ow selection button
D3) ECO Real Feel button
D4) Timer button
D5) MODE button
D6-D7)Increase/Decrease button
D8) Arctic Whisper button
D9) Swing button
D1
D5
D3
D7
D6
D8
D4
TURNING THE APPLIANCE ON/OFF
• Plug into the outlet.
• Press the button D1 (when turned on, the air condi-
tioner starts operating in the same mode as when it was
turned o) .
• To switch the appliance o, press button D1 .
Note: Never switch the appliance o by removing the plug.
Always switch it o by pushing the button and waiting few
minutes before removing the plug. Only in this way the appli-
ance will perform the standard checkings.
SELECTING THE OPERATING MODES
Most of the commands available on the remote control corre-
spond to those on the appliance control panel A2.
D
D9
D2

12
SELECTING THE TEMPERATURES
In air conditioning and heating modes, press increase/decrease
keys to select the desired temperature.
SELECTING THE AIR FLOW
In conditioning and fan modes, press air ow selection button
on remote control to select the desired air ow. The air ow
available are:
Minimum air ow: when maximum quiet
operation is desired.
Medium air ow: when the noise level needs to
be low but with a good comfort level.
Maximum air ow: for maximum performance.
AUTO air ow: The appliance automatically
chooses the air ow based on the temperature
selected and the environmental conditions (This
is available only in the air conditioning mode).
ECO REAL FEEL FUNCTION
To activate this function, push button D3 on the remote control.
See description of the function on page 10.
ARCTIC WHISPER available in conditioning mode
only)
By activating this funtcion, the operating noise is further re-
duced. To activate, press button on the remote control.
The display shows the relative symbol C12.
SWING FUNCTION
The SWING button D9 moves the ap, evenly distributing the air
into the room. When the SWING button is pressed, the ap will
begin to move forwards and backwards alternatively. If pressed
again, the ap will be locked into its current position. When the
button is next pressed, the ap will start to move forwards and
backwards again.
Note: in order to avoid damaging the internal mechanisms, the
ap must not be moved manually.
SETTING THE TIMER
The timer allows for the delayed start up or shut down of the
appliance. This function will prevent wasting electricity by opti-
mising the operating periods.
How to program delayed shut down
• While the appliance is on in any operating mode, delayed
shut down can be programmed.
• Press the timer button D4: the timer symbol C7 and hours
C6 light up.
• Press the timer key until the desired numbers of hours to
shut down appears on the display (1,2,4,6,8,12 hours).
A few seconds after the timer is set, the setting is memorized and the
display shows the operating mode and the timer symbol stays lit. Once
the set time is elapsed, the air conditioner goes into standby. To cancel
the timer program, press the timer button D4 twice. The timer symbol
C7 will go o.
Note: Once the timer has been activated, by pressing the timer key only
one time, the remaining hours to shut down will be displayed.
How to program delayed start up
• Plug in the appliance and set to standby.
• Press the timer button D4: the timer symbol C7 and hours
C6 light up.
• Press the timer key until the desired numbers of hours to
start up appears (1,2,4,6,8,12 hours).
When the set time is elapsed, the appliance will start to operate
in the same operating mode that was previously set.
To cancel the timer program, touch the timer button D4 twice.
The timer symbol C7 will go o.
NOTE: Once the timer has been activated, by pressing the timer
key only one time, the remaining hours to the start up will be
displayed.
Notes:
• This equipment has been tested and found to comply with
the limits for a Class B digital device, pursuant to part 15 of
the FCC Rules. These limits are designed to provide reasona-
ble protection against harmful interference in a residential
installation.

13
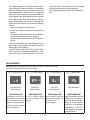
SELFDIAGNOSIS
The appliance has a self diagnosis system to identify a number of warning/malfunctions.
Error messages are displayed on the appliance display.
IF ... IS DISPLAYED,
“Low Temperature”
(frost prevention)
..WHAT SHOULD I DO?
The appliance is tted with a
frost protection device to avoid
excessive formation of ice. The
appliance starts up again auto-
matically when the defrosting
process is completed.
IF ... IS DISPLAYED,
Probe Failure
(Probe damaged)
..WHAT SHOULD I DO?
If this is displayed, contact
our toll free customer service
number.
IF ... IS DISPLAYED,
“High Level”
(Internal tray full)
..WHAT SHOULD I DO?
Empty the internal safety tank
following the instructions in
the section “End of
season operations”.
IF ... IS DISPLAYED,
“High Temperature”
..WHAT SHOULD I DO?
Empty the internal safety tank
following the instructions in
the section “End of season ope-
rations”. If HL alarm reoccurs
frequently in Air Conditioning,
Dehumidifying or Real Feel
mode, contact your local autho-
rized service center.
• This equipment generates, uses and can radiate radio fre-
quency energy and, if not installed and used in accordance
with the instructions, may cause harmful interference to
radio communications. However, there is no guarantee
that interference will not occur in a particular installation.
If this equipment does cause harmful interference to radio
or television reception, which can be determined by turn-
ing the equipment o and on, the user is encouraged to try
to correct the interference by one or more of the following
measures:
- Reorient or relocate the receiving antenna.
- Increase the separation between the equipment and
receiver.
- Connect the equipment into an outlet on a circuit dier-
ent from that to which the receiver is connected.
- Consult the dealer or an experienced radio/TV technician
for help.
Changes or modications not expressly approved by the
party responsible for compliance could void the user’s au-
thority to operate the equipment.
• This device complies with Part 15 of the FCC Rules. Oper-
ation is subject to the following two conditions: (1) this
device may not cause harmful interference, and (2) this
device must accept any interference received, including
interference that may cause undesired operation.
• This Class B digital apparatus complies with Canadian ICES-
003.

14
TIPS FOR CORRECT USE
To ensure optimal results from your air conditioner, follow these
recommendations:
• close the windows and doors in the room to be air condi-
tioned When installing the air conditioner semi-perma-
nently, you should leave a door slightly open (as little as
1/2’’ inch. (1 cm)) to guarantee proper ventilation.
Close doors and windows
• Never use the appliance in very damp rooms (laundries for
example).
• Protect the room from direct exposure to the sun by par-
tially closing curtains and/or blinds to make the appliance
much more economical to run.
Close blinds or curtains
• Never use the appliance outdoors.
•
Make sure there are no heat sources in the room;
• make sure the air conditioner is standing on a level surface.
do not cover the appliance
• Never rest objects of any kind on the air conditioner;
• Never obstruct the air intake or outlet grilles;
CLEANING
Before cleaning or maintenance, turn the appliance o by using
the button, then unplug from the outlet.
CLEANING THE CABINET
You should clean the appliance with a slightly damp cloth then
dry with a dry cloth. For safety reasons, never wash the air con-
ditioner with water.
Precautions
Never use petrol, alcohol or solvents to clean the appliance. Nev-
er spray insecticide liquids or similar.
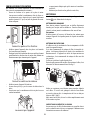
CLEANING THE AIR FILTER
If the lter is dirty, air circulation is compromised and the ef-
ciency of the appliance decreases.
It is therefore good practice to clean the lter at regular inter-
vals. The frequency depends on the duration and conditions of
operation. If the unit is used constantly or systematically, you are
recommended to clean the lter once a week.
The lter is housed in the intake grille.
Remove the grille to access the lter. To clean the lter, it will
need to be extracted as shown in g. 9.
9
Use a vacuum cleaner to remove any dust deposited on the lter.
If it is very dirty, submerge it into warm water and rinse it several
times. The water temperature must be kept below 104° F (40°C).
After washing the lter, allow it to dry completely before
repositioning it.
CHECKS AT THE START OF THE SEASON
Make sure the power cable and socket are in perfect condition
and make sure the grounding system is sucient. Comply strict-
ly with the installation standards.
END OF SEASON OPERATIONS
To drain all water from the circuit, remove the cap A11 from the
drainage on the back of the appliance and allow the water to
drain out into a basin (g. 10). To facilitate this operation, at the
start of the season, it’s possible to apply the water drain hose
with cap B6.

15
In order to properly storage the appliance at the end of the sea-
son, we suggest you cover it with the supplied end of season
dust cover B8 and you put the accessories in the relevant
end of season accessories bag B9.
10
When the appliance is empty, replace the cap.
Clean the lter and dry thoroughly before putting back. Unit
should be stored in large, well ventilated area.
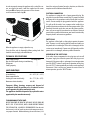
TECHNICAL SPECIFICATIONS
Power supply voltage see rating label
Max. absorbed power during air conditioning “
Refrigerant “
Cooling capacity “
LIMIT CONDITIONS
Room temperature for
air conditioning 64 ÷ 95°F (18° ÷ 35°C)
Room temperature for
heating (on some models only) 50 ÷ 77°F (10 ÷ 25°C)
Maximum relative humidity : 80% RH
Transport, lling, cleaning, recovery and disposal of
refrigerant should be performed by a technical service
centre appointed by the manufacturer only.
The appliance should be disposed of by a specialist centre
appointed by the manufacturer only.
TO AVOID DAMAGE TO THE UNIT:
NEVER TRANSPORT OR TURN THE APPLIANCE UPSIDE DOWN OR
ON ITS SIDE. IF THIS OCCURS, WAIT 6 HOURS BEFORE TURNING
THE APPLIANCE ON, 24 HOURS IS RECOMMENDED. After the unit
has been on its side, oil needs to return to the compressor to en-
sure proper function. Without allowing the unit this time (6-24
hours) the unit may function for only a short time, and then the
compressor will break down from lack of oil.
ELECTRICAL CONNECTION
This appliance is equipped with a 3 prong grounded plug. The
plug must be connected into an outlet that is properly installed
and grounded in the accordance with all local codes and ordi-
nances. Do not modify the plug provided with the appliance.
If it will not t the outlet, have a proper outlet installed by a
qualied electrician or relocate the unit to a proper outlet. If the
household electrical supply does not meet the above specica-
tions, or if you are not sure your home has an eective electrical
ground, have a qualied electrician or your local electrical utility
company check it and correct any problems.
SAFETY PLUG
The appliance is tted with a safety plug to protect the power
cable. If power is cut o, unplug from the outlet and make sure
the power cable is undamaged. If the cable is damaged, call the
service center immediately. If power cuts o frequently and the
power cable is undamaged, contact a qualied electrician.
OPERATION OF THE SAFETY PLUG
If the safety device incorporated in the plug trips and cuts o
the power supply, check that the power cable and plug are not
damaged. If the power cable is undamaged, to restore operation
press the “RESET” button. To verify correct operation of the plug,
press the “TEST” button periodically and make sure the appliance
disconnects. If this is not the case, contact the service center. To
restore operation, press the “RESET” button.

16
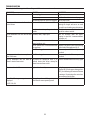
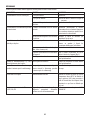
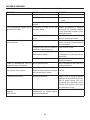
TROUBLESHOOTING
Please check the following points before calling our toll free customer service number.
PROBLEMS CAUSES SOLUTIONS
The air conditioner does not turn on lt is not plugged in plug it in
there is no power wait for at least 3 minutes and try again
the internal protection device was triggered
call the help center
The air conditioner works for a short
period of time
the air exhaust hose is obstructed or bent correctly position the air exhaust hose,
limiting the length and curves as much
as possible and avoiding any obstructions
an obstruction is impeding air exhaust
outside
identify and remove the obstacles that
impede air exhaust outside
The air conditioner runs but does not cool
the room
windows, doors, drapes open close the windows, doors and drapes,
keeping in mind the “recommendations
for proper use”
there is some heat source in the room
(oven, hair dryer, etc.)
eliminate the heat source
the air exhaust hose is disconnected from
the appliance
attach the air exhaust hose to the housing
on the back of the appliance (g.1)
dust lters clogged clean or replace the lters as previously
described
During operation there is an unpleasant
odor in the room
dust lters clogged clean or replace the lters as previously
described
The air conditioner does not work for
about 3 minutes from restart
to protect the compressor there is an
internal device that delays startup for
about 3 minutes from restart
wait the recommended time and try again
The internal tank is full high ambient humidity apply the evaporator water drain tube
supplied (B11) to the upper drainage hose
(A13), thus allowing the water to ow into
a container. Pay attention the water does
not overow on to the oor.
One of the following messages is
displayed:
Lt/PF/HL/Ht
the appliance has a self-diagnosis system
that identies some operating errors
refer to the SELF-DIAGNOSIS chapter

17
Précautions importantes
• L’appareil n’est pas prévu pour des personnes
(y compris des enfants) dont les capacités
physiques, sensorielles ou mentales sont
diminuées, ou manquent d’expérience et
de connaissances, sauf s’ils reçoivent de la
supervision ou des instructions sur l’utilisation
de l’appareil par une personne responsable de
leur sécurité.
• Les enfants doivent être supervisés pour
s'assurer qu'il ne jouent pas avec l’appareil.
• Si le CORDON D'ALIMENTATION est endommagé,
il doit être remplacé par le fabricant, son
agent de service ou des personnes ayant une
qualication similaire an d'éviter tout risque.
• L'appareil doit être installé conformément
aux réglementations nationales en matière de
câblage.
L'appareil fonctionnant à l’électricité, la possibilité
d'un choc électrique ne peut être exclue.
Les consignes de sécurité suivantes doivent donc être
respectées :
• Après avoir retiré l'emballage, vériez l'état
de l'appareil. En cas de doute, n'utilisez pas
l'appareil et contactez du personnel qualié
pour ce travail.
• Avant d'utiliser l'appareil, vériez toujours l'état
du cordon d'alimentation.
• Il est dangereux de modier ou d'altérer les
caractéristiques de l'appareil de quelque
manière que ce soit.
• Cet appareil doit être branché à un système
de «mise à la terre» ecace. Faites vérier le
système électrique par un électricien dument
qualié.
• Avant chaque opération de nettoyage ou de
maitenance, débranchez toujours la che de la
prise de courant.
• Ne plongez jamais l'appareil dans l'eau.
• N'utilisez pas l'appareil à l'extérieur.
• N'obstruez pas les entrées et sorties d'air.
• Lorsque l'appareil est branché au secteur, gardez
à l'esprit les règles de sécurité suivantes:
• Ne touchez pas l'appareil avec des mains
mouillées ou humides;
• N'utilisez pas l'appareil avec les pieds nus ou
mouillés;
• Ne tirez pas sur le cordon d'alimentation ou sur
l'appareil pour débrancher la che de la prise de
courant;
• Ne déplacez pas l'appareil en tirant sur le câble
d'alimentation.
• Gardez l'appareil hors de portée des enfants;
• Ne introduisez pas de corps étrangers dans
l'appareil;
• N'insérez pas d'objets métalliques dans les
ouvertures.
Danger ! Pièces en rotation; le contact avec le
ventilateur interne peut provoquer un choc
électrique ou des blessures.
• ne laissez pas l'appareil exposé aux agents
atmosphériques;
• Si vous souhaitez mettre l’appareil au rebut
dénitivement, après avoir débranché la che
de la prise de courant, il est recommandé de
le rendre inutilisable en coupant le cordon
d'alimentation.
• En cas de panne et/ou de mauvais
fonctionnement, éteignez l'appareil sans y
toucher. Pour toute réparation, contactez
uniquement un centre de service technique
agréé et demandez l'utilisation de pièces de
rechange et d'accessoires d'origine.
• Évitez d'utiliser des rallonges électriques.
1.1 Usage prévu
Cet appareil doit être utilisé exclusivement dans
un environnement domestique et pour l'usage
pour lequel il a été conçu. Toutes les autres
utilisations sont considérées comme inappropriées
et donc dangereuses. Le fabricant décline toute
responsabilité en cas des dommages causés par une
utilisation inappropriée, erronée et irresponsable, et/
ou par des réparations eectuées par du personnel
non qualié.
1.2 Installation de l'appareil
• L'appareil doit être installé conformément
aux normes nationales régissant les systèmes
électriques.

18
• Ne faites pas fonctionner votre conditionneur
d’air dans une pièce humide comme une salle de
bain ou une buanderie.
• N'installez pas l'appareil dans des pièces
contenant du gaz, du pétrole ou du soufre ou à
proximité de sources de chaleur.
• N'utilisez pas l'appareil sur des surfaces
inclinées.
• Tenez l'appareil à une distance d'au moins 52
cm (20 pouces) de substances inammables
(alcool, etc.) ou de récipients sous pression (par
exemple, les bombes aérosols).
• Ne posez pas d'objets sur l'appareil.
• Au cours du transport, l'appareil doit être
maintenu en position verticale. Si cela n'est pas
possible, xez l'appareil
• en oblique; ne le positionnez pas à l'horizontale.
• Avant de transporter l’appareil, purgez-le.
• Après le transport, attendez au moins 6 heures
avant de
• mettre l’appareil en marche.
1.3 Informations sur l'environnement
• Les matériaux utilisés pour l'emballage peuvent
être recyclés. Il est donc recommandé de les
éliminer dans des conteneurs spéciaux de
collecte diérenciée des déchets.
Informations spéciques concernant
les appareils à gaz réfrigérant R32
• Lisez attentivement tous les avertissements.
• Lors du dégivrage et du nettoyage de
l'appareil, n'utilisez pas d'autres outils que ceux
recommandés par le fabricant.
• L'appareil doit être stocké dans un endroit bien
ventilé;
• L'appareil doit être stocké dans une pièce sans
amme nue (par exemple, un appareil à gaz
en marche) et sans source d'inammation (par
exemple, un chauage électrique en marche).
• Ne brûlez aucune partie de l'appareil.
• Les gaz réfrigérants peuvent être inodores.
• Cet appareil contient du gaz réfrigérant R32.
(Pour plus de détails sur le réfrigérant, voir la
couverture arrière).
• Ne percez aucune partie du circuit de réfrigérant.
• La maintenance doit être eectuée uniquement
selon les recommandations du fabricant.
• L'appareil doit être stocké dans un endroit sûr
an d’éviter tout dommage.
• Les personnes qui opèrent ou travaillent
sur le circuit frigorique doivent posséder
la certication appropriée délivrée par un
organisme agréé qui garantit la compétence
dans la manipulation des réfrigérants selon
une évaluation spécique reconnue par les
associations de l'industrie.
• Les réparations doivent être eectuées sur la
base des recommandations du fabricant. La
maintenance et les réparations qui nécessitent
l'assistance d'un autre personnel qualifié
doivent être effectuées sous la supervision
d'une personne spécialisée dans l'utilisation de
réfrigérants inflammables.
1. INFORMATIONS GÉNÉRALES
1.1 Mode d'emploi
Lisez attentivement tout le mode d’emploi avant
d'utiliser l'appareil. Le non-respect de ce mode
d'emploi peut entraîner des brûlures ou des
dommages à l'appareil.
Le fabricant n'est pas responsable des dommages
résultant du non-respect du présent mode d’emploi.
ATTENTION : Les modications non expressément
approuvées par l’entité responsable de la conformité
peuvent annuler l’autorisation de l’utilisateur
d’utiliser l’équipement.
Remarque :
Ces mises en garde de sécurité sont valables
pour tous les conditionneurs d’air De’Longhi.
Si l'appareil est transféré à d'autres personnes,
celles-ci doivent également recevoir le présent mode
d’emploi. Cet appareil est équipé d'un dispositif de
sécurité spécial. Lorsque le compresseur s'éteint, ce
dispositif l'empêche de se rallumer pendant au
moins 3 minutes.

19
INTRODUCTION
Merci d’avoir choisi un produit De’Longhi. Veuillez prendre
quelques moment pour lire les instructions an d’éviter les
risques ou d’endommager l’appareil.
DESCRIPTION
Description de l’appareil (voir page 3 - A)
A1 Grille d’évacuation d’air
A2 Tableau de commande
A3 Poignées
A4 Roues
A5 Récepteur du signal de la télécommande
A6 Logement de la télécommande
A7 Filtre
A8 Grille d’entrée d’air
A9 Logement du exible d’évacuation d’air
A10 Grille d’entrée d’air
A11 Flexible de purge inférieur avec bouchon
A12 Câble d’alimentation électrique
A13 Flexible de purge supérieur avec bouchon
Description des accessoires (voir page 3 - B)
B1 Bride murale avec bouchon
B2 Bouche de sortie pour fenêtre
B3 Flexible d’évacuation d’air monté
B4 Support de fenêtre avec goupille de verrouillage
B5 Support de fenêtre supplémentaire avec goupille de ver-
rouillage
B6 Tuyau de vidange de l'eau avec bouchon
B7 Télécommande
B8 Pare-poussière de n de saison (uniquement sur certains
modèles)
B9 Sac d'accessoires de n de saison (uniquement sur certains
modèles)
B10 Bande en mousse
B11 Tuyau de vidange de l’eau de l’évaporateur
Raccord électrique
Avant de brancher l'appareil dans la prise, vériez les points
suivants:
• L’alimentation électrique de la prise secteur correspond à
la valeur indiquée sur la plaque signalétique à l’arrière de
l’appareil;
• La prise et le réseau électrique conviennent à l'appareil;
• La prise est une prise à 3 ches reliée à la terre . Si ce
n’est pas le cas, vous devez choisir une autre prise. Le non
respect de ces instructions de sécurité importantes dégage
le fabricant de toute responsabilité.
Si cela devient nécessaire, le câble d’alimentation doit
être remplacé uniquement par un professionnel qualié.
Les instructions ci-dessous vous permettront de préparer votre
conditionneur d’air aussi ecacement que possible avant sa
mise en service. Avant de l’utiliser, assurez-vous que les grille
d’entrée et de sortie d’air ne sont pas obstruées.
UTILISATION
Remarque: Cet appareil est doté de la fonction évapora-
tion automatique pour éliminer la condensation d’eau
en excès lorsqu’il fonctionne en mode refroidissement
ou déshumidication.
INSTALLATION MURALE DU CLIMATISEUR
An d’obtenir des résultats optimaux, installez votre ap-
pareil de la façon suivante:
• Logez l’ensemble du exible d’évacuation d’air B3 dans le
boîtier à l’arrière de l'appareil. Placer le symbole du cade-
nas ouvert présent sur le tuyau d’air en face de la èche
2. AVANT L’UTILISATION
Important!
Conservez le matériel d'emballage (sacs en plastique,
styromousse) hors de portée des enfants.
RISQUE D'ÉTOUFFEMENT. L'appareil peut contenir
de petites pièces. Certaines de ces petites pièces
peuvent devoir être démontées lors des opérations
de nettoyage et de maintenance. Manipulez
l'appareil avec précaution et gardez les petites pièces
hors de portée des enfants.
2.1 Vérier l'appareil
Après avoir retiré l'emballage, assurez-vous que le
produit est complet, qu’il n’est pas endommagé et
que tous les accessoires sont présents. N'utilisez pas
l'appareil s'il est visiblement endommagé. Contactez
le service clientèle de De’Longhi.
Conservez ces instructions
Ce produit est réservé à un
usage domestique

20
à l’arrière de l’appareil. Faites tourner le tuyau d'air dans
le sens inverse des aiguilles d’une montre jusqu’à ce que
le symbole du cadenas fermé soit aligné avec la èche,
comme dans la gure 1.
1
• Respectez les distances indiquées dans la gure 2 ci-des-
sous.
Procédez comme suit:
•
Percez un trou ø 5,25 pouces (134 mm) dans un mur extérieur
ou dans le bord en bois d’une fenêtre. Respectez les dimen-
sions et la hauteur de l’orice donné dans la gure 2 et 3.
134
Ø 5,25 in
3
dans la planche en bois
d’une fenêtre française
ou d'un panneau
dans le mur:
Il vaut mieux
que vous isoliez la section de
mur à l’aide d’un
matériau isolant approprié
• Introduisez la bride de montage murale B1 dans l’orice.
• Logez le tuyau monté B3 dans la bride de montae murale
B1.
• Lorsque le tuyau d'air B3 n’est pas connecté, l’orice percé
peut être fermé avec le bouchon de la bride B1.
• Lorsque vous installez le conditionneur d’air, vous devriez
laisser une porte légèrement ouverte, d’environ 1 cm (1/2
pouce) an de garantir une ventilation et une pression cor-
recte dans la pièce.
• Conservez les tuyaux d'air aussi courts et exempts de cour-
bures que possible an d'éviter les étranglements.
Remarque:
• Étant donné qu’il est nécessaire, pour ce type d’ins-
tallation, d’utiliser des outils spéciaux, nous vous
conseillons de faire installer l’appareil par un pro-
fessionnel.
INSTALLATION DU CLIMATISEUR À UNE FENÊTRE
Vous pouvez également installer l’appareil dans une fe-
nêtre à guillotine:
• Placez le support pour fenêtre sur le rebord de la fenêtre,
étendez le support sur toute la largeur du cadre de la fe-
nêtre, puis xez le support en utilisant la goupille de ver-
rouillage. Attachez la bande en mousse fournie B10sur le
support pour fenêtre, puis fermez la fenêtre sur le support.
(Si le support de fenêtre est trop grand pour la fenêtre, le
plastique peut être coupé à l'aide d'une scie par un profes-
sionnel qualié.)
• Fixez le exible d’évacuation d’air B3 dans le logement cor-
respondant situé à l’arrière de l’appareil. Alignez le symbole
du cadenas ouvert présent sur le tuyau d’air avec la èche à
l’arrière de l’appareil, tournez le tuyau d’air dans le sens in-
verse des aiguilles d’une montre jusqu’à ce que le symbole
du cadenas fermé soit aligné avec la èche, comme indiqué
dans la gure 1
• Connectez la bouche de sortie de fenêtre B2 à l’autre extré-
mité du exible d'évacuation.
• Insérez la bouche de sortie de fenêtre B2 du exible d'éva-
cuation dans la fente du support de fenêtre (g. 4).
50 cm
50 cm
50 cm
20 in 20 in
20 in
80 cm
50 cm
50 cm
20 in
20 in
32 in
90 cm
36 in
2
La page est en cours de chargement...
La page est en cours de chargement...
La page est en cours de chargement...
La page est en cours de chargement...
La page est en cours de chargement...
La page est en cours de chargement...
La page est en cours de chargement...
La page est en cours de chargement...
La page est en cours de chargement...
La page est en cours de chargement...
La page est en cours de chargement...
La page est en cours de chargement...
La page est en cours de chargement...
La page est en cours de chargement...
La page est en cours de chargement...
La page est en cours de chargement...
La page est en cours de chargement...
La page est en cours de chargement...
La page est en cours de chargement...
La page est en cours de chargement...
La page est en cours de chargement...
La page est en cours de chargement...
La page est en cours de chargement...
La page est en cours de chargement...
La page est en cours de chargement...
-
 1
1
-
 2
2
-
 3
3
-
 4
4
-
 5
5
-
 6
6
-
 7
7
-
 8
8
-
 9
9
-
 10
10
-
 11
11
-
 12
12
-
 13
13
-
 14
14
-
 15
15
-
 16
16
-
 17
17
-
 18
18
-
 19
19
-
 20
20
-
 21
21
-
 22
22
-
 23
23
-
 24
24
-
 25
25
-
 26
26
-
 27
27
-
 28
28
-
 29
29
-
 30
30
-
 31
31
-
 32
32
-
 33
33
-
 34
34
-
 35
35
-
 36
36
-
 37
37
-
 38
38
-
 39
39
-
 40
40
-
 41
41
-
 42
42
-
 43
43
-
 44
44
-
 45
45


dans d''autres langues
- English: DeLonghi EL Series User manual
- español: DeLonghi EL Series Manual de usuario
Documents connexes
Autres documents
-
DE LONGHI PACEX390LN-BK Manuel utilisateur
-
Kenwood KW85 Manuel utilisateur
-
Honeywell MN4CFS9 Manuel utilisateur
-
Danby DPAC120061 Manuel utilisateur
-
Danby APAC9036 Manuel utilisateur
-
DE LONGHI EX CST Series Le manuel du propriétaire
-
-