1
IAD_DGS_WRP_10EP
P.6 P.2P.1
Q41G78SP05901A
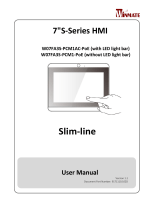
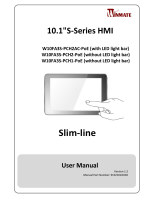
Mounting and Installation
Drill the four mounting holes
Step 2Step 1
Install the mounting plate
using the four screws
Option 1: Flush Wall Mount
Paste sticker on the back
of the mounting plate
Ensure the glass surface is
clean and dry
The mount sheet can be
temporary fixed on the other
side of the glass to locate the
area for the cover sheet.
Affix the mounting plate
to the glass surface
Option 2: Mounting on Glass
Plug in the required cables
to the room panel
Lock the room panel to the
mounting plate using a
screw at each corner
The room panel is ready to
be brought online
Attach the room panel to the
mounting plate
Plug in the required cables
to the room panel
Attach the room panel
to the mounting plate
Lock the room panel using a
screw at the top, and two
screws at the outside corners
The room panel is ready
to be brought online
Install the mounting plate
using the four screws
Drill the four mounting
holes
Option 3: Mounting close to a window frame
Align the mounting sheet guide
parallel to the window frame
Paste the mount sheet on
the wall
Step 3
Plug in the required cables
to the room panel
The room panel is ready
to be brought online
Step 4
Attach the room panel to
the mounting plate
Lock the room panel to the
mounting plate using a
screw at each corner
Step 5 Step 6 Step 7
1.Affix the cover sheet to the
glass surface.
2.Align the mounting plate to
the cover sheet with the
kensington lock hole.
Step 1 Step 2 Step 3 Step 4
Step 5 Step 6 Step 7 Step 8
Step 1 Step 2
Window frame Window frame Window frame
Window frame
Step 3 Step 4
Step 5 Step 6 Step 7
Window frame
Screw M3*13
Screw M3*13
Screw of cover plate Screw of cover plate
Screw of cover
plate
Screw of cover
plate
Screw M3*13
Cover sheet
Screw M3*13
Window frame
Screw of cover
plate
Screw M3*13
Screw M3*6
Quick Start Guide
This is a quick walkthrough of the set up process. For complete documentations
and quick start guides, please visit http://support.IAdea.com.
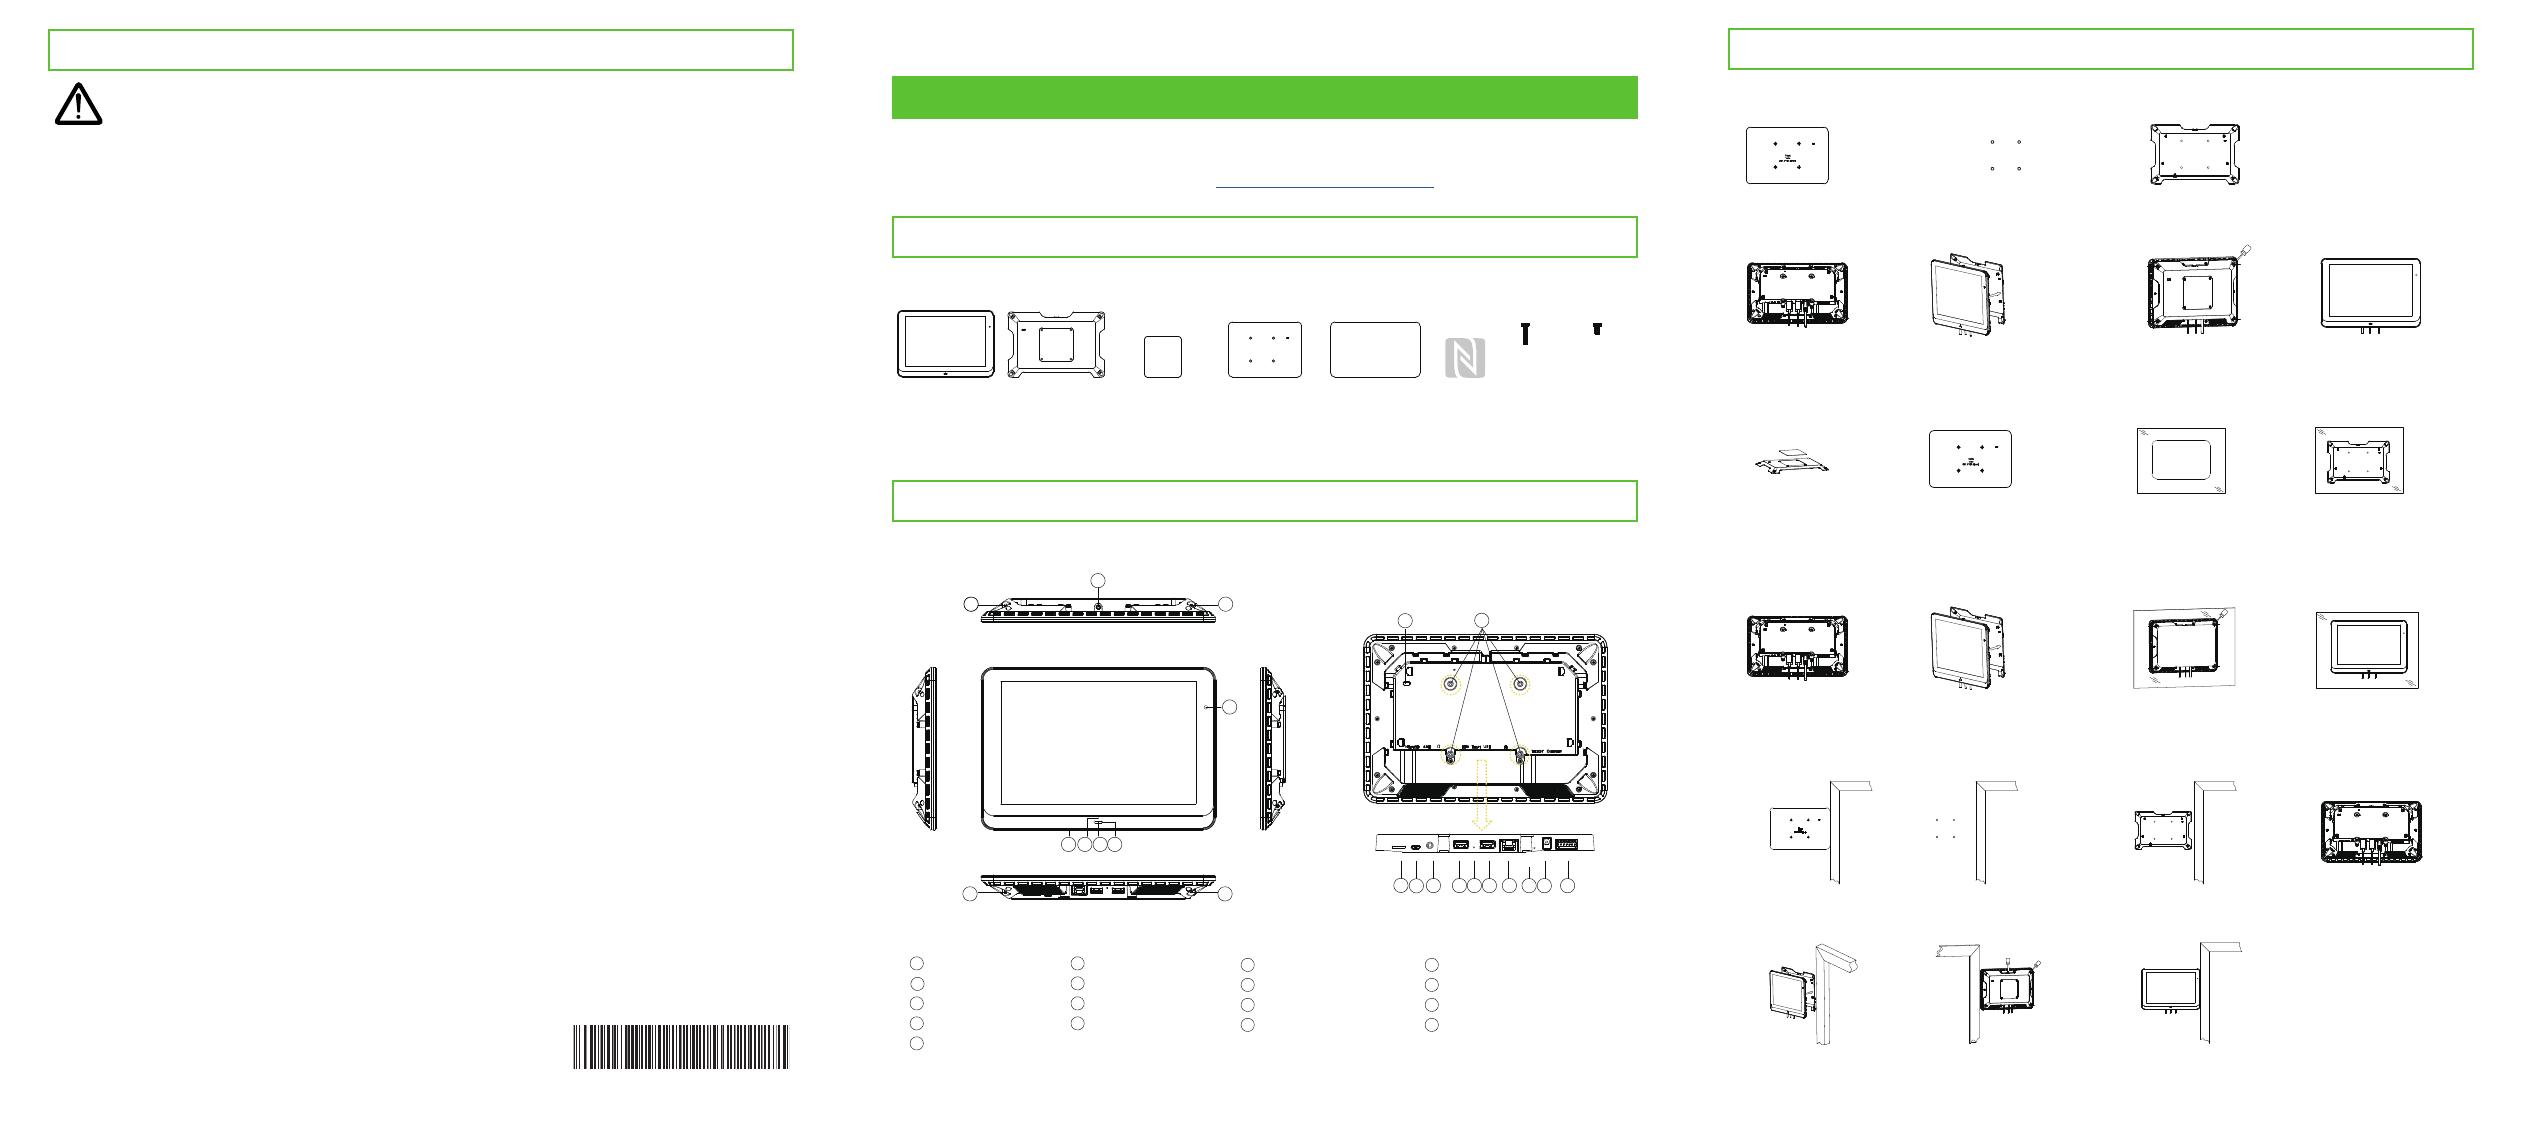
Box Content
WRP-1000 (V2) Series
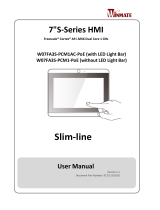
Port Connections
1Screw Hole
2Camera*
3Microphone*
4LED
6MicroSD card slot
7ADB
83.5mm audio
9USB port
10 Reset
11 USB port
12 Ethernet RJ45(PoE+)
13 Power LED
14 12V DC power
15 Expansion*
16 Kensington Lock
17 VESA mount (MIS-D75)
Screw spec: M4
5NFC/RFID reader
* The functions marked with "*" only appear on certain models.
MicroSD ADB Audio Power
LED
USB Reset USB Ethernet DC Expansion
43
1
678910 11
17
16
2
4
12 13 14 15
1
11
11
5
Room booking
panel
Mounting plate Glass mount
sticker
Front View
261.7*181.6(mm)
Mounting guide
sheet
Glass mount
cover sheet
CAUTION
- Replacement of a battery with an incorrect type that can be defeat a safeguard;
- Disposal of a battery into fire or a hot oven, or mechanically crushing or cutting of a
battery, that can result in an explosion;
- Leaving a battery in an extremely high temperature surrounding environment that can
result in an explosion or the leakage of flammable liquid or gas;
- A battery subjected to extremely low air pressure that may result in an explosion or the
leakage of flammable liquid or gas.
Risk of explosion if the battery is replaced by an incorrect type.
Wait one-half hour after switching off before handling parts.
Company Name: IAdea Corporation
Address: 3F, No. 21, Lane 168, Xingshan Road,Neihu Dist. Taipei, 114 Taiwan
Tel: 886-2-2791-1110
This device complies with Industry Canada licence-exempt RSS standard(s). Operation
is subject to the following two conditions: (1) this device may not cause interference,
and (2) this device must accept any interference, including interference that may cause
undesired operation of the device.
Le présent appareil est conforme aux CNR d'Industrie Canada applicables aux
appareils radio exempts de licence. L'exploitation est autorisée aux deux conditions
suivantes : (1) l'appareil ne doit pas produire de brouillage, et (2) l'utilisateur de
l'appareil doit accepter tout brouillage radioélectrique subi, même si le brouillage est
susceptible d'en compromettre le fonctionnement.
FCC Radiation Exposure Statement:
This equipment complies with FCC RF radiation exposure and Industry Canada
RSS-102 RF exposure limits set forth for an uncontrolled environment. This device and
its antenna must not be co-located or operating in conjunction with any other antenna
or transmitter. To comply with FCC RF exposure and Industry Canada RSS-102 RF
exposure compliance requirements, this grant is applicable to only Mobile Configura-
tions. The antennas used for this transmitter must be installed to provide a separation
distance of at least 20 cm from all persons and must not be co-located or operating in
conjunction with any other antenna or transmitter.
Cet equipement est conforme aux limites d’exposition aux rayonnements enoncees
pour un environnement non controle et respecte les regles d’exposition aux frequences
radioe lectriques (RF) CNR-102 de I’IC. Cet equipement doit etre installe et utilize en
gardant une distance de 20 cm ou plus entre le radiateur et le corps humain (a
I’exception des extremites : mains, poignets, pieds et chevilles).
This device is restricted to indoor use due to its operation in the 5.15 to 5.25GHz
frequency range.
Les dispositifs fonctionnant dans la bande 5.15-5.25GHz sont reserves uniquement
pour une utilisation à l'intérieur afin de réduire les risques de brouillage préjudiciable
aux systèmes de satellites mobiles utilisant les mêmes canaux.
Screw
M3*13
Screw
M3*6
x 2
(1 Spare)
x 3
(1 Spare)
NFC sticker


 Winmate W07FA3S-PCM1-PoE Manuel utilisateur
 Winmate W07FA3S-PCM1-PoE Manuel utilisateur
 Winmate Slim-line Manuel utilisateur
 Winmate R15FA3S-PCC3-PoE Manuel utilisateur
 Winmate W07FA3S-PCM1-PoE Guide de démarrage rapide
 Winmate W10FA3S-PCH1-PoE Manuel utilisateur
 Winmate W15FA3S-EHA2 Manuel utilisateur
 Winmate W15FA3S-EHA2 Manuel utilisateur
 Winmate W28FA3S-CHA2 Manuel utilisateur