Perfectpro Workstation Le manuel du propriétaire
- Catégorie
- Radios
- Taper
- Le manuel du propriétaire

GB
GBINSTRUCTION MANUAL
GEBRUIKSAANWIJZING
BENUTZERHANDBUCH
MODE D’EMPLOI
NL
DE
FR

CONTENT
IMPORTANT GENERAL SAFETY INSTRUCTIONS ...................................................... 2
CONTROLS .................................................................................................................... 3
POWER SUPPLY ............................................................................................................ 4
GENERAL FUNCTIONS ................................................................................................. 7
USING THE RADIO FOR THE FIRST TIME ................................................................... 8
DAB MODE ..................................................................................................................... 9
FM MODE ...................................................................................................................... 11
PRESET STATIONS ...................................................................................................... 13
BLUETOOTH MODE ..................................................................................................... 14
USB MODE ................................................................................................................... 16
CHARGING A MOBILE PHONE .................................................................................... 18
AUX IN MODE ............................................................................................................... 18
MANUALLY SETTING CLOCK ..................................................................................... 19
LOUDNESS .................................................................................................................. 19
TONE ............................................................................................................................ 20
LANGUAGE SETTING .................................................................................................. 20
SOFTWARE VERSION ................................................................................................. 21
SYSTEM RESET ........................................................................................................... 21
BACKLIGHT .................................................................................................................. 22
WARRANTY .................................................................................................................. 23
INFORMATION ............................................................................................................. 23
WARNING ! WARRANTY BECOMES VOID ONCE THE DEVISE CABINET HAS BEEN
OPENED OR ANY MODIFICATIONS OR ALTERATIONS TO THE ORIGINAL DEVICE
HAVE BEEN MADE
1

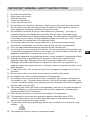
IMPORTANT GENERAL SAFETY INSTRUCTIONS
1. Read these instructions.
2. Keep these instructions.
3. Heed all warnings.
4. Follow all instructions.
5. Clean only with dry cloth.
6. Do not block any ventilation openings. Install in accordance with the instructions.
7. Do not install near any heat sources such as radiators, heat registers, stoves or
otherapparatus(includingampliers)thatproduceheat.
8. Do not defect the safety purpose of the polarized or grounding – type plug. A
polarized plug has two blades with one wider than the other. A grounding type
plug has two blades and a third grounding prong. The wide blade or the third prong
isprovidedforyoursafety.Iftheprovidedplugdoesnottintoyouroutlet,consult
an electrician for replacement of the obsolete outlet.
9. Protect the power cord from being walked on or pinched particularly at plug,
convenience receptacles, and the point where they exit from the apparatus.
10. Onlyuseattachments/accessoriesspeciedbythemanufacturer.
11. Useonlywiththecart,stand,tripod,bracket,ortablespeciedbythemanufacturer,
or sold with the apparatus. When a cart is used, use caution when moving the cart/
apparatus combination to avoid injury from tip-over.
12. Unplug this apparatus during lightning storms or when unused for long periods of time.
13. Referallservicingtoqualiedservicepersonnel.Servicingisrequiredifthe
apparatus has been damaged in any, such as power-supply cord or plug is
damaged, liquid has been spilled or objects have fallen into the apparatus, the
apparatus has been exposed to rain or moisture, does not operate normally, or has
been dropped.
14. Toreducetheriskofreorelectricshock,donotexposethisappliancetorainor
moisture.
15. Do not remove the cover; there are no user-serviceable parts inside.
16. Nonakedamesourcesshallbeplacedontheapparatus.
17. For outdoors use, to avoid electric shock, use battery only during a raining day or
the weather is wet. To prevent electric shock, if the radio has been exposed to rain
or water, the power supply cord and plug must be completely dried before plugging
into the mains socket outlet.
18. The power plug should be close to the apparatus, and easy to be approached that
during emergency, to disconnect the power from the apparatus, just unplug the
power plug from the AC power slot.
19. The marking information is located at the bottom of the apparatus.
20. Thisapparatusisprovidedwithprotectionagainstsplashingwater(IP65).
21. Incaseofmalfunctionduetoelectrostaticdischargeorfasttransient(burst),
remove and reconnect the power supply.
22. To prevent possible hearing damage, do not listen at high volume levels for long
periods.
23. The apparatus must be used in a moderate climate.
2
GB
GB

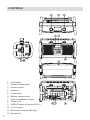
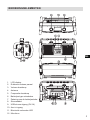
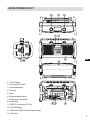
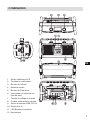
CONTROLS
1. LCD display
2. Rubber buttons panel
3. Volume control
4. Antenna
5. Tuning knob
6. Battery charger switch
7. Fuse of the battery charger
8. Power Cord
9. USBDCpoweroutsocket(5V/1A)
10. Aux-in socket
11. Bluetooth connected LED light
12. Microphone
3

4
GB
GB
POWER SUPPLY
AC operation
n Before plugging the AC power cord into the AC socket, make sure the voltage
is correct and the Battery charger switch is set correctly: ALKALINE when
using no batteries or Alkaline batteries / CHARGE NiHM ON when using NiMH
rechargeable batteries.
n If you use Alkaline batteries in the radio and the Battery charger switch is on
ALKALINE, the batteries will be disconnected automatically when using AC power
supply.
n If you use rechargeable NiMH batteries in the radio and the Battery charger
switch is on CHARGE NIMH ON, the NiMH batteries will be charged automatically
when using AC power supply.
n AC power cord and plug storage is designed to store the cord and plug when the
radio is not in use or playing on batteries.
Note:
In order to disconnect the unit from the AC mains completely, the AC power cord should
be removed from the mains socket completely. The AC power cord shall remain readily
operable and should not be obstructed during intended use.
Incaseofmalfunctionduetoelectrostaticdischargeorfasttransient(burst),removethe
power supply and all the batteries then reinstall the batteries and reconnect the power
supply.
Battery operation
1. Toopenthebatterycompartment,rstturnthebatterycoverxturescounter
clockwise to loosen and pull down the battery cover.
2. This unit can be operated with either Alkaline batteries (6 x 1,5V type IEC LR20 /
UM-1/D-size)orNiMHrechargeablebatteries(6x1,2VPerfectProRechargeable
Accu,DsizeHR20/8000mAh).SettheBattery charger switch in the battery
compartment according to the battery type to be used (ALKALINE or CHARGE
NIMH ON).
3. Insert the batteries with correct polarity as indicated in the battery compartment (+
and-).Closethebatterycoverandfastenthexturesbyturningclockwise.Close
well to prevent moist or dust from entering the compartment.
4. If the unit is not to be used for an extended period of time, it is recommended that
the batteries are removed from the radio.

The approximate power level of the batteries is displayed in the LCD display of the radio.
When the power level is very low, the indication “Battery Low!” appears and the battery
symbolashesonthedisplay.Thebatteriesshouldthenberechargedorreplacedsoon
to continue normal operation of the radio.
When the rechargeable NiMH batteries are being charged. The battery symbol in the
LCD display will animate. The charging and animation will stop automatically when the
batteries are full.
Back-up batteries (2 x AA)
Back-up batteries are used to back up the time memory when no 6 x D battery power
isused.Itisnecessarytoinsertbackupbatteries(2xAAsize/UM-3)fortimememory
back up if you use AC power supply only. Without the back up batteries time memory
will be lost if you remove the AC power cord from AC socket or during power failure. The
back up batteries will not be charged and should be replaced after 1 year.
Replacing the fuse of the Battery Charger
The battery charger uses a fuse as a safety device, which protects the radio from
over current or excessive surging during the charging process. The fuse will blow if
something goes wrong with the charger or the battery (for example, if the battery has
beendamaged).Incasethechargerrefusestochargethebatteryortheradiobecomes
inoperative with batteries, you should check and replace the battery and/or the fuse.
1. Turn off the radio and unplug the AC power cord from the mains power socket.
2. Toopenthebatterycompartment,turnthebatterycoverxturescounterclockwise
to loosen and pull down the battery cover.
3. Check the batteries carefully and make sure all of them are installed with correct
polarity(+and-)andreplacethebatteriesifthereisanydamage.Refer
to the section of “IMPORTANT INFORMATION ON CHARGING AND USING
RECHARGEABLE BATTERIES” for more detailed advises.
4. Locate the fuse holder in the battery compartment. The cover of the fuse holder has
the word “FUSE” on it.
5. To remove the fuse cover, use a slot head screwdriver and turn the screwdriver
counter clockwise while pressing down the fuse cover. The fuse cover should be
turned only when it is pressed down. Do not use too much force when turning the
fuse cover as this can cause damage.
6. Replace the blown fuse with an identical new one. The fuse rating is printed beside
thefuseholder(T4AL250V).Donotusefuseofanyothertype.
7. Replace the fuse cover using a slot head screwdriver. Turn the screwdriver
clockwise carefully while pressing down the fuse cover.
5

Note:
l If the new fuse blows again as soon as the radio is connected to AC power or when
you start using the radio, it indicates a problem with either the radio or the battery.
Havethemcheckedatadealerorqualiedserviceperson.
l The fuse also protects Alkaline batteries from over current.
Warning:
Danger of explosion if a battery is incorrectly replaced. Replace only with the same or
equivalent type.
Always make sure the Battery charger switch is set to the correct position.
An Alkaline battery is not rechargeable. Never attempt charging Alkaline batteries.
Do not mix up different battery types.
Do not mix up charged and uncharged batteries.
Donotexposethebatteriestoexcessiveheatsuchassunshine,reorthelike.
Batteries should not be disposed of by incineration and with household waste.
Disposable batteries should be taken to a suitable recycling centre if possible.
IMPORTANT INFORMATION ON CHARGING AND USING RECHARGEABLE
BATTERIES
1. Recharge the batteries in any case at least every 2 months.
2. Make sure the Battery charger switch next the battery compartment is set to the
“CHARGE NiMH ON” position.
3. Put the batteries in the compartment whilst paying attention to the correct
polarity of the batteries (+ and -).
4. First use: Charge new batteries in one continuous, uninterrupted, charge until
they are full.Thisrstchargemaytakelongerthannormal.Forlongerbatterylifeit
is advised to always recharge in one continuous, uninterrupted charge until batteries
are full and to not recharge again whilst the batteries are still full.
5. New batteries will only reach their full capacity after some time of use (several
charge–dischargecycles).
6. Leave the complete group of batteries in place inside the radio and do not use these
batteriesorafewofthemforotherpurposes.Thiswillresultinamixof(fully)
chargedand(partly)emptybatteries.Thiscanseriouslydamagethebatteriesand
radio when recharged.
7. It is advised to only charge batteries at room temperatures between 5 degrees C –
35 degrees C. In lower or higher temperatures full charge cannot be achieved.
6
GB
GB

8. Depending on the capacity of the batteries, charging from “empty” to “full” can take
several hours, even up to 10 hours or more.
9. Do not charge batteries when the radio is hot or exposed to heat or heat sources.
10. It is advised to clean the metal contacts of the batteries and of the charger inside
the radio e.g. with a contact-spray from time to time.
11. Do not use a mix of old and new rechargeable batteries.
12. Do not use a mix of rechargeable and non-rechargeable batteries.
13. Do not use a mix of full and empty rechargeable batteries.
14. Do not use batteries that have a different mAh capacity.
15. Do not use damaged, deformed or leaking batteries.
16. Battery level indication is an approximate indication only and can vary with battery
type used.
17. Batteries can become hot during charging.
18. In cold conditions the capacity of batteries will be much lower than when used at
normal room temperature
19. Batteries(evenwhensuppliedwiththeradio),asbeingconsumables,donotfall
under the warranty conditions of the radio.
20. It is advised to use Perfectpro rechargeable batteries as the radio and its charger
were developed for use with these batteries.
21. Always disconnect from mains power before installing the batteries.
GENERAL FUNCTIONS
1. Switching on and off
Press the On/Off button to turn the radio on or in standby.
2. Switching among DAB / FM / Bluetooth / AUX IN modes
Press the Source button to switch between modes.
3. Tuning the Radio
Tune the radio using the Tuning knob on the right.
4. Adjusting the Volume
Adjust the volume with the Volume knob on the left.
5. Adjusting the Tone
Press the Volume knob on the left and rotate it to adjust the Bass and Treble.
6. Selecting Stereo or Mono mode (in FM mode only)
Press the Mono/Stereo button to switch between FM Mono or FM Stereo.
7

7. Pairing the Bluetooth with your mobile phone
Select the device “Workstation” in the Bluetooth setting screen of the mobile
phone.
8. Playing music from your mobile phone in Bluetooth mode
Use the media players in the mobile phone.
9. Playing music stored in a paired mobile phone from the Workstation radio in
Bluetooth mode
Press the , and buttons(presetbuttons3,4and5).
10. Answering an incoming phone call from the Workstation radio
PresstheTuningknob(Phoneicon)ontherighttopickupandhangupthephone
call.
11. Redialing the last out going phone call in Bluetooth mode
PressandholdtheTuningknob(Phoneicon)ontherightformorethan2seconds.
12. Charging a mobile phone from the Workstation radio
Connect the mobile phone to the USB socket on the left side with an appropriate
cable(notincludedwiththeradio).
USING THE RADIO FOR THE FIRST TIME
1. Placetheradioonaatsurface.
2. Carefully extend the antenna located on the top of the radio. Adjust the antenna so
it is vertically extending above the radio.
3. Plug the AC power cord into the AC socket. The radio will start up and the display
will show “WELCOME TO DIGITAL RADIO” for a few seconds. Then the radio will
automatically perform an auto scan of the Band III DAB channels and the FM band.
The display will show “Scanning” in DAB and “Auto” in FM.
4. When the scan is completed, the 10 strongest FM stations will be stored as presets
and the available DAB stations will be in the list of stations. The radio will switch to
standby with the updated clock and date showing on the display.
5. If no signals are found, the clock will not be updated. It may be necessary to
relocate the radio to a position with better reception.
8
GB
GB

DAB MODE (DAB – DAB+)
Operating the radio – DAB
1. Carefully extend the antenna. Press the On/Off button to switch on the radio.
2. Select the DAB waveband by pressing the Source button.
3. Therststationinthelistofstationsfoundwillbeplayed.Thedisplaywillshowthe
station name. If the radio has been used before, the last used station will be selected.
4. If no DAB signals are detected, “No stations available” will be displayed. It may
be necessary to relocate the radio to a position with better reception. You should
thencarryoutanautoscantondstations,pleaserefertothesection“Finding
new stations - DAB”.
Selecting a station – DAB
1. Press the On/Off button to switch on the radio.
2. Select the DAB waveband by pressing the Source button.
3. The display will show “Connecting” for a few seconds.
4. The display shows the name of the radio station currently selected.
5. Rotate the Tuning knob to scroll through the list of available stations.
6. When the desired station name appears on the display, press the Tuning knob to
select the station.
Note: If after selecting a station the display shows “No stations available”, it may be
necessary to relocate the radio to a position with better reception.
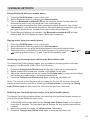
Display modes – DAB
In DAB mode, the radio can display a range of information on the display.
Press the Info button to cycle through the various modes.
a. Scrolling text Displays scrolling text message e.g. station information,
artist/track name, phone-in number, etc.
b. Signal strength Displays the signal strength of radio reception. The clear
unlledrectangleindicatesminimumsignallevelrequired
for satisfactory reception.
c. Program type Displays the type of station being listened to e.g. Pop,
Classic, News, etc.
d. Multiplex name Displays the name of multiplex to which the current station
belongs.
e. Channel & frequency Displays the channel number and frequency for the
currently tuned DAB station.
f. Bit rate & audio format Displays the digital audio bit rate and audio format.
g. Time & date Displays the current time and date.
9

Finding new stations – DAB
Fromtimetotime,newstationsmaybecomeavailable.Youmayproceedtondnew
stations as follows:
1. In DAB mode, press the Menu button, “Full scan” shows on the display.
2. Press the Tuning knob, the radio will perform a scan of the Band III DAB channels.
As new stations are found, the station counter on the right-hand side of the display
will increase and new radio stations found will be added to the list stored in the radio.
Manual Tuning – DAB
Manualtuningisanalternativemethodofndingnewstations.Insteadofscanningthe
entire Band III channels automatically, you may tune the radio directly to a known DAB
channel and store all the multiplex in that channel into the available station list.
1. In DAB mode, press the Menu button and rotate the Tuning knob until the LCD
display shows “Manual Tune”, then press the Tuning knob. The display will show
DAB channel and Frequency.
2. Rotate the Tuning knob to select the desired channel or Frequency and press the
Tuning knob to tune to the chosen frequency.
3. When DAB stations in the tuned channel are found, the display will show the name
of the station. Any new radio stations found will be added to the list stored in the radio.
4. Thesignalstrengthdisplayshowsthereceptionofthestation.Theclearunlled
rectangle indicates minimum signal level required for satisfactory reception. The
signal strength bars will go up or down showing the changing signal strength as you
adjust the antenna or the position of the radio.
5. Repeat step 1 to 4 for other channels with new stations.
6. Press the Menu button twice to exit manual tuning and return to normal DAB
operation.
Dynamic Range Control (DRC) settings – DAB
DRC can make quieter sounds easier to hear when your radio is used in a noisy
environment.
1. In DAB mode, press the Menu button and rotate the Tuning knob until “DRC
value” appears on the display, press the Tuning knob.
2. Rotate the Tuning knobtoselectrequiredDRCsetting(defaultisOFF).
DRC off DRC is switched off, broadcast DRC will be ignored.
DRC high DRC is set as sent by broadcaster.
DRC low DRC level is set to 1/2 that sent by broadcaster.
3. Press the Tuning the knobtoconrmthesetting.Thedisplaywillreturntonormal
radio display.
Note: Not all DAB broadcasts are able to use the DRC function. If the broadcast does
not support DRC, then the DRC setting in the radio will have no effect.
10
GB
GB

Prune stations – DAB
If you move to a different part of the country, some of the stations that were listed
may no longer be available. Also, from time to time, some DAB services may stop
broadcasting, or may change location or frequency. The Prune stations function will
delete the unavailable DAB stations from your station list.
1. In DAB mode, press the Menu button.
2. Rotate the Tuning knob until the display shows “Prune”.
3. Press the Tuning knob to enter the setting.
4. Rotate the Tuning knobtoselectbetween“Yes”or“No”(defaultisNo).Select
“Yes” to enable this function if required, otherwise, select “No”.
5. Press the Tuning knobtoconrmyoursetting.Thedisplaywillreturntolastmenu
and press menu to go to the normal radio display.
Note: If you have moved the radio to a different part of the country, you should also carry
outasearchfornewstations(pleaseseethesection“Findingnewstations–DAB”).
FM MODE
Operating the radio – FM seek station
1. Press the On/Off button to turn on the radio.
2. Select the FM waveband by pressing the Source button.
3. IfthisisthersttimetoswitchtoFMmode,thestationinpreset1willbeplayed.If
the radio has been used before, the last listened station will be played.
4. To seek station, press the Tuning knob.Thescanstopsautomaticallywhenitnds
astationofsufcientstrength.
5. After a few seconds, the display will update and show station name if RDS
information is being received.
6. Tondthenextstation,presstheTuning knob again.
7. To seek stations in an opposite direction, rotate the Tuning knob clockwise (to scan
fromlowfrequencytohighfrequency)orrotatecounterclockwise(toscanfrom
highfrequencytolowfrequency),andpresstheTuning knob.
8. When the waveband end is reached, the radio will recommence tuning from the
opposite waveband end.
11

Manual tuning – FM
1. Press the On/Off button to turn on the radio.
2. Select the FM band by pressing the Source button.
3. Rotate the Tuning knob to reach the preferred FM station. The radio will change
the frequency in steps of 50 kHz.
4. Rotate the rubber antenna to get the best reception. If the radio is tuned to a station
ofsufcientsignalstrengthwithRDSinformationpresent,thedisplaymaychange
to show the station name.
5. When the waveband end is reached, the radio will recommence tuning from the
opposite waveband end.
RDS station service – FM
RDS(RadioDataSystem)isaninformationsystemwhichinaudibledigitalinformation
is transmitted in addition to the normal FM radio program. When the radio is receiving a
RDSstationandthereceptionstrengthissufcient,thestationnamewillappearinthe
display. It may take some time before the RDS information is available.
Calling up RDS information
When you are listening to a FM station with RDS system, repeatedly press the Info
button to cycle through the information. This will only function if the reception level is
sufcientandclear.
a. Radiotext(RT) Displaysthemessageaboutthestationbeinglistenedtoas
ticker text.
b. Programtype(PTY) Displaysthetypeofstationbeinglistenedto,e.g.Pop,
Classic, News, etc.
c. Frequency Displays the frequency of the station being listened to.
d. Signal level Displays the signal strength.
e. Time&date Displaysthecurrenttime(24hourclock)anddate.
12
GB
GB

Scan sensitivity setting – FM
The radio will normally scan all stations from FM broadcasts including the weaker
signals.However,youmaywishtheAuto-scantondonlythosestationswithstrong
enough signals to give good reception.
1. Press the On/Off button to turn on the radio.
2. Select the FM band by pressing the Source button.
3. Press the Menu button, the display shows “Scan setting”.
4. Press the Tuning knob.
5. Rotate the Tuning knob to select between “All stations” or “Strong station” (default
is“Allstations”).The“Strongstation”optionwillallowtheradiotondstrongsignals
only when scanning.
6. Press the Tuning knobtoconrmyoursetting.Thedisplaywillreturntonormal
radio display.
PRESET STATIONS
Storing preset stations
There are 20 memory presets in the radio, 10 for DAB and 10 for FM. Presets are
remembered by the radio in the event of a power failure.
1. Press the On/Off button to turn on the radio.
2. Press the Source button to select the desired waveband.
3. Tune to the required station.
4. Press and hold the required Preset button until the radio beeps and shows “Stored”.
5. Repeat step 3 and 4 for the remaining presets.
6. Stations stored in the preset memories can be over-written by following the above
procedure.
Recalling preset stations
1. Press the On/Off button to turn on the radio.
2. Press the Source button to select the desired waveband.
3. BrieyPresstherequiredPreset button. In FM mode the display will show for
example ”P1” on top right hand side.
13

USING BLUETOOTH
Pairing Bluetooth with your mobile phone
1. Press the On/Off button to turn on the radio.
2. Select Bluetooth mode by pressing the Source button.
3. The blue Bluetooth connected LED on the front bar will be blinking when the
Workstation radio is not yet paired with your mobile phone.
4. In your mobile phone open the Setting menu and select Bluetooth, then select
“Workstation” in the Bluetooth devices list (Bluetooth pairing instructions may vary
pertypeofmobilephone,pleasecheckyourmobilephonemanual).
5. When Bluetooth pairing is successful, the Bluetooth connected LED will stop
blinking and the LCD display will show “Bluetooth Connected”.
Playing music from your mobile phone
1. Press the On/Off button to turn on the radio.
2. Select Bluetooth mode by pressing the Source button.
3. Start playing music by using the media players in the paired mobile phone.
4. Playback can be controlled from the mobile phone or by pressing the , and
buttons(presetbuttons3,4and5)ontheWorkstationradio.
Answering an incoming phone call from the Workstation radio
The Hands-Free-Calling feature allows you to answer an incoming phone call when
operating in the Bluetooth, DAB, FM or AUX IN mode.
1. Press the Tuning knob (Phone icon) on the right to pick up an incoming call.
2. Speak towards the microphone located in the middle of the radio.
3. Adjust the conversation volume by turning the Volume knob. A lower volume setting
can reduce a possible echo in the phone conversation.
4. Press the Tuning knob (Phone icon) again to hang up the phone call.
Notes:ThevolumeoftheRingtonewillbeloudestfortherst20seconds,thenitwill
resume to the previous used level. Rotating the Volume knob or pressing the Tuning
knob (Phone icon) will also return the volume to the previous used level.
Redialing your last dialed phone number (of a paired mobile phone)
The Hands-Free-Calling feature allows you redialing your last dialed phone number on
yourmobilephone(Bluetoothmodeonly).
1. In Bluetooth mode, press and hold the Tuning knob (Phone icon) on the right for
more than 2 seconds. The last dialed phone number on your mobile phone will be
redialed.
2. Adjust the volume by turning the Volume knob if necessary.
3. Press the Tuning knob (Phone icon) again to hang up the phone call.
14
GB
GB

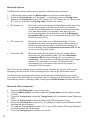
Bluetooth Options
The Bluetooth function can be set to operate in different ways as below:
1. In Bluetooth mode, press the Menu button to enter the system setting.
2. Rotate the Tuning knob until “Bluetooth” is displayed; press the Tuning knob.
3. Rotate the Tuning knob to select “BT always on”, “BT mode only” or “Disconnect
BT” options, and press the Tuning knob to select the setting.
a. BT always on Bluetooth is turned on when the Workstation radio is on. You
can playback music in the Bluetooth mode and use the
Hands-Free-Calling feature to answer incoming phone calls
in all operation modes, for example, also when you are
listening to the radio. As an indication, the blue Bluetooth
connected LED will be on in all operation modes (FM, DAB,
BluetoothandAUXIN).
b. BT mode only Bluetooth is turned on only in Bluetooth mode. You can
playback music and use the Hands-Free-Calling feature to
answer incoming phone calls in the Bluetooth mode only.
As an indication, the blue Bluetooth connected LED will be
on only in the Bluetooth mode.
c. Disconnect BT Bluetooth will be disconnected from your mobile phone
and enter the “discoverable mode” (The blue Bluetooth
connected LED will start blinking until a new pairing is
established).ThisistoallowtheBluetoothpairingtoanother
device. If no new device is paired, the Bluetooth will
automatically try to connect to the last device when it is
switched off and on again.
Note:Thevolumesettingsofyourmobilephoneinuencethevolumeofthemusic
streaming and the volume of the incoming phone calls on the Workstation radio.
The Auto-Power management function will be activated in Bluetooth mode. If there
is no signal from Bluetooth for a period of over 15 minutes, the Workstation radio will
automatically switch to standby mode. Pressing the On/Off button will wake up the unit.
Bluetooth LED conguration
1. Press the On/Off button to turn on the radio.
2. Press the Menu button, and then rotate the Tuning knob until the display shows
“System”.
3. Press the Tuning knob; rotate the Tuning knob until the display shows “Bluetooth
LED”.
4. Press the Tuning knob to enter the Bluetooth LED adjustment menu.
5. Rotate the Tuning knobtoselect“on”(bydefault)inordertokeepBluetoothLED
lightened when connected;
6. Or rotate the Tuning knob to select “off” to turn off Bluetooth LED when Bluetooth
connection has been established.
7. Press the Tuning knobtoconrmyourchoice.
15

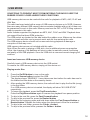
USB MODE
CONDITIONS TO PREVENT MOIST FROM ENTERING THE RADIO!! KEEP THE
RUBBER COVER CLOSED UNDER THESE CONDITIONS.
USB memory devices can be used with the radio for playback of MP3, AAC, FLAC and
WAVles.
The radio has been tested with a range of USB memory devices up to 32GB. However,
there are many different USB memory device variants available and not all of them can
beguaranteedtoworkinthisradio.MemorymustusetheFATorFAT32lingsystemin
order to operate in this radio.
Audio formats supported for playback are MP3, AAC, FLAC and WAV. Playback does
notsupportlesthathaveDRMprotection.
The USB socket are located on the side behind the rubber cover. Make sure the rubber
cover is closed well after use to prevent moist and dirt from entering the radio.
The USB memory device should not be removed during playback as damage or
corruptionoflesmayoccur.
USB memory devices are not included with this radio.
Note: When the radio is playing a USB stick, due to additional power consumption
of this, the charging of the batteries will stop in order to maintain normal functioning
and quality of the USB playback. Once the USB stick is removed normal charging will
continue.
Insert and remove a USB memory device
Carefully insert a USB memory device into the USB socket.
To remove the USB memory device, simply pull the device out.
Playing music les
1. Press the On/Off button to turn on the radio.
2. Press the Source button to select the USB.
The display shows “READING”. It may take some time before the radio has read in
thefoldersandlesdataonthememorydevice.
3. AfterreadingtheUSBmemorydevice,theradiowillstarttoplaytherstle(song)
intherstfolder.
If no USB memory device is inserted, the display will show “NO USB STICK”
respectively.
4. To pause the playback, press the Play/Pause button.
Press the Play/Pause button again to resume the playback from pause position.
5. Toskiptothenextle,presstheFast Forward button.
6. Toskiptothepreviousle,presstheRewind button
7. Whiletheleisplaying,pressandholddowneithertheFast Forward button or
Rewind button.Releasethebuttonwhenthedesiredpartoftheleisreached.
8. To skip to the next folder, presses the Folder + button.
9. To skip to the previous folder, presses the Folder + button.
16
GB
GB

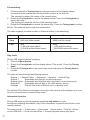
File searching
1. Press and hold the Tuning knob for a few seconds until the display shows
thecurrentfoldernumberandthetotalfoldernumberintherstline.
The second line shows the name of the current folder.
2. Rotate the Tuning knob to search the desired folder. Press the Tuning knob to
select the folder.
Thedisplaywillshowtherstleoftheselectedfolder.
3. Rotate the Tuning knobtosearchthedesiredle.PresstheTuning knob to select
thele.Theradiowillstarttoplaytheselectedle.
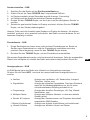
Theradiosupportsalimitednumberoffoldersandlesinthesearching:
Mode Max.no.offolderssupported Max.no.oflessupported
Stop 999(withfoldername) 9999(withlename)
Play 999 9999
(1-99withfoldername) (1-999withlename)
(100-999withoutfoldername) (1000-9999withoutlename)
Play mode
During USB memory device is playing,
1. Press the Menu button,
2. Rotate the Tuning knob until the display shows “Play mode”. Press the Tuning
knob.
3. Rotate the Tuning knob to the desire play mode and press the Tuning knob to
conrm.
The radio will step through the following options:
Repeat1→RepeatFolder→RepeatAll→Random→NormalPlay
Repeat1 Repeatedlyplaytheleyouarelisteningto.
RepeatFolder Repeatedlyplaytheleswithinthefolderyouarelisteningto.
RepeatAll RepeatedlyplayalllesintheUSBmemorydevice.
Random PlayalllesintheUSBstickonceinrandomorder.
The selected Play Mode is indicated on the right of the top line of the display by an icon.
No icon is shown when in Normal Play mode.
Information function
During USB memory device playback, press the Info button to cycle
throughthefollowinginformation(onlyifthisinformationispresentwiththeleonthe
memorydevice):
Filename(song)→Foldername→Artistname→Albumname→Totalno.ofles
ontheUSBstick→ClocktimeandDate→Normalplaybackstatus(playtime).
17

18
GB
GB
CHARGING A MOBILE PHONE
The USB socket on the left side can provide DC power of 5V/1A for charging a mobile
phone. Connect the mobile phone to the USB socket with an appropriate cable (not
includedwiththisradio).TheUSBpowerisavailableinallmodes,includingstandby
mode.
Refer to the user manual or the manufacturer of the mobile phone to verify if it supports
charging from an USB power.
Warning: Never use the USB socket in rainy or moist conditions to prevent moist from
entering the radio and so to prevent potential short circuit. Always keep the rubber cover
well closed under these conditions.
It is recommended to use AC power while charging a mobile phone via USB socket. On
DC power it is also possible to charge a mobile phone from the USB socket, however
using DC power to charge a mobile phone will consume energy from the batteries and
so drain the batteries easily.
AUX IN MODE
A 3.5mm stereo Aux-In socket is provided on the side behind the rubber cover, for
connecting an external audio device such as MP3 player or CD player (Aux cable not
includedwiththisradio).
1. Connect an external player to the Aux-In socket.
2. Press the Source button to select AUX input. Display will show “AUX IN”.
3. Play the external player.
4. Adjust the volume both the radio and the player for comfortable listening.
5. After use, close the rubber cover to prevent moist or dust from entering into the
sockets and radio.
Notes: Never use the Aux-In socket in rainy or moist conditions to prevent moist from
entering the radio. Keep the rubber cover well closed under these conditions.
The Auto-Power management function will be activated in AUX IN mode. If there is no
signal* from the Aux-In socket for a period of over 15 minutes, the Workstation radio will
automatically switch to standby mode. Pressing the On/Off button will wake up the unit.
* Also when the incoming signal from the external device is too low and cannot
be detected for a period of over 15 minutes by the Auto-Power management, the
Workstation radio will switch to standby mode.
To prevent this raise the output level of the external device enough to be detected.

MANUALLY SETTING CLOCK
The clock can only be manually set when the radio is in standby mode. If no buttons are
pressed for 5 seconds, the radio will exit the clock setup and the setting is cancelled.
1. Press and hold the Time Set knobfor12secondsuntilthehourdigitsashonthe
display.
2. Rotate the Time Set knob to set the hour.
3. Press the Time Set knobtoconrm,theminutedigitsash.
4. Rotate the Time Set knob to set the minute.
5. Press the Time Set knobtoconrm,thedayashesonthedisplay.
6. Rotate the Time Set knob to set the current day.
7. Press the Time Set knobtoconrm,themonthashes.
8. Rotate the Time Set knob to set the current month.
9. Press the Time Set knobtoconrm,theyearwillthenashonthedisplay.
10. Rotate the Time Set knob to set the current year.
11. Press the Time Set knobtoconrm,“SYNCLOCKON”ashes.
12. Rotary the Time Set knob to select “SYNCLOCK ON” or “SYNCLOCK OFF”.
13. Press the Time Set knobtoconrmandnishtheclocksetting.
RDS time synchronisation
If “SYNCLOCK ON” is selected, the symbol “ ” will show on the clock display. Some
RDS stations transmit a time signal. If reception is good and you have selected the
“SYNCLOCK ON” option during the time setting, the time will be automatically updated
(“ ”ashesonthedisplay).Timesynchronizationcantakeseveralminutes.The
automatic time setting is always activated when the radio is switched from standby to
FM broadcasting and receives a RDS station.
LOUDNESS
The Loudness function enables to get compensation on lower and higher frequency.
The effect will be more audible when the radio is on a lower volume level (Dynamic
Loudness).
1. Press the On/Off button to turn on the radio.
2. Press the Menu button, and then rotate the Tuning knob until the display shows
“System”.
3. Press the Tuning knob; rotate the Tuning knob until the display shows “Loudness”.
4. Rotate the Tuning knob to select between “Loudness On” or “Loudness Off”. Press
the
Tuning knobtoconrmthesettingandreturntonormaldisplay.
19
La page est en cours de chargement...
La page est en cours de chargement...
La page est en cours de chargement...
La page est en cours de chargement...
La page est en cours de chargement...
La page est en cours de chargement...
La page est en cours de chargement...
La page est en cours de chargement...
La page est en cours de chargement...
La page est en cours de chargement...
La page est en cours de chargement...
La page est en cours de chargement...
La page est en cours de chargement...
La page est en cours de chargement...
La page est en cours de chargement...
La page est en cours de chargement...
La page est en cours de chargement...
La page est en cours de chargement...
La page est en cours de chargement...
La page est en cours de chargement...
La page est en cours de chargement...
La page est en cours de chargement...
La page est en cours de chargement...
La page est en cours de chargement...
La page est en cours de chargement...
La page est en cours de chargement...
La page est en cours de chargement...
La page est en cours de chargement...
La page est en cours de chargement...
La page est en cours de chargement...
La page est en cours de chargement...
La page est en cours de chargement...
La page est en cours de chargement...
La page est en cours de chargement...
La page est en cours de chargement...
La page est en cours de chargement...
La page est en cours de chargement...
La page est en cours de chargement...
La page est en cours de chargement...
La page est en cours de chargement...
La page est en cours de chargement...
La page est en cours de chargement...
La page est en cours de chargement...
La page est en cours de chargement...
La page est en cours de chargement...
La page est en cours de chargement...
La page est en cours de chargement...
La page est en cours de chargement...
La page est en cours de chargement...
La page est en cours de chargement...
La page est en cours de chargement...
La page est en cours de chargement...
La page est en cours de chargement...
La page est en cours de chargement...
La page est en cours de chargement...
La page est en cours de chargement...
La page est en cours de chargement...
La page est en cours de chargement...
La page est en cours de chargement...
La page est en cours de chargement...
La page est en cours de chargement...
La page est en cours de chargement...
La page est en cours de chargement...
La page est en cours de chargement...
La page est en cours de chargement...
La page est en cours de chargement...
La page est en cours de chargement...
La page est en cours de chargement...
La page est en cours de chargement...
La page est en cours de chargement...
La page est en cours de chargement...
La page est en cours de chargement...
La page est en cours de chargement...
La page est en cours de chargement...
La page est en cours de chargement...
La page est en cours de chargement...
La page est en cours de chargement...
La page est en cours de chargement...
La page est en cours de chargement...
La page est en cours de chargement...
La page est en cours de chargement...
La page est en cours de chargement...
La page est en cours de chargement...
La page est en cours de chargement...
-
 1
1
-
 2
2
-
 3
3
-
 4
4
-
 5
5
-
 6
6
-
 7
7
-
 8
8
-
 9
9
-
 10
10
-
 11
11
-
 12
12
-
 13
13
-
 14
14
-
 15
15
-
 16
16
-
 17
17
-
 18
18
-
 19
19
-
 20
20
-
 21
21
-
 22
22
-
 23
23
-
 24
24
-
 25
25
-
 26
26
-
 27
27
-
 28
28
-
 29
29
-
 30
30
-
 31
31
-
 32
32
-
 33
33
-
 34
34
-
 35
35
-
 36
36
-
 37
37
-
 38
38
-
 39
39
-
 40
40
-
 41
41
-
 42
42
-
 43
43
-
 44
44
-
 45
45
-
 46
46
-
 47
47
-
 48
48
-
 49
49
-
 50
50
-
 51
51
-
 52
52
-
 53
53
-
 54
54
-
 55
55
-
 56
56
-
 57
57
-
 58
58
-
 59
59
-
 60
60
-
 61
61
-
 62
62
-
 63
63
-
 64
64
-
 65
65
-
 66
66
-
 67
67
-
 68
68
-
 69
69
-
 70
70
-
 71
71
-
 72
72
-
 73
73
-
 74
74
-
 75
75
-
 76
76
-
 77
77
-
 78
78
-
 79
79
-
 80
80
-
 81
81
-
 82
82
-
 83
83
-
 84
84
-
 85
85
-
 86
86
-
 87
87
-
 88
88
-
 89
89
-
 90
90
-
 91
91
-
 92
92
-
 93
93
-
 94
94
-
 95
95
-
 96
96
-
 97
97
-
 98
98
-
 99
99
-
 100
100
-
 101
101
-
 102
102
-
 103
103
-
 104
104


Perfectpro Workstation Le manuel du propriétaire
- Catégorie
- Radios
- Taper
- Le manuel du propriétaire
dans d''autres langues
- English: Perfectpro Workstation Owner's manual
- Deutsch: Perfectpro Workstation Bedienungsanleitung
- Nederlands: Perfectpro Workstation de handleiding
Documents connexes
-
Perfectpro WORKTUBE Le manuel du propriétaire
-
-
Perfectpro TEAMBOX Le manuel du propriétaire
-
Perfectpro Rockpro Le manuel du propriétaire
-
-
-
-
Perfectpro AUDISSE Getting Started
Autres documents
-
Soundmaster DAB400SI Manuel utilisateur
-
Makita DMR115 Manuel utilisateur
-
TEAC AG-H600DNT Le manuel du propriétaire
-
Sangean DCR-200 Mode d'emploi
-
TEAC R-5DAB Le manuel du propriétaire
-
TEAC CR-H260iDAB Le manuel du propriétaire
-
Philips DCB152/05 Manuel utilisateur
-
 Albrecht Audio DR855 Le manuel du propriétaire
-
TechniSat DIGITRADIO 370 CD IR Le manuel du propriétaire
-
