TEAC R-5DAB Le manuel du propriétaire
- Catégorie
- Réveils
- Taper
- Le manuel du propriétaire

IB_WP_R-5_DAB
FRA DEU
ENG
Z
R-5DAB
DAB/FM Portable Radio
OWNER’S MANUAL
MODE D’EMPLOI
BEDIENUNGSANLEITUNG

22
CAUTION
< DO NOT REMOVE THE EXTERNAL CASES OR
CABINETS TO EXPOSE THE ELECTRONICS. NO
USER SERVICEABLE PARTS ARE WITHIN.
< IF YOU ARE EXPERIENCING PROBLEMS
WITH THIS PRODUCT, CONTACT TEAC FOR
A SERVICE REFERRAL. DO NOT USE THE
PRODUCT UNTIL IT HAS BEEN REPAIRED.
WARNING: TO PREVENT FIRE OR
SHOCK HAZARD, DO NOT EXPOSE
THIS APPLIANCE TO RAIN OR
MOISTURE.
CAUTION: TO REDUCE THE RISK OF ELECTRIC
SHOCK, DO NOT REMOVE COVER (OR BACK).
NO USER-SERVICEABLE PARTS INSIDE.
REFER SERVICING TO QUALIFIED SERVICE
PERSONNEL.
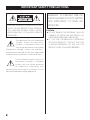
IMPORTANT SAFETY PRECAUTIONS
The lightning flash with arrowhead
symbol, within an equilateral
triangle, is intended to alert the
user to the presence of uninsulated
“dangerous voltage” within the product’s
enclosure that may be of sufficient magnitude
to constitute a risk of electric shock to persons.
The exclamation point within an
equilateral triangle is intended
to alert the user to the presence
of important operating and
maintenance (servicing) instructions in the
literature accompanying the appliance.

3
ENG
3
Company names and product names in this
document are the trademarks or registered
trademarks of their respective owners.
14) Refer all servicing to qualified service
personnel. Servicing is required when
the apparatus has been damaged in any
way, such as power-supply cord or plug is
damaged, liquid has been spilled or objects
have fallen into the apparatus, the apparatus
has been exposed to rain or moisture, does
not operate normally, or has been dropped.
The apparatus draws nominal non-operating o
power from the AC outlet with its POWER or
STANDBY/ON switch not in the ON position.
Caution should be taken when using o
earphones or headphones with the product
because excessive sound pressure (volume)
from earphones or headphones can cause
hearing loss.
1) Read these instructions.
2) Keep these instructions.
3) Heed all warnings.
4) Follow all instructions.
5) Do not use this apparatus near water.
6) Clean only with dry cloth.
7) Do not block any ventilation openings.
Install in accordance with the manufacturer’s
instructions.
8) Do not install near any heat sources such
as radiators, heat registers, stoves, or
other apparatus (including amplifiers) that
produce heat.
9) Do not defeat the safety purpose of the
polarized or grounding-type plug. A
polarized plug has two blades with one
wider than the other. A grounding type
plug has two blades and a third grounding
prong. The wide blade or the third prong
are provided for your safety. If the provided
plug does not fit into your outlet, consult an
electrician for replacement of the obsolete
outlet.
10) Protect the power cord from being
walked on or pinched particularly at plugs,
convenience receptacles, and the point
where they exit from the apparatus.
11) Only use attachments/accessories specified
by the manufacturer.
12) Use only with the cart,
stand, tripod, bracket,
or table specified by the
manufacturer, or sold with
the apparatus. When a cart
is used, use caution when
moving the cart/apparatus combination to
avoid injury from tip-over.
13) Unplug this apparatus during lightning
storms or when unused for long periods of
time.
Do not expose this apparatus to drips or o
splashes.
Do not place any objects filled with liquids, o
such as vases, on the apparatus.
Do not install this apparatus in a confined o
space such as a book case or similar unit.
The apparatus should be located close o
enough to the AC outlet so that you can
easily reach the power cord plug at any
time.
If the product uses batteries (including a o
battery pack or installed batteries), they
should not be exposed to sunshine, fire or
excessive heat.
CAUTION for products that use replaceable o
lithium batteries: there is danger of
explosion if a battery is replaced with an
incorrect type of battery. Replace only
with the same or equivalent type.
CAUTION
IMPORTANT SAFETY INSTRUCTIONS

4
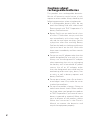
Cautions about
rechargeable batteries
This product uses rechargeable batteries.
Misuse of batteries could cause a leak,
rupture or other trouble. Always abide by the
following precautions when using batteries.
< If a rechargeable battery leaks, do not
touch the leaking fluid with a bare hand.
Please consult with TEAC Corporation if a
battery fluid leak occurs.
< Battery fluid in an eye could result in loss
of vision. If fluid enters an eye, wash the
eye immediately with clean water. Do
not rub the eye when washing. Consult
a physician soon after washing. Battery
fluid on the body or clothing could cause
injuries or burns on the skin. Wash with
clean water immediately and then consult
a physician.
< Do not use any AC adaptor other than the
model designated for use with this unit.
Always use the designated AC adaptor
when operating the unit or recharging
the battery with a household AC power
source. Use of an AC adaptor other
than the designated one could lead to
overheating and cause injury, burns, fires
or stains, as well as battery ruptures and
battery fluid leaks.
< Do not put a battery into a fire or leave it
or recharge it near a fire, under the sun or
in other hot conditions.
< Do not disassemble a battery. Doing so
could cause electric shock. Please contact
the shop where you bought the product
or TEAC Corporation if you want to have a
battery inspected or repaired. When you
want to dispose of the product, please
follow the instruction in the Owner’s
Manual to remove the batteries and
recycle the equipment properly.

5
ENG
5
Contents
Thank you for choosing TEAC. Read this
manual carefully to get the best performance
from this unit.
Before Use
< As the unit may become warm during
operation, always leave sufficient space
around the unit for ventilation.
< The voltage supplied to the unit should
match the voltage as printed on the label
of the AC adaptor. If you are in any doubt
regarding this matter, consult an electrician.
< Choose the installation location of your unit
carefully. Avoid placing it in direct sunlight or
close to a source of heat. Also avoid locations
subject to vibrations and excessive dust, heat,
cold or moisture.
< Do not place the unit on amplifiers, receivers or
other heat-generating devices.
< Do not open the cabinet as this might result
in damage to the circuitry or electrical shock.
If a foreign object should get into the unit,
contact your dealer or service company.
< When removing the power plug from the
wall outlet, always pull directly on the plug,
never yank the cord.
< Keep this manual in a safe place for future
reference.
Maintenance
If the surface of the unit gets dirty, wipe with a
soft cloth or use a diluted mild liquid soap. Be
sure to remove any excess liquid completely. Do
not use thinner or alcohol as they may damage
the surface of the unit. Allow the surface of the
unit to dry completely before using.
Before Use ..............................5
Connection (Rechargeable Batteries) ....6
Connections (Other Devices) ............8
Unit Functions .........................10
Setting the Clock ......................13
Listening to the DAB Radio .............16
Using the DAB menu ...................18
Listening to the FM Radio ..............22
Using the FM Menu ....................24
Preset Tuning ..........................26
Listening to an External Source .........27
Tone Control ...........................28
Headphones ...........................28
Timer ..................................29
Sleep Timer ............................32
Dimmer ...............................32
Troubleshooting .......................33
Specifications ..........................34

66
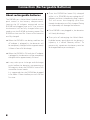
Connection (Rechargeable Batteries)
About rechargeable batteries
The R-5DAB uses a Nickel-Metal-Hydride battery
pack stored in the battery compartment.
Leaving the AC adaptor connected to the
R-5DAB and plugged into an AC line, ensures
the batteries will be fully charged when you
need to use the R-5DAB on battery power. The
R-5DAB can be used for 5 hours after batteries
are fully charged.
< When the R-5DAB is not being used but the
AC adaptor is plugged in, the batteries will
be completely charged within approximately
3.5 hours from a full discharge.
< When the R-5DAB is ON and the AC adaptor
is plugged in, the batteries will be completely
charged within approximately 24 hours.
< It may take up to 4 charge and discharge
cycles before the batteries are operating at
full capacity when the R-5DAB is new or left
unused for several weeks.
It is suggested that the R-5DAB be plugged
in for about 12 hours before you use it for the
first time.
< Once the R-5DAB has been fully charged
while it is in STANDBY, do not unplug the AC
adaptor and then immediately plug it again.
This will restart the charging cycle even
though the batteries are fully charged. Doing
this repeatedly will damage the batteries.
< If the R-5DAB is not plugged in, the batteries
will slowly discharge.
< The cycles of recharging the Nickel-Metal-
Hydride battery pack diminish the battery’s
capacity. It is called “Memory effect”. To
prevent this, sometimes the battery must be
discharged before you recharge it.

7
ENG
7
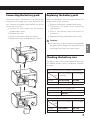
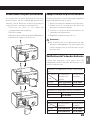
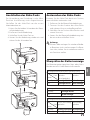
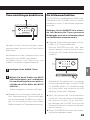
Connecting the battery pack
The battery pack’s connector is not connected
to prevent discharge when you purchase the
unit. Connect the battery pack before using the
unit for the first time.
1. Loosen the two screws on the battery
compartment cover.
2. Remove the cover.
3. Connect the battery pack connector.
4. Replace the cover and tighten the screws.
Replacing the battery pack
When the batteries are exhausted, replace the
battery pack with a new one.
1. Remove the battery compartment cover.
2. Disconnect the battery pack connector,
and remove it.
3. Insert a new battery pack and attach its
connector.
4. Replace the cover and tighten the screws.
Caution:
< Do not heat or disassemble rechargeable
batteries. Never dispose of old batteries by
throwing them into fire or open water.
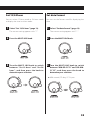
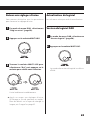
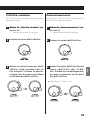
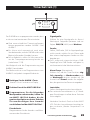
Checking the battery icon
The battery icon state varies depending on the
AC adaptor, battery pack, and power standby/
on states.
When connected to AC adaptor and batteries
Battery
pack
Unit
Not fully charged
(charging)
Fully charged
Standby icon blinking No icon
ON icon blinking No icon
When connected to AC adaptor only
Standby icon blinking
ON No icon
When connected to batteries only
Battery
pack
Unit
Not fully charged Fully charged
Standby icon shown No icon
ON icon shown No icon

8
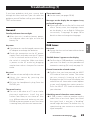
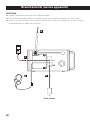
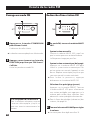
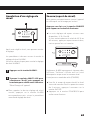
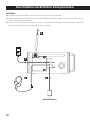
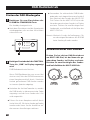
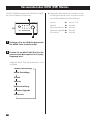
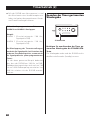
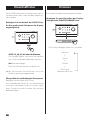
Connections (Other Devices)
CAUTION:
< Switch off the power before making any connections.
< Read the instructions of each component you intend to use with this unit.
< Be sure to insert each plug securely. To prevent hum and noise, do not bundle the connection
cords.
C
D
A
B
AC Outlet

9
ENG
9
A
DC IN
Connect the provided AC adaptor to this
jack. Then connect the AC adaptor's plug to
the AC wall socket.
Do not use any AC adaptors other than the
one included with this unit to avoid fire,
electric shock, etc. Be sure to connect the
adaptor to an AC outlet that supplies the
correct voltage.
B
FM Telescopic Antenna
Stretch the telescopic antenna to it's fullest
length and rotate it to the direction that
gives the best reception.
C
AUX IN jack
You can connect a portable audio player to
this jack.
Connect the LINE OUT or PHONES jack
(audio output jack) of the audio player
using the supplied stereo mini plug cable.
When using the PHONES jack of your audio
player, you must adjust the volume of the
audio player or you may hear no sound
from your R-5DAB.
< Turning the volume of the audio player
up too high may cause the sound from
your R-5DAB to be distorted. If this is the
case, reduce the volume of the audio
player until the distortion stops and then
adjust the volume level of the R-5DAB to a
comfortable listening level.
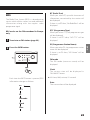
D
PHONES
For private listening, insert your headphones'
plug into this jack, and adjust the volume
using the VOLUME knob.
< You can listen to in stereo using headphones
when you are receiving a stereo broadcast.

10
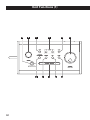
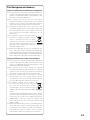
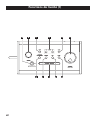
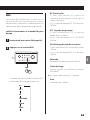
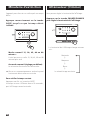
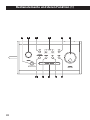
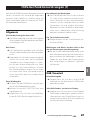
Unit Functions (1)
K J HI G
C EDB FA

11
ENG
11
A
STANDBY/ON
Use this button to turn the unit on or put it
in standby.
The indicator lights when the unit is in
standby. When the unit is turned on, the
indicator turns off.
B
VOLUME
Turn this knob to adjust the volume level.
C
TONE
Use this button together with the MULTI
JOG knob to adjust the bass and treble.
D
ALARM 1/2
Use these buttons to set timers.
E
MENU
Use this button to access menus.
< In DAB mode, this button allows you to
enter “Full scan”, “DRC” (Dynamic Range
Control), “Prune”, etc.
< In FM mode, this button allows you to enter
“Scan setting”, “Audio setting”, etc.
< This button also allows you to return to the
previous menu (one level up).
F
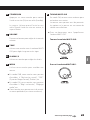
TUNING/MULTI JOG
In FM mode, turn this knob to tune in to a
station.
You can also browse options by turning
this knob or determine your selection by
pressing the centre of the knob.
< This knob is described as “MULTI JOG knob”
in this document.
Turning the MULTI JOG knob:
Pressing the MULTI JOG knob:
Continued on the next page

1212
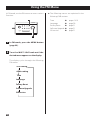
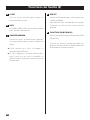
G
SLEEP
Use this button to set the sleep timer.
H
INFO
In DAB or FM mode, use this button to view
information.
I
SNOOZE/DIMMER
When the alarm goes off, press this button
to activate the snooze timer.
< This button is also used to change the
brightness of the display.
< If you press this button while the unit is in
standby, the backlight turns on and stays
on for about 10 seconds.
J
PRESET
Use this button to select a preset station.
You can also save your favourite stations by
pressing and holding this button.
K
FUNCTION (DAB/FM/AUX)
Use this button to select DAB, FM or AUX.
When a portable audio player is connected
to the AUX IN jack, select AUX to listen to
the external source.
Unit Functions (2)

13
ENG
13
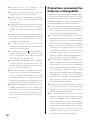
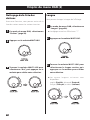
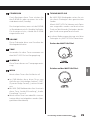
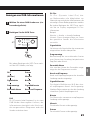
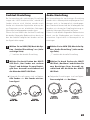
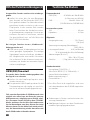
Setting the Clock (1)
If you want to change the displayed language
before setting the clock, follow the instructions,
“Language” on page 20.
3
2
1
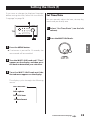
1
Press the MENU button.
< If no button is pressed for 15 seconds, the
menu mode will be cancelled.
2
Turn the MULTI JOG knob until “Time”
appears on the display, and then press
the knob to determine your selection.
3
Turn the MULTI JOG knob until the
desired menu appears on the display.
The display cycles through the following
menus.
Set Time/Date
Auto update
Set 12/24 hour
Set date format
Set Time/Date
You can manually adjust the hour, minute, day,
month and year one by one.
1
Select “Set Time/Date” (see the left
column).
2
Press the MULTI JOG knob.
Continued on the next page

1414
Setting the Clock (2)
3
Turn the MULTI JOG knob to change
the hour, and then press the knob to
determine your selection.
4
Repeat step
3
to set the minute, day,
month and year
.
< If the auto update is turned on, the clock is
automatically updated when the DAB signal
is received. (For the auto update setting,
see “Auto update” in the right column).
< If the unit is disconnected from the power
supply and the batteries have been
completely discharged for about an hour,
clock and timer settings will be lost.
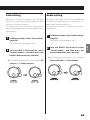
Auto update
You can turn on the auto update to automatically
adjust the time setting by receiving the information
from a DAB or FM station.
1
Select “Auto update” (page 13).
The current setting appears with “ * ”.
2
Press the MULTI JOG knob.
3
Turn the MULTI JOG knob to switch to
“Update from DAB” or “Update from
FM”, and then press the knob to
determine your selection.
< To turn off the auto update setting, select
“No update” instead.

15
ENG
15
Set 12/24 hour
You can select 12-hour mode or 24-hour mode
to display the time in either mode.
1
Select “Set 12/24 hour” (page 13).
The current setting appears with “ * ”.
2
Press the MULTI JOG knob.
3
Turn the MULTI JOG knob to switch
between “Set 12 hour“ and “Set 24
hour”, and then press the knob to
determine your selection.
Set date format
You can set the format used for displaying the
date:
1
Select “Set date format” (page 13).
The current setting appears with “ * ”.
2
Press the MULTI JOG knob.
3
Turn the MULTI JOG knob to switch
between “MM-DD-YYYY” and “DD-MM-
YYYY”, and then press the knob to
determine your selection.
< MM: month, DD: day, YYYY: year

1616
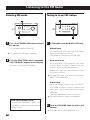
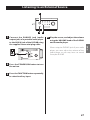
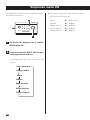
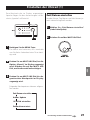
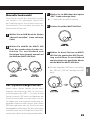
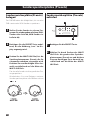
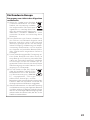
Listening to the DAB Radio
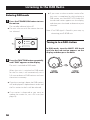
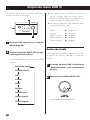
Entering DAB mode
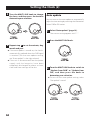
1
Press the STANDBY/ON button to turn
the unit on.
The standby indicator lights off.
<
The unit turns on with the source that was
last selected.
1
2
2
Press the FUNCTION button repeatedly
until “DAB” appears on the display.
The unit is switched to DAB mode.
When the unit is switched to DAB mode
for the first time, it will automatically run a
full scan to detect all DAB stations and save
them into its memory.
<
Once the scanning is done, the DAB stations
will be displayed in alphanumeric order and
the first station in the list will be selected.
< If no station is detected or you want to
update the station list, run a full scan (see
page 18).
< If you want to select another station after
the scan is completed or while playing a
DAB station, turn the MULTI JOG knob until
the desired station appears on the display,
and then press the knob to determine your
selection.
Note: If no DAB signal is found in your area, try
relocating your R-5DAB unit.
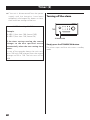
Tuning in to a DAB station
In DAB mode, turn the MULTI JOG knob
until the desired station appears on the
display, and then press the knob.

17
ENG
17
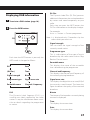
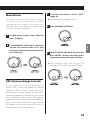
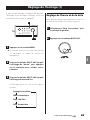
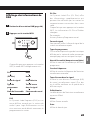
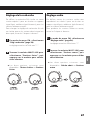
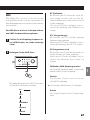
Displaying DAB information
1
Tune in to a DAB station (page 16).
2
Press the INFO button.
Each time the INFO button is pressed, the
INFO mode is changed as follows:
DLS
(DL Plus)
Signal strength
Programme type
Ensemble name
Date
Time
Bitrate
Signal error rate
Channel / frequency
DLS
The Dynamic Label Segment (DLS) is a
scrolling text label supplied by the radio
station. It may be information about music
titles or details regarding the programme
or station.
DL Plus
The Dynamic Label Plus (DL Plus) presents
additional information that can be broadcast
by stations and stored temporarily on your
radio.
Each time you press the INFO button, the
DL Plus information on the display changes.
For example:
Artist q Station q Current programme
Note: It is displayed only if broadcast by the
radio station you tune in to.
Signal strength
You can check the signal strength of the
currently tuned station.
Programme type
This is a description of the type of music
broadcast by the radio station such as Pop,
Rock or Classical music.
Ensemble name
This displays the name of the ensemble
that is broadcasting the programme.
Channel and frequency
This displays the channel and frequency of
the currently playing broadcast.
Signal error rate
This displays the digital bit error rate (0-9) of
the currently tuned channel. The lower the
figure the better the quality of the received
broadcast.
Bitrate
The bitrate of the broadcast currently being
received is displayed.
Time
This displays the current time.
Date
This displays the current date.

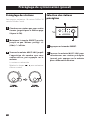
1818
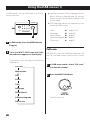
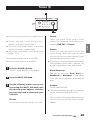
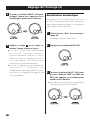
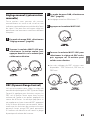
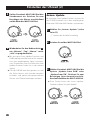
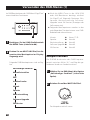
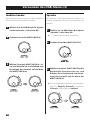
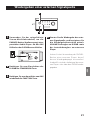
Using the DAB menu (1)
In DAB mode, use the DAB menus to access
various functions.
1
2
1
In DAB mode, press the MENU button
(Page 16).
2
Turn the MULTI JOG knob until the
desired menu appears on the display.
The display cycles through the following
DAB menus.
Full scan
Manual tune
DRC
Prune
Time
Language
Factory Reset
Software Upgrade
SW version
< You can also access Time, Language, Factory
Reset, Software Upgrade and SW version
menus by pressing the MENU button in FM
or AUX mode.
<
The following menus are explained in the
following DAB sections.
Time e pages 13-15
Language e page 20
Factory Reset e page 21
Software Upgrade e page 21
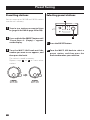
SW version e page 21
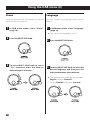
Full scan
The unit will scan the DAB bands between 5A
and 13F and add stations found to the station
list.
1
In DAB menu mode, select “Full scan”
(see the left column).
2
Press the MULTI JOG knob.
The full scan starts.

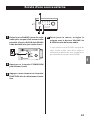
19
ENG
19
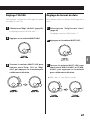
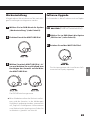
Manual tune
This option allows you to manually tune in
a channel and view a continuously updated
indication of the strength of the signal. This
could be useful when adjusting or positioning
an antenna for better reception.
1
In DAB menu mode, select “Manual
tune” (page 18).
2
Turn the MULTI JOG knob to select the
station you want to tune in to, and
then press the knob twice to determine
your selection.
DRC (Dynamic Range Control)
Use this option to set the Dynamic Range
Control (DRC) value to be applied to received
broadcasts. DRC is used to reduce the range
between high and low volumes of audio and is
sometimes applied at the broadcast source. Pop
music might have a high value of DRC applied,
appropriate for constantly high listening levels,
while classical music broadcasts might have no
DRC applied to allow the listener to hear the full
dynamic range of the source volume.
1
In DAB menu mode, select “DRC”
(page 18).
< The current setting appears with “ * ”.
2
Press the MULTI JOG knob.
3
Turn the MULTI JOG knob to select the
desired DRC setting, and then press
the knob to determine your selection.
< The following three DRC settings are
available: DRC off, DRC low, and DRC high.

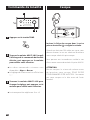
2020
Using the DAB menu (2)
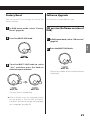
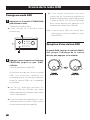
Prune
Using this function, you can remove all inactive
stations from the station list.
1
In DAB menu mode, select “Prune”
(page 18).
2
Press the MULTI JOG knob.
3
Turn the MULTI JOG knob to select
“Yes”, and then press the knob to
determine your selection.
Language
You can change the language shown on the
display.
1
In DAB menu mode, select “Language”
(page 18).
< The current setting appears with “ * ”.
2
Press the MULTI JOG knob.
3
Turn the MULTI JOG knob to select the
desired language, and then press the
knob to determine your selection.
< The following four languages are available:
English, German (Deutsch),
French (Français) and Italian (Italiano).
La page est en cours de chargement...
La page est en cours de chargement...
La page est en cours de chargement...
La page est en cours de chargement...
La page est en cours de chargement...
La page est en cours de chargement...
La page est en cours de chargement...
La page est en cours de chargement...
La page est en cours de chargement...
La page est en cours de chargement...
La page est en cours de chargement...
La page est en cours de chargement...
La page est en cours de chargement...
La page est en cours de chargement...
La page est en cours de chargement...
La page est en cours de chargement...
La page est en cours de chargement...
La page est en cours de chargement...
La page est en cours de chargement...
La page est en cours de chargement...
La page est en cours de chargement...
La page est en cours de chargement...
La page est en cours de chargement...
La page est en cours de chargement...
La page est en cours de chargement...
La page est en cours de chargement...
La page est en cours de chargement...
La page est en cours de chargement...
La page est en cours de chargement...
La page est en cours de chargement...
La page est en cours de chargement...
La page est en cours de chargement...
La page est en cours de chargement...
La page est en cours de chargement...
La page est en cours de chargement...
La page est en cours de chargement...
La page est en cours de chargement...
La page est en cours de chargement...
La page est en cours de chargement...
La page est en cours de chargement...
La page est en cours de chargement...
La page est en cours de chargement...
La page est en cours de chargement...
La page est en cours de chargement...
La page est en cours de chargement...
La page est en cours de chargement...
La page est en cours de chargement...
La page est en cours de chargement...
La page est en cours de chargement...
La page est en cours de chargement...
La page est en cours de chargement...
La page est en cours de chargement...
La page est en cours de chargement...
La page est en cours de chargement...
La page est en cours de chargement...
La page est en cours de chargement...
La page est en cours de chargement...
La page est en cours de chargement...
La page est en cours de chargement...
La page est en cours de chargement...
La page est en cours de chargement...
La page est en cours de chargement...
La page est en cours de chargement...
La page est en cours de chargement...
La page est en cours de chargement...
La page est en cours de chargement...
La page est en cours de chargement...
La page est en cours de chargement...
La page est en cours de chargement...
La page est en cours de chargement...
La page est en cours de chargement...
La page est en cours de chargement...
La page est en cours de chargement...
La page est en cours de chargement...
La page est en cours de chargement...
La page est en cours de chargement...
La page est en cours de chargement...
La page est en cours de chargement...
La page est en cours de chargement...
La page est en cours de chargement...
-
 1
1
-
 2
2
-
 3
3
-
 4
4
-
 5
5
-
 6
6
-
 7
7
-
 8
8
-
 9
9
-
 10
10
-
 11
11
-
 12
12
-
 13
13
-
 14
14
-
 15
15
-
 16
16
-
 17
17
-
 18
18
-
 19
19
-
 20
20
-
 21
21
-
 22
22
-
 23
23
-
 24
24
-
 25
25
-
 26
26
-
 27
27
-
 28
28
-
 29
29
-
 30
30
-
 31
31
-
 32
32
-
 33
33
-
 34
34
-
 35
35
-
 36
36
-
 37
37
-
 38
38
-
 39
39
-
 40
40
-
 41
41
-
 42
42
-
 43
43
-
 44
44
-
 45
45
-
 46
46
-
 47
47
-
 48
48
-
 49
49
-
 50
50
-
 51
51
-
 52
52
-
 53
53
-
 54
54
-
 55
55
-
 56
56
-
 57
57
-
 58
58
-
 59
59
-
 60
60
-
 61
61
-
 62
62
-
 63
63
-
 64
64
-
 65
65
-
 66
66
-
 67
67
-
 68
68
-
 69
69
-
 70
70
-
 71
71
-
 72
72
-
 73
73
-
 74
74
-
 75
75
-
 76
76
-
 77
77
-
 78
78
-
 79
79
-
 80
80
-
 81
81
-
 82
82
-
 83
83
-
 84
84
-
 85
85
-
 86
86
-
 87
87
-
 88
88
-
 89
89
-
 90
90
-
 91
91
-
 92
92
-
 93
93
-
 94
94
-
 95
95
-
 96
96
-
 97
97
-
 98
98
-
 99
99
-
 100
100


TEAC R-5DAB Le manuel du propriétaire
- Catégorie
- Réveils
- Taper
- Le manuel du propriétaire
dans d''autres langues
- English: TEAC R-5DAB Owner's manual
- Deutsch: TEAC R-5DAB Bedienungsanleitung
Documents connexes
-
TEAC R-2 Le manuel du propriétaire
-
TEAC R-5 Le manuel du propriétaire
-
-
-
-
-
TEAC AG-H600DNT Le manuel du propriétaire
-
-
-
Autres documents
-
 NEW ONE R250 Le manuel du propriétaire
-
Muse M-189 CDB Manuel utilisateur
-
Tangent PICO DAB+ Matt Satin Black Manuel utilisateur
-
Sony XDRS41DB.EU8 Manuel utilisateur
-
-
Sony XDR-C1DBP Mode d'emploi
-
Tangent Alio Junior DAB+ White High Gloss Manuel utilisateur
-
TechniSat DIGITRADIO 51 Le manuel du propriétaire
-
Muse M-175 DBI Manuel utilisateur
-
