Sage BGR250 Mode d'emploi
- Catégorie
- Fabricants de sandwichs
- Taper
- Mode d'emploi

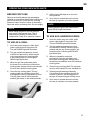
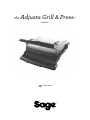
the Adjusta Grill & Press™
BGR250
EN QUICK GUIDE DE KURZANLEITUNG
FR GUIDE RAPIDE NL SNELSTARTGIDS
ES GUÍA RÁPIDA

2
CONTENTS
• The appliance is for household
use only. Do not use the
appliance for anything other
than its intended use. Do not
use in moving vehicles or
boats. Do not use outdoors.
Misuse may cause injury.
• Fully unwind the power cord
before operating.
• Position the appliance on a
stable, heat resistant, level,
dry surface away from the
edge and do not operate on
or near a heat source such as
a hot plate, oven or gas hob.
• Do not let the power cord hang
over the edge of a bench or
table, touch hot surfaces or
become knotted.
• Position the appliance at least
20cm from walls or heat/steam
sensitive materials and provide
adequate space above and on
all sides for air circulation.
• Ensure the power cord
does not become trapped
between the upper and lower
hot plates of the appliance
during use or storage.
• Do not leave the appliance
unattended when in use.
• The appliance is not intended
to be operated by the means
of an external timer or separate
remote control system
• Do not place anything on top
of the grill when lid is closed,
when in use and when stored.
SAGE®
RECOMMENDS
SAFETY FIRST
At Sage® we are very safety
conscious. We design and
manufacture appliances
with your safety foremost
in mind. In addition, we ask
that you exercise a degree
of care when using any
electrical appliance and
adhere to the following
precautions.
IMPORTANT
SAFEGUARDS
READ ALL INSTRUCTIONS
BEFORE USE AND SAVE
FOR FUTURE REFERENCE
• A downloadable version of this
document is also available at
sageappliances.com
• Before using the rst time
ensure your electricity supply
is the same as shown on
the label on the underside
of the appliance.
• Remove and safely discard
any packaging materials
before rst use.
2 Sage® Recommends Safety First
4 Getting To Know Your New Appliance
5 Operating Your New Appliance
7 Care & Cleaning
7 Guarantee

3
EN
The appliance is marked
with a HOT surface
symbol. The lid and
other surfaces will be
hot when the appliance is
operating and for some time
after use. To prevent burns
always use insulated oven
mitts or use handles or
knobs where appropriate.
• Always ensure the appliance
is turned OFF, unplugged at
the power outlet and has been
allowed to cool before cleaning,
moving or storing.
• Do not use the appliance if
the power cord, plug, or
appliance becomes damaged
in any way. If damaged or
maintenance other than
cleaning is required, please
contact Sage Customer Service
or go to sageappliances.com
• Any maintenance other
than cleaning should be
performed by an authorised
Sage® service centre.
• Children shall not play with
the appliance.
• The appliance can be used by
children aged 8 or older and
persons with reduced physical,
sensory or mental capabilities
or a lack of experience and
knowledge, only if they have
been given supervision or
instruction concerning use
SAGE® RECOMMENDS SAFETY FIRST
of the appliance in a safe
way and understand the
hazards involved.
• Cleaning of the appliance
should not be carried out by
children unless they are 8 years
or older and supervised.
• The appliance and its cord
should be kept out of reach
of children aged 8 years
and younger.
• The installation of a residual
current safety switch is
recommended to provide
additional safety when using
all electrical appliances.
Safety switches with a rated
operating current not more
than 30mA are recommended.
Consult an electrician for
professional advice.
The symbol shown
indicates that this appliance
should not be disposed of
in normal household waste.
It should be taken to a local
authority waste collection centre
designated for this purpose or to
a dealer providing this service.
For more information, please
contact your local council oce.
To protect against electric
shock, do not immerse
the power plug, cord or
appliance in water or any liquid.
SAVE THESE INSTRUCTIONS

4
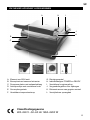
GETTING TO KNOW YOUR NEW APPLIANCE
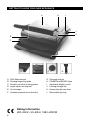
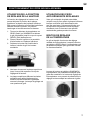
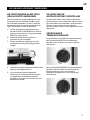
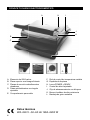
A. 2200 Watt element
B. Floating hinged top plate
C. Durable non-stick cooking plates
D. Angle adjust non-slip feet
E. Cord storage
F. Variable temperature control dial
K
B
C
E
HA I
G. Cleaning spatula
H. POWER and READY lights
I. Adjustable height control
J. Locking storage clip
K. Heavy duty die cast arms
L. Removable drip tray
J
L
D F G
Rating Information
220–240V~ 50–60Hz 1850–2200W

5
EN
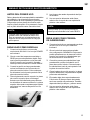
BEFORE FIRST USE
Remove and safely discard any packaging
material or promotional labels before using your
grill for the rst time. Check that the cooking
plates are clean and free of dust. If necessary,
wipe over with a soft damp cloth. Dry thoroughly.
NOTE
When using the grill for the rst time you
may notice a ne smoke haze. This is
caused by the heating of some of the
components. There is no need for concern.
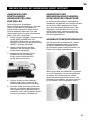
TO USE AS A GRILL
1. Insert the power plug into a 220–240V
power outlet and turn the power ON.
The red POWER light will illuminate.
2. Turn the variable temperature control
to SEAR for fast heat up. Allow the grill
to pre-heat with the top cooking plate
in the closed position until the green
READY light illuminates.
3. When the grill has preheated, place
the foods to be cooked onto the bottom
cooking plate. Always place foods towards
the rear of the bottom cooking plate.
4. Close the top cooking plate. The top
cooking plate has a oating hinge that
is designed to evenly press down on food.
The top plate must be fully lowered to
achieve grill marks on the selected foods.
5. Grilling times will depend on the food
being cooked.
6. Once food is cooked remove food with
the help of a plastic or wooden spatula.
NOTE
Always allow the grill to pre-heat until the
green READY light illuminates.
TO USE AS A SANDWICH PRESS
1. Insert the power plug into a 220–240V
power outlet and turn the power ON.
The red POWER light will illuminate.
2. Turn the variable temperature control
to SANDWICH setting. Allow the grill to
preheat with the top cooking plate in the
closed position until the green READY
light illuminates.
3. When the sandwich press has
pre-heated, place the sandwich onto
the bottom cooking plate. Always place
sandwiches towards the rear of the bottom
cooking plate.
4. Close the top cooking plate. The top plate
must be fully lowered to cook sandwiches.
5. Toasting should take approximately
5–8 minutes. Exact toasting time will be
a matter of taste. It will also depend on
the type of bread and type of lling used.
6. Once food is cooked remove food with
the help of a plastic or wooden spatula.
OPERATING YOUR NEW APPLIANCE

6
OPERATING YOUR NEW APPLIANCE
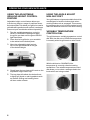
USING THE ADJUSTABLE
GRILLING HEIGHT CONTROL
FEATURE
Adjustable height control feature allows you
to x the top plate to a range of positions above
the bottom plate. This allows your grill to be used to
grill delicate ingredients such as sh, hamburger
buns and open sandwiches without squashing.
1. Turn the variable temperature control to
SEAR or SANDWICH setting and allow
the grill to pre-heat until the green READY
light illuminates.
2. Place food to be grilled or your sandwich
to be melted on the bottom plate.
3. Move the adjustable height control
clip on the right hand side of the grill
to the desired height.
4. Slowly lower the top plate until it rests on the
adjustable height control clip.
5. The top plate will radiate the desired heat
to lightly grill foods or melt ingredients such
as cheese. Grilling and toasting times
will be a matter of taste.
USING THE ANGLE ADJUST
NON-SLIP FEET
Your grill features unique extendable feet which
are designed to level the bottom plate when
cooking foods such as sausages. This ensures
the sausages do not roll o the hotplate but still
drain the maximum amount of fat while cooking.
VARIABLE TEMPERATURE
CONTROL DIAL
The grill features a variable temperature control
dial. With the dial set on SEAR the temperature
is correctly suited to grill meats or other foods.
With the dial set on SANDWICH the
temperature is correctly suited to toasting
sandwiches. The variable temperature control
dial allows you to select a setting suited to the
foods which are being cooked.

7
EN
CARE & CLEANING
GUARANTEE
Before cleaning, switch the power o at the
power outlet and then remove the power plug.
Allow your grill to cool before cleaning. The grill
is easier to clean when slightly warm.
Always clean your grill after each use to prevent
a build up of baked-on foods.
Wipe cooking plates with a soft cloth to remove
food residue. For baked on food residue squeeze
some warm water mixed with detergent over
the food residue then clean with a non abrasive
plastic scouring pad.
CLEANING THE DRIP TRAY
Remove and empty the drip tray after each
use and wash the tray in warm, soapy water.
Alternatively the drip tray can be cleaned
in the dishwasher.
DURABLE NON-STICK COATING
Cooking on a non-stick surface minimises the
need for oil, food does not stick and cleaning
is easier. Any discolouration that may occur
will not aect the cooking performance. When
cleaning the non-stick coating, do not use metal
(or other abrasive) scourers. Wash with warm
soapy water. Remove stubborn residue with
a non abrasive plastic scouring pad or nylon
washing brush.
STORAGE
To store your grill:
1. Switch o the grill and unplug power cord
from the power outlet.
2. Allow the grill to fully cool.
3. Slide the height control clip towards the
front handle to the LOCK position so that
the top and bottom cooking plates are
locked together.
4. Click the removable drip tray into place.
5. Wrap the power cord in the cord storage
area below the grill.
6. Store on a at, dry level surface.
Can be stored vertically.
2 YEAR LIMITED GUARANTEE
Sage Appliances guarantees this product for
domestic use in specied territories for 2 years
from the date of purchase against defects
caused by faulty workmanship and materials.
During this guarantee period Sage Appliances
will repair, replace, or refund any defective
product (at the sole discretion of
age Appliances).
All legal warranty rights under applicable
national legislation will be respected and will
not be impaired by our guarantee. For full terms
and conditions on the guarantee, as well as
instructions on how to make a claim, please visit
www.sageappliances.com.

8
INHALTE
• Vor dem ersten Gebrauch
prüfen, dass Ihre Netzspan-
nung mit der auf dem Eti-
kett an der Unterseite des
Geräts übereinstimmt.
• Vor dem ersten Gebrauch alle
Verpackungsmaterialien abneh-
men und sicher entsorgen.
• Dieses Gerät ist nur für den
Haushaltsgebrauch bestimmt.
Gerät nur bestimmungsgemäß
verwenden. Nicht in fahrenden
Fahrzeugen oder Booten
verwenden. Nicht im Freien
verwenden. Missbrauch kann
Verletzungen nach sich ziehen.
• Netzkabel vor dem Gebrauch
vollständig entrollen.
• Gerät in sicherem Abstand
von Kanten auf eine stabile,
hitzebeständige, ebene und
trockene Fläche stellen.
Nicht auf oder neben einer
Wärmequelle wie einem Gas-
oder Elektroherd oder einem
heißen Ofen betreiben.
• Netzkabel nicht über
Arbeitsplatten oder Tischkanten
hängen lassen, von heißen
Oberächen fern halten,
Kabelgewirr vermeiden.
• Zwischen dem Gerät und
Wänden oder hitze- bzw.
SAGE® EMPFIEHLT:
SICHERHEIT
GEHT VOR
Wir bei Sage® sind sehr
sicherheitsbewusst.
Beim Design und bei der
Herstellung unserer Geräte
denken wir zu allererst
an Ihre Sicherheit. Darüber
hinaus bitten wir Sie, bei
der Verwendung jedes
Elektrogeräts angemessene
Sorgfalt anzuwenden und
sich an die folgenden
Vorsichtsmaßnahmen
zu halten.
WICHTIGE
VORSICHTSMASS-
NAHMEN
BITTE ALLE ANWEISUNGEN
VOR DEM GEBRAUCH LESEN
UND ZUR SPÄTEREN BEZUG-
NAHME AUFBEWAHREN.
• Dieses Informationsbuch
steht zum Download unter
www.sageappliances.com zur
Verfügung.
8 Wir Empfehlen: Sicherheit Geht Vor
11 Anwendung Ihres Neuen Geräts
12 Machen Sie Sich Mit Ihrem Neuen
Gerät Vertraut
14 Pege & Reinigung
14 Garantie

9
DE
dampfempndlichen Materialien
mindestens 20 cm Abstand
halten und nach allen Seiten
und oberhalb des Geräts
stets ausreichend Platz zur
Luftzirkulation lassen.
• Sicherstellen, dass das
Netzkabel beim Gebrauch
oder während der Lagerung
des Geräts nicht zwischen der
oberen und unteren Heizplatte
eingeklemmt werden kann.
• Gerät während des Betriebs
nicht unbeaufsichtigt lassen.
Das Gerät trägt das
Symbol für HEIßE
Oberächen. Der Deckel
und andere Oberächen
werden beim Betrieb des Geräts
heiß und bleiben dies für einige
Zeit nach dem Gebrauch.
• Zur Vermeidung von
Verbrennungen immer
Ofenhandschuhe verwenden
und gegebenenfalls Grie und
Knöpfe nutzen.
• Gerät immer ausschalten,
Netzstecker ziehen und
abkühlen lassen, ehe Sie es
bewegen, reinigen oder lagern.
• Gerät nicht verwenden, wenn
das Netzkabel, der Netzstecker
oder das Gerät selbst in irgend-
WIR EMPFEHLEN: SICHERHEIT GEHT VOR
einer Weise beschädigt ist.
Wenden Sie sich bei Schäden
und zur Wartung (außer Reini-
gung) bitte an den Sage®-Kun-
dendienst oder besuchen Sie
sageappliances.com
• Alle Wartungsarbeiten
außer der Reinigung nur
von autorisierten Sage®-
Kundendienststellen
vornehmen lassen.
• Kinder nicht mit dem Gerät
spielen lassen.
• Dieses Gerät kann von Kindern
im Alter ab 8 Jahren und von
Personen mit eingeschränkten
körperlichen, sensorischen
oder geistigen Fähigkeiten
oder mit mangelnder Erfahrung
und fehlenden Kenntnissen
genutzt werden, sofern sie
beaufsichtigt werden oder in
den sicheren Gebrauch des
Geräts eingewiesen wurden
und sich der entsprechenden
Risiken bewusst sind.
• Reinigung des Geräts nicht
von Kindern unter 8 Jahren
und nur unter Aufsicht
vornehmen lassen.
• Gerät und Netzkabel für
Kinder bis zu 8 Jahren
unzugänglich aufbewahren.

10
WIR EMPFEHLEN: SICHERHEIT GEHT VOR
DIESE ANLEITUNG AUFBEWAHREN
• Die Installation eines Schutz-
oder Sicherheitsschalters
wird bei der Verwendung von
Elektrogeräten als zusätzliche
Schutzmaßnahme empfohlen.
Es wird ein Sicherheitsschalter
mit maximal 30 mA Nennleistung
empfohlen. Fachgerechte
Beratung erhalten Sie
von Ihrem Elektriker.
Dieses Symbol zeigt, dass
das Gerät nicht im normalen
Hausmüll entsorgt werden
sollte. Es sollte stattdessen
bei einem entsprechenden
kommunalen Wertstohof oder
Fachhändler zur Entsorgung
abgegeben werden. Weitere
Einzelheiten erfahren Sie von Ihrer
Kommunalbehörde.
Netzstecker, Netzkabel oder
Gerät nicht in Wasser oder
sonstige Flüssigkeiten tauchen.

11
DE
ANWENDUNG IHRES NEUEN GERÄTS
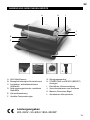
A. 2200 Watt Element
B. Beweglich befestigtes Deckelelement
C. Langlebige, antihaftbeschichtete
Grillplatten
D. Neigungsausgleichende, rutschfeste
Standfüße
E. Kabelaufbewahrung
F. Variabler Temperaturregler
K
B
C
E
HA I
G. Reinigungsspachtel
H. POWER (AN) und READY (BEREIT)
Anzeigen
I. Einstellbare Höhenverstellung
J. Verschlussklammer zum Verstauen
K. Massive Gusseisen-Bügel
L. Abnehmbare Abtropfschale
J
L
D F G
Leistungsangaben
220–240V~ 50–60Hz 1850–2200W

12
VOR DER ERSTEN
INBETRIEBNAHME
Entfernen und entsorgen Sie das gesamte
Verpackungsmaterial und alle Werbeaufkleber,
bevor Sie Ihren Grill zum ersten Mal benutzen.
Stellen Sie sicher, dass die Grillächen sauber
und frei von Staub sind. Wenn nötig, benutzen
Sie ein weiches, feuchtes Reinigungstuch zum
Abwischen. Gründlich trocknen lassen.
HINWEIS
Wenn Sie den Grill zum ersten Mal
benutzen, ist es möglich, dass Sie ein
wenig feinen Rauch aufsteigen sehen.
Dies wird durch das Erhitzen einiger
Elemente verursacht. Es gibt jedoch
keinen Grund zur Besorgnis.
ANWENDUNG ALS GRILL
1. Schließen Sie den Netzstecker
an eine 220-240V Steckdose an.
Die rote POWER (STROM AN)
Anzeige wird sofort aueuchten.
2. Drehen Sie den variablen Temperaturregler
auf SEAR (ANBRATEN) für schnelles
Erhitzen. Lassen Sie den Grill, bei
geschlossenem Deckelelement
vorwärmen, bis die grüne READY (BEREIT)
Anzeige aueuchtet.
3. Wenn der Grill vorgewärmt ist, legen Sie die
zu grillenden Lebensmittel auf die untere
Kochäche. Legen Sie die Lebensmittel
immer näher an den hinteren Rand der
unteren Kochäche.
4. Schließen Sie die obere Kochplatte. Die
obere Kochplatte hat ein bewegliches
Scharnier, das so gebaut ist, dass auf der
gesamten Fläche gleichmäßiger Druck auf
die Lebensmittel ausgeübt wird. Die obere
Kochplatte muss ganz heruntergedrückt
sein, um Grillstreifen auf den ausgewählten
Lebensmitteln zu erhalten.
5. Die Grilldauer hängt von den zu kochenden
Lebensmitteln ab.
6. Wenn die Lebensmittel gekocht sind,
nehmen Sie diese mit Hilfe eines
Bratenhebers aus Holz oder Kunststo
heraus.
HINWEIS
Lassen Sie den Grill immer vorwärmen,
bis die grüne READY (BEREIT) Anzeige
aueuchtet.
ANWENDUNG ALS
SANDWICHPRESSE
1. Schließen Sie den Netzstecker an
eine 220-240V Steckdose an. Die rote
POWER (STROM AN) Anzeige wird
sofort aueuchten.
2. Drehen Sie den variablen Temperaturregler
auf die SANDWICH Einstellung. Lassen
Sie den Grill bei geschlossenen Platten
vorwärmen, bis die grüne READY (BEREIT)
Anzeige aueuchtet.
3. Wenn die Sandwichpresse vorgewärmt
ist, legen Sie das Sandwich auf die untere
Kochäche. Legen Sie die Sandwiches
immer näher an den hinteren Rand der
unteren Kochäche.
4. Schließen Sie die obere Kochplatte. Diese
muss ganz heruntergedrückt sein, um
Sandwiches zu toasten.
5. Das Toasten dauert etwa 5-8 Minuten. Die
genaue Toastzeit ist Geschmackssache. Sie
hängt auch davon ab, welche Art von Brot
und welche Füllung Sie toasten.
6. Wenn das Sandwich getoastet ist, nehmen
Sie es mit Hilfe eines Kunststo- oder
Holzbratenhebers heraus.
MACHEN SIE SICH MIT IHREM NEUEN GERÄT VERTRAUT

13
DE
MACHEN SIE SICH MIT IHREM NEUEN GERÄT VERTRAUT
ANWENDUNG DER
EINSTELLBAREN
HÖHENVERSTELLUNG
ZUM GRILLEN
Die Vorrichtung zur einstellbaren
Höhenverstellung erlaubt es Ihnen, die obere
Platte in verschiedenen Abständen zur
unteren Platte einzustellen. Damit können
Sie auch delikate Zutaten wie Fisch oder
Hamburgerbrötchen und oene Sandwiches
grillen, ohne sie zu zerdrücken.
1. Drehen Sie den variablen Temperaturregler
auf die SEAR (ANBRATEN) oder
SANDWICH Einstellung und lassen Sie
den Grill vorwärmen, bis die grüne READY
(BEREIT) Anzeige aueuchtet.
2. Legen Sie das Grillgut oder das
Sandwich, das Sie toasten wollen
auf die untere Kochplatte.
3. Bringen Sie den Schieber für die
einstellbare Höhenverstellung
auf der rechten Seite des Grills
auf die gewünschte Höhe.
4. Drücken Sie die obere Kochäche
langsam nach unten, bis sie auf der
Höhenverstellungsvorrichtung auiegt.
5. Die obere Platte strahlt die gewünschte
Hitze ab, um Speisen leicht anzubraten
oder Zutaten wie zum Beispiel Käse zu
schmelzen. Grill- und Toastzeiten hängen
von Ihren persönlichen Vorlieben ab.
ANWENDUNG DER
NEIGUNGSAUSGLEICHENDEN,
RUTSCHFESTEN STANDFÜSSE
Ihr Grill ist mit einzigartigen, aufklappbaren
Standfüßen ausgestattet, die konzipiert wurden,
um die untere Platte waagrecht zu stellen,
wenn Sie zum Beispiel Würste braten. Dies
stellt sicher, dass die Würste nicht von der
heißen Platte rollen, während trotzdem die
größtmögliche Menge an Fett während des
Kochens abgeleitet wird.
VARIABLER TEMPERATURREGLER
Der Grill hat einen Drehschalter für variable
Temperatureinstellung. Wenn der Schalter
auf SEAR (ANBRATEN) eingestellt ist, ist
die Temperatur genau richtig zum Grillen von
Fleisch und anderen Lebensmitteln.
Wenn der Schalter auf SANDWICH eingestellt
ist, ist die Temperatur richtig um Sandwiches
zu toasten. Der Drehschalter für variable
Temperatureinstellung erlaubt es Ihnen, die
Einstellung auszuwählen, die genau richtig ist
für die Speisen, die Sie zubereiten wollen.

14
PFLEGE & REINIGUNG
GARANTIE
Vor dem Reinigen den Netzstecker abziehen.
Lassen Sie den Grill abkühlen, bevor Sie ihn
reinigen. Der Grill ist einfacher zu reinigen, wenn
er noch ein wenig warm ist.
Reinigen Sie den Grill immer nach jedem
Gebrauch, um zu verhindern, dass sich
angebackene Speisereste ansammeln.
Wischen Sie Speisereste mit einem weichen
Reinigungstuch von den Kochplatten. Um
angebackene Speisereste zu entfernen,
spritzen Sie ein wenig Wasser mit Spülmittel auf
die Speisereste und reinigen Sie die Platte mit
einem nicht kratzenden Scheuerschwamm.
REINIGUNG DER
ABTROPFSCHALE
Nehmen Sie die Abtropfschale nach jedem
Gebrauch heraus und waschen Sie die Schale
in warmem, seigem Wasser. Alternativ
können Sie die Abtropfschale auch im
Geschirrspüler waschen.
LANGLEBIGE
ANTIHAFTBESCHICHTUNG
Das Kochen auf Oberächen mit
Antihaftbeschichtung reduziert den Bedarf
an Speiseöl auf ein Minimum, Speisen
haften nicht und die Reinigung ist einfacher.
Farbveränderungen, die auftreten können,
haben keinen Einuss auf die Kochleistung.
Benutzen Sie keine metallischen (oder andere,
scheuernde) Spülschwämme. Reinigen Sie
mit warmem, seigem Wasser. Hartnäckige
Speisereste können mit einem nicht
scheuernden Kunststo-Scheuerschwamm oder
einer Nylon-Abwaschbürste entfernt werden.
AUFBEWAHRUNG
Um Ihren Grill zu verstauen:
1. Schalten Sie den Grill aus und ziehen Sie
den Netzstecker von der Steckdose ab.
2. Lassen Sie den Grill vollständig abkühlen.
3. Schieben Sie die Klammer an der
Höheverstellung nach vorne in Richtung
Bügel in die LOCK (SPERRE) Position, so
dass die obere und die untere Kochplatte
zusammen verriegelt sind.
4. Lassen Sie die Abtropfschale einrasten.
5. Wickeln Sie das Netzkabel in die
Kabelaufbewahrung unter dem Grill.
6. Bewahren Sie den Grill auf einer
achen, ebenen Fläche. Sie
können ihn aufrecht verstauen.
2 JAHRE BESCHRÄNKTE
GARANTIE
Sage Appliances gibt auf dieses Produkt für den
häuslichen Gebrauch in bestimmten Gebieten
eine Garantie über 2 Jahre ab Kaufdatum für
Mängel, die durch fehlerhafte Verarbeitung
und Materialien verursacht wurden. Während
dieser Garantiezeit wird Sage Appliances
jedes fehlerhafte Produkt reparieren, ersetzen
oder das Geld zurückerstatten (nach eigenem
Ermessen von Sage Appliances).
Alle gesetzlichen Gewährleistungsrechte nach
geltendem nationalem Recht werden beachtet
und durch unsere Garantie nicht beeinträchtigt.
Die vollständigen Garantiebestimmungen
und -bedingungen sowie Hinweise zur
Geltendmachung von Ansprüchen nden Sie
unter www.sageappliances.com.

FR
the Adjusta Grill & Press™
BGR250
FR GUIDE RAPIDE

2
TABLE DES MATIÈRES
• Avant une première utilisation,
assurez-vous que l’alimentation
électrique est identique à celle
illustrée sur l’étiquette sous
l’appareil.
• Retirez tout emballage avant la
première utilisation et éliminez-
le de façon sûre.
• L’appareil est réservé à un
usage domestique. N’utilisez
pas l’appareil pour toute autre
n que son utilisation prévue.
Ne l’utilisez pas sur un bateau
ou dans des véhicules en
mouvement. Ne l’utilisez pas en
plein air. Une mauvaise utilisation
peut engendrer des blessures.
• Déroulez entièrement le cordon
d’alimentation avant utilisation.
• Placez l’appareil sur une
surface stable, résistante à la
chaleur, plane et sèche, loin
du bord. Ne l’utilisez pas sur
ou à proximité d’une source
de chaleur (plaque chauante,
four ou cuisinière au gaz).
• Ne laissez pas le cordon
d’alimentation pendre au bord
d’un plan de travail ou d’une
table, entrer en contact avec des
surfaces chaudes ou se nouer.
• Placez l’appareil à au moins
20 cm des murs ou des
matériaux sensibles à la
chaleur/vapeur et prévoyez un
espace susant au-dessus
et sur tous les côtés pour la
circulation d’air.
SAGE®
RECOMMANDE
LA SÉCURITÉ
EN PREMIER
Chez Sage®, la sécurité est
une priorité. Nous concevons
et fabriquons des appareils
en mettant votre sécurité
au premier plan. Nous vous
demandons également
de faire attention lorsque
vous utilisez un appareil
électrique et de respecter
les consignes suivantes.
CONSIGNES
DE SÉCURITÉ
IMPORTANTES
LISEZ TOUTES LES
INSTRUCTIONS AVANT
UTILISATION ET CONSERVEZ-
LES POUR RÉFÉRENCE
ULTÉRIEURE
• Une version téléchargeable
de ce document est
également disponible sur
sageappliances.com
2 Sage® recommande la sécurité
en premier
5 Découverte de votre nouvel appareil
6 Fonctionnement de votre nouvel appareil
8 Entretien et nettoyage
8 Garantie

3
FR
• Assurez-vous que le cordon
d’alimentation ne reste pas
coincé entre les plaques
chauantes supérieure et
inférieure de l’appareil pendant
l’utilisation ou lorsqu’il est rangé.
• Ne laissez pas l’appareil
sans surveillance lorsqu’il
est en marche.
• L’appareil ne doit pas être
utilisé avec une minuterie
externe ou un système de
commande à distance séparé.
• Ne placez rien au-dessus du
gril lorsque le couvercle est
fermé, ni lorsque l’appareil est
utilisé ou rangé.
L’appareil est marqué
avec un symbole surface
CHAUDE. Le couvercle
et les autres surfaces
deviennent chauds lorsque
l’appareil est en marche et
pendant quelques temps après
son utilisation. An d’éviter les
brûlures, utilisez toujours des
gants isolants, les poignées
ou les boutons au besoin.
• Assurez-vous toujours que
l’appareil est hors tension,
débranché de la prise électrique
et refroidi avant de le nettoyer,
de le déplacer ou de le ranger.
SAGE® RECOMMANDE LA SÉCURITÉ EN PREMIER
• N’utilisez pas l’appareil si le
cordon d’alimentation, la prise
ou l’appareil est endommagé
de quelque manière que ce soit.
En cas de dommages ou si un
entretien autre que le nettoyage
est nécessaire, contactez le
service client Sage ou consultez
le site sageappliances.com
• Tout entretien autre que le
nettoyage doit être réalisé
par un centre de services
Sage® agréé.
• Les enfants ne doivent pas
jouer avec l’appareil.
• Cet appareil peut être
utilisé par des enfants âgés
de 8 ans ou plus et des
personnes aux capacités
mentales, sensorielles ou
physiques réduites, ou ayant
peu d’expérience et de
connaissances, uniquement
sous supervision ou s’ils ont
reçu des instructions sur
l’utilisation sécuritaire de
l’appareil et qu’ils comprennent
les risques impliqués.
• Le nettoyage de l’appareil ne
doit pas être eectué par des
enfants à moins qu’ils aient
8 ans ou plus, et ce, sous la
surveillance d’un adulte.
• L’appareil et son cordon
doivent être conservés hors
de la portée des enfants de
8 ans et moins.

4
• L’installation d’un commutateur
de sécurité de courant résiduel
est recommandée pour fournir
une sécurité supplémentaire
lors de l’utilisation de tous
les appareils électriques. Les
commutateurs de sécurité avec
un courant de fonctionnement
nominal maximal de 30 mA
sont recommandés. Consultez
un électricien pour obtenir des
conseils professionnels.
Le symbole illustré indique
que cet appareil ne doit
pas être jeté aux ordures
ménagères. Il doit être
amené dans un centre de collecte
de déchets local agréé désigné
à cette n ou à un revendeur
proposant ce service. Pour en
savoir plus, veuillez contacter le
bureau de votre municipalité.
An d’éviter tout risque
de décharge électrique,
ne plongez pas la prise
électrique, le cordon ou l’appareil
dans de l’eau ou dans un
autre liquide.
SAGE® RECOMMANDE LA SÉCURITÉ EN PREMIER
CONSERVEZ CES INSTRUCTIONS

5
FR
DÉCOUVERTE DE VOTRE NOUVEL APPAREIL
A. Élément chau ant de 2 200 W
B. Plaque supérieure articulée
C. Plaques de cuisson anti-adhésives
durables
D. Pieds anti-dérapants réglables
E. Rangement du cordon
F. Bouton de réglage de la température
K
B
C
E
HA I
G. Spatule de nettoyage
H. Voyants POWER (MARCHE/ARRÊT)
et READY (PRÊT)
I. Contrôle de la hauteur réglable
J. Clip de verrouillage pour rangement
K. Bras robustes en métal moulé
L. Bac d’égouttement amovible
J
L
D F G
Informations sur la tension nominale
220-240 V ~50-60 Hz 1 500-2 200 W

6
AVANT LA PREMIÈRE UTILISATION
Retirez et jetez en lieu sûr les emballages et les
étiquettes promotionnelles avant d’utiliser le gril
pour la première fois. Vériez que les plaques
de cuisson sont propres et exemptes de
poussières. Essuyez-les avec un chion doux et
humide si nécessaire. Séchez soigneusement.
REMARQUE
Lorsque vous utilisez le gril pour la première
fois, une légère émanation de fumée peut
se dégager de l’appareil. Ce phénomène
est causé par le chauage de certains
composants. Il n’y a pas à s’inquiéter.
UTILISATION COMME GRIL
1. Branchez le cordon d’alimentation sur
une prise de courant de 220 à 240 V et
allumez l’appareil. Le voyant d’alimentation
rouge s’allume.
2. Tournez le sélecteur de température sur
SEAR (Saisir) pour un chauage rapide.
Laissez le gril préchauer en mettant la
plaque de cuisson supérieure en position
fermée jusqu’à ce que le voyant READY
(Prêt) devienne vert.
3. Lorsque le gril est préchaué, placez les
aliments à griller sur la plaque de cuisson
inférieure. Placez toujours les aliments à
l’arrière de la plaque de cuisson inférieure.
4. Fermez la plaque de cuisson supérieure.
La plaque de cuisson supérieure est
équipée d’une articulation mobile conçue
pour se refermer de façon uniforme sur les
aliments. Abaissez entièrement la plaque
supérieure pour laisser des marques de
grillage sur les aliments choisis.
5. La durée du grillage dépend des aliments
cuisinés.
6. Une fois grillés, retirez-les avec une spatule
en plastique ou en bois.
REMARQUE
Préchauez toujours le gril jusqu’à ce que
le témoin vert READY (PRÊT) s’allume.
POUR UTILISER LE PRESSE-
SANDWICHS
1. Branchez le cordon d’alimentation sur une
prise de courant de 220 à 240 V et allumez
l’appareil. Le voyant d’alimentation rouge
s’allume.
2. Tournez le sélecteur de température sur
la position SANDWICH. Laissez le gril
préchauer en mettant la plaque de cuisson
supérieure en position fermée jusqu’à ce
que le voyant READY (Prêt) devienne vert.
3. Lorsque le presse-sandwichs est
préchaué, placez le sandwich sur la
plaque de cuisson inférieure. Placez
toujours les sandwichs à l’arrière de la
plaque de cuisson inférieure.
4. Fermez la plaque de cuisson supérieure.
Abaissez entièrement la plaque supérieure
pour faire chauer les sandwichs.
5. Environ 5 à 8 minutes sont nécessaires
pour le grillage. La durée exacte du
grillage se fera en fonction des goûts.
Elle dépendra par ailleurs du type de pain
et des ingrédients utilisés.
6. Une fois grillés, retirez-les avec une spatule
en plastique ou en bois.
FONCTIONNEMENT DE VOTRE NOUVEL APPAREIL
La page est en cours de chargement...
La page est en cours de chargement...
La page est en cours de chargement...
La page est en cours de chargement...
La page est en cours de chargement...
La page est en cours de chargement...
La page est en cours de chargement...
La page est en cours de chargement...
La page est en cours de chargement...
La page est en cours de chargement...
La page est en cours de chargement...
La page est en cours de chargement...
La page est en cours de chargement...
La page est en cours de chargement...
La page est en cours de chargement...
La page est en cours de chargement...
La page est en cours de chargement...
La page est en cours de chargement...
La page est en cours de chargement...
La page est en cours de chargement...
-
 1
1
-
 2
2
-
 3
3
-
 4
4
-
 5
5
-
 6
6
-
 7
7
-
 8
8
-
 9
9
-
 10
10
-
 11
11
-
 12
12
-
 13
13
-
 14
14
-
 15
15
-
 16
16
-
 17
17
-
 18
18
-
 19
19
-
 20
20
-
 21
21
-
 22
22
-
 23
23
-
 24
24
-
 25
25
-
 26
26
-
 27
27
-
 28
28
-
 29
29
-
 30
30
-
 31
31
-
 32
32
-
 33
33
-
 34
34
-
 35
35
-
 36
36
-
 37
37
-
 38
38
-
 39
39
-
 40
40


Sage BGR250 Mode d'emploi
- Catégorie
- Fabricants de sandwichs
- Taper
- Mode d'emploi
dans d''autres langues
- English: Sage BGR250 User guide
- español: Sage BGR250 Guía del usuario
- Deutsch: Sage BGR250 Benutzerhandbuch
- Nederlands: Sage BGR250 Gebruikershandleiding