RTI NEO ONE Manuel utilisateur
- Catégorie
- Projecteurs
- Taper
- Manuel utilisateur

Manual / Bedienungsanleitung /
Mode d‘emploi
RTI NEO ONE
Please spend a few minutes to read this manual fully
before operating this laser!
Bitte lesen Sie diese Bedienungsanleitung sorgfältig
vor Inbetriebnahme dieses Showlasersystems!
Avant d’utiliser cet appareil pour la première fois nous vous recommandons
de lire cette notice d’utilisation!
04/2018
English
Deutsch
Français

Manual: RTI NEO ONE
page 2 / 48
Rechtlicher Hinweis:
Die Firma Ray Technologies GmbH behält sich das Recht vor, Änderungen an ihren Produk-
ten vorzunehmen, die der technischen Weiterentwicklung dienen. Diese Änderungen werden
nicht notwendigerweise in jedem Einzelfall dokumentiert.
Diese Betriebsanleitung und die darin enthaltenen Informationen wurden mit der gebotenen
Sorgfalt zusammengestellt.
Die Laserworld (Switzerland) AG und ihr Tochterunternehmen, die Ray Technologies GmbH,
übernehmen jedoch keine Gewähr für Druckfehler, andere Fehler oder daraus entstehende
Schäden.
Die in dieser Bedienungsanleitung genannten Marken und Produktnamen sind Warenzeichen
oder eingetragene Warenzeichen der jeweiligen Titelhalter.
Legal Notice:
Thank you for purchasing this Ray Technologies product.
Due to continual product developments and technical improvements, Ray Technologies
GmbH reserves the right to make modications to its products.
This manual and its content have been made with due care, but neither Laserworld (Switzer-
land) AG nor its subsidiary Ray Technologies GmbH cannot, however, take any responsibility
for any errors, omissions or any resulting damages forthwith.
The brands and product names mentioned in this manual are trade marks or registered trade
marks of their respective owners.
Information juridique :
L’entreprise Ray Technologies GmbH se réserve le droit d’eectuer des modications con-
cernant leurs produits et ainsi de répondre au développement technique. Ces modications
ne seront pas nécessairement annoncées en tout cas spécique. Ce mode d’emploi et les in-
formations contenues dedans ont été établis avec le soin minutieux qui s’impose dans ce cas.
Laserworld (Switzerland) AG et sa liale Ray Technologies GmbH ne pourra pas être tenue
responsable pour d’éventuelles erreurs d’impression ou dommages en résultants.
En cas de doutes, veuillez toujours contacter Laserworld (Switzerland) AG . Les noms de
marques et de produits utilisés dans ce mode d’emploi sont des marques de fabrique ou des
marques déposées.
L’utilisation est réservée à un usage professionnel selon décret n°2007-665 du 2 mai
2007 relatif à la sécurité des appareils à laser sortant!
Article 4 bis :
« Les usages spéciques autorisés pour les appareils à laser sortant d’une classe supérieure à 2
sont les usages professionnels suivants :
(…)
9° Spectacle et achage :
Toutes les applications de trajectoire, de visualisation, de projection ou de reproduction
d’images en deux ou trois dimensions. »

Manual: RTI NEO ONE
page 3 / 48
Content:
1. Product and Package Contents
2. Preliminary Warning Notices
3. Initial Operations, Safety Instructions
4. Working on the Device
5. Service Notes
6. Warnings and other Notices on the Device
7. Device & Connections
8. Operation
9. Device Array Assembly
10. More Information / Tutorials
Final Statement
Technical Data Sheet
Laser Specications

Manual: RTI NEO ONE
page 4 / 48
1. Product and Package Contents
Please check if all listed parts are included and undamaged. Included in delivery:
1 x laser projector 1 x NEO ONE power cable 1 x manual
1 x data cable 1 x spring clamp connector
3. Initial Operations, Safety Instructions
1. Only use the RTI NEO ONE with the speci-
c RTI NEO ONE PSU.
2. Make sure that the device is not connec-
ted to mains during installation.
3. Installation has to be done by technical
experienced and qualied persons ac-
cording to safety regulations of the res-
pective country.
4. Always ensure that maximum permis-
sible exposure (MPE) is not exceeded
in areas accessible to the public or
members of sta.
5. In some countries an additional ins-
pection by technical control institutes
could be necessary.
6. Connect an easily accessible inter-
lock connector or circuit breaker
to the RTI NEO ONE PSU.
7. The power supply should be easily acces-
sible.
8. When installing the laser mount it with
a minimum distance of 15 cm from walls
and objects.
9. When connecting several RTI NEO ONE
devices to each other, make sure the
spring clamp connector is tightened.
10. Never load a connector with more than
100 kg!
11. For safe setup e.g. on walls or ceilings
please use a safety cord. The safety cord
should be able to withstand tenfold the
weight of the device. Please follow the
accident prevention regulations of pro-
fessional associations and/or comparable
regulations for accident prevention.
12. If the device has been exposed to great
temperature changes, do not switch it
on immediately. Condensation (or any
moisture/water formed) may damage
this device.
2. Preliminary Warning Notices
1. Please use this device only according to these operating instructions.
2. Do not use the device if there are any visible damages on housing, connector panels,
power supplies or power cords.
3. Never look directly into the light source of a laser projector. Danger of damage to the
eyes or even blindness in extreme circumstances!
4. Do not operate the device at high humidity or in the rain.
5. Protect device against dripping or splashing water. Do not place any liquid lled con-
tainers near to this device.
Any warranty claims are void if the warranty label is removed or tampered
with in any way.

Manual: RTI NEO ONE
page 5 / 48
13. Never use dimmer, RC or other electroni-
cally switched sockets. Whenever possib-
le, do not use the laser projector together
with large appliances (especially fog ma-
chines) on the same mains!
14. Ensure sucient ventilation and do not
place the device on any warm or heat ra-
diating surface. Especially the ventilati-
on openings must not be covered!
15. Ensure that device does not get over-
heated. Make sure that the device is not
exposed to spotlights (especially moving
heads). Heat of spotlights could overheat
laser in a little while and leads to a degra-
dation of performance.
5. Service Notes
• Moisture and heat can reduce lifetime of
the laser system dramatically and expires
any warranty claim.
• Quick on/o switching of this device will
reduce durability of the laser diode dra-
matically.
• Avoid sharp knocks and shocks to this
device and ensure sucient protection
during transportation. Look after your La-
serworld product.
• To increase durability of your laser,
protect device against overheating:
- Always ensure sucient ventilation.
- Do not face spotlights (especially mo-
ving heads) to the device.
- Check temperature after approx. 30
minutes with each new installation.
If necessary install the projector at a
place with dierent temperature.
- Keep the device dry. Protect it from
moisture, rain and damp.
- Switch o device when it is not nee-
ded. Diodes are switched on and can
wear out even if there is no visible la-
ser output.
• Removal of the warranty label as well
as damages to the device caused by
improper handling, neglect of the sa-
fety instructions and service notes will
void the warranty.
4. Working on the Device
1. This product has no user serviceable parts inside and should only
be maintained and serviced by a qualied engineer.
2. Be sure that the mains plug is not connected to the power
supply while installing the device.
3. Take o all reecting things like rings, watches etc. befo-
re starting to work with or at the projector.
4. Only use non-reecting tools to work on device.
5. Wear protective clothing (like goggles, gloves etc.) according to laser power
and wavelength of the laser.

Manual: RTI NEO ONE
page 6 / 48
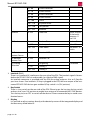
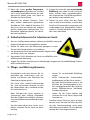
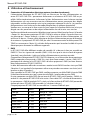
6. Warnings and other Notices on the Device
Laser radiation!
Avoid exposure
to beam
Laser class 4
Caution of
radiation if co-
ver is removed
Power supply
& consumption
Model type
Wavelength
Output power
Production year
Only for indoor use!
LASER RADIATION
AVOID EYE OR SKIN
EXPOSURE TO DIRECT OR
INDIRECT RADIATION
CLASS 4 LASER PRODUCT
DIN EN 60825-1: 2014
CAUTION OF RADIATION
IF COVER IS REMOVED
445nm - 655nm
3‘300 - 3‘600mW
320
RTI NEO ONE RGB
YEAR:
λ =
P =
VOLTAGE: 24V DC | Power: W
IEC protection (isolation) class 1 appliance
Ray Technologies GmbH, Mühlbachweg 2, 83626 Valley, Germany
Model:
Warning! Read user manual before use.
Operation by qualied personnel only.
Never point laser beam at people.
Never look directly into the beam.

Manual: RTI NEO ONE
page 7 / 48
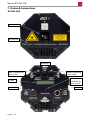
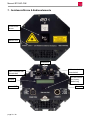
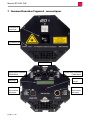
7. Device & Connections
Laser aperture
Ethernet IN
Power OUT
DMX & Interlock OUT
(Data Cable)
DMX & Interlock IN
(Data Cable)
Power IN
Display
Data entry
wheel for dis
-
play control
Emission LED
RTI NEO ONE

Manual: RTI NEO ONE
page 8 / 48
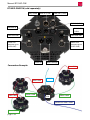
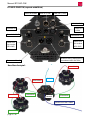
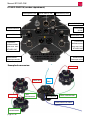
RTI NEO ONE PSU (sold separately)
Key switch
Power OUT
(connect up to
3 NEO ONE)
Data Cable OUT
Interlock IN
DMX IN (5 PIN) DMX OUT (5 PIN)
DMX IN (3 PIN)
DMX OUT
(3 PIN)
Power OUT
(connect up to
3 NEO ONE)
Data Cable OUT
Mains IN Mains through
Connection Example:
powerCON TRUE1 cable
Data Cable
Power Cable
DMX IN
Data Cable
Data Cable
Power Cable
Power Cable
PSU

Manual: RTI NEO ONE
page 9 / 48
8. Operation
1. Power Connection to the PSU (sold separately)
One RTI NEO ONE PSU is needed for up to six RTI NEO ONE devices. Make sure that the PSU is
provided with the correct voltage. Wrong voltage could lead to irreparable damages. Please
nd the correct voltage data in the synoptical table at the end of this manual. It must be en-
sured that the devices are not directed to people or ammable objects during installation.
Connect a power cable to ‚Power IN‘ at the RTI NEO ONE device and then either to the
left or to the right ‚Power through‘ at the PSU. After that connect the powerCON TRUE1
power cable to ‚Mains IN‘ at the PSU and then to the mains.
A second RTI NEO ONE can either be connected to the other side of the PSU or to ‚Power
through‘ of the rst device as illustrated in the connection example above. Each side of the
PSU can power up a maximum of three RTI NEO ONE show laser lights.
2. DMX
The device can be controlled via DMX. One RTI NEO ONE PSU ist needed for up to six
RTI NEO ONE devices (a maximum of three devices on each side). There are two
‚DMX IN‘ interfaces at the rear side of the PSU. One for DMX controllers with 5 pins
and one for DMX controllers with 3 pins. Only use one controller at the same time.
On the rear side of the NEO ONE there are a ‚DMX IN‘ (DMX input) and a ‚DMX OUT‘ (DMX
through) interface.
First connect ‚DMX IN‘ of the NEO ONE PSU via a DMX cable to a DMX controller. Then con-
nect ‚DMX IN‘ of the NEO ONE with a data cable to a ‚Data Cable OUT‘ of the NEO ONE PSU.
‚DMX through‘ at the PSU is intended to Daisy Chain the control signal with a DMX cable
to the ‚DMX IN‘ interface of a further DMX device. ‚DMX OUT‘ at the NEO ONE is intended
to Daisy Chain the control signal with another data cable to the ‚DMX IN‘ of a further NEO
ONE device.
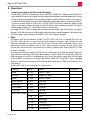
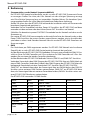
The RTI NEO ONE uses 13 channels as shown here:
Channel Value Eect Comment
1 Red 0 - 255 Red: 0 - 100%
2 Green 0 - 255 Green: 0 - 100%
3 Blue 0 - 255 Blue: 0 - 100 %
4 Pan Coarse 0 - 255 Pan MSB
5 Pan Fine 0 - 255 Pan LSB
6 Tilt Coarse 0 - 255 Tilt MSB
7 Tilt Fine 0 - 255 Tilt LSB
8 O / Dot / Gobo 0 Blackout Safety channel
1 - 10 Dot
11 - 20 Rectangle
21 - 30 Triangle
31 - 40 Line horizontal
41 - 50 Line vertical

Manual: RTI NEO ONE
page 10 / 48
51 - 60 2 dots horizontal
61 - 70 2 dots vertical
71 - 80 3 dots horizontal
81 - 90 3 dots vertical
91 - 100 Circle
101 - 110 4 quarter circle
111 - 120 Test picture
241 - 255 Blackout
9 Zoom 0 - 255 Gobo size active, if value
of channel 8
between 11
and 110
10 Strobe 0 Strobe o Strobe eect
1 - 127 Strobe speed 2Hz - 12Hz
128 - 255 Grow eect 256 points - 0
points
11 Rotation
pattern Coarse
0 - 255 Rotation MSB
12 Rotation
pattern Fine
0 - 255 Rotation LSB
13 Grating
Selection
0 No grating If available
1 - 127 Grating 1
128 - 255 Grating 2
3. Interlock (RJ45)
There is an ‚Interlock IN‘ interface on the rear side of the PSU. The Interlock signal is forwar-
ded to the RTI NEO ONE via a data cable (just like the DMX signal).
An interlock connector is provided with the PSU for testing purposes. Use an E-Stop for
your laser shows. If an Interlock / E-Stop is plugged in the PSU, the laser output of the con-
nected RTI NEO ONE devices gets enabled (if key switch is in ‚ON‘ position).
4. Key Switch
There is a key switch on the rear side of the PSU. Please insert the key into the key switch
and turn it to ‚Laser ON‘ position to enable laser output of all connected NEO ONE devices.
Turn the key to ‚Laser OFF‘ to switch o the devices. Please remove the key to avoid unau-
thorized access.
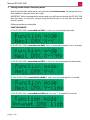
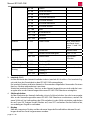
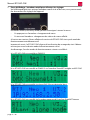
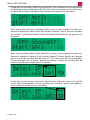
5. Display
It is possible to adjust settings directly at the device by means of the integrated display and
the data entry wheel below it:

Manual: RTI NEO ONE
page 11 / 48
The data entry wheel navigates you through the menu:
• By pressing the wheel you will change the menu.
• By turning the wheel you will change the values of the very menu.
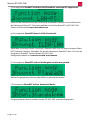
The starting display shows the version and the currently used function mode.
Please note: The RTI NEO ONE has a memory function and will always start with the last
used function mode.
One of the following modes is displayed at the beginning:
a) The RTI NEO ONE is controlled via DMX
b) The RTI NEO ONE is controlled via DMX over the built-in ShowNET
c) The RTI NEO ONE is controlled via network (display becomes blue)
d) The RTI NEO ONE runs in ShowNET stand-alone mode

Manual: RTI NEO ONE
page 12 / 48
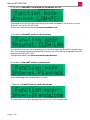
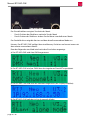
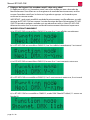
6. Settings at the device / data entry wheel
By pressing the data wheel once, you will enter the function menu. To change the func-
tion mode turn the data wheel left / right.
IMPORTANT: After changing the function mode, you will have to remove the RTI NEO ONE
from the mains to save your settings! Plug the device back in to start with the desired
function mode.
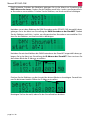
Following modes are selectable:
FUNCTION MODES
a) The RTI NEO ONE is controlled via DMX; X- and Y-axis are displayed normally
b) The RTI NEO ONE is controlled via DMX; X-axis is displayed normally, Y-axis is inverted
c) The RTI NEO ONE is controlled via DMX; X- and Y-axis are exchanged with each other
d) The RTI NEO ONE is controlled via DMX; X- and Y-axis are exchanged, X is inverted
e) The RTI NEO ONE is controlled via DMX and uses only 11 instead of 13 channels

Manual: RTI NEO ONE
page 13 / 48
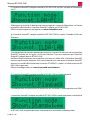
f) The built-in ShowNET is controlled via Showeditor on a PC
Download and install the latest version of Laserworld Showeditor. The license is on the
ShowNET card of the RTI NEO ONE.
Details and software download on www.showeditor.com
g) The built-in ShowNET works as ILDA interface
First connect your laser show controller via ILDA with an external ShowNET network inter-
face. Then connect the external ShowNET interface via LAN with the integrated ShowNET
interface of the RTI NEO ONE.
Conguration details on www.laserworld.com/shownet
h) The built-in ShowNET works as playback unit
Select and trigger the saved patterns via DMX.
i) The built-in ShowNET runs in stand-alone mode
The saved patterns will be displayed by the RTI NEO ONE automatically.

Manual: RTI NEO ONE
page 14 / 48
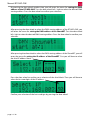
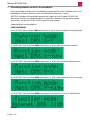
By pressing the data wheel another time, you will enter the menu for setting the DMX
address of the RTI NEO ONE. Turn the data wheel left / right to select the desired DMX
starting address. Press the data wheel to conrm your selection.
After pressing the data wheel to select the DMX starting address of the RTI NEO ONE, you
will enter the menu for setting the DMX address of the ShowNET. Turn the data wheel
left / right to select the desired DMX starting address. Press the data wheel to conrm your
selection.
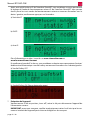
After pressing the data wheel to select the DMX starting address of the ShowNET, you will
enter the menu for setting the IP address of the ShowNET. First you will have to select
the third IP address block:
Press the data wheel to conrm your selection of the third block. Then you will have to
select the last two digits of the IP address:
Conrm your selection of the last two digits by pressing the data wheel.

Manual: RTI NEO ONE
page 15 / 48
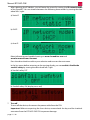
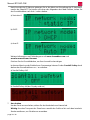
After selecting the IP address, you will enter the menu for setting the IP network mode
of the ShowNET. You can choose between the following three modes by turning the data
wheel left / right:
a) Static IP
b) DHCP
c) Auto IP
More information and troubleshooting on www.showeditor.com and
www.laserworld.com/shownet
Press the data wheel to conrm your selection and to enter the next menu.
In the last menu before returning to the starting display you can enable / disable the
scanfail safety by turning the data wheel left / right:
a) Scanfail safety OFF
b) Scanfail safety ON (display turns red)
7. Turn o
To turn o the device, disconnect the power cable from the PSU.
Important: Before transporting the laser device, remove both the key and the Interlock
connector from the RTI NEO ONE PSU to prevent damage.

Manual: RTI NEO ONE
page 16 / 48
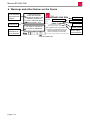
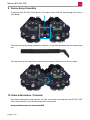
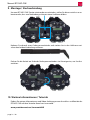
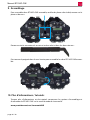
9. Device Array Assembly
To connect two RTI NEO ONE devices, rst place them with the connecting rails next to
each other:
Then take the spring clamp connector and put it in the hole between the two connecting
rails.
Turn the crank at the end of the spring clamp connector clockwise to screw it tight:
10. More Information / Tutorials
Find more information and tutorials on how to connect and operate the RTI NEO ONE
show laser device on the Youtube channel of Laserworld:
www.youtube.com/user/LaserworldAG

Manual: RTI NEO ONE
page 17 / 48
Final Statement
RTI products are tested and product packaging is inspected before leaving our warehouse.
Users must to follow the local safety regulations and warnings within this manual and adhere
to any regulations within its place of use. Damages through inappropriate use will void any
liability or warranty of our products.
Due to continual product developments, please check for the latest update of this product
manual at www.laserworld.com. If you do have any further questions, then please contact
your dealer/place of purchase or use our contact section on our website.
For service issues, please contact your dealer/place of purchase and ensure only genuine
Laserworld spare parts are used in any service repairs.
Errors and Omissions excepted and products are subject to change.
Laserworld (Switzerland) AG
Kreuzlingerstrasse 5
8574 Lengwil
Switzerland
Registered oce:
8574 Lengwil / Switzerland
Company number: CH-440.3.020.548-6
Commercial Registry Kanton Thurgau
CEO: Martin Werner
VAT no. (Switzerland): 683 180
UID (Switzerland): CHE-113.954.889
VAT no. (Germany): DE 258030001
WEEE-Reg.-No. (Germany): DE 90759352
www.laserworld.com
Representative according to EMVG:
Ray Technologies GmbH
Managing Director: Martin Werner
Mühlbachweg 2
83626 Valley / Germany

Manual: RTI NEO ONE
page 18 / 48
Inhaltverzeichnis:
1. Lieferumfang
2. Einleitende Warnhinweise
3. Schritte zur Inbetriebnahme, Sicherheitshinweise
4. Sicherheitshinweise für Arbeiten am Gerät
5. Pege- und Wartungshinweise
6. Warnhinweise und Spezikationen am Gerät
7. Geräteanschlüsse & Bedienelemente
8. Bedienung
9. Montage / Steckverbindung
10. Weitere Informationen / Tutorials
Abschließende Erklärung
Technische Daten
Leistungsdaten

Manual: RTI NEO ONE
page 19 / 48
1. Lieferumfang
Bitte den Lieferumfang zunächst auf Vollständigkeit und eventuelle Beschädigungen prüfen.
Im Lieferumfang enthalten sind:
1 x Laserprojektor 1 x NEO ONE Stromkabel 1 x Anleitung
1 x Datenkabel 1 x Federspannverbinder
3. Schritte zur Inbetriebnahme, Sicherheitshinweise
1. Das Gerät nur mit der separat angebote-
nen RTI NEO ONE PSU verwenden.
2. Stellen Sie sicher, dass das Gerät während
der Installation nicht mit dem Strom-
netz verbunden ist.
3. Der Laser darf nur von technisch versier-
tem Fachpersonal gemäss der im jewei-
ligen Land geltenden Sicherheitsbestim-
mungen installiert werden.
4. Die am Betriebsort geforderten Sicher-
heitsabstände zwischen Gerät und
Publikum, bzw. maximal zulässige Be-
strahlungswerte (MZB), müssen immer
eingehalten werden.
5. In bestimmten Ländern kann zusätzlich
eine Abnahme durch ein technisches
Überwachungsinstitut erforderlich sein.
6. Verbinden Sie einen leicht zugänglichen
Interlock-Stecker bzw. Notausschalter
mit der RTI NEO ONE PSU.
7. Die Stromversorgung zugänglich halten.
8. Halten Sie bei der Installation einen Min-
destabstand von 15 cm zur Wand und an-
deren Objekten ein.
9. Stellen Sie beim Verbinden mehrerer RTI
NEO ONE Geräte sicher, dass der Feder-
spannverbinder fest verschraubt ist.
10. Niemals die maximale Traglast eines Ver-
binders von 100 kg überschreiten!
11. Bei einer Festinstallation an Wand, Decke
o.ä., sichern Sie den Laser zusätzllich mit
einem Sicherheitsfangseil. Das Fang-
seil sollte mindestens dem 10-fachen
Gewicht des Geräts standhalten können.
Im Übrigen beachten Sie die Unfallverhü-
tungsvorschriften der Berufsgenossen-
schaften und/oder vergleichbare Rege-
lungen zur Unfallverhütung.
2. Einleitende Warnhinweise
1. Betreiben Sie das Gerät nur gemäß dieser Bedienungsanleitung.
2. Benutzen Sie das Gerät nicht, wenn sichtbare Beschädigungen am Gehäuse, den An-
schlussfeldern oder vor allem an den Stromversorgungsbuchsen oder -kabeln vorliegen.
3. Niemals direkt in den Strahl des austretenden Lasers blicken. Dies könnte zu irreparab-
len Schäden an den Augen und der Netzhaut führen. Erblindungsgefahr!
4. Gerät nicht bei hoher Luftfeuchtigkeit oder im Regen betreiben.
5. Vor Tropf-/Spritzwasser schützen, keine mit Flüssigkeit gefüllten Gefäße auf oder neben
dem Gerät abstellen.
Bei Entfernung oder Manipulation des Garantielabels erlischt jeglicher
Anspruch auf Gewährleistung!

Manual: RTI NEO ONE
page 20 / 48
12. Wenn das Gerät großen Temperatur-
schwankungen ausgesetzt war, schalten
Sie es nicht unmittelbar danach an. Kon-
denswasser (Nebel, Haze, usw.) kann zu
Schäden am Gerät führen.
13. Benutzen Sie niemals Dimmer-, Funk-
oder andere elektronisch gesteuerten
Steckdosen! Falls möglich benutzen Sie
den Laser nicht zusammen mit anderen
großen elektrischen Verbrauchern (ins-
besondere Nebelmaschinen) auf dersel-
ben Leitung/Phase!
14. Sorgen Sie immer für eine ausreichende
Belüftung und stellen Sie das Gerät auf
keine warmen oder wärmeabstrahlen-
den Untergründe. Die Belüftungsönun-
gen dürfen nicht verdeckt sein.
15. Stellen Sie auch sicher, dass das Gerät
nicht zu heiß wird und dass es nicht dem
Strahl von Scheinwerfern ausgesetzt wird
(insbesondere bei beweglichen Schein-
werfern!). Die Wärme dieser Strahler kann
den Laser überhitzen.
4. Sicherheitshinweise für Arbeiten am Gerät
1. Service- und Reparaturarbeiten sollten ausschließlich von quali-
ziertem Fachpersonal durchgeführt werden.
2. Stellen Sie sicher, dass der Netzstecker gezogen ist, wenn
Sie am Gerät hantieren bzw. es installieren.
3. Vor Arbeiten am Gerät alle reektierenden Gegenstände
wie Ringe, Uhren etc. ablegen.
4. Verwenden Sie für Arbeiten am Gerät ausschließlich nicht
reektierendes Werkzeug.
5. Tragen Sie auf die Laserstärke und -wellenlängen angepasste Schutzbekleidung (Schutz-
brille, Handschuhe, etc.).
5. Pege- und Wartungshinweise
• Feuchtigkeit und Hitze können die Le-
bensdauer des Lasersystems stark ver-
kürzen und führen zum Erlöschen des
Gewährleistungsanspruchs.
• Das Gerät nicht schnell hintereinander
Ein- und Ausstecken/-schalten, da dies
die Lebensdauer der Laserdiode erheb-
lich verkürzen kann!
• Beim Transport des Lasers jegliche Er-
schütterung oder Schläge vermeiden.
Bitte das Produkt bestmöglich schützen.
Laserworld bietet entsprechendes Equip-
ment an.
• Um die Lebensdauer Ihres Lasers zu er-
höhen, schützen Sie das Gerät vor Über-
hitzung:
- Immer für ausreichende Belüftung
sorgen.
- Keine Scheinwerfer (insbesondere
kopfbewegte) auf das Gerät richten.
- Bei jeder Neuinstallation nach ca. 30
Minuten die Gerätetemperatur prü-
fen und gegebenenfalls das Gerät an
einem kühleren/besser belüfteten
Standort platzieren.
- Halten Sie das Gerät trocken und
schützen Sie es vor Nässe, Regen und
Spritzwasser.
• Schalten Sie das Gerät aus, wenn es nicht
benutzt wird. Trennen Sie hierzu die PSU
von der Stromversorgung. Auch wenn
die Diode nicht leuchtet: Sie ist in Betrieb,
solange das Gerät angeschaltet ist.
La page est en cours de chargement...
La page est en cours de chargement...
La page est en cours de chargement...
La page est en cours de chargement...
La page est en cours de chargement...
La page est en cours de chargement...
La page est en cours de chargement...
La page est en cours de chargement...
La page est en cours de chargement...
La page est en cours de chargement...
La page est en cours de chargement...
La page est en cours de chargement...
La page est en cours de chargement...
La page est en cours de chargement...
La page est en cours de chargement...
La page est en cours de chargement...
La page est en cours de chargement...
La page est en cours de chargement...
La page est en cours de chargement...
La page est en cours de chargement...
La page est en cours de chargement...
La page est en cours de chargement...
La page est en cours de chargement...
La page est en cours de chargement...
La page est en cours de chargement...
La page est en cours de chargement...
La page est en cours de chargement...
La page est en cours de chargement...
-
 1
1
-
 2
2
-
 3
3
-
 4
4
-
 5
5
-
 6
6
-
 7
7
-
 8
8
-
 9
9
-
 10
10
-
 11
11
-
 12
12
-
 13
13
-
 14
14
-
 15
15
-
 16
16
-
 17
17
-
 18
18
-
 19
19
-
 20
20
-
 21
21
-
 22
22
-
 23
23
-
 24
24
-
 25
25
-
 26
26
-
 27
27
-
 28
28
-
 29
29
-
 30
30
-
 31
31
-
 32
32
-
 33
33
-
 34
34
-
 35
35
-
 36
36
-
 37
37
-
 38
38
-
 39
39
-
 40
40
-
 41
41
-
 42
42
-
 43
43
-
 44
44
-
 45
45
-
 46
46
-
 47
47
-
 48
48


RTI NEO ONE Manuel utilisateur
- Catégorie
- Projecteurs
- Taper
- Manuel utilisateur
dans d''autres langues
- English: RTI NEO ONE User manual
- Deutsch: RTI NEO ONE Benutzerhandbuch
Autres documents
-
Laserworld BeamBar Series Manuel utilisateur
-
Cameo LEYA 3000 RGB Manuel utilisateur
-
HQ Power KRYSTAL RGY260 spécification
-
-
 Laserworld CS-500RGB Le manuel du propriétaire
-
 Ibiza Light SCAN500RGB Le manuel du propriétaire
-
Ibiza Light SCAN500RGB Le manuel du propriétaire
-
Renkforce laser;;001RGMSplash-proof Le manuel du propriétaire
-
Laserworld EL-230RGB Le manuel du propriétaire
-
Evolite Infinium 10 000 RGB Manuel utilisateur

