Krups KM730 Manuel utilisateur
- Catégorie
- Cafetières
- Taper
- Manuel utilisateur
Ce manuel convient également à

www.krups.com
EN
FR
ES
www.krups.com
NC00116597
English . . . . . . . . . . . . . . . . . . p. 4
Français . . . . . . . . . . . . . . . . . p. 14
Español . . . . . . . . . . . . . . . . . p. 25
KM730
Réalisation : Espace Graphique
b
a
d
c
e
f
g
h
i
j
q
o n m l k
p
KR_CAFETIERE_KM730_NC00116597_Mise en page 1 06/11/12 11:59 PageC1

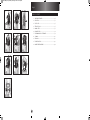
fig. 4
fig. 6
fig. 1 fig. 2
fig. 7
fig. 10
fig. 3
fig. 5
fig. 8 fig. 9
TABLE OF CONTENTS
1. IMPORTANT SAFEGUARDS ........................................................................................p. 5
2. DESCRIPTION..................................................................................................................p. 7
3. PRIOR TO USE .................................................................................................................p. 7
4. SETTING THE CLOCK ...................................................................................................p. 7
5. MAKING COFFEE............................................................................................................p. 7
6. AROMA SELECTION ......................................................................................................p. 9
7. PROGRAMMING YOUR COFFEE MAKER .............................................................p. 9
8. CLEANING .........................................................................................................................p. 10
9. DESCALING ......................................................................................................................p. 10
10. TROUBLESHOOTING ...................................................................................................p. 11
11. MANUFACTURER’S WARRANTY...............................................................................p. 12
English
4
KR_CAFETIERE_KM730_NC00116597_Mise en page 1 06/11/12 11:59 PageC4

5
English
1. IMPORTANT SAFEGUARDS
When using electrical appliances, basic safety precautions should always be
followed to reduce the risk of fire, electric shock, and/or injury to persons
including the following :
1. Read all instructions prior to first use.
2. Do not touch hot surfaces. Do not touch the heating plate or bottom of
the carafe when the keep warm function is on. Use handles or knobs.
3. To protect against fire, electric shock and injury to persons, do not
immerse cord, plugs or machine in water or other liquid.
4. Not intented for use by children.
5. Close supervision is necessary when any machine is used near children.
Keep machine out of reach of children.
6. This appliance is not designed to be used by children or people without
knowledge or experience with the product, unless they are supervised
or given prior instructions concerning the use of the appliance by
someone responsible for their safety.
7. Children must be supervised to ensure that they do not play with the
appliance.
8. Burns can occur from touching hot plate, hot water or steam. Exercise
caution.
9. Unplug machine from outlet when not in use and when cleaning. Allow
to cool before putting on or taking off parts, before cleaning the machine,
and before storing.
10. All machines are subject to stringent quality control. Practical tests using
machines taken at random are conducted and this may explain any slight
marks or coffee residue prior to use.
11. Do not operate any machine with a damaged cord or plug or after the
machine malfunctions, or has been damaged in any manner. Return
machine to the nearest Krups Service Center for examination, repair or
adjustment or your respective countries Consumer Service Department.
12. To reduce the risk of injury do not drape cord over the counter top or
table top where it can be pulled on by children or tripped over
accidentally.
13. Do not let cord hang over edge of table or counter, or touch hot surfaces.
14. The use of accessory attachments not recommended by Krups may
result in fire, electric shock or injury to persons.
15. Do not use outdoors.
16. Do not place on or near hot gas or electric burner, or in a heated oven.
17. To disconnect the machine, turn the control to “off” then remove plug
from wall outlet. Do not yank cord, instead grasp plug and pull to
disconnect.
KR_CAFETIERE_KM730_NC00116597_Mise en page 1 06/11/12 12:00 Page5

18. Do not use the machine for other than intended use.
19. Do not pour liquids other than water and descaling solutions specified
in this manual into the water tank.
20. Protect the machine against humidity and freezing.
21. This machine is for household use only.
22. The container is designed for use with this appliance. It must never be
used on a range top.
23. Do not set a hot container on a wet or cold surface.
24. Do not use a cracked container or a container having a loose or
weakened handle.
25. Do not clean container with cleansers, steel wool pads, or other abrasive
material.
SAVE THESE INSTRUCTIONS
CAUTION
This machine is intended for household use only. Any servicing other than cleaning and
user maintenance should be performed by the nearest authorized Krups Service Center.
Visit our website at www.krupsusa.com in the USA or www.krups.ca in Canada or
contact your respective country's Consumer Service department for the service center
nearest to you.
To reduce the risk of fire or electric shock, do not attempt to disassemble the machine.
Repair should be done by an authorized Krups Service Center only.
SHORT CORD INSTRUCTIONS
A.We do not recommend using an extension cord with this device. A short power
cord or a detachable power cord is provided to reduce the risk of becoming
entangled in or tripping over a longer cord accidentally.
B.If an extension cord is absolutely necessary,
1) the marked electrical rating of the extension cord should be at least as great
as the electrical rating of the machine,
2) the longer cord should be arranged so that it will not drape over the counter
top or table top where it can be pulled on by children or tripped over.
C.This machine has a polarized plug (one blade is wider than the other). To reduce
the risk of electric shock, this plug is intended to fit into a polarized outlet only
one way. If the plug does not fit fully into the outlet, reverse the plug. If it still
does not fit, contact a qualified electrician. Do not attempt to modify the plug in
any way.
In the interest of improving products, Krups reserves the right to change specifications
without prior notice.
English
6
KR_CAFETIERE_KM730_NC00116597_Mise en page 1 06/11/12 12:00 Page6

English
7
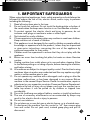
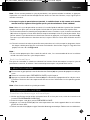
2. DESCRIPTION
3. PRIOR TO USE
n Operate your coffee maker for the first time without coffee using 1 liter of water to rinse the circuit.
IMPORTANT: Use only cold water. The automatic brewing system has been
designed to work only with cold water.
4. SETTING THE CLOCK
There are two ways to set the clock on your coffee maker.
1- When you initially plug in the coffee maker, the unit will beep and “12:00” will flash on the LCD display
for a few seconds. Press immediately the h/min button (o) to set the current hour. If “12:00” starts to
flash, press the PROG button (n) for a few seconds until the “12:00” flashes again. Then press the
h/min button (o) to set the current hour. There are AM and PM indicators on the top right side of the
LCD screen. To set the current minutes, press the PROG button (n) and then press the h/min button
(o) until the correct minutes appear on the LCD display. After 5 seconds, the unit will beep and the
time will stop flashing.
2- At any other time, you can set the clock or change the set time by pressing and holding the h/min button
(o). The unit will beep and “12:00” will flash on the LCD display. Use the h/min button (o) to set the
current hour. There are AM and PM indicators on the top right side of the LCD screen.
To set the current minutes, press the PROG button (n) and then press the h/min button (o) until the
correct minutes appear on the LCD display. After 5 seconds, the unit will beep and the time will stop
flashing.
Notes: Your clock has now been set and will continue to keep the correct time, even after the coffee
maker has been shut off.
Unplugging the coffee maker or a power failure will reset the clock to 12:00 AM. Repeat the instructions
above to reset the clock.
5. MAKING COFFEE
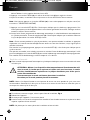
1- Open the coffee maker lid (b).
2- Place the coffee maker on a hard, flat surface. With the coffeemaker turned off, plug into a 120V outlet.
3- Fill the carafe with fresh, cold water (preferably bottled or filtered water). Open the hinged cover and
pour the water into the water tank Fig. 1 and 2. The number of cups is shown by the water level
indicator Fig. 3. Do not exceed the 12 cup level.
a Main body
b Top lid
c Water tank
d Water level indicator
e Carafe lid
f Carafe handle
g Carafe
h Heating plate
i Filter holder
j Permanent filter
k On/Off button with blue LED
l Auto On brewing selection button with blue LED
m Aroma coffee selection button with blue LED
n Programming button with blue LED
o h/min button with blue LED
p Display
q Spoon
KR_CAFETIERE_KM730_NC00116597_Mise en page 1 06/11/12 12:00 Page7

Notes:
- Use only cold water. The automatic brewing system has been designed to work only with cold water.
-
There are overflowing holes on the back of the water tank to prevent exceeding the capacity of the coffee
maker. If you add too much water, it will leak out from the back of the unit.
- The amount of brewed coffee will be less than the water poured in the watertank since about 10% is
absorbed by the coffee grounds and the filter.
4- Place the carafe with its lid on to the heating plate (h) making sure it is fully seated on the heating plate
to activate the pouring mechanism.
CAUTION: To avoid filter basket overflow, the carafe must fit securely into the
coffeemaker with the lid on. If not properly positioned on the heating plate, it could
cause hot water or hot coffee to overflow.
5- Open the coffee maker lid (b), insert the filter holder (i). Make sure it is securely pushed down and
locked. Then insert a standard #4 cone paper filter or the permanent filter (j) into the filter holder (i).
Use a fresh paper filter or clean the permanent filter for each carafe of coffee Fig. 4 and 5.
6- Add about 2 ounces of ground coffee for 12 cups. Do not exceed the 12 cup level Fig. 6.
7- Close the top lid making sure it is securely closed Fig. 7.
8- Press the On/Off button (k). The button will illuminate, indicating that your coffee maker has begun the
brewing cycle.
CAUTION: The coffee maker becomes very hot during the brew cycle. Please handle
with care.
Note: at any time during the brewing cycle, you can turn the coffee maker off by simply pressing the
On/Off button (k). No buttons will be illuminated, indicating that the coffee maker is off.
9- When the brewing cycle is completed, the coffee maker will beep and the On/Off button
(k) will blink. This indicates that the keep warm cycle has started.
Notes: When the brewing cycle is finished, there will still be hot liquid in the filter basket. Wait a few
minutes for the rest of the liquid to drip through into the carafe before removing the basket.
- The keep warm function will operate up to two hours. During the keep warm cycle, the On/Off button (k)
will keep flashing and the LCD display will count up the time since brewing completed. At any time you
can stop the keep warm cycle just by pressing the On/Off button (k). When the keep warm cycle is done
the LED will switch off and the LCD will display the clock again.
10- Open the top lid and carefully remove the filter holder by grasping the tab on each side of the filter
holder, and lifting straight up from the filter holder. Discard the used coffee filter (if using a paper filter)
and grounds Fig. 8 and 9.
Note:
- If two or more pots of coffee are to be made it is recommended to let the coffee maker cool down for 10
minutes between each brewed pot.
Auto Shut-Off
As a convenience, your coffee maker has been designed with an Auto Shut-Off feature. When the brewing
cycle is completed, the coffee maker will shut off automatically after 2 hours.
English
8
KR_CAFETIERE_KM730_NC00116597_Mise en page 1 06/11/12 12:00 Page8

English
9
6. AROMA SELECTION
n
To ensure optimum flavor, the Aroma coffee selection button (m) allows you to prepare a stronger coffee.
n Follow the directions for MAKING COFFEE until step 6.
n Press Aroma coffee selection button (m) to select a stronger strength of brew. The button will illuminate
and a black cup icon appears on the left top corner.
Fig. 10.
Note: This function will slow down the brewing cycle.
7. PROGRAMMING YOUR COFFEE MAKER
Auto on setting
1- Check to ensure digital clock is set to correct time. If the time is incorrect, follow the instructions in the
“Setting the Clock” section.
2- Follow steps 1 through 6 in the “Making Coffee” section.
3- Press the PROG button (n). A bell icon appears on the left bottom corner of the LCD.
4- Use the h/min button (o) to set the desired start brewing time in hours. Refer to the AM and PM
indicators on the top right side of the LCD display.
5- Press the PROG button (n) and then use the h/min button (o) to set the desired start brewing time in
minutes.
6- After 5 seconds, the coffee maker will beep and the LCD display will show the current time.
Note: You can press the AROMA button (m) if you want to prepare a stronger coffee (refers to 5- AROMA
SELECTION)
7- Press the AUTO button (l). Its led will illuminate to indicate that the coffee maker is programmed. A
clock icon appears on the right bottom corner of the LCD. The digital clock will continue to show the
current time.
8- Once the preset brew time is reached, the coffee maker will automatically initiate the brew cycle. The
On/Off button (k) will illuminate, indicating that your coffee maker has begun the brewing cycle. The
AUTO button (l) switches off.
Note: At any time during the brewing cycle, you can turn the coffee maker off or cancel a brewing cycle,
by simply pressing the On/Off button (k). No button will be illuminated, indicating that the coffee maker
is off.
To cancel a preset brewing cycle, press the AUTO button (l) - the preset brew cycle is cancelled when
the AUTO button (l) is no longer illuminated.
For your convenience, your coffee maker will remember your preset brewing time. Simply press the AUTO
button (l) to activate the preset brewing cycle. To change the preset brewing time, follow steps 3 through
7 above.
Pause & serve
n This feature allows you to interrupt the brewing cycle and pour a cup of coffee before the end of the
brewing cycle.
KR_CAFETIERE_KM730_NC00116597_Mise en page 1 06/11/12 12:00 Page9

CAUTION: While this will temporarily stop the coffee from dripping into the carafe,
it does not stop the brewing cycle. After serving, the carafe should be immediately
returned to the heating plate to prevent the filter basket from overflowing.
Make sure the carafe is positioned firmly against the back of the coffee maker.
Do not remove the carafe for longer than 30 seconds.
NOTE: While the pause and serve is a convenient way to pour a cup of coffee mid-cycle, we recommend
you wait until the completion of the brew cycle as the strength and flavor of coffee poured mid-cycle will
vary from the finished brew.
8. CLEANING
n To remove the used coffee grounds, remove the filter holder from the coffeemaker. Fig 8.
n Unplug the appliance.
n Do not clean the appliance when it is still hot.
n Carafe, carafe lid and removable filter holder can go on the top shelf of the diswasher.
NOTE: Do not place any other part of the coffee maker in the dishwasher.
n Clean with a soft cloth or a damp sponge. Never use harsh detergents or abrasive cleaners on any part
of the coffee maker.
n To clean the stainless steel parts of your coffee maker, rinse a soft cloth or sponge in warm water and
squeeze out excess water. Wipe the surface of the stainless steel in the direction of the brush marks.
Dry thoroughly and polish with a soft dry cloth.
n For hard to remove stains, use a plastic mesh pad or cloth damped in vinegar.
n Do not immerse the appliance in water or place it under running water.
9. DESCALING
n Calcium build-up frequently occurs in drip coffeemakers. This build-up is normal and is caused by
minerals commonly found in drinking water. Periodically, your coffeemaker will need cleaning to remove
calcium or mineral deposits that may form.You will know when your unit will need descaling when you
notice an obvious slow down in brewing time.
n We recommend descaling your unit with a solution of white vinegar and cold water or a suitable
descaling agent. A solution of two tablespoons of white vinegar to one carafe of cold water works best.
Pour this solution into the water tank, and follow your normal operating instructions, without a filter in
the filter basket.
n When the brew cycle is finished, empty the carafe and rinse with water. Refill the water reservoir with
cold water only and repeat the brew cycle with water only, twice more. This will rinse out any remaining
vinegar solution.
- We strongly recommend decalcifying your coffee maker any time the brewing time slows down or when
you begin to notice excessive steaming. The frequency of decalcifying will depend on the hardness of
your water. We suggest decalcifying approximately every 80 brew cycles if you have soft water or every
40 brew cycles if you have hard water.
English
10
KR_CAFETIERE_KM730_NC00116597_Mise en page 1 06/11/12 12:00 Page10

English
11
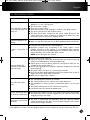
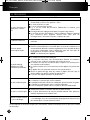
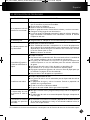
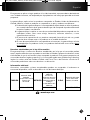
10. TROUBLESHOOTING
PROBLEM SOLUTION
The coffee does not brew
or the machine does not
switch on.
n
Check to ensure the appliance is plugged into a working outlet, and the
appliance is in the
“
ON
”
position.
n
The water tank is empty.
n
There was a power failure.
n
There was a power surge. Unplug the machine, then plug it back in.
n
The clock must be reset after a power failure.
n
The Auto-Off function switches off the coffee maker. Switch off the
coffee maker then switch it back on to make more coffee. For more
information, refer to the section
“
Making coffee
”
.
Appliance appears to be
leaking.
n Make sure that the water tank has not been filled beyond the max fill level.
It takes a long time to
brew.
n It may be time to descale your coffee dispenser.
n Numerous minerals may accumulate in the coffee maker’s circuit.
Periodic descaling of the machine is recommended. More frequent
descaling may be necessary depending on the hardness of the water. For
more information, refer to the “Descaling” section.
NOTE: do not dismantle the machine.
The brew basket (j)
overflows or the coffee
drips too slowly.
n
Coffee maker needs cleaning.
n
Excessive amount of coffee. We recommend that you use one measuring
spoon or one tablespoon of coffee ground per cup.
n
Coffee grind is too fine (beans ground for an Espresso maker are not
suitable for drip coffee makers).
n
Some coffee grounds have seeped in between the paper filter and the
brew basket (j).
n
The paper filter is not open or is incorrectly positioned.
n
Rinse out the brew basket (j) before putting in the paper filter so that its
edges stick to the damp sides of the filter.
n More than one paper filter in basket.
The coffee has a bad
taste.
n The coffee dispenser needs to be cleaned.
n The coffee grounds are not suited to your coffee dispenser.
n The proportion of coffee to water is inadequate. Adjust it to suit your
taste.
n The quality and freshness of the coffee are not optimal.
n Poor-quality water. Use filtered or bottled water.
Coffee dispensing does
not work (no coffee flow).
n Check the front window to ensure some coffee remains in the coffee tank
(i)
.
n The dispensing system may be clogged. You can clean the water tank
simply by rinsing it with water.
The timer is not accurate
(delayed).
n The timer is synchronized and dependent from your electrical network,
should you notice any clock delay, we recommend setting the clock at least
once a week to keep it accurate.
If your appliance still does not work properly, please call your respective country’s Consumer Service.
KR_CAFETIERE_KM730_NC00116597_Mise en page 1 06/11/12 12:00 Page11

11. MANUFACTURER’S WARRANTY
: www.krups.com
With a strong commitment to the environment, most of Krups products are
repairable during and after the warranty period. Before returning any defective
products to the point of purchase, please call Krups consumer service directly
at the phone number below for repair options.
Your help to sustain the environment is appreciated!
After sales service
The appliance isn't user-serviceable. If it's not working properly, check that:
- You've followed the instructions correctly;
- The main supply fuse/circuit breaker hasn't blown/tripped.
If it still doesn't work, consult your retailer.
The Warranty
This product is guaranteed by Krups for a period of 2 years against any manufacturing defect in
materials or workmanship, starting from the initial date of purchase.
The manufacturer's warranty by Krups is an extra benefit which does not affect consumer's
Statutory Rights.
The Krups warranty covers all costs related to restoring the proven defective product so that it
conforms to its original specifications, through the repair or replacement of any defective part
and the necessary labor. At Krups’s choice, a replacement product may be provided instead of
repairing a defective product. Krups’s sole obligation and your exclusive resolution under this
warranty are limited to such repair or replacement.
Conditions & Exclusions
The Krups warranty only applies within USA, Canada & Mexico, and is valid only on presentation
of a proof of purchase. The product can be taken directly in person to an authorized
service centre or must be adequately packaged and returned, by recorded delivery (or equivalent
method of postage), to a Krups authorized service centre. Full address details for each country’s
authorized service centre are listed on the Krups website (www.krups.com
) or by calling the
appropriate telephone number listed below to request the appropriate postal address.
Krups shall not be obliged to repair or replace any product which is not accompanied by a valid
proof of purchase.
This warranty will not cover any damage which could occur as a result of misuse, negligence,
failure to follow Krups instructions, use on current or voltage other than as stamped on the
product, or a modification or unauthorized repair of the product. It also does not cover normal
tear and wear, maintenance or replacement of consumable parts, and the following:
-using the wrong type of water
-scaling (any de-scaling must be carried out according to the instructions for use);
-ingress of water, dust or insects into the product;
English
12
KR_CAFETIERE_KM730_NC00116597_Mise en page 1 06/11/12 12:00 Page12

English
13
-mechanical damages, overloading
-damages or bad results due to wrong voltage or frequency
-accidents including fire, flood, lightning, etc
-professional or commercial use
-damage to any glass or porcelain ware in the product
This warranty does not apply to any product that has been tampered with, or to damages incurred
through improper use and care, faulty packaging by the owner or mishandling by any carrier.
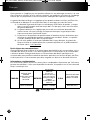
The Krups manufacturer's warranty applies only for products purchased and used in USA, Canada
& Mexico. Where a product purchased in one country and then used in another one:
a) The Krups guarantee duration is the one in the country of usage of the product, even if
the product was purchased in another listed country with different guarantee duration.
b) The Krups guarantee does not apply in case of non conformity of the purchased product
with the local standards, such as voltage, frequency, power plugs, or other local technical
specifications
c) The repair process for products purchased outside the country of use may require a
longer time if the product is not locally sold by Krups
d) In cases where the product is not repairable in the new country, the Krups guarantee is
limited to a replacement by a similar product or an alternative product at similar cost,
where possible
.
Consumer Statutory Rights
This Krups manufacturer's warranty does not affect the statutory rights a consumer may have or
those rights that cannot be excluded or limited, nor rights against the retailer from which the
consumer purchased the product. This warranty gives a consumer specific legal rights, and the
consumer may also have other legal rights which vary from State to State or Country to Country
or Province to Province. The consumer may assert any such rights at his sole discretion.
Additional information
Accessories, Consumables and end-user replaceable parts can be purchased, if locally available,
as described in Krups internet site.
: www.krups.com
CANADA
GROUPE SEB
CANADA
345 Passmore Avenue
Toronto, ON
M1V 3N8
MEXICO
Groupe SEB
MEXICO
S.A. de C.V.
Goldsmith 38 Desp.
401 Col. Polanco
Delegacion Miguel
Hildalgo
11 560 Mexico D.F.
MEXICO
U.S.A.
GROUPE SEB USA
2121 Eden Road
Millville, NJ 08332
1-800-418-3325 01800 1128325 800-526-5377
KR_CAFETIERE_KM730_NC00116597_Mise en page 1 06/11/12 12:00 Page13

Français
14
TABLE DES MATIÈRES
1. MISES EN GARDE IMPORTANTES ...........................................................................p. 15
2. DESCRIPTION..................................................................................................................p. 17
3. AVANT LA PREMIÈRE UTILISATION ..........................................................................p. 17
4. PROGRAMMER L’HORLOGE .....................................................................................p. 17
5. PRÉPARER DU CAFÉ .....................................................................................................p. 18
6. SÉLECTION D’ARÔME...................................................................................................p. 19
7. PROGRAMMER LA CAFETIÈRE .................................................................................p. 19
8. NETTOYAGE ......................................................................................................................p. 20
9. DÉTARTRAGE....................................................................................................................p. 21
10. DÉPANNAGE.....................................................................................................................p. 22
11. GARANTIE DU FABRICANT..........................................................................................p. 23
KR_CAFETIERE_KM730_NC00116597_Mise en page 1 06/11/12 12:00 Page14

Français
15
1. MISES EN GARDE IMPORTANTES
Lorsque vous utilisez un appareil électrique, afin de réduire les risques
d’incendie, de choc électrique et de blessure, des consignes de sécurité
élémentaires doivent toujours être observées et en particulier les
suivantes :
1. Lire le mode d’emploi en entier avant la première utilisation.
2. Ne pas toucher les surfaces chaudes. Ne pas toucher la plaque
chauffante ou le dessous de la carafe lorsque la fonction maintien au
chaud est activée. Utiliser les poignées ou les boutons.
3. Pour se protéger des incendies, des chocs électriques et des blessures,
ne pas immerger le cordon d’alimentation, les prises de courant ou la
machine dans l’eau ni dans tout autre liquide.
4. Cet appareil n’est pas conçu pour être utilisé par des enfants.
5. Une surveillance étroite est nécessaire lorsque l’appareil électrique est
utilisé à proximité des enfants. Garder hors de la portée des enfants.
6. Cet appareil n’est pas prévu pour être utilisé par des personnes (y
compris les enfants) dénuées d’expérience ou de connaissance, sauf
si elles ont pu bénéficier, par l’intermédiaire d’une personne responsable
de leur sécurité, d’une surveillance ou d’instructions préalables
concernant l’utilisation de l’appareil.
7. Il convient de surveiller les enfants pour s’assurer qu’ils ne jouent pas
avec l’appareil.
8. Tout contact avec les surfaces chaudes, l’eau chaude ou la vapeur peut
causer des brûlures. Faire preuve de prudence.
9. Débrancher l’appareil de la prise murale immédiatement après usage
et avant de le nettoyer. Laisser l’appareil refroidir avant d’installer ou
d’enlever les accessoires et avant de le nettoyer ou de le ranger.
10. Tous les appareils sont soumis à des contrôles rigoureux de la qualité.
Des tests pratiques sont effectués sur des appareils sélectionnés au
hasard, ce qui peut expliquer des petites marques ou des résidus de
café dans l’appareil avant sa première utilisation.
11. Ne pas utiliser un appareil électrique avec un cordon d’alimentation ou
une prise endommagé, quand l’appareil fonctionne mal, ou s’il a été
endommagé de quelque manière que ce soit. Retourner tout appareil
défectueux au centre de service Krups le plus près afin qu’il soit
examiné, ajusté ou réparé.
12. Pour diminuer les risques de blessures, ne pas laisser le cordon pendre
de la table ou du comptoir, où il pourrait être tiré par un enfant ou faire
trébucher quelqu’un.
KR_CAFETIERE_KM730_NC00116597_Mise en page 1 06/11/12 12:00 Page15

13. Le cordon ne doit pas pendre de la table ou du comptoir, ni entrer en
contact avec des surfaces chaudes.
14. L’utilisation d’accessoires non recommandés par Krups peut causer des
incendies, des chocs électriques ou des blessures.
15. Ne pas utiliser à l’extérieur.
16. Ne pas placer sur ou près d’un brûleur à gaz, d’une plaque électrique
ou dans un four chaud.
17. Toujours commencer par brancher le câble à l’appareil, puis le raccorder
à la prise murale. Pour débrancher l’appareil, mettre le bouton de
commande en position « off » (arrêt), puis retirer la fiche de la prise
murale. Ne jamais tirer sur le câble mais saisir la fiche et la tirer pour
débrancher.
18. Utiliser cet appareil uniquement pour l’usage auquel il est destiné.
19. Ne pas verser des liquides autres que de l’eau et la solution de
détartrage précisée dans ce manuel dans le réservoir d’eau.
20. Protéger l’appareil de l’humidité et du gel.
21. Pour usage domestique seulement.
22. Le contenant est conçu pour être utilisé avec cet appareil. Il ne doit
jamais être utilisé sur une cuisinière.
23. Ne pas placer un contenant chaud sur une surface humide ou froide.
24. Ne pas utiliser un contenant fêlé ou dont la poignée est lâche ou
affaiblie.
25. Ne pas nettoyer le contenant avec des nettoyants abrasifs, des tampons
abrasif ou tout autre matériel abrasif.
CONSERVER CES INSTRUCTIONS
ATTENTION
Cet appareil est conçu pour une utilisation domestique seulement. Tout entretien autre
que le nettoyage et l’entretien normal de l’appareil par son propriétaire doit être effectué
par le personnel d’un centre de service agréé Krups uniquement. Visiter notre site Web
www.krups.ca au Canada ou communiquer avec le service à la clientèle pour le centre
de service le plus près de chez vous.
Afin de réduire les risques d’incendie et de choc électrique, ne pas démonter la base
de l’appareil. Toute réparation doit être effectuée par le personnel d’un centre de service
agréé Krups uniquement.
INSTRUCTIONS POUR UN CORDON
D’ALIMENTATION COURT
A.Nous déconseillons d’utiliser une rallonge avec cet appareil. Un câble
d’alimentation court est fourni avec l’appareil pour éviter qu’il ne s’emmêle et
réduire les risques de trébucher sur un cordon plus long.
Français
16
KR_CAFETIERE_KM730_NC00116597_Mise en page 1 06/11/12 12:00 Page16

Français
17
B.Si une rallonge est absolument nécessaire :
1) la capacité électrique indiquée sur la rallonge doit être au moins égale à celle
de la machine;
2) la rallonge ne doit pas pendre du plan de travail ou de la table de sorte que
les enfants ne puissent pas tirer dessus ou trébucher.
C.Cet appareil est doté d’une fiche polarisée (une lame est plus large que l’autre).
Pour diminuer le risque de choc électrique, cette fiche ne peut être branchée
dans la prise que d’une seule façon. Si elle ne rentre pas complètement dans la
prise, la retourner. Si elle ne rentre toujours pas, communiquer avec un électricien
qualifié. Ne modifier en aucun cas la prise.
Dans le but d’améliorer ses produits, Krups se réserve le droit de modifier les
spécifications sans avis préalable.
2. DESCRIPTION
3. AVANT LA PREMIÈRE UTILISATION
n Faites fonctionner votre cafetière sans café en utilisant 1 litre d’eau pour rincer le circuit.
IMPORTANT : Utilisez uniquement de l’eau froide. Le système de percolation
automatique a été conçu pour fonctionner seulement avec de l’eau froide.
4. PROGRAMMER L’HORLOGE
Il y a deux façons de programmer l’horloge de votre cafetière.
1- Lorsque vous branchez la cafetière pour la première fois, l’appareil émet 2 bips sonores et « 12 :00 »
s’affiche et clignote à l’écran ACL pendant quelques secondes. Appuyez immédiatement sur la touche
« h/min » (o) pour programmer l’heure. Si « 12 :00 » clignote, appuyez sur la touche « PROG » (n)
quelques secondes jusqu’à ce que « 12 :00 » clignote à nouveau. Ensuite, appuyez sur la touche
« h/min » (o) pour programmer l’heure. Les indications AM et PM s’affichent dans le coin supérieur droit
de l’écran ACL. Pour programmer les minutes, appuyez sur la touche « PROG » (n) puis appuyez de
nouveau sur la touche « h/min » (o) jusqu’à ce que l’heure soit réglée. Après 5 secondes, l’appareil
émet un bip et l’heure cesse de clignoter.
a Corps de l’appareil
b Couvercle
c Réservoir d’eau
d Indicateur de niveau d’eau
e Couvercle de la carafe
f Poignée de la carafe
g Carafe
h Plaque chauffante
i Porte-filtre
j Filtre permanent
k Touche marche/arrêt avec voyant ACL bleu
l Touche de sélection de démarrage automatique
avec voyant ACL bleu
m Touche de sélection d’arôme avec voyant ACL bleu
n Touche de programmation avec voyant ACL bleu
o Touche heures/minutes avec voyant ACL bleu
p Affichage
q Cuillère
KR_CAFETIERE_KM730_NC00116597_Mise en page 1 06/11/12 12:00 Page17

2- Vous pouvez aussi programmer ou modifier l’heure à tout autre moment en appuyant et maintenant la
touche « h/min » (o). L’appareil émet un bip et « 12 :00 » clignote à l’écran ACL. Utilisez les touches
«
h/min » (o) pour régler l’heure. Les indications AM et PM s’affichent dans le coin supérieur droit de
l’écran ACL. Pour programmer les minutes, appuyez sur la touche « PROG » (n) puis appuyez de
nouveau sur la touche « h/min » (o) jusqu’à ce que l’heure soit réglée. Après 5 secondes, l’appareil
émet un bip et l’heure cesse de clignoter.
Note : Votre horloge est maintenant programmée et continuera d’afficher l’heure courante même lorsque
vous éteignez l’appareil.
Si l’appareil est débranché ou en cas de panne de courant, l’horloge reviendra à 12 :00 AM. Il faut répéter
les instructions ci-dessus pour programmer de nouveau l’horloge.
5. PRÉPARER DU CAFÉ
1- Ouvrez le couvercle de la cafetière (b).
2- Placez la cafetière sur une surface dure et plane. Avec la machine en position « arrêt », branchez la fiche
dans la prise murale de 120V.
3- Remplissez la carafe avec de l’eau fraîche et froide (idéalement de l’eau embouteillée ou filtrée). Ouvrez
le couvercle à charnières et versez l’eau dans le réservoir d’eau Fig. 1 et 2. L’indicateur de niveau d’eau
affiche le nombre de tasses Fig. 3. Ne dépassez pas 12 tasses.
Note :
- Utilisez uniquement de l’eau froide. Le système de percolation automatique a été conçu pour fonctionner
seulement avec de l’eau froide.
- Le réservoir est muni d’orifices de trop-plein à l’arrière de l’appareil pour éviter de remplir le réservoir au-
delà de sa capacité maximale. Si vous ajoutez trop d’eau, elle fuira par les trous à l’arrière de l’appareil.
- La quantité de café infusé est inférieure à la quantité d’eau versée dans le réservoir d’eau puisque la
mouture et le filtre en absorbent environ 10 %.
4- Mettez la carafe avec son couvercle sur la plaque chauffante (h) en vous assurant qu’elle est bien
placée pour activer le mécanisme permettant au café de s’écouler.
ATTENTION : Pour éviter que le panier ne déborde, la carafe doit être bien placée
dans la cafetière, sinon il pourrait y avoir un débordement d’eau chaude ou de café
chaud.
5- Levez le couvercle de la cafetière (b), insérez le porte-filtre (i). Assurez-vous qu’il est bien poussé vers
le bas et verrouillé. Insérez ensuite un filtre papier n° 4 ou le filtre permanent (j) dans le porte-filtre (i).
Utilisez un nouveau filtre chaque fois ou nettoyez le filtre permanent entre chaque utilisation Fig. 4 et 5.
6- Ajoutez environ 2 onces de mouture pour 12 tasses d’eau. Ne dépassez pas le niveau de 12 tasses
Fig. 6.
7- Fermez le couvercle en vous assurant qu’il est bien fermé Fig. 7.
8- Appuyez sur la touche marche/arrêt (k). La touche s’illumine pour indiquer que la cafetière a démarré
le cycle de percolation.
ATTENTION : La cafetière devient très chaude pendant le cycle de percolation.
Veuillez la manipuler avec précaution.
Français
18
KR_CAFETIERE_KM730_NC00116597_Mise en page 1 06/11/12 12:00 Page18

Français
19
Note : À tout moment pendant le cycle de percolation, vous pouvez éteindre la cafetière en appuyant
simplement sur la touche marche/arrêt (k). Aucune touche ne sera alors illuminée, ce qui signifie que la
cafetière est éteinte.
9- Lorsque le cycle de percolation est terminé, la cafetière émet un bip sonore et la touche
marche/arrêt (k) clignote. Cela signifie que le cycle de maintien au chaud a débuté.
Note : Même si le cycle de percolation est terminé, il reste du liquide chaud dans le panier-filtre. Attendez
quelques minutes pour que le reste du liquide s’écoule dans la carafe avant de retirer le panier-filtre.
- La fonction de maintien au chaud fonctionne pendant 2 heures. Pendant ce cycle, la touche marche/arrêt
(k) continue à clignoter et l’écran ACL affiche le temps écoulé depuis la fin du cycle de percolation. Vous
pouvez arrêter le cycle de maintien au chaud à tout moment en appuyant sur la touche marche/arrêt (k).
Lorsque le cycle de maintien au chaud est terminé, le voyant s’éteint et l’écran ACL affiche de nouveau
l’heure.
10- Ouvrez le couvercle et retirez le porte-filtre avec précaution, en le saisissant par les languettes situées
de chaque côté du porte-filtre puis en le levant verticalement. Jetez le filtre usagé (s’il s’agit d’un filtre
papier) et le marc de café Fig. 8 et 9.
Note :
- Si vous voulez préparer plus d’une carafe de café de suite, il est recommandé de laisser la cafetière
refroidir 10 minutes entre les cycles de percolation.
Arrêt automatique
Pour plus de commodité, la cafetière est dotée d’une fonction d’arrêt automatique. Lorsque le cycle de
percolation est terminé, la cafetière s’éteint automatiquement après une période de 2 heures.
6. SÉLECTION D’ARÔME
n Pour assurer un goût optimal, la touche de sélection d’arôme (m) vous permet de préparer un café plus
corsé.
n Suivez les instructions pour PRÉPARER DU CAFÉ jusqu’à l’étape 6.
n Appuyez sur la touche de sélection d’arôme (m) pour sélectionner la préparation d’un café plus corsé.
La touche s’illumine et une icône représentant une tasse noire s’affiche dans le coin supérieur gauche.
Fig. 10.
Note : Cette fonction ralentit le cycle de percolation.
7. PROGRAMMER LA CAFETIÈRE
Fonction de démarrage automatique
1- Vérifiez que l’horloge est bel et bien à la bonne heure. Si ce n’est pas le cas, suivez les instructions de
la section PROGRAMMER L’HORLOGE.
2- Suivez les étapes 1 à 6 de la section PRÉPARER DU CAFÉ.
3- Appuyez sur la touche PROG (n). Une icône représentant une cloche apparait dans le coin inférieur
gauche de l’écran ACL.
4- Utilisez la touche h/min (o) pour régler l’heure de démarrage automatique. Référez-vous aux indications
KR_CAFETIERE_KM730_NC00116597_Mise en page 1 06/11/12 12:00 Page19

AM et PM dans le coin supérieur droit de l’écran ACL.
5- Appuyez sur la touche PROG (n) puis utilisez la touche h/min (o) pour régler les minutes.
6
- Après 5 secondes, la cafetière émet un bip sonore et l’écran ACL affiche l’heure courante.
Note : Vous pouvez appuyer sur la touche AROMA (m) si vous voulez préparer un café plus corsé (voir
la section 6 – SÉLECTION D’ARÔME)
7- Appuyez sur la touche AUTO (l). Elle s’illumine pour indiquer que la cafetière est programmée. Une
icône représentant une cloche apparait dans le coin inférieur gauche de l’écran ACL. L’horloge continue
toutefois à afficher l’heure courante.
8- Lorsqu’arrive l’heure programmée du démarrage automatique, la cafetière démarre automatiquement
un cycle de percolation. La touche marche/arrêt (k) s’illumine pour indiquer que la cafetière a démarré
le cycle de percolation. La touche AUTO (l) s’éteint.
Note : À tout moment pendant le cycle de percolation, vous pouvez éteindre la cafetière en appuyant
simplement sur la touche marche/arrêt (k). Aucune touche ne sera alors illuminée, ce qui signifie que la
cafetière est éteinte.
Pour annuler le cycle préprogrammé, appuyez sur la touche AUTO (l) – elle s’éteint pour indiquer que le
cycle est annulé.
Pour plus de commodité, votre cafetière conserve en mémoire l’heure de démarrage automatique. Il suffit
par la suite d’appuyer sur la touche AUTO (l) pour activer le démarrage automatique à l’heure programmée.
Pour modifier l’heure de démarrage, suivez les étapes 3 à 7 ci-dessus.
Arrêter et servir
n Cette caractéristique permet d’interrompre le cycle de percolation pour verser une tasse de café avant
la fin du cycle.
ATTENTION : Même si ce dispositif arrête temporairement l’écoulement de café
dans la carafe, il n’arrête pas le cycle en soi. Après avoir servi une tasse, la carafe
doit être immédiatement replacée sur la plaque chauffante pour éviter que le
panier-filtre ne déborde.
Assurez-vous que la carafe est bien en place dans la cafetière.
Ne retirez pas la carafe pendant plus de 30 secondes.
NOTE : Même si le dispositif arrêter et servir permet de verser une tasse pendant le cycle, nous vous
recommandons d’attendre la fin du cycle car la force et la saveur du café versé en milieu de cycle ne
seront pas les mêmes qu’en fin de cycle.
8. NETTOYAGE
n Pour enlever la mouture usagée, retirez le porte-filtre de la cafetière. Fig 8.
n Débranchez l’appareil.
n Ne nettoyez pas l’appareil s’il est encore chaud.
n Lavez la carafe, son couvercle et le porte-filtre amovible à l’eau chaude savonneuse ou placez-les dans
le panier supérieur du lave-vaisselle.
NOTE : Ne placez pas les autres pièces de la cafetière au lave-vaisselle.
Français
20
KR_CAFETIERE_KM730_NC00116597_Mise en page 1 06/11/12 12:00 Page20

Français
21
n Nettoyez la cafetière à l’aide d’un chiffon doux ou d’une éponge humide. N’utilisez jamais de produits
a
brasifs ou forts sur n’importe quelle pièce de votre cafetière.
n Pour nettoyer les pièces en acier inoxydable de votre cafetière, humidifiez un chiffon doux ou une
éponge à l’eau chaude et tordez-le bien. Essuyez les surfaces en acier inoxydable dans le même sens
que l’acier inoxydable.
Essuyez-le bien et polissez-le à l’aide d’un chiffon sec.
n Pour les taches difficiles à déloger, utilisez un tampon en plastique ou un chiffon avec du vinaigre.
n N’immergez pas l’appareil dans l’eau ou sous l’eau courante.
9. DÉTARTRAGE
n Il est fréquent qu’une cafetière présente une accumulation de tartre. Cela est normal et est causé par
les minéraux présents dans l’eau potable. Il faut donc détartrer régulièrement la cafetière pour enlever
les dépôts de calcium ou de minéraux. Vous saurez qu’il est temps de détartrer votre cafetière lorsque
le cycle de percolation sera beaucoup plus long.
n Nous vous recommandons de détartrer votre appareil à l’aide d’une solution de vinaigre et d’eau froide
ou d’un agent de détartrage adéquat. Pour de meilleurs résultats, utilisez deux cuillères à soupe de
vinaigre pour une carafe d’eau froide.
Versez cette solution dans le réservoir d’eau et suivez les instructions habituelles de fonctionnement,
sans mettre de filtre dans le panier-filtre.
n Lorsque le cycle de percolation est terminé, videz la carafe et rincez-la à l’eau. Remplissez le réservoir
d’eau froide et répétez le cycle de percolation avec de l’eau seulement, deux fois de plus. Cela rincera
toute solution de vinaigre restante.
- Nous vous recommandons fortement de détartrer votre cafetière lorsque le temps de percolation devient
plus long ou si vous remarquez une formation de vapeur excessive. La fréquence de détartrage dépend
de la dureté de votre eau. Nous vous suggérons de la détartrer environ à tous les 80 cycles si votre eau
est douce et tous les 40 cycles si votre eau est dure.
KR_CAFETIERE_KM730_NC00116597_Mise en page 1 06/11/12 12:00 Page21

Français
22
10. DÉPANNAGE
PROBLÈME SOLUTION
Le café n’infuse pas ou
l’appareil ne s’allume
pas.
n
Assurez-vous que l’appareil est bien branché dans une prise
fonctionnelle, et qu’il est en position « ON ».
n
Le réservoir d’eau est vide.
n
Il y a eu une panne de courant.
n
Il y a eu une saute de puissance. Débranchez la machine, puis
rebranchez-la.
n
L’horloge doit être reprogrammée après une panne de courant.
n
La fonction d’arrêt automatique a éteint l’appareil. Éteignez l’appareil
puis rallumez-le pour préparer d’autre café. Pour plus de
renseignements, consultez la section « Préparer du café ».
L’appareil semble fuir.
n Assurez-vous que le réservoir d’eau n’a pas été rempli au-delà de la limite
maximale.
L’infusion prend
beaucoup de temps.
n Il est peut-être temps de détartrer l’appareil.
n Plusieurs minéraux peuvent s’accumuler dans le circuit de la cafetière. Il est
recommandé de détartrer la machine régulièrement. Il est possible de devoir
le faire plus fréquemment selon la dureté de votre eau. Pour plus de
renseignements, consultez la section « Détartrage ».
NOTE : ne démontez pas l’appareil.
Le panier-filtre (j)
déborde ou le café
s’écoule trop lentement.
n
La cafetière a besoin d’être nettoyée.
n
Il y a trop de café. Nous vous recommandons d’utiliser une cuillère à
mesurer ou une cuillère à soupe de café moulu par tasse.
n
La mouture est trop fine (la mouture pour l’espresso ne convient pas à
une cafetière à percolation).
n
Il y a de la mouture qui s’est insérée entre le filtre papier et le panier-filtre
(j).
n
Le papier filtre n’est pas bien ouvert ou est mal positionné.
n
Rincez le panier-filtre (j) avant d’y mettre le papier filtre afin que ce
dernier adhère aux parois humides du panier-filtre.
n
Il y a plus d’un papier filtre dans le panier-filtre.
Le café a mauvais goût.
n La sortie de café doit être nettoyée.
n La mouture ne convient pas à votre cafetière.
n Le proportion de café et d’eau est inadéquate. Ajustez-la selon vos goûts.
n La qualité et la fraîcheur du café ne sont pas optimales.
n L’eau est de piètre qualité. Utilisez un filtre ou de l’eau embouteillée.
Le café ne s’écoule pas.
n Vérifiez par la fenêtre s’il reste du café dans le panier-filtre
(i)
.
n Le système d’écoulement de café est peut-être obstrué. Vous pouvez le
nettoyer simplement en le rinçant à l’eau.
L’heure n’est pas exacte
(il y a un décalage).
n La minuterie est synchronisée et dépendante de votre réseau électrique. S’il
y a un décalage, nous vous recommandons de programmer l’heure une fois
par semaine pour s’assurer qu’elle est exacte.
Si votre appareil ne fonctionne toujours pas correctement, veuillez communiquer avec le service à la clientèle
de votre pays.
KR_CAFETIERE_KM730_NC00116597_Mise en page 1 06/11/12 12:00 Page22
La page est en cours de chargement...
La page est en cours de chargement...
La page est en cours de chargement...
La page est en cours de chargement...
La page est en cours de chargement...
La page est en cours de chargement...
La page est en cours de chargement...
La page est en cours de chargement...
La page est en cours de chargement...
La page est en cours de chargement...
La page est en cours de chargement...
La page est en cours de chargement...
La page est en cours de chargement...
-
 1
1
-
 2
2
-
 3
3
-
 4
4
-
 5
5
-
 6
6
-
 7
7
-
 8
8
-
 9
9
-
 10
10
-
 11
11
-
 12
12
-
 13
13
-
 14
14
-
 15
15
-
 16
16
-
 17
17
-
 18
18
-
 19
19
-
 20
20
-
 21
21
-
 22
22
-
 23
23
-
 24
24
-
 25
25
-
 26
26
-
 27
27
-
 28
28
-
 29
29
-
 30
30
-
 31
31
-
 32
32
-
 33
33


Krups KM730 Manuel utilisateur
- Catégorie
- Cafetières
- Taper
- Manuel utilisateur
- Ce manuel convient également à
dans d''autres langues
- English: Krups KM730 User manual
- español: Krups KM730 Manual de usuario
Documents connexes
-
Krups KM208D50 Manuel utilisateur
-
-
-
-
-
Krups KM750850 Manuel utilisateur
-
-
Krups KM468850 Manuel utilisateur
-
-
Autres documents
-
Tefal CM600840 Manuel utilisateur
-
-
T-Fal CM730D51 Le manuel du propriétaire
-
West Bend Performance 56710 Manuel utilisateur
-
Schumacher 128 12V 3 Cup Coffee Maker Le manuel du propriétaire
-
-