Kärcher FC 7 Cordless Mode d'emploi
- Catégorie
- Humidificateurs
- Taper
- Mode d'emploi
Ce manuel convient également à


2English
FLOOR CLEANER OPERATOR MANUAL
Contents
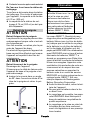
IMPORTANT
SAFETY
INSTRUCTIONS
When using this product basic precau-
tions should always be followed,
including the following:
READ ALL IN-
STRUCTIONS BE-
FORE USING
THIS MACHINE
This device is exclusively intended for
private household use.
몇WARNING
●Read all safety warnings and all
instructions. Failure to follow the
warnings and instructions may result
in electric shock, fire and/or serious
injury.
To reduce the risk of fire, electric
shock, or injury:
●Unplug from outlet when not in use
and before servicing.
●The device is not a toy. Exercise
special care when using the device
in the presence of children.
●Do not expose to rain. Store indoors.
●Use only as described in this manual.
Use only accessories recommend-
ed by the manufacturer.
●Do not use with damaged battery
charger cord or plug. If device is not
working as it should, has been
dropped, damaged, left outdoors, or
dropped into water, do not use and
call our customer service team, see
chapter customer service.
●Do not pull or carry by the battery
charger cord, do not use battery
charger cord as a handle, do not
close a door on the battery charger
cord, or pull battery charger cord
around sharp edges or corners. Do
not run device over battery charger
cord. Keep battery charger cord
away from heated surfaces.
●Repairs must only be performed by
an authorized service agent in ac-
cordance with national and local
safety regulations. Unauthorized re-
pairs could cause injury or machine
damage.
●Check that the power voltage match-
es the information on the type plate.
●Do not modify or attempt to repair
the device or the battery pack (as
applicable) except as indicated in
the instructions for use and care.
●Do not unplug by pulling battery
charger cord. To unplug, grasp plug.
●Do not handle battery charger or de-
vice with wet hands.
●Exercise caution when using the de-
vice on stairs.
●Never fill the water tank with sol-
vents, solvent-containing liquids or
undiluted acids (e.g. detergents,
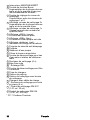
FLOOR CLEANER OPERATOR
MANUAL ............................................ 2
IMPORTANT SAFETY INSTRUC-
TIONS ................................................ 2
Customer Service .............................. 5
Technical data .................................... 6
Description of the unit ........................ 7
Installation.......................................... 9
Initial startup....................................... 9
Operation ........................................... 10
Care and service................................ 16
Troubleshooting guide........................ 21
Disposal ............................................. 24

English 3
petrol, paint thinner, and acetone)
as these substances corrode the
materials used in the device.
●Never insert objects into the device
openings. Do not use the device if
the device openings are blocked.
●Do not charge the unit outdoors.
●Use only the charger supplied by the
manufacturer to recharge.
●Do not incinerate the device even if
it is severely damaged. The batter-
ies can explode in fire.
●Short circuit hazard! Do not insert
conductive objects (such as screw-
drivers or similar) into the charger
plug.
●You may recharge the battery using
only the original charger provided
with the device or a charger ap-
proved by KÄRCHER.
●In case of visual damage, replace
the charger with original manufac-
turer suggested parts.
●Under abusive conditions, liquid
may be ejected from the battery;
avoid contact. If contact accidentally
occurs, flush with water. If liquid con-
tacts eyes, additionally seek medical
help. Liquid ejected from the battery
may cause irritation or burns.
●Do not use a battery pack or device
that is damaged or modified. Dam-
aged or modified batteries may ex-
hibit unpredictable behavior
resulting in fire, explosion or risk of
injury.
●Recharge only with the charger
specified by the manufacturer. A
charger that is suitable for one type
of battery pack may create a risk of
fire when used with another battery
pack.
●Follow all charging instructions and
do not charge the battery pack or
device outside of the temperature
range specified in the instructions.
Charging improperly or at tempera-
tures outside of the specified range
may damage the battery and in-
crease the risk of fire.
●Store and use the charger in dry
rooms only.
●Do not expose a battery pack or de-
vice to fire or excessive tempera-
tures. Exposure to fire or
temperatures above 265°F (130°C)
may cause explosion.
●Store and use the charger in dry
rooms only, ambient temperature
41 - 104°F (5 - 40°C).
●Store and operate the device at tem-
peratures from 41 - 104°F (5 - 40 °C).
●The battery has been tested as per
the relevant directives for interna-
tional transport and can be trans-
ported/shipped.
●Never immerse the device in water
or other liquids.
●Never use the device in pools con-
taining water.
●Do not service the device when it is
plugged in.
●Do not clean over floor electrical out-
lets.
●Create stability for the device prior to
any work on or with the device to
prevent accidents or damage.
●Keep hair, loose clothing, fingers,
and all parts of the body away from
openings and moving parts.
●Keep your hands protected while
cleaning the suction head - risk of inju-
ry from sharp objects (e.g. splinters).
●The device may not be operated in
explosive atmospheres.
●The air vents on the device must not
be blocked.
●Do not add acetic acids, descaling
agents, essential oils or similar sub-
stances to the fresh water tank. Also

4English
ensure that the substances are not
drawn in.
●Only use this device on sealed hard
floors (e. g. Sealed Hardwood, Tile,
Stone, Laminate, Vinyl, Linoleum).
●Store the device indoors in a cool,
dry place.
●Only carry the device by the carrying
handle.
●The device must not be used for the
intake of sharp or large objects (e.g.
glass, pebbles, toys).
●Do not use the device for cleaning of
carpets or carpeted floors.
●Do not use the device over the floor
vents of convector heaters. The de-
vice is not able to take in the water
discharged when used above vents.
●Do not overfill the tank. Do not ex-
ceed the maximum filling level.
●Only switch on the device when the
fresh water tank and waste water
tank are attached.
●Do not let the device operate in the
same spot too long, as this may
damage the floor.
●To Reduce the Risk of Fire and
Electric Shock due to internal com-
ponent damage, use only KÄRCH-
ER cleaning fluid intended for use
with this appliance. See Chapter
Cleaning and care agents.
SAVE THESE IN-
STRUCTIONS
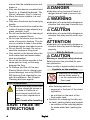
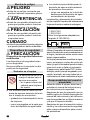
Hazard levels
DANGER
●Indication of an imminent threat of
danger that will lead to severe inju-
ries or even death.
몇WARNING
●Indication of a potentially dangerous
situation that may lead to severe inju-
ries or even death.
몇CAUTION
●Indication of a potentially dangerous
situation that may lead to minor inju-
ries.
ATTENTION
●Indication of a potentially dangerous
situation that may lead to damage to
property.
Safety devices
몇CAUTION
Missing or modified safety devices
Safety devices are provided for your
own protection.
Never modify or bypass safety devices.
Symbols on the machine
●Symbols for device cleaning mode
after finishing work are:
–engraved in the bowl of the clean-
ing station,
–as a sticker on the back of the
fresh water tank.
●Symbols for unlocking the dirty wa-
ter tank / parking station are located:
–as a sticker on the unlocking button
for waste water tank / parking sta-
tion
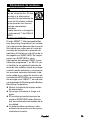
PROP 65 WARNING
This product may contain one
or more chemicals known to
the state of California to
cause cancer and birth de-
fects or other reproductive
harm.
Wash hands after handling.
●Warning not to keep the
device under water is:
–on the underside of the
floor head.

English 5
The application and description of the
symbols (see chapter Floor head
cleaning by a rinsing process).
Intended use
Use the floor cleaner exclusively for
cleaning hard floors in your private
household and only on waterproof hard
floors.
Do not clean water-sensitive floor cov-
erings such as e.g. untreated cork
floors, since the moisture can pene-
trate and damage the floor.
The device is suitable for cleaning
PVC, linoleum, tiled, stone, oiled and
waxed wood, laminate and all water-
resistant floor coverings.
Owner/User Responsibility
The owner and/or user must have an
understanding of the manufacturer’s
operating instructions and warnings
before using this device.
Warning information should be empha-
sized and understood.
If the operator is not fluent in English,
the manufacturer’s instructions and
warnings shall be read to and dis-
cussed with the operator in the opera-
tor’s native language by the purchaser/
owner, making sure that the operator
comprehends its contents.Owner and/
or user must study and maintain for fu-
ture reference the manufacturer’s in-
structions.
Customer Service
Registration
Your device must be registered in order
to help with any questions or issues
that you have. You can register your
device at
www.karcher-register.com if located
in the U.S.A., www.karcher/ca if locat-
ed in Canada, or www.karcher.com/
mx if located in Mexico.
Warranty
In the case of a warranty claim, you
can contact customer support. Please
see the contact information listed be-
low for either the USA, Canada, or
Mexico. You MUST provide your proof
of purchase in order to file a warranty
claim either via email, phone, or fax.
USA Customer Service
You can contact our Customer Service
department by phone at
1-800-537-4129 or via the website at
www.karcher-help.com.
Mexico Customer Service
You can contact our Customer Service
department by phone at
01-800-024-13-13 or via the website at
www.karcher.com/mx.
Canada Customer Service
You can contact our Customer Service
department by phone at
1-800-465-4980 or via the website at
www.karcher.com/ca.
Scope of delivery
The scope of delivery for the device is
shown on the packaging. During un-
packing, check the contents for com-
pleteness. If any accessories are
missing or in the event of any shipping
damage, please notify our Customer
Service department as stated above
either by phone or via the website.
Battery
Device type:
●1.055-733.0
●1.055-764.0
Use the following adaptor
(6.195-096.9 charger):
PS07

6English
Technical data
Subject to technical changes without
notice.
Electrical connection
Voltage V 100 -
240
Phase ~ 1
Frequency Hz 50 - 60
Protection class IPX4
Device protection class III
Charger protection
class
II
Nominal power of de-
vice
W80
Nominal voltage of bat-
tery
V 25.20
-
25.55
Battery type Li-ion
Operating time when
battery is fully charged
min 45
Charging time for an
empty battery
h4
Charger output voltage V 30
Charger output current A 0.6
Device performance data
Roller revolutions per
minute cleaning level 1
RPM 450
Roller revolutions per
minute cleaning level 2
RPM 490
Roller revolutions per
minute boost function
RPM 530
Filling quantity
Fresh water tank vol-
ume
oz
(ml)
13.53
(400)
Waste water tank volume oz
(ml)
6.76
(200)
Dimensions and weights
Weight (without acces-
sories)
lbs
(kg)
6.76
(4.3)
Length in
(mm)
12.2
(310)
Width in
(mm)
9.06
(230)
Height in
(mm)
47.64
(1210)
Part number 1.055-733.0
1.055-764.0

English 7
2
1
3
4
7
8
9
10
11
12
13
13
16
17
18
14
15
RM
537
RM
536
5
6
9
10
21
11
23 23
20
13
19
16
17
18
14
15
RM
536
24
22
14
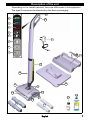
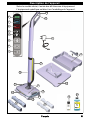
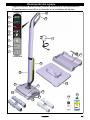
Description of the unit
Depending on the model selected, there are differences in the equipment.
The specific equipment is described on the device packaging.

8English
1ON / OFF switch
2Boost function button
Increases the roller speed and the
amount of water for stubborn soiling
3Button for setting the cleaning level
Switching between cleaning levels 1
and 2
4"Cleaning level 2" display
Increased roller speed and amount
of water
5Display "Cleaning level 1"
Normal roller speed and amount of
water
6Display "MAX" (red)
Waste water tank is full
7Display "MIN" (blue)
Fresh water tank is empty
8Display "Battery" (green)
Charge level indicator of the battery
9Wall slip protection handle
10 Handle
11 Fresh water tank
12 Removable hair filter
13 Unlocking button for waste water
tank and parking station
14 Cleaning rollers (4 x)
15 Waste water tank
16 * LED lighting
17 Unlocking button for hair filter
18 Charging socket
19 Parking station
20 Cleaning station with cleaning brush
21 Charger with charging cable
22 * Cleaning rollers for stone floors
(4 x)
23 * Detergent RM 537 (1.01 oz / 30 ml)
24 Detergent RM 536 (16.91 oz / 500 ml)
* FC 7 Cordless Premium

English 9
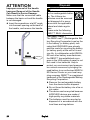
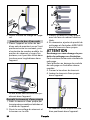
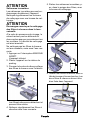
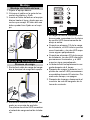
Installation
Installing the handle
1. Hold the basic unit firmly.
2. Insert the cable into the guide of the
plastic connector and fix it in place.
3. Insert the handle into the basic unit
as far as it will go, until it audibly
clicks into place. The handle must sit
firmly in the device.
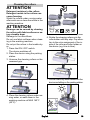
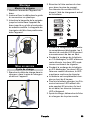
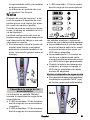
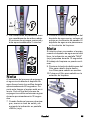
Initial startup
Charging process
1. Plug the charging cable of the char-
ger into the charging socket on the
device.
2. Plug the power plug of the charger
into the socket.
The LED indicator lights show the
current charging state of the battery.
●When charging the completely emp-
ty battery, all 3 LED indicator lights
flash one after the other from bottom
to top.
●When the battery is 1/3 charged, the
bottom LED lights up continuously,
the two top LEDs continue to flash.
●When the battery is 2/3 charged, the
two lower LEDs light up continuous-
ly, the uppermost LED continues to
flash.
●The battery is fully charged after 4
hours.
●After the battery has been charged,
the 3 LED indicator lights will remain
lit for 60 minutes. After this period of
time, the LED indicator lights go out.
3. Unplug the power plug for the char-
ger from the socket after charging.
4. Pull the charging cable out of the device.
a
b
a
b
4 h
a
b

10 English
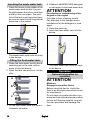
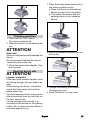
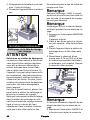
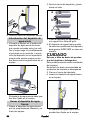
Inserting the waste water tank
1. Place the device in the middle of the
waste water tank so that it is posi-
tioned between the rollers, and then
audibly clicks into place. The posi-
tion of the tank is not important here,
as it can be used in both longitudinal
directions in the device.
The waste water tank must sit firmly
in the device.
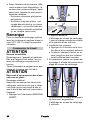
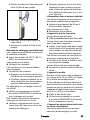
Filling the fresh water tank
1. Grasp the fresh water tank by the re-
cessed grips on the side, and re-
move it from the device.
2. Open the tank cap and turn it to the
side.
3. Fill the fresh water tank with cold or
lukewarm tap water.
4. If desired, add KÄRCHER detergent
or care agent to the fresh water tank.
ATTENTION
Overdosing or underdosing of de-
tergent or care agent
Can lead to poor cleaning results.
Pay attention to the dosage recom-
mendations for the detergent or care
agent.
5. Close the tank cap.
6. Insert the fresh water tank into the
device.
The fresh water tank must sit firmly
in the device.
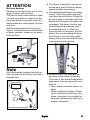
Operation
General information on
operation
ATTENTION
Moisture
Damage to sensitive floors
Before using the device, check the
floor in an inconspicuous place for wa-
ter consistency.
Do not clean any water-sensitive cov-
erings such as untreated wood or other
porous soft flooring material, as mois-
ture can penetrate and damage the
floor.
b
c
a

English 11
ATTENTION
Machine damage
Damage to the device can occur from
large, pointed, bulky objects.
The device must not be stored or used
on hard, coarse dirt or objects, as the
parts can become jammed under the
waste water tank and scratch the floor
and tank.
Before starting work and storing the
device, remove objects such as shards
of glass, pebbles, screws or toy parts
from the floor.
Note
Work backwards towards the door so
that no footprints are left on the freshly
mopped floor.
●The floor is cleaned by moving the
device back and forth at the same
speed as when vacuuming.
●Activate the boost function for heavy
soiling. To do this, press and hold
the boost function button. When the
boost function is activated, the roller
speed and the amount of water are
increased. The boost function can
be switched on at cleaning level 1
and cleaning level 2. When the
boost function is activated, the dis-
play of the corresponding cleaning
level flashes. Let the device slide
slowly across the floor without exert-
ing pressure on the device.
●Different rollers are available de-
pending on the scope of delivery.
The color of the rollers shows which
application they are especially suit-
able for.
–Gray / yellow universal rollers: ver-
satile
–Rollers with black stripes: Clean-
ing of insensitive hard floors (e.g.
stone, ceramics); not suitable for
sensitive natural stone floors (e.g.
marble, terracotta)
+
+

12 English
Note
For optimal cleaning results, wash the
rollers in the washing machine at MAX
140°F (60°C) before using them for the
first time.
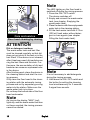
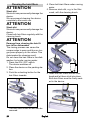
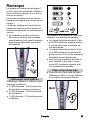
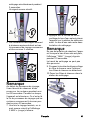
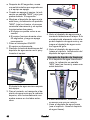
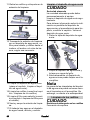
Start working
ATTENTION
Uncontrolled movement
Uncontrolled Movement Can Lead
to Equipment and Material Damage
As soon as the device is switched on,
the cleaning rollers start rotating.
Hold the handle so that the device
does not move by itself.
ATTENTION
Fresh or waste water tank not insert-
ed
Fresh or Waste Water Tank Not In-
serted can lead to Damage to Device
as well as Surroundings.
Before starting the cleaning work,
make sure that the fresh water tank is
filled with water, and the waste water
tank is inserted in the device.
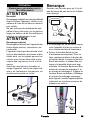
1. Press the ON / OFF switch.
The device switches on.
Cleaning level 1 display for normal
roller speed and amount of water
lights up.
2. Moisten the rollers.
a Press and hold the boost function but-
ton.
b Move the device back and forth
until the rollers are sufficiently
moistened.
3. If necessary, switch to cleaning level
2 with the button for setting the
cleaning level.
The roller speed and the amount of
water are increased.
The cleaning level 2 display lights up.
Note
The setting of cleaning level 1 or clean-
ing level 2 depends on the surface to
be cleaned (e.g. wood or stone floor).
The device is set to cleaning level 1 for
the initial start-up.
After an interruption in work or restart-
ing, the last cleaning level setting is al-
ways activated.
4. If necessary, activate the boost func-
tion to clean stubborn soiling (see al-
so chapter General information on
operation).
a
c
a
ON
b
ab

English 13
Battery run time
The display "Battery" shows the bat-
tery run time:
●3 LEDs light up - 3/3 (full) battery run
time
●2 LEDs light up - 2/3 battery run time
●1 LED lights up - 1/3 battery run time
Acoustic or optical signals warn of an
empty battery.
●Approx. 5 minutes before the bat-
tery is empty, an acoustic signal
sounds twice and the bottom LED
flashes.
●Approx. 1.5 minutes before the bat-
tery is empty, an acoustic signal
sounds twice and the bottom LED
continues to flash.
●After the battery is empty and the
device has switched off, the bottom
LED flashes faster for 60 seconds.
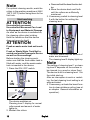
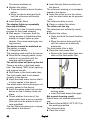
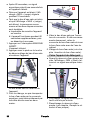
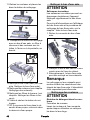
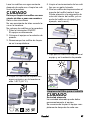
Emptying the waste water tank
●If the waste water tank is full, the dis-
play "MAX" (red) lights up and an
acoustic signal sounds.
●After 60 seconds, an acoustic signal
sounds for the second time and the
device switches off.
●As soon as the device is switched
off, the display "MAX" (red) flashes
for 10 seconds.
●As long as the waste water tank is
full and the display "MAX" (red)
lights up, the process starts again
and the following two steps are re-
peated:
a The device can be switched on
again.
b The device runs for another 60 sec-
onds and then switches off again.
1. Press the ON / OFF switch.
The device switches off.
2. Press the unlocking button for the
waste water tank with your foot and
lift the device.
+
+
~ 1,5
min
~ 5
min
MAX

14 English
The waste water tank detaches from
the device.
3. To empty the waste water tank, do
not use the top cover to transport it,
but use both hands horizontally on
the narrow sides.
4. Empty the waste water tank through
the opening in the cover. In the case
of stubborn soiling, remove the cov-
er of the waste water tank, and rinse
out the waste water tank with tap
water.
5. Insert the waste water tank (see
chapter Inserting the waste water
tank).
Refilling the cleaning fluid
●If the fresh water tank is empty, the
display "MIN" (blue) lights up and an
acoustic signal sounds.
●As a reminder, the acoustic signal
sounds once a minute.
1. Fill the fresh water tank (see chapter
Filling the fresh water tank).
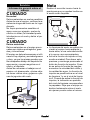
Interrupting operation
ATTENTION
Moisture damage on sensitive
floors
Moist Rollers Left on Surface Can
Cause Damage to Sensitive Floors.
When taking longer breaks, place the
device on the parking station to avoid
damage to sensitive floors from moist
rollers.
1. Press the ON / OFF switch.
The device switches off.
2. Place the device on the parking sta-
tion.
Note
If the device is placed on the parking
station without a waste water tank, the
unlocking button must be pressed to
remove the device.
a
b
1.
1.
1.
1.
2.
2.
MIN

English 15
Finishing operation
1. Press the ON / OFF switch.
The device switches off.
2. Place the device on the parking sta-
tion.
ATTENTION
Stuck dirt
Stuck dirt can permanently damage the
device.
We recommend cleaning the device
completely after each use.
3. Clean the device (see chapter Care
and service).
Keep the device safe
ATTENTION
Liquids / moist dirt
If the device still contains liquids / moist
dirt during storage, this can lead to an
odor.
When storing the device, completely
empty the fresh water tank and the
waste water tank.
Use the cleaning brush to remove hairs
and dirt particles from the hair filter on
the floor head cover.
Let the cleaned rollers air dry, e.g.
mounted on the device on the parking
station. Do not place the wet rollers in
enclosed spaces to dry.
1. Place the empty waste water tank in
the cleaning station to dry.
a Place the device on the parking
station and let it click into place.
b Then place the device with the
parking station on the cleaning
station.
2. Mount the cleaned rollers on the de-
vice to dry.
3. Charge the battery (see chapter
Charging process).
4. Store the device in a dry room.
a
b
a
b

16 English
Care and service
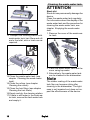
Floor head cleaning by rinsing
process
ATTENTION
Dirt or detergent residues
The waste water tank and hair filter
must be cleaned regularly so that dirt
does not get stuck in the tank or in the
hair filters. If the device is not cleaned
after it has been used, dirt particles can
clog the hair filters and the slots. Fur-
thermore, the accumulation of dirt and
bacteria can cause an unpleasant odor
in the device.
After finishing work, place the device in
the cleaning station and start the rins-
ing process.
Only clean the floor head in the clean-
ing station with the automatic rinsing
process and not by separately pouring
water into the station. Make sure the
waste water tank is in place.
Do not keep the bottom side of the floor
head underwater.
Note
As long as the display "MAX" (red)
lights up, and the waste water tank has
not been emptied, the rinsing process
cannot be started.
Note
The LED lighting on the floor head is
switched off during the rinsing process.
1. Press the ON / OFF switch.
The device switches off.
2. Empty and reinsert the waste water
tank (see chapter Emptying the
waste water tank).
3. Place the device with the empty waste
water tank in the cleaning station.
4. Fill the fresh water tank with 6.76 oz
(200 ml) fresh water without deter-
gent or care agents (see chapter
Filling the fresh water tank).
Note
It is not necessary to add detergents
during the rinsing process.
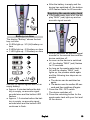
5. Hold down the ON / OFF switch and
the button for setting the cleaning
level simultaneously for 3 seconds.
A signal tone sounds.
b
a
6.76 oz /
200 ml

English 17
6. The display indicators light up re-
peatedly from top to bottom.
The rinsing process begins and
takes about 2 minutes.
Note
At the beginning of the rinsing process,
the water runs from the fresh water
tank onto the rollers for about 80 sec-
onds. During this time, the device is
noiseless. Only at the end of the rins-
ing process do the rollers begin to turn
for approx. 30 seconds.
7. When the rinsing process is com-
plete, a signal tone sounds and the
display "MAX" (red) lights up.
8. Press the unlocking button for the
waste water tank and place the de-
vice on the parking station. The
waste water tank remains in the
cleaning station.
Note
If you try to switch the device on again
when the waste water tank is full, the dis-
play "MAX" (red) flashes for 10 seconds.
It is not possible to continue to clean.
9. Push the unlocking button for the
hair filters inwards.
The hair filters come off.
10.Place the hair filters in the cleaning
station.
11.Remove the rollers and place them
in the cleaning station.
3
sec
ca. 2 min
a
c
b

18 English
12.Transport the cleaning station with
waste water tank, hair filters and roll-
ers to the toilet, sink or trash can as
required.
13.Clean the waste water tank (see
chapter Cleaning the waste water
tank).
14.Clean the rollers (see chapter
Cleaning the rollers).
15.Clean the hair filters (see chapter
Cleaning the hair filters).
16.Empty and dry the cleaning station.
17.If there is still water in the fresh wa-
ter tank, remove the fresh water tank
and empty it.
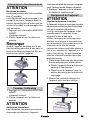
Cleaning the waste water tank
ATTENTION
Stuck dirt
Stuck dirt can permanently damage the
device.
Clean the waste water tank regularly.
For information about the display of the
waste water tank and the procedure for
cleaning the waste water tank, see
chapter Emptying the waste water
tank.
1. Remove the cover of the waste wa-
ter tank.
2. Clean the waste water tank and the
cover using tap water.
3. Alternatively, the waste water tank
can be cleaned in the dishwasher.
Note
The rubber coating of the waste water
tank flap can become sticky after
cleaning in the dishwasher. The tight-
ness is not impaired and does not im-
pact the effectiveness of the device.
a
b
a
c
b

English 19
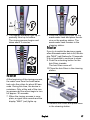
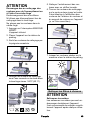
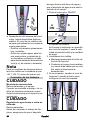
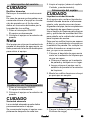
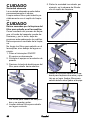
Cleaning the rollers
ATTENTION
Detergent residues in the rollers
Detergent reside in the rollers can
cause foaming.
Wash the rollers under running water
after each use or clean the rollers in the
washing machine.
ATTENTION
Damage can be caused by cleaning
the rollers with fabric softener or us-
ing a tumble dryer
Damage to the microfibers
Do not use fabric softener when clean-
ing in the washing machine.
Do not put the rollers in the tumble dry-
er.
1. Press the ON / OFF switch.
The device switches off.
2. Place the device using the parking
station.
3. Unscrew the cleaning rollers on the
recessed grip.
4. Clean the cleaning rollers under run-
ning water, or wash them in the
washing machine at MAX 140°F
(60°C).
5. Clean the roller drive with a damp cloth.
6. Rotate the cleaning rollers onto the
roller holder until they stop. Pay atten-
tion to the color assignment of the in-
side of the roller and roller holder on
the device (e.g. blue to blue).
7. Let the rollers dry while installed on the
device and sitting on the parking station.
a
b
140 °F
(60 °C)
a
b

20 English
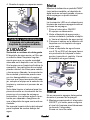
Cleaning the hair filters
ATTENTION
Stuck dirt
Stuck dirt can permanently damage the
device.
We recommend cleaning the device
completely after each use.
ATTENTION
Stuck dirt
Stuck dirt can permanently damage the
device.
Clean both hair filters regularly with the
cleaning brush.
ATTENTION
Damage from cleaning the hair fil-
ters in the dishwasher
The rinsing process can cause the
scraper edge to warp and thus no lon-
ger press properly on the rollers. This
deteriorates the cleaning result.
Do not clean the hair filters in the dish-
washer, but under running water.
1. Press the ON / OFF switch.
The device switches off.
2. Place the device on the parking sta-
tion.
3. Push the unlocking button for the
hair filters inwards.
The hair filters come off and can be
removed.
4. Clean both hair filters under running
water.
5. Remove stuck dirt, e.g. in the filter
comb, with the cleaning brush.
6. Insert the hair filters into the floor
head and let them click into place.
Both hair filters must be firmly seat-
ed in the device.
a
c
b
La page est en cours de chargement...
La page est en cours de chargement...
La page est en cours de chargement...
La page est en cours de chargement...
La page est en cours de chargement...
La page est en cours de chargement...
La page est en cours de chargement...
La page est en cours de chargement...
La page est en cours de chargement...
La page est en cours de chargement...
La page est en cours de chargement...
La page est en cours de chargement...
La page est en cours de chargement...
La page est en cours de chargement...
La page est en cours de chargement...
La page est en cours de chargement...
La page est en cours de chargement...
La page est en cours de chargement...
La page est en cours de chargement...
La page est en cours de chargement...
La page est en cours de chargement...
La page est en cours de chargement...
La page est en cours de chargement...
La page est en cours de chargement...
La page est en cours de chargement...
La page est en cours de chargement...
La page est en cours de chargement...
La page est en cours de chargement...
La page est en cours de chargement...
La page est en cours de chargement...
La page est en cours de chargement...
La page est en cours de chargement...
La page est en cours de chargement...
La page est en cours de chargement...
La page est en cours de chargement...
La page est en cours de chargement...
La page est en cours de chargement...
La page est en cours de chargement...
La page est en cours de chargement...
La page est en cours de chargement...
La page est en cours de chargement...
La page est en cours de chargement...
La page est en cours de chargement...
La page est en cours de chargement...
La page est en cours de chargement...
La page est en cours de chargement...
La page est en cours de chargement...
La page est en cours de chargement...
La page est en cours de chargement...
La page est en cours de chargement...
La page est en cours de chargement...
La page est en cours de chargement...
La page est en cours de chargement...
La page est en cours de chargement...
La page est en cours de chargement...
La page est en cours de chargement...
-
 1
1
-
 2
2
-
 3
3
-
 4
4
-
 5
5
-
 6
6
-
 7
7
-
 8
8
-
 9
9
-
 10
10
-
 11
11
-
 12
12
-
 13
13
-
 14
14
-
 15
15
-
 16
16
-
 17
17
-
 18
18
-
 19
19
-
 20
20
-
 21
21
-
 22
22
-
 23
23
-
 24
24
-
 25
25
-
 26
26
-
 27
27
-
 28
28
-
 29
29
-
 30
30
-
 31
31
-
 32
32
-
 33
33
-
 34
34
-
 35
35
-
 36
36
-
 37
37
-
 38
38
-
 39
39
-
 40
40
-
 41
41
-
 42
42
-
 43
43
-
 44
44
-
 45
45
-
 46
46
-
 47
47
-
 48
48
-
 49
49
-
 50
50
-
 51
51
-
 52
52
-
 53
53
-
 54
54
-
 55
55
-
 56
56
-
 57
57
-
 58
58
-
 59
59
-
 60
60
-
 61
61
-
 62
62
-
 63
63
-
 64
64
-
 65
65
-
 66
66
-
 67
67
-
 68
68
-
 69
69
-
 70
70
-
 71
71
-
 72
72
-
 73
73
-
 74
74
-
 75
75
-
 76
76


Kärcher FC 7 Cordless Mode d'emploi
- Catégorie
- Humidificateurs
- Taper
- Mode d'emploi
- Ce manuel convient également à
dans d''autres langues
- English: Kärcher FC 7 Cordless User guide
- español: Kärcher FC 7 Cordless Guía del usuario
Documents connexes
Autres documents
-
Windsor 30 Manuel utilisateur
-
Dustbane Hurricane 700 XTT Operations Manual
-
Roborock MDS02LRR Manuel utilisateur
-
K RCHER BD 70/75 W Classic Bp Vacuum Cleaner Manuel utilisateur
-
-
Wacker Neuson RD14K-90 Manuel utilisateur
-
 kaercher 6 P S Wet And Dry Vacuum Cleaner Manuel utilisateur
