Bercomac 700565 Manuel utilisateur
- Catégorie
- Mur
- Taper
- Manuel utilisateur
Ce manuel convient également à

K-10
Instruction Sheet
UPDATE KIT #700556 (for 700527)
INSTALLATION
If the tractor has a manual clutch you must install this update kit in order to install the drive mechanism.
Install the parts according to the following instructions:
FI_700556-EN
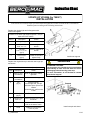
Replace the original right and left supports with
these new supports.
Install the new left & right supports (items 1 & 2) on
each side of the vehicle.
Item # Description Action
1 & 2 Left & right supports Install as shown.
3 Hex bolt
5/16’’ n.c. x 1‘’
Insert in supports as
shown.
4 Hex bolt
5/16’’ n.c. x 1/2‘’
(qty 3)
Insert in supports as
shown.
5 Hex nut 5/16’’
(qty 4)
Install on bolts and
tighten firmly.
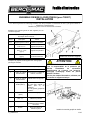
Install the drive mechanism (item 1).
# Item Description Action
1 Back of drive
mechanism
Hook on the tractor frame,
right side.
2 Front of drive
mechanism
Install between the supports.
4 Pin
(qty 2)
Insert as shown.
On the right side, new pin
and sleeve (item 3) from the
outside.
On the left side, pin from the
inside.
5 Hair pin
(qty 2)
Secure the pins.
6 Carriage bolt
5/16’’ x 1’’
Insert in the back of the drive
as shown.
7 Bracket Install on the bolt as shown
and on the tractor frame.
8 Knob Tighten to lock the drive
frame in place.
Replace the original short pin with this new longer pin
and sleeve. WARNING
TO PREVENT INJURIES:
It is the person who installs the drive mechanism
responsibility to make sure that when the clutch
is disengaged that all moving parts stop.
For more information, do not hesitate to contact
the technical support.
Install new supports
Install new pin and sleeve

Si le tracteur possède un embrayage manuel vous devez installer cet ensemble de mise à jour pour installer le
mécanisme d’entraînement.
Installer les pièces selon les instructions suivantes:
Feuille d'Instruction
ENSEMBLE DE MISE À JOUR #700556 (pour 700527)
INSTALLATION
Remplacer les supports gauche & droit originaux par ces
nouveaux supports.
K-10 FI_700556-FR
Installer les nouveaux supports gauche et droit (items 1 & 2)
de chaque côté du véhicule.
Item # Description Action
1 & 2 Support gauche et droit Installer tel qu’illustré.
3 Boulon hex.
5/16’’ n.c. x 1‘’
Insérer dans les
supports tel qu’illustré.
4 Boulon hex.
5/16’’ n.c. x 1/2‘’
(qty 3)
Insérer dans les
supports tel qu’illustré.
5 Écrou hex 5/16’’
(qty 4)
Insérer sur les boulons
et serrer fermement.
ATTENTION
POUR PRÉVENIR LES BLESSURES:
C’est la responsabilité de la personne qui
effectue l’installation du mécanisme
d’entraînement de s’assurer que lorsqu’on
désengage l’embrayage toutes les pièces
mobiles s’arrêtent.
Pour de plus amples informations, n’hésitez pas
à contacter le support technique.
Remplacer la goupille courte originale avec cette goupille
plus longue et douille.
Installer le châssis d’entraînement (item 1).
# Item Description Action
1 L’arrière du châssis
d’entraînement
Accrocher sur le châssis du
tracteur, côté droit
2 L’avant du châssis
d’entraînement
Installer entre les supports.
4 Goupille (qté 2) &
douille (item 3)
Insérer tel qu’illustre.
Du coté droit, goupille et
douille (item 3) de
l’extérieur.
Du coté gauche, goupille de
l’intérieur.
5 Goupille à ressort
(qté 2)
Sécuriser les goupilles.
6 Boulon à carr.
5/16’’ x 1’’
Insérer dans l’arrière du
châssis tel qu’illustré.
7 Fixation Installer sur le boulon tel
qu’illustré et sur le châssis
du tracteur.
8 Bouton Serrer pour barrer le
châssis en place.
Installer les nouveaux supports
Installer la nouvelle goupille et douille
-
 1
1
-
 2
2


Bercomac 700565 Manuel utilisateur
- Catégorie
- Mur
- Taper
- Manuel utilisateur
- Ce manuel convient également à
dans d''autres langues
- English: Bercomac 700565 User manual
Documents connexes
-
Bercomac 700259-4 700258-2 Manuel utilisateur
-
-
-
-
-
-
-
-
-