LG 35900 Le manuel du propriétaire
- Catégorie
- Cheminées
- Taper
- Le manuel du propriétaire
Ce manuel convient également à

Owner's Manual
Manuel de l’usager
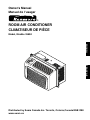
ROOM AIR CONDITIONER
CLIMATISEUR DE PIÈCE
Model, Modèle 35900
Distributed by Sears Canada Inc. Toronto, Ontario,Canada M5B 2B8
www.sears.ca
ENGLISH FRANÇAIS
®

- 2 -
TABLE OF CONTENTS
- 2 -
TABLE OF CONTENTS
........................
2
WARRANTY
..............................................
2
SAFETY
.....................................................
3
Important Safety Instructions
......................
3
ELECTRICAL REQUIREMENTS
.......
4
INSTALLATION
........................................
5
Installation Requirements
.........................
5
Installation
................................................
6
How to Install............................................6
Removal from Window .............................7
OPERATION
.............................................
8
How and Why
...........................................
8
Normal Sounds
........................................
8
Capacity and Running Time
.....................
8
Features
...................................................
9
Using the Air Conditioner
.........................
9
Air Conditioner Features
........................
10
MAINTENANCE
.....................................
11
Air Filter Cleaning
...................................
11
Air Conditioner Cleaning
........................
11
How to Remove the Front Grille
.............
11
How to Replace the Front Grille .............11
TROUBLESHOOTING
.........................
12
Before Calling for Service
......................
12
FRANÇAIS
................................................
14
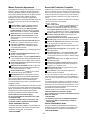
MASTER PROTECTION
AGREEMENTS
......................................
27
SERVICE NUMBERS
............
Back Cover
WARRANTY
One Year Limited Warranty
When installed, operated and maintained according to all instructions supplied with the product, if this appliance fails
due to a defect in material and workmanship within one year from the date of purchase, call 1-800-4-MY-HOME® to
arrange for free repair.
Five Year Limited Warranty on Sealed Refrigerant System
For five years from the date of purchase, when this product is installed, operated and maintained according to all supplied
instructions, the sealed refrigerant system will be repaired free of charge if it is defective in material or workmanship.
This warranty covers only defects in material and workmanship. Sears will NOT pay for:
1. Expendable items that can wear out from normal use, including but not limited to filters, belts, light bulbs, and bags.
Customer’s sole and exclusive remedy under this limited warranty shall be product repair as provided herein. Implied
warranties, including warranties of merchantability or fitness for a particular purpose, are limited to one year or the shortest
period allowed by law. Sears shall not be liable for incidental or consequential damages. Some states and provinces do not
all
ow the exclusion or limitation of incidental or consequential damages, or limitation on the duration of implied warranties of
merchantability or fitness, so these exclusions or limitations may not apply to you.
Sears Canada Inc., Toronto, Ontario, Canada M5B 2B8
All warranty coverage applies for only 90 days from the date of purchase if this product is ever used for other than private
family purposes.
2. A service technician to instruct the user in correct product installation, operation or maintenance.
3. A service technician to clean or maintain this product.
4. Damage to or failure of this product if it is not installed, operated or maintained according to the all instructions suppl ied
with the product.
5. Damage to or failure of this product resulting from accident, abuse, misuse or use for other than its intended purpose.
6. Damage to or failure of this product caused by the use of detergents, cleaners, chemicals or utensils other than those
recommended in all instructions supplied with the product.
7. Damage to or failure of parts or systems resulting from unauthorized modifications made to this product.
Disclaimer of implied warranties; limitation of remedies
This warranty applies only while this appliance is used in the United States or Canada.
This warranty gives you specific legal rights, and you may also have other rights which vary from state to state.

-3-
ENGLISH
SAFETY
IMPORTANT SAFETY INSTRUCTIONS
The safety instructions below will tell you how to use your room air conditioner to avoid harm to yourself or
damage to your ROOM AIR CONDITIONER.
FOR YOUR SAFETY
Do not store or use gasoline or other flammable
vapors and liquids in the vicinity of this or any other
appliance. Read product labels for flammability and
other warnings.
PREVENT ACCIDENTS
To reduce the risk of fire, electrical shock, or injury
to persons when using your air conditioner, follow
basic precautions, including the following:
• Be sure the electrical service is adequate for the
model you have chosen.
• If the air conditioner is to be installed in a window,
you will probably want to clean both sides of the
glass first. If the window is a triple-track type with a
screen panel included, you may want to remove
the screen completely before installation.
• Be sure the air conditioner has been securely and
correctly installed according to the separate
installation instructions provided with this manual.
Save this manual and installation instructions for
possible future use in removing or reinstalling this
unit.
• Use gloves when handling the air conditioner.
Be careful to avoid cuts from sharp metal fins on
front and rear coils.
ELECTRICAL INFORMATION
The complete electrical rating of your new room air
conditioner is stated on the serial plate. Refer to the
rating when checking the electrical requirements.
• Be sure the air conditioner is properly grounded.
To minimize shock and fire hazards, proper
grounding is important. The power cord is
equipped with a three-prong grounding plug for
protection against shock hazards.
• Your air conditioner must be plugged into a
properly grounded wall receptacle. If the wall
receptacle you intend to use is not adequately
grounded or protected by a time delay fuse or
circuit breaker, have a qualified electrician install
the proper receptacle.
• Do not run air conditioner with a protective
covering. This could result in mechanical damage
within the air conditioner.
• Do not use an extension cord or an adapter
plug.
ENERGY SAVING IDEAS
• The capacity of the room air conditioner must fit
the room size for efficient and satisfactory
operation.
• Install the room air conditioner on the shady side
of your home. A window that faces north is best
because it is shaded most of the day.
• Do not block air flow inside with blinds, curtains, or
furniture; or outside with shrubs, enclosures, or
other buildings.
• Close the floor and wall registers and the fireplace
damper so cool air does not escape up the
chimney and into the duct work.
• Keep blinds and drapes in other windows closed
during the sunniest part of the day.
• Clean the air filter as recommended in the
MAINTENANCE section of this manual.
• Proper insulation and weather stripping in your
home will help keep warm air out and cool air in.
• External house shading with trees, plants or
awnings will help reduce the air conditioner's work
load.
• Operate heat producing appliances such as
ranges, washers, dryers, and dishwashers during
the coolest part of the day.
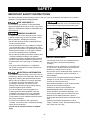
Avoid fire hazard or electric shock.
Do not use an extension cord or an adapter plug.
Do not remove any prong from the power cord.
3-prong
grounding
plug
Reset
Test
Ground
prong
Power
supply
cord
3-prong
grounding
type wall
receptacle

- 4 -
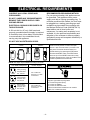
ELECTRICAL REQUIREMENTS
OBSERVE ALL LOCAL CODES AND
ORDINANCES.
DO NOT, UNDER ANY CIRCUMSTANCES,
REMOVE THE POWER SUPPLY CORD
GROUND PRONG.
ELECTRICAL GROUND IS REQUIRED ON
THIS APPLIANCE.
A 250-volt 60 Hz, AC only, 20A fused and
properly grounded electrical supply is required.
A time delay fuse or time delay circuit breaker
is recommended. Use a dedicated circuit,
serving only this appliance.
DO NOT USE AN EXTENSION CORD.
RECOMMENDED GROUNDING METHOD
For your personal safety, this appliance must
be grounded. This appliance has a power
supply cord with a 3-prong grounding plug. To
minimize possible shock hazard, the cord must
be plugged into a mating grounding type wall
receptacle and grounded in accordance with
the National Electrical Code (ANSI/NFPA 70)
latest edition and all local codes and
ordinances. If a mating wall receptacle is not
available, it is the personal responsibility and
obligation of the customer to have a properly
grounded 3-prong wall receptacle installed by a
qualified electrician.
115V~ 230V~
Power cord may include a current interrupter
device. A test and reset button is provided on the
plug case. The device should be tested on a
periodic basis by first pressing the TEST button
and then the RESET button. If the TEST button
does not trip or if the RESET button will not stay
engaged, discontinue use of the air conditioner and
contact a qualified service technician.
Electrical Shock Hazard
Plug into a grounded 3 prong outlet.
Do not remove ground prong.
Do not use an adapter.
Do not use an extension cord.
Failure to follow these instructions can result in
death, fire, or electrical shock.
Use Wall Receptacle Power Supply
Standard 125V,
3-wire grounding
receptacle rated
15A, 125V AC
Standard 250V,
3-wire grounding
receptacle rated
15A, 250V AC
Use 15 AMP. time
delay fuse or 15 AMP.
circuit breaker.
Use 20 AMP. time
delay fuse or 20 AMP.
circuit breaker.
Standard 250V,
3-wire grounding
receptacle rated
20A, 250V AC
NOTE: The shape may be different according to its model.

-5-
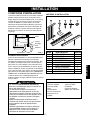
INSTALLATION
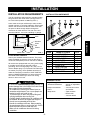
INSTALLATION REQUIREMENTS
Your air conditioner will install into standard double
hung windows with actual clear opening widths of
21 to 35 inches (533mm to 889mm) (FIG. 1).
Lower sash must open sufficiently to allow a clear
vertical opening of 12 inches (305mm). Side louvers
and the rear of the air conditioner must have clear
air space to allow enough airflow through the
condenser for heat removal. The rear of the unit
must be outdoors, not inside a building or garage.
ELECTRICAL SERVICE
Check your available electrical service. The power
supply available must be the same as that shown
on the unit nameplate (found on left side of cabinet).
All models are equipped with a 3-prong service plug
to provide proper service and safe positive
grounding. Do not change plug in any way. Do not
use an adapter plug. If your present wall outlet does
not match your plug, call a qualified electrician to
make the necessary corrections. SAVE CARTON
and this OWNER'S MANUAL for future reference.
The carton is the best way to store unit during
winter or when not in use.
INSTALLATION HARDWARE
533mm to 889mm
305mm
Inner sill
Offset
Winddow
Sash
Sill
Exterior
Interior wall
FIG. 1
G A B C
H
I
D
F
E
To avoid risk of personal injury, property damage, or
product damage due to the weight of this device and
sharp edges that may be exposed:
• Air conditioners covered in this manual pose an
excessive weight hazard. Two or more people are
needed to move and install the unit.
To prevent injury or strain, use proper lifting and
carrying techniques when moving unit.
• Carefully inspect location where air conditioner will
be installed. Be sure it will support the weight of
the unit over an extended period of time.
• Handle air conditioner with care. Wear protective
gloves whenever lifting or carrying the unit. AVOID
the sharp metal fins of front and rear coils.
• Make sure air conditioner does not fall during
installation.
CAUTION
REQUIRED TOOLS:
• Tight Fitting gloves
• Standard screwdriver
• Phillips screwdriver
• Pliers
• Sharp knife
• 3/8-inch open end
wrench or adjustable
wrench
• 1/4-inch hex socket
and ratcher
• Tape measure
• Electric drill
• 1/4-inch drill bit
ITEM NAME OF PARTS Q'TY
A SHORT SCREW 14
B WOOD SCREW 2
C WOOD SCREW 2
D L BRACKET 3
E FOAM STRIP 1
F FOAM SEAL 1
G SIDE CURTAIN 2
H UPPER GUIDE 1
I DRAIN PIPE 1
ENGLISH

INSTALLATION
Pick a location which will allow you to blow the cold
air into the area you want. Windows used for
installation must be strong enough to support the
weight of the air conditioner. Good installation with
special attention to the proper position of the unit will
lessen the chance that service will be needed.
If air conditioner is blocked by a storm window frame,
see step 9 on page 7 before beginning to install.
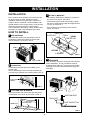
HOW TO INSTALL
SIDE CURTAINS
Insert the side curtains into the guides of the air
conditioner. Fasten the curtains to the unit with
screws (ITEM A), as shown in FIG. 2.
FOAM STRIP
Cut the adhesive-backed foam strip (ITEM E) to the
window width.
Remove the backing from the foam strip and attach the
foam strip to the underside of the bottom window. (FIG. 3)
LOCATING UNIT IN WINDOW
Open the window and mark center line with pencil
on the center of the inner sill, as shown in FIG. 4.
ATTACH L BRACKET
• Use screws (ITEM A) to install the L brackets on
the outer sill as shown. See FIG. 5.
• The bracket helps to hold unit securely in place.
Be sure to place bracket edge flush against back
of inner sill. See FIG. 5.
• lf air conditioner is blocked by storm window
frame, see step 9.
DRAINAGE
First, be sure to insert the drain pipe into base pan
before installation. The air conditioner must be
installed with a slight tilt (
1
/4”)downward for proper
drainage of excess condensed water through the
drain pipe.
-6-
OUTSIDE
INSIDE
L
BRACKET
OUTER SILL
INNER SILL
ITEM A
7.5"
7.5"
CENTER LINE
DRAIN PIPE
DRAIN CAP
BASE PAN REAR
DRAIN PIPE
BASE PAN BOTTOM
INSTALLATION
1
4
2
3
ITEM A
ITEM A
ITEM A
FOAM STRIP
(ITEM E)
ROOM SIDE
CENTER LINE
INNER SILL
FIG. 2
FIG. 3
FIG. 4
FIG. 5
FIG. 6
5

-7-
ENGLISH
INSTALLATION
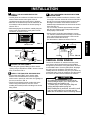
INSTALL THE AIR CONDITIONER IN THE
WINDOW
• Carefully lift the air conditioner and slide it into the open
window. Make sure the bottom guide of the air
conditioner drops into the notches of the L brackets.
• When the air conditioner drops into the L brackets, the
air conditioner will be centered in window opening as
shown in FIG. 7.
• While steadying the air conditioner, carefully bring the
window sash down behind the upper guide of the air
conditioner, as shown in FIG. 8.
SECURE THE GUIDE PANELS
Extend the guide panels (ITEM G) to fill the window
opening using 2 ITEM B and 2 ITEM C screws to secure
them, as shown in FIG. 9.
INSTALL THE FOAM SEAL AND SASH LOCK
• Cut the foam seal (ITEM F) to the window width.
Stuff the foam seal between the lower and upper
window sash to prevent air and insects from getting into
the room, as shown in FIG. 9.
• Fasten the remaining L bracket on either side of the
window using screw (ITEM A). See FIG. 9 inset.
Installing this bracket prevents unit falling from window
being raised.
IF AIR CONDITIONER IS BLOCKED BY STORM
WINDOW FRAME
• If storm window presents interference, fasten a 2" wide
wood strip to the inner window sill across the full width of
the sill. The wood strip should be thick enough to raise
the height of the window sill so that the unit can be
installed without interference from the the storm window
frame. See FIG. 10.
Top of wood strip should be approximately 3/4" higher
than the storm window frame to help condensation to
drain properly to the outside.
• Install a second wood strip (approximately 6" long by
1
1
/2" wide and same thickness as first strip) in the center
of the outer sill flush against the back of the inner sill.
Screw the L brackets into this strip.
This will raise the L bracket as shown in FIG. 10.
REMOVAL FROM WINDOW
Turn the air conditioner off, and disconnect the power
cord. Remove the L bracket and the screws installed
through the top and bottom of the guide panels, and save
for reinstallation later. Close the guide panels. Keeping a
firm grip on the air conditioner, raise the sash, and
carefully tilt the air conditioner away from you to drain any
condensate water. Lift the air conditioner from the window
and remove the foam seal from between the windows.
• Air conditioners covered in this manual pose an
excessive weight hazard. Two or more people are
needed to move and install the unit.
To prevent injury or strain, use proper lifting and
carrying techniques when moving unit.
• When handling the air conditioner, be careful to avoid
cuts from sharp metal fins on front and rear coils.
• Make sure air conditioner does not fall during removal.
6
9
SEAL
WINDOW FRAME
BOTTOM
GUIDE
ABOUT
1
/4"
UPPER GUIDE
L
BRACKET
L BRACKET
FOAM SEAL
(
ITEM
E)
ITEM A
FIG. 9
FIG. 8
CAUTION
CENTER LINE
FIG. 7
7
8
INNER
SILL
WOOD STRIP MOUNTED
ON TOP OF INNER SILL
WOOD STRIP
FOR
L
BRACKET
L BRACKET
3/4"
CLEARANCE
1" MAX.
STORM
WINDOW
FRAME
OUTSIDEINSIDE
OUTER
SILL
FIG. 10

-8-
OPERATION
HOW AND WHY
Your room air conditioner provides the following
functions to make hot weather living more
comfortable:
• Cools and circulates room air.
• Lowers humidity by removing excess moisture.
• Filters out summertime dust, dirt, and some
airborne impurities.
The air conditioner performs these functions by
drawing room air through a filter which traps dust
and dirt particles. The air then passes over a
cooling coil which refrigerates the air and removes
excess moisture. The same air is then returned to
the room– cooler, drier, and cleaner. Moisture
removed from the room air is carried to the outside
and evaporated.
Your air conditioner is designed to be easy to
operate and to provide plenty of cooling power.
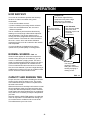
NORMAL SOUNDS
FIG. 11
Aside from the regular fan motor and compressor
sounds coming from your air conditioner, you will
once in a while hear a pinging sound. This is the
result of moisture being picked up from the air in the
room and thrown against the air conditioner's fan.
This is normal and should not be cause for concern.
Also, do not be alarmed if you hear a slight hissing or
gurgling sound coming from your air conditioner after
it is off. These are normal coolant noises.
CAPACITY AND RUNNING TIME
Proper unit size is important in deciding the desired
comfort for the area you want to cool. The proper
size is determined by the number of square feet in
the area to be cooled.
Whenever the heat or humidity load is above normal
the air conditioner must run longer and more often
to keep the desired temperature you have selected,
Under heavy heat load conditions the air conditioner
may need to run constantly to keep the temperature
you want.
At times using the HIGH FAN setting to circulate the
room air may make it comfortable even though you
do not have the air conditioner set to cool the air.
This will decrease your cost of use.
Fan
You may hear air
movement from the
fan.
Condenser
You may hear
droplets of water
hitting the condenser,
causing a pinging or
clicking sound.
Unit Vibration
The unit may vibrate
and make noise
because of poor wall
or window
construction.
Compressor
The modern high efficiency
compressor may have a high
pitched hum or pulsating
noise that cycles on and off.
FIG. 11

-9-
ENGLISH
OPERATION
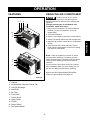
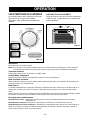
FEATURES
11. Cabinet
12. Horizontal Air Direction Control Tab
13. Cool Air Discharge
14. Inlet Grille
15. Air Filter
16. Front Grille
17. Control Knob
18. Upper Guide
19. Curtain
10. Power Switch
11. Fan Speed Switch
USING THE AIR CONDITIONER
To reduce the risk of fire, electric
shock, or injury to persons, read the important
SAFETY instructions section before operating this
appliance.
To begin operating the air conditioner after
installation, follow these steps:
1. Plug in the air conditioner. (To prevent electrical
hazards, do not use an extension cord or an
adapter plug.)
2. Turn Power Switch on.
3. Set the Control Knob control to the coolest setting.
4. Set the Fan Speed Switch control at the high level.
5. Adjust the air direction control tabs for comfortable
air flow.
6. Once the room has cooled, adjust the Control
Knob and Fan Speed Switch control to the setting
you find most comfortable.
NOTE : If the air conditioner is turned off, wait 3
minutes before restarting. This allows pressure
inside the compressor to equalize. Failure to wait 3
minutes before restarting may cause inefficient
operation.
If you move the Control Knob control to a warmer,
then immediately back to a cooler setting, the unit
will shut off. Wait 3 minutes before restarting.
Refer to the AIR CONDITIONER FEATURES
section for other settings.(See page 10)
F
A
N
S
PE
E
D
PO
W
ER
FA
N
O
NL
Y
CO
O
L
O
N
1
3
2
8
10
711
6
5
4
9
FIG. 12

-10-
AIR CONDITIONER FEATURES
The controls featured in this manual are
representative of the many models available. Your
model may look slightly different.
AIR DIRECTION ADJUSTMENT
Using the Control Tabs, the air flow can be directed
to the left, right, straight ahead, or any combination
of these directions.
OPERATION
FIG. 13
FIG. 14
Power
Turns air conditioner on and off.
NOTE: If the air conditioner is off and is then turned on while set in the Cool On mode, it wil take
aproximately 3 minutes for the compressor to start and cooling to begin.
Fan Speed
Use to set the fan speed to LOW or HI.
Mode/Temp Control
Use to set the air conditioner to the Fan Only or the Cool On mode.
Fan Only Mode
Use Fan Only at HI or LOW Fan Speed to provide air circulation and filtering without cooling.
Cool On Mode
The mode/Tem p control is used to maintain the room temperature. When set in the Cool On mode, the
compressor will cycle on and off to keep the room at the desired level of comfort.
Use Cool On with HI or LOW Fan Speed for cooling. Tur n the knob toward the cooler area for the indoor air
to become cooler. Tur n the knob toward the Cool On area for the indoor air to become warmer.
Cooling Descriptions
For Normal Cooling - Select the Cool On mode with the Mode/Tem p knob set at the midpoint(5).
For Maximum Cooling - Select the Cool On Mode with the Mode/Tem p knob set toward the cooler area(9).
For Quieter & Nighttime Cooling - Select the Cool On mode with the Mode/Temp knob set toward the Cool
On. area(1).
NOTE: If you move the mode/Tem p control knob from the Cool On setting to the Fan Only setting, wait least
3 minutes before switching back to a Cool On setting.

-11-
ENGLISH
MAINTENANCE
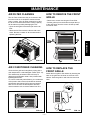
AIR FILTER CLEANING
The Air Filter will become dirty as it removes dust
from the inside air. It should be washed at least
every 2 weeks. If the Air Filter remains full of dust,
the air flow will decrease and the cooling capacity
will be reduced, possibly damaging the unit.
• Open the inlet grille forward and pull out the air
filter.
• Wash the Air Filter under the faucet with warm
water. Be sure to shake off all the water before
replacing the filter.
AIR CONDITIONER CLEANING
Clean the front grille and inlet grille by wiping with a
cloth dampened in a mild detergent solution (FIG. 16).
The cabinet may be washed with mild soap or
detergent and lukewarm water, then polished with
liquid appliance wax.
To ensure continued peak efficiency, the condenser
coils (outdoor side of the unit) should be checked
periodically and cleaned if they become clogged
with soot or dirt from the atmosphere. Brush or
vacuum exterior coils to remove debris from fins.
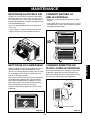
HOW TO REMOVE THE FRONT
GRILLE
• Remove two screws securing the Front Grille.
• Pull the grille up from the bottom and pull the top
of the grille away from the case to lift the top tabs
out of their stots.
HOW TO REPLACE THE
FRONT GRILLE
Attach the front grille to the cabinet by inserting the
tabs on the grille into the slots on the front of the
cabinet. Push the grille in until side ribs insert into
case.
FA
N S
P
E
E
D
P
OW
E
R
FAN
O
N
L
Y
CO
O
L
O
N
Side Rib
FIG. 15
FIG. 16
FIG. 17
FIG. 18

-12-
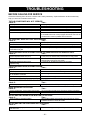
TROUBLESHOOTING
THE AIR CONDITIONER WILL NOT OPERATE
Check if... Then...
AIR FROM UNIT DOES NOT FEEL COLD ENOUGH.
Check if... Then...
THE AIR CONDITIONER COOLING, BUT ROOM IS TOO WARM – ICE FORMING ON COOLING COIL BEHIND INLET GRILLE.
Check if... Then...
Then...
THE AIR CONDITIONER COOLING, BUT ROOM IS TOO WARM
Check if...
THE AIR CONDITIONER TURNS ON AND OFF RAPIDLY.
Check if... Then...
NOISE WHEN UNIT IS COOLING.
Check if... Then...
WATER DRIPPING INSIDE ROOM WHEN UNIT IS COOLING.
Check if... Then...
WATER DRIPPING OUTSIDE WHEN UNIT IS COOLING.
Check if... Then...
Fan Speed Switch in LOW position. Turn Fan Speed Switch to HI position
Control Knob set too warm. Turn Mode/Temp Control Knob clockwise to a cooler setting.
Room temperature below 70°F (21°C). Cooling may not occur until room temperature rises above 70°F (21°C).
Temperature sensing tube touching evaporator coil,
Remove front grille, and straighten tube away from evaporator coil.
located behind front grille.
Outdoor temperature below 70°F (21°C).
To defrost the coil, set Mode/Temp Control Knob to Fan Only position.
Air filter may be dirty. Clean filter. Refer to Maintenance section of owner's manual. To defrost,
set Mode/Temp control to Fan Only position.
Mode/Temp control Knob set too cold for
night-time cooling.
To defrost the coil, set Mode/Temp control to Fan Only position.
Dirty air filter – air restricted. Clean air filter. Refer to Maintenance section of owner's manual.
Mode/Temp control Knob set too warm. Control Knob clockwise to a COOLER setting.
Front of unit is blocked by drapes, blinds, furniture, Clear blockage in front of unit.
etc. Air distribution is restricted.
Doors, windows, registers, etc. open. Cold air escapes. Close doors, windows, registers, etc.
Unit recently turned on in hot room. A
llow additional time to remove stored heat from walls, ceiling, floor, and furniture.
Outside temperature is extremely hot.
Set Fan Speed Switch on HIGH speed to bring air past cooling coils faster.
Sound of fan hitting water – from the moisture removal system.
This is normal when humidity is high. Close doors, windows, and registers.
Window vibration – poor installation. Refer to installation instructions or check with installer.
The air conditioner is improperly installed. Tilt air conditioner slightly to the outside to allow water drainage. Refer to
installation instructions or check with installer.
The unit is removing large quantities of moisture This is normal during excessively humid days.
from humid room.
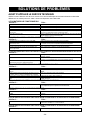
BEFORE CALLING FOR SERVICE
Check the following list to be sure a service call is really necessary. A quick reference to this manual may
help you avoid an unneeded service call.
Wall plug disconnected. Push plug firmly into wall outlet.
House fuse blown or circuit breaker tripped. Replace fuse with time delay type or reset circuit breaker.
MODE selector is OFF position. Turn MODE selector to the desired COOL setting.
Unit was turned off and then on too quickly. Turn unit off and wait 3 minutes before restarting.
TEMP Control set warmer than room temperature. Turn TEMP Control clockwise to a cooler setting (higher number).
The current interrupter device is triped Press the RESET button located on the power cord plug
If the RESET button will not stay engaged, discontinue use of the air
conditioner and contact a qualified service technician.

-13-
ENGLISH
MEMO

TABLE DES MATIÈRES
TABLE DES MATI ÈRES
.....................
...............................................
...............................................
.................
............
......................................
..............................................
......................
14
GARANTIE 14
SÉCURITÉ 15
Recommandations de sécurité
15
EXIGENCES ÉLECTRIQUES 16
INSTALL ATION 17
Exigences de l’installation 17
Installation 18
..........
18
..........
............................
............................
........................................
....
18
Comment procéder à l’installation
Retirer le climatiseur de la fenêtre
FONCTIONNEMENT 20
Comment et pourquoi 20
Sons normaux 20
Capacité et durée de fonctionnement 20
Caractéristiques
.....................................
........................
..........................
..........................
..........
.....
...........
.............
21
Utilisation du climatiseu 21
Caractéristiques du climatiseur 22
MAINTENANCE
.....................................
23
Nettoyage du filtre à air 23
Nettoyage de l’appareil 23
Comment retirer la grille frontale 23
......
23
Comment remettre en place la grille frontale
SOLUTION DE PROBLÈMES 24
Avant d’appeler le service technique 24
- 14 -
ACCORDS SUR LA PROTECTION
DU MASTER
..........................................
27
...................................
Au dos
NUM ROS DE SERVICE
TECHNIQUE
É
Sears Canada Inc., Toronto, Ontario, Canada M5B 2B8
Garantie Limitée d’une Année
S i cet appareil est installé, utilisé et entretenu selon toutes les instructions fournies avec, en
cas de panne due à
des défauts de matériel ou de fabrication arrivées pendant la première
année suivant la date d’achat marquez
1
-
800
-
4
-
MY - HOME®
pour arranger des réparations
gratuites.
Cinq Années de Garantie Limitée pour le Système de Réfrigération Hermétique
Pendant les cinq années suivant la date d’achat, et s i cet appareil est installé, utilisé et entretenu selon toutes les
instructions fournies, le système de réfrigération hermétique sera réparé gratuitement en cas de dé faut matériel
ou de fabrication.
La couverture des garanties n’est valable que pour les 90 jours suivant la date d’achat si ce
produit est utilis é dans pour des raisons non familiales et privées.
Cette garantie ne recouvre que des d éfauts de matériel ou de fabrication.
Sears ne pr
end PAS en charge
:
1.Des éléments à usure sous un usage normal, y compris, entre autre, filtres, courroies,
ampoules et sacs.
2.Un technicien qualifié pour instruire l’usager sur l’installation, le fonctionnement ou l’entretien
corrects du produit.
3.U
n technicien qualifié pour nettoyer ou ent retenir ce produit.
4.D
es dégâts ou des pannes du produit s’il n’est pas install é, utilisé ou entretenu selon toutes les
instructions qui l’accompagnent.
5.D
es dégâts ou des pannes du pro duit découlant d’accidents, d’abus, d’usage incorrect ou
dans des buts différent
s à ce ux pour lesquel s il a été conçu.
6.D
es dégâts ou des pannes du produit dus à l’utilisation de détergents, de produits nettoyants ou chimiques, ou
d’ustensiles différents à ceux qui sont recommandés dans les instructions qui l’accompagne
nt.
7.D
es dégâts ou des pannes des pièces ou des systèmes issus de modifications non autorisées
à l’appareil.
Négation de garanties tacites ; limitation des recours
Le seul et unique remède accordé à l’usager avec cette garantie limitée sera la réparation ici
décrite. Les garanties
tacites, telles les garanties de conformité ou d’aptitude à des fins
spécifiques, sont limitées à une année où à la
période la plus courte permise par la loi. Sears ne sera pas responsable pour des dommages accidentels ou
conséquents. Certains états ou provinces ne permettent pas d’exclusions ou de limitations sur les dommages
accidentels ou conséquents, ou la limitation de la durée des garanties tacites de conformité ou d’aptitude à des fins
spécifiques, et il est donc possible que ces exclusions ou limitations ne soient pas
valables dans votre cas.
Cette garantie est seulement valable pour des appareils utilis
és aux Etats
-Unis ou au Canada.
Cette garantie vous accorde des droits particuliers,et il est possible que vous enayez d’autres
qui varient d’ état en état.
GARANTIE

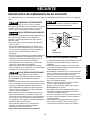
SÉCURITÉ
IMPORTANTES RECOMMANDATIONS DE SÉCURITÉ
CONCERNANT VOTRE SÉCURITÉ
IDÉES POUR ÉCONOMISER L’ÉNERGIE
Prise à 3 fiches
Remise
à zéro
Test
Prise de terre
Câble
d’alimentation
Prise murale
avec
3 entrées
Les recommandations qui suivent vous indiqueront comment utiliser votre CLIMATISEUR DE PIÈCE sans vous blesser ni endommager
celui-ci.
Ne pas stocker ni utiliser de l’essence ni aucun autre liquide
inflammable ou produisant des vapeurs inflammables à proximité de
cet appareil ni d’aucun autre. Lire les étiquettes concernant les
avertissements liés à l’inflammabilité ou à d’autres dangers.
Pour éviter les risques d’incendie ou de
décharge électrique. N’utiliser ni prolongateur ni adaptateur.
Ne retirer aucune fiche du câble d’alimentation.
Pour réduire les risques d’incendie, de décharge électrique,
ou de blessures personnelles lors de l’utilisation du
climatiseur, respecter les précautions de base, incluant
celles qui suivent :
• Assurez-vous que le courant est adapté au modèle que
vous avez choisi.
• Si le climatiseur doit être installé sur une fenêtre, vous
voudrez sans doute d’abord nettoyer les deux faces de la
vitre. Si la fenêtre est composée de 3 panneaux dont un
panneau écran, ce dernier doit être retiré avant
l’installation.
• Assurez-vous que le climatiseur a été installé correctement
et dans le respect des recommandations de sécurité en
fonction des instructions d’installation fournies dans ce
manuel. Conserver ce manuel et les instructions
d’installation pour vous y reporter dans le futur lors du
retrait et de la réinstallation de cet appareil.
• Utilisez des gants lors des manipulations de l’appareil.
Faites attention de ne pas vous couper avec les extrémités
métalliques des serpentins avant et arrière.
L’évaluation électrique complète de votre nouveau
climatiseur figure sur la plaque de série. Vous reporter à
cette évaluation lors de la vérification des exigences
électriques.
• Assurez-vous que le climatiseur est correctement relié à la
terre. La connexion à la terre est importante afin de réduire
les risques de décharges électriques et d’incendies. Le
câble d’alimentation est équipé d’une prise à trois fiches
dont une reliée à la terre pour une meilleure protection
contre les risques de décharges.
• Votre climatiseur doit être correctement branché sur une
prise murale disposant d’une connexion à la terre. Si la
prise murale que vous voulez utiliser n’a pas de connexion
à la terre ou n’est pas protégée par un fusible temporisé
ou un disjoncteur, faites appel à un électricien qualifié pour
installer une prise murale conforme.
• Na pas utiliser le climatiseur avec une couverture
protectrice. Ceci pourrait provoquer un problème
mécanique à l’intérieur du climatiseur.
• Ne pas utiliser de prolongateur ou d’adaptateur.
• La capacité du climatiseur doit correspondre à la taille de
la pièce afin que son fonctionnement soit efficace et
satisfaisant.
• Installer le climatiseur à l’ombre. Une fenêtre orientée
vers le nord est le meilleur emplacement parce qu’il est à
l’ombre presque toute la journée.
• Ne pas bloquer la circulation de l’air, à l’intérieur par des
stores, des rideaux ou des meubles, et à l’extérieur par
des arbustes, des clôtures ou des constructions.
• Fermer les ouvertures du sol et des murs de même que
le conduit de la cheminée afin que l’air froid ne s’échappe
pas par ces différents conduits.
• Fermer les stores et les tentures des autres fenêtres
durant les moments les plus ensoleillés.
• Nettoyer le filtre à air comme indiqué dans la section
MAINTENANCE de ce manuel.
• Une isolation correcte et un nettoyage saisonnier de
votre maison permettront de maintenir l’air chaud à
l’extérieur et l’air froid à l’intérieur.
• Les arbres, les plantes ou les bannes extérieures faisant
de l’ombre à la maison faciliteront la mise en place du
travail du climatiseur.
• Faire fonctionner les appareils générant de la chaleur,
tels cuisinières, machines à laver, séchoirs et lave-
vaisselle durant le moment le plus frais de la journée.
SUR LA PRÉVENTION D’ACCIDENTS
SUR LES PRÉCAUTIONS ÉLECTRIQUES
FRANÇAIS
- 15 -

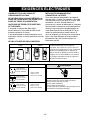
EXIGENCES ÉLECTRIQUES
115V~ 230V~
Utiliser une prise Murale encastrée
125V standard,
boîtier de 3 entrées
de 15A, 125V AC.
NOTE: La forme peut différer suivant les modèles.
OBSERVER TOUS LES CODES ET
ORDONNANCES LOCAUX.
NE RETIRER SOUS AUCUN PRÉTEXTE LA
FICHE DE CONNEXION À LA TERRE DE LA
PRISE DU CÂBLE D’ALIMENTATION.
UNE PRISE DE TERRE EST EXIGÉE SUR
CET APPAREIL.
Il est exigé un courant de 250V 60Hz,
exclusivement AC un fusible de 20A et une
correcte connexion à la terre.
Il est recommandé un fusible temporisé ou un
disjoncteur. Utiliser un circuit particulier pour cet
appareil.
NE PAS UTILISER DE PROLONGATEUR.
MÉTHODE RECOMMANDEE DE
CONNEXION À LA TERRE.
Pour votre sécurité personnelle, cet appareil
doit être relié à la terre. Cet appareil a un câble
d’alimentation muni d’une prise à 3 fiches avec
connexion à la terre. Afin de réduire au
maximum les risques de décharge, le câble doit
être branché sur une prise murale encastrée et
reliée à la terre suivant la dernière édition du
Code Électrique National (ANSI/NFPA 70) et
toutes les ordonnances et codes locaux. Si
vous ne disposez pas d’une prise murale de ce
type, c’est votre obligation et responsabilité
personnelle d’en faire installer une par un
électricien qualifié.
Le câble d’alimentation inclut un dispositif
interrupteur. Sur le boîtier de la prise il existe une
touche de test et une de remise à zéro. Le dispositif
doit être testé périodiquement en appuyant sur
TEST et ensuite sur RESET. Si la touche TEST ne
bouge pas ou si la touche RESET ne se maintient
pas engagée, interrompre l’usage de l’appareil et
contacter un électricien agréé
250V standard,
boîtier de 3 entrées
de 15A, 250 AC.
250V standard,
boîtier de 3 entrées
de 20A, 250V AC.
Utiliser un fusible
temporisé ou un
disjoncteur de 15 AMP.
Utiliser un fusible
temporisé ou un
disjoncteur de 20 AMP.
AVERTISSEMENT
Risque de décharge électrique
Brancher la prise sur une prise murale à 3 entrées
Ne pas retirer la fiche reliée à la terre
Ne pas utiliser d’adaptateur
Ne pas utiliser de prolongateur
Le non respect de ces instructions peut provoquer la mort,
un incendie ou une décharge électrique.
- 16 -

INSTALLATION
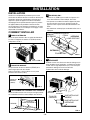
MATÉRIEL D’INSTALLATION
533 et 889mm
305mm
Seuil interieur
Decalage
Fenetre
Cadre
Seuil
Exterieur
Mur interieur
FIG. 1
G A B C
H
I
D
F
E
PRÉCAUTION
OUTILS NÉCESSAIRES:
NOM DES PIÈCES ET
QUANTITÉS
A VIS COURTE
VIS À BOIS
VIS À BOIS
ÉQUERRES EN L
BANDE DE MOUSSE
JOINT EN MOUSSE
PAROI LATÉRALE
GUIDE SUPÉRIEUR
TUBE DE DRAINAGE
14
B2
C2
D3
E1
F1
G2
H1
I1
CONDITIONS D’INSTALLATION
Le climatiseur doit être installé sur une fenêtre standard à
guillotine à deux panneaux ayant une ouverture d’une
largeur comprise entre 533 et 889mm (FIG. 1). Le châssis
inférieur doit ouvrir de manière à laisser une ouverture
verticale de 305mm. Les parois latérales et la partie
postérieure du climatiseur doivent disposer d’un espace
permettant la circulation de l’air dans le condenseur afin
d’éliminer la chaleur. La partie postérieure de l’appareil
doit donner sur l’extérieur et non sur une autre pièce ou
un garage.
COURANT ÉLECTRIQUE
Vérifier le courant disponible. Le courant disponible fourni
doit être le même que celui qui figure sur la plaque
nominative de l‘appareil (sur la gauche du coffrage). Tous
les modèles sont équipés d’une prise à 3 fiches prévue
pour fournir un service adéquat et une connexion sure à
la terre. Ne faire aucune modification sur la prise. Ne pas
utiliser d’adaptateur. Si votre prise murale ne coïncide pas
avec la prise du câble, faites appel à un électricien qualifié
pour effectuer les corrections nécessaires. CONSERVER
L’EMBALLAGE et LE MANUEL DE L’USAGER pour vous
y reporter dans le futur. L’emballage original est la
meilleure manière de ranger l’appareil en hiver ou quand il
n’est pas utilisé.
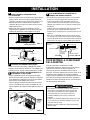
Pour éviter les risques de blessures, des dommages
personnels ou d’endommager l’appareil à cause de son
poids ou des angles pointus :
• Les climatiseurs couverts par ce manuel sont
généralement lourds. Deux personnes ou plus sont
nécessaires pour déplacer et installer un appareil. Afin
d’éviter de vous blesser ou d’être sous pression, utiliser
les méthodes correctes pour soulever et transporter
l’appareil.
• Inspecter soigneusement l’endroit dans lequel le
climatiseur sera installé. Assurer vous que cet endroit
pourra supporter le poids de l’appareil pendant
longtemps.
• Manipuler soigneusement le climatiseur. Utiliser des
gants de protection lorsque vous le soulevez ou le
déplacez. ÉVITER le contact avec les extrémités
métalliques des serpentins avant et arrière.
• Gants moulants
• Tournevis standard
• Tournevis Phillips
• Pince
• Couteau pointu
• Clé avec ouverture de
3/8 pouces ou clé
réglable
• Prise hexagonale de 1/4
pouces et rochet
• Centimètre
• Perçeuse électrique
• Mèche de 1/4 de pouce
FRANÇAIS
- 17 -

PAROIS LATÉRALES
BANDE DE MOUSSE
EMPLACEMENT DE L’APPAREIL SUR LA FENÊTRE
ÉQUERRES EN L
DRAINAGE
EXTÉRIEUR
INTÉRIEUR
ÉQUERRE EN L
REBORD
EXTÉRIEUR
REBORD INTÉRIEUR
ITEM A
7.5"
7.5"
LIGNE CENTRALE
TUBE DE
DRAINAGE
CAPUCHON DU
TUBE DE
DRAINAGE
BASE MÉTALLIQUE
ARRIÈRE
BASE MÉTALLIQUE
INFÉRIEURE
TUYAU DE
DRAINAGE
1
4
2
3
ITEM A
ITEM A
ITEM A
BANDE DE
MOUSSE
(ITEM E)
VERS LA PI
ÈCE
LIGNE CENTRALE
REBORD
FIG. 2
FIG. 3
FIG. 4
FIG. 5
FIG.
6
5
INSTALLATION
INSTALLATION
Choisissez un emplacement permettant que l’air froid
souffle dans la direction désirée. Les fenêtres utilisées pour
l’installation doivent être suffisamment résistantes pour
supporter le poids de l’appareil. Une bonne installation
accompagnée d’une spéciale attention quant à la position
de l’appareil diminue la possibilité d’avoir besoin d’un
service technique. Si le climatiseur est bloqué par le cadre
d’une double fenêtre, voir la rubrique 9 sur la page 7 avant
de procéder à l’installation.
COMMENT INSTALLER
Insérer les parois latérales dans les guides du climatiseur.
Les fixer sur l’appareil à l’aide des vis (ITEM A) comme
indiqué dans la FIG. 2.
• Utiliser les vis (ITEM A) pour installer les équerres en L
sur le rebord extérieur comme indiqué. Voir FIG.5.
• Les équerres vous aident à maintenir l’appareil en place
en toute sécurité. Assurez-vous de placer l’angle de
l’équerre contre la partie arrière du rebord intérieur. Voir
FIG.5.
• Si le climatiseur est bloqué par une double fenêtre, voir la
rubrique 9.
Couper la bande de mousse adhésive (ITEM E) de la
même largeur que celle de la fenêtre.
Retirer la protection et la faire adhérer sous la partie
inférieure de la fenêtre. (FIG.3)
D’abord, assurez-vous d’insérer le tube de drainage sur la
base métallique avant l’installation. Le climatiseur doit être
installé avec un léger déplacement (1/4’’) vers le bas pour
permettre le drainage correct d’une excessive
condensation dans le tube de drainage.
Ouvrir la fenêtre et tracer avec un crayon une ligne centrale
sur le rebord de la fenêtre, comme indiqué dans la FIG.4.
- 18 -

INSTALLATION
INSTALLATION DU CLIMATISEUR SUR
LA FENÊTRE
ASSURER LES PANNEAUX DES GUIDES
INSTALLER LE SCELLAGE EN MOUSSE ET LE
BLOCAGE DE LA GUILLOTINE
SI LE CLIMATISEUR EST BLOQUÉ PAR LE
CADRE D’UNE DOUBLE FENÊTRE.
POUR RETIRER LE CLIMATISEUR
DE LA FENÊTRE
6
9
SCELLAGE
GUIDE SUPÉRIEUR
GUIDE INFÉRIEUR
ENVIRON
1
/4"
CADRE DE LA FENÊTRE
ÉQUERRE EN L
ÉQUERRE EN L
BANDE DE
MOUSSE
(
ITEM
E)
ITEM A
FIG. 9
FIG.
8
PRÉCAUTION
LIGNE CENTRALE
FIG. 7
7
8
REBORD INTÉRIEUR
BANDE DE BOIS
POUR LES
ÉQUERRES
ÉQUERRE
EN L
ESPACE DE 3/4"
1’’ MAX
CADRE
DE LA DOUBLE
FENÊTRE
EXTÉRIEURINTÉRIEUR
REBORD EXTÉRIEUR
FIG. 10
• Soulever soigneusement le climatiseur et le glisser dans la
fenêtre ouverte. Assurez-vous que le guide inférieur du
climatiseur coïncide avec les encoches des équerres en L.
• Quand le climatiseur s’emboîte dans les équerres le
climatiseur doit être centré sur la fenêtre ouverte comme
indiqué dans la FIG.7.
• Quand vous mettez en place le climatiseur, amener
soigneusement la guillotine vers le bas derrière le guide
supérieur du climatiseur comme indiqué sur la FIG.8.
• Si la double fenêtre présente une ingérence, fixer une bande
de bois de 2’’ sur toute la largeur du rebord intérieur de la
fenêtre. Cette bande doit être suffisamment épaisse pour
élever la hauteur de la fenêtre de manière à pouvoir installer
l’appareil sans interférence avec le cadre de la double fenêtre.
Voir FIG.10.
La partie supérieure de la bande de bois doit être plus haute
d’environ 3/4 ’’ que le cadre de la double fenêtre pour
permettre que la condensation soit correctement évacuée vers
l’extérieur.
• Placer une seconde bande de bois (d’environ 6’’ de long et 1
1/2’’ de large et de la même épaisseur que la première bande)
au centre du rebord extérieur contre la partie arrière du rebord
intérieur. Visser les équerres comme indiqué dans la FIG.10.
• Les climatiseurs couverts par ce manuel présentent des
risques dus à leur poids. Deux personnes ou plus sont
nécessaires pour manipuler et installer l’appareil. Afin
d’éviter des blessures ou des tensions, utiliser les
techniques indiquées pour soulever ou transporter
l’appareil.
• Lorsque vous manipulez l’appareil faites attention de ne pas
vous couper avec les extrémités métalliques pointues des
serpentins avant et arrière.
• Assurez-vous que le climatiseur ne risque pas de tomber
durant le retrait.
• Couper la bande de mousse de la largeur de la fenêtre.
Bourrer la mousse entre les parties inférieure et supérieure
de la guillotine pour empêcher l’air et les insectes d’entrer
dans la pièce, comme indiqué dans la FIG.9.
• Fixer les équerres restantes de chaque côté de la fenêtre
avec les vis (ITEM A). Voir la FIG.9. L’installation de cette
équerre empêche que l‘appareil tombe quand la fenêtre est
levée.
Déplier les coulisses des guides (ITEM G) pour remplir
l’ouverture de la fenêtre en utilisant les 2 vis ITEM B et les
2 ITEM C pour les assurer, comme indiqué dans la FIG.9.
Éteindre le climatiseur et débrancher le câble
d’alimentation. Retirer les équerres et les vis des parties
supérieure et inférieure des panneaux guides, et
conservez-les pour une réinstallation future. Plier les
panneaux coulissants. Maintenir une pression ferme sur le
climatiseur, lever la guillotine de la fenêtre et déplacer
soigneusement le climatiseur en le maintenant loin de vous
pour éviter une possible condensation d’eau. Soulever le
climatiseur et retirer la bande de mousse se trouvant entre
les deux panneaux de la fenêtre.
BANDE DE BOIS MONTÉE SUR LA
PARTIE SUPÉRIEURE DU REBORD
INTÉRIEUR
FRANÇAIS
- 19 -

FONCTIONNEMENT
Ventilateur
Condensateur
Vibration de l’appareil
Compresseur
FIG. 11
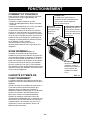
COMMENT ET POURQUOI
Votre climatiseur dispose des fonctions suivantes
permettant de vivre plus agréablement une
température élevée.
• Rafraîchit l’air qui circule dans la pièce.
• Réduit l’humidité générale en retirant l’humidité
excessive.
• Filtre les poussières dues à la saison, les saletés
et les impuretés contenues dans l’air.
Le climatiseur réalise ces fonctions en envoyant
l’air dans un filtre qui retient les poussières et les
particules. L’air passe par un serpentin qui refroidit
l’air et en retire l’humidité excessive. Ce même air
revient ensuite sur le réfrigérant, le séchage et le
nettoyage. L’humidité excessive ôtée est évacuée
vers l’extérieur où elle s’évapore.
Vote climatiseur est conçu pour offrir un
fonctionnement simple et offrir un grand pouvoir
réfrigérant.
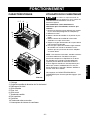
SONS NORMAUX
FIG. 11
Le moteur du ventilateur et le compresseur
émettent les bruits que proviennent du climatiseur :
vous entendrez comme un tintement. Ce tintement
est le fruit de l’humidité absorbée dans l’air de la
pièce et envoyée dans le ventilateur du climatiseur.
Ce bruit est normal et ne doit pas vous inquiéter.
Ne vous alarmez pas non plus si vous entendez
des sifflements ou des gargouillements émanant du
climatiseur après qu’il soit éteint. Ce sont les bruits
normaux de la réfrigération.
CAPACITÉ ET TEMPS DE
FONCTIONNEMENT
La taille du climatiseur est importante quand vous
décidez du niveau de confort désiré pour la pièce à
réfrigérer.
Quand la chaleur ou l’humidité sont supérieures à
la normale le climatiseur doit fonctionner plus
longtemps et plus souvent pour maintenir la
température désirée sélectionnée. En cas de fortes
chaleurs le climatiseur doit fonctionner tout le
temps pour maintenir la température désirée.
Pendant les moments d’utilisation le choix de
VENTILATION PUISSANTE pour la circulation d’air
contenu dans la pièce peut donner une sensation
agréable même si le climatiseur n’est pas sur la
position d’air froid. Et cela permet, de plus, de
réduire le coût d’utilisation.
Le compresseur super efficace et
moderne peut avoir un bourdonnement
sonore ou une sorte de palpitation
dans les cycles on et off.
Vous pouvez entendre
un mouvement d’air
provenant du
ventilateur.
L’appareil peut vibrer et
faire du bruit se devant à
un mur peu épais ou à la
nature de la construction
de la fenêtre.
Vos pouvez entendre des
gouttelettes heurter le
condensateur, produisant
un bruit qui peut être
semblable à un déclic.
FIG.11.
- 20 -
La page est en cours de chargement...
La page est en cours de chargement...
La page est en cours de chargement...
La page est en cours de chargement...
La page est en cours de chargement...
La page est en cours de chargement...
La page est en cours de chargement...
La page est en cours de chargement...
-
 1
1
-
 2
2
-
 3
3
-
 4
4
-
 5
5
-
 6
6
-
 7
7
-
 8
8
-
 9
9
-
 10
10
-
 11
11
-
 12
12
-
 13
13
-
 14
14
-
 15
15
-
 16
16
-
 17
17
-
 18
18
-
 19
19
-
 20
20
-
 21
21
-
 22
22
-
 23
23
-
 24
24
-
 25
25
-
 26
26
-
 27
27
-
 28
28


LG 35900 Le manuel du propriétaire
- Catégorie
- Cheminées
- Taper
- Le manuel du propriétaire
- Ce manuel convient également à
dans d''autres langues
- English: LG 35900 Owner's manual
Documents connexes
-
LG 35910 Le manuel du propriétaire
-
-
-
LG TWC121LLMK0 Le manuel du propriétaire
-
-
-
-
LG LW6017R Le manuel du propriétaire
-
-