VTech ErisStation VCS702 Manuel utilisateur
- Catégorie
- Répondeurs
- Taper
- Manuel utilisateur
Ce manuel convient également à

6TFSmTNBOVBM
.PEFM7$4
BC
ErisStation
businessphones.vtech.com
Conference Phone
with Two Wireless Mics

$POHSBUVMBUJPOT
on purchasing your new VTech product. Before using this product, please read
*NQPSUBOUTBGFUZJOTUSVDUJPOT on page i of this manual.
This manual includes the information and procedures necessary to install and
operate your new VTech product. Please review this manual thoroughly
to ensure proper installation and operation of this innovative and feature rich
VTech product. For support, shopping, and everything new at VTech, visit our
website at IUUQCVTJOFTTQIPOFTWUFDIDPN.
ErisStation
®
is a registered trademark of VTech Communications, Inc.
Orbitlink Wireless Technology
TM
is a trademark of VTech Communications, Inc.

i
When using your ErisStation Conference Phone, basic safety precautions should always be followed to
reduce the risk of fire, electric shock and injury to persons, including the following:
Read and understand all instructions.
Follow all warnings and instructions marked on the product.
Unplug this product from the wall outlet before cleaning. Do not use liquid or aerosol cleaners. Use a
damp cloth for cleaning.
Do not use this product near water such as near a bathtub, wash bowl, kitchen sink, laundry tub or
swimming pool, or in a wet basement or shower.
For pluggable equipment, the socket-outlet shall be installed near the equipment and shall be easily
accessible.
6. $"65*0/ Use only the batteries indicated in this manual. There may be a risk of explosion if a
wrong type of battery is used. Use only the supplied rechargeable battery or replacement battery
pack (BT183642/BT283642). Do not dispose of batteries in a fire. They may explode. Dispose of used
battery according to the information in 5IF3#3$
TFBM.
Use only the adapter included with this product. Incorrect adapter polarity or voltage can seriously
damage the product. Base unit power adapter: Input 100-240V AC 50/60 Hz; Output: 9V DC 1500mA.
Do not place this product on an unstable table, shelf, stand or other unstable surfaces.
Slots and openings in the back or bottom of the base unit and wireless mic are provided for ventilation.
To protect them from overheating, these openings must not be blocked by placing the product on a soft
surface such as a bed, sofa or rug. This product should never be placed near or over a radiator or heat
register. This product should not be placed in any area where proper ventilation is not provided.
This product should be operated only from the type of power source indicated on the marking label.
If you are not sure of the type of power supply in your office, consult your dealer or local power
company.
Do not allow anything to rest on the power cord. Do not install this product where the cord may be
walked on.
Never push objects of any kind into this product through the slots in the base unit or wireless mic
because they may touch dangerous voltage points or create a short circuit. Never spill liquid of any
kind on the product.
To reduce the risk of electric shock, do not disassemble this product, but take it to an authorized
service facility. Opening or removing parts of the base unit or wireless mic other than specified access
doors may expose you to dangerous voltages or other risks. Incorrect reassembling can cause electric
shock when the product is subsequently used.
Do not overload wall outlets and extension cords.
Unplug this product from the wall outlet and refer servicing to an authorized service facility under the
following conditions:
When the power supply cord or plug is damaged or frayed.
If liquid has been spilled onto the product.
If the product has been exposed to rain or water.
If the product does not operate normally by following the operating instructions. Adjust only those
controls that are covered by the operation instructions. Improper adjustment of other controls may
result in damage and often requires extensive work by an authorized technician to restore the
product to normal operation.
If the product has been dropped and the base unit and/or wireless mic has been damaged.
If the product exhibits a distinct change in performance.
Avoid using the ErisStation Conference Phone during an electrical storm. There is a remote risk of
electric shock from lightning.
Do not use the ErisStation Conference Phone to report a gas leak in the vicinity of the leak. Under
certain circumstances, a spark may be created when the adapter is plugged into the power outlet, or
when the wireless mic is replaced in its cradle. This is a common event associated with the closing
of any electrical circuit. The user should not plug the phone into a power outlet, and should not put a
charged wireless mic onto the charging cradle, if the phone is located in an environment containing
concentrations of flammable or flame-supporting gases, unless there is adequate ventilation. A spark
1.
2.
3.
4.
5.
7.
8.
9.
10.
11.
12.
13.
14.
15.
•
•
•
•
•
•
16.
17.
*NQPSUBOUTBGFUZJOTUSVDUJPOT

ii
in such an environment could create a fire or explosion. Such environments might include: medical
use of oxygen without adequate ventilation; industrial gases (cleaning solvents; gasoline vapors; etc.);
a leak of natural gas; etc.
Only put the wireless mic next to your mouth when it is in normal talk mode.
The power cables are intended to be correctly oriented in a vertical or floor mount position. The
prongs are not designed to hold the plug in place if it is plugged into a ceiling or cabinet outlet.
4"7&5)&4&*/4536$5*0/4
1SFDBVUJPOTGPSVTFSTPGJNQMBOUFEDBSEJBDQBDFNBLFST
Cardiac pacemakers (applies only to digital cordless telephones):
Wireless Technology Research, LLC (WTR), an independent research entity, led a multidisciplinary
evaluation of the interference between portable wireless telephones and implanted cardiac pacemakers.
Supported by the U.S. Food and Drug Administration, WTR recommends to physicians that:
1BDFNBLFSQBUJFOUT
Should keep the wireless telephone at least six inches from the pacemaker.
Should NOT place wireless telephones directly over the pacemaker, such as in a breast pocket, when it
is turned ON.
Should use the wireless telephone at the ear opposite the pacemaker.
WTR’s evaluation did not identify any risk to bystanders with pacemakers from other persons using
wireless telephones.
"CPVUXJSFMFTTNJDT
1SJWBDZ The same features that make a wireless mic convenient create some limitations. Calls on
conference phones are transmitted between the base unit and the wireless mic by radio waves,
so there is a possibility that the wireless mic conversations could be intercepted by radio receiving
equipment within range of the wireless mic. For this reason, you should not think of conference phone
conversations as being as private as those on corded telephones.
&MFDUSJDBMQPXFS The base unit of this conference phone must be connected to a working electrical
outlet. The electrical outlet should not be controlled by a wall switch. Calls cannot be made from the
conference phone if the base unit is unplugged, switched off or if the electrical power is interrupted.
1PUFOUJBM57JOUFSGFSFODF Wireless mic operates at frequencies that may cause interference to
televisions and VCRs. To minimize or prevent such interference, do not place the base unit near or on
top of a TV or VCR. If interference is experienced, moving the wireless mic farther away from the TV or
VCR often reduces or eliminates the interference.
3FDIBSHFBCMFCBUUFSJFT Exercise care in handling batteries in order not to create a short circuit with
conducting material such as rings, bracelets and keys. The battery or conductor may overheat and
cause harm.
/JDLFMNFUBMIZESJEFSFDIBSHFBCMFCBUUFSJFTDispose of these batteries in a safe manner. Do not
burn or puncture. Like other batteries of this type, if burned or punctured, they could release caustic
material which could cause injury.
18.
19.
•
•
•
p
p
p
p
p

5BCMFPGDPOUFOUT
*OUSPEVDUJPO
About ErisStation Conference Phone ....1
Parts checklist .......................................1
(FUUJOH4UBSUFE
Connect base unit ..................................2
Install battery to the wireless mic ..........3
Before use .............................................4
Base unit overview (front) ......................5
Base unit overview (rear) .......................7
Wireless mic overview ...........................8
Status indicators overview .....................9
4FUUJOHT
Using the Menu ...................................10
Ringer volume .....................................10
Ringer tone ..........................................11
Set date and time ................................11
LCD language ......................................12
Rename base ......................................12
Key tone ...............................................13
Dial mode ............................................13
Area code ............................................14
Loop gain .............................................14
Reset ...................................................15
$POGFSFODFQIPOFPQFSBUJPO
Make a call ..........................................16
Answer a call .......................................16
End a call .............................................16
Redial ..................................................16
Predial a call ........................................16
Speakerphone volume .........................16
Mute .....................................................17
Temporarily silencing the ringer ...........17
3-way conference ................................17
Call waiting ..........................................18
Paging .................................................18
Chain dialing ........................................19
1IPOFCPPL
About the phonebook ..........................20
Add a phonebook entry .......................20
Review phonebook entries ..................21
Alphabetical search .............................21
Dial a phonebook entry .......................21
Edit a phonebook entry .......................22
Delete a phonebook entry ...................22
Delete all phonebook entries ...............23
About speed dial ..................................23
Assign a speed dial entry ....................23
Reassign a speed dial entry ................24
Dial a speed dial number .....................24
Delete a speed dial entry .....................24
$BMMMPH
About caller ID .....................................25
Call log .................................................25
Missed call indicator ............................25
Review the call log ...............................26
Save a call log entry to phonebook .....26
Dial a call log entry ..............................27
Delete a call log entry ..........................27
Delete all call log entries......................27
Caller ID screen messages .................27
8JSFMFTTNJDSFHJTUSBUJPO
To register a wireless mic ....................28
To deregister a wireless mic ................29

5BCMFPGDPOUFOUT
"QQFOEJY
Battery .................................................30
5SPVCMFTIPPUJOH
.BJOUFOBODF
'$$"$5"BOE*$
SFHVMBUJPOT
5IF3#3$
TFBM
$BMJGPSOJB&OFSHZ$PNNJTTJPO
CBUUFSZDIBSHJOH
UFTUJOHJOTUSVDUJPOT
'PSD&5-DPNQMJBODFPOMZ
-JNJUFEXBSSBOUZ
5FDIOJDBMTQFDJGJDBUJPOT

1
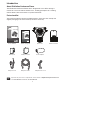
*OUSPEVDUJPO
Telephone line cord
Battery X2
User’s manual
Wireless mic X2
Base unit
DC power cable
"CPVU&SJT4UBUJPO$POGFSFODF1IPOF
The ErisStation Conference Phone with is designed for use in office settings. It
consists of a base unit and two wireless mics, enabling participants of a meeting
room to deliver clear conversation in a phone conference.
1BSUTDIFDLMJTU
Your conference phone contains the following items. Save your sales receipt and
original packaging in the event warranty service is necessary.
AC power cord
Power adapter
To purchase any accessories or replacements, visit our website at IUUQCVTJOFTTQIPOFTWUFDIDPN
or call . In Canada, call .
Battery door X2
Quick start guide
ErisStation
6TFSmTNBOVBM
.PEFM7$4
BC
ErisStation
businessphones.vtech.com
Conference Phone
with Two Wireless Mics
2VJDL4UBSU(VJEF
.PEFM7$4
businessphones.vtech.com
Conference Phone
with Two Wireless Mics
ErisStation

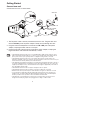
2
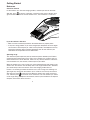
$POOFDUCBTFVOJU
Connect the base unit as shown below.
The ErisStation Conference Phone is not compatible with IP-PBX systems, unless it comes
with an analog-line interface with RJ-11 connector. If you already have an IP-PBX system in
place, please contact your system provider for a digital-to-analog interface converter.
The ErisStation Conference Phone is not a network device and is not PoE (Power over
Ethernet) compatible. It does not require an ethernet network to work. Do not connect it to your
ethernet network or directly with any other network devices.
The supplied power adapter is designed for use with only the ErisStation Conference Phone. It
is not PoE compatible and is not designed to power any network devices. Do not connect the
supplied power adapter to any other network devices through the supplied DC power cable or
any other Cat5e ethernet cable.
The ErisStation Conference Phone requires a telephone line to operate.
The ErisStation Conference Phone requires connection to AC power to operate.
When the base unit is powered up, the status indicators turn green for about two seconds.
If you subscribe to digital subscriber line (DSL) high-speed Internet service through your
telephone line, you must install a DSL filter between the telephone line cord and wall jack.
Contact your DSL service provider for more information about DSL filter.
The AC power cord is intended for a vertical or floor mount position. The prongs are not
designed to hold the plug in place if it is plugged into a ceiling or cabinet outlet.
•
•
•
•
•
•
•
•
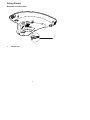
The DC power cable is already connected to the base unit. Plug the other end
into the 7$4 jack of the power adapter. Route the cord through the slots.
Plug one end of the telephone line cord into the 5&--*/&jack of the power
adapter, and plug the other end into a wall jack.
Plug the small end of the AC power cord into the power adapter, and plug the
large end into the wall outlet not controlled by a switch.
1.
2.
3.
(FUUJOH4UBSUFE
8BMMKBDL
1
TEL LINE
VCS702
2
3
8BMMPVUMFU
%4-GJMUFSPQUJPOBM
OPUJODMVEFE
%$QPXFS
DBCMF
4MPUT
"$QPXFSDPSE
5FMFQIPOFMJOF
DPSE

(FUUJOH4UBSUFE
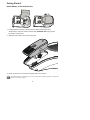
3
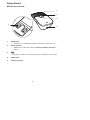
*OTUBMMCBUUFSZUPUIFXJSFMFTTNJD
1. Plug the battery connector securely into the socket inside the battery
compartment. Insert the battery with the label 5)*44*%&61 facing up onto
the battery compartment.
2. Slide the battery door until it clicks into place.
The status indicator on the wireless mic turns orange when charging, and turns off when the
wireless mic is fully charged.
3. Place the wireless mic onto the charging cradle until it is flush.

(FUUJOH4UBSUFE
4
#FGPSFVTF
$IFDLGPSEJBMUPOF
Lift the wireless mics from the charging cradles, and then put them on the table.
After that, press
. If you hear a dial tone, and see that the status indicators turns
green on both the base unit and the wireless mics, the installation is successful.
*GZPVEPOPUIFBSBEJBMUPOF
Make sure the installation procedures described above are properly done.
It may be a wiring problem. If you have changed your telephone service to digital
service from a cable company or a VoIP service provider, the telephone line may
need to be rewired to allow all existing telephone jacks to work. Contact your
cable/VoIP service provider for more information.
0QFSBUJOHSBOHF
This conference phone operates with the maximum power allowed by the Federal
Communications Commission (FCC). Even so, this wireless mic and base unit can
communicate over a certain distance, which can vary with the locations of the base
unit and wireless mic, the weather, and the layout of your office.
When the wireless mic is out of range, the status indicator flashes red slowly on the
wireless mic. The wireless mic will sleep after out of range for 30 minutes. Therefore,
you should always return the wireless mic to the charging cradle after use.
If there is an incoming call while the wireless mic is out of range, the incoming call
green light may not flash on the wireless mic. If it flashes, the call may not connect
well when you press
on the base unit. Move the wireless mic closer to the base
unit, and then press
on the base unit to answer the call. If the wireless mic moves
out of range during a telephone conversation, there may be interference. To improve
reception, move closer to the base unit.
•
•

(FUUJOH4UBSUFE
5
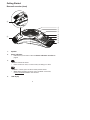
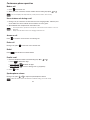
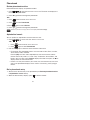
#BTFVOJUPWFSWJFXGSPOU
4QFBLFS
4UBUVTJOEJDBUPST
Indicate the system status. See also 4UBUVTJOEJDBUPSTPWFSWJFX on
page 9.
•
Press to show the menu.
Press to select an item, or save an entry or setting in a menu.
While in a menu, press to return to the previous menu.
While editing numbers or names, press to delete a character,
or press and hold to delete all characters.
•
•
•
•
-$%EJTQMBZ
ErisStation
c
d
g
e
f
h
i
k
j
l
b
n
a
m

(FUUJOH4UBSUFE
6
Press to scroll through the menu, phonebook, or call log.
Press to adjust the ringer volume.
During a call, press to adjust the listening volume.
•
•
•
Press to make, answer, or end a call.•
%JBMJOHLFZT
Press to enter numbers or characters.
While entering numbers, press and hold to insert a dialing pause.
While editing names, press to add a space.
Press to switch to tone dialing temporarily when using pulse service
while on a call.
•
•
•
•
.JDSPQIPOF
Press to access the phonebook when idle.
Press to access the call log when idle.
.FOV4DSPMM
Press to scroll up or down while in the menu, phonebook, or call log.
While entering names or numbers, press to move the cursor to right
or left.
•
•
•
•
During a call, press to answer an incoming call when you receive a call
waiting alert.
•
Press to redial the last number dialed.•
During a call, press to mute or end mute all microphones in the system.•
$IBSHJOHDPOUBDUT
8JSFMFTTNJD
See 8JSFMFTTNJDPWFSWJFXon page 8.•

(FUUJOH4UBSUFE
7
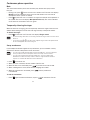
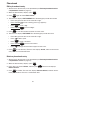
#BTFVOJUPWFSWJFXSFBS
"EBQUFSKBDL
a

(FUUJOH4UBSUFE
8
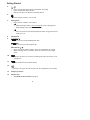
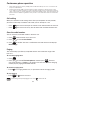
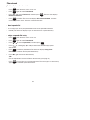
8JSFMFTTNJDPWFSWJFX
.JDSPQIPOF
Functions as an extended microphone of the base unit during a call.•
4UBUVTJOEJDBUPS
Indicates the system status. See also 4UBUVTJOEJDBUPSTPWFSWJFX on
page 9.
•
During a call, press to mute or end mute all microphones in the system.•
#BUUFSZEPPS
$IBSHJOHDPOUBDUT
a
b
c
d
e

(FUUJOH4UBSUFE
9
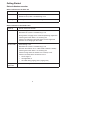
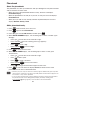
4UBUVTJOEJDBUPSTPWFSWJFX
4UBUVTJOEJDBUPSTPOUIFCBTFVOJU
Power up Green for about two seconds.•
On a call Green during a call.
Red when the system is muted during a call.
•
•
Incoming call Flash green when there is an incoming call.•
4UBUVTJOEJDBUPSPOUIFXJSFMFTTNJD
Power up Red for about two seconds.•
On the cradle Green during a call.
Red when the system is muted during a call.
Orange when charging on the cradle except during registration.
Flashes green when there is an incoming call.
Flashes red and green alternately when the non-registered
wireless mic is charging on the cradle.
•
•
•
•
•
Off the cradle Green during a call.
Red when the system is muted during a call.
Off when the wireless mic is in idle mode or without a battery.
Flashes green when there is an incoming call.
Flashes orange when the wireless mic’s battery is low.
Flashes red slowly when the wireless mic is:
out of range; or
not registered; or
off cradle during paging (with a paging tone).
•
•
•
•
•
•
•
•
•
During
registration
Flashes red and green alternately.•

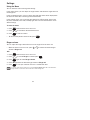
6TJOHUIF.FOV
You can enter the menu to change the settings.
In the ringers menu, you can adjust the ringer volume and select the ringer tones for
incoming calls.
In the set date/time menu, you can set the date and time which will be displayed on
the base unit when idle, or showing caller ID information.
In the settings menu, you can change the settings for LCD language, base name,
key tone, dial mode, area code, and loop gain. You can also reset the base unit to
default settings.
5PFOUFSUIFNFOV
Press
when the base unit is not in use.
Press or to scroll to the desired feature menu.
Press to enter that menu.
To return to the previous menu or idle, press
.
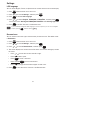
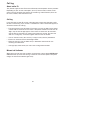
3JOHFSWPMVNF
You can adjust the ringer volume from or turn the ringer off on the base unit.
When the base unit is not in use, press
or to choose the desired ringer
volume or 3JOHFSPGG.
03
Press when the base unit is not in use.
Press
or to scroll to 3JOHFST, and then press .
Press again to select 3JOHFSWPMVNF.
Press or choose the desired ringer volume or 3JOHFSPGG.
Press
to save your selection. You hear a confirmation tone.
If you turn off the ringer volume, the screen will display 3JOHFSPGG on idle screen. When the
ringer volume is off, the base unit is silenced for all incoming calls.
1.
2.
3.
•
•
1.
2.
3.
4.
5.
4FUUJOHT
10

4FUUJOHT
11
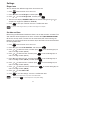
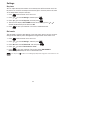
3JOHFSUPOF
You can choose from different ringer tones on the base unit.
Press
when the base unit is not in use.
Press
or to scroll to 3JOHFST, and then press .
Press or to scroll to 3JOHFSUPOF, and then press .
The base unit displays 3*/(&350/& with the current setting. Press
or to
sample each ringer tone (5POFto5POF).
Press to save your selection. You hear a confirmation tone.
If you turn off the ringer volume, you will not hear ringer tone samples.
4FUEBUFBOEUJNF
Before using the ErisStation Conference Phone, set the date and time as follows. The
date and time will be displayed on the base unit when idle. If you subscribe to callerIf you subscribe to caller
ID service, the day, month, and time are set automatically with each incoming call.
However, the year must be correct so that the day of the week can be calculated from
the call log information.
Press
when the base unit is not in use.
Press or to scroll to 4FUEBUFUJNF, and then press .
Press
or to select the month, and then press , or use the dialing keys to
enter a two-digit number (-).
Press or to select the date, and then press , or use the dialing keys to
enter a two-digit number (-).
Press
or to select the year, and then press , or use the dialing keys to
enter a two-digit number (-), and then press .
Press or to select the hour, and then press , or use the dialing keys to
enter a two-digit number (-).
Press
or to select the minute, and then press , or use the dialing keys to
enter a two-digit number (-).
Press
or to select ". or 1..
Press
to save the settings. You hear a confirmation tone.
The base unit beeps twice if you enter an invalid number.
You can press
to correct the previous entry while editing.
1.
2.
3.
4.
5.
1.
2.
3.
4.
5.
6.
7.
8.
9.
•
•

4FUUJOHT
12
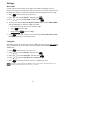
-$%MBOHVBHF
You can select English, French, or Spanish to be used in the base unit screen display.
Press when the base unit is not in use.
Press
or to scroll to 4FUUJOHT, and then press .
Press to choose -$%MBOHVBHF.
Press
or to choose &OHMJTI, '3"/"*4, or &41"Ñ0-, and then press
. The screen shows 4FU&OHMJTI
'3"/"*4
&41"Ñ0-BT-$%MBOHVBHF .
Press to confirm. You hear a confirmation tone.
If you accidentally changed the LCD language to French or Spanish, you can reset it to English
easily by pressing , and then entering .
3FOBNFCBTF
You can create a new name (up to 16 characters) for the base unit. The default name
is &SJT4UBUJPO.
Press
when the base unit is not in use.
Press or to scroll to 4FUUJOHT, and then press .
Press or to scroll to 3FOBNFCBTF, and then press .
The screen displays the current name of the base unit. Use the dialing keys to edit
the name.
Press
or to move the cursor to the left or right.
Press
to add a space.
Press to erase a character.
Press and hold to erase all characters.
Press
to change the next letter to upper or lower case.
Press to save the name. You hear a confirmation tone.
1.
2.
3.
4.
5.
1.
2.
3.
4.
•
•
•
•
•
5.

4FUUJOHT
13
,FZUPOF
You can adjust the key tone volume or turn the key tone off for the base unit. If the
key tone is on, the base unit beeps with each key press. If the key tone is off, there
are no beeps when you press the keys.
Press
when the base unit is not in use.
Press
or to scroll to 4FUUJOHTand then press .
Press or to scroll to ,FZUPOF, and then press .
The base unit displays ,&:50/& with the current setting. Press or to
choose the desired key tone volume or 0GG.
Press
to save your selection. You hear a confirmation tone.
%JBMNPEF
The dial mode is preset to tone dialing. If you have pulse (rotary) service, you must
change the dial mode to pulse dialing before using the base unit to make a call.
Press when the base unit is not in use.
Press or to scroll to 4FUUJOHT, and then press .
Press
or to scroll to %JBMNPEF, and then press .
Press or to choose 5PVDIUPOF or 1VMTF.
Press
to save your selection. The screen shows %*"-.0%&JT
UPVDIUPOFQVMTF briefly. You hear a confirmation tone.
You can press to switch to tone dialing temporarily when using pulse service while on a call.
1.
2.
3.
4.
5.
1.
2.
3.
4.
5.

4FUUJOHT
14
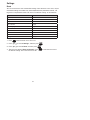
"SFBDPEF
If you dial local calls using only seven digits (area code not required), you can
program your home area code so that when you receive a call within your local area,
the telephone number is automatically stored in the call log without the area code.
Press
when the base unit is not in use.
Press or to scroll to 4FUUJOHT, and then press .
Press or to scroll to "SFBDPEF, and then press .
The base unit displays 0OMZGPSEJHJUGSPN$*%briefly and then"3&"$0%&.
Use the dialing keys to enter the 3-digit area code.
Press
or to move the cursor to the left or right.
Press
to erase a digit.
Press and hold to erase all digits.
Press
to save your selection. The screen shows "SFBDPEFXJMMOPUTIPX
JO$*% briefly. You hear a confirmation tone.
-PPQHBJO
The default settings of the loop gain feature is 0GG. Turn this feature on only when the
callers cannot hear you well, and you are using a public switched telephone network
(PSTN) line.
Press
when the base unit is not in use.
Press or to scroll to 4FUUJOHT, and then press .
Press
or to scroll to -PPQHBJO, and then press .
Press or to choose -PPQHBJO0O or -PPQHBJO0GG.
Press to save your selection. You hear a confirmation tone.
Turn the loop gain feature back to 0GG if the callers cannot observe any improvement or are
experiencing any new audio issues like echo or dropout.
1.
2.
3.
4.
•
•
•
5.
1.
2.
3.
4.
5.
La page est en cours de chargement...
La page est en cours de chargement...
La page est en cours de chargement...
La page est en cours de chargement...
La page est en cours de chargement...
La page est en cours de chargement...
La page est en cours de chargement...
La page est en cours de chargement...
La page est en cours de chargement...
La page est en cours de chargement...
La page est en cours de chargement...
La page est en cours de chargement...
La page est en cours de chargement...
La page est en cours de chargement...
La page est en cours de chargement...
La page est en cours de chargement...
La page est en cours de chargement...
La page est en cours de chargement...
La page est en cours de chargement...
La page est en cours de chargement...
La page est en cours de chargement...
La page est en cours de chargement...
La page est en cours de chargement...
La page est en cours de chargement...
La page est en cours de chargement...
La page est en cours de chargement...
La page est en cours de chargement...
La page est en cours de chargement...
La page est en cours de chargement...
La page est en cours de chargement...
La page est en cours de chargement...
La page est en cours de chargement...
-
 1
1
-
 2
2
-
 3
3
-
 4
4
-
 5
5
-
 6
6
-
 7
7
-
 8
8
-
 9
9
-
 10
10
-
 11
11
-
 12
12
-
 13
13
-
 14
14
-
 15
15
-
 16
16
-
 17
17
-
 18
18
-
 19
19
-
 20
20
-
 21
21
-
 22
22
-
 23
23
-
 24
24
-
 25
25
-
 26
26
-
 27
27
-
 28
28
-
 29
29
-
 30
30
-
 31
31
-
 32
32
-
 33
33
-
 34
34
-
 35
35
-
 36
36
-
 37
37
-
 38
38
-
 39
39
-
 40
40
-
 41
41
-
 42
42
-
 43
43
-
 44
44
-
 45
45
-
 46
46
-
 47
47
-
 48
48
-
 49
49
-
 50
50
-
 51
51
-
 52
52


VTech ErisStation VCS702 Manuel utilisateur
- Catégorie
- Répondeurs
- Taper
- Manuel utilisateur
- Ce manuel convient également à
dans d''autres langues
- English: VTech ErisStation VCS702 User manual
Documents connexes
-
VTech ErisStation VCS702 Manuel utilisateur
-
VTech VCS754 Guide de démarrage rapide
-
VTech VCS754 Manuel utilisateur
-
-
-
-
-
VTech DS6251-4 Manuel utilisateur
-
-

