VTech VH6212 Manuel utilisateur
- Catégorie
- Casques mobiles
- Taper
- Manuel utilisateur

Go to
businessphones.vtech.com
to register your product for
enhanced warranty support
and the latest VTech product
news.
VH6212
DECT 6.0
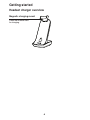
Cordless Headset
and Charger with
Dongle
User’s manual
#$

$POHSBUVMBUJPOT
POZPVSQVSDIBTFPGUIJT75FDIQSPEVDU#FGPSFVTJOHUIJTQSPEVDU
QMFBTFSFBEUIF*NQPSUBOUTBGFUZJOGPSNBUJPO
5IJTVTFSmTNBOVBMQSPWJEFTZPVXJUIUIFDPNQMFUFJOTUBMMBUJPO
TFUVQBOEPQFSBUJPOJOTUSVDUJPOT
'PSDVTUPNFSTFSWJDFPSQSPEVDUJOGPSNBUJPOWJTJUPVSXFCTJUFBU
CVTJOFTTQIPOFTWUFDIDPNPSDBMM*O$BOBEB
QMFBTFEJBM
T
Compatible with
Hearing Aid T-Coil
TIA-1083
5FMFQIPOFTJEFOUJGJFEXJUIUIJTMPHPIBWFSFEVDFEOPJTFBOE
JOUFSGFSFODFXIFOVTFEXJUINPTU5DPJMFRVJQQFEIFBSJOH
BJETBOEDPDIMFBSJNQMBOUT5IF5*"$PNQMJBOU-PHPJTB
USBEFNBSLPGUIF5FMFDPNNVOJDBUJPOT*OEVTUSZ"TTPDJBUJPO6TFE
VOEFSMJDFOTF

Skype
®
and Skype for Business
®
are registered trademarks of Microsoft Corporation.
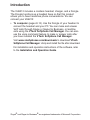
The VH6212 includes a cordless headset, charger, and a Dongle.
The Dongle functions as a headset base so that this product
allows you to have handsfree phone conversations. You can
connect your VH6212:
5PDPNQVUFS (pages 8-10). Use the Dongle of your headset to
connect the headset and your PC. You can make and answer
VoIP calls through Skype or Skype for Business, or landline
calls using the 75FDI4PGUQIPOF$BMM.BOBHFS. You can also
use the voice command feature to make or answer calls after
you have installed the 75FDI4PGUQIPOF$BMM.BOBHFS.
Visit XXXWUFDIQIPOFTDPNEPXOMPBET to download
75FDI
4PGUQIPOF$BMM.BOBHFS
. Unzip and install the file after download.
For installation and operation instructions of the software, refer
to the *OTUBMMBUJPOBOE0QFSBUJPO(VJEF.
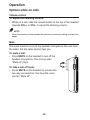
p
*OUSPEVDUJPO

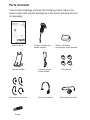
1BSUTDIFDLMJTU
:PVSQSPEVDUQBDLBHFDPOUBJOTUIFGPMMPXJOHJUFNT4BWFZPVS
TBMFTSFDFJQUBOEPSJHJOBMQBDLBHJOHJOUIFFWFOUXBSSBOUZTFSWJDF
JTOFDFTTBSZ
Dongle
Headset charger Headset charger
power adapter
User's manual
Battery with battery
compartment cover attached
Cordless headset with
earbud attached
Behind-the-neck bandFour over-the-ear hooks
Four earbuds
Over the head band

5BCMFPGDPOUFOUT
Getting started
Headset overview ....................1
Headset lights .......................1
Headset alert tones ..............3
Headset charger overview .......4
Dongle overview ......................5
Dongle lights .........................5
Battery installation ...................6
Headset charger installation
and battery charging ............7
Connect the Dongle to a
computer ..............................8
Connect the Dongle of your
headset to a computer ..........8
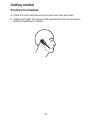
Position the headset ..............11
Over-the-ear hook ...............11
Over the head band ............14
Behind-the-neck band .........16
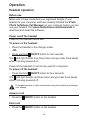
Operation
Headset operation .................18
Before use ..........................18
Power on/off the headset ....18
Answer a call ......................18
End a call ............................18
Voice command ..................19
Headset ringer ....................19
Caller ID announce .............19
Temporary ringer
silencing .............................19
Options while on calls ............20
Volume control ....................20
Mute ....................................20
Appendix
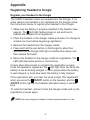
Registering Headset to
Dongle ................................21
Register your Headset to
the Dongle ..........................21
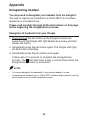
Deregistering headset ...........22
Deregister all headsets
from your Dongle ................22
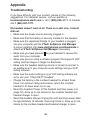
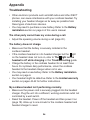
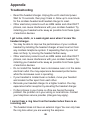
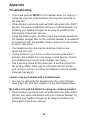
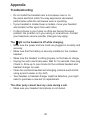
Troubleshooting .....................23
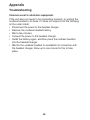
Maintenance ..........................29
Important safety information ... 30
Safety information ...............30
Especially about cordless
headsets .............................31
Precautions for users
of implanted cardiac
pacemakers ........................32
For C-UL compliance .............33
Mesures de sécurité
importantes .........................33
FCC Part 15 ...........................37
California Energy Commission
battery charging testing
instructions .........................39
Limited warranty ....................40
Technical specifications .........43

1
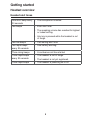
(FUUJOHTUBSUFE
LED light status
Red Steady red when the headset battery is low and the
headset is charging in the headset base.
Flashes every 10 seconds to indicate the battery is low
when the headset is not in the headset base.
Flashes three times to indicate the headset is powering off.
•
•
•
Blue Steady blue when the headset battery is fully charged.
Flashes three times to indicate the headset is powering on.
Flashes twice every three seconds when the headset is in
use.
Flashes four times every four seconds when there is an
incoming call in PHONE mode.
Flashes every 10 seconds when a registered headset in
idle mode is out of the headset base.
•
•
•
•
•
Purple Steady purple when the headset battery is well charged.•
Red and
blue
Alternate slowly when the headset is not registered.
Alternate quickly when the headset is trying to register to a
headset base.
•
•
Off The battery is depleted.
No battery is installed.
The headset is powered off.
•
•
•
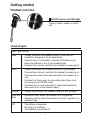
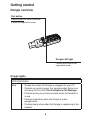
)FBETFUPWFSWJFX
)FBETFUMJHIUT
0/0''CVUUPOBOE-&%MJHIU
Press to make, answer or end a
call.

22
(FUUJOHTUBSUFE
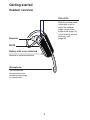
)FBETFUPWFSWJFX
&BSQJFDF
.JDSPQIPOF
The microphone
incorporates noise
canceling technology
for clearer calls.
#BUUFSZXJUIDPWFSBUUBDIFE
Remove to replace the battery.
.65&
70-70-
Slide the volume switch
to the right or left to
adjust the headset
ringer volume while
in idle mode (page 19),
or the listening volume
while on a call
(page 20).

33
(FUUJOHTUBSUFE
One short beep every
30 seconds
The microphone is muted. •
Two beeps Error alert tone.
The speaking volume has reached its highest
or lowest setting.
Any key is pressed while the headset is out
of range.
•
•
•
Two low beeps Call waiting alert tone.•
Two rapid beeps
every 20 seconds
Low battery warning.•
Three rising beeps A conference call has started.•
Three rapid beeps
every 20 seconds
The headset is out of range.
The headset is not yet registered.
•
•
Three rapid beeps The headset is powering on or off.•
)FBETFUPWFSWJFX
)FBETFUBMFSUUPOFT

44
(FUUJOHTUBSUFE
)FBETFUDIBSHFSPWFSWJFX
.BHOFUJDDIBSHJOHNPVOU
Place the headset here
for charging.

55
(FUUJOHTUBSUFE
%POHMFPWFSWJFX
1BJSCVUUPO
Press and hold for about 4 seconds
to enter the registration mode.
%POHMF-&%MJHIU
Flashes slow while in the
registration mode.
LED light status
Blue Steady blue when the Dongle is plugged into your PC.
Flashes very quickly every four seconds when there is an
incoming call from the 75FDI4PGUQIPOF$BMM.BOBHFS.
Flashes quickly every three seconds when the headset is
in use.
Flashes moderately when the Dongle is under
deregistration.
Flashes slowly when when the Dongle is registering to the
headset
•
•
•
•
•
%POHMFMJHIUT

66
(FUUJOHTUBSUFE
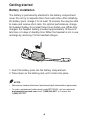
#BUUFSZJOTUBMMBUJPO
The battery is permanently attached to the battery compartment
cover. Do not try to separate them from each other. After installing
the battery pack, charge it for at least 15 minutes. You may be able
to make and receive short calls. For optimal performance, charge
the headset battery for at least three hours before use. When fully
charged, the headset battery provides approximately 12 hours of
talk time or 5 days of standby time. When the headset is not in use,
recharge by returning it to the headset charger.
/05&4
Remove any headset attachment (earbud excluded) before battery replacement.
To order a replacement battery pack (model BT191665), visit our website at
CVTJOFTTQIPOFTWUFDIDPN or call . In Canada, dial
.
•
•
1. Insert the battery pack into the battery compartment.
2. Press down on the battery pack until it clicks into place.

77
(FUUJOHTUBSUFE
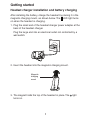
)FBETFUDIBSHFSJOTUBMMBUJPOBOECBUUFSZDIBSHJOH
After installing the battery, charge the headset by placing it in the
magnetic charging mount, as shown below. The
LED light turns
on when the headset is charging.
Plug the small end of the headset charger power adapter at the
back of the headset charger.
Plug the large end into an electrical outlet not controlled by a
wall switch.
Insert the headset into the magnetic charging mount.
The magnet holds the top of the headset in place. The
light
turns on.
1.
2.
3.
Magnetic
charging
mount

88
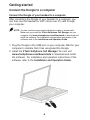
(FUUJOHTUBSUFE
$POOFDUUIF%POHMFUPBDPNQVUFS
$POOFDUUIF%POHMFPGZPVSIFBETFUUPBDPNQVUFS
After connecting the Dongle of your headset to a computer, you
can then use the headset for VoIP (Voice over IP) calls through
your computer.
/05& You can use the voice command feature to make or answer calls.
Make sure you install the 75FDI4PGUQIPOF$BMM.BOBHFS on your
computer. Visit XXXWUFDIQIPOFTDPNEPXOMPBET to download and
install the software. For installation and operation instructions of the
software, refer to the *OTUBMMBUJPOBOE0QFSBUJPO(VJEF.
Plug the Dongle to the USB port on your computer. Wait for your
computer to indicate that it has recognized the Dongle.
Install the 75FDI4PGUQIPOF$BMM.BOBHFS. You can visit
XXXWUFDIQIPOFTDPNEPXOMPBET to download and install
the software. For installation and operation instructions of the
software, refer to the *OTUBMMBUJPOBOE0QFSBUJPO(VJEF.
1.
2.

99
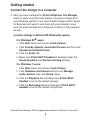
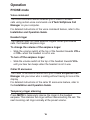
(FUUJOHTUBSUFE
After you have installed the 75FDI4PGUQIPOF$BMM.BOBHFS,
check to make sure the audio setting is properly configured in
your Windows system. If you have installed Skype and/or Skype
for Business and want to use them with your headset, make
sure the audio settings are configured correctly in the programs
as well.
B"VEJPTFUUJOHTJO.JDSPTPGU
8JOEPXT
TZTUFN
'PS8JOEPXT91
VTFST
Click 4UBSU menu and choose $POUSPM1BOFM.
Click 4PVOET4QFFDIBOE"VEJP%FWJDFT and then click
4PVOETBOE"VEJP%FWJDFT.
Click the "VEJP tab.
Make sure 75FDI%&$5)FBETFU is selected under the
4PVOEQMBZCBDL and 4PVOESFDPSEJOH settings.
'PS8JOEPXTVTFST
Click 4UBSU menu and choose $POUSPM1BOFM.
Click )BSEXBSFBOE4PVOE and then click .BOBHF
BVEJPEFWJDFT under the 4PVOE menu.
Click the 1MBZCBDL tab and make sure 75FDI%&$5
)FBETFU is set as the default speaker.
Click the 3FDPSEJOH tab and make sure 75FDI%&$5
)FBETFU is set as the default microphone.
3.
i.
ii.
iii.
iv.
i.
ii.
iii.
iv.
$POOFDUUIF%POHMFUPBDPNQVUFS
Windows
®
and Windows XP
®
are registered trademarks of Microsoft Corporation.

1010
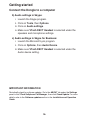
(FUUJOHTUBSUFE
C"VEJPTFUUJOHTJO4LZQF
Launch the Skype program.
Click on 5PPMT, then 0QUJPOT.
Click on "VEJPTFUUJOHT.
Make sure 75FDI%&$5)FBETFU is selected under the
speakers and microphone settings.
D"VEJPTFUUJOHTJO4LZQFGPS#VTJOFTT
Launch the Microsoft Lync program.
Click on 0QUJPOT, then "VEJP%FWJDF.
Make sure 75FDI%&$5)FBETFU is selected under the
Audio device setting.
i.
ii.
iii.
iv.
i.
ii.
iii.
$POOFDUUIF%POHMFUPBDPNQVUFS
*.1035"/5*/'03."5*0/
Periodically check for software updates. Go to the "#065 tab under the 4FUUJOHT
panel in the 75FDI4PGUQIPOF$BMM.BOBHFS, then click $IFDL6QEBUF. For more
details, refer to the 4PGUXBSFVQEBUFT section in the *OTUBMMBUJPOBOE0QFSBUJPO
(VJEF.

1111
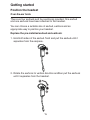
(FUUJOHTUBSUFE
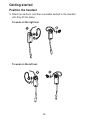
1PTJUJPOUIFIFBETFU
0WFSUIFFBSIPPL
There are four earbuds and four earhooks provided. One earbud
and one earhook have been attached to the headset.
You can choose a suitable size of earbud, earhook and an
appropriate way to position your headset.
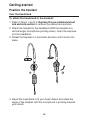
3FQMBDFUIFQSFJOTUBMMFEFBSCVEBOEFBSIPPL
Hold both sides of the earbud. Twist and pull the earbud until it
separates from the earpiece.
Rotate the earhook to vertical direction andthen pull the earhook
until it separates from the headset.
1.
2.

1212
(FUUJOHTUBSUFE
Attach an earhook, and then a suitable earbud to the headset
until they fit into place.
5PXFBSPOUIFSJHIUFBS
5PXFBSPOUIFMFGUFBS
3.
1PTJUJPOUIFIFBETFU

1313
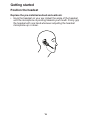
(FUUJOHTUBSUFE
3FQMBDFUIFQSFJOTUBMMFEFBSCVEBOEFBSIPPL
Hook the headset on your ear. Adjust the angle of the headset
until the microphone is pointing towards your mouth. Firmly grip
the headset with one hand whenever adjusting the headset
microphone up or down.
•
1PTJUJPOUIFIFBETFU

1414
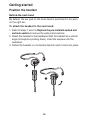
(FUUJOHTUBSUFE
1PTJUJPOUIFIFBETFU
0WFSUIFIFBECBOE
5PBUUBDIUIFIFBECBOEUPUIFIFBETFU
Refer to Steps 1 and 2 in 3FQMBDFUIFQSFJOTUBMMFEFBSCVE
BOEFBSIPPLTFDUJPOto remove the earbud and earhook.
Attach the headset to the headband. With the headset at a
vertical angle (microphone pointing down), insert the earpiece
into the headband.
Rotate the headset in a horizontal direction until it clicks into
place.
Adjust the head band to fit your head. Adjust and rotate the
angle of the headset until the microphone is pointing towards
your mouth.
1.
2.
3.
4.

1515
(FUUJOHTUBSUFE
1PTJUJPOUIFIFBETFU
5PSFNPWFUIFIFBECBOEGSPNUIFIFBETFU
Hold the headset with one hand and the headband with your
other hand.
Rotate the headset downwards to a verticalposition and then pull
out the headset until it separates from the head band.
1.
2.
La page est en cours de chargement...
La page est en cours de chargement...
La page est en cours de chargement...
La page est en cours de chargement...
La page est en cours de chargement...
La page est en cours de chargement...
La page est en cours de chargement...
La page est en cours de chargement...
La page est en cours de chargement...
La page est en cours de chargement...
La page est en cours de chargement...
La page est en cours de chargement...
La page est en cours de chargement...
La page est en cours de chargement...
La page est en cours de chargement...
La page est en cours de chargement...
La page est en cours de chargement...
La page est en cours de chargement...
La page est en cours de chargement...
La page est en cours de chargement...
La page est en cours de chargement...
La page est en cours de chargement...
La page est en cours de chargement...
La page est en cours de chargement...
La page est en cours de chargement...
La page est en cours de chargement...
La page est en cours de chargement...
La page est en cours de chargement...
La page est en cours de chargement...
-
 1
1
-
 2
2
-
 3
3
-
 4
4
-
 5
5
-
 6
6
-
 7
7
-
 8
8
-
 9
9
-
 10
10
-
 11
11
-
 12
12
-
 13
13
-
 14
14
-
 15
15
-
 16
16
-
 17
17
-
 18
18
-
 19
19
-
 20
20
-
 21
21
-
 22
22
-
 23
23
-
 24
24
-
 25
25
-
 26
26
-
 27
27
-
 28
28
-
 29
29
-
 30
30
-
 31
31
-
 32
32
-
 33
33
-
 34
34
-
 35
35
-
 36
36
-
 37
37
-
 38
38
-
 39
39
-
 40
40
-
 41
41
-
 42
42
-
 43
43
-
 44
44
-
 45
45
-
 46
46
-
 47
47
-
 48
48
-
 49
49


VTech VH6212 Manuel utilisateur
- Catégorie
- Casques mobiles
- Taper
- Manuel utilisateur
dans d''autres langues
- English: VTech VH6212 User manual
Documents connexes
Autres documents
-
AT&T TL7900 Manuel utilisateur
-
-
HTC UA Band Mode d'emploi
-
Pioneer XW-BTSP1-K Manuel utilisateur
-
bbpos WisePOS E Mode d'emploi
-
-
bbpos LVH326 Manuel utilisateur
-
Coleman 5010000711 Manuel utilisateur
-
Rain Bird WR2 Series Manuel utilisateur
-
Sony Ericsson HBV-100 Manuel utilisateur