Korg volca fm Le manuel du propriétaire
- Catégorie
- Instruments de musique
- Taper
- Le manuel du propriétaire

Precautions
Location
Using the unit in the following locations can result in a malfunction.
•
In direct sunlight
•
Locations of extreme temperature or humidity
•
Excessiv
ely dusty or dirty locations
•
Locations of excessiv
e vibration
•
Close to magnetic elds
Power supply
Please connect the designated AC adapter to an AC outlet of the correct voltage. Do
not connect it to an AC outlet of voltage other than that for which your unit is
intended.
Interference with other electrical devices
Radios and televisions placed nearby may experience reception interference. Operate
this unit at a suitable distance from radios and televisions.
Handling
To avoid breakage, do not apply excessive force to the switches or controls.
保証規定(必ずお読みください)
本保証書は、保証期間中に本製品を保証するもので、付属品類(ヘッドホンなど)は保
証の対象になりません。保証期間内に本製品が故障した場合は、保証規定によって無
償修理いたします。
1. 本保証書の有効期間はお買い上げ日より1か年です。
2. 次の修理等は保証期間内であっても有償となります。
・消耗部品(電池、スピーカー、真空管、フェーダーなど)の交換。
・お取扱い方法が不適当のために生じた故障。
・天災(火災、浸水等)によって生じた故障。
・故障の原因が本製品以外の他の機器にある場合。
・不当な改造、調整、部品交換などにより生じた故障または損傷。
・保証書にお買い上げ日、販売店名が未記入の場合、または字句が書き替えられて
いる場合。
・本保証書の提示がない場合。
尚、当社が修理した部分が再度故障した場合は、保証期間外であっても、修理した日
より3か月以内に限り無償修理いたします。
3. 本保証書は日本国内においてのみ有効です。
ThiswarrantyisvalidonlyinJapan.
4. お客様が保証期間中に移転された場合でも、保証は引き続きお使いいただけます。
詳しくは、お客様相談窓口までお問い合わせください。
5. 修理、運送費用が製品の価格より高くなることがありますので、あらかじめお客様
相談窓口へご相談ください。発送にかかる費用は、お客様の負担とさせていただき
ます。
6. 修理中の代替品、商品の貸し出し等は、いかなる場合においても一切行っておりま
せん。
本製品の故障、または使用上生じたお客様の直接、間接の損害につきましては、弊社は
一切の責任を負いかねますのでご了承ください。
本保証書は、保証規定により無償修理をお約束するためのもので、これよりお客様の
法律上の権利を制限するものではありません。
■お願い
1. 保証書に販売年月日等の記入がない場合は無効となります。記入できないときは、
お買い上げ年月日を証明できる領収書等と一緒に保管してください。
2. 保証書は再発行致しませんので、紛失しないように大切に保管してください。
コルグ
volca fm
保証書
本保証書は、保証規定により無償修理をお約束するものです。
お買い上げ日 年 月 日
販売店名
アフターサービス
修理または商品のお取り扱いについてのご質問、ご相談は、お客様相談窓口へお問い
合わせください。
お客様相談窓口
受付時間月曜~金曜10:00 ~ 17:00(祝祭日、窓口休業日を除く)
PHS等一部の電話ではご利用できません。固定電話または携帯電話から
おかけください 。
●サービス・センター: 〒168-0073東京都杉並区下高井戸 1-18-162F
5
IMPORTANT NOTICE TO CONSUMERS
This product has been manufactured according to strict specications and voltage
requirements that are applicable in the country in which it is intended that this product
should be used. If you have purchased this product via the internet, through mail order,
and/or via a telephone sale, you must verify that this product is intended to be used in
the country in which you reside.
WARNING: Use of this product in any country other than that for which it is intended
could be dangerous and could invalidate the manufacturer’s or distributor’s warranty.
Please also retain your receipt as proof of purchase otherwise your product may be
disqualied from the manufacturer’s or distributor’s warranty. Company names,
product names, and names of formats etc. are the trademarks or registered trademarks
of their respective owners.
* All product names and company names are the trademarks or registered trademarks
of their respective owners.
Main Specications
Keyboard: Multi-touch controller Sound generators: FM sound sources (6
operators (maximum of 3 simultaneous notes))
Connectors:
(Headphone) jack (ø3.5mm stereo mini-phone jack), SYNC IN
jack (ø3.5mm monaural mini-phone jack, 20V maximum input level), SYNC OUT
jack (ø3.5mm monaural mini-phone jack, 5V output level)
Power supply: AA/LR6 alkaline baery ×6 or AA nickel-metal hydride baery
×6, DC 9V
AC adapter (
) Baery life: Approximately 10 hours (when
using alkaline baeries) Current consumption: 300 mA
Dimensions (W×D×H): 193 × 115 × 40 mm/7.60” × 4.53”× 1.57”
Weight: 360 g/12.70 oz. (excluding baeries)
Included items: Six AA alkaline baeries, Cable, Owner´s Manual, Edit
P
arameter List Options: AC adapter (DC 9V
)
* Specications and appearance are subject to change without notice for
improvement.
Care
If the exterior becomes dirty, wipe it with a clean, dry cloth. Do not use liquid cleaners
such as benzene or thinner, or cleaning compounds or ammable polishes.
Keep this manual
After reading this manual, please keep it for later reference.
Keeping foreign matter out of your equipment
Never set any container with liquid in it near this equipment. If liquid gets into the
equipment, it could cause a breakdown, re, or electrical shock.
Be careful not to let metal objects get into the equipment. If something does slip
into the equipment, unplug the AC adapter from the wall outlet. Then contact
your nearest Korg dealer or the store where the equipment was purchased.
THE FCC REGULATION WARNING (for USA)
NOTE: This equipment has been tested and found to comply with the limits for a Class B
digital device, pursuant to Part 15 of the FCC Rules. These limits are designed to provide
reasonable protection against harmful interference in a residential installation. This
equipment generates, uses, and can radiate radio frequency energy and, if not installed
and used in accordance with the instructions, may cause harmful interference to radio
communications. However, there is no guarantee that interference will not occur in a
particular installation. If this equipment does cause harmful interference to radio or
television reception, which can be determined by turning the equipment o and on, the
user is encouraged to try to correct the interference by one or more of the following
measures:
•
Reorient or relocate the receiving antenna.
•
Increase the separation betw
een the equipment and receiver.
•
Connect the equipment into an outlet on a circuit dierent from
that to which the
receiver is connected.
• Consult the dealer or an experienced radio/TV technician for help.
If items such as cables are included with this equipment, you must use those included
items.
Unauthorized changes or modication to this system can void the user’s authority to
operate this equipment.
Notice regarding disposal (EU only)
If this symbol is shown on the product, manual, baery, or package, you must
dispose of it in the correct manner to avoid harm to human health or damage to
the environment. Contact your local administrative body for details on the
correct disposal method. If the baery contains heavy metals in excess of the
regulated amount, a chemical symbol is displayed below the symbol on the
baery or baery package.
Précautions
Emplacement
L’utilisation de cet instrument dans les endroits suivants peut en entraîner le
mauvais fonctionnement.
•
En plein soleil
•
Endroits très chauds ou très humides
•
Endroits sales ou fort poussiéreux
•
Endroits soumis à de fortes vibrations
•
A proximité de champs magnétiques
A
limentation
Branchez l’adaptateur secteur mentionné à une prise secteur de tension
appropriée. Evitez de brancher l’adaptateur à une prise de courant dont la
tension ne correspond pas à celle pour laquelle l’appareil est conçu.
Interférences avec d’autres appareils électriques
Les postes de radio et de télévision situés à proximité peuvent par conséquent
sourir d’interférences à la réception. Veuillez dès lors faire fonctionner cet
appareil à une distance raisonnable de postes de radio et de télévision.
Maniement
Pour éviter de les endommager, manipulez les commandes et les boutons de
cet instrument avec soin.
Entretien
Lorsque l’instrument se salit, neoyez-le avec un chion propre et sec. Ne vous
servez pas d’agents de neoyage liquides tels que du benzène ou du diluant,
voire des produits inammables.
Conservez ce manuel
Après avoir lu ce manuel, veuillez le conserver soigneusement pour toute
référence ultérieure.
Evitez toute intrusion d’objets ou de liquide
Ne placez jamais de récipient contenant du liquide près de l’instrument. Si
le liquide se renverse ou coule, il risque de provoquer des dommages, un
court-circuit ou une électrocution. Veillez à ne pas laisser tomber des objets
métalliques dans le boîtier (trombones, par ex.). Si cela se produit, débranchez
l’alimentation de la prise de courant et contactez votre revendeur Korg le plus
proche ou la surface où vous avez acheté l’instrument.
Note concernant les dispositions (Seulement EU)
Si ce symbole apparait sur le produit, le manuel, les piles ou les packs de piles,
cela signie que vous devez le recycler d’une manière correcte an de prévenir
les dommages pour la santé humaine et les dommages potentiels pour
l’environnement. Contactez votre administration locale pour de plus amples
renseignements concernant la bonne méthode de recyclage. Si la pile contient
des métaux lourds au-delà du seuil réglementé, un symbole chimique est aché
en dessous du symbole de la poubelle barrée d’une croix sur la pile ou le pack de piles.
REMARQUE IMPORTANTE POUR LES CLIENTS
Ce produit a été fabriqué suivant des spécications sévères et des besoins en tension
applicables dans le pays où ce produit doit être utilisé. Si vous avez acheté ce produit via
l’internet, par vente par correspondance ou/et vente par téléphone, vous devez vérier
que ce produit est bien utilisable dans le pays où vous résidez.
ATTENTION: L’utilisation de ce produit dans un pays autre que celui pour lequel il a
été conçu peut être dangereuse et annulera la garantie du fabricant ou du distributeur.
Conservez bien votre récépissé qui est la preuve de votre achat, faute de quoi votre
produit ne risque de ne plus être couvert par la garantie du fabricant ou du distributeur.
* Tous les noms de produits et de sociétés sont des marques commerciales ou
déposées de leur détenteur respectif.
Vorsichtsmaßnahmen
Aufstellungsort
Vermeiden Sie das Aufstellen des Geräts an Orten, an denen.
•
es direkter Sonneneinstrahlung ausgeset ist;
•
hohe Feuchtigkeit oder Extremtemperaturen auftreten können;
•
Staub oder Schmu in großen Mengen vorhanden sind;
•
das Gerät Erschüerungen ausgeset sein kann.
•
in der Nähe eines Magnetfeldes.
Stromversorgung
Schließen Sie das optionale Neteil nur an eine geeignete Steckdose an. Verbinden Sie es
niemals mit einer Steckdose einer anderen Spannung.
Störeinüsse auf andere Elektrogeräte
Dieser kann bei in der Nähe aufgestellten Rund-funkempfängern oder Fernsehgeräten
Empfangsstörungen hervorrufen. Betreiben Sie solche Geräte nur in einem geeigneten
Abstand von diesem Erzeugnis.
Bedienung
Vermeiden Sie bei der Bedienung von Schaltern und Reglern unangemessenen
Kraftaufwand.
Reinigung
Bei auftretender Verschmuung können Sie das Gehäuse mit einem trockenen, sauberen
Tuch abwischen. Verwenden Sie keinerlei Flüssigreiniger wie beispielsweise
Reinigungsbenzin, Verdünnungs- oder Spülmiel. Verwenden Sie niemals brennbare
Reiniger.
Bedienungsanleitung
Bewahren Sie diese Bedienungsanleitung gut auf, falls Sie sie später noch einmal
benötigen.
Flüssigkeiten und Fremdkörper
Stellen Sie niemals Behältnisse mit Flüssigkeiten in der Nähe des Geräts auf. Wenn
Flüssigkeit in das Gerät gelangt, können Beschädigung des Geräts, Feuer oder ein
elek-trischer Schlag die Folge sein.
Beachten Sie, daß keinerlei Fremdkörper in das Gerät gelangen. Sollte ein Fremdkörper in
das Gerät gelangt sein, so trennen Sie es sofort vom Ne. Wenden Sie sich dann an Ihren
Korg-Fachhändler.
Hinweis zur Entsorgung (Nur EU)
Wenn Sie das Symbol mit der „durchgekreuzten Mülltonne“ auf Ihrem Produkt, der
dazugehörigen Bedienungsanleitung, der Baerie oder der Verpackung sehen, müssen Sie das
Produkt in der vorgeschriebenen Art und Weise entsorgen um Schäden an der menschlichen
Gesundheit und der Umwelt zu vermeiden. Baerien oder Akkus, die Schadstoe enthalten,
sind auch mit dem Symbol einer durchgekreuzten Mülltonne gekennzeichnet. In der Nähe zum
Mülltonnensymbol bendet sich die chemische Bezeichnung des Schadstoes.
WICHTIGER HINWEIS FÜR KUNDEN
Dieses Produkt wurde unter strenger Beachtung von Spezikationen und Spannungsanforderungen
hergestellt, die im Bestimmungsland gelten. Wenn Sie dieses Produkt über das Internet, per Postversand
und/oder mit telefonischer Bestellung gekauft haben, müssen Sie bestätigen, dass dieses Produkt für Ihr
Wohngebiet ausgelegt ist.
WARNUNG: Verwendung dieses Produkts in einem anderen Land als dem, für das es bestimmt ist,
verwendet wird, kann gefährlich sein und die Garantie des Herstellers oder Importeurs hinfällig lassen
werden. Bie bewahren Sie diese Quiung als Kaueleg auf, da andernfalls das Produkt von der
Garantie des Herstellers oder Importeurs ausgeschlossen werden kann.
* Alle Produkt- und Firmennamen sind Warenzeichen oder eingetragene Warenzeichen
der betreenden Eigentümer.
La page est en cours de chargement...

Introduction
Thank you for purchasing the Korg volca fm DIGITAL FM SYNTHESIZER. This digital
synthesizer uses a 3-voice, 6-operator FM (Frequency Modulation) sound engine.
In addition to the basic FM sound parameters, there are also a number of volca
fm-specic parameters that provide further sound-editing capabilities. Sound les
(SYS-EX/SYX) created on the Yamaha DX7 can be converted and loaded into the volca
fm. Sounds created on the volca fm can be exported and shared with another volca fm.
In addition, the volca fm also includes a built-in step sequencer, motion sequencer, and
an arpeggiator—plus various voice modes—that can all add movement, depth, and
expression to your volca fm sounds.
FM (Frequency Modulation) is based on synthesis elements known as operators.
The volca fm sound engine uses six operators. Operators can function as either
modulators or carriers; modulating operators apply modulation to audio-source
carrier operators to create sound. The way that these modulating and carrier
operators interact is called an algorithm; the volca fm provides 32 distinct FM
algorithms.
In the EDIT mode, the parameters required for the FM sound source, such as the
LFO waveform and speed as well as the EG level and rate, can be set for each
operator.
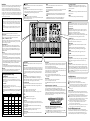
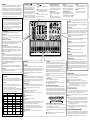
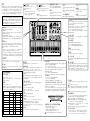
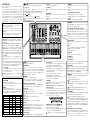
TRANSPOSE slider
This slider raises or lowers the pitch in units of octaves or semitones.
VELOCITY slider
In PLAY mode, this slider controls the global velocity. In EDIT mode, this slider
functions as the VALUE slider for editing the FM synthesis parameters.
OCTAVE ,/ OPERATOR +, – buttons
In PLAY mode, these buons change the octave range of the keyboard. In EDIT
mode, these buons select the operator to edit. By selecting “A” (All), you can edit
parameters that apply to all operators.
SAVE/EXPORT button
When not in EDIT mode, this buon saves the FM sound engine parameters.
Press the SAVE/EXPORT buon, and then use the PROGRAM knob to select the
save location for the program. Press the SAVE/EXPORT buon again to begin
saving. To cancel the save operation, press the EDIT buon before pressing the
SAVE/EXPORT buon.
Exporting
You can connect the volca fm’s SYNC OUT jack to the SYNC IN jack of another
volca fm unit, and export (transmit) FM sound programs and sequences to the
other volca fm unit.
In EDIT mode, press the SAVE/EXPORT buon so that the buon blinks, and
then use the PROGRAM knob to select the item to be exported. After selecting
the item to be exported, press the SAVE/EXPORT buon again to export it. The
SAVE/EXPORT buon lights up while the export operation is being performed.
The SAVE/EXPORT buon blinks again when the operation is nished.
Items to be exported
Crnt PGM (currently selected program), ALL PGM (all 32 programs), Crnt SEQ
(current sequence), ALL SEQ (all 16 sequences), CLOnE (all previously listed items)
EDIT button
Use this buon to toggle between the EDIT and PLAY modes. EDIT mode is the
mode for specifying seings for FM synthesis parameters and exporting.
Specifying global parameter settings
Setting the MIDI channel
1. While holding down the MEMORY buon,turn the volca fm on.
2.
Keyboard buons 1 to 16 correspond to the MIDI channels 1 to 16
. Press the
buon that corresponds to the desired channel, and the LED below the keyboard
buon will light up.
Other parameters
1. While holding down FUNC buon, turn on the volca fm.
2.
Use the keyboard bu
ons 1–8 to set your preferences for any or all of the global
parameters. (Refer to the table.)
3. When you have nished, press the
(REC) buon. Your seings will be saved, and
the volca fm will restart. To cancel without making changes, press the
(PLAY)
buon.
Button LED lit up LED unlit
Parameter
Status
Display indication
Status
Display indication
1
Auto power-o
function
*Enabled AutoP On Disabled AutoP OFF
2
Battery type selection
Nickel-metal
hydride
bAtt nH *Alkaline bAtt AL
3
Sync Out polarity Fall SyncOt Lo *Rise SyncOt HI
4
Sync In polarity Fall SyncIn Lo *Rise SyncIn HI
5
Tempo range settings Full (10-600) TEmPo FuL *Narrow (56-240) TEmPo nAr
6
MIDI Clock Src *Auto MdCLK Aut Internal MdCLK Int
7
MIDI RX ShortMessage
*On MdShrt On O MdShrt OF
8
Sync input/output unit Once a step SyncStp 1
*Once every 2 steps
SyncStp 2
*: Factory default seing
Keyboard buttons
Arranged as in a traditional keyboard, these buons are used to play the volca fm.
MEMORY buttons
The volca fm is equipped with 16 memory locations that are used to save sequences.
To load a sequence, press the MEMORY buon, and then press one of the 1 through
16 buons. Hold down the FUNC buon and press the MEMORY (WRITE) buon to
enter the save-ready condition. In this condition, press one of the 1–16 buons to
save the currently selected program number and sequence in the buon that you
pressed.
CHAIN function
Multiple saved sequences can be linked together to create a longer and more
interesting performance. Hold down the MEMORY buon, and using the 1–16
buons in which sequences have been saved, specify the range of sequences that you
want to play; the sequences in that range will play back consecutively.
FUNC (function) button
To access various volca fm functions, hold down the FUNC buon and press the
appropriate keyboard buon. The LED below the key will light to conrm your
selection.
VOICE MODE
•FUNC + POLY: Up to three-note chords can be played.
•FUNC + MONO: One note at a time can be played.
•FUNC + UNISON: All three voices will sound in unison, operating as a mono
synth.
CHORUS
•FUNC + CHORUS: This applies a chorus eect.
ARP ON/OFF
•FUNC + ARP ON/OFF: This turns arpeggiator on/o.
Tempo settings
•FUNC + 1/1, 1/2, 1/4: The volca fm tempo can be set to one-half, one-quarter, or
equal to the value of the incoming MIDI clock, the SYNC IN clock rate, or the current
tempo knob seing.
• FUNC + METRONOME: When selected, the metronome will sound during
sequence playback.
• FUNC + WARP ACT.STEP: If there are fewer than 16 active steps, they are
compensated to occupy the same playback time as 16 steps.
Transpose setting
• FUNC + TRANSPS NOTE: Switches the operation of the TRANSPOSE slider to
semitone units.
(Power) button
Press this buon to turn the volca fm on. To turn the volca fm o, hold this buon for
approximately one second.
Auto power-o
The power-o function will automatically turn the volca fm o after roughly four
hours have passed with no sound being produced. The auto power-o function can
be disabled using the global parameters. (See global parameters.)
DC 9V Jack
Connect the plug end of the optional AC adapter to this jack.
Only use the specied AC adapter. Using any AC adapter other than the specied
model could damage the volca fm.
DISPLAY
The value of the selected knob, buon, or function is shown in the screen.
Envelope Generator Controls
The envelopes [EG] control how fast an operator comes up to full level (Aack) and how
fast an operator dies down (Decay) after the key is pressed or released.
MODULATOR
• ATTACK: This knob controls the EG aack for the selected MODULATOR operator.
• DECAY: This knob controls the EG decay for the selected MODULATOR operator.
CARRIER
• ATTACK: This knob controls the EG aack for the selected CARRIER operator.
• DECAY: This knob controls the EG decay for the selected CARRIER operator.
Installing the batteries
On the back panel, locate the baery compartment and slide o the cover. Insert the
baeries—being sure to observe the correct polarity—and then replace the baery
cover.
Turn the volca fm o before replacing the baeries.
Remove depleted baeries at once. Depleted baeries left in the baery
compartment may leak over time, and may cause malfunctions. Also, remove the
baeries if you will not be using the volca fm for an extended period of time.
Do not mix partially used baeries with new ones, and do not mix baeries of
diering types.
Battery level indicator
When the volca fm is turned on, the LEDs below the keyboard buons indicate the
remaining amount of baery power. If all LEDs are lit up, the baeries are completely
full. Fewer lit LEDs mean that the baery level is correspondingly lower.
When using the AC adapter, the remaining baery level will not be indicated correctly.
TIP Either alkaline or nickel-metal hydride baeries can be used. In order for the
remaining baery level to be detected and indicated correctly, the type of baeries
being used must be specied in the global parameters of the volca fm.
TIP
If the baeries are running low during usage of the volca fm, t
he low baery
warning “bA Lo” will appear in the display. If the baeries run down
completely, the volca fm automatically turns o.
TIP
It’s not possible to turn o the low baery w
arning; however, you will be able to
continue using the volca fm until the baeries have run down completely.
About the MIDI implementation chart
The volca fm can be controlled via MIDI; simply connect the MIDI output of an
external MIDI device to the MIDI IN jack of the volca fm. The MIDI messages that can
be received by the volca fm are listed in its MIDI implementation chart. You can
download the MIDI implementation chart for the volca fm from the Korg Web site.
LFO (Low Frequency Oscillator)
• RATE: This knob sets the LFO speed of the FM sound source parameters.
• P.DEPTH: This knob sets the depth of the LFO applied to the pitch of the FM
sound source parameters.
PROGRAM
Normally, this knob selects the program. In EDIT mode, this knob selects the FM
synthesis parameter.
ALGRTM
This knob selects the operator algorithm for the FM sound engine.
MOTION SEQUENCE
This function records knob or slider operations that are performed while a sequence is being
recorded. Once the sequence has made a full cycle from the step where an operation was
performed, record is automatically deactivated.
• FUNC + ON/OFF: This turns motion sequencing on/o.
• FUNC + SMOOTH: If this is turned on, the parameters change smoothly during each step
according to the motion value recorded at the beginning of each step. If this is turned o, the
parameters change abruptly at the beginning of each step.
TIP Some parameters won’t play back smoothly.
• FUNC + CLEAR: All recorded knob adjustments will be erased.
TIP
Motion Sequence can record operations of TRANSPOSE, VELOCITY and all clear knobs
except TEMPO.
CLEAR (erasing data)
• FUNC + ACT.STP: All values in the active step will be deleted
• FUNC + ALL: All sequence data will be erased.
• FUNC +
(REC/ERASE) during playback: Use the keyboard buons to remove individual
sounds.
ACTIVE STEP mode: FUNC button + (PLAY) button
Using the ACTIVE STEP mode, each step of the current sequence can be individually turned
on or o; disabled (o) steps will be skipped during playback and recording .
While holding down the FUNC buon, press the
buon (ACTIVE STEP) to enter active
step mode.Each step of the current sequence can be turned on/o. Steps that are turned o
are disabled and will be skipped during playback and recording. The LEDs below the
keyboard buons representing the active steps will light up. When you’ve nished, press the
FUNC buon to exit active step mode.
Restoring all factory default FM sound programs and sequence data
1. While holding down the FUNC and MEMORY buons, turn the volca fm on.
The
(REC) and
(PLAY) buons will blink.
2. Press the
(REC) buon to restore the factory defaults and start volca fm. Press the
(PLAY) buon to cancel the reset operation and simply start volca fm.
Restoring the factory defaults will erase any saved FM sound program and sequence data.
MIDI IN jack
By connecting a MIDI cable to this input, the volca fm can be played and controlled
by the MIDI output of an external device. SYX sound data les for the Yamaha DX7
can also be received.
SYNC (IN, OUT) jacks
These jacks allow you to synchronize your volca fm to Korg volca, monotribe or
other equipment—including an analog sequencer or a DAW. The polarity of the
SYNC jacks can be set using the global parameters.
• SYNC OUT: a 5 V pulse of 15 ms is sent at the beginning of each step.
• SYNC IN: If this jack is connected, the internal step-clock will be ignored, and the
volca fm sequencer will advance according to the pulses received here.
(Headphone) jack
Connecting your headphones to this 1/8”stereo mini jack will mute the volca fm’s
internal speaker and allow you to create music in private.
ARP (Arpeggiator)
The arpeggiator plays the individual notes held on the keyboard in a rhythmic
paern.
• TYPE: Select one of the available arpeggiator paerns using this knob.
• DIV: Use this knob to change the note timing resolution of the arpeggiator.
TEMPO
The tempo knob sets the playback tempo for the arpeggiator and sequencer.
VOLUME
This is the master volume knob; use this to set the output level of volca fm.
(PLAY) button
Pressing this buon will cause the current sequence to begin playing. The
(PLAY)
buon will light up during playback. Press this buon a second time to stop
playback.
(REC) button
This records your performance on the keyboard buons as a sequence. If you press
this buon while stopped, you’ll enter record-ready mode (the buon will blink);
when you then press the
(PLAY) buon, recording will start (the buon will light).
You can also start recording by playing the keyboard when in record-ready mode. If
you press the
(REC) buon during playback, recording will start from the point at
which you pressed the buon.

Introduction
Merci d’avoir choisi le SYNTHÉTISEUR NUMÉRIQUE FM de Korg. Ce synthétiseur numérique
repose sur un moteur sonore à 3 voix et 6 opérateurs FM ( “Frequency Modulation” ou
“modulation de fréquence”). Outre les paramètres de base du son FM, cet instrument ore une
série de paramètres portant le cachet volca fm et élargissant les possibilités d’édition sonore. Les
chiers sonores (SYS-EX/SYX) créés sur un Yamaha DX7 peuvent être convertis et chargés dans le
volca fm. Les sons produits avec le volca fm peuvent être exportés et partagés avec un autre volca
fm. En outre, le volca fm comporte un séquenceur à pas intégré, un séquenceur de manips ainsi
qu’un arpégiateur—plus divers modes de voix. Bref tous les outils nécessaires pour conférer
dynamique, profondeur et expression aux sons créés sur votre volca fm.
La modulation de fréquence (“FM” pour “Frequency Modulation”) est basée sur des
éléments de synthèse appelés “opérateurs”. Le moteur sonore du volca fm comporte 6
opérateurs. Les opérateurs peuvent faire oce de modulateurs ou de porteurs. Les
opérateurs modulateurs appliquent une modulation aux opérateurs porteurs d'une source
audio pour créer un son. L'interaction entre ces opérateurs modulateurs et porteurs est ce
qu'on appelle un algorithme. Le volca fm ore 32 algorithmes FM diérents.
En mode EDIT, les paramètres nécessaires pour la source sonore FM, tels que la forme
d'onde et la vitesse du LFO ainsi que le niveau et l'intensité du générateur d'enveloppe,
peuvent être dénis pour chaque opérateur.
Curseur TRANSPOSE
Ce curseur augmente ou diminue la hauteur d’une octave ou d’un demi-ton.
Curseur VELOCITY
En mode PLAY, ce curseur commande la dynamique (vélocité) globale de l’instrument. En
mode EDIT, ce curseur fait oce de curseur de valeur (“VALUE”) pour l’édition des
paramètres de synthèse FM.
Boutons OCTAVE ,/ OPERATOR +, –
En mode PLAY, ces boutons changent la plage de hauteur du clavier par pas d’une octave. En
mode EDIT, ces boutons sélectionnent l’opérateur à éditer. Choisissez “A” (“All”, comme
dans “tous”) pour éditer les paramètres s’appliquant à tous les opérateurs.
Bouton SAVE/EXPORT
En mode PLAY, ce bouton sauvegarde les paramètres du moteur sonore FM.
Appuyez sur le bouton SAVE/EXPORT, puis choisissez l’emplacement de sauvegarde du
programme avec la commande PROGRAM. Appuyez à nouveau sur le bouton SAVE/
EXPORT pour exécuter la sauvegarde. Pour annuler la sauvegarde, appuyez sur le bouton
EDIT, puis sur le bouton SAVE/EXPORT.
Exportation
Vous pouvez relier la prise SYNC OUT du volca fm à la prise SYNC IN d’un autre volca fm
et exporter (transmere) les programmes sonores FM et les séquences à l’autre volca fm.
En mode EDIT, appuyez sur le bouton SAVE/EXPORT de sorte que le bouton clignote, puis
choisissez l’élément à exporter avec le commande PROGRAM. Après avoir choisi l’élément
à exporter, appuyez à nouveau sur le bouton SAVE/EXPORT pour démarrer l’exportation.
Le bouton SAVE/EXPORT s’allume pendant l’exportation. Le bouton SAVE/EXPORT
clignote à nouveau quand l’opération est terminée.
Éléments à exporter
Crnt PGM (programme actuellement sélectionné), ALL PGM (tous les 32 programmes), Crnt SEQ
(séquence actuelle), ALL SEQ (toutes les 16 séquences), CLOnE (tous les éléments ci-dessus)
Bouton EDIT
Ce bouton permet d’alterner entre les modes EDIT et PLAY. Le mode EDIT sert à eectuer les
réglages des paramètres de synthèse FM et à l’ exportation.
Commandes de générateur d'enveloppe
L’enveloppe détermine la vitesse à laquelle un
opérateur aeint son niveau maximal (Aack) et la
vitesse à laquelle l’opérateur s’estompe (Decay) après
l’enfoncement ou le relâchement d’une touche.
MODULATOR (modulateur)
• ATTACK: Cee commande contrôle l'aaque de
l'enveloppe pour l'opérateur MODULATOR
sélectionné.
• DECAY:
Cee commande contrôle la chute de
l'enveloppe pour l'opérateur MODULATOR sélectionné.
Réglage des paramètres globaux
Réglage du canal MIDI
1. Meez le volca fm sous tension en maintenant son bouton MEMORY enfoncé.
2. Les boutons de clavier 1 à 16 correspondent aux canaux MIDI 1 à 16. Appuyez sur le bouton
de clavier correspondant au canal MIDI voulu. La diode s'allume alors sous ce bouton.
Autres paramètres
1. Meez le volca fm sous tension en maintenant son bouton FUNC enfoncé.
2.
Réglez le ou les paramètres globaux voulus de l'instrument selo
n vos préférences avec les
boutons de clavier 1 à 8. (Voyez le tableau pour plus de détails.)
3. Quand vous avez ni les réglages globaux, appuyez sur le bouton
(enregistrement). Le
volca fm sauvegarde vos réglages avant de redémarrer. Vous pouvez annuler les réglages
globaux avant la sauvegarde en appuyant sur le bouton (lecture).
Bouton Témoin allumé Témoin éteint
Paramètre
Statut
Indication à l’écran
Statut
Indication à l’écran
1
Mise hors tension
automatique
*Activée AutoP On Désactivée AutoP OFF
2 Sélection du type de piles Au nickel-hydrure métallique bAtt nH *Alcalines bAtt AL
3 Polarité ‘Sync Out’ Diminue SyncOt Lo *Augmente SyncOt HI
4 Polarité ‘Sync In’ Diminue SyncIn Lo *Augmente SyncIn HI
5
Réglages de plage de tempo
Intégrale (10...600) TEmPo FuL *Réduite (56...240) TEmPo nAr
6 Source d’horloge MIDI *Automatique MdCLK Aut Interne MdCLK Int
7
Réception MIDI
ShortMessage
*Active MdShrt On Coupée MdShrt OF
8
Synchro du dispositif
d’entrée/de sortie
Une fois par pas SyncStp 1 *Une fois tous les 2 pas SyncStp 2
*: réglage d’usine
Boutons de clavier
Ces boutons sont disposés comme les touches d’un clavier traditionnel et permeent de jouer
sur le volca fm.
Boutons MEMORY
Le volca fm comporte 16 emplacements de mémoire utilisés pour sauvegarder les séquences.
Pour charger une séquence, appuyez sur le bouton MEMORY puis sur un des boutons 1 à 16.
Maintenez enfoncé le bouton FUNC et appuyez sur le bouton MEMORY (WRITE) pour parer
l’instrument à la sauvegarde. Il sut alors d’appuyer sur un des boutons 1–16 pour
sauvegarder dans la mémoire correspondante le numéro du programme actuellement
sélectionné et la séquence.
Fonction CHAIN
Cee fonction permet de mere bout à bout plusieurs séquences sauvegardées pour produire
des données de jeu plus longues et intéressantes. Maintenez le bouton MEMORY enfoncé et
choisissez les diérentes séquences à lier avec les boutons 1~16 (des mémoires contenant des
données de séquence). Les séquences seront alors jouées et enchaînées dans l’ordre selon
lequel vous les avez choisies.
Bouton FUNC (fonction)
Pour accéder aux diverses fonctions du volca fm, maintenez enfoncé le bouton FUNC et
appuyez sur le bouton de clavier correspondant à la fonction voulue. La diode en dessous de
chaque bouton s’allume et ore une conrmation visuelle de votre sélection.
VOICE MODE
•FUNC + POLY: Pour jouer des accords contenant jusqu’à 3 notes.
•FUNC + MONO: Pour jouer une note à la fois.
•FUNC + UNISON: Les 3 voix sont jouées à l’unisson, comme sur un synthé mono.
CHORUS
•FUNC + CHORUS: Active l’eet Chorus.
ARP ON/OFF
•FUNC + ARP ON/OFF: Active/coupe l’arpégiateur.
Réglages de tempo
•FUNC + 1/1, 1/2, 1/4: Ces boutons permeent de régler le tempo du volca fm sur la moitié,
le quart ou la même valeur que le signal d’horloge MIDI transmis au volca fm, le signal
d’horloge SYNC IN ou la valeur dénie avec la commande TEMPO.
• FUNC + METRONOME: Active le métronome pendant la lecture de séquence.
• FUNC + WARP ACT.STEP: Si la séquence comporte moins de 16 pas actifs, le volca fm
applique une compensation de sorte que les pas occupent l’équivalent temporel de 16 pas.
Réglages de transposition
• FUNC + TRNSPS NOTE: Le curseur TRANSPOSE règle la transposition par pas d’un
demi-ton.
Interrupteur d’alimentation ( )
Appuyez sur cet interrupteur pour mere le volca fm sous
tension. Pour mere le volca fm hors tension, maintenez
cet interrupteur enfoncé pendant environ une seconde.
Fonction de coupure automatique de l'alimentation
La fonction de coupure automatique de l'alimentation met le
volca fm hors tension quand 4 heures environ se sont
écoulées sans aucune manipulation ni production de son sur
l’instrument. Vous pouvez désactiver la fonction de coupure
automatique de l’alimentation avec les paramètres globaux de
l’instrument. (Voyez la description des paramètres globaux.)
PROGRAM
En mode normal, cee commande sert au choix d’un
programme. En mode EDIT, cee commande
sélectionne le paramètre de synthèse FM.
ALGRTM
Cee commande sert au choix de l’algorithme
d’opérateur pour le moteur sonore FM.
Prise MIDI IN
La connexion d’un dispositif MIDI à cee prise via un câble MIDI permet de jouer et de
piloter le volca fm depuis le dispositif externe. Vous pouvez aussi recevoir des chiers de
données sonores SYX pour le Yamaha DX7.
Prises SYNC (IN, OUT)
Ces prises permeent de synchroniser le volca fm avec un Korg volca, monotribe ou un autre
instrument—y compris un séquenceur analogique ou une station de travail audio numérique
(DAW). La polarité des prises SYNC peut être réglée avec les paramètres globaux du volca fm.
• SYNC OUT: Transmet une impulsion de 5 V durant 15 ms au début de chaque pas.
• SYNC IN: Quand cee prise est reliée à un dispositif, le séquenceur du volca fm ignore son
horloge interne et aligne ses pas sur les impulsions reçues à cee prise.
Prise casque
Vous pouvez brancher un casque d’écoute à cee che minijack stéréo de 3,5mm pour couper
le son du haut-parleur interne et jouer sans déranger votre entourage.
ARP (arpégiateur)
L’arpégiateur produit les notes individuelles jouées avec le clavier sous forme de motifs
rythmiques.
• TYPE: Cee commande permet de choisir un des motifs d’arpégiateur de l’instrument.
• DIV: Cee commande sert à modier la résolution de note de l’arpégiateur.
TEMPO
Cee commande règle le tempo de l’arpégiateur et du séquenceur.
VOLUME
Cee commande de volume général règle le niveau de sortie du volca fm.
Bouton (lecture)
Appuyez sur ce bouton pour lancer la lecture de la séquence sélectionnée. Le bouton
(lecture) s’allume pendant la lecture. Une nouvelle pression sur ce bouton arrête la lecture.
Bouton (enregistrement)
Appuyez sur ce bouton pour enregistrer votre jeu sur les boutons de clavier et vos
manipulations des commandes sous forme de séquence. Quand le séquenceur est à l’arrêt,
une pression sur ce bouton active le mode paré à enregistrer (le bouton clignote alors). Vous
pouvez alors démarrer l’enregistrement en appuyant sur le bouton
(lecture) (le bouton
s’allume). Vous pouvez aussi lancer l’enregistrement en jouant avec les boutons de clavier
quand le volca fm est en mode paré à enregistrer. Quand vous appuyez sur le bouton
(enregistrement) pendant la lecture, l’enregistrement commence au point où vous avez
enfoncé le bouton.
CARRIER (porteur)
• ATTACK: Cee commande contrôle l'aaque de
l'enveloppe pour l'opérateur CARRIER sélectionné.
• DECAY: Cee commande contrôle la chute de
l'enveloppe pour l'opérateur CARRIER sélectionné.
LFO (oscillateur basse fréquence)
• RATE: Règle la vitesse de l'oscillateur basse
fréquence des paramètres de la source sonore FM.
• P.DEPTH: Règle la profondeur du LFO appliqué à la
hauteur des paramètres de la source sonore FM.
Installation des piles
Localisez le couvercle du compartiment des piles sur la face arrière et ouvrez le couvercle en
le glissant. Insérez les piles en veillant à respecter les indications de polarité, puis remeez
en place le couvercle du compartiment des piles.
Meez le volca fm hors tension avant de remplacer les piles.
Retirez toujours immédiatement les piles usées du volca fm. La présence de piles
usées dans l’instrument peut provoquer des dysfonctionnements (dus à une fuite du
liquide des piles). Retirez également les piles si vous n’avez pas l’intention d’utiliser
le volca fm pendant une période prolongée.
Ne mélangez pas des piles partiellement utilisées avec des piles neuves et ne
mélangez pas diérents types de piles.
Indication d’autonomie restante des piles
À la mise sous tension, le volca fm indique l’autonomie restante des piles avec les témoins sous
ses boutons de clavier. Avec des piles neuves en place, tous les témoins sont allumés. Au l de
l’utilisation, les témoins s’éteignent un à un, indiquant l’autonomie restante.
Quand un adaptateur secteur est branché, l’ indication de charge des piles ne reète pas la
charge réelle.
ASTUCE
Vous pouvez alimenter l’instrument avec des piles alcalines ou au nickel-hydrure métallique.
Pour que l’instrument détecte et indique correctement l’autonomie restante des piles, il est
primordial de dénir le type de piles en place avec les paramètres globaux du volca fm.
ASTUCE Quand les piles s’épuisent durant l’utilisation du volca fm, le message d’avertissement de
basse tension des piles “bA Lo” s’ache sur l’écran. Le volca fm est automatiquement
mis hors tension quand les piles sont plates.
ASTUCE
L’achage du message d’avertissement de basse tension des piles ne peut pas être
désactivé. Toutefois, vous pouvez continuer à utiliser le volca fm jusqu’à ce que les piles
soient complètement plates.
À propos du tableau d’implémentation MIDI
Pour piloter le volca fm via MIDI, raccordez simplement la prise de sortie MIDI du dispositif
MIDI externe voulu à la prise MIDI IN du volca fm. Les types de messages MIDI qui peuvent
être reçus par le volca fm gurent dans son tableau d’implémentation MIDI. Vous pouvez
télécharger le tableau d’implémentation MIDI du volca fm sur le site web de Korg.
MOTION SEQUENCE
Cee fonction enregistre les manipulations des commandes et curseurs durant
l’enregistrement d’une séquence. Quand la séquence a eectué un cycle complet depuis le pas
où la manipulation initiale a été eectuée, l’enregistrement est automatiquement désactivé.
• FUNC + ON/OFF: Active/désactive l’enregistrement de manipulations.
• FUNC + SMOOTH: Cee fonction adoucit les changements de valeurs de paramètre d’un
pas à l’autre dans la séquence. Quand cee fonction est coupée, les diérentes valeurs de
paramètres produisent des changements abrupts d’un pas à l’autre.
ASTUCE
La lecture de séquence ne permet pas de transitions uides pour
certains paramètres.
• FUNC + CLEAR: Eace toutes les manipulations de commandes et curseurs enregistrées
dans la séquence.
ASTUCE
La fonction Motion Sequence permet d’enregistrer les manipulations des curseurs
TRANSPOSE, VELOCITY et de toutes les commandes transparentes à l’exception de TEMPO.
CLEAR (eacer des données)
• FUNC + ACT.STP: Eace toutes les valeurs du pas actif.
• FUNC + ALL: Eace toutes les données de la séquence.
• FUNC +
(enregistrement/ERASE)
pendant la lecture: Permet de supprimer des sons
individuels avec les boutons de clavier.
Mode ACTIVE STEP: Bouton FUNC + bouton (lecture)
Le mode ACTIVE STEP permet d’activer/de couper individuellement chaque pas de la
séquence actuelle. Les pas désactivés sont ignorés durant la lecture et l’enregistrement.
Maintenez enfoncé le bouton FUNC et appuyez sur le bouton
(ACTIVE STEP) pour activer
le mode ACTIVE STEP. Vous pouvez alors activer/couper chaque pas de la séquence actuelle.
Les pas désactivés sont eectivement coupés et ignorés durant la lecture et l’enregistrement.
Les diodes allumées sous les boutons de clavier indiquent les pas actifs. Quand vous avez
terminé votre sélection, appuyez sur le bouton FUNC pour quier le mode ACTIVE STEP.
Initialisation de tous les programmes sonores FM et de toutes les données de séquence
1. Meez le volca fm sous tension en maintenant ses boutons FUNC et MEMORY enfoncés.
Les boutons
(enregistrement) et (lecture) clignotent.
2. Appuyez sur le bouton
(enregistrement) pour initialiser les réglages et redémarrer le volca fm.
Appuyez sur le bouton
(lecture) pour annuler l’initialisation et redémarrer simplement
le volca fm.
L’initialisation entraîne la perte de tous les programmes sonores FM et toutes les
données de séquence sauvegardés.
Prise DC 9V
Branchez à cee prise la che de l'adaptateur secteur
en option.
Utilisez uniquement le type d'adaptateur secteur
spécié. L’utilisation de tout autre adaptateur
secteur pourrait endommager le volca fm.
ÉCRAN
Ache les valeurs sélectionnées avec les commandes,
boutons et fonctions de l'instrument.
La page est en cours de chargement...
La page est en cours de chargement...
La page est en cours de chargement...

イント ロ ダクション
このたびは、コルグ・デジタル FM シンセサイザー volcafm をお買い上げいただきまして、
まことにありがとうございます。
v o l c a
f
m は 3 ボイス、6 オペレーターからなる F M 音源とステップ・シーケンサーを搭載
したデジタル FM シンセサイザーです。基本的な FM 音源のパラメーターはエディットでき、
さらに volca
f
m 固有のパラメーターで FM 音源の可能性を広げます。また、ヤマハ社の
DX7 の音色 SYX ファイルをコンバージョン・ロードし、volca
f
m に取り込むことができます。
volca fm で作成した音色を別の volca fm にエクスポートして、再現することができます。
アルペジエーターを使うことで、シーケンス・パターンに躍動感をつけてループの変化を楽
しむことができます。volca
k
eys でも使用しているユニゾンなどの VOICE
MODE
を持ち、
FM 音源と組み合わせることで、volca らしいシンセサイザーの音色になります。
FM( 周波数変調 ) 音源の基本は、オペレーターと呼ばれる、音源の基本となる要素によっ
て 構 成 さ れ ま す 。 オ ペレ ー タ ー の 役 割 に は モ ジュレ ー タ ー と キャリア が あ り 、キャリア に 対
し て モ ジュレ ー タ ー が 変 調 を か け 音 を 作ります 。
volca
fm
の音源は 6 つのオペレーターを持っており、その組み合わせは 32通りあります。
この組み合わせをアルゴリズムといい、32 通りの中からアルゴリズムを選ぶことが音作
りの 基礎になります。
EDIT モードでは、各オペレーターに対して、LFO の波形やスピード、EG の LEVEL や
RATE など、FM 音源に必要な各パラメーターを設定することができます。
TRANSPOSE スライダー:オクターブまたは半音位で音程を上下に変化させます。
VELOCITY スライダー:ベロシティを設定します。EDIT モード時には FM 音源パラメー
ターの値を設定します。
OCTAVE
,
/OPERATOR - , + ボタン:
鍵
盤を演奏したときに発音するオクターブ
を設定します。EDIT モード時には、設定対象のオペレーターを選択します。“A”(All)
を選択すると、すべてのオペレーターに対するパラメーターを設定することができます。
SAVE/EXPORT ボタン:EDIT モード時以外に FM 音源パラメーターを保存します。
SAVE/EXPORT ボタンを押してから PROGRAMノブを回して保存先のプログラム
を選択します。再度 SAVE/EXPORT ボタンを押すと保存が実行されます。SAVE/
EXPORT ボタンを押す前に EDIT ボタンを押すと保存をキャンセルすることができます。
エ
クスポ ート 機 能
本機の SYNC
O
UT 端子と別の volca
fm
の SYNC
I
N 端子を接続し、別の volca
f
m に F M 音源プログラムやシーケンス・データをエクスポート(転送)することがで
きます。
EDIT モード時にSAVE/EXPORT ボタンを押すとボタンが点滅し、PROGRAMノブ
で エクス ポ ートす る 項 目 を 選 択しま す。 エクスポ ートす る 項 目 を 選 ん だら、 再 度 S A V E /
EXPORT ボタンを押してエクスポートを実行します。実行中は SAVE/EXPORT ボタン
が点灯になります。SAVE/EXPORT ボタンが点滅に戻ったら完了です。
・エクスポ ート 項 目 内 容
Crnt
P
GM
(
現在選択中のプログラム )、ALL
P
GM
(3
2 個すべてのプログラム )、
CrntSEQ( 現在のシーケンス・データ )、ALLSEQ(16 個のシーケンス・データ )、
CLOnE
(
上記の EXPORT 内容すべて )
E D I T ボ タ ン:EDIT モードへの出入りをします。EDIT モードとは、FM 音源パラメーター
の 設 定 と エクス ポ ート を 行う モ ードで す 。
MIDI IN 端子
外部 M I DI 機器と接続して v o l c a f m の音源をコントロールします。また、ヤマハ社の
DX7 の音色 SYX ファイルを受信することができます。
IN–SYNC–OUT(SYNC IN、SYNC OUT)端子
付属のケーブルを使用して volca fm とその他の volca シリーズ、monotribe などの
機器を接続し、両方の機器を同期させます。SYNC OUT 端子はステップのはじめに
15ms のパルスを 5V で出力します。SYNC
I
N 端子に接続すると、内部のステップ・クロッ
クが無効になり、volca
f
m のシーケンサーは入力されたパルスに応じてステップが進み
ます。monotribe 等の SYNC
O
UT 端子やその他のアナログ・シーケンサー、DAW
などのオーディオ・アウトから出力されるパルスにステップを同期する場合に使用します。
( ヘ ッ ド ホ ン ) 端 子
ヘッドホン(ステレオ・ミニ・プラグ) を接続します。接続していないときは、内蔵のスピー
カーで出力します。
ARP
アルペジエーターは鍵盤ボタンで押された音を選んだタイプで自動演奏します。
T Y P E ノブ:アルペジエーターのタイプを設定します。
D I V ノブ:分解能を設定します。
TEMPO ノブ
アルペジエーターやシーケンサーの再生テンポを設定します。
VOLUME ノブ
出力の音量を設定します。
(PLAY) ボタン
シーケンスを再生します。シーケンスは、必ず先頭から再生を開始します。再生中は
▶
(PLAY)ボタンが点灯します。もう一度ボタンを押すと停止します。
(REC) ボタン
鍵盤ボタンでの演奏をシーケンスとして録音します。停止中にボタンを押すと録音待機
状態になり(ボタン点滅)、
▶
(PLAY)ボタンを押すと録音を開始します(ボタン点灯)。
録音待機中に鍵盤を演奏することによって録音を開始することもできます。再生中に
●
(REC)ボタン押すと、押したところから録音を開始します。
ディスプレイ
ノブやボタンを操作したときに値などを表示します。
PROGRAM ノブ
通常時は、プログラムを選択します。EDIT モード時は、FM 音源パラメーターを選択し
ます。
MODULATOR
ATTACK ノブ:MODULATOR のオペレーターに対して、EG のアタックのパラメーター
を設定します。
D E C A Y ノブ:MODULATOR のオペレーターに対して、EG のディケイのパラメーター
を設定します。
グローバル・パラメーターの設定
MIDI チャンネルの設定
1.MEMORY ボタンを押しながら、電源をオンにします。
2.1 ~ 16 ( 鍵 盤 ) ボタン が M I D I チャン ネ ル 1 ~ 16 に対 応します。 チャン ネル に対 応
するボタンを押してボタンの LED を点灯させます。
その他の設定
1. F U N C ボ タ ン を 押 し な が ら 、 電 源 を オ ン に し ま す 。
2.1 ~ 8(鍵盤)ボタンを押してグローバル・パラメーターを設定します。(表参照)
3. 設定を終了したら
●
(REC)ボタンを押します。設定が保存され本機が再起動します。
キャンセ ル す る場 合は
▶
(PLAY)ボタンを押します。
ボタン LED 点灯 LED 消灯
機能
状態 表示 状態 表示
1
オ ート・パ ワ ー・オ フ 機 能 * 有効
AutoP On
無効
AutoP OFF
2
使用電池の選択 ニッケル 水 素
bAtt nH
* アルカリ
bAtt AL
3
SyncOut 極性 立下り
SyncOt Lo
* 立上り
SyncOt HI
4
SyncIn 極性 立下り
SyncIn Lo
* 立上り
SyncIn HI
5
Tempo レンジ設定 Full(10 ~ 600)
TEmPo FuL
*Narrow(56 ~ 240)
TEmPo nAr
6
MIDIClockSrc *Auto
MdCLK Aut
Internal
MdCLK Int
7
MIDIRX
ShortMessage
*On
MdShrt On
O
MdShrt OF
8
Sync 入出力単位 1 ステップに 1 回
SyncStp 1
* 2 ステップに 1 回
SyncStp 2
*:工場出荷時の設定です。
鍵盤ボタン
ボタンを押すと設定した音色で発音します。
MEMORY ボタン
volcafm にはシーケンスを保存できる 16 個のメモリーが内蔵されています。
ME MOR Y ボタンを押してから 1 ~ 16 ボタンを押すと、 保 存されたシーケンスを読み込
みます。FUNC ボタンを押しながら MEMORY(WRITE)ボタンを押すと保存待機状
態になります。その状態で保存したい 1 ~ 16 ボタンを押すと、現在選択しているプログ
ラム番号とシーケンスが押したボタンに保存されます。
CHAIN 機能
複数のシーケンス・データを続けて読み出す機能です。
MEMORY ボタンを押しながらシーケンスが保存されている 1 ~ 16 ボタンで、演奏した
いシーケンスの区間を指定すると、その区間のシーケンスが連続して再生されます。
FUNC ボタン (ファンクション・ボタン)
FUNC ボタンを押しながら鍵盤ボタンを押すことによって、さまざまな機能を設定するこ
とができます。鍵盤ボタンの下にある LED の点灯と消灯で設定を表示します。
VOICE MODE
FUNC + POLY:3 和音まで演奏できます。
FUNC + MONO:1 つのボイスで演奏できます。
FUNC + UNISON:3 ボイスがすべてユニゾンになり、モノ・シンセとして動作します。
コーラス
FUNC + CHORUS:コーラス・エフェクトをかけることができます。
アルペジエーター
FUNC + ARP ON/OFF:アルペジエーターのオン、オフを切り替えます。
テンポ設定
FUNC + 1/1、1/2、1/4:TEMPO ノブ、または MIDI IN、SYNC IN からのテンポ情
報が半分または 1/4 になります。1/1 にすると、テンポ情報のままで動作します。
FUNC + METRONOME: シーケンス再生時にメトロノーム音を出力します。
FUNC+WARP ACT.STEP: アクティブ・ステップが 1 6 ステップ 未満 のときに 、1 6 ステッ
プと同じ演奏時間に補正します。
トランスポーズ設定
FUNC + TRNSPS NOTE:
TRANSPOSE スライダーの変化を半音単位に
切り替えます
。
モーション・シーケンス
シーケンス録音中に操作したノブやスライダーの動作を記録します。操作したステップか
らシーケンスが一周すると、この機能は自動的に解除されます。
FUNC + ON/OFF:モーション・シーケンスのオン、オフを切り替えます。
FUNC+SMOOTH:オンにすると、ステップの先頭に記録されているモーション・シー
ケンスの動作で滑らかに再生します。オフにすると、ステップ毎に記録されているシーケ
ンスの値に変化しながら再生します。
TIP
パラメーターによってはスムースに再生しないものがあります。
FUNC + CLEAR:記録されているノブの動作を削除します。
TIP
TEMPO 以外の透明なノブと TRANSPOSE スライダー、VELOCITY スライダーの
設定がモーション・シーケンスの記録対象です。
CLEAR(削除)
FUNC+ ACT.STP:アクティブ・ス テップ・モ ードの 全ステップ をオン に設 定します 。
FUNC +ALL:すべてのシーケンス・データを削除します。
再生中に FUNC +● (REC/ERASE):押している間、発音情報が削除されます。
アクティブ・ステップ・ モ ード
FUNC ボタンを押しながら
▶
ボタン(ACTIVESTEP)を押すと、アクティブ・ステップ・モー
ドになります (
▶
ボタン点滅)。現在のシーケンスの各ステップのオン / オフを設定しま
す。オフにしたステップは再生、録音ともに無効となりシーケンスから除外されます。ス
テップがオンの状態の鍵盤ボタンの下の LED が点灯します。設定が終了したら、FUNC
ボタンを押してアクティブ・ステップ・モードから抜 けます。
FM 音源プログラムとシーケンス・データを工場出荷時に戻す
1.FUNC ボタンと MEMORY ボタンを押しながら電源をオンにします。
●
(REC)ボタンと
▶
(PLAY)ボタンが点滅します。
2.
●
(REC)ボタンを押すと、本機を工場出荷状態に戻してから起動します。
▶
(PLAY)
ボタンを押すと、キャンセル動作になり何もせずに起動します。
FM音源プログラムとシーケンス・データが消去されますので注意して実行してください。
CARRIER
ATTACKノブ:CARRIER のオペレーターに対して、EG のアタックのパラメーターを
設定します。
D E C A Y ノブ:CARRIER のオペレーターに対して、EG のディケイのパラメーターを設
定します。
LFO (Low Frequency Oscillator)
R A T E ノブ:FM 音源パラメーターの LFO のスピードを設定します。
P . D E P T H ノブ:FM 音源パラメーターのピッチに LFO をかける深さを設定します。
アルゴリズ ム
ALGRTM ノブ:FM 音源パラメーターのアルゴリズムを設定します。
電池の入れ方
本体裏面の電池カバーをスライドさせて取り外し、電池の極性に注意して電池を入れます。
そして、電池カバーを取り付けます。
電 池の交 換は電源を 切った状 態 で行ってください。
使えなくなった電 池は、すぐに本機 から取り出してください。そのままにしておくと、故障
の原因(電池の液漏れなど)となります。また、長期間ご使用にならない場合も、電池を
外しておいてください。
新しい電池と1度使用した電池や、違う種類の電池を混ぜて使用しないでください。
付属の電池は動作確認用のため、通常より寿命が短いときがあります。
バッテリー残量表示
電源を入れたときに鍵盤ボタンの下の LED に電池の残量値が表示されます。全点灯で最
大値、残量が少なくなるにつれて点灯する数が少なくなります。
ACアダプター(別売)を接続している場合、残量は正しく表示されません。
TIP
単 3 形アルカリ乾電池、またはニッケル水素電池の両方が使用できます。残量の検出、
表示を正確におこなうためにグローバル設定でお使いの電池の種類を設定してください。
TIP
使用時にバッテリー残 量が少なくなると警告動作がはじまり、ディスプレイに 「bAttLo」
が点 滅で表 示されます 。 バッテリー 残量がなくなると、電源が自動的にオフになります。
TIP
警告動作を止めることはできませんが、バッテリーがなくなるまで引き続き使用するこ
とは可能です。
MIDI インプリメンテーション・チャートについて
volcafm の MIDI IN 端子と外部 MIDI 機器の MIDI OUT 端子を接続して、volca fm の
音源をコントロールすることができます。v ol c a f m が受信できる M I D I メッセージについ
ては MIDI インプリメンテーション・チャートに記載されています。volcafm の MIDI イン
プリメン テ ー ション・チャートはコ ル グ・ウェブ サ イトか ら ダ ウン ロ ードして くだ さ い 。
(電源)ボタン
電源をオン、またはオフにします。オフにするときは約 1 秒間押したままにします。
オート・パワー・オフ
volcafmにはオート・パワー・オフ機能がついています。オート・パワー・オフとは、本
体の操作や発音がない状態が約 4 時間続くと、自動的に電源が切れる機能です。オート・
パワー・オフ機能は解除することができます(→グローバル・パラメーターの設定)。
DC 9V 端子
別売のコルグ KA-350AC アダプター(DC9V )を接続します。
A Cアダプターは、必ず指定のものを使用してください。指定以外のA Cアダプターを
使用した場合、故障の原因となります。
-
 1
1
-
 2
2
-
 3
3
-
 4
4
-
 5
5
-
 6
6
-
 7
7
-
 8
8


Korg volca fm Le manuel du propriétaire
- Catégorie
- Instruments de musique
- Taper
- Le manuel du propriétaire
dans d''autres langues
- English: Korg volca fm Owner's manual
- español: Korg volca fm El manual del propietario
- Deutsch: Korg volca fm Bedienungsanleitung
- 日本語: Korg volca fm 取扱説明書
Documents connexes
-
Korg volca drum Le manuel du propriétaire
-
Korg volca kick Le manuel du propriétaire
-
Korg volca nubass Le manuel du propriétaire
-
-
-
Korg EFGSC Volca Digital Sample Sequencer Le manuel du propriétaire
-
Korg VOLCASAMPLE Manuel utilisateur
-
-
-