Sigma EOX VIEW 1200 Operating And Mounting Instructions Manual

Catégorie
Moniteurs de fréquence cardiaque
Taper
Operating And Mounting Instructions Manual

Ce manuel convient également à

OPERATING AND MOUNTING INSTRUCTIONS
1 EOX
®
REMOTE 500 3
1.1 Safety notes 4
1.2 Operation and display elements 5
1.2.1 Battery level display 6
1.2.3 Push Assistance 7
1.2.2
Assist mode display
7
1.2.3 Error messages 7
1.3 Operation 8
1.3.1 Turn on the E-Bike 8
1.3.2
Turn off the E-Bike
8
1.3.3 Switch assist mode 9
1.3.4 Trigger start-up assistance 9
1.3.5 Switch light status 10
1.3.6 Remote control 10
1.4 Technical information 11
1.5
Product care
11
1.5.1 Transport and storage 11
1.6 Disposal 11
2 EOX
®
VIEW 1200 14
2.1 Safety notes 15
2.2 Display elements 16
2.2.1 Battery level 17
2.2.2 Assist Mode 18
2.2.3 Power 18
2.2.4 Heart rate and benefit indicator 19
2.2.5 Light status 19
2.2.6 Komoot turn-by-turn instructions 20
2.2.7
All functions of the
multifunctional area
21
2.3 Operation 23
2.3.1 Controlling the ride menu 23
2.3.2 Settings 23
2.3.3
Trip Reset
23
2.3.4 Connect heart rate sensor 24
2.4 Technical information 26
2.5 Product care 26
2.5.1 Transport and storage 26
2.6 Disposal 26
3
EOX
®
ASSEMBLY
29
3.1
EOX
®
Remote 500
30
3.2
EOX
®
Remote 500 und EOX
®
View 1200
30
4 EOX
®
APP 33
Contents
4 I EOX
®
REMOTE 500 I Safety notes
Read the safety notes and the manual before putting the EOX
®
REMOTE 500 into operation! Improper use can cause
damage of the component and/or injuries.
Save the safety notes and the manual for your future reference!
Make sure not to be distracted by the EOX
®
REMOTE 500 during the ride! Do not be distracted by the LED indicator.
During the ride you should not perform any operation other than changing the assist mode, changing the light,
and changing the values display on the EOX
®
VIEW.
Do not use the EOX
®
REMOTE 500 as a handle to lift up your E-Bike!
This can lead to irreparable damage of the component.
1.1 Safety notes
EOX
®
REMOTE 500 I Operation and display elements I 5
The EOX
®
REMOTE 500 has seven ergonomical designed buttons.
The button backlight will be automatically triggered once the environment becomes dark.
The LED bar consists of 9 RGB LEDs and provides feedback for different E-Bike specific information.
1.2 Operation and display elements
ASSIST MODE UP
ASSIST MODE DOWN
LIGHT MODES
LED BAR
REMOTE CONTROL
REMOTE CONTROL
REMOTE CONTROL
A
POWER
B
C
UP
DOWN
LIGHT
6 I EOX
®
REMOTE 500 I Operation and display elements
The LED bar of the EOX
®
REMOTE 500 shows the current level of your E-Bike‘s battery.
Six levels are distinguished.
Threshold values may vary slightly depending on the system.
= LED flashing
1.2.1 Battery level
Charging Discharging
0 - 19 % 100 - 80 %
20 - 39 % 79 - 60 %
40 - 59 % 59 - 40 %
60 - 79 % 39 - 20 %
80 - 99 % 19 - 10 %
100 % 9 - 0 %
EOX
®
REMOTE 500 I Operation and display elements I 7
1.2.2 Assist Mode
1.2.4 Error messages
1.2.3 Push Assistance
The EOX
®
REMOTE 500 indicates the assistance level currently selected by the upper four LEDs of the status bar.
Five assistance levels are color-differentiated.
The EOX
®
REMOTE 500 shows error messages of your E-Bike.
Four severity levels are distinguished.
Please contact your professional workshop in any case.
= LED flashing
The EOX
®
REMOTE 500 indicates on the upper four LEDs of the status bar whether pushing assistance is activated
The four LEDs flash white
= LED flashing
LED bar
Assist Mode Off 1 (Minimum) 2 3 4 (Maximum)
LED bar
Assistance
Level
Level 1 Level 2 Level 3 Level 4
LED bar
Status On
8 I EOX
®
REMOTE 500 I Operation
1.3.1 Turn on the E-Bike
1.3.2 Turn off the E-Bike
1.3 Operation
To turn on your E-Bike press the button
of the EOX
®
REMOTE 500 briefly.
The LED bar of the EOX
®
REMOTE 500 turns on.
If an EOX
®
VIEW 1200 is connected the display
turns on automatically.
To turn off your E-Bike long-press the button
of the EOX
®
REMOTE 500 (>2 s).
If an EOX
®
VIEW 1200 is connected the display
turns off automatically.
POWER
POWER
POWER
EOX
®
REMOTE 500 I Operation I 9
1.3.3 Switch assist mode
1.3.4 Trigger start-up assistance
To switch to the next higher assist mode
press the UP button briefly.
To switch to the next lower assist mode
press the DOWN button briefly.
The staus bars‘ upper four LEDs are color-changing
according to the selected level of assistance
(see chapter 1.2.2).
To trigger the start-up assistance long-press
the DOWN and the C button simultaneously.
Once you release one of the buttons the start-up
assistance stops.
The start-up assistance of the EOX
®
REMOTE 500
has been proven to be functional safe in accordance
to EN15194.
10 I EOX
®
REMOTE 500 I Operation
1.3.5 Switch light status
By the integrated ambient light sensor the
EOX
®
REMOTE 500 can control the light
of your E-Bike automatically.
The light status can always be switched manually
by and pressing the LIGHT button.
If the light is turned on you can press the LIGHT button
to switch between low beam and high beam mode
(in case your E-Bike light supports these modes).
SINGLE
LONG
1.3.6 Remote control
The functionality of the three remote control buttons (A, B, C)
changes if an EOX
®
VIEW 1200 is connected or not.
With EOX
®
VIEW 1200 connected, the purpose of the
three buttons is to remotely operate the display (see chapter 2)
If no EOX
®
VIEW 1200 is connected, the three remote control
buttons can be used to control the EOX
®
App (see chapter 4).
A
B
C
AUTO
MODE
LONG
SINGLE
SINGLE
LONG
SINGLE
SINGLE
SINGLE
SINGLE
LONG
EOX
®
REMOTE 500 I Product care I Technical information I Disposal I 11
1.4 Technical information
1.5 Product care
Do not use hot water in case the buttons are iced.
Remove dirt carefully with water or a soft wipe.
Do not submerse the product into water.
Do not clean the product with a high-pressure jet.
Avoid the contact with oils and greases.
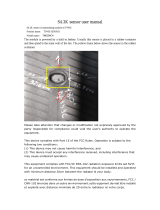
To celan the product below the big UP and DOWN buttons
• remove the screw (A),
• pull out the buttons carefully from its guidance,
clean the case and the lower side of the buttons carefully,
mount the buttons und
tigthen the screw (A) carefully.
1.5.1 Transport and storage
Protect the product from direct intensive solar radiation.
Protect the prodcut from extreme temperatures (see temperature specifications).
Store the product dry and at room temperature during longer non-use.
1.6 Disposal
The EOX
®
REMOTE 500 should be disposed of in an environmentally correct manner.
Do not dispose the EOX
®
REMOTE 500 into house-hold waste.
Only for EC countries
According to the European Guideline 2012/19/EU on waste electrical and electronic equipment as well as
the European Guideline 2006/66/EC on batteries and accumulators, devices and batteries must be collected separately
and disposed of in an environmentally correct manner.
Dimensions 38.75 x 39.35 x 55.73 mm
Weight 33.8 g
Protection level IPX6, IPX7
Handlebar diameter 22.2 mm
Storage temperature -20/25/70 °C (min/typ/max)
Operating temperature -10/25/60 °C (min/typ/max)
Certifications CE, EN25194, FCC, IC, REACH, ROHS
A
12 I EOX REMOTE 500 I FCC Statement
Federal Communication Commission
Interference Statement
FCC ID: M5LR500
Caution: If any changes or modifications not expressly approved by the party responsible for compliance could void
the user’s authority to operate the equipment.
This device complies with Part 15 of the FCC Rules.
Operation is subject to the following two conditions:
(1) This device may not cause harmful interference, and
(2) This device must accept any interference received, including interference that may cause undesired operation.
The grantee is not responsible for any changes or modifications not expressly approved by the party responsible
for compliance. Such modifications could void the user’s authority to operate the equipment.
The RF Exposure Compliance distance is 5 millimeters.
NOTE: This equipment has been tested and found to comply with the limits for a Class B digital device, pursuant to part 15
of the FCC Rules. These limits are designed to provide reasonable protection against harmful interference in a residential
installation. This equipment generates, uses and can radiate radio frequency energy and, if not installed and used in
accordance with the instructions, may cause harmful interference to radio communications. However, there is no
guarantee that interference will not occur in a particular installation. If this equipment does cause harmful interference
to radio or television reception, which can be determined by turning the equipment off and on, the user is encouraged
to try to correct the interference by one or more of the following measures:
Reorient or relocate the receiving antenna.
Increase the separation between the equipment and receiver.
Connect the equipment into an outlet on a circuit different from that to which the receiver is connected.
Consult the dealer or an experienced radio/TV technician for help.
EOX REMOTE 500 I ISED Statement I 13
Industry Canada
Statement
IC number: 7580A-R500
This device complies with Innovation, Science and Economic Development Canada licence-exempt RSS standard(s).
Operation is subject to the following two conditions:
(1) this device may not cause interference, and
(2) this device must accept any interference, including interference that may cause undesired operation of the device.
CAN ICES-3(B)/NMB-3(B)
Le présent appareil est conforme aux CNR Innovation, Sciences et Développement économique Canada applicables aux
appareils radio exempts de licence.
L’exploitation est autorisée aux deux conditions suivantes:
(1) il ne doit pas produire de brouillage et
(2) l’ utilisateur du dispositif doit étre prêt à accepter tout brouillage radioélectrique reçu,
même si ce brouillage est susceptible de compromettre le fomctionnement du dispositif.
CAN ICES-3(B)/NMB-3(B)
The device meets the exemption from the routine evaluation limits in section 2.5 of RSS 102 and compliance
with RSS-102 RF exposure, users can obtain Canadian information on RF exposure and compliance.
Le dispositif rencontre l’exemption des limites courantes d’évaluation dans la section 2.5 de RSS 102 et la conformité
à l’exposition de RSS-102 rf, utilisateurs peut obtenir l’information canadienne sur l’exposition et la conformité de rf.
This transmitter must not be co-located or operating in conjunction with any other antenna or transmitter. This equipment
should be installed and operated with a minimum distance of 5 millimeters between the radiator and your body.
Cet émetteur ne doit pas être Co-placé ou ne fonctionnant en même temps qu’aucune autre antenne ou émetteur.
Cet équipement devrait être installé et actionné avec une distance minimum de 5 millimètres entre le radiateur et
votre corps.
EOX
®
VIEW 1200 I Safety notes I 15
Read the safety notes and the manual before putting the EOX
®
VIEW 1200 into operation! Improper use can cause damage
of the component and/or injuries.
Save the safety notes and the manual for your future reference!
Make sure not to be distracted by the EOX
®
VIEW 1200 during the ride! Do not be distracted by the display.
During the ride you should not perform any operation other than changing the assist mode, changing the light,
and changing the values displayed.
Do not use the EOX
®
VIEW 1200 as a handle to lift your E-Bike! This can lead to irreparable damage of the component.
2.1 Safety notes
16 I EOX
®
VIEW 1200 I Display elements
2.2 Display elements
SMARTPHONE CONNECTION
HIGH BEAM
LOW BEAM
GPS (FROM
SMARTPHONE)
UNITS
(
KMH
/
MPH
)
TRIP RECORDING
MULTIFUNCTIONAL
AREA
CLOCK
EOX
®
VIEW 1200 I Display elements I 17
2.2.1 Battery level
The multifunctional area of the EOX
®
VIEW 1200 can show the battery level of your E-Bike.
= Battery icon flashes
Charging Discharging
0 - 19 % 100 - 80 %
20 - 39 % 79 - 60 %
40 - 59 % 59 - 40 %
60 - 79 % 39 - 20 %
80 - 99 % 19 - 10 %
100 % 9 - 0 %
18 I EOX
®
VIEW 1200 I Display elements
2.2.2 Assist Mode
2.2.3 Power
The multifunctional area of the EOX
®
VIEW 1200 can show the currently selected assist mode.
The multifunctional area of the EOX
®
VIEW 1200 can show a visual comparison between human and motor power.
The harder you pedal the more the display deflects to the left.
The more power is added by the motor the more the display deflects to the right.
Display
Assist Mode
Off 1 (Minimum) 2 3 4 (Maximum)
Pedalling easy with
high motor assistance
Pedalling strong with
high motor assistance
Pedalling string without
motor assistance
EOX
®
VIEW 1200 I Display elements I 19
2.2.4 Heart rate and benefit indicator
2.2.5 Light status
The multifunctional area of the EOX
®
VIEW 1200 can show the current heart rate
if an external heart rate sensor is connected (see chapter 2.3.4).
The benefit indicator provides feedback for the training effect of your activity.
The multifunctional area of the EOX
®
VIEW 1200 can show the status of your E-Bikes integrated light.
Additionally, the light status will be indicated by two fixed icons.
How to control your E-Bikes light with the EOX
®
VIEW 1200 is described in chapter 1.3.5.
Stress reduction,
recovery
Improve
basic endurance,
burn fat
Improve
aerobic fitness
Improve
maximal
performance
Improve
speed
Light not connected Light off Low beam High beam
20 I EOX
®
VIEW 1200 I Display elements
2.2.6 Komoot turn-by-turn instructions
The EOX
®
VIEW 1200 shows the turn-by-turn instructions from komoot if the komoot app is connected
(see chapter 2.3.5).
The next turning situation can
be seen in the multifunctional
area.
The EOX
®
VIEW 1200 additional shows a pop-up message if the distance
towards the next turning situation falls below 75 m. The pop-up message
will only be shown if the feature is not shown in the multifunctional area.
  • Page 1 1
  • Page 2 2
  • Page 3 3
  • Page 4 4
  • Page 5 5
  • Page 6 6
  • Page 7 7
  • Page 8 8
  • Page 9 9
  • Page 10 10
  • Page 11 11
  • Page 12 12
  • Page 13 13
  • Page 14 14
  • Page 15 15
  • Page 16 16
  • Page 17 17
  • Page 18 18
  • Page 19 19
  • Page 20 20
  • Page 21 21
  • Page 22 22
  • Page 23 23
  • Page 24 24
  • Page 25 25
  • Page 26 26
  • Page 27 27
  • Page 28 28
  • Page 29 29
  • Page 30 30
  • Page 31 31
  • Page 32 32
  • Page 33 33
  • Page 34 34
  • Page 35 35
  • Page 36 36
  • Page 37 37
  • Page 38 38
  • Page 39 39
  • Page 40 40

Sigma EOX VIEW 1200 Operating And Mounting Instructions Manual

Catégorie
Moniteurs de fréquence cardiaque
Taper
Operating And Mounting Instructions Manual
Ce manuel convient également à

dans d''autres langues